When setting up the equalization for a piano, the goal is to achieve a warm sound that doesn’t shout out at you, minimizing resonant frequencies that could make the sound honky.
You want the piano to play a supportive role, especially if vocals are present in the track or live performance.
When learning how to EQ a piano, there are four steps you can follow to get the best results:
- Cut the Mid-Low resonant frequencies between 440Hz to 500Hz
- Cut the resonant frequencies at 220Hz to reduce boxiness
- Roll the high-pass filter with a cut-off frequency set anywhere between 60-80Hz
- Add a high-shelf EQ filter starting at 3kHz to sweeten the sound
These four steps will make your piano sound more alive, cutting through the mix.
Without further ado, let’s go through each one in more detail.
1. Cut the Mid-Low Resonant Frequencies Between 440Hz to 500Hz
The first step is to reduce the mid-low resonant frequencies that will end up causing problems.
In the audio spectrum, the frequencies between 440Hz-500Hz are part of the fundamental frequencies of many instruments such as kick drums, snare, hi-hat, electric guitars, etc. The last thing you want is to add more clutter to an already congested audio spectrum.
A piano has resonant frequencies around 440-500Hz, which tend to dampen the sound. For this reason, we need to remove these resonances before they happen to maintain a clean audio mix.
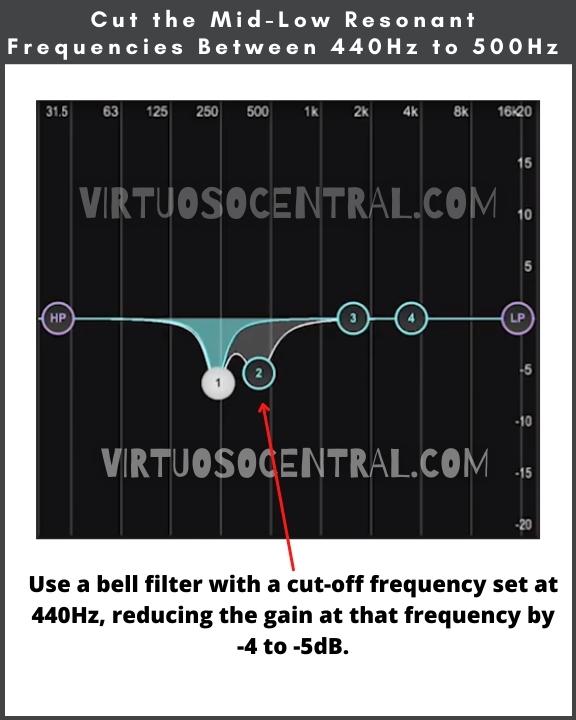
If you are using a digital mixer, start by using a bell filter with a cut-off frequency set at 440Hz, reducing the gain at that frequency by -6dB.
With an analog mixer, use the mid-frequency selector to set the center frequency between 440 – 500Hz. Then use the mid-frequency “boost/cut” knob to reduce the gain at that frequency by -6dB.
The image below shows you, in a graphical form, the cut you need to make between 440-500Hz.
Related Article that Might Interest You: How to EQ Vocals
2. Cut the Resonant Frequencies at 220Hz to Reduce Boxiness
The second step is to reduce boxiness, meaning we want to cut the resonant frequencies that make the piano sound as if enclosed in a box.
In a piano, this usually happens at 220Hz. So, by reducing this frequency, we can get rid of the boxy sound.
Remember that 220Hz is also part of the fundamental frequency of most instruments, including guitars, kick drums, snare, toms, bass, and vocals.
So, when mixing, if you don’t remove this resonant frequency in the piano’s EQ, in addition to it sounding boxy, you’ll have a messy mix due to the buildup from all the other instruments in that frequency range.
To fix this issue, you need to remove the resonance at 220Hz when equalizing a piano to carve out some space for the other instruments.
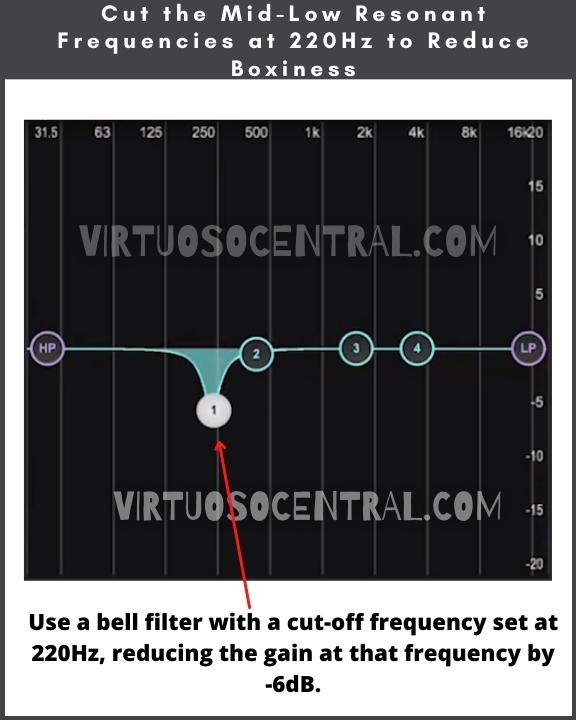
If working with a digital mixer, use a bell filter with a cut-off frequency set at 220Hz, reducing the gain at that frequency by -5 to -6dB.
With an analog mixer, unless it has a mid-low frequency selector, you won’t be able to pinpoint the 220Hz frequency. The best you can do is set the LOW frequency at 0dB and compromise a little.
Remember that in the previous step, with the analog mixer, we set the mid-frequency selector at 440Hz, and cut it by -6dB. Doing this has already reduced the 220Hz frequency by a few dB because the type of filter used for the mid-frequencies is a bell curve EQ filter.
So, by leaving the LOW knob at 0dB, we should have a decent compromise for cutting the resonances in the piano’s sound.
The image below is a graphical representation of this step.
Related Article that Might Interest You: How to EQ an Electric Guitar
3. Roll the High-Pass Filter with a Cut-Off Frequency Set Between 60-80Hz
The fundamental frequencies of an 88-key piano are the frequencies at which the piano’s strings vibrate when the keys are struck, with the lowest key (A0) having a frequency of 27.5 Hz and the highest key (C8) having a frequency of 4186 Hz.
Anything below 40 Hz is considered ultra-low-end frequency that muddy up your piano’s sound, meaning that the sound is not clear, has weak harmonics, and has a smeared time response, which is a perfect recipe for a horrible sound if not dealt with.
For the piano, anything below 64 Hz will only add unnecessary low-end rumble to the mix, and we want to leave this space open in the frequency spectrum for the bass.
So, to start with a clean piano sound right off the bat, cut the frequencies below 64 Hz.
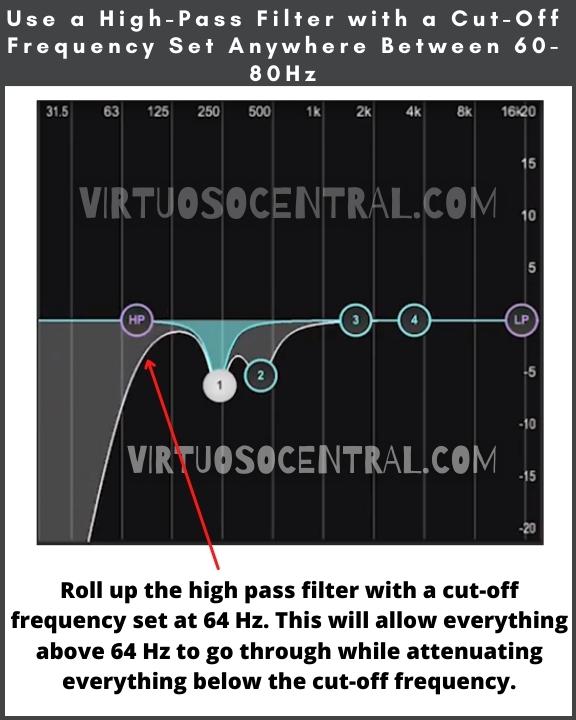
With a digital mixer, all you have to do is to roll up the high pass filter with a cut-off frequency set at 64 Hz. This will allow everything above 64 Hz to go through while attenuating everything below the cut-off frequency.
On most commercial analog mixing consoles, the included high-pass filter has a cut-off frequency set at 80 Hz or 100 Hz, which is not ideal but is better than letting all low frequencies go through.
In this case, engage the high pass filter switch to remove the unnecessary low-end rumble from the piano’s sound.
Related Article that Might Interest You: How to EQ Bass
4. Add a High-Shelf EQ Filter Starting at 3kHz to Sweeten the Sound
At this point, the piano could sound dark and dull, which is ok if you are looking for a darker, lighter tone.
This could be the case if a vocalist is using only the piano to accompany themselves. Some pianists also like a darker sound in their performance.
But if the piano is part of a dense mix full of drums, guitars, bass, and other instruments, it needs some brightness to cut through the mix in the upper-range frequencies.
Also, boosting the high frequencies starting at 3kHz, will add some attack to the piano’s sound giving it a sweet tone that complements the mix.
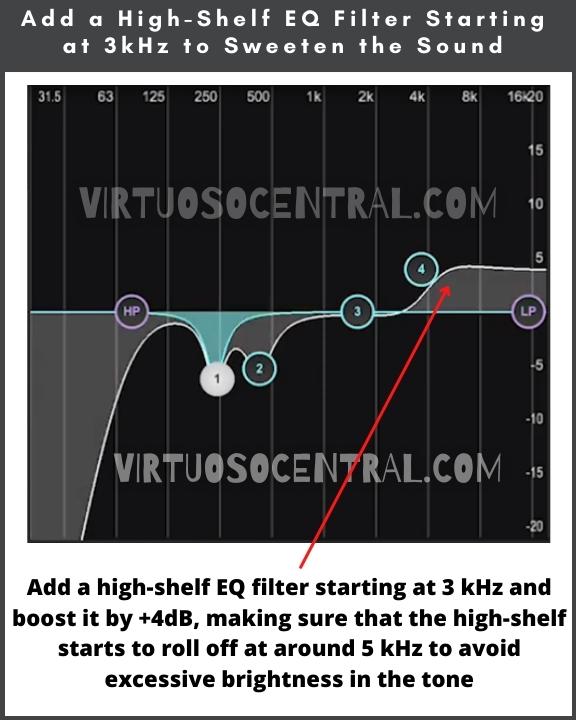
To do this with a digital mixer, add a high-shelf EQ filter starting at 3 kHz and boost it by +4dB, making sure that the high-shelf begins to roll off at around 5 kHz to avoid excessive brightness in the tone.
With an analog audio mixer to add more presence and sparkle to the piano’s sound, boost the HIGH-Frequency knob by +2 to +4dB. Make sure you don’t overdo it to avoid excessive brightness that could make the piano sound harsh.
The image below shows the boost you need to make to add presence and sparkle to the piano’s sound.
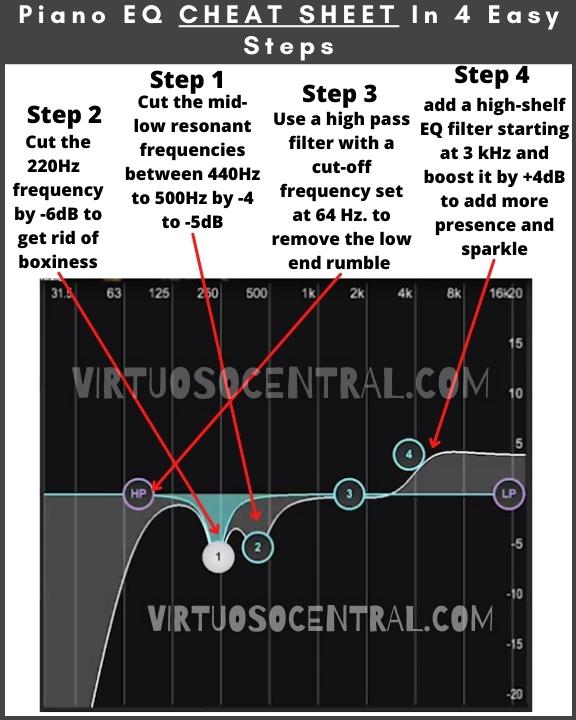
Piano EQ Cheat Sheet – EQ Settings For Piano
The image below is a cheat sheet showing the four steps presented in this article in a graphical form, showing the cuts or boosts you need to make to get started when equalizing a piano.
Please understand that this is not an exact science, as many other factors can affect the piano’s sound, such as room acoustics, sound reflections, distance from the microphones, type of microphone used to pick up the sound, microphone phase, and many other factors.
But this is a good starting point you can use to set the EQ for the piano. Then make the necessary adjustments to bring out the tone you want.
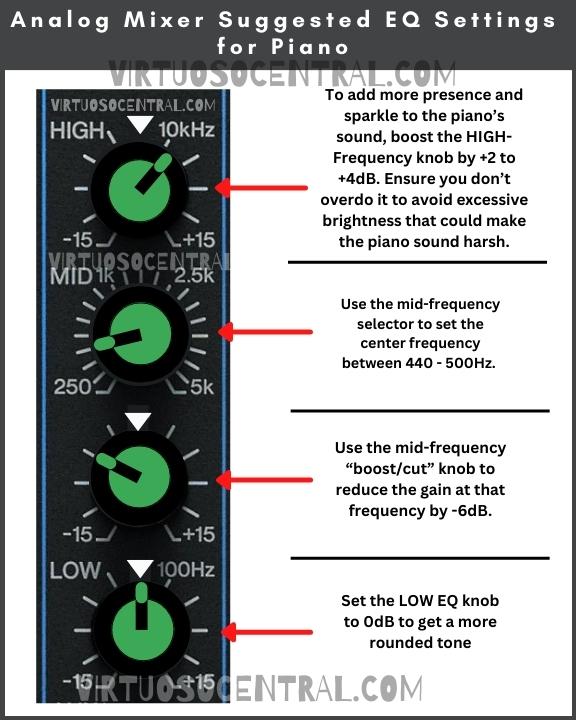
The image below shows suggested eq settings for piano when using an analog mixer. The mixer I am using for this example is the popular Yamaha MG16XU mixing console. But if you are using a different audio mixer, just set it using the same principle shown here, and it should sound good.
As explained previously, don’t forget that these are just suggested settings, and you might need to make small adjustments to compensate for the different factors that could affect the sound.
Conclusion
Learning how to EQ a piano is essential for any aspiring sound engineer, whether for the studio or live performance. If you know the basics, you can apply these steps for acoustic and electric pianos.
To sum up this article, the eq settings for piano can be divided into four steps, which are:
- Cut the Mid-Low resonant frequencies between 440Hz to 500Hz
- Cut the resonant frequencies at 220Hz to reduce boxiness
- Roll the high-pass filter with a cut-off frequency set anywhere between 60-80Hz
- Add a high-shelf EQ filter starting at 3kHz to add more presence and sparkle to the piano’s sound
To make things a bit easier, I have included a piano eq cheat sheet that you can use to eq live piano or electric piano using analog and digital mixers.
If you liked this article, consider sharing it with others, and don’t forget to visit our website to explore more articles like this one by clicking here. Thank you for reading my blog.
