It is a fact that no live band or music record sounds good without bass. So, getting the bass guitar to sound right first will help the other instruments in the band to sit nicely in the mix.
Bass is considered the foundation of any mix, whether it is live or in the studio. But knowing how to EQ bass guitar takes some practice.
The good thing is that once you know which frequencies to cut and which to boost, the process will be straightforward, and your mixes will sound great.
If you want the summarized, quick answer on how to eq a bass guitar, here it is. You have to:
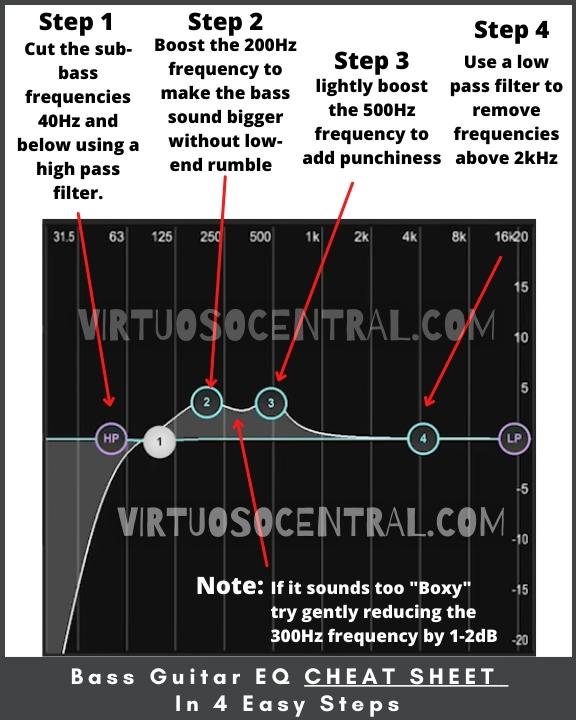
- Cut the ultra-low-end frequencies below 40 Hz that muddy up your bass sound using a high pass filter.
- Enhance the bass’s fundamental frequencies from 40-400 Hz.
- Adjust the Mid-range frequencies between 500-1kHz to add or remove punchiness and growl.
- Watch out for the harmonics between 2-4 kHz, as they are necessary to add excitement to the sound.
In this article, I will go through these four steps to get your bass to sound great, which will make your whole mix sound better because the bass is essential in any mix.
Plus, I have included an alternative EQ setup, suggested starting EQ points for analog mixers, and a cheat sheet to get you started in no time. Let’s get started.
Your EQ’s Accuracy Depends on the Mixing Console You Use
Before we continue, it is necessary to understand a few things about audio mixers and how each mixer will affect the accuracy of your equalization (EQ).
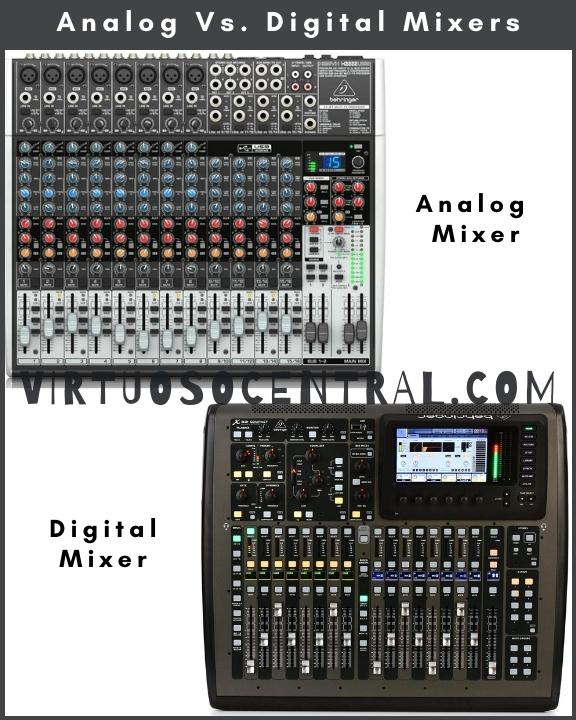
All audio mixers are not created equal. You have analog and digital mixers, and even though they do the same thing, they are entirely different.
Analog Mixers
Analog mixers, for example, come with preset cutoff frequencies for the EQ section of each channel strip. This means that you are limited in what you can do when equalizing different sound sources.
Most commercial analog mixers come with 4-knob EQ sections per channel strip, giving you only one frequency selector to choose a specific Mid frequency to boost or cut. This limits you a lot in what you can do.
To get low-mid and high-mid frequency selectors, you will need a 6-knob EQ mixer. These types of mixers are usually found in recording studios and tend to be older generation and very big and bulky.
Preset Filters Found in Analog Mixers
Analog mixers use shelving filters for the High-end and Low-end EQ knobs and a peak filter, also known as a bell curve filter, for the Mid frequencies.
Each filter comes with preset cut-off frequencies. The only one that can be changed is the bell curve filter for the mid frequencies because it comes with a frequency selector for choosing the center frequency.
A shelving filter is linear, which boosts or cuts all frequencies above or below a preset cut-off frequency. The preset center frequency can’t be changed because it is set by choosing specific electronic component values when the audio mixer is designed. These components are soldered to the circuit board inside the mixer.
A peaking filter attenuates or boosts frequencies around a specified center frequency point. This filter on an analog mixer also comes with preset cut-off frequencies, but in this case, you have more options to choose from, as the manufacturer included a frequency selector knob you can use to set your cut-off frequency.
In this article, I will use the popular Yamaha MG16XU mixer as an example for this explanation and, later in the article, to provide you with the suggested EQ starting points.
For most popular commercial audio mixers, including the Yamaha MG16XU, the cut-off frequency for each frequency range is as follows:
- HIGH: Cut-Off frequency: 10 kHz shelving
- MID: Cut-Off frequency: 250 Hz to 5 kHz peaking
- LOW: Cut-Off frequency: 100 Hz shelving
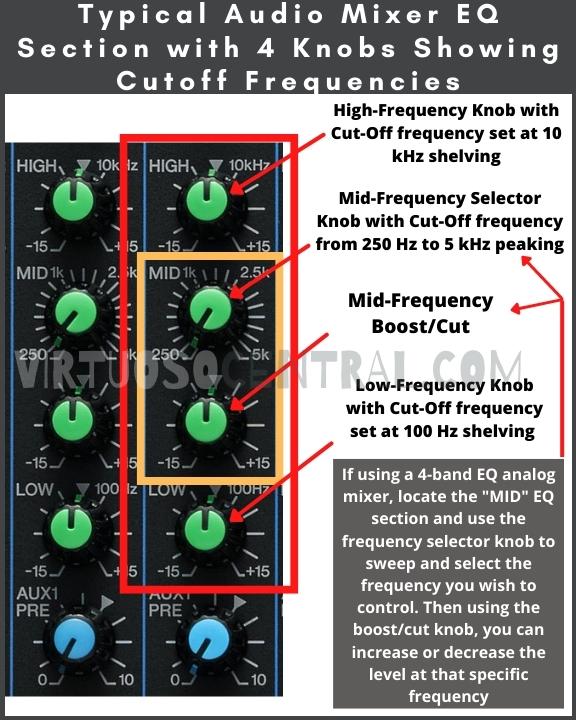
For example, the low-frequency knob has a 100Hz shelving frequency. This means that if you increase the low-frequency knob, you will increase the gain at frequencies above 100Hz but below 250Hz, which is the starting frequency for the Mid-Frequency selector.
So, by increasing the low-frequency knob slightly, you’ll also increase the frequencies between 100-250Hz. So, if you wanted to cut 200Hz, you couldn’t do it accurately.
I know this sounds confusing and could be hard to understand, but with analog mixers, there is no way around this. That’s why digital mixers are more accurate when dealing with EQs.
Digital Mixers
Digital mixers, on the other hand, are more convenient and precise. They usually offer a wide EQ section in the form of menus and submenus that allow you to pinpoint specific frequencies and provide a wide range of filtering options you can use to boost or cut specific frequencies, giving you more control over the EQ process.
A typical digital mixer will offer the following EQ filters: low cut, low shelf, high cut, high shelf, bell curve, band pass, and notch filters.
You can use any combination of these filters to equalize the sound in any of the channels, giving you a great deal of control over the equalization process.
A good starter digital mixer is the Behringer X32, as it’s loaded with all kinds of features to help you get the best mix possible, whether it is for live sound or in the studio (link to Amazon).
To learn more about analog and digital audio mixers, click the link, as I have a dedicated article explaining both types of mixing consoles in more detail.
If you are new to the world of PA systems and audio mixers, here is an article explaining the basics of mixing consoles to get you started.
Now that I have explained a bit about the way analog and digital mixers deal with EQ let’s see how to EQ bass guitar in four easy steps.
1. Cut the Ultra-Low-End Frequencies below 40 Hz Using a High pass Filter
The fundamental frequencies of a 4-string bass guitar tuned to E standard using A=440 Hz as a reference are from E1=41.20 Hz to E4=329.63 Hz.
For a 5-string bass guitar tuned to E standard, the fundamental frequencies are from B0=30.87 Hz to E4=329.63 Hz. And for a 6-string bass guitar, the fundamental frequencies are from B0=30.87 Hz to A4=440 Hz.
As you can see, the lowest frequency a bass guitar can generate is 31 Hz, and the Highest is 440 Hz. But its harmonics can go all the way up to 4kHz.
Anything below 40 Hz is considered ultra-low-end frequency that muddy up your bass sound, meaning that the sound is not clear, has weak harmonics, and has a smeared time response, which is a perfect recipe for a horrible sound if not dealt with.
So, to start with a clean sound, the first step is to cut the frequencies below 40 Hz.
With a digital mixer, all you have to do is set a high-pass filter, also known as a low-cut, with a cut-off frequency set at 40 Hz. This will allow everything above 40 Hz to go through while attenuating everything below the cut-off frequency.
On most analog mixers, the included high-pass filter has a cut-off frequency set at 80 Hz or 100 Hz. So, engaging it will do nothing good for us because it will cut frequencies below 80 Hz, which is not ideal when EQing bass.
In this case, leave the high pass filter off (disengaged) to avoid cutting out some of the fundamental frequencies.
2. Enhance the Bass’s Fundamental Frequencies from 40-400 Hz
The frequencies between 40-400 Hz are the “body” of the bass guitar’s sound. These frequencies add weight and character to the sound.
The bottom end of the instrument lies between 100-200 Hz, which is also part of the fundamental frequencies for other instruments, such as the kick drum. Therefore, we need to be careful only to boost what is necessary to avoid instruments fighting each other in the mix.
My advice is always to avoid boosting frequencies if not necessary to enhance the sound. In this case, if the bass sounds with enough weight and character, don’t boost anything.
If it sounds a bit thin and you want to add more body, boosting the 200Hz frequency will help you get a bigger bass sound without adding low-end rumble.
If it sounds boxy or chunky, your problematic frequency will likely be 300Hz.
Adding More Body and Removing Boxiness Using a Digital Mixer
To add more body, use a bell curve EQ filter with a center frequency set at 200Hz. Boost it by +3 to +5dB. This should be enough to produce a well-rounded sound without low-end rumble.
To remove boxiness, gently reduce the 300Hz frequency by 1 to 2dB or until the boxiness goes away. Don’t overdo it because you will be carving away essential bass frequencies.
Setting bell curve filters at specific center frequencies can only be done with a digital mixer or in the DAW (Digital Audio Workstation) using a plugin when mixing and mastering a record.
Add Weight and Get Rid of Boxiness with an Analog Mixer
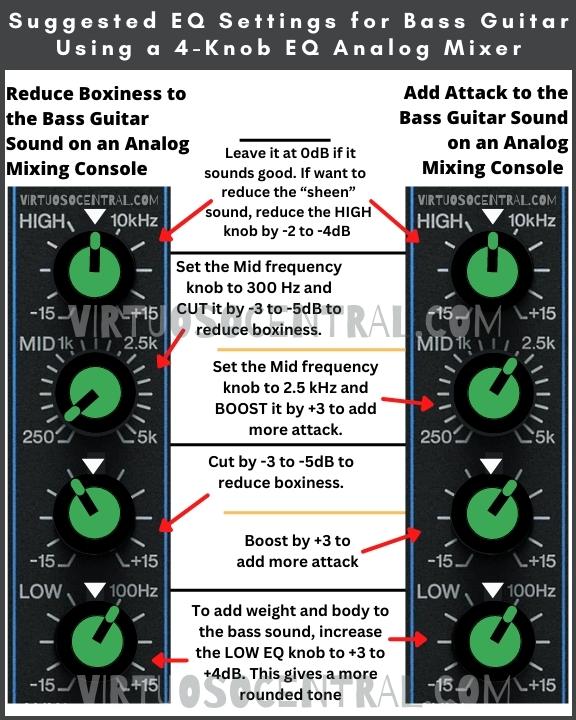
To add weight and body to the bass sound with an analog mixer, increase the LOW EQ knob to +3 to +4dB. Doing this will give you a well-rounded bass tone.
At this point, you are faced with a decision when working with an analog mixer. You either remove boxiness by setting your mid-frequency selector to 300Hz and cutting it by -3 to -5dB, or you add more attack by putting the mid-frequency selector to 2.5kHz and boosting it by +3dB.
If it doesn’t sound “boxy” or “nasal,” you could also boost the 500Hz frequency to add more punchiness to the sound. This is explained in more detail in the next step.
Unfortunately, you can’t do both due to the limitations of an analog mixer’s ability to set different cut-off frequencies.
In this case, you need to try both options and see what sounds better. If you hear that the bass interferes with the kick drum, cut the 300Hz frequency by -3 to -5dB. If the kick drum and the bass don’t fight each other, then you could add more attack to the bass to make it more intelligible in the overall mix.
The image below shows the setting to remove boxiness or add attack using the EQ section of the popular Yamaha MG16XU mixer.
3. Adjust the Mid-Range Frequencies Between 500-1kHz to Add or Remove Punchiness
The term punchiness is used in audio to describe that a sound has a good reproduction of dynamics (variation of loudness), good transient response (no overhang or extended notes), and a strong impact in the mix.
To add some punchiness or growl and get the notes more defined, increase the 500Hz frequency by +2 to +4dB
To do this, use a bell curve filter with a center frequency set at 500Hz. As you increase it to +4dB, you will notice that the frequencies from 500Hz to 1kHz are also slightly increased, providing a more defined tone that cuts through the mix.
4. Watch out for the Harmonics Between 2-4 kHz.
When equalizing an electric bass, you want to avoid some of the harmonics that appear between 2-4kHz. Everything above 5kHz is unnecessary, as it would not affect the bass’s sound much, so cutting it off is a good idea.
By using a low pass filter with a cutoff frequency of around 2kHz, you would make some space for other instruments in that zone while reducing the harmonics the bass guitar produces.
Removing Harmonics and Adding Snap with a Digital Mixer
At this stage in the EQ process, we need to get rid of the harmonics that appear above 2kHz. To do this, use a low pass filter with a cutoff frequency set a 2kHz, and attenuate it by -6dB. This will help reduce the harmonics making more room for the other instruments with fundamental frequencies above 2kHz, such as pianos and keyboards.
At this point, you will notice that the sound is a bit dull in the upper frequencies. If you want to add “snap” to the sound, you need to use a bell eq filter for the high mid band with a cutoff frequency set at 2kHz and boost it by +2 to +3dB.
Basically, what you are doing by using the low pass and bell curve is to slightly boost the frequencies around 2kHz, while sharply rolling off anything above 3kHz.
Dealing with High Frequencies with an Analog Mixers
With analog mixers, there is little you can do in the high band at specific frequencies. My advice is to set the HIGH knob to 0dB. This should give you a balanced high-frequency response with a snappy sound.
To reduce the “sheen” sound, reduce the HIGH knob by -2 to -4dB until you are happy with the results.
Alternative EQ Setting for a Bass Guitar
If the EQ setup explained above doesn’t suit your sound taste, I have included an alternative EQ setting focusing on keeping the bass’s low end and high definition while removing the growly mid-tones in the 500-1kHz range.
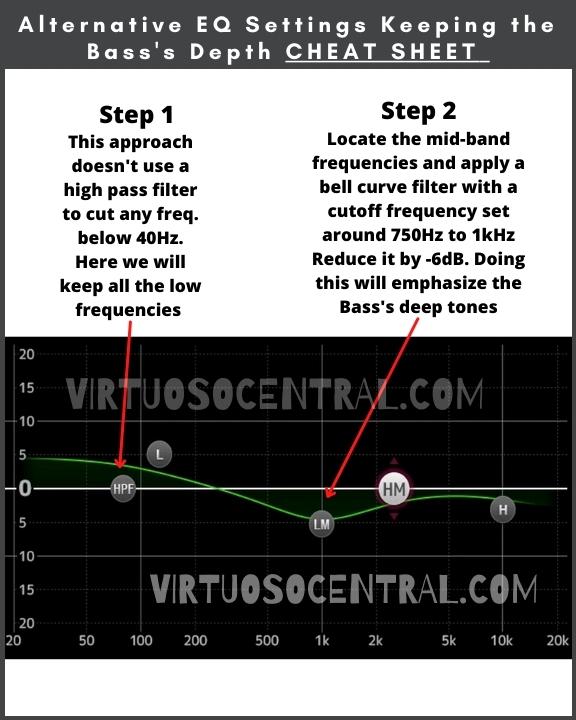
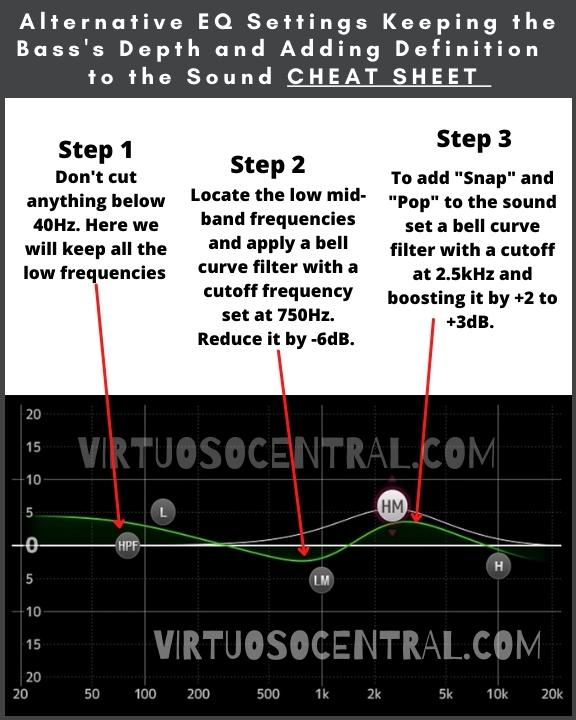
For this approach, we don’t use a high-pass filter to remove the low frequencies below 40Hz. Here we will keep all the low frequencies and concentrate on the mids and high-mid frequencies.
Using a digital mixer, start by applying a high-shelf filter with a cutoff frequency set at 2kHz and attenuate it by -6 to -8dB. This will remove the harmonics and unnecessary sheen from the bass’s sound.
Next, locate the mid-band frequencies and apply a bell curve filter with a cutoff frequency set at 750Hz. Reduce it by -6dB. This will carve out some space in the frequency range for the guitar and piano while keeping the bass’s bottom end and high definition.
Notice that previously in step 3, the approach was to add some punchlines or growl at 500Hz by boosting that frequency by +2 to +4dB. In this case, the approach is different. We want to keep the bass’s depth and remove the growliness.
If the sound is too dark and deep, we can add some sheen by setting a bell curve filter with a cutoff at 2kHz and boosting it by +2 to +3dB. The result will be a bass that sounds deep while keeping the high definition in the upper mid frequencies.
Conclusion
Learning how to eq bass guitar for live performance or for the recording studio is a must for any sound engineer.
As I have shown in this article, it is a simple process once you know what to cut and what to boost, but it takes some practice to master it.
In summary, to EQ a bass guitar, you have to:
- Get rid of the ultra-low-end frequencies below 40 Hz that muddy up your bass sound using a high pass filter.
- Enhance the bass’s fundamental frequencies from 40-400 Hz.
- Add or remove growl/punchiness by adjusting the mid-range frequencies between 500-1kHz.
- Cut out the harmonics between 2-4 kHz and add some “snap” to the sound.
I hope this article was helpful to you. Visit the site to explore more articles like this one by clicking here. Thank you for reading my blog.