This website uses cookies to improve and personalize your visit. Learn more about cookies. Got It

  • Skip to primary navigation
  • Skip to main content
  • Skip to primary sidebar

Virtuoso Central

  • About Us
  • Contact
  • Privacy

how to eq piano

4 Easy Steps to EQ a Piano – With Cheat Sheet

When setting up the equalization for a piano, the goal is to achieve a warm sound that doesn’t shout out at you, minimizing resonant frequencies that could make the sound honky.

You want the piano to play a supportive role, especially if vocals are present in the track or live performance.

When learning how to EQ a piano, there are four steps you can follow to get the best results:

  1. Cut the Mid-Low resonant frequencies between 440Hz to 500Hz
  2. Cut the resonant frequencies at 220Hz to reduce boxiness
  3. Roll the high-pass filter with a cut-off frequency set anywhere between 60-80Hz
  4. Add a high-shelf EQ filter starting at 3kHz to sweeten the sound

These four steps will make your piano sound more alive, cutting through the mix.

Without further ado, let’s go through each one in more detail.

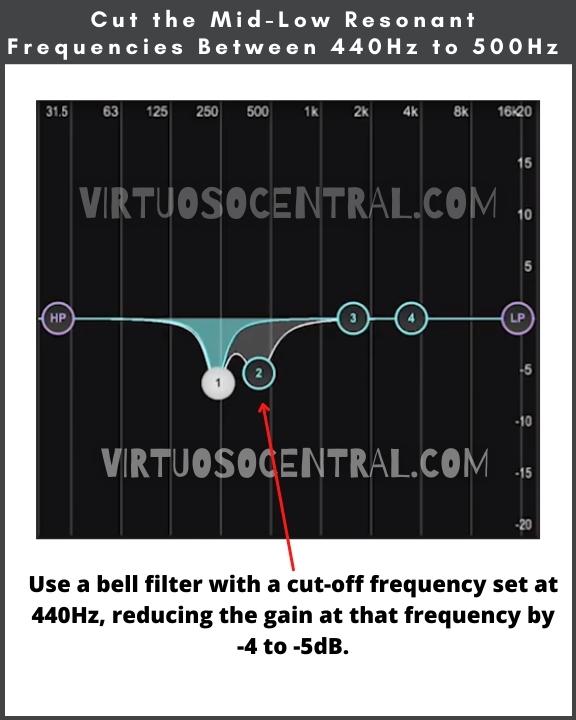
1. Cut the Mid-Low Resonant Frequencies Between 440Hz to 500Hz

The first step is to reduce the mid-low resonant frequencies that will end up causing problems.

In the audio spectrum, the frequencies between 440Hz-500Hz are part of the fundamental frequencies of many instruments such as kick drums, snare, hi-hat, electric guitars, etc. The last thing you want is to add more clutter to an already congested audio spectrum.

A piano has resonant frequencies around 440-500Hz, which tend to dampen the sound. For this reason, we need to remove these resonances before they happen to maintain a clean audio mix.

If you are using a digital mixer, start by using a bell filter with a cut-off frequency set at 440Hz, reducing the gain at that frequency by -6dB.

With an analog mixer, use the mid-frequency selector to set the center frequency between 440 – 500Hz. Then use the mid-frequency “boost/cut” knob to reduce the gain at that frequency by -6dB.

The image below shows you, in a graphical form, the cut you need to make between 440-500Hz.

This image shows the first step to eq a piano in graphical form, cutting resonant frequencies at 440Hz.

Related Article that Might Interest You: How to EQ Vocals

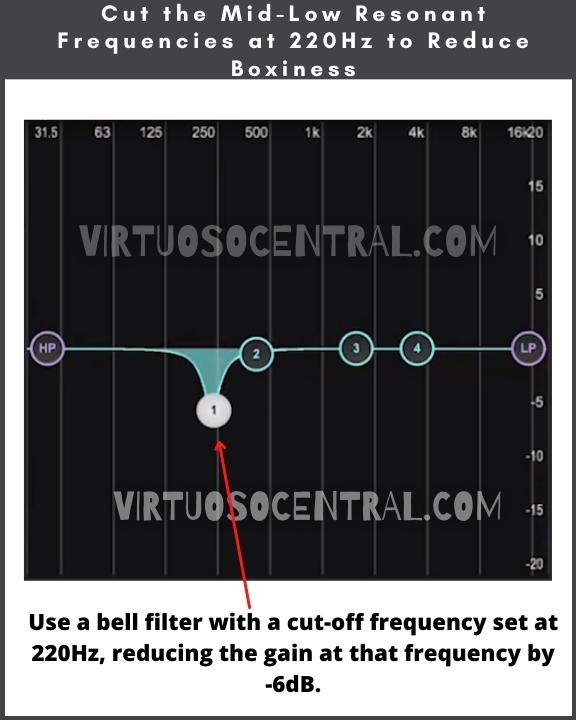
2. Cut the Resonant Frequencies at 220Hz to Reduce Boxiness

The second step is to reduce boxiness, meaning we want to cut the resonant frequencies that make the piano sound as if enclosed in a box.

In a piano, this usually happens at 220Hz. So, by reducing this frequency, we can get rid of the boxy sound.

Remember that 220Hz is also part of the fundamental frequency of most instruments, including guitars, kick drums, snare, toms, bass, and vocals.

So, when mixing, if you don’t remove this resonant frequency in the piano’s EQ, in addition to it sounding boxy, you’ll have a messy mix due to the buildup from all the other instruments in that frequency range.

To fix this issue, you need to remove the resonance at 220Hz when equalizing a piano to carve out some space for the other instruments.

If working with a digital mixer, use a bell filter with a cut-off frequency set at 220Hz, reducing the gain at that frequency by -5 to -6dB.

With an analog mixer, unless it has a mid-low frequency selector, you won’t be able to pinpoint the 220Hz frequency. The best you can do is set the LOW frequency at 0dB and compromise a little.

Remember that in the previous step, with the analog mixer, we set the mid-frequency selector at 440Hz, and cut it by -6dB. Doing this has already reduced the 220Hz frequency by a few dB because the type of filter used for the mid-frequencies is a bell curve EQ filter.

So, by leaving the LOW knob at 0dB, we should have a decent compromise for cutting the resonances in the piano’s sound.

The image below is a graphical representation of this step.

This image shows the second step to eq a piano in graphical form, cutting resonant frequencies at 220Hz to reduce boxiness.

Related Article that Might Interest You: How to EQ an Electric Guitar

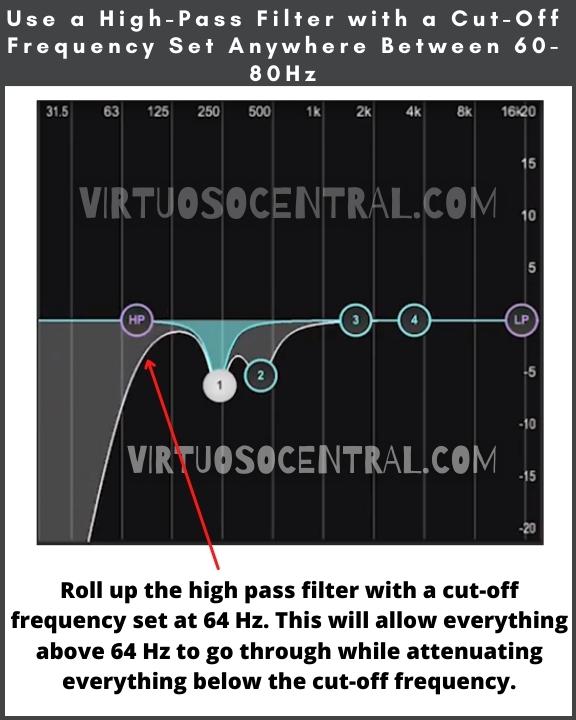
3. Roll the High-Pass Filter with a Cut-Off Frequency Set Between 60-80Hz

The fundamental frequencies of an 88-key piano are the frequencies at which the piano’s strings vibrate when the keys are struck, with the lowest key (A0) having a frequency of 27.5 Hz and the highest key (C8) having a frequency of 4186 Hz.

Anything below 40 Hz is considered ultra-low-end frequency that muddy up your piano’s sound, meaning that the sound is not clear, has weak harmonics, and has a smeared time response, which is a perfect recipe for a horrible sound if not dealt with.

For the piano, anything below 64 Hz will only add unnecessary low-end rumble to the mix, and we want to leave this space open in the frequency spectrum for the bass.

 So, to start with a clean piano sound right off the bat, cut the frequencies below 64 Hz.

With a digital mixer, all you have to do is to roll up the high pass filter with a cut-off frequency set at 64 Hz. This will allow everything above 64 Hz to go through while attenuating everything below the cut-off frequency.

On most commercial analog mixing consoles, the included high-pass filter has a cut-off frequency set at 80 Hz or 100 Hz, which is not ideal but is better than letting all low frequencies go through. 

In this case, engage the high pass filter switch to remove the unnecessary low-end rumble from the piano’s sound.

This image shows the third step to eq a piano in graphical form, adding a high pass filter to cut the low end rumble.

Related Article that Might Interest You: How to EQ Bass

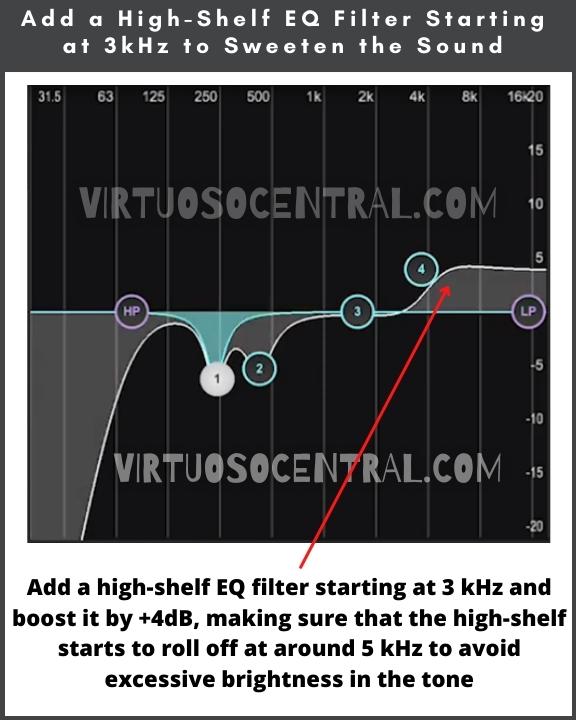
4. Add a High-Shelf EQ Filter Starting at 3kHz to Sweeten the Sound

At this point, the piano could sound dark and dull, which is ok if you are looking for a darker, lighter tone.

This could be the case if a vocalist is using only the piano to accompany themselves. Some pianists also like a darker sound in their performance.

But if the piano is part of a dense mix full of drums, guitars, bass, and other instruments, it needs some brightness to cut through the mix in the upper-range frequencies.

Also, boosting the high frequencies starting at 3kHz, will add some attack to the piano’s sound giving it a sweet tone that complements the mix.

To do this with a digital mixer, add a high-shelf EQ filter starting at 3 kHz and boost it by +4dB, making sure that the high-shelf begins to roll off at around 5 kHz to avoid excessive brightness in the tone.

With an analog audio mixer to add more presence and sparkle to the piano’s sound, boost the HIGH-Frequency knob by +2 to +4dB. Make sure you don’t overdo it to avoid excessive brightness that could make the piano sound harsh.

The image below shows the boost you need to make to add presence and sparkle to the piano’s sound.

This image shows the fourth and final step to eq a piano in graphical form, adding a high shelf eq filter at 3kHz to add presence and sparkle to the piano's sound.

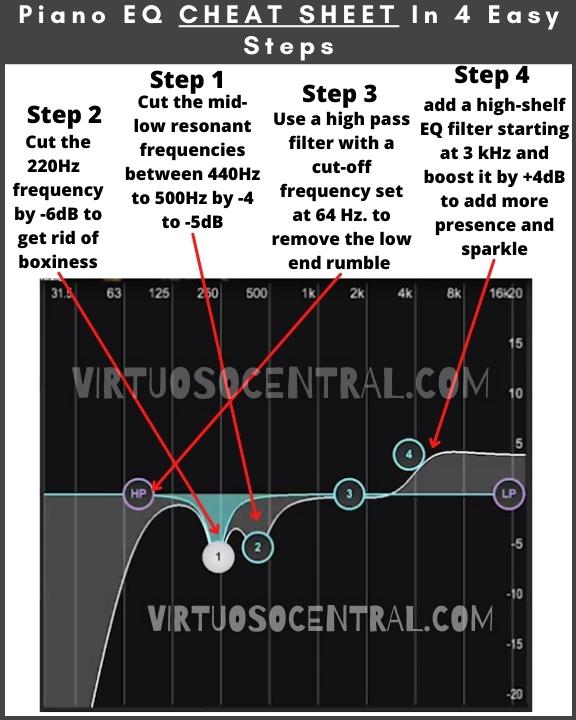
Piano EQ Cheat Sheet – EQ Settings For Piano

The image below is a cheat sheet showing the four steps presented in this article in a graphical form, showing the cuts or boosts you need to make to get started when equalizing a piano.

Please understand that this is not an exact science, as many other factors can affect the piano’s sound, such as room acoustics, sound reflections, distance from the microphones, type of microphone used to pick up the sound, microphone phase, and many other factors.

But this is a good starting point you can use to set the EQ for the piano. Then make the necessary adjustments to bring out the tone you want.

This image is a piano eq cheat sheet showing the four steps explained in this article in a easy to follow format, that can be used to eq acoustic or electric pianos for the studio or live performance.

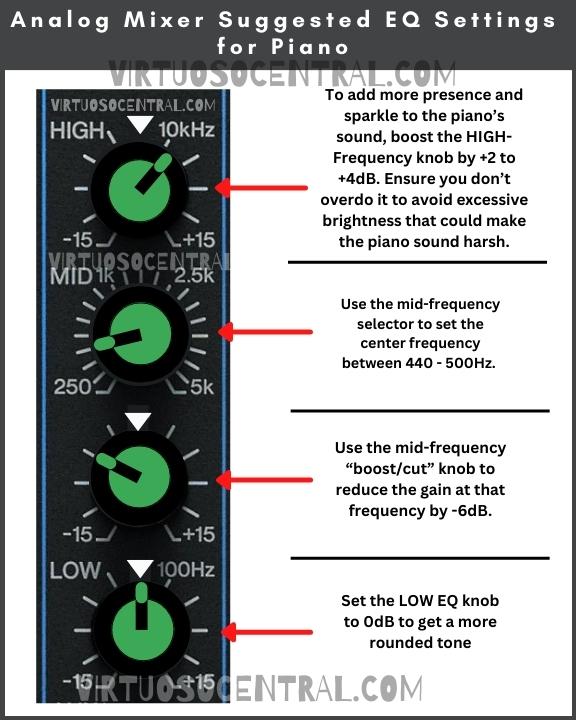
The image below shows suggested eq settings for piano when using an analog mixer. The mixer I am using for this example is the popular Yamaha MG16XU mixing console. But if you are using a different audio mixer, just set it using the same principle shown here, and it should sound good.

As explained previously, don’t forget that these are just suggested settings, and you might need to make small adjustments to compensate for the different factors that could affect the sound.

This image shows suggested eq for settings for piano using an analog mixer.

Conclusion

Learning how to EQ a piano is essential for any aspiring sound engineer, whether for the studio or live performance. If you know the basics, you can apply these steps for acoustic and electric pianos.

To sum up this article, the eq settings for piano can be divided into four steps, which are:

  1. Cut the Mid-Low resonant frequencies between 440Hz to 500Hz
  2. Cut the resonant frequencies at 220Hz to reduce boxiness
  3. Roll the high-pass filter with a cut-off frequency set anywhere between 60-80Hz
  4. Add a high-shelf EQ filter starting at 3kHz to add more presence and sparkle to the piano’s sound

To make things a bit easier, I have included a piano eq cheat sheet that you can use to eq live piano or electric piano using analog and digital mixers.

If you liked this article, consider sharing it with others, and don’t forget to visit our website to explore more articles like this one by clicking here. Thank you for reading my blog.

How to EQ Different Sound Sources for Live Performance

Do you ever feel like managing live sound is like trying to tame a wild beast? One minute, everything seems fine, then the click of a guitar pedal or change of a vocalist sends the whole thing crashing down. The key to dealing with these problems is EQ.

EQ is essential to any live performance, from large orchestras to solo singer-songwriters. Below, we discuss how to EQ live sound in our handy, must know guide.


What is EQ?

EQ is the short term for equalization. It is the process in which sound is mixed to provide an equal, balanced tone for the listener. This is done by manipulating the sound sources’ frequencies as they come through the microphones and sound equipment. 

To get a good, solid EQ, you must first have developed the ear to recognize what “good sound” is. Of course, some of this is down to personal preference, but there are some universally acknowledged truths that equate to bad sound. Essentially, you are trying to make the sound as clear as possible for the audience without any sudden jumps or peaks in the mix. 

It may be that the sound is too bassy or that the cymbals are cutting through too much. Perhaps the vocals are too quiet, or the treble on the guitars is overpowering. EQ will allow you to identify and correct these problems. 

EQ will also let you individualize each instrument or sound source. By pocketing each instrument in a frequency range, it’s possible to avoid unclear, muddy mixes and wailing feedback.

Imagine sound as paint on a canvas. Once it bleeds into other sources, it distorts the overall image and picture. 


What Factors Can Impact the Sound?

Literally, anything can impact the sound of a performance. The shape of a venue and the sound sources are the main factor, meaning EQ will be different every time you set up. 

In addition to this, the sound will change depending on the number of people that fill it. This can mean that your EQ in the soundcheck sounds very different from the actual performance. This is why it is essential to have a good ear and be able to identify what instruments and frequencies are working within your music in a live mix.


How to EQ Live Sound – Overview

The first step you must take when doing EQ is to identify any unwanted frequencies. Once you have them, try to cut them from the mix. This cleans up the overall sound, giving the frequencies you do want more clarity. 

First Cut then Boost the Needed Frequencies

Do not be tempted to boost the wanted frequencies and leave the unwanted in. This will just produce a confusing, muddy mix. You also want to avoid adding or boosting lots of elements unless really necessary, as it makes the whole mix harder to control.

When setting up a sound system and doing a soundcheck in a venue, the best practice is to start with all the EQ knobs in your mixer set to the middle or 0 dB. That way, you can clearly understand how the system sounds and reacts in that particular venue.

Furthermore, while doing the soundcheck, try to identify which frequencies are problematic and decrease them. Remember that to keep a mix clean is usually better to cut than to boost. In other words, first cut problematic frequencies and then boost what is needed to get the best mix possible.

Slow and Incremental Changes are Your Best Bet During the Live Performance

Make sure that any changes are extremely slow and incremental. This can be hard if you are under pressure during a gig, but a sudden spike or change in sound will be more noticeable than the current one. You can end up making it far worse, and you may end up with feedback or low end rumbling in the bass. 

Besides, working slowly is usually all you need to make a sound correction. Even a slight tweak when doing EQ can have huge differences. 

Additionally, keep it simple and focus on using one frequency range for the channel. It may be tempting to use complex EQ settings that are pre-installed in your mixer if using a digital mixer, but they can throw things off and take up a lot of time to fix.


Understanding The EQ Architecture of the Mixer

The frequency spectrum of any audio signal coming into your mixer will be made up of frequencies between 20 Hz to 20 kHz. This frequency range is subdivided into smaller ranges so that complex sounds made up of many frequencies can be equalized in the mixer.

Here is the breakdown of the audio frequency spectrum used to identify and equalize different sound sources:

Depending on the mixer you use, it will have from two to six knobs to boost or decrease various frequency envelopes, as shown in the table above.

Most analog mixers used for live setups have three to five knobs that sweep the audio spectrum. Digital mixers tend to have a wider frequency range and allows for more precise control when dealing with frequency envelopes.

When equalizing live sound, you should concentrate on the following EQ bands in your mixer:

Sub-Bass

Sub-bass frequencies go between 20 Hz to 60 Hz. These frequencies will only appear if you have high-end sound equipment with subwoofers or bass bins. Sub-bass frequencies fill the room, and depending on the type of music being played, they might be essential to get a full audio experience.

Unless your PA system has subwoofers capable of reproducing these frequencies, make sure to cut them out of your mix. If you don’t, it will not sound good, and you’ll get a lot of low-end rumble.

If it is not audible on your equipment, you should cut it out completely to avoid confusion and sound problems later on. 

Bass

Between 60Hz to 200Hz is the bass. This will mainly deal with bass guitars, low ends of pianos, synths, vocals, and any wood or brass instruments in that range. 

Bass can be tricky, as the human ear finds it hard to pinpoint the direction from which it has come. This means unlike your drum kit, guitars, and piano, it will not matter what side of the stage the source is set up. Bass will also sound very different close to the stage to how it does at the back of the crowd. 

Low-Mids

The low-mid frequencies run from 200 Hz to 600 Hz. It will require a lot of your attention, as it deals with many instrument ranges, including guitars, pianos, vocals, and the top end of the bass. This can result in a very muddy mix if not set right. 

One Tip when dealing with low mids is to deal with problems at the sound source. Tweak the instruments and amplifiers onstage, solving problems at the root rather than when they arrive at your mixing desk. 

Mids

The mid-range frequencies of the audio spectrum are found between 600 Hz to 3 kHz. These are essential in vocal ranges and acoustic instruments. You need to pay special attention to these frequencies as they help with the clarity of the sound.

Upper-Mids

Upper mids run from 3 kHz to 8 kHz. This is where you start to get harsh, sharp tones if not appropriately equalized depending on the sound source. They are essential because they can add more expression, punch, and aggression to your mix. Upper mid frequencies need to be balanced to avoid pops and hisses that may occur.

When you get feedback from vocals or other instruments, make sure to check the range of mid frequencies. It will probably be one of them that needs adjustments to solve the problem. 

Treble

Treble is anything above 8 kHz. This is usually the easiest area to EQ, as you will have a lot of space that is occupied mainly by guitars and cymbals. As long as they do not sound too harsh, you should not have a problem at this end. 


Tips on How to EQ Specific Live Sound Sources

EQ Vocals

The fundamental frequencies of vocals are between 100 Hz-300 Hz. Even adult males with deep voices don’t go below 85Hz. All this means is that any frequencies below 80 Hz should be cut out when equalizing vocals to avoid low-end rumbles.

Plosive sounds happen when a burst of air leaves the mouth at high speeds. It usually occurs when a word contains letters like “Ps,” “Ts,” etc. To avoid plosives, Try cutting around 200 Hz-250 Hz.

If in your mix vocals sound muddy or boomy, try adjusting the frequencies between 220 Hz-350 Hz. Don’t aggressively cut frequencies in this area because you could eliminate part of the warmth of the vocal’s sound.

Another critical area to EQ carefully is the frequencies between 350 Hz – 600 Hz. An emphasis around those frequencies will make the vocals sound “Boxy,” meaning that they will have resonances as if the vocals were enclosed in a box.

The upper mid-range or high-mid frequencies are the “Nasal Frequencies” and are located between 1 kHz – 3.5 kHz. They need to be carefully balanced because if there is an excessive buildup in this area, vocals will sound “harsh” or “grating.”

It is critical to bring out the vocals in a live mix because vocals are the most important part of the mix. This can be achieved by slightly increasing the “presence range of frequencies,” which are between 4 kHz – 6 kHz.

Frequencies between 6 kHz – 10 kHz need to be adjusted carefully to avoid a sibilant sound. Start with the EQ set in the middle and have vocalists sing. If you hear that the “s” sounds too exaggerated and bright, decrease the knob until the sibilant tone is gone from the vocal sound.

In any live sound setup, the vocals are the most important part of the mix but tend to be the hardest to get right. Click the link to read a more detailed explanation of how to EQ live vocals like a pro.

EQ Acoustic Guitars

When using an open to air microphone to mic an acoustic guitar, you have to consider how the microphone reacts to the venue’s acoustics. If using piezoelectric mics, like the ones in electro-acoustic guitars, the venue’s acoustics don’t affect the sound as much.

When equalizing acoustic guitars, any frequencies below 60 Hz is most likely to cause problems. These frequencies are boomy, which means that they are excessive on bass and have low-frequency resonances. This is why it is recommended to get rid of them by using the mixer’s high-pass filter, usually located below the gain knob.

Frequencies between 60 Hz and 125 Hz are responsible for the low-end response on the guitar. Here you have to be careful not to boost it excessively because you would end up with a muddy mix. However, if you cut too much, the guitar will sound thin in the mix.

Between 125 Hz and 500 Hz is where you get most of the acoustic tones of the guitar. This is also referred to as fullness of sound or body, with particular emphasis on the upper bass response. As always, be mindful when cutting or boosting in this range because it can negatively impact the sound within this envelope of frequencies.

Signature sounds unique to the different guitar brands will be emphasized between 500 Hz to 2 kHz. Here elements like the type of wood and building techniques used to construct the guitar will be audible within this frequency range. Make sure you sweep the full range of frequencies until you find the best response for the guitar being used.

The presence range responsible for the clarity, detail, closeness, and definition of the guitar is between 2kHz and 6kHz. Increasing this range can make the music seem closer to the listener. Reducing the 5kHz content makes the sound more distant and transparent.

Extra Tip: when equalizing electro-acoustic guitars that use piezoelectric pickup elements, avoid overemphasizing frequencies between 2 kHz and 7 kHz because it will sound harsh and abrasive.

Mic Placement is Critical

Another vital aspect you need to consider when dealing with acoustic guitars is mic placement, whether in a studio recording or live performance setup.

Even if you have a pickup, there will come a time to mike up because you can get a much fuller and more natural sound from a miked-up guitar, especially when compared to a piezo pickup.

When miking up your acoustic guitar, you need to know the best practices. Because there is not much you can fix with EQ if the mics are in the wrong place.

I won’t go into detail here explaining guitar miking techniques because I have prepared an entire article on how to mic acoustic guitars. Click the link to check it out.

EQ Electric Guitars

Cut The Sub-Bass Frequencies

Like acoustic guitars, when dealing with EQing an electric guitar, the first thing to do is get rid of anything below 80 Hz, because these frequencies are responsible for the low-end rumble that dirties up the guitar’s EQ. To do that, activate the high-pass filter in the mixer.

Boost The “Body” Frequencies to Add Weight to The Sound

In general, the equalization of an electric guitar is not that different from an acoustic one. The body of the instrument’s sound is found between 200Hz to 500Hz. In this range of frequencies, you don’t want to overdo it because it can overpower the rest of the mix.

You can start with a gain of “0 dB” at those frequencies and listen to how it sounds. If it sounds too fat and with too much emphasis on the upper bass, decrease it to “-2 dB” or until you hear a balanced tone.

Cut The Resonant Frequencies

An electric guitar has a complex tone because it has many harmonics. For the most part, these harmonics are present between 400 Hz to 1 kHz, and in some cases, it can go as high as 2 kHz.

These frequencies are the ones that give that unique tone to electric guitars. An excessive gain in this range can make the guitar sound honky and grating, especially in the 500 Hz to 700 Hz range. So to start on the right track, cut the resonant frequencies between 400Hz-1kHz, specifically at 600Hz.

Add Or Remove The “Presence” Frequencies to Get a Clear Tone

From 2 kHz to 10 kHz, you’ll get the clarity and definition of the electric guitar. An excessive gain here will make the sound too bright and can overpower the mix in a bad way.

My recommendation is to concentrate in the 1 kHz to 3 kHz range when adding “presence” or “brightness” to the sound. From there, you can decide if you want more “air” by boosting higher frequencies, but don’t overdo it, or it will sound harsh and piercing to the ear.

I have a complete article that includes a cheat sheet explaining how to EQ electric guitars in four easy steps using digital or analog audio mixers, click the link to check it out.

Equalizing Electric Bass

Cut The Ultra-Low-End Frequencies

Basses as electric guitars have many resonances that end up muddying the mix. In an electric bass, these resonances are present between 40 Hz to 80 Hz.

Make sure to use the high-pass filter in the mixer to cut everything below 40 Hz. That way, you get rid of problematic frequencies when equalizing bass guitars.

With a digital mixer, all you have to do is set a high-pass filter with a cut-off frequency set at 40 Hz.

If using an analog mixer, the included high-pass filter has a cut-off frequency set at 80 Hz or 100 Hz. So, engaging it will do nothing good for us because it will cut frequencies below 80 Hz, which is not ideal when EQing bass.

So, if your analog mixer doesn’t have a high-pass filter with a cut-off frequency below 80 Hz, leave it off (disengaged) to avoid cutting out some of the fundamental frequencies.

Enhance The Bass’s Fundamental Frequencies

The sound’s body of a bass guitar is found in frequencies between 40 Hz and 400 Hz. These fundamental frequencies are what shape the unique tone of an electric bass.

If you hear poorly damped harmonics that make the sound too boomy, try cutting around 125 Hz to fix the problem. Don’t over-cut because that will weaken the sound of the bass.

When the bass sounds boxy, most likely, the problem is between 250 Hz and 300 Hz. Try cutting it until you get a fuller, clearer sound.

As you may know, any note played on an instrument contains harmonics, but when the sound’s body is found in the lower frequencies, the harmonics can be challenging to control.

If you find yourself trying to figure out why the sound is congested when equalizing a bass, the problem may be fixed by dealing with frequencies from 500 Hz to 1 kHz. These are the upper harmonics of the electric bass, also called overtones,

Watch Out for The Harmonics

Lastly, from 2 kHz to 5 kHz, you’ll find what’s referred to in the industry as string noise. These include string slaps and more rhythmic percussive sounds. Here you can adjust it to your liking; just be careful not to make the sound excessively bright as it will lose the whole purpose of having a bass.

If you are interested in a more detailed explanation on equalizing bass guitars, click the link. In the article we go through an easy to follow 4-step process to eq an electric bass, plus a handy cheat sheet to help you visualize the process.

Equalizing Piano and Keyboards

Piano

When dealing with acoustic pianos, EQ should be applied carefully and mostly to correct issues, especially if the sound clashes with the rest of the mix. You want the piano to play a supportive role, mainly if vocals are present in the track or live performance.

One of the critical things to do when dealing with a piano is to have the correct mic placement, which will help you avoid feedback and get a better sound response. But when it comes to equalizing the sound, here are some tips.

Cut the Mid-Low Resonant Frequencies

A piano has resonant frequencies around 440-500Hz, which tend to dampen the sound. We need to remove these resonances before they happen to maintain a clean audio mix.

Try using a bell filter with a cut-off frequency set at 440Hz, reducing the gain at that frequency by -6dB.

Reduce Boxiness

The range of frequencies between 100 Hz and 250 Hz gives the piano its fullness and warmth. But at 220 Hz, you can get a resonant frequency that makes it sound boxy, meaning that it sounds like it was enclosed in a box. So, by reducing this frequency, we can get rid of the boxy sound.

When mixing, if you don’t remove this resonant frequency in the piano’s EQ, in addition to it sounding boxy, you’ll have a messy mix due to the buildup from all the other instruments in that frequency range.

Use a bell filter with a cut-off frequency set at 220Hz, reducing the gain at that frequency by -5 to -6dB.

Use a High-Pass Filter at 60-80 Hz

For the piano, anything below 64 Hz will only add unnecessary low-end rumble to the mix, and we want to leave this space open in the frequency spectrum for the bass.

So, to start with a clean piano sound right off the bat cut the frequencies below 64 Hz.

If using an analog mixer, activate the high pass filter (HPF) button. If you can select a frequency, set it at 60 Hz. With a digital mixer, all you have to do is to roll up the high pass filter with a cut-off frequency set at 64 Hz.

Extra Tips

Avoid boosting frequencies between 250 kHz to 3 kHz because this will add muddiness to the mix.

Frequencies from 3 kHz to 6 kHz add presence to the piano’s sound. They are responsible for the sound’s clarity and definition of the instrument.

From 8 kHz and above, you will get a lot of hiss, which brings out the noise of the dumpers, which is annoying if they are too loud. Carefully boosting this range of frequencies can add a bit of brightness to the sound, which is a good thing in some cases.

You can read this four-step piano Eq article, which walks you through this process in more detail. Plus, in the article, I have provided a cheat sheet in a graphical form so that you visualize the EQ process. Check it out by clicking the link.

Keyboards

Keyboards have several sounds, and each time the sound is changed, the EQ might need adjustment as well. Here are a few rules of thumb that you can follow to make it easier.

It’s always recommended to cut the sub-bass frequencies below 60 Hz with the high-pass filter. Most of the time, the lower frequencies add more problems to the mix as they have many harmonics that can create an uncontrollable low-end rumble.

With keyboards, frequencies between 400 Hz to 600 Hz can create a lot of muddiness in the sound, so be careful when dealing with this range.

If the sound is changed to a different one in the middle of the performance, and you hear muddiness, your problem will be solved by reducing the gain in this frequency range. 

If you want the keys to cut through the mix, like for a solo performance, boost frequencies between 1 kHz to 2 kHz.

To add presence to the sound, slightly boost between 3 kHz to 6 kHz. For a darker sound, decrease the gain within this range of frequencies.

EQ Drums

Equalizing drums is one of the most challenging tasks in live sound. It’s a way to measure an engineer’s ability to EQ and mix live sound. Drums set the rhythm, and their sound is very energetic; for that reason taming that wild beast is not an easy task. Here are a few tips to help you EQ drums.

Kick

When EQing kicks, you want to create a sound that’s big with a good transient response and a strong impact, but without overpowering the whole mix. If the kick’s sound is not deep enough with enough punchiness to cut through the mix, it will sound thin and anemic, lacking sturdiness. 

You have to consider two ranges of frequencies to get a big sound. These are from 40 Hz to 60 Hz and from 60 Hz to 100 Hz. But be careful because if they are boosted too much, the low-end rumble will be a nightmare, but if they are cut out or too low, there won’t be any punchiness in the sound.

The body of the kick’s sound or fundamental tone is from 100 Hz to 200 Hz. If you get a muddy sound, decrease frequencies between 200 Hz and 500 Hz, these are the muddy frequencies when dealing with kicks.

From 500 Hz to 2 kHz, you get the attack frequencies. Attack is the time it takes for a note to reach its maximum or peak amplitude. When the beater hits the drum head, the produced transients are difficult to EQ and can become a problem. If that’s the case, remember to control the attack frequencies mentioned.

Snare

The snare is the second on the drum list to EQ. For starters, you want to cut any sub-bass and bass frequencies. Anything below 80 Hz must go away because it will cause problems to the overall mix.

The snare’s fundamental tone is between 100 Hz and 400 Hz, but with particular emphasis between 150 Hz and 250 Hz.

When EQing snare drums, you have to know the problematic frequencies to deal with them before becoming a problem. These frequencies are between 400 Hz and 800 Hz. Don’t completely remove them but just be mindful to avoid a boxy sound.

If you want the snare to sound punchy with a good transient response and strong impact, you’ll need to take care of frequencies between 1kHz and 4 kHz. Boost them or decrease them depending on the result you want to achieve.   

Toms

When dealing with toms, you need to take care of two ranges mostly. The first range is the one that deals with the body or fundamental tone of the toms. The second range mainly deals with the attack and transients of the sound.

For creating a balanced tone, boost or decrease frequencies between 150 Hz to 400 Hz. Try moving the knobs within that range until you hear a full sound with the correct tone. But if this range is boosted too much, it will sound like a cardboard box.

The attack frequencies are found between 400 Hz to 4 kHz. This is the sound produced when the stick hits the drum head. You could decrease it entirely, but I don’t recommend it. This range of frequencies provides the characteristic sound and a more realistic sound.

Extra Tip: I recommend cutting anything below 80 Hz using a high-pass filter to avoid low-end rumble.

Cymbals

When dealing with bigger sound systems setups, and you need to mic cymbals, it becomes another critical element to deal with. If they are not equalized properly, you will get all kinds of problems such as harsh, overpowering, or inaudible cymbals.

The first thing you want to do is get rid of the unneeded frequencies that don’t help in the sound. In this case, this would be all frequencies below 200 Hz. If using a digital mixer is easier to achieve than when using an analog one because you can set the cut-off frequency to whatever you want.

But when dealing with analog mixers, you don’t have the flexibility to choose the high-pass filter’s cut-off frequency because it’s already set to 60 or 80 Hz. In that case, just activate the high-pass filter usually located under the gain knob, and try cutting anything below 200 Hz manually.

When EQing hi-hats, you want to have a modest gain between 200 Hz and 300 Hz as this range gives the particular sound clarity for this set of cymbals. The dominant frequencies in hi-hats are found between 300 Hz to 3 kHz.

To bring up the unique tones in crash and ride cymbals, you want to experiment with frequencies between 300 Hz to 700 Hz. I say “experiment” because depending on the cymbal’s size, the material alloy, and bell size, the sound will be unique.

Your cymbals’ attack frequencies are between 700 Hz to 7 kHz, with harmonics expanding all the way to 25 kHz. When equalizing, crash, rides, chinas, etc. Depending on the size, you want to sweep the attack range of frequencies until you tune the EQ to get a well-balanced tone that is not harsh overpowering.

Any frequencies beyond 8 kHz will add brightness or treble to the cymbal’s sound. Here it’s up to you what you want to achieve. Just remember that if you boost anything beyond 8 kHz too much, it will sound too bright, which tends to pierce through the ear, and that’s a negative effect.

To make your cymbals shine a little bit on the mix, you can subtly boost this range, and you will achieve a nice balanced cymbal’s mix.


Create Balance

Experience is also one of the key factors in how to EQ live sound. However, even with limited knowledge, you can do a decent job by cutting out unwanted noise and cleaning up the sound by dealing with the proper frequency ranges. 

If you are starting out on your first foray into live sound, then Virtuoso Central is here to help. Start by reading our handy guide on live sound tips for beginners by clicking here. 

Primary Sidebar

Search

Guides & Tutorials

  • Choosing a Portable PA System
  • How to Be a Better Singer
  • Build a Budget Live Streaming System Using PTZ Cameras
  • How to Get the Best Audio Quality on YouYube
  • Setting Up Stage Monitors
  • Mixing Console Basics
  • How to Position PA Speakers
  • Stage Sound System Set-Up
  • How to EQ Live Vocals
  • How to EQ Live Sound
  • Daisy Chain Active Speakers
  • Zoom Audio Settings for Music
  • How to Livestream a Wedding
  • Improve Your Livestream Audio Quality
  • Microphone Preamp Buying Guide

Featured Posts

Treblab X9 Pro: Tough Earbuds, Big Performance

Escape the Noise: Best Affordable Noise-Canceling Headphones

How to Combine Passive and Powered Mixers

What is a Ground Loop? – 5 Simple Ways to Fix the Buzz and Hum

Disclaimer

VirtuosoCentral.com is a participant in the Amazon Services LLC Associates Program, an affiliate advertising program designed to provide a means for sites to earn advertising fees by advertising and linking to Amazon.com.

Home  About  Contact  Disclaimer  Privacy

Copyright © 2019-2025 Virtuoso Central. All Rights Reserved.