This website uses cookies to improve and personalize your visit. Learn more about cookies. Got It

  • Skip to primary navigation
  • Skip to main content
  • Skip to primary sidebar

Virtuoso Central

  • About Us
  • Contact
  • Privacy

Informational

What is a Ground Loop? – 5 Simple Ways to Fix the Buzz and Hum

The intricate dance of electrons in our audio devices does more than just produce melodic symphonies and gripping dialogues.

Sometimes, it leads to an unwelcome guest: the persistent hum or buzz. This auditory invader, often the result of a ground loop, can ruin the perfect audio/video experience.

This article provides a few quick solutions that solve most common ground loop noise-related issues and provides a deeper dive into understanding ground loops and comprehensive solutions to eliminate them.

But before we go into the detailed version of what causes ground loops and how to fix ground loop hum, here are a few quick solutions to eliminate most hum and buzz from your A/V system.

Quick Solutions for Getting Rid of Ground Loop Buzz and Hum

When you get a ground loop that materializes as a consistent buzz or hum, the problem could be bad electric wiring, defective equipment, or just a noisy electronic environment.

In most cases, you can fix a ground loop by using a ground loop isolator, a ferrite bead, or an isolated transformer.

  • If your problem is an audible hum coming out of your speaker or amp, something like the Ebtech Hum X or the Morley Hum Exterminator will help filter out the voltage in the ground line. Just make sure that your system doesn’t draw more than 6 Amps or 720 Watts of power.
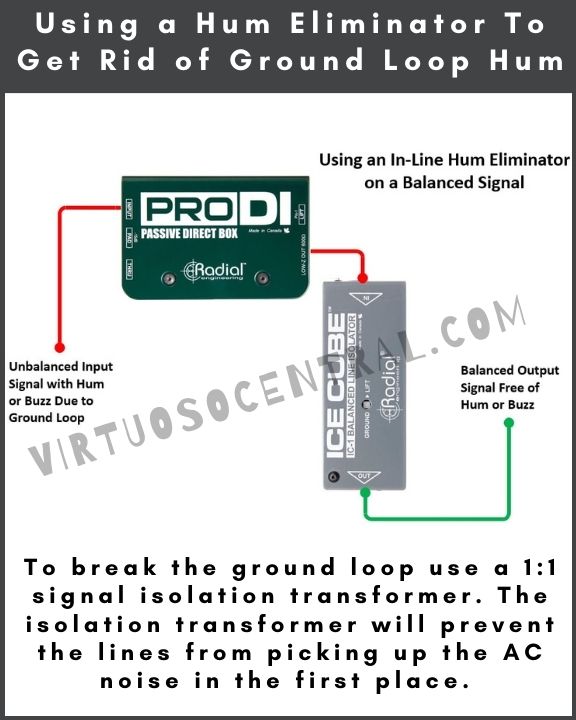
  • When dealing with 60Hz AC hum on your audio signal lines caused by ground loops acting like antennae, picking up noise, you need to break the ground loop using a 1:1 signal isolation transformer. The isolation transformer will prevent the lines from picking up the AC noise in the first place. Devices like the PYLE-PRO Compact Mini Hum Eliminator or the HappyMusic Professional Ground Loop Isolator should do the trick.
  • Is the noise present in the coaxial TV cable? In that case, you would need a ground loop isolator for cable TV applications, such as the TII 220.
  • The most effective way of getting rid of buzz and hum due to a ground loop is to isolate the system from the AC input line by using an isolation transformer such as the 1000-Watt Tripp Lite IS1000HG or the 1800-Watt Tripp Lite IS1800HG, which offers 100 percent isolation from the input AC line, thus eliminating any buzz or hum created by a ground loop. Just make sure your equipment doesn’t consume more than what the transformers can deliver.

Isolation transformers are used in hospitals to provide a clean power source for sensitive medical equipment. So, if you are dealing with ground loop problems and have HI-FI sound and video components, you should definitively consider using isolation transformers to provide a clean power source to your system.

Now that you have a few quick solutions, if you are interested in knowing what causes this problem and how you can avoid having ground loop noise in your A/V equipment, keep reading as we go into more detail. Let’s get started.

Deeper Dive – Understanding Electrical Grounding

At the heart of many electrical systems is the concept of grounding, a silent guardian that keeps our devices safe and our experiences optimal. It’s more than just a connection to the Earth.

Purpose

The primary purpose of grounding is to provide a safe pathway for stray or excess electricity to flow back to the Earth.

In doing so, it significantly reduces the risk of electrical shock and prevents the likelihood of circuit overloads, which could otherwise cause damage to electrical components or, worse, result in an electrical fire.

By creating this “escape route,” grounding safeguards both people and devices from unforeseen electrical faults.

Protection

One of the critical roles of grounding is protection against electrical fires and shocks. When an electrical system is grounded, any extra electricity that may be generated due to faults, surges, or spikes has a place to go.

This substantially reduces the risk of fire caused by overheating circuits. Furthermore, grounding reduces the risk of electric shocks, which can be harmful or fatal. A well-grounded system automatically directs excess electricity away from people and into the Earth, acting as an additional safety measure.

Performance

Beyond safety considerations, grounding also plays a role in the quality of electrical device performance.

For audio systems, proper grounding ensures a lower noise floor, meaning you hear less background hum or buzz and more of the audio signal you want.

Similarly, in other types of electronic systems like computers or televisions, grounding can help minimize the effects of electromagnetic interference, which can distort signals and reduce performance. Proper grounding ensures that all devices operate at the same electrical potential, which is crucial for accurate signal transmission between interconnected devices.

image explaining the primary purpose of electrical grounding in equipment

Decoding the Ground Loop

Imagine multiple devices connected, like dancers holding hands in a circle. Now, if all dancers (devices) were perfectly in sync, the circle would remain stable. However, if even one dancer stumbles, the entire circle is affected. This is the essence of a ground loop.

Formation

Ground loops are essentially unintended pathways for electrical currents. They materialize when two or more devices connected to a shared grounding point find alternative routes to that ground, completing an unintentional circuit.

Think of it as two dancers having their feet tied together but trying to move in slightly different directions. The tension created can cause them both to falter. Likewise, in electrical terms, this closed-loop circuit often behaves like an unintentional antenna. Instead of broadcasting a signal, however, it picks up electromagnetic interference from its surroundings. This interference is what often leads to the dreaded hum or buzz in audio systems.

Tell-Tale Signs

One of the most identifiable symptoms of a ground loop is a persistent hum in audio devices. For most, this hum resonates at 60Hz, which aligns with the standard frequency of alternating current (AC) in many countries. However, in regions where the AC frequency is 50Hz, the hum will mirror this frequency instead. This hum is not just a random noise; it’s a direct reflection of the electrical currents that power our devices. When it becomes audible, it’s a sign that there’s a disruption in the system – in other words, a ground loop.

The importance of identifying and addressing ground loops cannot be stressed enough. While they might seem like minor nuisances, they can degrade the performance of devices, reduce their lifespan, and in some extreme cases, even pose safety hazards.

Ground Loop Consequences

While the hum is annoying, ground loops aren’t just about the noise. The consequences of ground loops in electrical systems can be far-reaching and multifaceted. From mild disturbances to potential threats, ground loops cast a shadow over our electronic ecosystem.

Equipment Health

Every electronic device is an intricate symphony of components working in harmony. These components, especially the more sensitive ones like microprocessors or fine-tuned capacitors, have a certain threshold of electrical current they can safely handle.

Ground loops introduce stray currents into the system. Over time, the continuous stress from these unintended currents can cause wear and tear, gradually degrading the performance of these components.

For example, transistors and integrated circuits might overheat, and capacitors and other components can wear out faster. This not only hampers the device’s optimal function but also can shorten its overall useful life. It’s similar to driving a car continuously in a higher gear than necessary; the wear on the engine accelerates.

Quality Degradation

For audiophiles and enthusiasts, the purity of sound is paramount. A well-composed piece of music or an immersive dialogue in a movie can transport listeners into a different realm. However, the hum or buzz from a ground loop acts as an unwanted intruder, breaking this immersion.

Beyond just being a background noise, the hum can drown out subtle tones, rhythms, or speech elements, making the audio feel flat or muddled.

This is particularly true for high-fidelity systems where the distinction between various sounds is more pronounced. In such systems, even a minor disruption like that caused by a ground loop can dramatically reduce the quality of the listening experience.

Safety

Ground loops, at their worst, aren’t merely inconveniences. In situations where the grounding is not properly set up or is compromised, ground loops can intensify existing electrical faults.

The surplus currents roaming within the system, without a proper channel to escape, can lead to overheating or even electrical fires.

Additionally, any equipment housing these faults becomes a potential shock hazard. For instance, touching an improperly grounded device chassis might deliver a dangerous jolt. It’s critical to realize that while ground loops often manifest as harmless noises, they can sometimes be indications of more grave electrical dangers lurking beneath.

What Causes Ground Loops in Our Equipment?

When troubleshooting electronic issues, understanding the root cause is vital. Here’s a closer look at some of the primary instigators behind these unintentional electrical pathways:

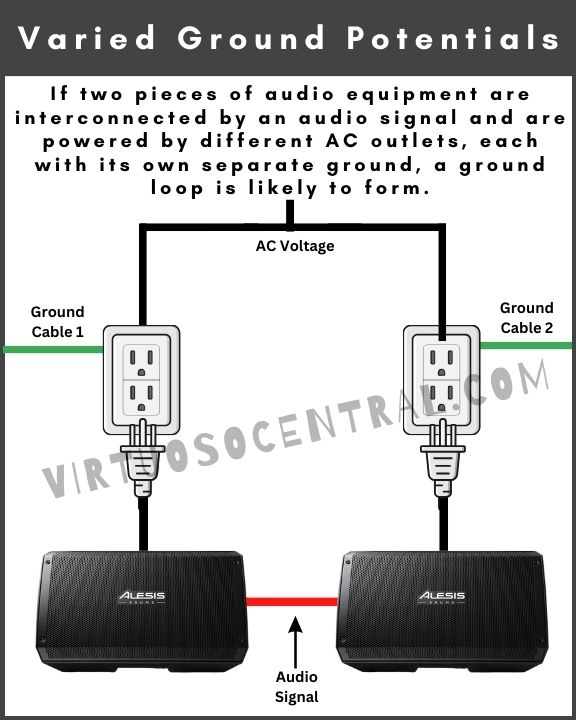
Varied Ground Potentials

Every electronic device connects to the earth (or ground) for safety and functional purposes.

However, not all grounds are created equal. In larger setups or buildings, different grounding points might exist, and these could have varied electrical potentials, even if slightly.

When devices connected to these different grounds are linked, a discrepancy in potential between them can cause current to flow. This flow, trying to equalize the potential difference, inadvertently forms a loop.

It’s similar to water flowing between two tanks connected by a pipe, trying to level the water height in both. Similarly, electrical current will always seek the path of least resistance to balance out differences in potential.

diagram showing the varied ground potential in electrical outlets when connecting audio equipment

Mixed Outlets

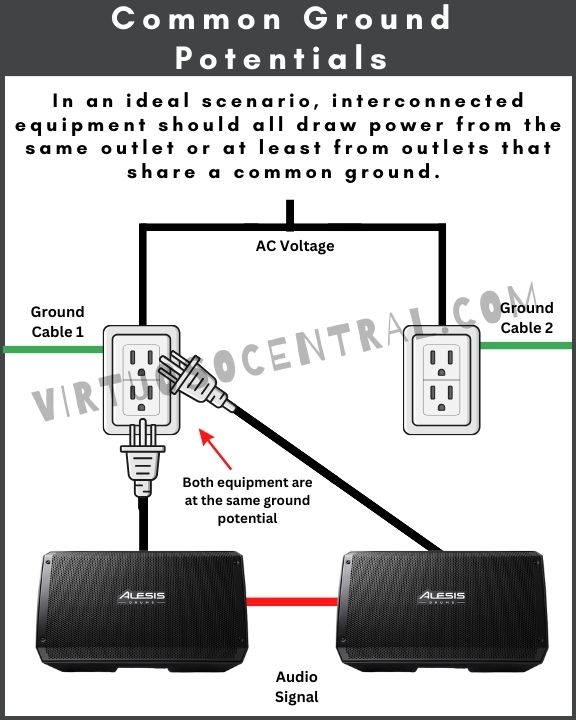
In an ideal scenario, interconnected equipment should all draw power from the same outlet or at least from outlets that share a common ground.

When setting up a stage sound system, a home studio, or entertainment system, equipment might be spread across the room, plugged into whichever outlet is closest.

Different outlets could potentially lead back to different ground points or circuits in the building’s electrical wiring. This creates a situation where multiple paths to ground exist for interconnected equipment, laying the perfect groundwork (pun intended) for ground loops.

The act of simply using different sockets can unintentionally weave a complex web of grounding paths, each with its own potential and resistance, making it ripe for ground loop formation.

External Connections

While the usual suspects in ground loop issues tend to be power sources and audio connections, there are more covert culprits to be wary of. External connections, especially those that aren’t immediately associated with audio, can stealthily introduce ground loops.

Consider devices like cable TV boxes, satellite dishes, or even antennas. These devices, often outside the purview of standard audio equipment, come with their own grounding mechanisms. A cable TV line, for instance, is grounded at the service provider’s local distribution box to protect against lightning strikes and voltage surges.

When such a device connects to your audio system, it brings along its own ground potential, which might not harmonize with the existing grounding scheme. This disparity can, once again, pave the way for those pesky ground loops.

How to Detect Ground Loops – Comprehensive Approaches to Unmasking the Culprit

Identifying ground loops can be much like solving a mystery. That characteristic hum or buzz is your first clue, indicating that unwanted currents are flowing somewhere in your interconnected devices.

However, pinning down the exact source and nature of these currents requires a bit more in-depth investigation. Let’s delve deeper into some of the methods used to detect these elusive ground loops.

Isolation Test

The isolation test is one of the most straightforward and effective methods to identify ground loops. The principle is simple: by disconnecting devices one by one and observing any changes in the hum or noise, you can often trace back to the problematic connection or device. Here’s how it’s typically done:

  1. Starting Point: Begin with all devices powered on and interconnected as they usually would be.
  2. Systematic Disconnection: Unplug one device or connection from the system.
  3. Observation: Listen carefully. Has the hum or noise diminished or disappeared altogether?
  4. Reconnection & Repetition: Reconnect the device and move on to the next one, repeating the process.
  5. Pinpointing the Culprit: If, after disconnecting a particular device or cable, the noise vanishes, you’ve likely found the primary source of your ground loop. This can be further validated by reintroducing the device and noting if the hum reappears.

The isolation test, while simple, can be time-consuming, especially in intricate setups with multiple devices and connections. However, its strength lies in its direct approach, often yielding definitive results.

Frequency Analysis

For those who desire a more tech-savvy approach or are dealing with complex systems where the isolation test might be cumbersome, frequency analysis offers a sophisticated solution. Many audio software tools and applications can “listen” to and analyze the noise or hum in your system, breaking it down into its constituent frequencies.

  1. Capturing the Noise: By feeding the system’s noise into a computer or dedicated analyzer, the software can capture a “profile” of the sound.
  2. Spectrum Analysis: The software then dissects this profile, presenting the various frequencies that make up the noise. This is often visualized as a spectrum, with peaks showing dominant frequencies.
  3. Matching the Frequency: A ground loop will typically manifest as a hum at 60Hz (in countries with a 60Hz mains frequency) or 50Hz (in countries with a 50Hz mains frequency). By comparing the peaks in your noise profile to these characteristic frequencies, you can determine if a ground loop is the primary culprit.

Frequency analysis not only helps in detecting ground loops but can also be instrumental in identifying other types of interference or noise sources, making it a versatile tool in any audio detective’s kit.

While ground loops might be stealthy adversaries, they can be effectively identified and addressed with the right tools and methodologies. Whether you’re an audiophile, a professional sound engineer, or just someone seeking a noise-free audio experience, understanding how to detect ground loops is the first step toward pristine sound quality.

Solutions to Eliminate Buzz and Hum from your Amp.

The persistent hum indicative of a ground loop can compromise the quality of any audio experience. Addressing this requires a multifaceted approach, deploying various strategies and tools that cater to specific situations. Here’s an expanded look at some of these solutions:

Ground Loop Isolator

A ground loop isolator acts much like a peacekeeping mediator in a dispute – it works to sever the unwanted ground loop without disrupting the essential audio signal.

  • Functionality: At its core, a ground loop isolator typically employs transformers. These transformers allow audio signals, which are alternating currents (AC), to pass through while blocking the direct current (DC) that might be causing the ground loop.
  • Applications: These devices are especially beneficial for setups involving consumer audio devices, home theaters, or car audio systems, where introducing additional grounding can be complex.

Here are some ground loop isolators that can help you get rid of the hum and buzz due to ground loops:

  • Remove audible hum coming out of your speaker or amp: Use the Ebtech Hum X or the Morley Hum Exterminator
  • To get rid of 60Hz AC hum on your audio signal lines: Use the PYLE-PRO Compact Mini Hum Eliminator or the HappyMusic Professional Ground Loop Isolator.
  • For the most effective way of getting rid of buzz and hum due to a ground loop try using an isolation transformer such as the 1000-Watt Tripp Lite IS1000HG or the 1800-Watt Tripp Lite IS1800HG.

Balanced Connections

In the audio world, balanced connections are like a harmonious duet that drowns out background noise.

  • Design: These connections use two conductors, typically labeled positive and negative, to carry the audio signal. There’s also a separate ground or shield. The magic happens because the audio signal on the positive conductor is an inverted version of the negative one.
  • Noise Rejection: Any external interference affecting the signal usually affects both conductors simultaneously. However, since one signal is the inverse of the other, the interference gets canceled out at the receiving end, resulting in a noise-free signal.
  • Usage: Balanced connections are a staple in professional audio setups, from studios to live events, given their superior noise-rejection capability.

Here are a few suggestions of XLR cables you can get:

  • Amazon Basics XLR Cable
  • Audio Technica XLR Cable

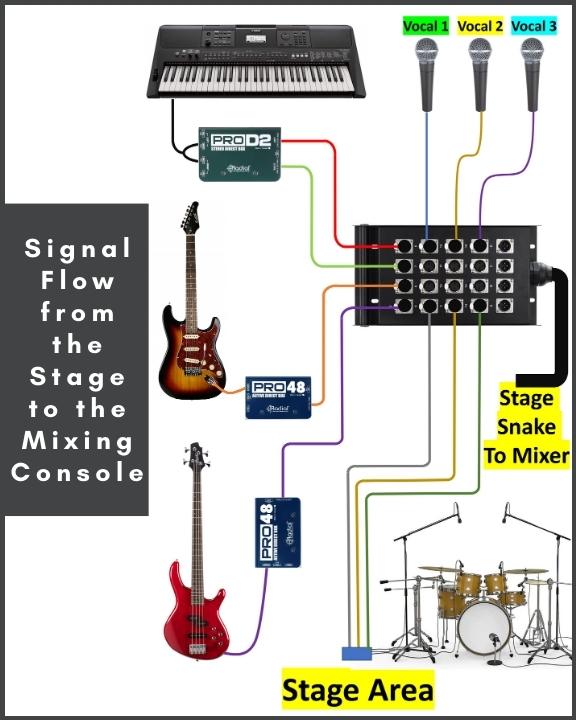
When using unbalanced cables with instruments such as guitars, basses, keyboards, etc., to avoid picking up noise, it is recommended to use a Direct Insertion Box (DI Box) to convert the unbalanced signal into a balanced, thus reducing the risk of picking up ground loop noise in your audio signal.

diagram for connecting an in-line hum eliminator on a balanced audio signal

Unified Grounding

Sometimes, simplicity wins. By connecting all devices to a single power source, you can effectively negate multiple ground paths.

  1. Implementation: All interconnected audio devices should ideally share a single wall outlet or be connected to the same power strip.
  2. Benefit: This approach minimizes the chances of varied ground potentials between devices, reducing the risk of ground loops.
diagram showing common ground potential in electrical outlets when connecting audio equipment

Isolation Transformers for External Connections

It’s not just traditional audio connections that pose risks. Non-audio connections, like those from cable TV or antennas, can be covert ground loop instigators.

  • How They Work: These transformers, while allowing the desired signals (like your TV channels) to pass through, break the direct electrical path that might form a ground loop.
  • Advantage: Especially in setups with multiple input sources, these transformers are invaluable in maintaining a clean, hum-free audio/video experience.

Something like the TII 220should help you remove the noise present in the coaxial TV cable.

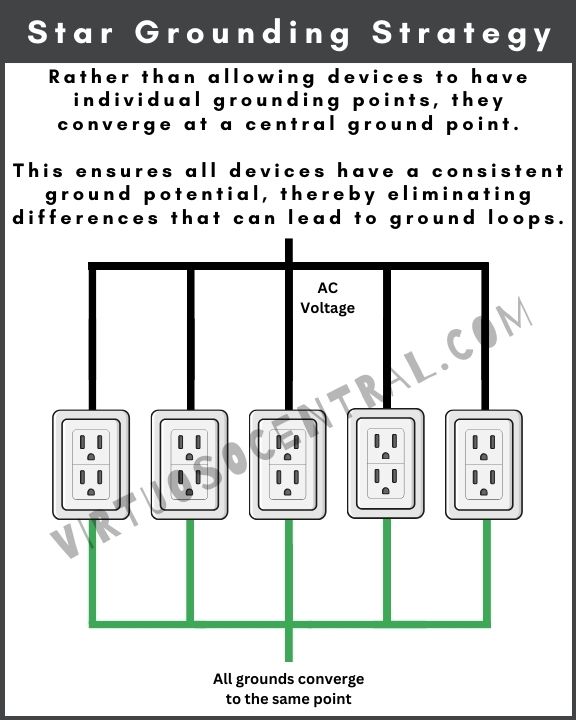
Star Grounding Strategy

Picture a star with its central core and radiating arms. The star grounding strategy centralizes all grounding points, ensuring uniformity.

  • Concept: Rather than allowing devices to have individual grounding points, they converge at a central ground point.
  • Benefit: This ensures all devices have a consistent ground potential, thereby eliminating differences that can lead to ground loops.
diagram showing the principle of the start grounding strategy for connecting audio equipment to avoid ground loop hum

Professional Intervention

Like all things electrical, sometimes the issue runs deep, rooted in foundational electrical setups or intricate, professional audio systems.

  • When to Consider: If you’ve tried multiple solutions and the hum persists or if you’re uncertain about your grounding infrastructure, it’s time to seek expert advice.
  • Expertise: A seasoned electrician can evaluate the electrical grounding of your premises, while an audio professional can dive deep into your setup, ensuring optimal configuration and grounding strategies.

Confronting ground loops, while challenging, isn’t an impossible task. With the right combination of tools, strategies, and, when necessary, professional guidance, that intrusive hum can be relegated to a distant memory, letting the pure, unadulterated sound take center stage.

Proactive Measures – Stepping Ahead to Prevent Ground Loops

Anticipating potential challenges and addressing them before they arise is often half the battle won. Regarding ground loops, this proactive approach can save both time and frustration. Here’s a deeper dive into steps you can take right from the start:

Education

Just as a seasoned traveler reads about a destination before visiting, delving into your device manuals can be enlightening.

  • Manufacturer’s Insights: Manufacturers often include specific guidelines or recommendations related to optimal setup and grounding strategies. These guidelines are based on extensive product testing and are designed to give users the best possible experience.
  • Caveats and Red Flags: Manuals may also highlight common challenges or pitfalls encountered by users, with grounding issues being a frequent topic. By being aware of these, you can sidestep problems even before they emerge.

Quality First

The saying, “you get what you pay for,” holds especially true for audio equipment. Prioritizing quality ensures a more stable, interference-free environment.

  • Shielding: High-quality cables often come with superior shielding, which acts as a barrier against external electromagnetic interference. This shielding minimizes the risk of introducing noise into your audio signal.
  • Durability: Premium cables and connectors are also more resilient to wear and tear, ensuring longevity. A degraded or damaged cable can be a potential entry point for interference.
  • Gold-Plated Connectors: While it may seem like a luxury, gold-plated connectors offer superior conductivity and are resistant to corrosion. This ensures consistent, high-quality connections over time.

Balanced Setup

The world of professional audio often hinges on the nuances, and opting for a balanced setup can be a game-changer.

  • Inherent Noise Rejection: As discussed previously, balanced connections naturally reject external interference. When setting up a new system or even upgrading an existing one, integrating balanced connections can dramatically reduce the risk of ground loops and other forms of interference.
  • Industry Standard: Balanced connections are the norm in many professional audio scenarios, from recording studios to live stage setups. Adhering to this standard offers a cleaner audio signal and ensures compatibility and interoperability with other professional equipment.
  • Cost Consideration: While balanced equipment and cables might come with a higher upfront cost, the long-term benefits in terms of reduced noise issues and potentially reduced maintenance can justify the investment.

In essence, while reactive solutions to ground loops are essential, there’s immense value in a proactive stance. By combining education with quality investments and industry best practices, you can set the stage for a cleaner, clearer, and more enjoyable audio experience from the outset.

Conclusion

Ground loops are a prevalent issue that can inject unwanted noise into your audio systems, compromising the clarity and purity of sound. However, understanding the origin of these loops and implementing preventive and corrective measures can mitigate their impact, enabling a crisp and clear auditory experience.

By adopting high-quality cables, utilizing ground loop isolators, employing balanced connections, and ensuring proper grounding strategies, one can substantially reduce the chances of encountering this troublesome phenomenon. But, beyond the technical solutions, educating oneself on proper setup and grounding principles is crucial.

This not only aids in identifying potential problems before they escalate but also ensures the safety of both the equipment and the user. Ultimately, tackling ground loops is about reclaiming the sanctity of sound and enjoying an undisturbed and enriching audio experience.

If you liked this article, consider sharing it with others, and don’t forget to visit our website to explore more articles like this one by clicking here. Thank you for reading my blog.

How to Set Gain on an Audio Mixer – Easy Method

The art of creating the perfect mix lies in the mastery of manipulating various controls on a mixing board, one of the most crucial being the gain setting.

This guide aims to provide a comprehensive understanding and detailed step-by-step process of setting the gain on a mixing board.

Understanding Basic Terminology

Before we dive into the process, it’s essential to understand some key terminology.

Gain: Gain controls the sensitivity of your mixer’s inputs. It adjusts the level of the input signal coming from your sound source and is the first point of amplification in the signal path.

Volume: Determines the level of a channel strip’s output signal or the master output. It regulates how loud the sound is in the mix.

Clipping: Clipping occurs when an amplifier, in this case, your mixer, is asked to deliver a voltage level beyond its capability. This results in a distortion of the signal, which is audibly unpleasant.

Distortion: It’s a form of audio signal degradation often resulting from an overload in the signal chain, such as when a signal is too strong for an audio component to handle, causing it to exceed its maximum output capabilities.

Gain is Different from Volume

While gain and volume might seem like the same thing to newcomers, they serve very different purposes in a mixing board.

Gain is the first stage of the amplification process in a mixer. It adjusts the level of the input signal coming from your source (like a microphone or an instrument) so that it’s at an optimal level for the rest of your mixer to work with. If the gain is set too low, the signal will be too weak and could get lost in the noise. If it’s set too high, the signal can clip and cause distortion.

On the other hand, volume is often controlled by the faders on the mixing board and adjusts the level of the output signal in the audio chain. It determines how loud the sound is in the mix in relation to the other channels. The volume can be turned up or down without affecting the input signal’s quality as long as the gain is set correctly.

Let’s illustrate this concept with a straightforward example. Audio mixers function at what we refer to as line level, electrically near one volt. A microphone, like the commonly used Shure SM58, produces a signal that’s roughly 1000 times weaker than line level.

So, for a mixer to utilize the signal from an SM58, it must substantially amplify it to a level that the mixer’s internal circuitry can handle. Without this amplification, you would essentially be trying to manipulate a considerable amount of noise. That’s where the role of your gain control becomes crucial.

Understanding this distinction between volume and gain is crucial, as incorrectly setting your gain can result in a poor-quality mix, even if your volume faders are set correctly. That’s why gain staging, the process of setting correct input levels, is an essential first step when mixing.

Finding the Gain Knob on Your Mixer

The label for the gain knob may vary based on the brand of your mixing console. It might be called “Trim,” “Input Trim,” “Input Sensitivity,” “Sensitivity,” or “Gain Sensitivity.”

In an analog mixer, the gain knob is typically the initial knob on a channel strip, positioned underneath the PAD switch.

In a digital mixer, the gain control is often located in the input settings of each channel. It may not always be a physical knob as it is on analog mixers. Depending on the digital mixer’s design and user interface, you might need to select the desired channel and then adjust the gain within that channel’s settings menu.

This could be represented by a virtual knob, slider, or a numerical value that you can adjust. Also, the gain might be labeled as “Gain,” “Input Gain,” “Trim,” or something similar, depending on the specific model and manufacturer of the mixer.

Regardless of the label, each of these controls serves an identical purpose: it adjusts the input level of the signal coming into the mixer from the connected sound source.

image shows the gain knob on different audio mixer brands

Step-by-Step Guide to Setting Gain on a Mixing Board

Step 1: Connecting the Sound Source

The first step is to connect your sound source, such as a microphone or instrument, to the mixer. Make sure to connect the source to the appropriate input channel on your mixer.

Step 2: Setting the Gain Knob to Zero

Before adjusting the gain, you need to start with a clean slate. Find the gain control on your mixer, usually at the top of each channel strip and labeled ‘Gain’ or ‘Trim’. Turn it all the way to the left to set the gain to zero.

Step 3: Setting All Other Controls to Neutral

Before you begin adjusting the gain, make sure all other controls on your mixing board are set to neutral.

Your EQ should be flat, and all effects should be turned off or disabled in that channel strip. This ensures that you are hearing the pure, unaffected signal when you adjust the gain.

Step 4: Set the Master Fader to Unity

Set the Master Faders to 0dB / U / Unity, depending on what’s labeled on your mixer.

Locate and press the PFL button to activate it. It is located at the bottom of the channel strip next to the fader in every channel. In some mixers, a small LED lights up when pressed.

Note: PFL stands for “Pre-Fader-Listen,” and it routes the audio signal from that channel to the VU Metter so that you can visually see and measure the strength of the audio signal on that specific channel.

Step 5: Playing the Sound Source

Instruct the musician to play their instrument or the vocalist to sing at the loudest they will during the performance. If you’re using a pre-recorded sound source, ensure it’s playing at its loudest part.

Step 6: Increasing the Gain

Slowly turn up the gain control as the sound plays until the level meter on your mixing board begins to show a signal. Gradually increase the gain until the signal consistently hits the ‘0dB’ or ‘unity’ mark during the loudest parts of the sound source.

The loudest sections of the audio source should be on the yellow area of the meter, and ideally, you want to be as close as possible to 0dB or Unity (green or first yellow LED).

Step 7: Monitoring for Clipping

Look out for any red LEDs lighting up on your level meter. These indicate clipping, which means your gain is too high and needs to be reduced slightly to avoid distortion.

In some cases, when using active bass guitars and electric guitars with pedals or keyboards/synthesizers, you might see your VU meter in the yellow or red section. If this is the case, it means that the sound at the source is too high and needs to be lowered to avoid distortion and clipping in the signal.

Step 8: Repeat for Each Channel

This process should be repeated for every channel on your mixer. Remember, each instrument or microphone will have a different output level and thus requires its gain setting.

Step 9: Fine-tuning Your Mix with Volume Faders

Once the gains are set correctly, you can use the volume faders to balance the overall mix.

Faders control the volume of each channel after it has been processed by the gain and EQ, allowing you to create a harmonious blend of all the instruments and voices.

Common Challenges and Solutions in Setting Gain

Challenge 1: Distortion and Clipping

One of the most frequent issues when setting gain is distortion or clipping. This problem typically arises when the gain is set too high, causing the signal to overload.

Solution: Always keep an eye on your level meters. If you see the signal is hitting the red zone or clipping indicator, lower the gain until you’re consistently in the green or yellow zone. Remember, occasional peaks into the yellow zone are acceptable, but constant red zone signals can damage your equipment and result in poor-quality sound.

Challenge 2: Inconsistency in Sound Levels

Another challenge is the variation in sound levels from different instruments or microphones. This variation can make it tricky to set the gain uniformly for all channels.

Solution: Each channel should be set individually. Ask each musician to play at their loudest level and adjust the gain for each channel accordingly. This ensures that each instrument or voice is coming through at an appropriate level.

Challenge 3: Feedback

Feedback is a loud, shrill sound that happens when a microphone picks up sound from a speaker and re-amplifies it. This can occur when the gain is set too high on a microphone near a loudspeaker.

Solution: Begin by setting your gain lower for microphones that are closer to speakers and monitor your system closely to avoid the start of a feedback loop. If you notice the onset of feedback, lower the gain immediately until it stops.

Challenge 4: Noise

Excessive gain settings can also introduce unwanted noise into your sound system. This can be heard as a hiss or hum.

Solution: Keep the gain only as high as necessary to achieve a strong signal but avoid turning it up too much. If your gain settings are optimal and you still encounter noise, you may have to check for other issues like faulty cables or electrical interference.

Challenge 5: Gain Staging

Gain staging involves managing the levels of all the various gain stages in your signal path to prevent noise and distortion. Mismanaged gain staging can result in poor sound quality.

Solution: When setting gain, start at the beginning of your signal chain and work your way to the end. Ensure that at each stage, the signal is strong enough to be above the noise but not so strong that it causes clipping or distortion.

Remember, setting gain correctly is a crucial step in achieving a good sound mix. It requires patience, attention to detail, and a lot of practice. But with time, it will become a natural part of your mixing process.

Suggested Gain Settings to Get Started

While the exact gain setting will depend on your specific sound source and equipment, here are some general suggestions to help you get started:

Microphones for Vocals: Depending on the singer’s volume, you may need to adjust the gain relatively high, as microphones often have low output levels, especially dynamic microphones such as the Shure SM58. A common starting point might be around halfway up the gain control, but you’ll need to adjust from there based on the specific performance.

If using condenser microphones, the gain should be set lower than dynamics. Start by setting the knob at around 1/4 a adjust from there. If the condenser mic is for live vocals, adding some compression would also help to keep the sound at a reasonable constant volume to avoid sudden audio spikes.

Electric Guitars: These often have a higher output, especially if they’re coming from an amplifier. So, when you connect a guitar amp to a mixer, the gain should be set carefully or it can clip the channel. As a starting point, set the gain lower, perhaps around 1/4 to 1/3 of the way up, and adjust from there.

Acoustic Guitars: If you’re miking an acoustic guitar, treat it similarly to a vocal mic, starting around halfway and adjusting based on the specific instrument and player. If it’s an electric-acoustic being plugged in directly, treat it more like an electric guitar.

Keyboards/Synthesizers: These can often have a very high output, specially if using balanced connections through a DI Box. Try starting with the gain quite low, around 1/4 or less, and adjust as needed.

Pre-recorded music – Like a Smartphone or Laptop Output: Start with a lower gain setting since the audio level from these devices can be quite high. You can start at 1/4 or even lower and then adjust as needed.

Remember, these are just starting points. The correct gain setting will depend on the specific sound source, the acoustics of the room, the other instruments in the mix, and your specific equipment.

The key is to start with a reasonable estimate and then adjust the gain while monitoring for clipping and listening for a clear, strong signal.

Most importantly, trust your ears. If it sounds too quiet, increase the gain. If it’s too loud or distorted, decrease the gain. With practice, you’ll get a sense of where to start with your gain settings for different sources.

Final Thoughts

Setting the correct gain structure on a mixing board is a fundamental step in achieving high-quality sound output, and is one of the skills you need to master when setting up a mixer to produce good sound.

It might seem complicated initially, but with practice, patience, and keen attention to detail, it becomes an integral part of your sound mixing journey.

Always remember that your ears are your most valuable tool. Don’t rush the process, and with each attempt, you’ll find your mixes sounding better and more balanced.

In-Ear vs. Floor Monitors: What’s Better for Live Performance

Monitoring is essential in live performance as it enables musicians to hear their instruments, vocals, and other band members with clarity. This allows performers to maintain proper pitch, rhythm, and overall cohesiveness during a performance.

This article compares two popular monitoring solutions: in-ear monitors (IEMs) and floor monitors (wedges). We will delve into the advantages and disadvantages of each option to help you make an informed decision for your live sound setup.

Our aim is to provide a comprehensive comparison of in-ear monitors and floor monitors, covering their pros and cons and discussing factors to consider when choosing the right solution for your live performance. Let’s get started.

In-Ear Monitors (IEMs)

Overview and functionality

In-ear monitors (IEMs) are a monitoring solution designed to provide a personalized audio experience for musicians and performers during live shows.

They consist of small earphones that fit snugly inside the ear canal, creating a seal that isolates external noise and delivers a customized audio mix directly to the performer. This enables musicians to focus on their performance without being distracted by ambient sounds or the venue’s acoustics.

IEMs often use wireless technology to transmit the audio signal from a mixing console to a receiver unit worn by the performer. This receiver then sends the audio signal to the in-ear monitors. Wireless systems provide the advantage of freedom of movement on stage, as performers are not tethered by cables.

The audio mix for IEMs is usually created by a monitor engineer, who is responsible for adjusting the levels of each instrument and vocal input to match the preferences of each musician. This gives performers a personalized mix highlighting the elements they need to hear most clearly during a performance.

In-ear monitors can be customized to fit the unique shape of each performer’s ear, providing optimal comfort and sound isolation. Custom-molded IEMs are created using impressions of the individual’s ear canal, resulting in a perfect fit and improved noise isolation. Alternatively, universal-fit IEMs come with various interchangeable ear tips to accommodate different ear shapes and sizes.

Overall, IEMs offer a high level of audio control, sound quality, and consistency that can significantly enhance a performer’s experience on stage. By isolating external noise and delivering a tailored audio mix, in-ear monitors allow musicians to focus on their performance and achieve better results.

Next, we present a few examples of in-ear monitors that deliver excellent results for live performance. The last one on this list is an inexpensive option that’s perfect for church praise teams:

  • Xvive U4 Wireless in-Ear Monitor System
  • Shure PSM300 Wireless in-Ear Monitoring System
  • Sennheiser IEM G4-Twin-A1 in Ear Monitor System
  • XTUGA RW2080 Rocket Audio

Pros of In-Ear Monitors

1. Improved sound quality and consistency

IEMs deliver superior sound quality with greater detail and consistency compared to floor monitors, thanks to their direct audio delivery method.

This enables performers to hear their instruments and vocals more accurately, ensuring better intonation and timing.

In addition, IEMs are less prone to the interference of external noise and room acoustics, which contributes to a more precise and reliable listening experience.

2. Personalized mix control

With IEMs, each musician can have a tailored mix, allowing them to focus on the instruments or vocals they need to hear most clearly.

This level of personalization enables better overall performance by allowing musicians to emphasize or de-emphasize specific sound sources according to their needs.

3. Reduced stage volume and feedback

IEMs help lower stage volume, as they don’t require loudspeaker monitors to project sound toward the performers.

As a result, the risk of microphone feedback is reduced, leading to cleaner sound quality and fewer distractions for both the performers and the audience.

4. Enhanced mobility and comfort

IEMs provide greater freedom of movement on stage, as performers aren’t limited by the position of floor monitors. They are also lightweight and less obtrusive than over-ear headphones, allowing for more comfortable and dynamic performances.

Cons of In-Ear Monitors

1. Initial investment and maintenance costs

IEMs tend to have a higher upfront cost than floor monitors, particularly when opting for high-quality systems with custom-molded earpieces.

Ongoing expenses, such as replacement ear tips, batteries, and wireless system maintenance, should also be considered when evaluating the overall cost-effectiveness of IEMs.

2. Potential for isolation from audience and bandmates

The noise isolation provided by IEMs can create a sense of detachment from the audience, potentially making it more challenging to gauge audience reactions and establish a connection during a performance.

Furthermore, IEMs can hinder communication with fellow band members, as they may reduce the ability to hear cues or spontaneous interactions.

3. Reliance on batteries and wireless technology

IEMs often depend on battery-powered wireless systems, which can be vulnerable to interference, signal dropouts, or battery failure during a performance.

To minimize these risks, it’s essential to invest in reliable wireless systems and ensure that batteries are regularly checked and replaced as needed.

4. Ear fatigue and hearing protection considerations

Extended use of IEMs at high volumes can lead to ear fatigue and potential hearing damage. It’s important to monitor volume levels and take breaks to protect your hearing.

Custom-molded earpieces can help alleviate pressure points and provide a more comfortable fit, reducing the risk of ear fatigue.

Additionally, using ambient microphones or vented ear tips can help maintain a better balance between sound isolation and awareness of the surrounding environment.

Floor Monitors (Wedges)

Overview and functionality

Floor monitors, also known as stage monitors or wedges, are speaker cabinets specifically designed for live performances. They are typically placed on the stage floor, angled upwards towards the performers, ensuring that the audio is directed at the musicians rather than the audience.

Floor monitors provide musicians with a clear and balanced mix of instruments and vocals, allowing them to hear themselves and their bandmates during a performance.

The audio mix for floor monitors is created by a monitor engineer or sound technician, who adjusts the levels of each instrument and vocal input based on the performers’ preferences. This mix is separate from the front-of-house mix, which is tailored to the audience’s listening experience.

The monitor mix, when using wedges, can be either a single mix shared by all band members or individual mixes for each performer, depending on the complexity of the performance and the available equipment.

Floor monitors come in various sizes and configurations, including passive and active designs. Passive monitors require an external power amplifier to drive the speakers, while active monitors have built-in amplifiers, simplifying the setup process.

The choice between passive and active floor monitors largely depends on the specific requirements of the performance, the available budget, and the preferences of the sound engineer and musicians. Here is an article explaining how to set up stage monitors; click the link to check it out.

Floor monitors are a vital tool for live performers, delivering a mix of instruments and vocals that enables musicians to stay in sync with their bandmates and maintain a high-quality performance.

Their familiarity, ease of use, and versatility make them a popular choice for a wide range of live performance scenarios.

Here are a few examples of powered (active) floor monitors from a wide range of prices, delivering excellent results and used extensively in the industry by professional sound engineers:

  • JBL Professional Portable 2-Way Self-Powered Monitor
  • Electro-Voice Coaxial Monitor
  • Samson 2-Way Active Stage Monitor

Pros of Floor Monitors

1. Familiarity and ease of use

Floor monitors have been a staple in live performances for decades, making them a familiar and comfortable choice for many musicians.

Their simple setup and ease of use during performances allow musicians to focus on their performance without worrying about complex monitoring systems.

2. Lower upfront cost

Compared to IEMs, floor monitors generally come with a lower initial cost, making them a more budget-friendly option for some performers, particularly those just starting or on a tight budget.

3. Shared monitoring experience among band members

Unlike IEMs, which provide individualized mixes, floor monitors enable a shared monitoring experience. This allows performers to hear the same mix, fostering better communication and cohesion among band members on stage.

4. No reliance on batteries or wireless technology

Floor monitors are typically hardwired to the mixing console, eliminating the need for batteries or wireless systems. This removes the risk of battery failure or signal interference during a performance, ensuring a more stable and reliable monitoring experience.

Cons of Floor Monitors

1. Limited sound quality and consistency

Floor monitors might not deliver the same level of sound quality and consistency as IEMs, making it more challenging for musicians to hear their instruments and vocals clearly.

The sound quality from floor monitors can also be affected by the acoustics of the venue and the position of the monitors on stage.

2. Increased stage volume and potential for feedback

Using floor monitors contributes to higher stage volume, as the sound from the monitors can bleed into the audience and other microphones on stage.

This increases the risk of feedback issues, which can be disruptive and challenging to manage during a performance.

Dealing with feedback issues is not easy, but there are ways to minimize it and achieve loud volumes while avoiding feedback. Here is an article that explains how to stop feedback on stage.

3. Restricted mobility and stage clutter

Floor monitors can limit a performer’s mobility on stage, as they must remain within the monitor’s coverage area to hear their mix clearly.

In addition, floor monitors can contribute to stage clutter, which can be a challenge in tight spaces and make it more difficult for performers to move around freely.

4. Difficulty in achieving the perfect mix for each performer

Creating an ideal mix for each musician can be challenging with floor monitors, especially when sharing the same audio source.

This makes it challenging to cater to individual preferences, and performers may struggle to hear specific instruments or vocals clearly, potentially affecting the overall performance quality.

Factors to Consider When Choosing a Monitoring Solution

1. Budget and cost-effectiveness

When selecting a monitoring solution, it’s essential to consider your available budget and weigh the cost-effectiveness of each option.

Consider not only the upfront costs but also the ongoing maintenance and replacement expenses associated with each solution.

While IEMs might have a higher initial cost, they could offer long-term benefits regarding sound quality and performance enhancement.

2. Performance environment and venue size

The size and acoustics of your performance venue can significantly impact the effectiveness of your chosen monitoring solution. IEMs are generally better suited for larger venues or those with challenging acoustics, as they provide a more consistent and personalized listening experience.

On the other hand, floor monitors may be sufficient for smaller venues where sound reinforcement and isolation are less critical.

3. Musical genre and onstage dynamics

The style of music you perform and the dynamics of your stage presence may also influence your choice of monitoring solution.

IEMs can offer better mobility for performers who engage in choreography or move around the stage frequently, as they aren’t limited by the position of floor monitors.

Conversely, floor monitors may be more suitable for bands with a stationary setup or those who prefer a more traditional, shared monitoring experience.

4. Performer preferences and adaptability

Lastly, consider the preferences and adaptability of the musicians involved in your performance. Some performers may prefer one monitoring solution over the other based on past experiences or personal comfort.

In addition,  each musician’s adaptability, as switching from one monitoring solution to another may require a period of adjustment.

It’s essential to find a monitoring solution that best suits the needs of your performers to ensure the best possible live performance experience.

Hybrid Monitoring Solutions

Combining In-Ear Monitors and Floor Monitors for Flexibility

A hybrid approach to monitoring combines the use of both in-ear monitors (IEMs) and floor monitors (wedges) to create a more flexible monitoring environment.

This setup allows performers to choose the monitoring solution that best suits their individual needs while still maintaining a shared monitoring experience for those who prefer it.

For instance, a lead vocalist might opt for IEMs to have better control over their mix, while other band members use floor monitors for a more communal listening experience.

Benefits And Challenges of Implementing a Hybrid System

Implementing a hybrid monitoring system can offer the best of both worlds, providing the advantages of both IEMs and floor monitors. Some of the benefits include:

  1. Greater flexibility: A hybrid system allows each performer to choose the monitoring solution that best meets their needs and preferences, improving overall comfort and performance quality.
  2. Enhanced sound control: Combining IEMs and floor monitors allows for better control over stage volume, as some performers can reduce their reliance on loud floor monitors.
  3. Adaptability: A hybrid setup can cater to various performance situations and accommodate different performers’ needs, making it a versatile option for touring bands or multi-act events.

However, implementing a hybrid system also presents some challenges. Here are a few to take into consideration:

  1. Increased setup time and expense: A hybrid system may require additional equipment, such as wireless transmitters for IEMs and extra floor monitors, increasing the overall cost and setup time.
  2. Complex mixing process: Managing a combination of IEM and floor monitor mixes can be more complicated for the sound engineer, as they must balance individual and group monitoring needs.
  3. Potential for phase and feedback issues: Using IEMs and floor monitors can increase the risk of phase and feedback problems, requiring careful attention to monitor placement and mix levels.

When considering a hybrid monitoring solution, weigh the benefits against the challenges to determine if it’s the right choice for your performance needs.

Tips for Making the Most of Your Monitoring System

Ensuring Proper Fit and Comfort for In-Ear Monitors

To maximize the benefits of in-ear monitors (IEMs), ensuring a proper fit and comfort is essential. Choosing the right ear tips is crucial for sound quality, noise isolation, and overall comfort.

Experiment with different sizes and materials to find the best ear fit. Alternatively, consider investing in custom-molded earpieces that are tailored to your unique ear shape, providing optimal comfort and sound quality.

Optimizing Floor Monitor Placement and Angling

For floor monitor users, strategic placement and angling can significantly improve sound quality and minimize feedback issues. Place monitors at an angle that directs sound toward the performers’ ears while avoiding microphone pickup patterns to reduce the risk of feedback.

Experiment with different positions and angles to find the sweet spot that provides the best monitoring experience without causing unwanted noise issues.

Communicating With Sound Engineers and Band Members

Effective communication with sound engineers and fellow musicians is key to achieving the best monitoring experience, regardless of the solution you choose. Be clear about your monitoring preferences and any specific requirements you have for your mix.

Regularly discuss your monitoring needs with your sound engineer and band members to ensure everyone is on the same page and can work together to optimize the monitoring setup.

Regularly Assessing and Updating Your Monitoring Setup

Evaluate your monitoring setup regularly and make necessary adjustments to adapt to changing performance needs and environments.

Whether it’s altering the mix levels, repositioning floor monitors, or replacing worn-out ear tips, regular assessment and maintenance can help you maintain a high-quality monitoring experience.

Additionally, stay informed about new technologies and developments in the world of live sound monitoring to ensure you’re always using the most effective solutions for your performances.

Conclusion

In-ear monitors and floor monitors each have their own set of advantages and drawbacks. IEMs generally offer superior sound quality and mobility, while floor monitors provide a familiar and shared monitoring experience.

Choosing the right monitoring solution is crucial for ensuring optimal performance quality and a positive experience for both musicians and audiences.

When deciding between in-ear and floor monitors, carefully weigh the pros and cons while considering personal preferences, venue size, musical genre, and budget. Considering these aspects, you can make a well-informed decision that best suits your live performance needs.

If you liked this article, consider sharing it with others, and don’t forget to visit our website to explore more articles like this one by clicking here. Thank you for reading my blog.

What is an Audio Mixer Used For?

An audio mixer is an essential tool in audio production, and its primary function is to accept and combine multiple audio signals into a single (Mono) or multiple (Stereo) output configuration while allowing the audio engineer to adjust the levels, apply signal processing, and route the audio to different outputs.

Mixing consoles are widely used in different audio production environments, such as recording studios, live concerts, church worship services, broadcasting, and film and television production.

In this article, I will briefly discuss the various functions of an audio mixer and how it can help you create high-quality audio.

But if you already know what is an audio mixer used for and are more interested in learning about the different parts of an audio mixer and what they do, and how to use them, check out our article about mixing console basics, which presents a short to the point explanation of the different sections of a mixing console so that after identifying the role of each knob, you can use it correctly.

Basic Functions of an Audio Mixer

If you are wondering what does an audio mixer do? In simple words, the most basic functions are:

  • Adjust the levels and balance of multiple audio signals.
  • Apply signal processing.
  • Route the audio to different outputs.

In addition to these basic functions, more advanced audio mixing consoles may also have additional features, such as:

  • Monitor Control – The mixer may have a dedicated section for controlling the volume levels of monitors, allowing the musicians and performers on stage to hear the mix accurately.
  • Talkback – The mixing console may have a talkback feature that allows communication between the engineer and musicians or performers in the recording booth.
  • Aux Sends – The mixer may have multiple aux sends, which allow the engineer to send a portion of the audio signal to a separate output, such as a monitor mix or an effects processor.
  • Panning – The mixer may have a panning control, which allows the engineer to adjust the stereo placement of each instrument in the mix.

These functions allow the sound tech to create a polished and professional sound for live sound reinforcement or recording purposes while providing greater flexibility and control over the audio signal. Let’s explore these basic functions in more detail.

Level and Balance Control Function

An audio mixer’s level and balance control function are one of its essential features. The mixer allows the sound engineer to adjust the volume levels of each input signal and balance them appropriately.

The engineer can adjust each signal’s level, ensuring every instrument or vocal is heard clearly and at the right level in the mix.

The balance control feature also allows you to adjust the level of each instrument in the stereo field, ensuring that every instrument is placed correctly in the mix.

In a live concert or recording studio, where several instruments and microphones may be placed at different locations, the audio mixer’s level and balance control function help create a cohesive sound. Without it, the audio may sound unbalanced, and some instruments or vocals may not be heard clearly in the mix.

Signal Processing

An audio mixer’s signal processing feature is crucial in audio production as it allows the engineer to set the equalization, add effects, compression, and other processing to each input signal.

Equalization

Equalization (EQ) is a signal processing tool that adjusts an audio signal’s frequency response. EQ can be used to create a balanced and polished sound by boosting or cutting specific frequencies in an audio signal.

The audio engineer can adjust the level of each frequency range by turning the corresponding EQ knob on the mixer. However, EQ should be used judiciously to avoid creating an unnatural or unbalanced sound.

Some mixers have advanced EQ features, such as parametric and graphic EQ, allowing more precise adjustments.

Knowing how to correctly EQ different sound sources is key to getting a clear and balanced mix.

Effects

The audio signals can be routed through the mixer’s internal or external signal processing sections, and various settings can be adjusted to enhance the sound quality or create specific effects.

For instance, the sound engineer might want to add some reverb or delay to create a more atmospheric effect. Using the effects section on the audio mixer allows for precise control over the intensity and level of each effect.

An alternative option would be to route the signal to an external effects unit to add these effects in real-time and adjust them as needed. We will expand some more on this in the next section.

Compression

Compression is a signal processing tool used to control the dynamic range of an audio signal. It works by reducing the volume of loud sounds and increasing the volume of soft sounds automatically, in real-time, thereby making the overall volume of the audio signal more consistent.

The compression level should be adjusted carefully because too much compression can make the sound dull and lifeless, while too little compression can result in an unbalanced mix that’s all over the place.

One common application of compression is in live sound reinforcement, where it prevents feedback by reducing the signal volume automatically when it reaches a certain level.

If available, I recommend using the audio compressor because compression can help to bring out the details in performance and to create a more polished sound.

In summary, the signal processing feature of an audio mixer is used to shape the sound of each instrument or vocal in the mix, making it sound more polished and professional.

Routing Function

The routing function of a mixing console is essential in situations where the audio needs to be sent to different destinations.

For instance, in a live concert, the audio engineer may need to send the main mix to the front-of-house (FOH) speakers for the audience to hear while also sending a separate mix to the stage monitors for the performers to hear themselves.

With a mixing console, multiple mixes called subgroups can be created and routed to different outputs as required. A couple of examples are sending one mix to a multitrack recorder and another mix for online streaming or broadcasting purposes.

The routing function of an audio mixer also helps to prevent feedback in live concert situations by isolating certain signals to specific outputs.

Another essential aspect of the routing function is the ability to insert external processing devices into the audio signal path.

This function is useful for inserting external effects, such as reverb or delay, into the audio signal path. It also allows for the insertion of external processors, such as compressors or equalizers, to further process the audio signal.

Recording Purposes

An audio mixer is also used for recording purposes in recording studios and can also be used to record live performances if necessary.

In a recording studio, the mixer combines multiple audio signals into a single or multi-track recording.

The engineer can adjust the levels and balance of each signal and apply signal processing as needed to create a cohesive sound.

The recorded audio can then be mixed and mastered to create a finished product. The audio mixer’s ability to record multiple audio channels makes it an essential tool in the recording process.

Digital Audio Mixer

Digital audio mixers have become increasingly popular in recent years due to their advanced features and capabilities.

Although digital and analog mixers do the same job, each one has advantages and disadvantages which sets them apart.

Digital mixers use software to process audio signals, allowing the engineer to store and recall settings easily. This makes it easier to set up the mixer for a specific session or event quickly.

Digital mixers also offer advanced signal processing capabilities and can even automate some mixing tasks. For instance, the mixer can adjust the volume levels of individual instruments or vocals automatically, allowing the engineer to focus on other aspects of the mix.

The ability to store settings in digital mixers makes it easier for engineers to recreate the same sound from previous sessions. They can also be used to record the performance with the touch of button, they can even do multi-track recordings easily while delivering excellent quality.

On the other hand, analog mixers use analog electronic devices to operate. They have one control per function, all of which are visible and accessible on the control panel.

You can quickly see what’s happening in the mixer and adjust where necessary. These mixers are perfect for live sound and for recording too.

Analog mixers have fewer onboard sound effects than digital models. If you want to get advanced audio effects and sound processing systems, you must buy external hardware for that.

Analog and digital mixers are both widely used, and each has its own set of advantages and disadvantages. Ultimately, the choice between the two types of mixers depends on personal preference and the intended use of the mixing console.

Managing Sound Quality with Audio Mixer

One of the most crucial functions of an audio mixer is managing the overall sound quality of the mix.

The mixer’s various features, such as level and balance control, signal processing, and routing, all work together to create a cohesive sound.

The audio engineer can use the mixer to adjust the sound quality of each input signal, shaping the sound to fit the overall mix.

The mixer’s EQ section allows the engineer to adjust the tonal balance of each input signal, ensuring that the mix sounds balanced and pleasing to the ear.

The overall sound quality of the mix can also be improved by applying compression and other signal processing techniques, making the mix sound more polished and professional.

Conclusion

In conclusion, an audio mixer is an essential tool in modern audio production, used in recording studios, live concerts, and broadcasting.

The mixer’s various functions, such as level and balance control, signal processing, and routing, all work together to create a cohesive sound.

The mixer’s ability to manage overall sound quality is crucial in creating a polished and professional sound.

The introduction of digital mixers has made it easier for audio engineers to process audio signals, automate certain tasks, and store settings for future use.

Rock Your Event with this Comprehensive Live Sound Checklist

A live event can be a memorable experience for everyone involved but requires careful planning and attention to detail.

As an audio engineer, sound quality is one of the most critical aspects of event planning. A poorly executed sound system can ruin an otherwise great event, while high-quality sound can elevate the experience and create lasting memories.

A live sound checklist is an essential tool to help you stay organized and focused on the critical tasks at hand and should be divided into five parts:

  • Pre-Event Planning
  • Equipment Setup
  • Sound Check
  • During the Performance
  • Post-Event Cleanup

To ensure that your event is a success, we have compiled a comprehensive live sound checklist covering everything from pre-event planning to equipment setup and testing that you can download and print to help you get started. Without further ado, let’s dive in.

Pre-Event Planning

The first step in a successful live sound event is pre-event planning. It’s essential to gather information about the event, the venue, and the equipment needed to achieve the best sound possible.

Here are some essential items to include on your pre-event planning checklist:

Confirm the date, time, and location of the event.

This step ensures that everyone involved is on the same page regarding the event details, and it’s crucial to avoid any confusion or scheduling conflicts.

Don’t forget to also verify the date and time with the performers to ensure that they are available and confirm the start and end times of their performance.

The event’s location must also be confirmed to ensure that the audio equipment and setup are appropriate for the space.

Obtain a floor plan and a technical rider.

A floor plan provides a visual representation of the space where the event will take place, which can help you plan the layout of the equipment and speakers.

It should include the dimensions of the performance space, the location of the stage, and any potential obstacles, such as pillars or fixed objects.

The floor plan should also indicate the location of power outlets and cable runs. The audio engineer can use the floor plan to plan ahead the speaker placement and microphone positioning, ensuring that the audio coverage is even throughout the venue.

If a floor plan isn’t available, I recommend visiting the venue or where the event will take place to familiarize yourself with the area.

The technical rider is a document that outlines the technical requirements of the performers, including the type and number of microphones, DI boxes, and other audio equipment needed for the performance.

The technical rider is typically provided by the performers or their management and is essential for the audio engineer to plan the necessary equipment and setup.

Determine the size of the audience and the scope of the performance.

This helps you determine the sound system and equipment required to effectively reach and engage the audience.

The audience size plays a critical role in the audio equipment selection process. The audio engineer must know the approximate number of people attending the event to determine the appropriate number of speakers and amplifiers needed to ensure the sound reaches every listener.

The scope of the performance refers to the type and style of the performance, the number of performers, and the instruments being used. The audio engineer must understand the performance scope to determine the type and quantity of audio equipment needed for the event.

Review the performance schedule and the order of the acts.

Understanding the performance schedule can help you plan the sound for each act and make necessary adjustments based on the performance order.

Determine the audio equipment needed.

This includes microphones, cables, mixers, amplifiers, and speakers. It’s important to consider the quality, quantity, and type of equipment needed to achieve the desired sound.

Plan for backup equipment in case of failure or malfunction.

It is vital to have backup equipment in case of a malfunction or failure of any gear during the performance.

Having extra mics, cables, DI-Boxes, speaker cabinets, monitors, and a backup mixing console ensures you have backup equipment in case of a major equipment failure.

Create a stage plot and a monitor mix plan.

A stage plot is a diagram that shows the location of each performer and their equipment on stage.

A monitor mix plan specifies the mix requirements for each performer, which can help you adjust the sound to each performer’s needs.

Create a Font-of-House (FOH) floor plan.

A front-of-house floor plan is a diagram that shows the location of each audio source on the stage relative to the FOH speaker placement according to the size and acoustics of the venue.

This plot helps the sound engineer know the scope of the event to plan accordingly and make a quicker setup.

Set up a communication plan with the performers, the stage crew, and the event staff.

Clear and effective communication is essential to ensure everyone involved in the performance is on the same page and working together effectively.

The sound engineer should establish clear communication channels with the performers, the stage crew, and the event staff.

The communication channels can be walkie-talkies, radios, headsets, or hand signals and should be tested to ensure they work correctly before the event.

Another thing to remember is that the communication plan should establish a clear chain of command and communication protocols.

The audio engineer is responsible for designating a point of contact for each performer, stage crew member, and event staff member. It should also establish a clear protocol for requesting assistance, notifying of technical issues, and providing updates during the event.

So, briefing the performers, stage crew, and event staff about the communication plan and protocols is critical in ensuring that things go smoother during the event.

this image shows the pre-event planning checklist

Equipment Setup

Once you’ve completed your pre-event planning, it’s time to set up the audio equipment. Equipment setup is crucial to the sound quality and effectiveness of the performance.

Here is a list of items you should include on your equipment setup checklist:

Set up the power distribution plan.

Proper power distribution ensures that each piece of equipment receives the necessary power without overloading the circuit breakers.

This prevents equipment failure during the performance and equipment going off due to overloaded electric circuits in the venue.

Before setting things up, the sound engineer must understand the power requirements of each piece of audio equipment, including the amplifiers, speakers, mixing consoles, and effects processors, and must also understand the power capacity of each outlet to ensure that the power supply is adequate to support the audio equipment and setup.

You should also establish a clear plan for power distribution to each piece of audio equipment. This may involve using power distribution boxes, power strips, and extension cords to distribute power evenly throughout the venue, thus avoiding overloading the electric circuit.

Test power outlets before connecting the equipment.

Thisensures that all equipment is connected to a reliable power source. For this, you can use a digital multimeter or voltage tester to confirm that there is power on the outlets, that it’s wired correctly, and that the voltage is within normal range. 

Test each piece of equipment to ensure it’s working correctly.

Testing each piece of equipment beforehand helps you ensure that all the equipment you bring to the event is in good working order, which helps you avoid any issues during the setup process and performance.

Set up the audio equipment.

At this point, you can start setting up the equipment according to the floor plan and the stage plot.  

The crew should use the floor plan to place the speakers, subwoofers, and other audio equipment in the appropriate locations identified in the floor plan to achieve even and balanced sound coverage throughout the venue.

Using the stage plot, the crew should also place the microphones, monitors, and other equipment on stage to ensure that each performer can hear themselves and each other clearly.

Proper miking techniques for instruments such as drums, electric guitars, acoustic guitars, and bass, and correct equipment placement ensures that the sound reaches the audience in the best possible way while avoiding feedback.

Label all cables and connectors.

Proper labeling ensures that each piece of equipment is connected correctly and helps you prevent confusion and mistakes. Labeling also makes troubleshooting easier.

My advice is always to label and document your connections. Labeling the stage box and cables can save you precious time when you are in a hurry to troubleshoot and fix a problem.

You can use colored tape and a marker to label your cables or buy multi-color cable labels to make things even better and easier to identify.

Set up any effects needed for the performance.

Effects such as reverb, delay, or chorus can add depth and character to the sound, and adjusting them to the room acoustics can enhance the sound quality.

As a sound engineer, you must understand the specific style of music to determine which effects are needed for the performance.

You should also consider the acoustics of the venue and the audience’s location when setting up the effects. This may involve adjusting the effects’ parameters to suit the venue’s specific needs or performance.

Test the effects during the sound check process to ensure they function correctly and the sound quality is clear and balanced.

this image shows the equipment setup checklist

Sound Check

Once the equipment is set up, it’s time to conduct a sound check with the performers. A sound check is an essential step in ensuring that the sound is clear and balanced for the audience and performers.

Here are some essential items to include on your sound check checklist:

Conduct a line check.

A line check involves verifying that all the audio equipment is connected and that the audio signal is transmitted correctly throughout the system without noise.

This involves testing the microphones and instruments individually and adjusting the levels and settings as necessary to achieve the desired sound quality.

Check and adjust the levels of each audio source.

Properly balanced sound is essential to ensure that each instrument and voice can be heard effectively.

In this step, you should set the correct gain for each microphone and instrument to avoid distortion and saturation on the audio signal. It is also crucial to ensure that the gain staging between the different equipment is correctly set.

Doing this guarantees that each audio source is balanced and leveled correctly in the mix, delivering excellent sound quality throughout the venue.

Remember that each audio source is different, and the goal here is to adjust the levels accordingly to ensure that each sound source is appropriately balanced in the overall mix.

Adjust the EQ of each audio source.

EQ is critical to enhancing the clarity and fullness of the sound. Don’t overdo it because it will negatively impact the overall sound.

Take your time to understand the mix and adjust the EQ for each sound source as necessary to create a clear and cohesive mix.

And don’t forget that in any live sound setup, the vocals are the most important part of the mix, so take special care when setting up the EQ for the vocals.

Set up the front-of-house mix.

Setting up the front-of-house mix is essential for ensuring the sound is balanced and clear for the audience.

The front-of-house mix is the audio mix that the audience hears, and if properly set up, the sound can be balanced, smooth, and clear, which can positively impact the audience’s experience of the performance.

Set up the monitor mix for each performer and adjust it to their liking.

The monitor mix is crucial for each performer to hear themselves and others clearly, and it can enhance the quality of the performance.

A well-balanced and properly calibrated monitor mix can help performers stay in sync with each other, stay on tempo, and perform their best.

As an audio engineer, you must understand the specific needs of each performer to set up a personalized monitor mix.

This may involve asking the performers for their specific preferences regarding volume level, EQ settings, and effects processing. Each performer may require a different mix for them to feel comfortable on stage, and you should adjust accordingly.

Test the monitor and main mix for sound quality and balance.

Testing the monitor and main mix involves playing back audio through the entire sound system and making adjustments as necessary to achieve the desired sound quality and balance.

While testing, it’s crucial to check the sound in different areas of the venue, including the front of house, the back of the house, and any other areas where the audience may be located. This helps ensure that the sound quality is consistent and balanced throughout the venue, enhancing the overall experience for the audience.

Conduct a full sound check with the performers.

A sound check with the performers is essential to ensure that each instrument and voice sounds good in the mix and to identify and resolve any potential issues before the performance.

During the sound check, we want to make any necessary adjustments to the overall mix, including levels, EQ, and effects processing, until we get a cohesive, well-balanced, and clear mix.

Test the system for feedback and other issues.

Testing the system for feedback and other issues is necessary to catch potential issues. In this step, you might have to troubleshoot the sound system if necessary to find and fix the problems. This step is crucial to avoid any disruptions during the performance.

In case of feedback, you might have to shift the speaker, monitor, or microphone positions to avoid being in close proximity. You can also use a feedback eliminator to help you ring out feedback.

this image shows the sound check checklist

Performance

During the performance, it’s crucial to be attentive and responsive to the performers’ needs and the sound quality and be ready to deal with potential problems that can arise.

Here are some items to include on your performance checklist:

Monitor the sound quality and adjust as needed.

This step involves constantly monitoring the system’s audio output to ensure that the sound quality is consistent and balanced throughout the venue.

Monitoring the sound quality is crucial to ensure each performer is heard correctly.

Monitor the performer’s monitoring mix.

During the event, don’t forget to continuously check the monitor mix for each performer to ensure that they can hear themselves and the other performers clearly, and watch out for cues from the performers to adjust accordingly.

Communicate with the performers and crew.

This step involves listening carefully to the performers and observing their movements to anticipate their needs and respond quickly to any issues that may arise.

During the event, be prepared to respond quickly to any requests or cues from the performers. This may involve adjusting the monitor mix level or the overall mix or making any other necessary adjustments to the audio equipment to address any issues that may arise.

Remember that previously we talked about setting a communication plan between the sound engineer, crew, and performers. This is where the communication plan comes in handy when you want to communicate with them in the middle of the performance without it being obvious.

So, paying attention to the performers and constantly making eye contact is crucial to watch for cues. You can use specific hand or signal gestures to communicate with the crew and performers. This ensures quick response when trying to solve issues during the performance.

Be prepared to troubleshoot any issues that arise.

Being prepared to troubleshoot any issues is crucial to avoid any disruptions during the performance. Having a sound system troubleshooting plan will help you shave out a lot of time, keeping to the minimum any disruptions.

Having a few tools on hand, such as a multimeter, flashlight, screwdrivers, cable tester, etc., will help the crew tackle any problems as they arise.

This is where backup equipment helps minimize the disruption time, as you can quickly swap and change the faulty element.

Ensure that the sound quality remains consistent.

Consistent sound quality is essential to maintain the audience’s attention and engagement. Avoid making quick and exacerbated changes in volume or EQ levels.

Only do small incremental changes instead to keep things smooth. Remember, you don’t want the audience to notice any sudden changes.

this image shows the during the performance checklist

Post-Event Cleanup

After the performance is over, it’s essential to clean up and ensure that all equipment is stored correctly and maintained.

Here are some items to include on your post-event cleanup checklist:

Power down and disconnect all equipment.

Properly powering down and disconnecting the equipment in a specific order is a good practice and helps avoid potential damage to the equipment.

Start powering down the amplifiers, powered speakers, subs, and monitors. Then go for the mixer and rack-mounted systems.

Clean and store all cables and Equipment.

Storing cables and connectors correctly helps ensure they are ready for the next performance and avoid confusion.

It’s a good practice to clean the cables before storing them. You can use a damp cloth to run the cables through to clean any dust or dirt picked up during the performance.

If necessary, also use a clean, lightly damp cloth to clean the dust-off speaker cabinets and monitors as well.

Don’t forget to remove unnecessary labels to avoid having sticky cables in your next performance.

Pack all equipment in protective cases.

This step ensures that the audio equipment is protected from damage during transport and storage, which helps to prolong the equipment’s lifespan and reduce repair costs.

Only use high-quality protective cases that are specifically designed for the equipment.

Don’t forget to take special care of the microphones, as they tend to be delicate, especially if you use condenser or ribbon microphones.

Test identified equipment for damage or malfunction.

If you have problems with cables, microphones, or any other equipment, set it aside and label it to make sure to test it and repair it before the next performance.

If they are beyond repair, remove them from the good equipment and label them so the crew knows the equipment is faulty or needs repair.

Review the performance and identify areas for improvement.

This step involves reviewing the performance and assessing the sound quality and the overall audio production to identify areas for improvement for the next performance.

A good practice is to record the performance, and during spare time, the sound engineer should listen to it to assess the sound quality and identify any issues that may have arisen during the event. This may involve listening to each audio source individually to identify any problems or areas for improvement.

Provide feedback to the performers and the event staff.

Providing feedback to the performers and the event staff can help them improve future events and enhance the quality of the performance.

Debrief with your team.

The debriefing should be structured and collaborative, with all team members encouraged to share their thoughts and feedback.

This may involve using a structured questionnaire or a discussion format to gather feedback and evaluate the performance.

Once the feedback has been gathered, the team should develop a plan to address any issues identified during the debriefing.

this image shows the post-event cleanup checklist

Conclusion

If you are involved with sound systems, never go into an event without a live sound checklist because it will help you stay organized and can help you catch potential issues before they become a problem, ensuring that you have a successful and memorable performance for the audience and performers.

The specific items on the checklist may vary depending on the event, the venue, and the equipment used. Still, the basic principles of planning, organization, and attention to detail apply to all live sound events.

Following the comprehensive checklist provided in this article will help you stay organized and ready, leaving a lasting impression on the audience and performers.

If you liked this article, consider sharing it with others, and don’t forget to visit our website to explore more articles like this one by clicking here. Thank you for reading my blog.

3 Ways to Add a Speaker Management System to a PA System

Whether you have a large PA system with several loudspeakers for a concert venue or a small church sound system, having a loudspeaker management system (LMS), also referred to as a speaker management system (SMS), will take your sound reinforcement system to a whole new level.

This is because an LMS optimizes and enhances the sound output of a speaker system by processing the audio signal to ensure that the output is evenly balanced, clear, and free of distortion and feedback.

To add a speaker management system to your PA system, there are the 3 methods you can use:

  • Full Range – For speakers that don’t require an active crossover.
  • 2-Way – For full range + subs or bi-amped main speakers with no subs.
  • 3-Way – For PA systems using bi-amped main speakers + subs.

Your configuration can be in Mono or Stereo, and the method you choose will depend on the type and size of your loudspeakers.

Keep reading because I will explain each method in more detail so that you can figure out which one will work best for your situation.

Also included in this article are easy-to-follow connection diagrams for each method to make the setup process straightforward. Let’s get started.

A Speaker Management System (SMS) Will Enhance Your Setup

Before we continue, let’s first explore some of the benefits of an SMS and why it will help you improve your PA system’s sound quality.

The primary function of an SMS is to ensure that the sound output is evenly balanced, clear, and distortion-free while helping prevent feedback.

This is achieved through advanced digital signal processing algorithms that allow for fine-tuning of parameters such as equalization, crossover filtering, time alignment, and limiting.

Modern speaker management systems like the ones manufactured by DBX come with AutoEQ™ features that use a microphone to “listen” to the room and use advanced algorithms to accurately and quickly set speaker levels and room EQ in seconds.

This makes the sound engineer’s job more accurate and allows for fast room adjustments without the need for lengthy and annoying broadcasts of pink noise.

A speaker management processor, with the help of the RTA Mic, “listens” for and anticipates potential feedback issues and adjusts speaker output automatically before it even has a chance to become a problem while never altering your sound.

With an LMS in place, sound engineers can rest assured that their sound is of the highest quality, making it ideal for use in various applications such as live performances, concerts, theater productions, and more.

Key Features of Loudspeaker Management Systems

The key benefits of using a loudspeaker management processor include the following:

Digital signal processing: The processing capabilities allow for precise equalization, crossover filtering, time alignment, and limiting, resulting in a more balanced and refined audio output.

Equalization: A loudspeaker management system allows you to fine-tune the frequency response of your speakers, ensuring that the sound is balanced and clear.

Crossover filtering: The system separates the audio signal into different frequency ranges and sends each range to the appropriate speaker. This helps prevent damage to the speakers and ensures the sound is clear and distortion-free.

Time alignment: The system synchronizes the arrival time of the audio signal at each speaker, improving sound quality and clarity. Very helpful for large venues and outdoor concert arenas.

Limiting: The system protects the speakers from damage by limiting the audio signal level while preventing distortion.

Feedback suppression: An SMS can be equipped with feedback suppression technology that helps to reduce or eliminate the feedback that can occur when the sound from a loudspeaker is picked up by a microphone and then amplified, creating a loop.

Ring-out feedback: Ring-out feedback is the process of testing a loudspeaker system for feedback frequencies and reducing or eliminating them. A loudspeaker management system can simplify this process by providing a graphical interface or automated tools that can quickly identify feedback frequencies and help to resolve the issue.

Best Loudspeaker Management Systems

There are several SMS in the market, but the best loudspeaker management systems for most applications are the dbx DriveRack PA2 and the Behringer Ultra-Drive Pro DCX2496.

There are also software-based SMS that run on dedicated server computers and are intended for larger, more professional setups, which is beyond the scope of this article.

As for the setup process explanation and the setup diagrams referred to in this article, I will use the dbx DriveRack PA2 as the reference for each setup explained in this article.

The reason is that this is an excellent system used extensively in sound system setups, and I have used it for many years. It is the standard loudspeaker management processor used worldwide by most sound engineers offering professional features at an excellent price. 

Without further ado, let’s continue with the three methods you can use to install it with your PA system.

Full Range Configuration

This configuration is the easiest to set up, and it’s suited for full-range systems that don’t require an active crossover.

In this case, the speaker management system will send a full range signal (20 Hz – 20 kHz) through one or more of the output pairs, usually the HIGH output.

There are several ways you can connect full-range speakers using this configuration; here are the most common ones:

  1. Standard – Uses a pair of full-range powered speakers.
  2. Standard and Subwoofer – Uses the sub as the crossover.
  3. All Outputs Full Range – All outputs send a full-range signal.

1. Standard Full Range Configuration

This method is ideal for small sound system setups with only a pair of powered or passive full-range speakers.

In this case, the SMS sends the full frequency range signal (20 Hz to 20 kHz) through the HIGH outputs only. The MID and LOW outputs will be deactivated and will not output any audio.

When using the DriveRack PA2, you can use the setup wizard so that it automatically adjusts the settings according to the size of your system.

Here are the steps you must follow if you choose this configuration method. As mentioned earlier, I will use the DBX DriveRack PA2 as the reference:

  1. With all the equipment turned off, connect your mixer’s output to the SMS’s left and Right input. If connecting in MONO mode, use only the left cable.
  2. Connect the Left and Right speakers to the corresponding connector in the HIGH Output section of the SMS.
  3. Turn on the equipment, run the Setup Wizard, choose MONO if you plan to connect your mixer via a single cable, or select STEREO if your mixer connects through a left and right stereo connection.
  4. In the wizard, select the speaker tuning preset that applies to your system. If your speaker model is not in the presets, you can choose the NOT LISTED option from the tuning list. You can use the control app to check the online database to see if the speaker tuning for your system has been added to the database.
  5. To avoid feedback, activate the Advanced Feedback Suppressor (AFS) to detect and eliminate offending frequencies before they become a problem.

          Here is the diagram to connect your PA system to the speaker management system using the standard full-range configuration.

          2. Standard Full Range and Subwoofer Configuration

          This method is very similar to the first one, but it accommodates a system that includes subwoofers.

          If your PA system uses a pair of full-range speakers and one or two subs that are meant to be integrated with the system, this method will work for your setup.

          In this case, we will use the subwoofer’s crossover network to separate low frequencies.

          But before proceeding with the setup, I recommend you check the setup wizard to see if your speaker and subwoofer are included in the speaker tunning list. If they are, it is better to connect the system using the 2-way configuration method explained in the next section. That way, you can take full advantage of the PA2 SMS features.

          To make the connection, follow the same steps mentioned above, but connect the full range signal from the PA2 to the subwoofer’s input because the powered subwoofer(s) would use its crossover to separate the mid/high frequencies from the low frequencies.

          With this setup, you can still utilize most of the features in the PA2, except the crossover and, in some cases, the limiters – as some powered speaker systems may have built-in limiters which cannot be defeated.

          Here is the diagram showing the connections you need to make if using this configuration.

          3. All Outputs Full Range Configuration

          This configuration is uncommon because a more straightforward approach would be to use the “Standard Full Range Configuration” explained above and then daisy-chain the powered speakers or amplifiers.

          In some rare cases, powered speakers or amplifiers don’t have the parallel connection feature that allows you to daisy chain them; in such a case, this would work perfectly fine.

          Another reason would be if you needed to connect three pairs of stereo speakers while having more control over the speakers from your rack.

          When using the PA2 for this configuration, the LOW, MID, and HIGH outputs will be operational and send a full-range signal ranging from 20 Hz to 20 kHz.

          It’s worth mentioning that you can modify the crossover frequencies as desired. For instance, if your setup requires four full-range outputs and two subwoofer outputs, you can still utilize this configuration by adjusting the crossover settings such that the low frequencies are directed to the subs (using the LOW outputs), and the mid and high frequencies are sent to the main speakers (using the MID and HIGH outputs).

          If this configuration method works for your setup, here are the steps you need to follow to make the connection:

          1. Make sure all the equipment is turned off.
          2. Connect your mixer’s output to the SMS’s left and Right input. For MONO mode, connect only the left cable.
          3. Connect the left and right outputs to the corresponding powered speaker or amplifiers (if using passive speakers). Remember that in this mode, all outputs from the speaker management processor will be full-range unless you make changes in the crossover settings.
          4. Turn on the equipment, run the Setup Wizard, choose MONO if you plan to connect your mixer via a single cable, or select STEREO if your mixer connects through a left and right stereo connection.
          5. If using the DriveRack PA2 LMS, you can choose preset 13, making all outputs full range.
          6. Next, you can experiment with different settings, such as the Advanced Feedback Suppressor (AFS), LIMITER, EQ, etc., to get the sound system running.

          The image below shows the diagram for making this connection using the PA2 loudspeaker management processor.

          2-Way Configuration

          This type of configuration is suitable for systems using full-range main speakers in combination with subwoofers or bi-amped main speakers without subs.

          In this case, the speaker management processor will divide the audio signal into two frequency bands and send the low frequencies to the subs and high/mid frequencies to the full-range mains or, in the case of bi-amped speakers, to the low-frequency drivers and high/mid-frequency drivers respectively.

          When setting up the LMS for this application, only the LOW and HIGH outputs will be activated, while the MID outputs will be deactivated.

          Follow these steps to make the connection:

          1. Make sure all the equipment is turned off before connecting anything.
          2. Connect the output from your mixer to the Left and Right input of the loudspeaker management system (LMS). If connecting in MONO mode, use only the left cable.
          3. Connect the left and right powered speakers or the left and right input of the Hi/Mid amp to the corresponding connector in the HIGH Output section of the LMS.
          4. If using the bi-amped configuration, connect the speaker to the amp.
          5. Run cables from the LOW Output to the left and right powered subwoofers or to the LOW amp.
          6. Turn on the equipment, run the Setup Wizard, and choose MONO if you plan to connect your mixer via a single cable, or select STEREO if your mixer connects through a left and right stereo connection.
          7. In the wizard, select the speaker tuning preset that applies to your system. If your speaker model is not in the presets, you can choose the “NOT LISTED” option from the tuning list. You can use the control app to check the online database to see if the tuning settings for your speaker system have been added to the database.
          8. If worried about feedback, activate the Advanced Feedback Suppressor (AFS) to detect and eliminate offending frequencies before they become a problem.

          Here is the diagram showing the connections you need to make for a 2-way configuration.

          3-Way Configuration

          This setup is appropriate for systems utilizing bi-amped main speakers and subs. In this case, the speaker management processor will separate the signal into three frequency ranges Low, Mid, and High.

          The low frequencies are sent to the subs via the LOW outputs, mid frequencies are sent to the main woofers through the MID outputs, and high frequencies are directed to the high-frequency drivers in the mains through the HIGH outputs.

          This application is usually used in larger sound reinforcement systems with dedicated amplifiers for each frequency range. It can also be used for powered speakers with the correct type of transducer for the specified frequency range.

          The connection is straightforward because all you have to do is route the correct signal to the proper component. Here are the steps to follow when using the 3-way configuration:

          1. Start by ensuring all the equipment is turned off before connecting anything.
          2. Take a pair of cables from the output of your mixer to the Left and Right input of the loudspeaker management system (LMS). If connecting in MONO mode, use only the left cable.
          3. Connect the LOW output of the LMS to the Left and Right subwoofer amplifier or to the powered subs depending on your system.
          4. Take a pair of cables and connect them from the MID output section of the LMS to the left and Right of the MID frequency amplifier or powered speaker with a mid-frequency transducer.
          5. Next, connect the HIGH output of the LMS to the Left and Right inputs of the high-frequency amplifier or to the powered loudspeaker with high-frequency transducers.
          6. If using separate amplifiers for each frequency range, at this point, connect the cables from the amplifiers to the different speakers, namely LOW, MID, and HIGH, respectively.
          7. If using the bi-amped configuration, connect the speaker to the amp.
          8. Turn on the equipment, run the Setup Wizard on the LMS, and choose MONO if you plan to connect your mixer via a single cable or select STEREO if your mixer connects through a left and right stereo connection.
          9. In the wizard, select the speaker tuning preset that applies to your system. If your speaker model is not in the presets, you can choose the “NOT LISTED” option from the tuning list. You can use the control app to check the online database to see if your speaker tunings have been added to the database.
          10. In the LMS wizard, select the 3-way configuration application to activate the crossover network.
          11. To make adjustments such as EQ, Limiter, or feedback suppression, refer to the manufacturer’s manual for your specific model.
          12. If worried about feedback, activate the Advanced Feedback Suppressor (AFS) to detect and eliminate offending frequencies before they become a problem.

          It’s been said that a picture is worth a thousand words; for that reason, the connection diagram shows all the steps mentioned above but in a graphical way. Use it for your reference.

          Final Thoughts

          Adding a loudspeaker management system like the DBX DriveRack PA2 will significantly enhance and improve your PA system by allowing for precise control over each frequency band and channel.

          This results in a clear, balanced, and optimized sound for your audience. The system will automatically compensate for room anomalies, adjust speaker levels and equalize the room, making setup and tuning much quicker and easier.

          If the room or venue is prone to feedback, you can activate the Advanced Feedback Suppressor (AFS) to detect and eliminate offending frequencies before they become a problem.

          By utilizing a loudspeaker management system, you can be confident that your PA system will deliver exceptional sound quality every time.

          If you liked this article, consider sharing it with others, and don’t forget to visit our website to explore more articles like this one by clicking here. Thank you for reading my blog.

          How to EQ Drums to Achieve a Punchy and Balanced Sound

          Knowing how to eq drums is crucial in achieving a balanced and powerful mix, as drums provide the foundation for most music.

          By adjusting the levels of different frequencies for each drum element, you can enhance the overall sound and ensure that each drum sits nicely in the mix.

          There are several approaches when it comes to equalizing drum sets, but here are five guidelines for EQing the different parts of a drum kit that will make your mix balanced yet powerful:

          1. Kick drum: Boost the low frequencies around 60-90 Hz to add thump and depth. Cut around 250 Hz to reduce muddiness.
          2. Snare drum: Boost around 3 kHz for snap and definition. Cut around 300 Hz to minimize boxiness.
          3. Toms: Boost around 4 kHz for attack and definition. Cut around 250 Hz to reduce boxiness.
          4. Overheads: Boost around 10 kHz for cymbal clarity. Cut around 300 Hz to reduce muddiness.
          5. High-Hat: Boost around 10 kHz for clarity. Cut around 600 Hz to minimize the “chick” sound.

          These five guidelines summarize the drum EQ process very well, but there is more to it to get the perfect sound.

          Keep reading because, in this article, I will discuss specific tips and go into more detail about EQing different drum kit parts, including the kick drum, snare drum, toms, overheads, and High-Hat. Plus provide you with easy-to-follow cheat sheets for each drum element for digital and analog mixers. Let’s get started.

          1. How to EQ the Kick Drum

          I like to approach the EQ process of any instrument in a way that enhances the fundamental frequencies while removing the problematic ones.

          The kick drum’s fundamental frequency is around 60 Hz, and the attack is between 3 kHz – 10 kHz. With this in mind, here are the steps I like to follow to EQ a kick drum:

          1. Leave the HPF turned off (High Pass Filter) because we want to allow all the low frequencies to be present.
            • On most analog mixers, the HPF has a cutoff set at 80 Hz, so if the HPF is on, it will cut out the fundamental frequency, and we don’t want that.
            • On a digital mixer, you set the HPF cutoff to any frequency, set it around 50 Hz, and depending on how it sounds, you can tighten or loosen the cutoff frequency as necessary.
          2. Cut the 250 Hz frequency because it creates muddiness in the mix, so reduce it by -4 to -6dB.
          3. Boost the low frequencies between 60-90 Hz by +3 to +5 dB to add thump and depth.
          4. To add more attack, increase the 4 kHz frequency by +3 to +5 dB. For a snappier sound, increase the attack frequency to 10 kHz. For a more acoustic sound, decrease the attack frequency to 2 to 3 kHz.

          If your kick drum sounds like “cardboard,” you could try reducing the 500 Hz frequency by -4 to -6 dB. If it sounds flabby, you can roll up the high pass filter to cut frequencies below 40 Hz to tighten the sound up.

          This can be done with a professional-grade analog mixer, where you can set the cutoff frequency, or with a digital mixer because it allows you to set your cutoff frequencies. With a commercial-grade analog mixer, this step can’t be done.  

          This image shows suggested EQ settings for kick drum using an analog mixer.

          Kick Drum EQ Cheat Sheet

          The following kick drum EQ cheat sheet provides a 4-step process for EQing a kick drum. This will work for digital or analog mixers, working your way through various frequencies to cut or bring out the desired elements of the kick drum.

          Remember to make sure the kick drum fits well with the rest of the mix, listen to it in the context of the full mix, and make any necessary adjustments.

          Lastly, listen to the kick drum in various contexts, such as different song sections, to ensure it sounds consistent and balanced throughout the song.

          this image shows a kick drum cheat sheet in four easy steps

          2. How to EQ the Snare Drum – With Top and Bottom Mics

          EQing the snare drum is a balancing act between adding snap and definition in the highs, cutting boxiness in the mids, and ensuring the snare drum sits well in the mix.

          A snare drum can be miked from the top and bottom to catch all the complex tones, but remember that the equalization of the top mic will be different from the mic set at the bottom. Here is the EQ setting process for both cases.

          Snare EQ From the Top

          When EQing the mic placed on top of the snare, you need to remove frequencies that could make it sound boxy while making sure the snare sounds punchy and with enough snap to be heard clearly in the mix. Here are the steps to EQ a snare drum when miked with a top mic:

          1. Start by turning on the HPF (High Pass Filter) switch to eliminate the unnecessary low-end frequencies for the snare drum. If using a digital mixer, set the HPF cutoff frequency around 50 Hz.
          2. Next, remove the boxy frequencies between 300 – 500 Hz. The 300 Hz frequency will likely be the most problematic, so reduce this frequency by -3 to -6 dB. If it sounds too thin, instead of reducing it at 300 Hz, you might want to boost 200 Hz by +2 to +4 dB.
          3. Add snap and definition to the snare’s sound by boosting the frequencies between 3 – 5 kHz by +3 to +5 dB. This will make the snare’s sound jump out and be present in the mix.
          4. To add more punch to the sound, you can boost the frequencies around 125 Hz by +2 to +4 dB, adding more thickness to the sound.

          Snare EQ From the Bottom

          To capture more of the snare’s buzz or wire sound, sound engineers add a second microphone underneath the drum.

          When using this approach, you must be careful not to have the top and bottom mics out of phase.

          When the mics are out-of-phase, the sound will be thinner; when they are in phase, the sound will be thicker. So, flip the polarity switch on your console if the sound gets thinner as you mix in the snare’s bottom mic.

          Follow these steps to EQ the bottom mic on a snare drum:

          1. Turn on the HPF switch to reduce unnecessary low-end frequencies.
          2. Flip the polarity switch to hear if the bottom end gets boosted. If it doesn’t, and the sound gets thinner, reverse the polarity switch again. All we are doing here is ensuring we have the top and bottom mics in phase.
          3. Remove some of the boxiness by reducing the 250 Hz frequency by -4 to -6 dB.
          4. To add crispiness, you can increase the 3 to 5 kHz range of frequencies. But be very careful here; if you overdo it, it will sound harsh and annoy the audience. Only boost this range of frequencies if the snare drum gets lost in the mix. But still, be very gentle to avoid a harsh sound.
          This image shows suggested EQ settings for the snare drum when using an analog mixer.

          Snare EQ Cheat Sheet – Top and Bottom

          The snare drum is often one of the most prominent instruments in the drum set, so it’s essential to make sure it sounds clear, punchy, and well-balanced.

          The following snare EQ cheat sheet provides a step-by-step guide to setting the EQ for the top and bottom mics and is focused on removing unwanted overtones and boosting the frequencies that give the snare its character.

          With the right EQ techniques and tools, you can create a snare drum sound that stands out in the mix and enhances the overall energy of your song.

          Please keep in mind that these are just starting EQ suggestions, and you need to make adjustments as the specific instrument, mic, and room acoustics are unique for each case.

          how to eq snare drum cheat sheet in four easy steps.

          3. How to EQ Toms

          Depending on the music style, toms can be tuned differently. The high and mid toms will have a higher pitch than the floor tom, so the EQ for each can be slightly different.

          But a good rule of thumb and a good starting point is to reduce boxiness and some of the overtones present in the mid-band and add some attack to make them slightly stand out in the mix.

          Remember that toms are “fill” instruments, meaning they shouldn’t stand out too much, only enough to “fill” specific parts of the song.

          With this in mind, follow these steps to EQ rack and floor toms:

          1. First, turn the HPF off because we want to allow the low frequencies to be present.
          2. Cut around 250 – 350 Hz by -4 to -8 dB to reduce “the cardboard sound” and minimize boxiness.
          3. If you hear that the mix sounds cloudy and the tone is not clear, the tom’s overtones are most likely the problem. To eliminate some overtones, reduce the 600 Hz frequency for a rack tom and around 400 – 500 Hz for floor toms.
          4. If the toms ring and are a bit flabby in the low end, try tightening the low end using a HPF with a cutoff frequency set at less than 60 Hz. This will make the fill toms sound clear in the mix.
          5. At this point, you can boost the fundamental frequency of the rack and floor toms a bit to give them more definition. For rack toms, increase the 125 -150 Hz range of frequencies by +6 dB, and for floor toms, boost the 90 – 100 Hz by +4 to +6 dB to give them more definition in the mix.
          6. Now is necessary to add some attack and clarity to the toms by boosting the 4 kHz frequency by +2 to +4 dB.
          This image shows suggested EQ settings for toms when using an analog mixer.

          Tom EQ Cheat Sheet

          Toms are sometimes referred to as fill instruments, but they are responsible for adding depth and warmth to the drum kit. 

          Having well-equalized toms provide you with a balanced and punchy drum sound, but if not correctly EQed, they can also contribute to a muddied mix.

          This cheat sheet provides easy-to-follow steps that will help you give the toms their body and definition, creating a tom’s sound that will blend well with the rest of the drum kit, enhancing your mix.

          Toms EQ cheat sheet in four easy steps.

          4. How to EQ Overheads

          To EQ overheads, you can choose from two approaches, and the approach you choose will depend on how you have set up the overhead mics.

          You can use the overhead mics to capture the entire drum kit, which captures the drum’s bottom end and tonal characteristics.

          On the other hand, you could use the overheads exclusively for capturing cymbals. This approach produces a more focused sound for the cymbals and eliminates the bottom end and tonal information from other drums in the kit.

          So setting up your mics correctly according to your goal will make EQing the overheads much easier.

          EQ Overheads for Capturing the Whole Drum Set

          Overhead mics are typically positioned high above the drum kit and capture the sound of the entire kit in a room, providing a sense of ambiance and space. So, for this approach, the EQ must include a broader range of frequencies to capture all that sound.

          Follow these steps to EQ Overheads to capture the whole drum set’s sound:

          1. Turn on the high pass filter to avoid picking up unnecessary low-end rumble and low frequencies. If you can set the cutoff frequency of the HPF, like when using a digital console, set it somewhere around 100 – 125 HZ.
          2. At this point, you should check the overhead mics’ polarities to ensure they are not out of phase, making the snare sounds thinner. We want the sound to be thicker and more robust.
          3. If the cymbals sound muddy, cut around 300 Hz by -2 to -4 dB.
          4. To add sparkle and clarity, boost the 10 kHz +2 to +4 dB.

          Please note that your overhead mics will be a few feet above the kick drum to capture the low end. I have written an article showing how to mic a drum set using several approaches, with the overhead method as one of the best options. Click the link to check it out.

          analog mixer suggested EQ settings for overheads focused in capturing the whole drum set

          Whole Drum Overheads EQ Cheat Sheet

          Whole drum set focused overheads EQ cheat sheet divided in three easy steps

          EQ Overheads for Cymbal Focused Approach

          To capture the sound of cymbals more naturally while providing a more focused cymbal sound, overhead mics are used and are equalized to minimize capturing the sound of the other drum elements.

          In this case, we need to reduce most of the lows and mid frequencies while boosting higher frequencies.

          1. Start by turning on the high pass filter to reduce the lower frequencies. If you are working with a digital mixer, roll off the high pass filter to set the cutoff frequency near 2 kHz.
          2.  If you are working with an analog mixer, bring the low-frequency knob to -6 to -10 dB to eliminate frequencies below 250 Hz.
          3. If it sounds muddy, reduce around the 300 Hz frequency by -2 to -4 dB. But don’t take out too much, or it can make the cymbals sound too thin, and we don’t want that.
          4. Add brightness and clarity to the cymbal sound by increasing the 10 kHz by +2 to +4 dB.
          5. If you get a piercing sound, it means that the 3 – 4 kHz needs to be reduced. You can reduce it by – 2 to -4 dB or just enough to make the piercing sound disappear.

          In this case, I also recommend checking the mic’s polarities to ensure they are not out of phase, thinning your sound.

          analog mixer suggested EQ settings for overheads focused in capturing the the cymbals sound

          Cymbals Focused Overheads EQ Cheat Sheet

          cymbals focused overheads EQ cheat sheet divided in three easy steps

          5. How to EQ High-Hats – High-Hat EQ Settings

          The fundamental or body frequencies for the High-Hats are between 280 – 500 Hz, and the overtones can reach up to 16 kHz plus.

          You don’t want to overdo the high-end frequencies with High-Hats, especially in the 4 – 5 kHz range, because it will sound harsh.

          Another thing to remember is that High-Hats tend to be loud enough that, depending on the music and the drummer’s style, in some cases, if overhead mics are used, you don’t even need to mic them.

          But it is also good to have the flexibility and the option of emphasizing the High-Hat sound if necessary. For this reason, putting a mic on the High-Hat should be considered.

          To EQ High-Hats when a mic is placed on top of it, follow these steps:

          1. The high pass filter (HPF) should be on to cut out the low frequencies.
          2. Decrease the low frequencies, anything below 100 Hz, by -6 to -10 dB to eliminate any low frequencies that are getting by.
          3. To add more sizzle, boost around 4 to 5 kHz by +2 to +4 dB.
          4. If the “chick” sound is too profound when closing the High-Hat, try reducing around the 600 Hz frequency bit.
          5. To add more clarity and boost some of those overtones that give the High-Hats that signature sound, boost around the 10 kHz for clarity.
          analog mixer suggested EQ settings for high-hats

          High-Hat EQ Cheat Sheet

          High-hat EQ cheat sheet divided in four easy steps

          Consider the Fundamental Frequencies and the Overtones

          As mentioned previously, all these are starting points for setting the EQ on a drum set. It’s important to remember that a drum’s frequency response can vary depending on the room or the environment where it is played or recorded, and the EQ settings that work well in one environment may not work as well in another.

          This is why you need to consider the correlation between the fundamental frequencies and the overtones of each drum element to adjust accordingly.

          The fundamental frequency is the lowest frequency at which an instrument or sound source vibrates, while overtones are the higher frequencies that are present in addition to the fundamental frequency.

          The fundamental frequency of a drum is determined by the drumhead’s size, shape, and tension, as well as the materials used to construct the drum. The overtones that a drum produces are determined by the same factors, as well as the way the drum is played and the surrounding acoustics.

          The fundamental frequency of a drum is often the most prominent in its sound, while the overtones provide additional harmonics that give the drum its unique character and tone. For example, a kick drum with a fundamental frequency of 60 Hz will also produce overtones at 120 Hz, 180 Hz, and so on, which contribute to the overall sound of the kick drum.

          When EQing drums, it’s essential to consider both the fundamental frequency and the overtones. Adjusting the levels of different frequency ranges can enhance the overall sound of the drums by bringing out the fundamental frequency while also shaping the overtones to create a unique tone.

          In summary, the fundamental frequency and overtones of drums are closely related, and adjusting the levels of different frequency ranges can enhance the overall sound of the drums by bringing out the fundamental frequency and shaping the overtones to create a unique tone.

          Conclusion

          When learning how to EQ drums, remember that it is a crucial part of the mixing process that can greatly enhance the overall sound of a drum kit.

          By understanding the fundamental and overtone frequencies of each drum, and using EQ techniques to remove unwanted frequencies and boost the desired ones, you can create a drum sound that is clear, balanced, and punchy.

          Whether you’re an experienced engineer or a beginner, having a cheat sheet or guide to follow can be extremely helpful in achieving the desired drum sound. But don’t forget that the provided cheat sheets are just starting EQ suggestions, and you need to make adjustments as the specific instrument, mic, and room acoustics are unique for each case.

          Remember that the key to great EQ is to use your ears and always trust your own musical judgment. Happy mixing!

          4 Ways to Mic a Drum Kit for Capturing the Full Sound

          Miking a drum kit can be tricky, but with the proper techniques and equipment, it is possible to capture the full sound of the drums and achieve a well-balanced and powerful mix.

          There are several different ways to mic a drum set, but the four best techniques are:

          1. The Individual Microphone Method – Perfect for live sound.
          2. The Overhead Technique – Works excellent for recording.
          3. Room Microphone Method – Adds a sense of depth and realism.
          4. Hybrid Technique – Works for live sound and the studio.

          Each method has its own set of advantages and disadvantages, and the choice will depend on the specific characteristics of the drum kit, the room acoustics, and the desired sound. So, choosing between these options will depend on what best suits your situation.

          In this post, I will explain how to mic a drum kit using each one of these methods in more detail so that you can choose the method that best suits your needs. Let’s get started.

          1. The Individual Microphone Method – Gives You More Control

          The individual mic technique is a miking method used to capture the sound of each drum kit element, such as the kick drum, snare drum, toms, hi-hat, and cymbals, and it involves using a separate microphone for each drum and cymbal.

          This drum miking method gives you the most control over the mix and the ability to isolate or accentuate specific drums and cymbals. For example, you may want to bring out the snare drum more in the mix, or you may want to reduce the amount of cymbal bleed in the kick drum microphone, etc.

          An essential thing to remember is that it doesn’t matter how great your mic set is if the drum kit sounds terrible; your mic and your miking technique can’t perform miracles.

          So before placing the mics, you need to concentrate on getting a great sound from the drum set, to begin with. With this in mind, let’s continue.

          The Type of Mic Used for Each Drum Element Plays a Key Role

          When using the individual microphone technique, choosing the right mic type and polar pattern for each drum and cymbal is essential, as the sound quality is directly affected by the mics used.

          For example, a dynamic microphone with a cardioid polar pattern is a good choice for the kick drum, as it can handle the high SPLs and reject off-axis sound.

          A condenser microphone with a cardioid or hypercardioid polar pattern is a good choice for the snare drum and toms, as it can provide a more detailed and accurate sound.

          Also, a condenser microphone with a cardioid or super-cardioid polar pattern is a good choice for hi-hat and cymbals, as it can provide a more detailed and accurate sound and reject off-axis sound.

          But please remember that having several condenser mics open-to-air for live sound situations can cause feedback problems. So, limit the usage of condensers and concentrate more on using dynamic mics when dealing with live sound. Condensers will give you excellent results in the studio, as the room’s acoustics is more controlled.

          Microphone manufacturers produce drum mic sets with all the microphones you need to set up and get going. They have taken the time and resources to test and design the perfect mic match for each drum and cymbal.

          Some examples are the AKG Acoustics Drum Set Concert 1, the Audio-Technica ATM-DRUM7, or the  Samson DK707, to name a few.

          But if you are a seasoned sound engineer, most likely you have tested many microphones and have come to have your go-to mics when miking up a drum set. But if you haven’t had the experience, going with a drum mic set is your best bet.

          Mic Placement is Half of the Puzzle

          When learning how to mic drums, it’s essential to note that the placement of the individual microphones is crucial for getting a good sound.

          For example, the kick drum microphone can be placed in front of the outer head and inside the kick drum, pointing towards the beater.

          The snare drum microphone should be placed above and pointing down at the snare drum, but you could also put a mic over and another under to capture the snare’s sound in more detail, and the tom-tom microphones should be placed above and pointing down at the tom-toms.

          I will expand more on mic placement as we go through each individual element of the drum kit. But the thing that is important to note is that even though I can provide you with a specific mic placement guideline, you should always experiment with different mic distances and placements to get the tone you want.

          FURTHER READING: How to EQ Live Sound

          Kick Drum

          Kick drums come in various sizes, and their size can have a significant impact on the sound and how it is miked.

          Larger kick drums tend to have a deeper and more powerful sound, while smaller kick drums may have a tighter and more punchy sound. It’s essential to take the size of the kick drum into account when miking it and choose a mic technique that will effectively capture the sound of the specific drum.

          Choose The Right Microphone

          Dynamic microphones with a cardioid polar pattern are a good choice for the kick drum, as they can handle high SPLs (Sound Pressure Levels), reject off-axis sound, and capture the kick drum’s low-frequency sounds.

          Microphones, such as the Shure Beta 52A or the AKG D112, are excellent choices for miking a kick drum from the outside. Thanks to their large diaphragm, these mics can accurately pick up low frequencies.

          To mic the kick from the inside, using boundary condenser microphones with a half-cardioid polar pattern, such as the Beyerdynamic TG D71C or the Shure BETA 91A, is the way to go.

          How to Place the Mic for Kick Drums

          When it comes to miking a kick drum, you can use several mic positions, each one delivering a different tone.

          One Mic In Front of the Resonant Head

          The most common drum mic position is to place a mic outside the front resonant head, but the sound you get will depend on where you place the mic. For a deeper sound, put it towards the center of the resonant head. For a tighter, more punchy sound, place it towards the rim.

          A good place for the mic to capture the overall sound is to position it in the lower half of the head, about one-third of the drum’s diameter away from the rim. Make sure to put the mic between 1 – 3″ away off the outer head. For this miking method, you can use the Shure Beta 52A or the AKG D112.

          If you have resonance on the front head, use a bass drum dampener to control them. This will help reduce the ring and sustain in the kick drum sound and make it sound punchier.

          If your drum has a front resonant head with a hole, you could also place a mic right at the hole so that it captures the deep, punchy low frequencies.

          Make sure to allow space for the air to escape. If the mic captures the air gust as they escape the hole, try putting the mic further inside the kick drum.

          One Mic Inside the Kick Drum

          This method only works if your drum has a front resonant head with a hole. In this case, you have to put a pillow or drum damper inside the kick drum, and on top of the pillow, you place a boundary mic.

          The mics I recommend for this method are the Beyerdynamic TG D71C or the Shure BETA 91A.

          Place the microphone inside the kick drum, about 6-8 inches from the beater head. Point the microphone at the beater head, not the front head. This will help capture the beater’s low-frequency sounds and avoid capturing resonances from the front head.

          One advantage of this miking technique is that it keeps the bleed from other drums and cymbals to a minimum and will give you lots of low ends because the pillow will act as a dampener, reducing resonances in the front head.

          One Mic Outside and One Inside

          This technique is a hybrid of the two mentioned above. It’s a great option because it allows you to mix the two mics to get a big, fat sound by increasing the level of the boundary mic or get a tighter, more pointy sound by increasing the volume of the external mic.

          In this case, I would use a Shure SM57 for the external mic because it naturally rolls off some of those sub-frequencies that are being picked up in detail by the mic inside the kick drum and use any of the two inside boundary mics mentioned previously, as they will capture the low frequencies in great detail.

          Snare Drum

          There are two ways to mic a snare drum, by placing a mic over the top of the snare or by using two mics, one over the top and one under the snare.

          Placing a Mic Over the Top

          This is the most common miking technique for snare drums, as it captures a good representation of the sound, but as with everything else, mic placement has a lot to do with the sound you’ll get.

          There is no exact formula for miking snares, and you should experiment to get a sound that works for you, but a good starting point is to place the mic between 1.5 to 2” above the head and about 2” from the outside rim. The mic should be angled down between 25 to 45 degrees, taking as a reference the head as the horizontal plane, with the mic’s head pointing towards the center of the snare.

          Placing a Mic Over and Under the Snare Drum

          To capture more of the snare’s buzz or wire sound, consider adding a second microphone underneath the drum.

          Position this second microphone 2 to 4” inches away from the drum and point it toward the snare wires. Experiment with combining this under-snare microphone with the primary over-snare microphone and try reversing the polarity of the under-snare microphone. Use the setting that yields the most low-end frequency for your desired sound.

          Microphone Choice

          You can use several mics, but I have found that what works best for snare drums in live sound are: the Shure SM57, Audix i5, and the Beyerdynamic M201 TG if you like a naturally boosted low-end when miking snares.

          Another excellent easy-to-mount option is the Sennheiser e604 which delivers crisp highs, balanced mids, and clear lows.

          For recording, you can use a small diaphragm condenser mic, and the Audio-Technica Pro 37 is one of the best choices for this purpose.

          Another thing you can try is to use a condenser and a dynamic mic next to each other, then blend the two tones on the mixer to get a signature sound.

          Whatever mic you choose, make sure it has a cardioid or hypercardioid polar pattern to get a more detailed and accurate sound while rejecting bleed from other drum elements and feedback.

          FURTHER READING: How to Set Up a Wireless PA System for Live Sound

          Toms

          When it comes to miking toms, there are many options you can choose from. But the method used by most sound engineers and that delivers the best results is placing the mic near the outer rim of the tom head, pointing down.

          Microphone Position

          A good starting point is to place the mic 1.5 to 2” above the tom’s head and about 2” from the outer rim. The mic should be angled down between 60 to 75 degrees, taking as a reference the head as the horizontal plane.

          There is no exact formula for miking any drum element, and the toms are no exception. This is why experimenting is vital. Use these suggestions as a starting point and go from there.

          With this technique, you need to consider the position of the cymbals. If the cymbals are too close to the toms, you’ll have difficulty isolating the sounds from both drum elements. So, try to get the cymbals as far as possible from the toms as possible, but make sure it is ok with the drummer.

          Microphone Choice

          I recommend using mics with a cardioid polar pattern for miking toms, as they tend to reject high-frequency sounds from behind much better than a hypercardioid or supercardioid mic. And you would usually have a cymbal above the tom. For this reason, a cardioid pattern mic will give much better results.

          For live sound situations, I like to use the Sennheiser e604 because it is a low-profile mic that delivers excellent sound, slightly emphasizing the highs and upper mids while providing open and clear lows.

          Another thing I like about this mic is its clip-on holder, which helps you mount it in seconds, right on the rim of the toms. You can position it any way you want, and wherever you clip it on will sound strong and warm, keeping the dynamics of the sound.

          You could also use the Shure SM57, which will also deliver excellent results, but because this is a bigger mic, you would need to place it on a stand, making it a bit inconvenient.

          For the studio, you can use the Sennheiser MD 421 II, or the Audio-Technica AE3000, both delivering fantastic sound.  

          Hi-Hat and Cymbals

          The Hi-Hat and cymbals tend to be loud elements of the drum set and depending on the music style and the drummer’s style, in some cases, if overhead mics are used, you don’t even need to mic them.

          But it is also good to have the flexibility and option of emphasizing the hi-hat or cymbal sounds if necessary. For this reason, putting a mic on the hi-hat should be considered.

          Mic Placement Over the Hi-Hat

          When miking the hi-hats, position the microphone above the top cymbal at about 3-6 inches, and place it halfway between the center and the outer edge of the cymbal. This will allow you to capture the sound of the hi-hats clearly and accurately while avoiding poppy and ringing sounds when the cymbals open and close.

          Choosing a Mic for the Hi-Hat

          For the hi-hat, condenser microphones with a cardioid or super-cardioid polar pattern are a good choice, as they provide a more detailed and accurate sound in the upper frequencies and reject off-axis sound.

          Industry-standard choices include the Shure SM81, Shure SM137, or the Audio-Technica AT4053B. These choices will deliver an excellent high-frequency response, translating into a crisp, crystal clear hi-hat tone.

          Cymbals Mic Placement

          For the cymbals, if overhead mics are used, don’t add an individual mic, as the overhead mic will do the job. But if you want to mic each individual cymbal, use the Shure SM81 and place it 4 to 6 inches above the cymbal and halfway between the center and the outer edge of the cymbal to capture the full tone.

          FURTHER READING: How to Set Up a Stage Sound System

          2. The Overhead Drum Set Miking Method – Works Great for Recording

          The overhead miking technique is a standard method used to capture the overall sound of a drum kit in live sound situations and the studio. This technique involves using a pair of overhead microphones, typically placed a few feet above the drum kit and aimed down at the drums.

          This technique is useful when you need to capture a balanced sound of the drum kit, and it provides a good representation of the drums and cymbals as they are heard from the audience’s perspective.

          It’s also suitable for capturing the natural room sound and ambiance. This technique is often used as the primary source of the drum sound in the mix, with the individual drum microphones being used to add more definition and control to specific elements of the drum kit if needed.

          Microphone Placement When Using This Method

          It’s important to note that the placement of the overhead microphones is crucial for getting a good sound. Here are three approaches you can use.

          Overhead Spaced Mics

          The first and most common approach is the overhead-spaced microphone technique, in which the microphones are placed about 3 to 6 feet above the drum kit and angled down at a 45-degree angle towards the center of the kit. This will give you the best balance and representation of the drums and cymbals and a good stereo separation.

          You can also use a kick drum mic to accentuate the lower frequencies because the overhead mics will miss the low frequencies in detail due to the distance from the mic.

          For this method, you can use a matched pair set of mics, such as the AKG C414 XLII, which will deliver excellent results. If your budget allows for it, the go-to mic used by many studios for miking drums is the Neumann U87 Ai and the Audio-Technica AT5045 mics.

          The Eddie Kramer Technique

          Another approach is to use the 3-mic technique developed by the legendary producer and sound engineer Eddie Kramer who has worked with artists such as Jimi Hendrix, Led Zeppelin, Rolling Stones, the Beatles, and more.

          With the 3-mic technique, the mics are positioned overhead on the left, center, and right, in a triangle shape over the drums. In addition to the overhead mics, another mic is placed on the kick drum to capture the lower frequencies.

          For the three overhead mics, you can use the Shure KSM44A, and for the kick drum, the Shure BETA 52A.

          Glyn Johns’s method

          The third approach is to use Glyn Johns’s method, also a legendary producer who worked with the Rolling Stones, Eric Clapton, the Eagles, the Who, the Beatles, etc.

          In this approach, three to four mics are used. The first mic should be positioned above the kit, pointing towards the center of the snare drum at about 4 feet. The second mic should be positioned next to the floor tom, pointing across the kit towards the hi-hat, and should be placed around 6 inches above the floor tom’s rim.

          To achieve a balanced sound, these two microphones should be positioned equidistant from the center of the snare drum and panned in a way that spreads the drum kit’s sound evenly across the stereo field.

          This technique works great with most condenser mics, but using three AKG C414 XLII or Neumann U87 Ai would be an excellent choice.

          The overhead technique is a great way to capture the overall sound of a drum kit and provides a good balance between the different drums and cymbals. It’s a widely used technique in the studio, but you can also use it in live sound situations as long as you can control the bleed from other instruments and the feedback. With the proper microphone placement, it can result in a natural and well-balanced drum sound.

          3. The Room Microphone Technique – Adds a Sense of Depth and Realism

          The room microphone technique is used when you want to capture the ambient sound of a drum kit in a live sound situation or in the studio.

          This technique involves using additional microphones placed in the room, away from the drum kit, to capture the natural sound reflections of the room and to add a sense of space, depth and realism to the overall drum sound which can help to fill out the mix.

          It’s also important to note that the room microphone technique works well when used in conjunction with other techniques, such as the overhead technique and the individual microphone technique.

          This allows you to capture the overall sound of the drum kit, the individual elements of the drum kit, and the ambient sound of the room, giving you a well-rounded and balanced drum sound.

          Microphone Placement and Choice

          When using this technique, it is essential to place the microphone to capture the sound as it develops in the room.

          A good starting point to capture the overall sound of the drum kit is to position a pair of microphones 4 to 6 feet in front of the drum set and about 2 to 4 feet above the floor.

          Stereo ribbon microphones like the AEA R88 or the Royer Labs SF-12 are particularly well suited for this task because they deliver a warm, well-balanced tone, as they can capture the full sound of the drum kit in high quality without over-emphasizing specific frequencies.

          Another mic placement method that can work well for the room miking technique is to use a matched pair large diaphragm set of mics, such as the AKG C414 XLII, and place them in the X-Y stereo or A-B stereo configuration. Then position the pair of mics 4 feet or more in front of the drum kit and about 2 to 4 feet from the floor.

          Moving the mics farther away from the drum set will sound more spacious and give the impression of a larger room. The closer they are to the set, the smaller the impression of space.

          4. The Hybrid Technique – Works for Live Sound and In the Studio

          With the hybrid technique, you combine different miking techniques to capture the sound of a drum kit whether in the studio or in a live sound situation.

          This technique can include using overhead microphones, individual microphones for each drum and cymbal, and room microphones to capture the room’s ambient sound.

          This miking method helps capture a more balanced and natural sound of the drum set. By combining microphone types, polar patterns, and positions, you can achieve a more detailed and accurate sound of the drum kit and have more flexibility during the mixing and mastering process.

          When using the Hybrid technique, it’s essential to choose the right microphone type and polar pattern for each individual drum and cymbal.

          For example, using a dynamic microphone with a cardioid polar pattern for the kick drum, a condenser microphone with a cardioid or hypercardioid polar pattern for the snare drum and toms, and a condenser microphone with a cardioid or super-cardioid polar pattern for hi-hat and cymbals.

          Then, you can use overhead microphones, such as condenser or ribbon microphones, to capture the overall sound and balance of the drum kit, and room microphones to capture the ambient sound of the room.

          It’s also important to note that when using the individual microphone technique, the placement of the microphones is crucial for getting a good sound and avoiding feedback.

          When dealing with live sound the individual microphone technique allows for more control over the mix and the ability to isolate specific drums and cymbals. It requires more microphone inputs and careful microphone placement but can result in a more detailed and accurate sound of the drum kit.

          The overhead microphone should be placed a few feet above the drum kit, spaced to the left and right of the drum for good stereo separation and angled down at a 45-degree angle towards the center of the kit.

          The Room microphones should be placed in the best location to capture the desired sound, such as at the back of the room, a few feet from the drum kit, or to the left and right side of the stage.

          The hybrid drum miking method is a powerful tool for capturing a more balanced and natural sound of the drum set. By using a combination of microphone types, polar patterns, and positions. This technique gives you more flexibility during the mixing and mastering process.

          Tips to Avoid Feedback in Live Sound When Using Microphones on Drum Kits

          Feedback is your number one enemy when using several microphones on drum kits in live sound situations. Here are a few tips to help you avoid it:

          Use Directional Microphones:

          Using directional microphones, such as cardioid or super-cardioid, helps reject off-axis sound and focus on the sound coming directly from the drums, thus helping you reduce feedback.

          Use Subtractive Equalization:

          Use equalization to reduce or remove problematic frequencies that are most likely to cause feedback. For example, reducing the level of specific high frequencies can help to reduce feedback caused by cymbals or snare drum.

          Use Drum Shields for Isolation

          Isolating the drums from other instruments and sound sources can help to reduce feedback. For example, using a drum shield around the drum set can help to reduce the sound coming from other instruments and sound sources.

          Good examples of drum shields are the Pennzoni DS6D, or the Pennzoni DS4  acrylic shields will help you reduce the loudness of the drum set, helping you produce better mixes.

          Use a Feedback Suppressor

          A feedback suppressor can help you reduce feedback by analyzing the audio signal and identifying the frequency range of the feedback, then automatically reducing or eliminating the gain in that specific frequency range.

          Something like the DBX AFS2 or the Behringer FBQ1000 is a perfect companion when dealing with live audio situations, as it can help you virtually eliminate feedback.

          Positioning

          Placing the microphones correctly, in the right distance and angle, can help to minimize feedback. For example, placing the kick drum microphone inside the drum and pointing it towards the beater can help to reduce feedback caused by the other drums and cymbals.

          Monitor Levels

          Keeping an eye on the monitor levels and making adjustments as needed can help to prevent feedback.

          Test the sound system before the performance, this will allow you to identify potential feedback issues and make adjustments to prevent them.

          It’s important to note that feedback can be caused by a variety of factors, including the room acoustics, the sound reinforcement system, and the position of the microphones. Therefore, it’s important to be aware of these factors and to make adjustments as needed to reduce the risk of feedback.

          Summary

          In this article, I have shown you how to mic a drum set using different techniques for capturing the full sound for live sound and in the studio.

          • The Individual Microphone Technique involves using individual microphones for each drum and cymbal, such as a microphone on the kick drum, snare drum, toms, hi-hat, and cymbals. This technique allows for more control over the mix and the ability to isolate specific drums and cymbals.
          • The Overhead Technique uses two or more overhead microphones, typically placed a few feet above the drum kit and aimed down at the drums. This technique captures the overall sound of the drum kit and provides a good balance between the different drums and cymbals.
          • The Room Microphone Technique involves in using additional microphones placed in the room to capture the ambient sound of the drums. This can add a sense of space and realism to the overall drum sound.
          • And finally, the hybrid method combines the above techniques to capture a more balanced and natural sound of the drum set, giving you more flexibility during the mixing and mastering process.

          It’s also important to note that the drum sound can vary based on the room acoustics and the sound reinforcement system, so it’s always a good idea to do a sound check before the performance and adjust accordingly.

          And don’t forget to experiment with different techniques and equipment to find the best approach for your specific situation.

          If you liked this article, consider sharing it with others, and don’t forget to visit our website to explore more articles like this one by clicking here. Thank you for reading my blog.

          4-Step Sound System Troubleshooting Plan to Find and Fix Problems

          When running a PA system, things can and will go wrong. Sometimes it’s because of a major component failure, but most of the time, it is because of a simple error such as a device being turned off or being misconnected.

          You could also have everything connected correctly, but you realize that there is no sound from the mixer to the speakers while the audience is waiting for the event to continue.

          While it’s not always possible to prevent technical issues from occurring, having a plan for troubleshooting and fixing problems can help you minimize disruptions and get back to running your event smoothly.

          Here are the 4 steps I follow for handling PA system technical issues when they arise:

          1. Start with the basics before moving on to more complex issues.
          2. Follow the signal flow and check the connections and components along the way.
          3. Use a quick, systematic checklist to help prioritize your troubleshooting efforts.
          4. Isolate one variable at a time to narrow down the potential causes of the problem

          Following this four-step PA system troubleshooting method will give you the best chance of finding and fixing the problem fast. Let’s explore each one in more detail.

          1. Start with The Basics Before Moving on To More Complex Issues

          When things go wrong with a sound system, and you are in charge and in a time crunch, it’s easy to overlook simple things that could be the leading cause of the problem.

          Instead of running around with no plan whatsoever, it is essential to calm down and start with the basics.

          Check if Everything is Plugged In

          Although you are confident that everything is plugged in, double-checking goes a long way because things can be overlooked, even if you are a seasoned sound engineer.

          If one of the instruments or microphones seems to have no signal, make sure it is plugged in. It may seem obvious, but it is easy to overlook the simple act of plugging in an instrument in a high-pressure live performance environment.

          To confirm that the device is plugged in, check the connections that go to the stage box or cable snake before considering any other potential issues.

          Suppose you have checked the connections, and the instrument or mic is still not producing sound. In that case, it may be worth trying a different cable or checking the input on your amplifier or pedalboard to ensure it is functioning correctly.

          Is There Power on the Outlets?

          When setting up a PA system, you might overload a circuit breaker without knowing. You could be installing speaker systems and amplifiers to the same electrical circuit, which could be tripping a breaker on the main electrical panel.

          In this case, you could check that the powered speaker or any other electric equipment is connected to an outlet and powered on. If it is, but the power indicator is off, it could mean that there is no power at that outlet. If this is the case, you should check if there is power coming from that outlet.

          To check it, you can use a digital multimeter or voltage tester to make sure that there is power on the outlet. If there is no power, go to the breaker box to check, as the circuit could have been overloaded by the equipment, thus tripping the circuit breaker.

          Is Everything Turned On?

          While setting up, you or one of the assistants could have forgotten to turn on the piece of equipment that seems not to be working. Just go and double-check to make sure it is on.

          You have no idea how often I have run into problems where there is no sound coming out of the speakers from the mixer to find out later that I had forgotten to turn on the powered monitors or main speakers.

          So, although it could seem obvious and you could be sure that you did turn it on, just walk around and make sure that all the devices are connected to an outlet and turned on.

          Is It Muted? Are the Volumes Up?

          This is another little thing that can throw you off, especially if you are under pressure and in a time crunch to get on with the show.

          The main fader or channel fader could be up, but the mute button engaged, not allowing the signal to go through.

          The volume on the powered speaker or monitor could be down; thus, no sound comes out.

          The Aux send knob that sends the signal to the monitors could also be down.

          The main and sub-mix assignment switches could be disengaged, consequently not routing the audio signal to where it should go.

          All these little things presented in these examples could create significant problems that you can overlook, especially if all eyes are on you and you are under pressure to carry on with the event.

          This is why understanding the signal flow is critical for solving any issues. The next step explains in detail the signal flow you can use to find and fix problems with your sound system.

          2. Follow the Signal Flow and Check the Connections and Components Along the Way

          When setting up the sound system, try to keep a mental map of the signal flow to visualize the path that the audio signal takes from the source to the destination, and make sure to check the connections and components along the way.

          If you are new to setting up sound systems, it would also help to make an actual sketch of the signal flow for each channel. That way, if you run into trouble, you can go back to the sketch and pinpoint specific places the problem could be located.

          This is why it is highly recommended to allow enough time before the event starts to fix any issues that could arise all of a sudden.

          The following paragraphs are a rundown of the signal flow of a typical sound system.

          Understanding the Signal Flow is Crucial for Troubleshooting

          To troubleshoot any sound system issues effectively, it’s essential to understand the path the audio signal takes from the stage to the audience.

          This signal flow can be broken down into three main parts:

          • From the stage to the mixing console
          • Inside the console itself
          • From the console to the speakers, speaker processing, or amplifier, depending on your setup.

          By understanding the signal flow, you can more efficiently identify and fix problems that could arise when setting up a PA sound system.

          This image shows the three main parts/sections of a live sound system

          Signal Flow from the Stage to the Mixing Console

          After the sound source itself, the audio signal is typically captured by a microphone or electronic pickup inside an instrument. From there, it must travel through a cable to reach the soundboard.

          For a microphone, this typically involves an XLR mic cable that connects to a stage box, which helps to organize the cables running from the stage to the soundboard.

          For instruments like guitars, and keyboards, a direct box is often used to convert the output signal from high impedance and unbalanced to low impedance and balanced. Here is an article that explains the DI Box in detail if you need to become more familiar with this device.

          All the audio signals from the stage are typically gathered in a stage box or sub-snake, which helps to organize and consolidate the cables on stage so that you don’t have a cable mess. This is then connected to a snake, which can be either analog or digital.

          An analog snake gathers all the mic and line inputs into a large cable that runs back to the soundboard.

          A digital snake, on the other hand, includes preamps and analog-to-digital converters on the stage, which allows the audio signal to be transferred digitally back to the soundboard, reducing the number of cables needed.

          Labeling and Documenting are Vital

          As you can see, to go from the stage to the soundboard, there are several steps and components along the way that can fail unexpectedly. But if you know which path each specific audio signal takes, figuring out the problem is much easier.

          This brings up another great piece of advice that will save you time. Always label and document your connections. Labeling the stage box and cables can and will save you time when you are in a hurry to figure out how to fix a problem.

          You can use light color tape and a marker to label your cables, or you can buy multi-color cable labels to make things even better and easier to identify.

          The image below shows in graphical form the typical signal flow from the stage area to the mixing console.

          This image shows the signal flow from the stage to the mixing console

          The Signal Flow Inside the Console Itself

          The console can be considered the brain of the sound system as it can route, interrupt, and modify audio signals. Because it offers several functions, we can easily misconfigure the path of a signal causing problems.

          The Input Section

          Once we get to the console, we plug the microphones and line signals into the preamp section of the mixer. If we use a digital snake, the preamp section will be on stage but can be remote-controlled at the console.

          Another control on the console that could affect devices connected to the input channels is the +48 VDC phantom power used to provide power to condenser mics and DI boxes through an XLR mic cable.

          So, for example, if you have a guitar connected to an active DI box that needs +48 VDC to work, and for some reason, there is no sound coming through that channel, check to see if you have enabled the phantom power switch.  The same can happen to a condenser mic if the phantom power is not enabled, the mic doesn’t work.

          EQ, Compression, and Inserts

          The channel path in a mixing console allows us to modify audio signals with EQ and compression, which are usually built into the channel strip.

          We can also use inserts to send the signal to a separate piece of equipment for processing and bring it back to the same channel. This allows us to interrupt the signal flow and make changes to the audio.

          If this is misconfigured, it can break the signal chain, and you won’t get any audio even if everything else is set up exactly right.

          Aux, Sub-Groups, and Main Output

          From there, we also have the Aux Sends, which can route the signal to external auxiliary devices such as monitors, or effects, having level controls over each channel individually, which is entirely separate from the main mix.

          We also have our sub-group and main bus assignment, which connects the channel path to the bus path or the main output.

          You also have the channel mute, and the way it works can vary depending on your mixer.

          For example, on Yamaha consoles, there is an ON button, so for a signal on that specific channel to go through, it needs to be engaged, and it will be lit up when it’s working.

          For most other console brands, when it’s lit up or engaged, the audio is cut. This can throw you off if you are unfamiliar with the mixing console you are using.

          The final place to check on your console is the main output level or Main Outs, and it’s mute.

          I don’t know how many times I’ve set everything up to realize that there is no sound from the mixer to the speaker, and after checking, I realize that the Main Outs mute button was engaged, or I forgot to turn the fader up to send the signal out to the speaker.

          Knowing how the signal flows through the mixer can help you pinpoint possible misconfigurations in your sound system setup. 

          The image shows the audio signal flow sections/paths on an analog mixing console

          The Signal Flow from the Console to the Speakers

          After the console’s main bus, we either go to processing inside the console through a matrix available on digital consoles, or the signal goes to a speaker system processor that distributes the signal and routes it to different components of our speaker system.

          After the system processor, if our speaker system is passive, we must go first through the amplifiers and then to the speakers or straight to the speaker if using powered ones.

          From what we have discussed in this section, the main goal is to help you get familiarized with the signal flow.

          How you set up your system could be different but understanding the path a signal takes from its source to the audience through the speaker is vital for troubleshooting any sound system.

          So, my advice is to be aware of each connection you are making so that you have a signal flow map in your mind so that you can go straight to the possible problem as it happens.

          If you are new to setting up sound systems, here are a few guides that will help you to properly set up a PA system, mixer, stage monitor, and front-of-house speaker placement. Because doing things correctly will set you up for a successful signal flow through all these systems.

          For a more fundamental look at mixing consoles to understand the ins and outs of it, check out this article.

          This image shows the signal flow from the mixing console to powered speakers going through a speaker management system.
          Possible Connection Between the Mixer to Full-Range Powered Speakers

          The image shows a typical signal flow from the mixing console to passive speakers and amplifiers going through a speaker management system.
          Possible Connection Between a Mixing Console and Passive Speakers/Amps

          3. Use a Systematic Quick Checklist to Help Prioritize Your Troubleshooting Efforts

          Now that you know how the signal goes from the stage to the mixer to the audience, it’s handy to have a systematic checklist to help you troubleshoot the problem and help you figure out if you missed something while setting up or if something failed.

          As you can see, there are many steps along the way where things can go wrong, and if you don’t work in an organized manner, you’ll waste time, and the event won’t go on.

          I like to start at the brains of the operation, the mixing console because here I am in the middle of the signal flow. This is the checklist I follow when troubleshooting issues at the console.

          Checks to Do at The Console

          • Is the correct cable connected to the input channel? Check it against your input list
          • Check if the phantom power is turned on, especially if you are using condenser mics and active DI Boxes
          • Main output assignments switches.
          • Sub-groups assignments switches (if used)
          • Aux sends knob volume level. Check for each channel and the Master Aux (if used)
          • Make sure channel inserts are patched correctly (if used)
          • Check if mute buttons are engaged
          • Make sure that the Main Outs fader is Up
          • If using sub-groups, make sure the faders are up
          • Check the output connection going from the mixer to the speaker system
          • If you are having problems with wireless channels due to interference, change the channel
          • If some channels work, but others don’t, compare settings between them. You can even swap input cables between channels to see if it fixes the problem. Do one change at a time.
          • If using a digital mixer and a digital snake, try rebooting both in the correct order. Sometimes a simple boot can fix audio issues with digital mixers.

          Checks to Do at The Stage – Chase the Signal Closer to the Source

          When things don’t work, it’s good practice to find a midpoint in the signal flow to start there. A midpoint in the signal flow between the stage and the mixer is the stage box or snake because this is where all signals from the stage are connected and sent to the mixer.

          Here is an example. If a guitar connected to the mixer through the DI Box doesn’t have any sound coming through the speakers, first, mentally, figure out its signal flow.

          The signal flow in this example is as follows:

          Guitar >> cable >> DI Box >> Cable >> Stage Box/Snake >> Mixer

          A midpoint between the guitar and the stage box/snake is the DI box. To troubleshoot this signal flow, start by checking the signal before the DI Box.

          If you get audio, then check it after the DI Box. If you keep getting an audio signal, continue the path. If you don’t get any audio after the DI Box, the problem could be the box itself or a cable.

          So, finding a midpoint between the signal flow helps pinpoint problems

          Here are some other checks you can do at the stage to troubleshoot problems:

          • Start at one end and move systematically through following the signal chain
          • Start your check at the snake/stage box and make sure your mics and signal cables are connected to the correct input. It’s always good to label things and have on hand an input list to guide you.
          • If having problems with wired microphones, check the mic and XLR cable that connects to the stage box/snake.
          • Find something that works and swap it with the one that doesn’t work to rule out cable issues or device issues. Do one change at a time.
          • When using wireless mics, make sure batteries have enough charge in them. Change them if their charge is getting too low. Always have enough extra fresh batteries to last you through the show.

          Troubleshooting Monitors

          If you are having problems with monitors, is it only one or all of them? Answering this simple question can help you understand if it is a broader problem or a specific problem.

          • If all monitors are not working, check the sends at the console and make sure that the monitor sends outputs are connected to the snake.
          • Make sure that the volume level for the “channel sends,” and “master sends” are up.
          • If using a distribution system, check that it is powered on and that input/output cables are connected.
          • If the problem is on one of the monitors only, check that the signal cable is connected, that it’s powered on, and that the volume is up.
          • If the problem persists, swap the signal cable with a different one. You can also use the signal cable of one of the working monitors. If it still doesn’t work, swap it with another working monitor, as the problem could also be the monitor itself being damaged.

          Checks to Do at The Front of House Speakers/Amps

          If everything else seems to be working, but you still have sound problems at one or several front-of-house speaker systems, here is a checklist you can follow to rule out problems at this stage of the signal flow.

          • Make sure that the Main volume fader is up and unmuted
          • Check that the Main bus assignment is correctly set
          • Make sure that the output cable going to the speakers, amps, or speaker management system is connected to the correct plug
          • If using powered speakers, ensure that they are turned on, that the volume is up, and that the signal cable is connected to the correct input
          • If using passive speakers powered by an amplifier, check that the amp is on, the cable signal is connected, that there is actually a signal coming into the amp, and that the volume is up. Also, ensure that the cables going to the speakers are connected, and secured and that no visible damage is done to the cable.
          • If using a speaker management system, check that it is turned on, the input/output cables are connected and make sure that the signal is present in the device.

          After all these checks, if you don’t find anything obvious, you can start swapping cables to rule out bad ones. Just don’t forget to do one at a time and swap things back as you rule out problems to avoid having a mess.

          As you check your connections, you need to know if a cable has failed or has a flaky connection. I use the Mackie Cable Tester to troubleshoot all my audio cables because it can quickly verify each pin via the 6-way switch, even with mismatched connectors.

          With this cable tester, you can check the most used connector types in live sound and studio applications: XLR, 1/4” TRS and TS, 1/8” TRS and TS, RCA/Phono, Speakon, MIDI, and Banana.

          If you don’t see the connector you need to test, plug in the included probes, and you can test continuity on any cable or non-active circuit. This works great for specialized or proprietary connectors. Remember to completely disconnect the cable from any system before using the cable tester to avoid damaging the equipment.

          Also, working in an organized manner will help you keep things clear and the stage ready to continue with the event when the problem is fixed. Using checklists enables you to rule out things faster and have a record of what you have already checked so that you don’t run in circles as you troubleshoot.

          4. Isolate One Variable at A Time to Narrow Down the Potential Causes of The Problem

          To troubleshoot effectively, we need to be sure only to change one variable at a time.

          For example, if we’re trying to identify a problem in the signal flow, we should try swapping out different components one by one.

          If we change two components at the same time and the problem goes away, we can’t be sure which component was causing the issue. Instead, we should change one component, test again, and then move on to the next component if the problem persists.

          This way, we can be sure to isolate the issue and not accidentally remove a working component from the signal flow.

          Additionally, by following this process, we can keep track of what we have tested and the results. This can help us to identify the cause of the problem more efficiently.

          Conclusion

          When setting up a PA system and things go wrong, having a clear plan is key for solving any issue.

          The four steps that can help you troubleshoot and fix the problem are:

          1. Start with the basics before moving on to more complex issues.
          2. Understand the signal flow to identify and fix potential problems efficiently.
          3. Use a quick, systematic checklist to help prioritize your troubleshooting efforts.
          4. Isolate one variable at a time to narrow down the potential causes of the problem

          Don’t forget that the signal flow can be broken down into smaller sections to simplify troubleshooting. These sections are:

          • From the stage to the mixing console
          • Inside the console itself
          • From the console to the speakers, speaker processing, or amplifier, depending on your setup.

          Another thing I cannot stress enough is to work in an organized manner. This will help you keep things clear and have the stage ready to continue with the event when the problem is fixed.

          To make things easier, use checklists to help you rule out things faster. Doing this will help you have a record of what you have already checked so that you don’t run in circles as you troubleshoot.

          If you liked this article, consider sharing it with others, and don’t forget to visit our website to explore more articles like this one by clicking here. Thank you for reading my blog.

          4 Easy Steps to EQ a Piano – With Cheat Sheet

          When setting up the equalization for a piano, the goal is to achieve a warm sound that doesn’t shout out at you, minimizing resonant frequencies that could make the sound honky.

          You want the piano to play a supportive role, especially if vocals are present in the track or live performance.

          When learning how to EQ a piano, there are four steps you can follow to get the best results:

          1. Cut the Mid-Low resonant frequencies between 440Hz to 500Hz
          2. Cut the resonant frequencies at 220Hz to reduce boxiness
          3. Roll the high-pass filter with a cut-off frequency set anywhere between 60-80Hz
          4. Add a high-shelf EQ filter starting at 3kHz to sweeten the sound

          These four steps will make your piano sound more alive, cutting through the mix.

          Without further ado, let’s go through each one in more detail.

          1. Cut the Mid-Low Resonant Frequencies Between 440Hz to 500Hz

          The first step is to reduce the mid-low resonant frequencies that will end up causing problems.

          In the audio spectrum, the frequencies between 440Hz-500Hz are part of the fundamental frequencies of many instruments such as kick drums, snare, hi-hat, electric guitars, etc. The last thing you want is to add more clutter to an already congested audio spectrum.

          A piano has resonant frequencies around 440-500Hz, which tend to dampen the sound. For this reason, we need to remove these resonances before they happen to maintain a clean audio mix.

          If you are using a digital mixer, start by using a bell filter with a cut-off frequency set at 440Hz, reducing the gain at that frequency by -6dB.

          With an analog mixer, use the mid-frequency selector to set the center frequency between 440 – 500Hz. Then use the mid-frequency “boost/cut” knob to reduce the gain at that frequency by -6dB.

          The image below shows you, in a graphical form, the cut you need to make between 440-500Hz.

          This image shows the first step to eq a piano in graphical form, cutting resonant frequencies at 440Hz.

          Related Article that Might Interest You: How to EQ Vocals

          2. Cut the Resonant Frequencies at 220Hz to Reduce Boxiness

          The second step is to reduce boxiness, meaning we want to cut the resonant frequencies that make the piano sound as if enclosed in a box.

          In a piano, this usually happens at 220Hz. So, by reducing this frequency, we can get rid of the boxy sound.

          Remember that 220Hz is also part of the fundamental frequency of most instruments, including guitars, kick drums, snare, toms, bass, and vocals.

          So, when mixing, if you don’t remove this resonant frequency in the piano’s EQ, in addition to it sounding boxy, you’ll have a messy mix due to the buildup from all the other instruments in that frequency range.

          To fix this issue, you need to remove the resonance at 220Hz when equalizing a piano to carve out some space for the other instruments.

          If working with a digital mixer, use a bell filter with a cut-off frequency set at 220Hz, reducing the gain at that frequency by -5 to -6dB.

          With an analog mixer, unless it has a mid-low frequency selector, you won’t be able to pinpoint the 220Hz frequency. The best you can do is set the LOW frequency at 0dB and compromise a little.

          Remember that in the previous step, with the analog mixer, we set the mid-frequency selector at 440Hz, and cut it by -6dB. Doing this has already reduced the 220Hz frequency by a few dB because the type of filter used for the mid-frequencies is a bell curve EQ filter.

          So, by leaving the LOW knob at 0dB, we should have a decent compromise for cutting the resonances in the piano’s sound.

          The image below is a graphical representation of this step.

          This image shows the second step to eq a piano in graphical form, cutting resonant frequencies at 220Hz to reduce boxiness.

          Related Article that Might Interest You: How to EQ an Electric Guitar

          3. Roll the High-Pass Filter with a Cut-Off Frequency Set Between 60-80Hz

          The fundamental frequencies of an 88-key piano are the frequencies at which the piano’s strings vibrate when the keys are struck, with the lowest key (A0) having a frequency of 27.5 Hz and the highest key (C8) having a frequency of 4186 Hz.

          Anything below 40 Hz is considered ultra-low-end frequency that muddy up your piano’s sound, meaning that the sound is not clear, has weak harmonics, and has a smeared time response, which is a perfect recipe for a horrible sound if not dealt with.

          For the piano, anything below 64 Hz will only add unnecessary low-end rumble to the mix, and we want to leave this space open in the frequency spectrum for the bass.

           So, to start with a clean piano sound right off the bat, cut the frequencies below 64 Hz.

          With a digital mixer, all you have to do is to roll up the high pass filter with a cut-off frequency set at 64 Hz. This will allow everything above 64 Hz to go through while attenuating everything below the cut-off frequency.

          On most commercial analog mixing consoles, the included high-pass filter has a cut-off frequency set at 80 Hz or 100 Hz, which is not ideal but is better than letting all low frequencies go through. 

          In this case, engage the high pass filter switch to remove the unnecessary low-end rumble from the piano’s sound.

          This image shows the third step to eq a piano in graphical form, adding a high pass filter to cut the low end rumble.

          Related Article that Might Interest You: How to EQ Bass

          4. Add a High-Shelf EQ Filter Starting at 3kHz to Sweeten the Sound

          At this point, the piano could sound dark and dull, which is ok if you are looking for a darker, lighter tone.

          This could be the case if a vocalist is using only the piano to accompany themselves. Some pianists also like a darker sound in their performance.

          But if the piano is part of a dense mix full of drums, guitars, bass, and other instruments, it needs some brightness to cut through the mix in the upper-range frequencies.

          Also, boosting the high frequencies starting at 3kHz, will add some attack to the piano’s sound giving it a sweet tone that complements the mix.

          To do this with a digital mixer, add a high-shelf EQ filter starting at 3 kHz and boost it by +4dB, making sure that the high-shelf begins to roll off at around 5 kHz to avoid excessive brightness in the tone.

          With an analog audio mixer to add more presence and sparkle to the piano’s sound, boost the HIGH-Frequency knob by +2 to +4dB. Make sure you don’t overdo it to avoid excessive brightness that could make the piano sound harsh.

          The image below shows the boost you need to make to add presence and sparkle to the piano’s sound.

          This image shows the fourth and final step to eq a piano in graphical form, adding a high shelf eq filter at 3kHz to add presence and sparkle to the piano's sound.

          Piano EQ Cheat Sheet – EQ Settings For Piano

          The image below is a cheat sheet showing the four steps presented in this article in a graphical form, showing the cuts or boosts you need to make to get started when equalizing a piano.

          Please understand that this is not an exact science, as many other factors can affect the piano’s sound, such as room acoustics, sound reflections, distance from the microphones, type of microphone used to pick up the sound, microphone phase, and many other factors.

          But this is a good starting point you can use to set the EQ for the piano. Then make the necessary adjustments to bring out the tone you want.

          This image is a piano eq cheat sheet showing the four steps explained in this article in a easy to follow format, that can be used to eq acoustic or electric pianos for the studio or live performance.

          The image below shows suggested eq settings for piano when using an analog mixer. The mixer I am using for this example is the popular Yamaha MG16XU mixing console. But if you are using a different audio mixer, just set it using the same principle shown here, and it should sound good.

          As explained previously, don’t forget that these are just suggested settings, and you might need to make small adjustments to compensate for the different factors that could affect the sound.

          This image shows suggested eq for settings for piano using an analog mixer.

          Conclusion

          Learning how to EQ a piano is essential for any aspiring sound engineer, whether for the studio or live performance. If you know the basics, you can apply these steps for acoustic and electric pianos.

          To sum up this article, the eq settings for piano can be divided into four steps, which are:

          1. Cut the Mid-Low resonant frequencies between 440Hz to 500Hz
          2. Cut the resonant frequencies at 220Hz to reduce boxiness
          3. Roll the high-pass filter with a cut-off frequency set anywhere between 60-80Hz
          4. Add a high-shelf EQ filter starting at 3kHz to add more presence and sparkle to the piano’s sound

          To make things a bit easier, I have included a piano eq cheat sheet that you can use to eq live piano or electric piano using analog and digital mixers.

          If you liked this article, consider sharing it with others, and don’t forget to visit our website to explore more articles like this one by clicking here. Thank you for reading my blog.

          • Page 1
          • Page 2
          • Page 3
          • Interim pages omitted …
          • Page 12
          • Go to Next Page »

          Primary Sidebar

          Search

          Guides & Tutorials

          • Choosing a Portable PA System
          • How to Be a Better Singer
          • Build a Budget Live Streaming System Using PTZ Cameras
          • How to Get the Best Audio Quality on YouYube
          • Setting Up Stage Monitors
          • Mixing Console Basics
          • How to Position PA Speakers
          • Stage Sound System Set-Up
          • How to EQ Live Vocals
          • How to EQ Live Sound
          • Daisy Chain Active Speakers
          • Zoom Audio Settings for Music
          • How to Livestream a Wedding
          • Improve Your Livestream Audio Quality
          • Microphone Preamp Buying Guide

          Featured Posts

          Treblab X9 Pro: Tough Earbuds, Big Performance

          Escape the Noise: Best Affordable Noise-Canceling Headphones

          How to Combine Passive and Powered Mixers

          How to EQ Bass Guitar – In 4 Easy Steps, Plus Cheat Sheets

          Disclaimer

          VirtuosoCentral.com is a participant in the Amazon Services LLC Associates Program, an affiliate advertising program designed to provide a means for sites to earn advertising fees by advertising and linking to Amazon.com.

          Home  About  Contact  Disclaimer  Privacy

          Copyright © 2019-2025 Virtuoso Central. All Rights Reserved.