Did you know that Michael Jackson’s Thriller is considered to be one of the best albums of all time? In fact, the album has sold over 30 million copies worldwide.
If you want to have a live production sound like Michael Jackson or another legend of music, you will need to master your mixing and other related skills.
If you are reading this article is because you are wondering which vocal mixing techniques you can use to get better-sounding vocals in live performance or the studio.
To get the best results when mixing vocals, you should:
- Coach the Vocalist to Use Proper Mic Techniques
- Set the Gain Stage to Minimize Noise and Distortion
- Use a High-Pass Filter to Clean Up the Vocal’s Sound
- Primarily Use Subtracting Rather than Additive EQ On Vocals
- Dial-In Compression Settings to Smooth the Sound
- Use Tools Such as Deezer or Multiband Compression Only If Necessary
- Use Effects to Enhance the Vocal’s Sound
- Make Sure to Provide a Good Monitor Mix for the Vocalist
This post will expand on these eight tips that will make a big difference when mixing vocals in the studio or at a live event. Hopefully, these tips will help you bring your sound to a higher standard and help you get better results. Let’s take a look.
1. Coach the Vocalist to Use Proper Mic Techniques
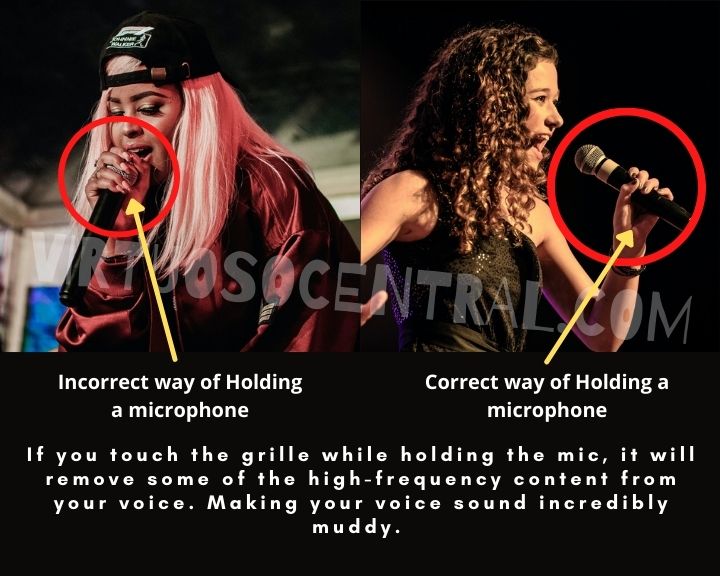
If you want to know how to mix vocals for a live performance, I’ll let you in on a little secret that is very simple but makes a lot of difference and will make your life easier when mixing vocals; good sound quality starts at the source.
This means that if you have the best mic and the vocalist has the most beautiful voice, but the microphone is not positioned or held using the proper techniques, it will sound awful no matter how good of a sound engineer you are.
So, using the correct mic techniques by the vocalist is the first and foremost important tip to get the best results when mixing vocals in a live environment. Because if your sound source doesn’t sound good before you capture the signal by the mic, no matter what you do on the mixer, it won’t sound good.
We have an entire article that explains the mic techniques every singer should know about when performing live. Click the link to check it out.
Choose the Right Type of Microphone
It is also vital that you and your vocalist are on the same page on which microphone will suit your needs best, whether it is a condenser or dynamic mic.
After all, a condenser mic isn’t going to sound the same as a dynamic one. Depending on what kind of result you want, either one could come in handy.
For instance, intimate concerts in tamer venues often require a condenser mic, while a dynamic mic is suited to stadiums and other noisy locations.
One would hope that your vocalist already has the necessary know-how and experience when dealing with microphones, but that’s not always the case.
It’s important for them to realize that the closer they get to their mic, the clearer the sound will be and the less noise it will pick up.

2. Set the Gain Stage to Minimize Noise and Distortion
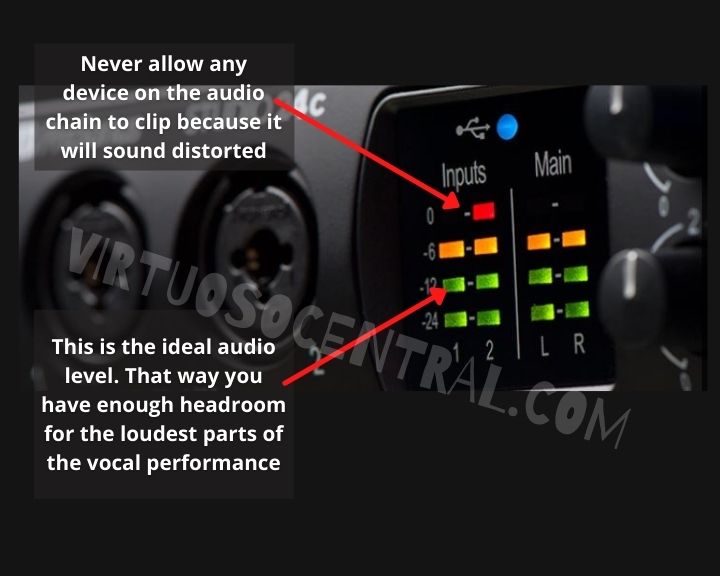
Gain staging is a crucial step for getting beautiful sounding vocals. If you didn’t know what gain staging is, here is a simple explanation. It is the process of setting the correct volume at the input of each amplification stage without distorting or clipping the signal.
The goal is to bring up the gain of the audio signal (in this case, the vocals) to the point that even if the signal goes down the audio chain to different pieces of equipment, it doesn’t distort or clip when it comes to the output.
For example, suppose you have a mic signal that goes through a preamp, EQ, effects, etc. You want to get the audio at the output with no distortion or clipping, even though the signal is going through several amplification stages.
To achieve this, you need to set the gain staging correctly so that you don’t end up with a distorted signal after manipulating it.
Performing a mic test will help you determine if you’ve increased the gain by too much or if the gain is not set high enough. Getting it at the perfect setting will allow you to cut out as much noise pollution and distortion as possible.
When setting the gain stage, be sure to keep the EQ in mind but don’t mess around with that until later. At this point, you should only use the EQ to eliminate any feedback that occurs during the mic test.
In this critical step, just make sure your signal goes through your audio chain and comes out strong, clean, and without clipping, distortion, or noise.

3. Use a High-Pass (Low-Cut) Filter to Clean Up the Vocal’s Sound
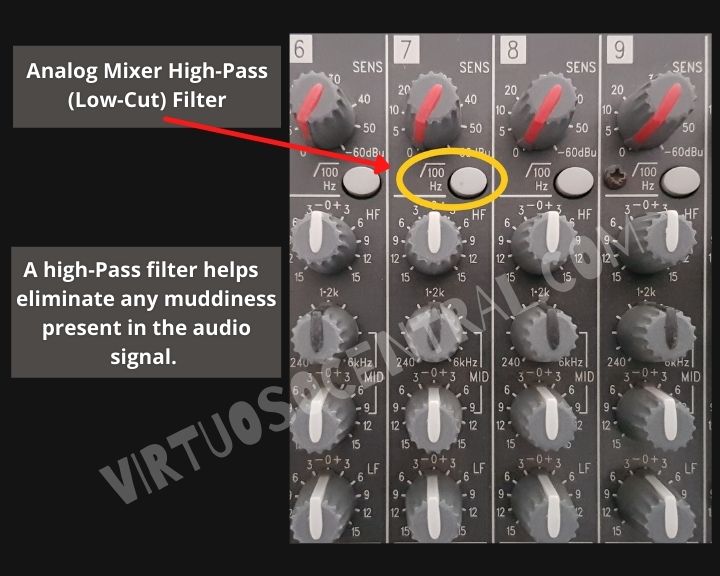
Another tip that will help you when mixing vocals is to use a high-pass, also known as a low-cut filter to eliminate any muddiness present in the audio signal.
When a signal sounds muddy, your audience can’t hear things clearly, and this is due to weak harmonics and a smeared time response.
So to clean up the vocals, use the handy high-pass filter that comes with your mixer; it will help a lot. The sweet spot zone for high-passing or low-cutting vocal sounds is at 100 Hertz and below.
When you use a low-cut filter on an audio signal, you get rid of frequencies below 100 Hz. Frequencies in this range don’t help at all when mixing vocals; all they do is create a low-end rumble that messes up your mix. So by activating the filter, you eliminate these problematic frequencies, and you end up cleaning the vocal’s sound.
After passing the signal through the filter, you’ll be glad to hear that any residual muddiness will be gone. This will go a long way toward making the vocals sound as clean and crisp as possible.

4. Mostly Use Subtracting Rather than Additive EQ On Vocals
Another aspect that will help when mixing live vocals involves using a subtracting EQ approach instead of additive EQ. Simply put, it can be tempting to use EQ to add and subtract many frequency elements. However, the old saying “less is more” definitely applies to vocal mixing when equalizing.
Rather than focusing on the additive side of things, you should spend a lot more time subtracting. This strategy can give you much more control over the sound of the vocals while also avoiding any unwanted compression.
As you boost specific frequencies, you end up coloring the sound, which could negatively impact it. With that in mind, you should listen closely to all the frequencies and bring down the ones that don’t belong or that add sound pollution to the singer’s voice.
Don’t forget to consider any outlying frequencies in the vocalist’s voice too. Addressing those will result in a voice that is crystal clear rather than muddy, for instance.
Remember that your job as a sound engineer is to create a mix that sounds as natural as possible. Being mindful when applying EQ will determine the sound quality you will deliver to the audience.
This principle also applies if you are mixing vocals in the studio. Your job is to capture the singer’s performance in the most natural way possible. Adding too much EQ will rob the natural characteristics of the performance, which is not acceptable.
Another vital aspect to keep in mind is that the vocals are the most important part of the mix in any live sound setup but tend to be the hardest to get right. In our article how to EQ live vocals, I explain in detail what you need to do to correctly EQ vocals. Click to link to check it out.
5. Dial-In Compression Settings to Smooth Vocals
As with EQ, a small amount of compression can work wonders on your live or studio vocal mixing. The last thing you want to do is go overboard with it. There are several ratios that are considered sweet spots for your dial-in compression settings, including 3:1, 4:1, and 6:1.
Be sure to go through your various attack and release settings so that you can find one that matches your vocalist’s singing style the best. From falsetto belting to death metal growls, not every style will be suited to a single compression setting.
For instance, a slow-release setting may end up compressing vocals for too long. Similarly, a too-fast attack setting will strip the power from even the most passionate voices out there.
In your effort to smooth out the vocals in a way that sounds pleasing and does justice to the singer’s voice, you may find yourself setting the compression between 3 and 60, but there are always exceptions.
6. Use Tools Such as De-Esser or Multiband Compression Only If Necessary
While audio tools can come in handy to help even out your sound mixing, you should do your best only to use them if it’s absolutely necessary.
Usually, if you add too much to your sound, it will end up sounding unnatural. This is why you should not go overboard when using different tools or filters, as this could be tempting when exploring different possibilities. Just use them only when strictly necessary and if they are going to enhance the performance.
For example, you can use de-essers to eliminate plosives and sibilance (intrusive “s” sounds), especially if they are more prominent in the singer’s voice in question. However, if this isn’t a noticeable aspect in your mix, then using a de-esser could end up muddying the sound.
A multiband compressor is often used to finetune and edit frequency layers within a given vocal track. Whether it’s low frequency, mid-frequency, or even high frequency, this tool gives you the option of toying with each.
You can even apply different compression settings for each frequency down to the specific attack and release settings. Typical multiband compressors have 3 to 5 bands of compression.
Remember to be mindful when using these types of audio tools and ask yourself if using them enhances the sound.
7. Use Effects to Enhance the Vocal Sound
Effects are like the icing on the cake, but they shouldn’t be added until your mix is as perfect as you can get it. From there, the effects you add will depend on the music genre and the specific tastes of the singer. For instance, you won’t want to give them autotune unless they request it.
Delay, reverb, and pitch shift are several types of effects that can enhance the voice of a general singer without being over the top. Since these effects are often quite subtle, the audience won’t notice them on a conscious level unless they’re sound-mix pros. Instead, all they’ll know is that what they’re hearing sounds amazing.
Hall or plate settings are often great starting points for figuring out how much reverb is needed. From there, you can tinker with the decay and pre-delay time of the reverb to find out what sounds best for the type of music involved.
In general, sound mixers like to use a ping-pong delay for a nice stereo movement, a short slap delay for a bit of depth, or a pitch shift to give the impression of a chorus sound without overdoing it.
8. Make Sure to Provide a Good Monitor Mix for the Vocalist
Your chores don’t stop there, though, because it’s essential to make sure that your vocalist’s stage monitor is also set correctly. You may even need to go up on the stage to have a better idea of what the surrounding area sounds like.
This info can help you adjust the mixing as needed, avoid feedback on stage, and boost the volume as much as possible so that everyone in the crowd will enjoy the show.
Once the show starts, you may be tempted to fiddle with the settings. However, it’s important to let the mix live its life. You should only make changes that are necessary or requested by one of the musicians. After all, each band has its own dynamics, and you could end up sabotaging that by constantly changing things as they play.
While there’s a science to mixing, you can’t forget to listen to music with the ears of an artist too. Not everything is going to fit into an exact mold. If it did, then music would have no personality or soul behind it.
Even if you’re not a huge fan of the vocalist who is singing, you should put yourself in the shoes of one and imagine what you would want to hear as you’re out there in the audience. That way, you can end up producing a concert that the crowd will remember for many years to come.
Ready to Use These Vocal Mixing Tips?
Now that you’ve learned all about the 8 tips for mixing live vocals, you can ensure that your performance has a pristine production that does the music justice.
When it comes to live sound and recording, you can always rely on us to provide you with helpful tips and hacks. We post high-quality content that covers a range of essential equipment and procedures, including PA systems, microphones, active and passive speakers and subwoofers, miniature PA systems, setting up various sound systems, and so much more.
If you have questions or comments about our dedicated site, please don’t hesitate to reach out.