These days, it is easier than ever before to record music from the comfort of your home. As equipment and software become better, you need less to make great stuff!
That being said, it is still worthwhile to invest in an audio interface such as the Focusrite Scarlett 2i2. This interface won’t break the bank, but it will make your recordings higher quality.
If you’re making music with your laptop, all you need is your interface, laptop, a DAW (Digital Audio Workstation), a microphone, and maybe a USB adapter, depending on what kind of laptop you have.
However, if you don’t have a laptop or desktop computer or would rather use your iPhone or iPad, don’t worry because you can easily connect the Scarlett 2i2 interface to your iPhone or iPad Pro.
Keep reading to learn how to connect your Focusrite Scarlett 2i2 to an iPhone or iPad Pro. It’s easier than you might think!
Why Connect Your iOS Device to Your Scarlett 2i2?
There are a few reasons why you might choose to record with an iPad Pro or iPhone instead of a personal computer.
If you don’t have a personal computer, you might not want to make the investment right away. And even if you do have one, you might find it easier to work with the touch screen user interface of iOS DAWs.
Some people swear by the specific recording setup they like to use, but at the end of the day, you can make great music with any DAW, even something basic like Garageband.
In fact, Garageband for the iPad and iPhone is a highly versatile app with an easy-to-learn user interface and more features than the desktop version you may have used before.
Don’t let the fear of having the wrong setup get you down. Simply connect your Scarlett 2i2 to an iPhone or iPad and start creating!
You Might Also Like: How to Connect a USB Mic to an iPhone or Any Other SmartPhone
Two Ways for Connecting the Focusrite Scarlett 2i2 to an iPhone or iPad
Connecting the Scarlett 2i2 straight to your iPhone or iPad wouldn’t work in most cases because the interface needs more current than what your device can supply.
If you have a 3rd Gen Focusrite Scarlett 2i2, you can connect it directly to an iPad Pro using the included USB-C cable, and the device will be able to power it because the new generation interfaces consume little power, and the iPad Pro can handle it.
Instead, if you have a 2nd Gen 2i2 interface, not even the iPad Pro will be able to power your interface by itself. Unless the interface uses an external power adapter, you will need to provide power for the interface to turn on
When it comes to the iPhone, it can’t power either the 2nd or 3rd Gen Scarlett 2i2 because its battery cannot deliver enough power for the interface to work.
To solve this issue, the interface needs to get the power from another source and only use the phone’s port to send and receive the data.
There are two ways of supplying power to the Focusrite Scarlett 2i2 to connect it to an iPhone or iPad:
- Using a PowerBank – Perfect for a Mobile Setup
- With a charger that delivers enough current to power the interface while charging the phone.
I assume that you already have an iPhone or iPad and the interface in this post.
If you don’t have an audio interface, I recommend the Focusrite Scarlett 2i2 3rd Gen interface, but the 2nd generation will also work if you already have one. The difference is that the third generation comes with USB-C, and it consumes less power than the previous generation interface [Link to Amazon].
You don’t even need to install any drivers because the interface is plug-and-play.
The Scarlett is an affordable, tried-and-true interface and has long been a go-to for musicians everywhere.
1. Connecting the Scarlett 2i2 to an iPhone Using a PowerBank
This method works best if you want the flexibility of a mobile setup to record on the go.
Another advantage of using this method is that you provide power to the phone or tablet. That way, you don’t run out of battery in the middle of the recording session.
One thing you need to take into consideration is to get a power bank or portable charger with enough capacity to last the time you need.
This is What You’ll Need for the Setup
- A PowerBank with Enough Capacity
- To connect your Focusrite Scarlett 2i2 to an iPhone or iPad, you’ll need a Lightning to USB 3 camera adapter – Please note that the adapter needs to have both the USB-A and Lightning charging port to connect to the PowerBank and interface at the same time.
- Lastly, you will also need your phone or tablet’s charging cable.
Please Note: The adapter mentioned above is made for cameras, but it is a must-have for any musician working with an iPad or iPhone. Not only can you use it to connect your interface to your iOS device, but also to hook up your MIDI keyboard as well!
A new adapter retails at around $39. If you have an older Apple USB adapter, you can make that work too. However, you will need a USB splitter and a Y cable to get power to your interface.
Making the Connection and Setting Things Up
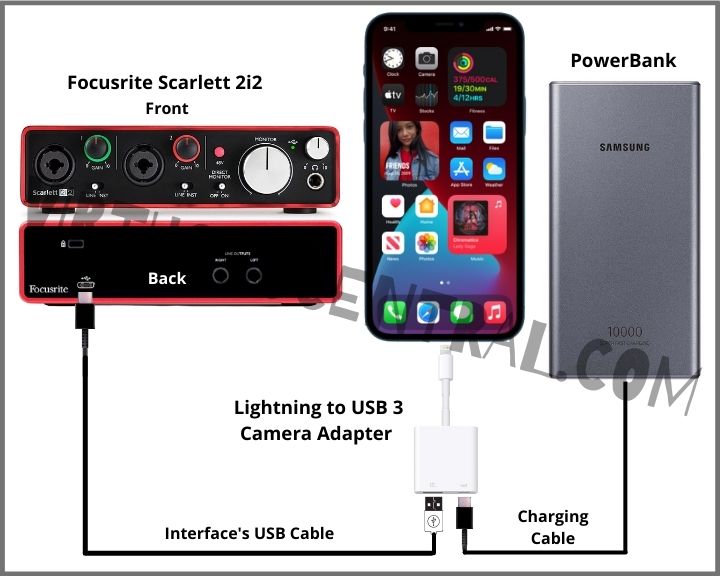
- Connect the Lightning to USB 3 camera adapter to your iPhone.
- Use your phone’s charging cable to connect from the power bank to the charging port on the adapter.
- Next, connect the USB cable from the interface to the USB-A port of the adapter.
- Unlock the phone and follow the on-screen instructions to finish the setup.
- Open GarageBand or any other application you wish to use the interface and run a test to ensure it works well.
- Setting the input audio levels on the interface is essential to avoid distortion or clipping of the incoming signal.
The following diagram shows the connections you have to make to connect your interface to an iPhone using a power bank to power both devices. Use it for your reference.

2. Connect the Focusrite Scarlett 2i2 to an iPhone Using a Charger and an Adapter
Another way of using the Scarlett 2i2 with an iPhone is by using the Lightning to USB 3 camera adapter and a power brick that delivers enough current to use the interface and phone simultaneously. Most fast phone chargers should work well with the interface.
This approach is not as mobile as the previous method but works perfectly well.
Adapters and Accessories You’ll Need for the Setup
- A Phone charger with enough output power to charge the phone and run the interface simultaneously.
- As with the previous method, you’ll need a Lightning to USB 3 Camera Adapter – The adapter must have the USB-A port and Apple’s Lightning port or USB-C for charging, depending on the device you have. Please check your device’s port before purchasing.
- You’ll also need your iPhone or iPad’s charging cable.
Making the Connection
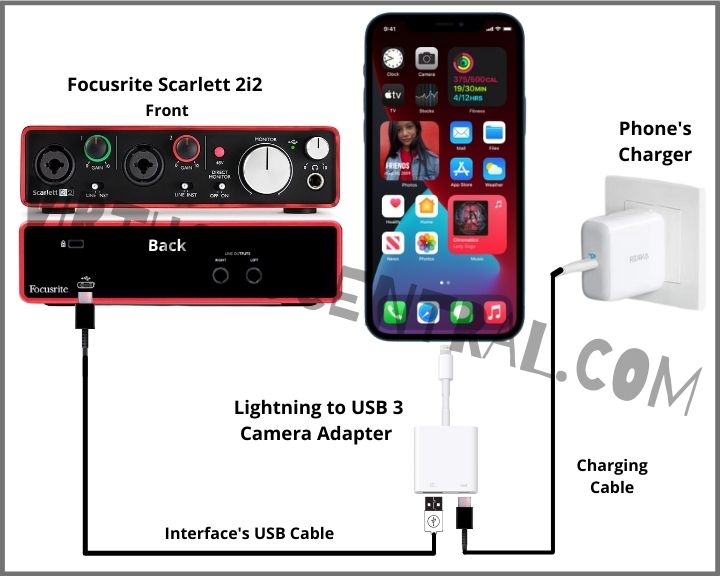
- Connect the adapter to your iPhone or iPad’s charging port.
- Connect the charger to the wall and use your phone’s charging cable to go from the charger to the corresponding port on the adapter.
- Attach the USB cable from the Scarlett 2i2 interface to the USB-A port of the adapter.
- Unlock the phone and follow the on-screen instructions to finish the setup.
- Open your favorite application or DAW to run a test. GarageBand should work great for any recording.
- It is important to check the input audio levels on the interface to avoid distortion or clipping on the incoming signal.
The diagram below can help you visualize the connection you need to make. Use it for your reference.

Bonus Tip – Connect an Audio Interface to an iPad Pro with USB-C
There is a simple method for connecting an audio interface, whether it is the Scarlett 2i2 or any other USB-C interface, to an iPad Pro that I will discuss in this article. And it is by leveraging a powered USB-C hub with pass-through charging.
The idea behind using this method is to use the hub to supply the necessary current that the interface needs and use the iPad’s USB-C port to send and receive the digital audio signal sent from the interface while charging it simultaneously.
This is What You Need for this Setup.
- A USB-C Hub with pass-through charging to provide power to the iPad Pro and interface.
- You will also need the iPad’s USB-C charger that will help power the audio interface and charge simultaneously.
- USB-C to USB-A cable, usually supplied with your interface.
Connecting All the Components to Your iPad Pro
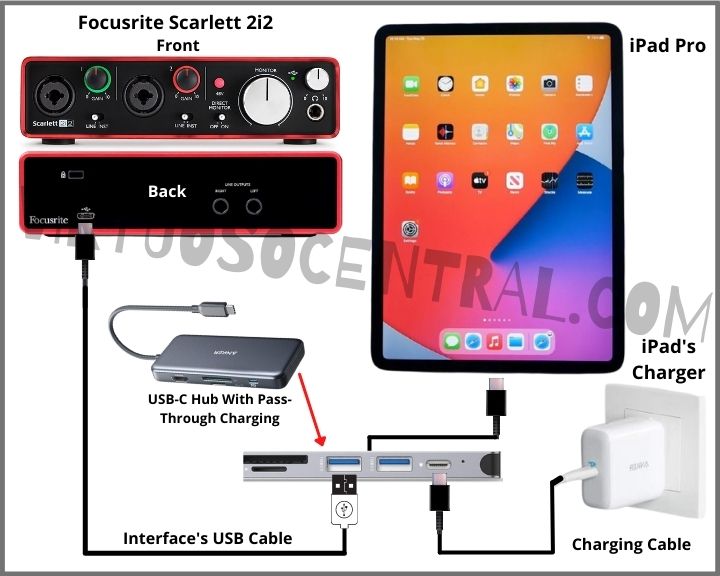
- First, connect the USB-C hub to your iPad Pro
- Connect your iPad’s USB-C charger to the Type-C charging port on the USB-C hub.
- Next, connect the iPad’s USB-C charger to the electrical outlet.
- At this point, you should see a notification letting you know that the device it’s charging. As mentioned earlier, the benefit of charging the iPad while recording is so that it doesn’t run out of power in the middle of a recording session.
- Take the corresponding USB cable and plug one side to the back of the interface and the other end to the appropriate port of the USB-C hub.
- If prompted to finish the setup on your phone, unlock it and follow the on-screen instructions.
- Run a test on any application where you want to use the interface to make sure it works.
Here is a diagram I have prepared that can serve as a reference showing the connections you need to make if you decide to use this method for connecting an audio interface like the Scarlett 2i2 to an iPad Pro.

Connect Your Focusrite Scarlett 2i2 to an iPhone or iPad Pro
By plugging your iOS device into your interface, you’re almost all the way to owning a cheap and totally functional home studio.
We hope you’ve enjoyed this guide on how to connect your Focusrite Scarlett 2i2 to an iPhone or iPad Pro. As you can see, the process is quite simple and rewarding.
Once you’ve got your interface connected to your iOS device, you can start making music to your heart’s content.
For more informational posts like this one, make sure to check out the rest of the articles in our blog by clicking here.
