The worst thing that could happen during your performance, other than misspelling the name of the city you’re in, is a gear failure. Popping speakers, audience members yelling they can’t hear you; cords being tripped over and broken, there’s a lot that can go wrong!
While there’s certainly quite a lot of work involved with setting up a band pa system, there has to be a simple PA system setup that works!
While there’s no “guaranteed perfect setup” that will work in every venue for every band, there is plenty you can do to make the process easier. The best part is that you don’t even need any experience with PA equipment.
Here are the 10 steps you need to follow to set up a simple PA system for a solo artist or small band:
- Choose the Right Portable PA System
- Check the Room Layout & Get Organized
- Position and Set Up the Speaker System
- Position the Microphones and Stands on stage
- Set Up Your Mixer to Be Within Your Reach
- Connect the Speaker, Mic, and Instruments with the Correct Type of Cables
- Run Power Drops to the Equipment
- Organize Your Cables to Prevent Mid-Show Tripping
- Power On Your Gear Carefully
- Perform a Sound Test
Read on as we go in more detail in this how-to guide on the ten steps you can take to set up a simple PA system for a solo artist or small band.
1. Choose the Right Portable PA System – A Good Simple PA System Setup Begins with the Right Gear
Your setup will only be as good as the gear you buy. That’s not to say that you need to blow your entire budget to sound good. There’s plenty of great equipment available at affordable prices. The onus lies in knowing what to look for.
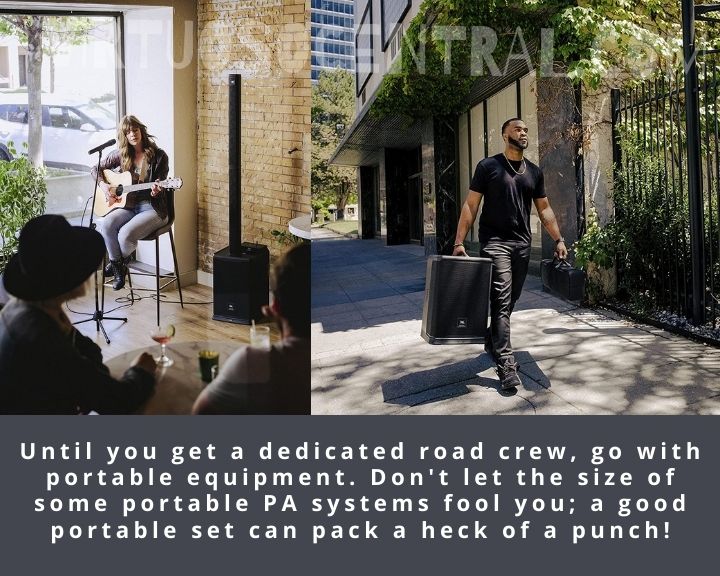
First, consider your needs. As you’re a solo artist or a small band, it’ll likely be you, your bandmates if you have any, and whatever venue staff offer to help. Until you get a dedicated road crew, go with portable equipment. Don’t let the size of some portable PA systems fool you; a good portable set can pack a heck of a punch!
When considering how powerful you want your speakers to be, keep in mind the Sound Pressure Level (SPL), not the system’s wattage. The SPL, which is measured in decibels, indicates how loud your speakers will be. The decibel level you aim for should depend on the types of venues you’ll be performing in; small venues range from 80-100+ dB, give or take.
In terms of sound quality, you’re going to need to look at the frequency range of your setup. In all, your setup should be capable of reproducing all frequencies between 20Hz-20kHz.
If you’re looking for a few recommendations, the Bose L1 Compact, Bose L1 Pro8, JBL EON One, Yamaha StagePas 600BT, Yamaha STAGEPAS 1K, and Electro-Voice Evolve 50, are excellent starter setups that I’ve reviewed before, click the links if you’d like to read the reviews.
These setups possess many features you should look for when shopping for your PA setup: easy to store/carry, compact size that won’t dominate the stage, and solid sound quality.
I also have a complete guide on how to shop for gear properly!
2. Check the Room Layout & Get Organized – Get the Lay of the Land Before You Start Setting Up
It’s always a good practice to get some idea of the venue before you start setting up. Not only do you need to consider acoustics and equipment placement, but you’ll also need to ensure that everything can be powered or that you don’t end up putting yourself in the wrong place!
Start by meeting with the venue staff. Talk with management to get an overview of the performance ahead of you. The venue may have restrictions in place on where things can be placed (and a lot of the time, this is for safety reasons), so make sure you listen carefully.
It also helps to get an idea of where the audience will be, especially in a restaurant or cafe setting where they may be seated and spread out more.
Next, you’ll want to locate electrical outlets. Before entering the venue, get a running total in your head of how many plugs you’ll need. Find outlets for each close to where you will need them. Additionally, try to determine how many power drops (extension cables) you’ll need.
A good tip is to make sure that the outlets work before you unpack and set up everything. To do this, you can use a simple outlet tester such as the Sperry Instruments GFI6302. With this tester, you can ensure that the wiring is correct and that the outlet has power before you start.
If you can, try to mark general locations for where you’d like everything to go. Use something that can be moved around just in case you start setting up and reconsider the layout.
3. Position and Set Up the Speaker System – Consider Your Speaker Setup Very Carefully!
As someone that’s set up many a band PA system, let me tell you: good speaker placement is vital. Always remember that speakers don’t just “blast sound”; they disperse it across an area. Each speaker has its own dispersion pattern and can project sound efficiently throughout that space.
For a live performance, especially as a solo artist or small band providing its own sound system, you’ll want speakers with a broad dispersion pattern to cover a larger area with the minimum number of speakers.
Broad dispersion speakers also sound better, providing a more enveloping sound for your audience. While narrow-dispersion speakers project further, their sound quality is lessened, and their projection area isn’t as wide.
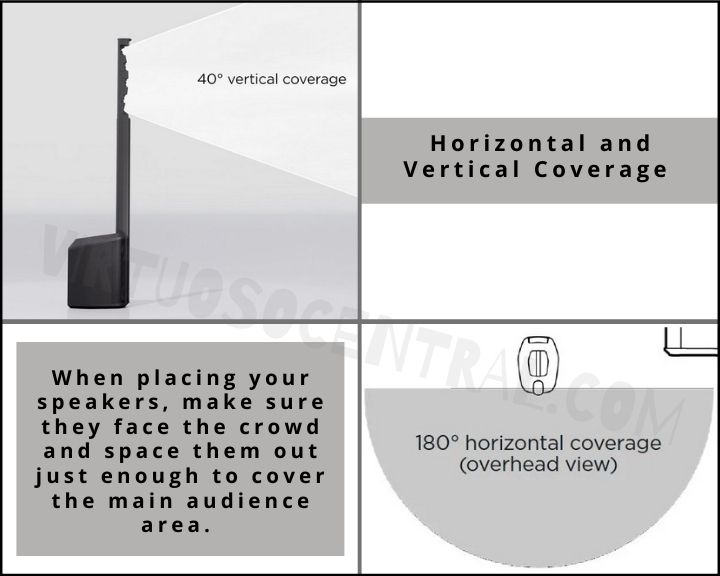
This is where portable PA systems like the Bose L1 Compact, Electro-Voice Evolve 30M, or the Bose L1 Pro8 outperform regular PA speakers. This is because the array enclosure is designed to deliver 180 degrees of usable horizontal coverage, ensuring that your audience hears the sound super clearly no matter where they are in the room.
Thanks to this capability, the speakers generate high-quality, crystal clear, and even sound throughout the room.
Most people find it hard to believe that clear and loud sound emanates from such small systems. If you use a pair of any of the speakers mentioned previously in a room packed with about 300-400 people, everyone would hear the sound clearly.
I have personally used a pair of the Bose L1 Compacts for setting up the PA system for an acoustic band, and the sound is not only clear but also of superior quality. Pretty much everyone who buys any of these PA systems greatly enjoys pushing it to its limits at gigs.
When placing your speakers, make sure they face the crowd and space them out just enough to cover the main audience area. When in doubt, aim both speakers towards the rear-middle of the room. Ensure that any speakers are in front of you and a safe distance from where you and any other band members will stand.
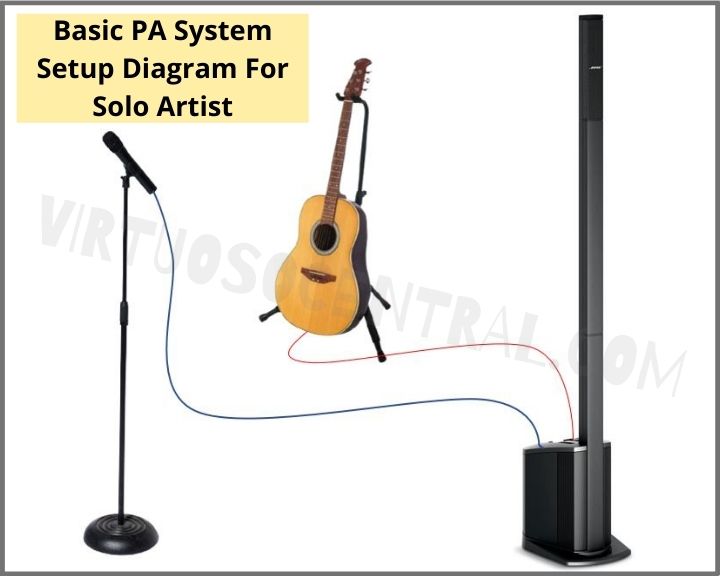
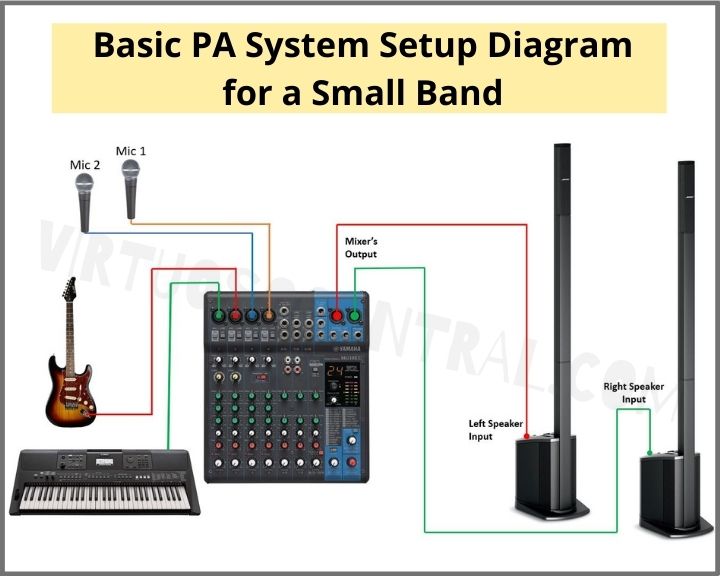
Basic PA System Setup Diagram
4. Position Your Microphones and Stands to Avoid Feedback
In placing your microphone stands, consider feedback. The closer a microphone is to a speaker, the higher the chance of ear-piercing feedback! This is why, when you placed your speakers, you put them to the front and to the side of where you and your bandmates would be.
When placing the stands, try to find a balance between the space everyone will need to move around while performing and the safe space needed to prevent feedback.
When considering these “bubbles” of space around your mic stands, make sure you consider how much movement each band member will be capable of during a show. You won’t need to worry about a drummer wandering in front of a monitor, but make sure any singers have enough room to move around without hitting a feedback minefield.
If you have wired mics, make sure you place stands and designate “bubbles” concerning the lengths of the cables you have. While cables aren’t as much of a problem with wireless mikes, take care to advise anyone using them to watch where they wander.
5. Set Up Your Mixer to Be Within Your Reach
If you’re a small band or a solo performer, chances are you don’t have a dedicated sound technician. Handling the sound mixing during a live performance is possible on your own, thankfully. Of course, you’ll need to make sure the mixer is close enough for you to use.
Considering the bubbles I discussed above, place your mixer somewhere you and other band members can easily reach. If you have a band member that tends to stay in one place, like a drummer or pianist, try tasking them with sound mixing, and set up the mixer near them. This will ensure that someone will always be close if you need to tweak your audio mid-performance.
If you’re not that versed on how to properly configure and use a mixing board, I’ve got you covered!
6. Connect Your Equipment, but Consider Your Audio Cables Carefully
Your gear is placed; now it’s time to hook it all together. Connecting audio cables might sound straightforward, but there’s quite a bit that goes into connecting cables to get the best audio quality.
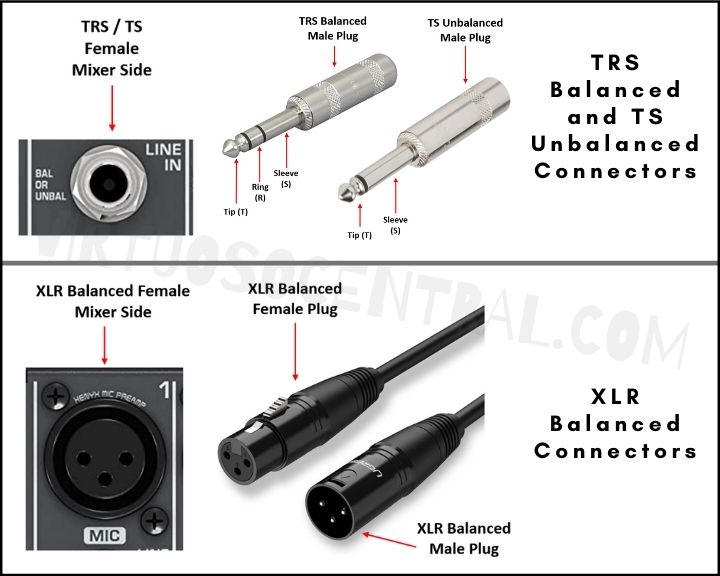
For starters, is your cable balanced or unbalanced? An unbalanced cable has a positive connection, as well as a grounded connection for shielding. A balanced cable, however, has an additional negative connection.
In layman’s terms, balanced cables are more stable and produce better sound quality over long distances.
Using XLR cables, connect your microphones to your mixer, and your mixer to the speakers. If you have musical instruments like guitars, you’ll want to use unbalanced TR cables or balanced TRS cables.
7. Run Power Drops to Your Equipment
Now that your audio equipment is connected, you can work on running power to your gear. A key thing to remember during the PA system setup is not to turn anything on before everything is connected. We’ll get to the reasons why later.
In the meantime, start running drops between your setup components. As you connect power cables, try to lay them neatly with audio cables. We’ll be returning to them in the next step.
8. Organize Your Cables to Prevent Mid-Show Tripping!
Time for some cable management. Your band sound system likely has a tangle of cables heading in every direction. Leaving it in this state as you perform is asking for trouble! As you connected power cables, you hopefully did so in a way that kept them consolidated with your audio cables.
Survey these cable bundles and consider the walkways that you, your bandmates, and venue staff will be using. Using gaffer’s tape, you can safely create “walkways” over cables spanning busy areas.
At the same time, try to mark out where cables are in spaces that might not be traveled as much. If someone tries to take a shortcut, don’t let them trip!
Don’t just leave cables in disorganized lumps, even if they’re out of the way. This will make packing up much harder. As best you can, try to organize grouped sections of cable neatly.
If it is within your budget, try getting wireless systems so you don’t use too many cables to set up the PA system. You can even connect the speakers to the mixer wirelessly. If you want to know how to do this, here is an article that explains the process in detail, and believe me, it is very simple.
9. Power On Your Gear Carefully
The order in which you power up the components of your setup greatly matters. If you turn something on out of order, you might be greeted with a loud POP! To avoid damaging your equipment, you’ll need to follow a specific order.
This process typically begins with any outboard effects; equipment that alters your sound from outside the mixer. Effects units, equalizers, preamplifiers, and other equipment like this should be powered on first. Anything else going into your mixer, like your mics, need to be switched on too.
Next, fire up the mixer itself. After this, you’re free to power on your speakers or amplifiers.
If using a simple PA system setup consisting of one Bose L1 Compact powered speaker, one microphone, and one instrument, don’t turn on the speaker until everything is connected to the speaker’s back.
You also want to make sure that the volume knobs are turned all the way down to avoid unexpected noise before turning on the speaker system.
Powering down your equipment requires the same care but effectively in reverse. When your show ends, shut down your amplifiers and speakers and wait for a minute or two.
Amplifiers need to store power to operate, and it’ll take a brief moment for them to discharge. Once you’ve waited for the discharge, continue the process in reverse—power down your mixer, followed by any outboard equipment.
Remember: last on is first off.
10. Perform a Sound Test
Now that you know how to set up a PA system for a solo artist or small band, all that remains is tweaking and testing your setup before your big show. This stage of the process is extremely vital, so make sure that you take your time!
This final stage should begin with some additional feedback prevention. To start, only keep microphones powered on when they’re going to be used. Additionally, keep little space between your mouth or instrument and the microphone. Too much space lets in errant sound waves. Here is a complete guide for correct microphone handling.
Now we can begin equalizing your band PA system. If you’re a solo act, position yourself in place near your mic and mixer. If this is a band act, have everyone take their places but don’t let anyone start playing yet.
With your mixer, cut any unwanted frequencies from the feed. Just powering above these by turning the wanted frequencies up will sound cacophonous and mess up your performance.
Next, have each member of the band individually play so that you can hear them through the sound system. Adjust the frequency bands as needed to balance each instrument and vocalist.
If you’re having issues finding a balance, have each member play the loudest part of the set first, followed by the softest. This method should help you get a good idea of the range you’ll need for the venue to make everyone heard.
Use the same method when testing together as a band, alternating between quiet and loud segments. Take your time to get the sound right.
While you’ll have chances to fix it later, doing so mid-performance can be jarring; picture it from your audience’s perspective; what if you suddenly got louder just as your loudest song was coming up? Make any adjustments during your show gradually to avoid this.
Looking for More Help for Your Big Show?
Your band’s PA system is vital, but it doesn’t need to be overly complicated to blow the roof off the venue! With careful consideration to your gear and the proper setup, any simple PA system setup can be fine-tuned to almost any small to medium venue.
Your audio equipment might be ready for the performance, but do you feel ready? If you’re feeling a little jittery or just looking for some advice, check out my guide on how to be a better singer!
