A mixing console is the most critical equipment in live sound setups because it controls all the audio sources before they are sent to the loudspeakers. Knowing the ins and outs of a mixing board and how to use them will make the difference between a perfect mix and a mediocre one.
In this article, I present a short to the point explanation of the different sections of a mixing console so that after identifying the role of each knob, you can use it correctly. After learning the basics of the mixing console, you will be able to start practicing and getting your ear trained for doing excellent mixes.
What is a Mixer, and What does it Do?
An audio mixer is a device used to combine multiple sound sources by manipulating the volume, frequency, and dynamics of the audio source. Audio Mixers are also called mixing console, mixing board, mixing desk, or soundboard.
Parts of a Mixing Board
Depending on the size of the mixing console, it could have hundreds of knobs that are designed to do a specific task. All of the knobs on the surface of a mixing console make it look complicated, but the truth is that each channel strip has a few controls that repeat for the rest of the channels. If you understand one channel, you would know how a mixer works.
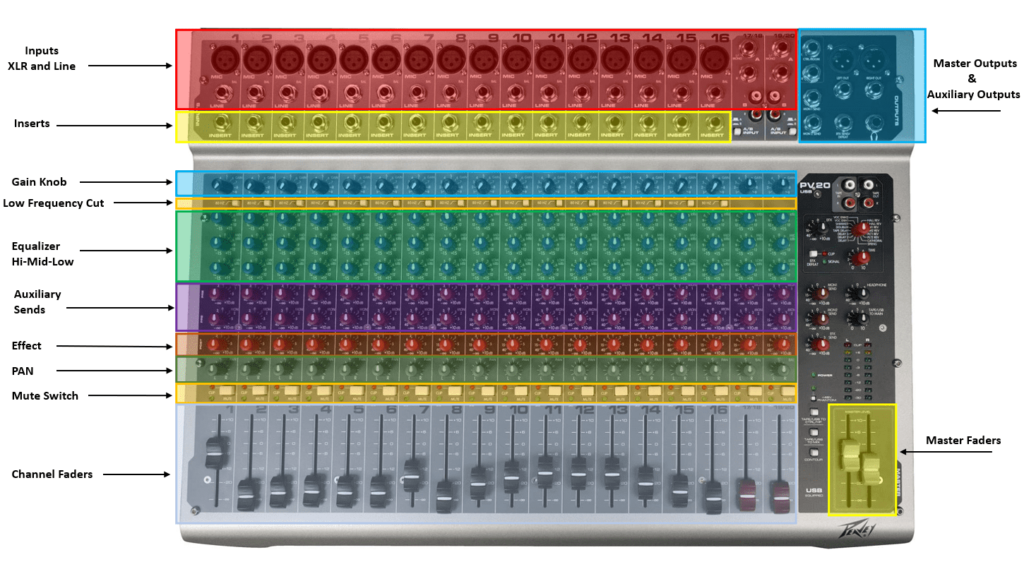
The diagram below shows the different parts of a mixing board so that you get familiarized with the different sections.
1. The Channel Strip
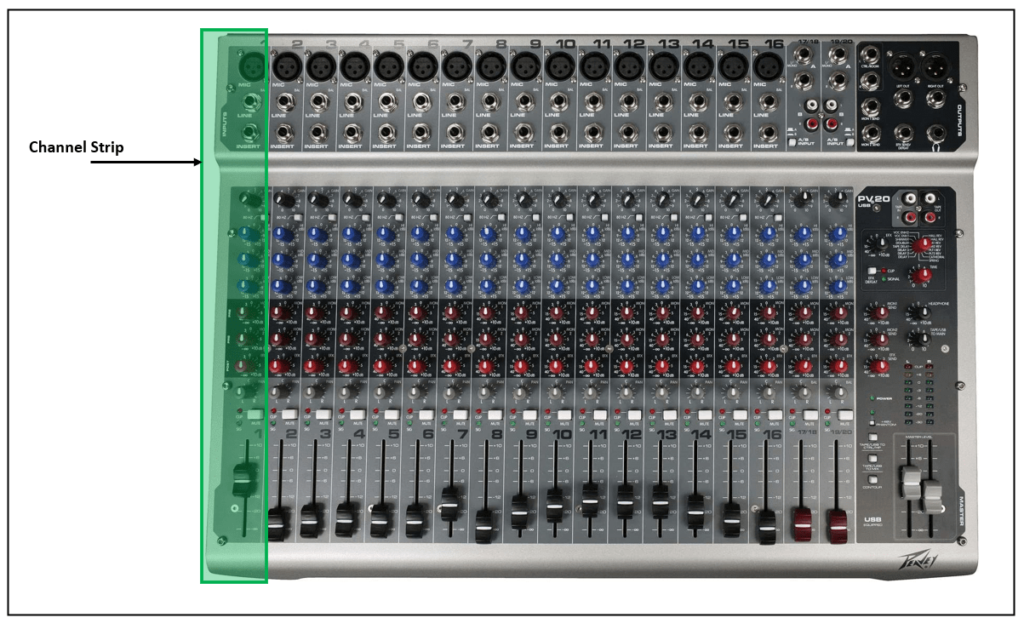
A single channel on a mixing board is also known as a channel strip, and it’s configured from top to bottom. All channels are arranged in columns that go across the board. Each channel strip has inputs, inserts, gain, equalization, auxiliary sends, and volume faders. I will explain each one in detail throughout the article.
The image below shows a channel strip, each channel strip is repeated according to the number of channels the audio mixer has.
2. Inputs
The Inputs on a soundboard are the connections that receive external signals to route them to the different sections of the mixer. There are different types of inputs connections, but the most commonly used are XLR and 1/4” Balanced or Unbalanced Line inputs.
- XLR
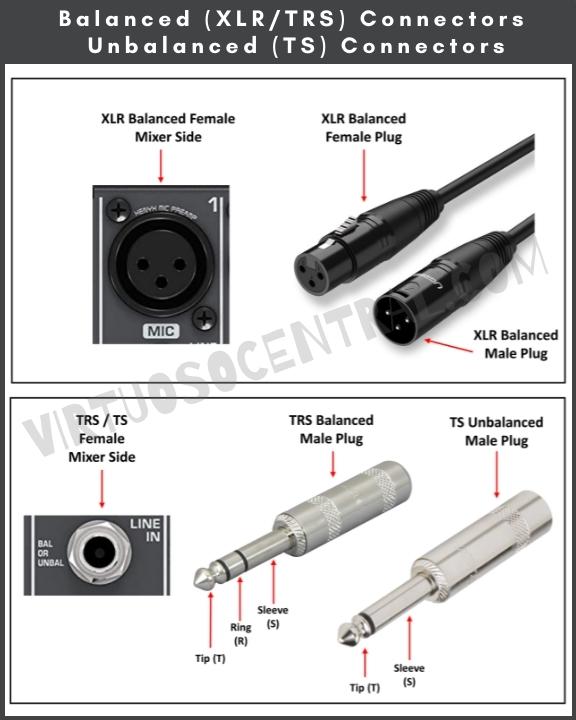
An XLR is a style of audio connector that is used primarily for professional audio connections. It has three pins for carrying the signal, positive (red), negative (black), and Ground (cable shield).
XLRs are balanced connections meaning that they cancel out noise. The way they do it is by sending the same signal on two wires (red and black) but with their polarities reversed. As the signal reaches the other side, they are reversed again, canceling out any noise on the line.
- 1/4” Jack
This style of connector is also known as a phone jack plug. It is was used initially for telephone switchboards and today is still widely used to carry analog audio signals. There are two versions of it, the balanced TRS connector (Tip, Ring, Sleeve), and the unbalanced connector TS (Tip Sleeve)
The image below shows the XLR connector, both male and female. It also shows both versions of a 1/4” jack plug for your reference.
3. Inserts
On a mixing board, an “Insert” is a connection point where the signal is interrupted to be taken outside the mixer for processing it. Then the signal is sent back to the same point on the mixer to continue its path. Typical applications include applying compression, gating, or EQ to a particular channel without affecting any other channels.
An example could be if you have an electric guitar connected to a mixer that needs to go through an effect box. You could use the insert connection to send the signal from the mixer to the effect box and then back to the mixing board to continue the path.
If you would like to learn in more detail about how to use inserts on a mixer, click the link. I have a complete article that explains this feature in more detail.
4. Gain Knob
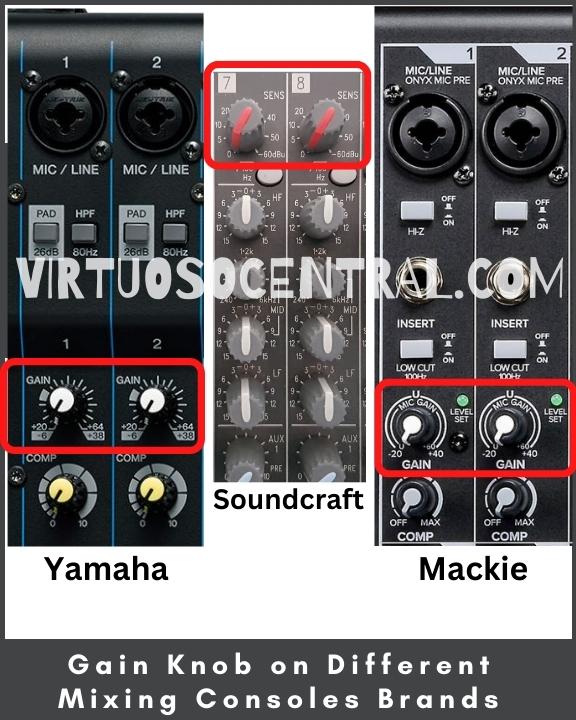
The gain knob on a mixer controls the signal level that is allowed to come into the audio mixer on that specific channel. In other words, it sets the amount by which the channel’s preamp will amplify the incoming analog signal.
In some models, it’s labeled as “Trim” or “Sensitivity.” If a signal is too weak, by increasing the gain, you would be amplifying the signal to line-level.
The gain is the single most important knob on the entire channel strip. If it’s set wrong, it will compromise the sound from the outset, and you will not be able to fix it later in the signal chain, so this knob must be set correctly from the get-go.
To learn how to set the gain on a mixing board correctly, click here to follow the step-by-step process. You’ll also learn more about this very important knob on your mixer.
5. Low-Cut Filter Switch
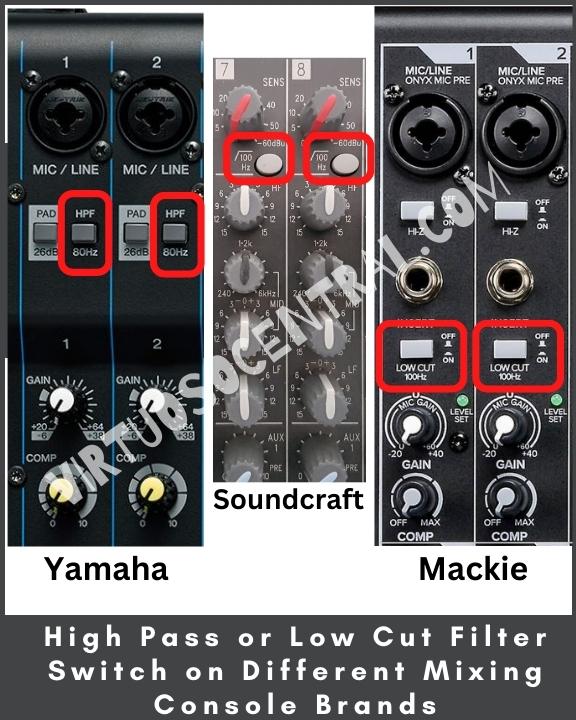
Most mixers have a small switch located either above or below the gain knob, and it is a low-cut filter, which is the same as a high pass filter. What it does is remove low frequencies from the audio signal. In some cases, this is a lifesaver because if the input signal is bass-heavy, it could saturate the channel no matter how you equalize it.
When the switch is pressed, the filter removes frequencies between 20 Hz and 150 Hz. The cutoff frequency could be different between brands of mixing consoles, but those numbers are typical. In case you didn’t know, the cutoff frequency is the starting point where the response is attenuated by 3dB.
6. Equalization
Soundboards have an EQ section to adjust the balance between the different frequency components that make up a sound signal. In other words, equalization is simple the process of changing the timbre of a sound signal.
Most mixers have three equalization bands, High, Mid, and Low, while smaller soundboards have only two bands. Professional-grade audio mixers, usually the ones found in recording studios, have four, even six-band EQ per channel.
- High: Controls the high frequencies between 6000 Hz – 20000 Hz. These frequencies provide brightness and presence to a sound. High frequencies are characterized for adding an edge, punch, detail, closeness, and clarity to the music.
- Mid: These are frequencies that range between 250 Hz – 6000 Hz. Balanced mid frequencies provide intelligibility to the sound, especially for speech. They are easy on the ears, not harsh, and deliver sound warmness.
- Low: Also known as Bass, controls the lower frequency in the sound spectrum. These frequencies go between 60 Hz – 250 Hz.
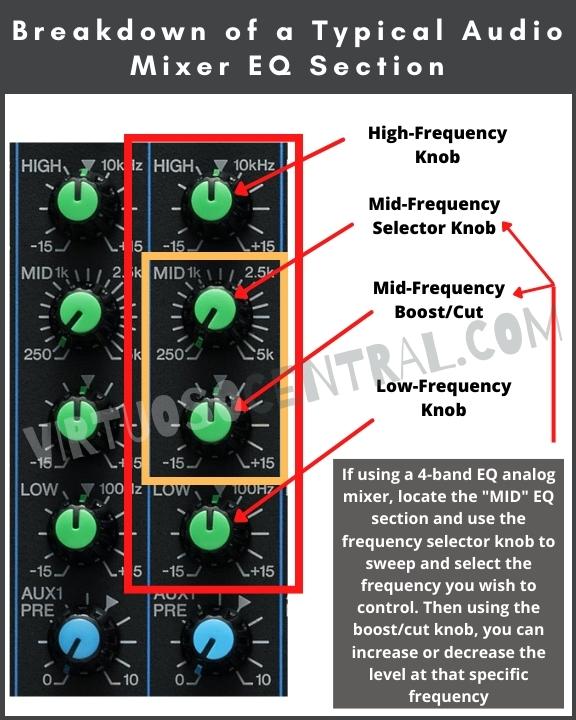
Equalization is another key factor that’s very important when dealing with sound. The difficulty when equalizing different sound sources is that there is no such thing as one fits all EQ setting. To EQ, you need to develop your ear to recognize what “good sound” is.
Luckily, there are many resources on the web that can help you with this. One of the resources is the 4000+ word article I wrote showing the procedure you need to follow and providing specific tips on how to EQ sound sources such as vocals, acoustic guitars, electric guitars, bass guitars, piano and keyboards, drums, etc.
Plus, I explain in detail the EQ architecture of a mixing console so that you understand what each knob in the EQ section does and how to use it properly. Click Here to check it out.
7. Auxiliary Sends
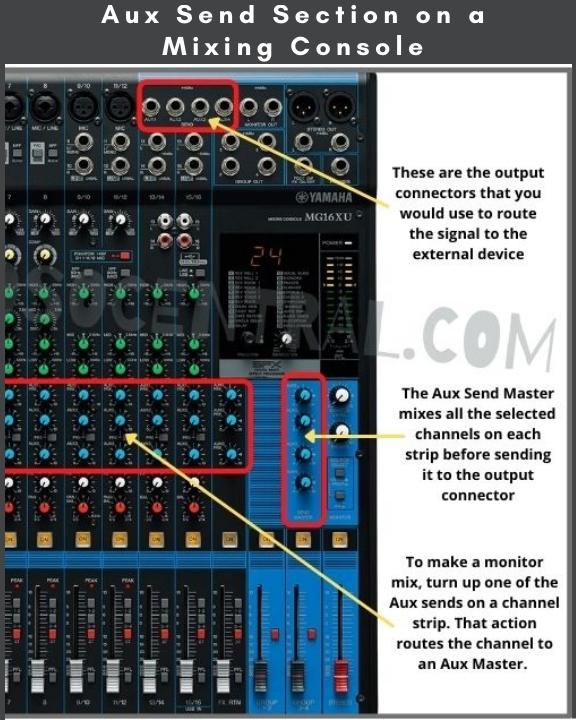
Most modern mixing boards have outputs used to route the signal to external auxiliary devices such as monitors, or effects. The signal coming out of an auxiliary send (Aux Send) has the advantage of having level controls over each channel individually, which is entirely separate from the main mix.
The typical use for “Aux Send” is to connect monitors on stage and create a separate mix, called the monitor mix so that performers can hear themselves on stage.
Here is an article that goes into more detail explaining everything you need to know about using mixer Aux Sends, click the link to check it out.
8. PAN Control
A pan control has three positions, left, center, and right. It is used to increase or decrease the level of the left and right audio signals. A pan control works by reducing the level of the audio signal in one channel, which makes it louder on the opposite channel.
By turning the PAN knob to the left, the audio signal comes out to the left speaker. Turn the knob to the center, and the audio is heard on both loudspeakers. Finally, by turning the knob to the right, the signal comes out of the right speaker.
9. Mute
Each channel has a Mute switch, by activating the switch all audio on that channel is disabled, including the signal going to the monitors. This feature is very helpful if, for example, you are done with soundcheck, and all the faders are at the ideal level. By activating the switch and disabling the channel, you ensure that no unwanted signal goes through to the speakers or monitors.
10. Over Load (OL) or Peak LED
The OL or Peak LED is available on all channels to visually indicate that the signal is turned up too high, which means that it is being clipped introducing distortion to that channel. All you have to do is turn the gain knob down until the LED stops flashing to avoid distortion.
11. Subgroup / SUB Switch
Audio consoles have one or more subgroups. A subgroup is made up of several sources such as channels, tracks, lines, etc. that are combined into a separate bus on the mixer. Subgroups are ideal when mixing live because you can route channel outputs to a different device or assign them to the main mix.
For example, you can create a mix of common sources such as vocals, guitars, drums, keyboards, etc., and group them so that they can be controlled together by a single fader. When you have separate subgroups, you could route the output of that specific subgroup to record it separately from the other groups.
If you want to stream online the audio coming out of the mixer and want to have more control over which group of audio sources to stream, use subgroups to route that signal to the audio interface, then to the computer to stream it. There are many uses for subgroups; just know that it is a separate bus to route audio sources.
Here is a complete article that explains everything you need to know about subgroups in more detail, click the link to check it out.
12. Channel Faders
Channel faders are potentiometers in the form of sliders. They are used as the volume controller for each channel. They perform the same function as a rotating potentiometer to increase or decrease the volume, but because they have more travel length between minimum and maximum, the volume can be controlled very smoothly.
13. Master Faders
On mixing consoles, the master fader is what controls the overall volume level of all the audio sources connected to the mixer. Just as channel faders, they increase or decrease the intensity of the audio output
14. Master Outputs
After all of the audio sources connected to the mixer are adjusted and equalized, this is where everything comes out to be amplified and then connected to the main loudspeakers that the audience is going to hear.
15. Auxiliary Outputs
Auxiliary outputs are used to take the routed signal “Aux Send” to connect it to either an effect processor or if used for stage monitors, this is where you would connect your monitors. Click on the following link If you would like to learn how to set up stage monitors.
Final Thoughts
This post covers the mixing console basics so that you can get familiarized with the different sections and knobs that make up a mixing board. Use the images included within the post to reference back as you need. As mentioned previously, by knowing the functions of a channel strip, you have the necessary knowledge required to start practicing on an audio mixer.
