Knowing how to eq drums is crucial in achieving a balanced and powerful mix, as drums provide the foundation for most music.
By adjusting the levels of different frequencies for each drum element, you can enhance the overall sound and ensure that each drum sits nicely in the mix.
There are several approaches when it comes to equalizing drum sets, but here are five guidelines for EQing the different parts of a drum kit that will make your mix balanced yet powerful:
- Kick drum: Boost the low frequencies around 60-90 Hz to add thump and depth. Cut around 250 Hz to reduce muddiness.
- Snare drum: Boost around 3 kHz for snap and definition. Cut around 300 Hz to minimize boxiness.
- Toms: Boost around 4 kHz for attack and definition. Cut around 250 Hz to reduce boxiness.
- Overheads: Boost around 10 kHz for cymbal clarity. Cut around 300 Hz to reduce muddiness.
- High-Hat: Boost around 10 kHz for clarity. Cut around 600 Hz to minimize the “chick” sound.
These five guidelines summarize the drum EQ process very well, but there is more to it to get the perfect sound.
Keep reading because, in this article, I will discuss specific tips and go into more detail about EQing different drum kit parts, including the kick drum, snare drum, toms, overheads, and High-Hat. Plus provide you with easy-to-follow cheat sheets for each drum element for digital and analog mixers. Let’s get started.
1. How to EQ the Kick Drum
I like to approach the EQ process of any instrument in a way that enhances the fundamental frequencies while removing the problematic ones.
The kick drum’s fundamental frequency is around 60 Hz, and the attack is between 3 kHz – 10 kHz. With this in mind, here are the steps I like to follow to EQ a kick drum:
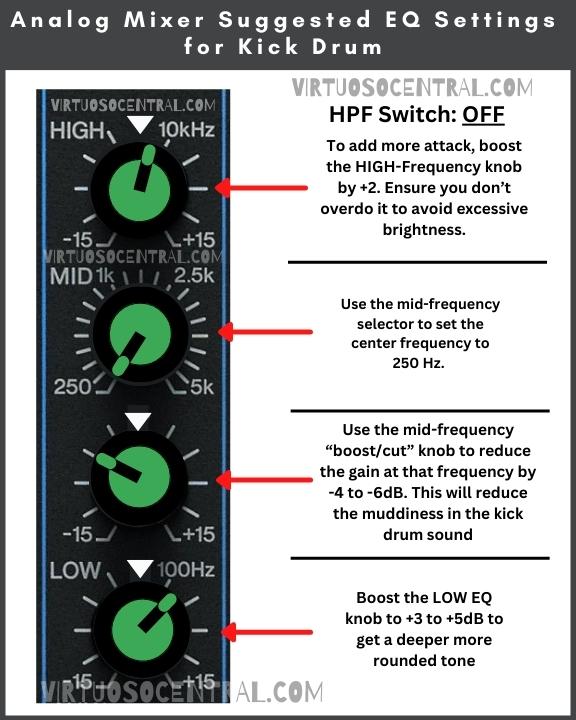
- Leave the HPF turned off (High Pass Filter) because we want to allow all the low frequencies to be present.
- On most analog mixers, the HPF has a cutoff set at 80 Hz, so if the HPF is on, it will cut out the fundamental frequency, and we don’t want that.
- On a digital mixer, you set the HPF cutoff to any frequency, set it around 50 Hz, and depending on how it sounds, you can tighten or loosen the cutoff frequency as necessary.
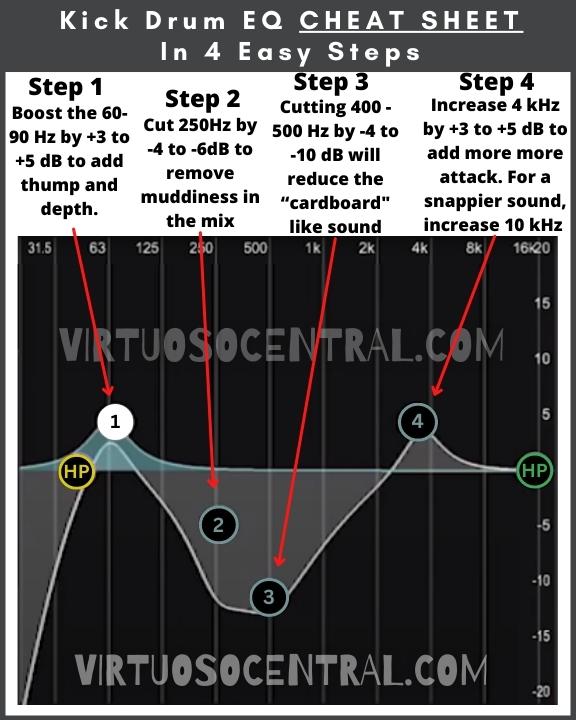
- Cut the 250 Hz frequency because it creates muddiness in the mix, so reduce it by -4 to -6dB.
- Boost the low frequencies between 60-90 Hz by +3 to +5 dB to add thump and depth.
- To add more attack, increase the 4 kHz frequency by +3 to +5 dB. For a snappier sound, increase the attack frequency to 10 kHz. For a more acoustic sound, decrease the attack frequency to 2 to 3 kHz.
If your kick drum sounds like “cardboard,” you could try reducing the 500 Hz frequency by -4 to -6 dB. If it sounds flabby, you can roll up the high pass filter to cut frequencies below 40 Hz to tighten the sound up.
This can be done with a professional-grade analog mixer, where you can set the cutoff frequency, or with a digital mixer because it allows you to set your cutoff frequencies. With a commercial-grade analog mixer, this step can’t be done.
Kick Drum EQ Cheat Sheet
The following kick drum EQ cheat sheet provides a 4-step process for EQing a kick drum. This will work for digital or analog mixers, working your way through various frequencies to cut or bring out the desired elements of the kick drum.
Remember to make sure the kick drum fits well with the rest of the mix, listen to it in the context of the full mix, and make any necessary adjustments.
Lastly, listen to the kick drum in various contexts, such as different song sections, to ensure it sounds consistent and balanced throughout the song.
2. How to EQ the Snare Drum – With Top and Bottom Mics
EQing the snare drum is a balancing act between adding snap and definition in the highs, cutting boxiness in the mids, and ensuring the snare drum sits well in the mix.
A snare drum can be miked from the top and bottom to catch all the complex tones, but remember that the equalization of the top mic will be different from the mic set at the bottom. Here is the EQ setting process for both cases.
Snare EQ From the Top
When EQing the mic placed on top of the snare, you need to remove frequencies that could make it sound boxy while making sure the snare sounds punchy and with enough snap to be heard clearly in the mix. Here are the steps to EQ a snare drum when miked with a top mic:
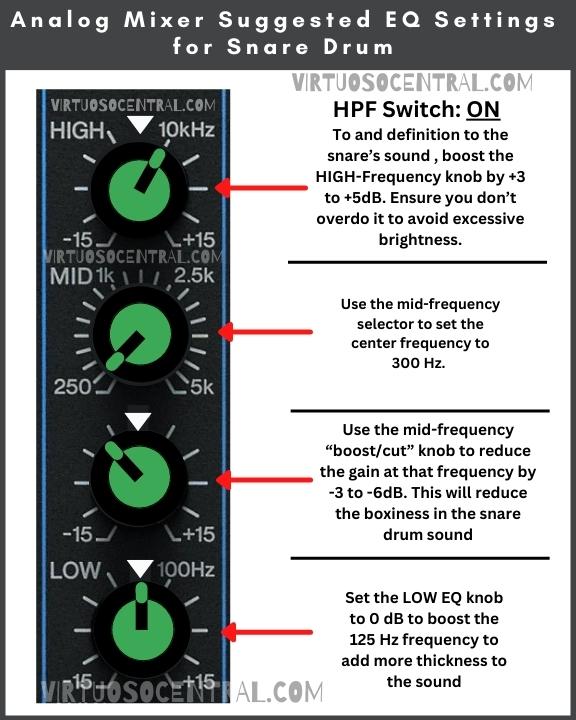
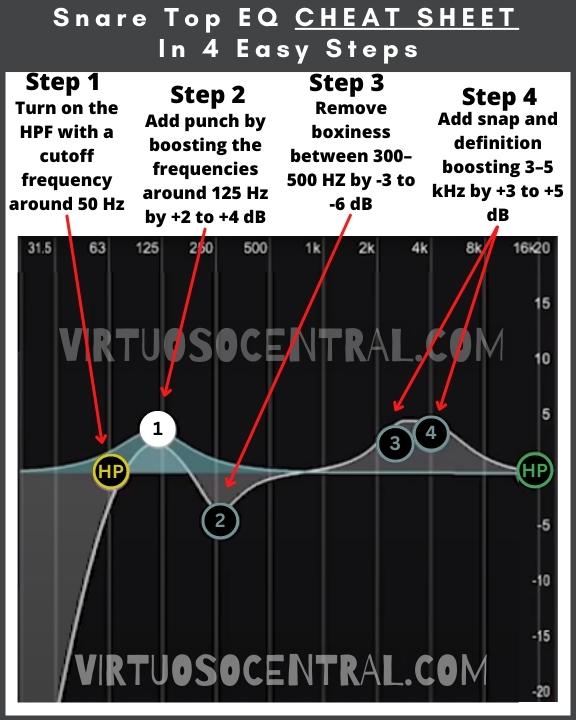
- Start by turning on the HPF (High Pass Filter) switch to eliminate the unnecessary low-end frequencies for the snare drum. If using a digital mixer, set the HPF cutoff frequency around 50 Hz.
- Next, remove the boxy frequencies between 300 – 500 Hz. The 300 Hz frequency will likely be the most problematic, so reduce this frequency by -3 to -6 dB. If it sounds too thin, instead of reducing it at 300 Hz, you might want to boost 200 Hz by +2 to +4 dB.
- Add snap and definition to the snare’s sound by boosting the frequencies between 3 – 5 kHz by +3 to +5 dB. This will make the snare’s sound jump out and be present in the mix.
- To add more punch to the sound, you can boost the frequencies around 125 Hz by +2 to +4 dB, adding more thickness to the sound.
Snare EQ From the Bottom
To capture more of the snare’s buzz or wire sound, sound engineers add a second microphone underneath the drum.
When using this approach, you must be careful not to have the top and bottom mics out of phase.
When the mics are out-of-phase, the sound will be thinner; when they are in phase, the sound will be thicker. So, flip the polarity switch on your console if the sound gets thinner as you mix in the snare’s bottom mic.
Follow these steps to EQ the bottom mic on a snare drum:
- Turn on the HPF switch to reduce unnecessary low-end frequencies.
- Flip the polarity switch to hear if the bottom end gets boosted. If it doesn’t, and the sound gets thinner, reverse the polarity switch again. All we are doing here is ensuring we have the top and bottom mics in phase.
- Remove some of the boxiness by reducing the 250 Hz frequency by -4 to -6 dB.
- To add crispiness, you can increase the 3 to 5 kHz range of frequencies. But be very careful here; if you overdo it, it will sound harsh and annoy the audience. Only boost this range of frequencies if the snare drum gets lost in the mix. But still, be very gentle to avoid a harsh sound.
Snare EQ Cheat Sheet – Top and Bottom
The snare drum is often one of the most prominent instruments in the drum set, so it’s essential to make sure it sounds clear, punchy, and well-balanced.
The following snare EQ cheat sheet provides a step-by-step guide to setting the EQ for the top and bottom mics and is focused on removing unwanted overtones and boosting the frequencies that give the snare its character.
With the right EQ techniques and tools, you can create a snare drum sound that stands out in the mix and enhances the overall energy of your song.
Please keep in mind that these are just starting EQ suggestions, and you need to make adjustments as the specific instrument, mic, and room acoustics are unique for each case.
3. How to EQ Toms
Depending on the music style, toms can be tuned differently. The high and mid toms will have a higher pitch than the floor tom, so the EQ for each can be slightly different.
But a good rule of thumb and a good starting point is to reduce boxiness and some of the overtones present in the mid-band and add some attack to make them slightly stand out in the mix.
Remember that toms are “fill” instruments, meaning they shouldn’t stand out too much, only enough to “fill” specific parts of the song.
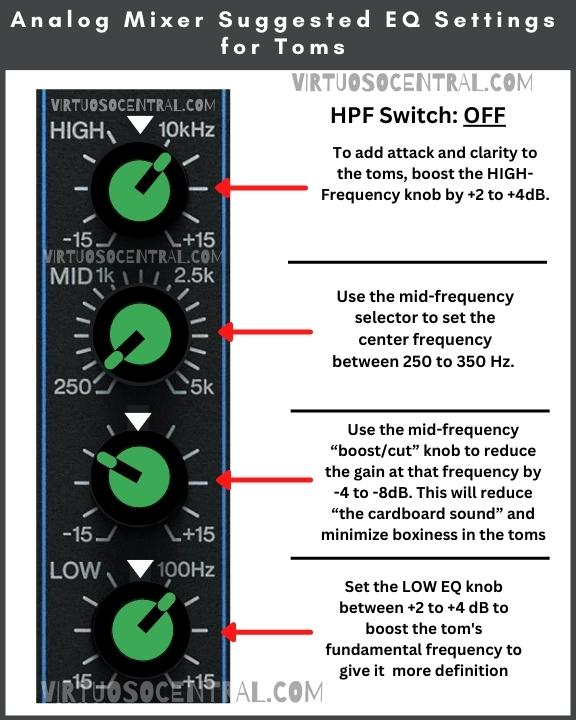
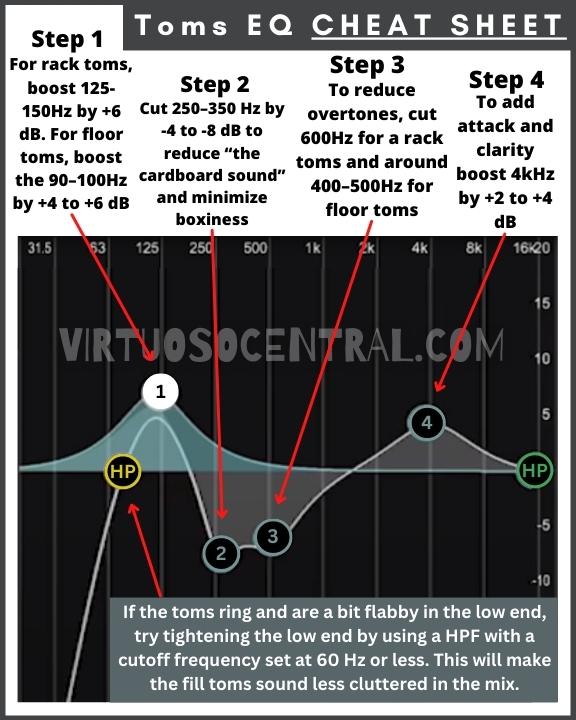
With this in mind, follow these steps to EQ rack and floor toms:
- First, turn the HPF off because we want to allow the low frequencies to be present.
- Cut around 250 – 350 Hz by -4 to -8 dB to reduce “the cardboard sound” and minimize boxiness.
- If you hear that the mix sounds cloudy and the tone is not clear, the tom’s overtones are most likely the problem. To eliminate some overtones, reduce the 600 Hz frequency for a rack tom and around 400 – 500 Hz for floor toms.
- If the toms ring and are a bit flabby in the low end, try tightening the low end using a HPF with a cutoff frequency set at less than 60 Hz. This will make the fill toms sound clear in the mix.
- At this point, you can boost the fundamental frequency of the rack and floor toms a bit to give them more definition. For rack toms, increase the 125 -150 Hz range of frequencies by +6 dB, and for floor toms, boost the 90 – 100 Hz by +4 to +6 dB to give them more definition in the mix.
- Now is necessary to add some attack and clarity to the toms by boosting the 4 kHz frequency by +2 to +4 dB.
Tom EQ Cheat Sheet
Toms are sometimes referred to as fill instruments, but they are responsible for adding depth and warmth to the drum kit.
Having well-equalized toms provide you with a balanced and punchy drum sound, but if not correctly EQed, they can also contribute to a muddied mix.
This cheat sheet provides easy-to-follow steps that will help you give the toms their body and definition, creating a tom’s sound that will blend well with the rest of the drum kit, enhancing your mix.
4. How to EQ Overheads
To EQ overheads, you can choose from two approaches, and the approach you choose will depend on how you have set up the overhead mics.
You can use the overhead mics to capture the entire drum kit, which captures the drum’s bottom end and tonal characteristics.
On the other hand, you could use the overheads exclusively for capturing cymbals. This approach produces a more focused sound for the cymbals and eliminates the bottom end and tonal information from other drums in the kit.
So setting up your mics correctly according to your goal will make EQing the overheads much easier.
EQ Overheads for Capturing the Whole Drum Set
Overhead mics are typically positioned high above the drum kit and capture the sound of the entire kit in a room, providing a sense of ambiance and space. So, for this approach, the EQ must include a broader range of frequencies to capture all that sound.
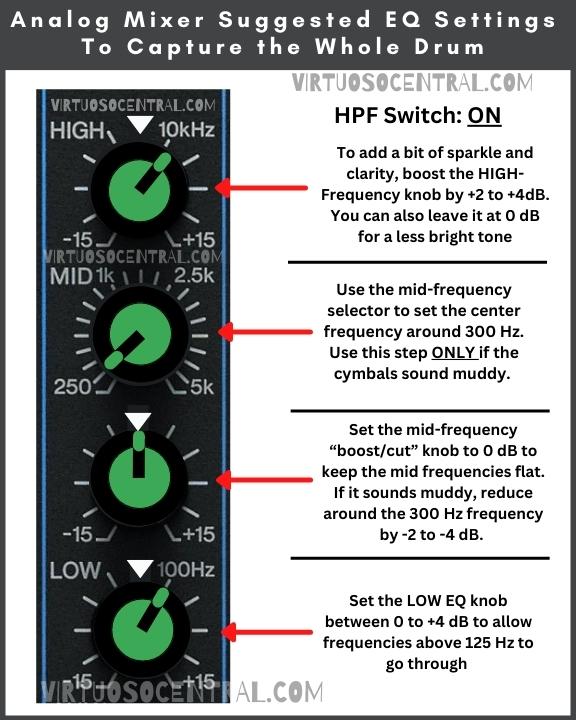
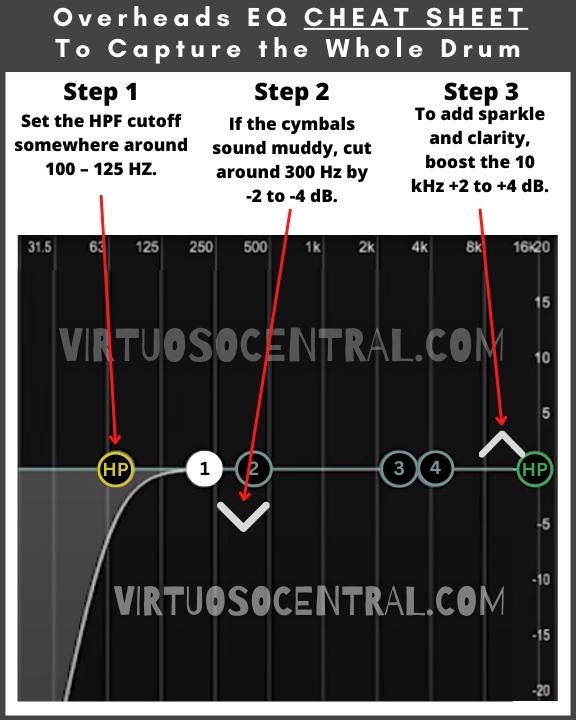
Follow these steps to EQ Overheads to capture the whole drum set’s sound:
- Turn on the high pass filter to avoid picking up unnecessary low-end rumble and low frequencies. If you can set the cutoff frequency of the HPF, like when using a digital console, set it somewhere around 100 – 125 HZ.
- At this point, you should check the overhead mics’ polarities to ensure they are not out of phase, making the snare sounds thinner. We want the sound to be thicker and more robust.
- If the cymbals sound muddy, cut around 300 Hz by -2 to -4 dB.
- To add sparkle and clarity, boost the 10 kHz +2 to +4 dB.
Please note that your overhead mics will be a few feet above the kick drum to capture the low end. I have written an article showing how to mic a drum set using several approaches, with the overhead method as one of the best options. Click the link to check it out.
Whole Drum Overheads EQ Cheat Sheet
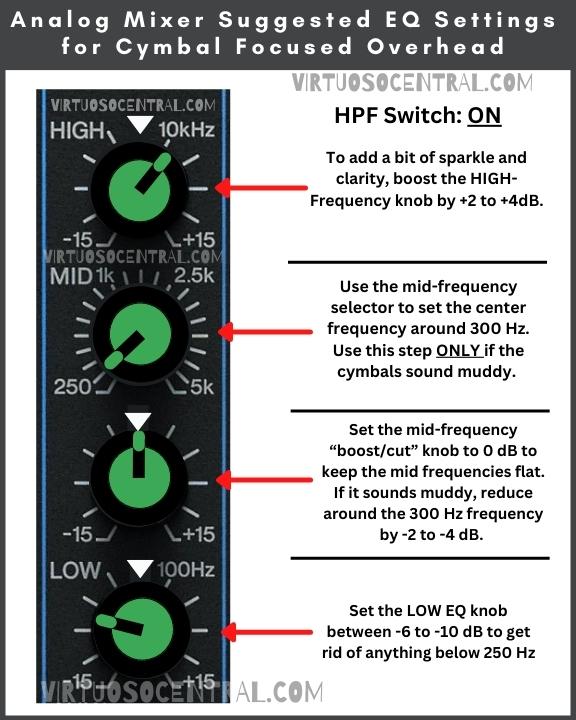
EQ Overheads for Cymbal Focused Approach
To capture the sound of cymbals more naturally while providing a more focused cymbal sound, overhead mics are used and are equalized to minimize capturing the sound of the other drum elements.
In this case, we need to reduce most of the lows and mid frequencies while boosting higher frequencies.
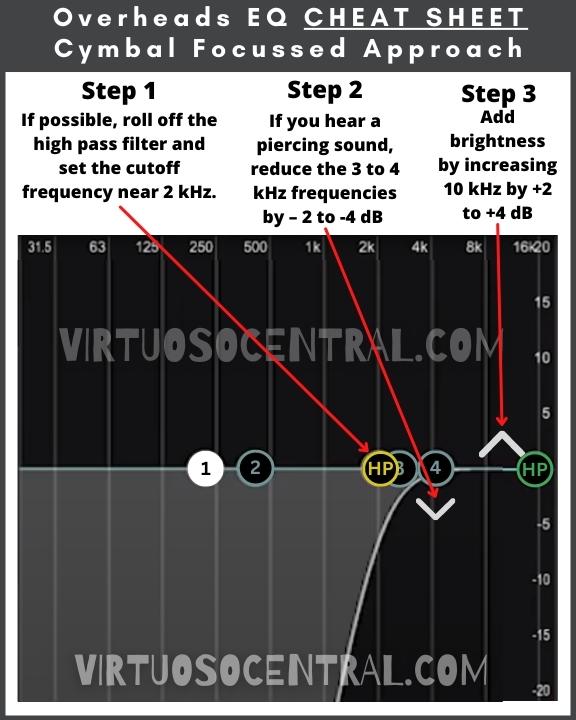
- Start by turning on the high pass filter to reduce the lower frequencies. If you are working with a digital mixer, roll off the high pass filter to set the cutoff frequency near 2 kHz.
- If you are working with an analog mixer, bring the low-frequency knob to -6 to -10 dB to eliminate frequencies below 250 Hz.
- If it sounds muddy, reduce around the 300 Hz frequency by -2 to -4 dB. But don’t take out too much, or it can make the cymbals sound too thin, and we don’t want that.
- Add brightness and clarity to the cymbal sound by increasing the 10 kHz by +2 to +4 dB.
- If you get a piercing sound, it means that the 3 – 4 kHz needs to be reduced. You can reduce it by – 2 to -4 dB or just enough to make the piercing sound disappear.
In this case, I also recommend checking the mic’s polarities to ensure they are not out of phase, thinning your sound.
Cymbals Focused Overheads EQ Cheat Sheet
5. How to EQ High-Hats – High-Hat EQ Settings
The fundamental or body frequencies for the High-Hats are between 280 – 500 Hz, and the overtones can reach up to 16 kHz plus.
You don’t want to overdo the high-end frequencies with High-Hats, especially in the 4 – 5 kHz range, because it will sound harsh.
Another thing to remember is that High-Hats tend to be loud enough that, depending on the music and the drummer’s style, in some cases, if overhead mics are used, you don’t even need to mic them.
But it is also good to have the flexibility and the option of emphasizing the High-Hat sound if necessary. For this reason, putting a mic on the High-Hat should be considered.
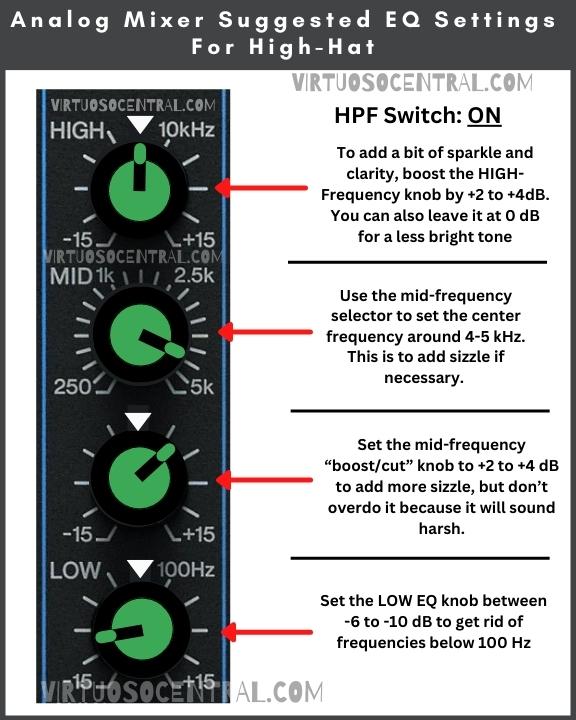
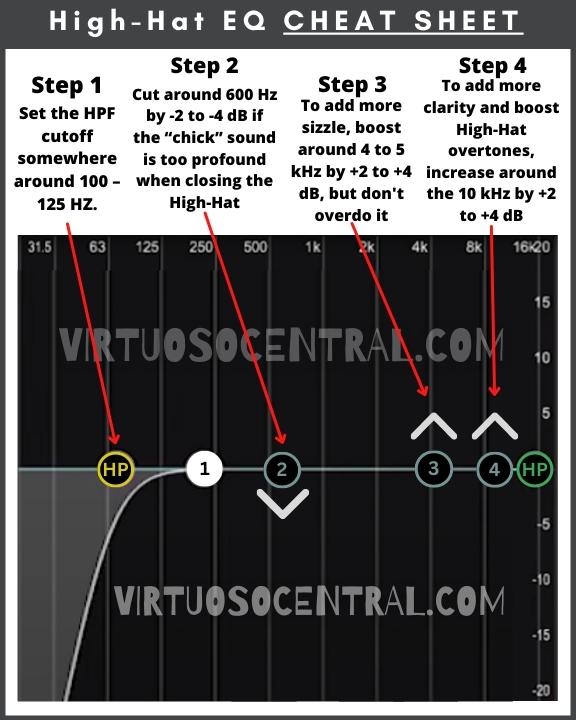
To EQ High-Hats when a mic is placed on top of it, follow these steps:
- The high pass filter (HPF) should be on to cut out the low frequencies.
- Decrease the low frequencies, anything below 100 Hz, by -6 to -10 dB to eliminate any low frequencies that are getting by.
- To add more sizzle, boost around 4 to 5 kHz by +2 to +4 dB.
- If the “chick” sound is too profound when closing the High-Hat, try reducing around the 600 Hz frequency bit.
- To add more clarity and boost some of those overtones that give the High-Hats that signature sound, boost around the 10 kHz for clarity.
High-Hat EQ Cheat Sheet
Consider the Fundamental Frequencies and the Overtones
As mentioned previously, all these are starting points for setting the EQ on a drum set. It’s important to remember that a drum’s frequency response can vary depending on the room or the environment where it is played or recorded, and the EQ settings that work well in one environment may not work as well in another.
This is why you need to consider the correlation between the fundamental frequencies and the overtones of each drum element to adjust accordingly.
The fundamental frequency is the lowest frequency at which an instrument or sound source vibrates, while overtones are the higher frequencies that are present in addition to the fundamental frequency.
The fundamental frequency of a drum is determined by the drumhead’s size, shape, and tension, as well as the materials used to construct the drum. The overtones that a drum produces are determined by the same factors, as well as the way the drum is played and the surrounding acoustics.
The fundamental frequency of a drum is often the most prominent in its sound, while the overtones provide additional harmonics that give the drum its unique character and tone. For example, a kick drum with a fundamental frequency of 60 Hz will also produce overtones at 120 Hz, 180 Hz, and so on, which contribute to the overall sound of the kick drum.
When EQing drums, it’s essential to consider both the fundamental frequency and the overtones. Adjusting the levels of different frequency ranges can enhance the overall sound of the drums by bringing out the fundamental frequency while also shaping the overtones to create a unique tone.
In summary, the fundamental frequency and overtones of drums are closely related, and adjusting the levels of different frequency ranges can enhance the overall sound of the drums by bringing out the fundamental frequency and shaping the overtones to create a unique tone.
Conclusion
When learning how to EQ drums, remember that it is a crucial part of the mixing process that can greatly enhance the overall sound of a drum kit.
By understanding the fundamental and overtone frequencies of each drum, and using EQ techniques to remove unwanted frequencies and boost the desired ones, you can create a drum sound that is clear, balanced, and punchy.
Whether you’re an experienced engineer or a beginner, having a cheat sheet or guide to follow can be extremely helpful in achieving the desired drum sound. But don’t forget that the provided cheat sheets are just starting EQ suggestions, and you need to make adjustments as the specific instrument, mic, and room acoustics are unique for each case.
Remember that the key to great EQ is to use your ears and always trust your own musical judgment. Happy mixing!
