We’ve all seen those connectors in a mixing board labeled “Insert.” Have you wondered what they are used for? Do you know how to configure and use inserts on a mixer?
In simple terms, inserts on a mixer are points of access on the signal path that can be used to take the signal out to an external device such as effects, compressor, limiter, etc. Then bring it back into the mixer so that it continues its path.
When you’re mixing audio, using audio effects is often the rule rather than the exception. It’s very uncommon to use raw, unprocessed audio, even in recording sessions when so much happens in post-production.
External effects are even more prevalent in live sound, though, where noise gates, reverb, compression, and limiters are so common.
Does that mean you need to use up all of your channels for routing audio from your mixer? Not at all. For this, you use inserts.
We’ve put together a guide on how to use inserts on a mixer to help you get started and, once and for all, understand how you can use them properly.
Keep reading to learn how to use channel inserts on a mixer and how it can elevate your mixes!
What Are Channel Inserts?
Picture your mixer, or if you’re still new to sound engineering, stand in front of it or pull up a picture.
Nearly every mixer on Earth will have a gain knob and three additional knobs for EQ. These are generally immediately above a pair of Aux Send knobs, and then there’s the Pan knob below that.
There may be an Effects send, as well. Then there’s the fader at the very bottom.
At the top of the channel strip, there’s usually an XLR and 1/4″ input. Finally, there’s a 1/4″ input immediately beneath the main inputs. This is a Channel Insert.
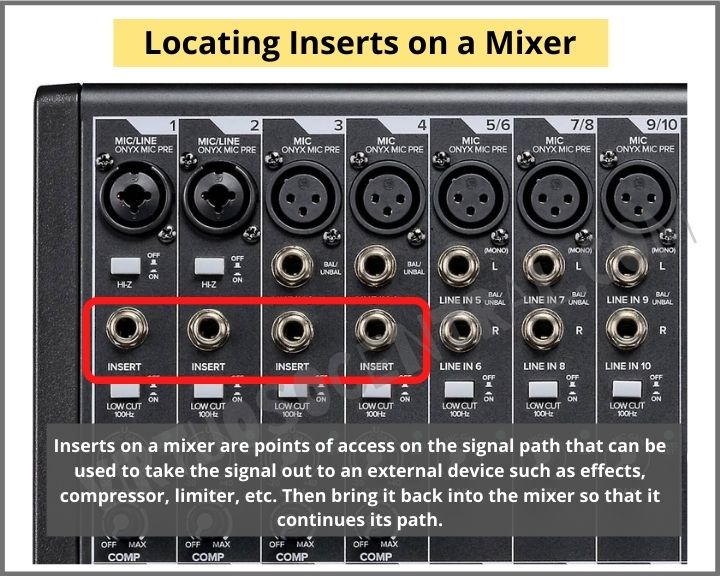
What it does, however, is a different story. It’s one of the more mysterious elements of a mixer. Although it resembles numerous other features, it’s also one of the more useful, especially if you have a limited number of channels.
Also, keep in mind that an insert works simultaneously as an input and output.
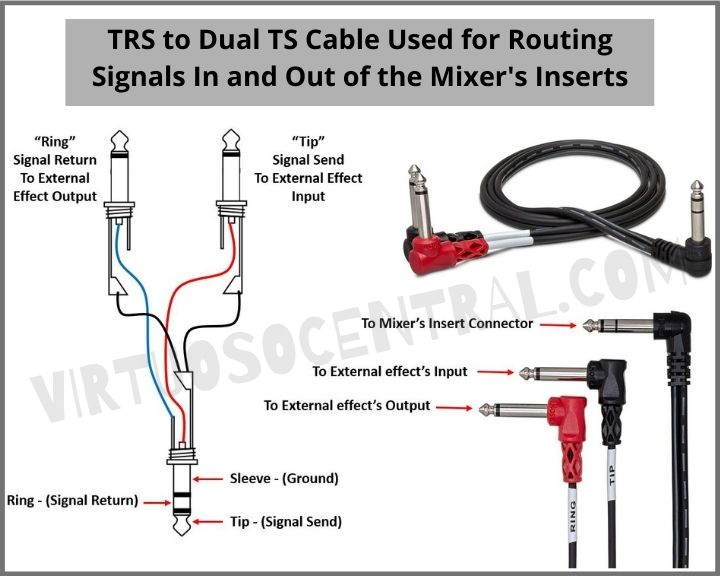
To put it simply, a channel insert hijacks the signal of a particular channel or group of channels and routes it to an external source (Out).
Then the signal from the external source is returned (In) to the mixer using the same connector to continue its path through the rest of the channel and ultimately end up at the main output or subgroup output.
To better understand the concept, here is a picture of a TRS to dual TS cable used for routing signals in and out of the mixer inserts.
“Isn’t this just a direct output or aux send, then,” you might be asking? No, not exactly, although it can function like either. More on this later.
Common Uses For Channel Inserts
Channel inserts are similar to other functions like aux sends. However, there are some reasons why you’d want to use channel inserts over other routing options. Here are a few.
Applying Effects
The most common reason, by far, for using channel inserts is as effects send/return. There are a few advantages of using inserts over other routing options when it comes to effects.
When you use the “Insert” feature on a channel, your signal is passed automatically through whatever effects it’s plugged into before moving down the signal chain.
It’s an easy way to ensure that all of your reverb, compression, EQ, or whatever other external effects modules you are using get into the mix.
For example, let’s say that the main vocalist has a high sibilance voice, meaning that there are excessive high-frequency bursts when using “S,” “CH,” and “T” sounds. Instead of a plosive that bursts out into the mic, sibilance is more of a high hiss.
Sometimes just lowering the high-frequencies in the EQ is not enough to take care of this issue. For this, you need a de-esser, but you only want it on the vocalist’s channel that has the problem. The easiest way to achieve this is to route that channel to an external de-esser using the channel insert. That way, this effect doesn’t affect the rest of the channels.
Another practical, real-life example of using channel inserts on a mixer would be to run a mic through a noise gate in a live setting. This way, the mic is guaranteed to be off when it’s not in use.

Using Channel Inserts as Direct Out
You can also route signals as direct-outs without interrupting their path using channel insert—this means that inserts don’t always return a signal depending on how you connect the cables.
For example, you can use channel inserts to handle sub-mixes. For instance, you might run the necessary channels into a secondary mixing board if you need to do a separate mix, whether it is for recording a raw take of each channel or as a broadcast feedline.
Another example of using channel inserts as a direct out is connecting a cable from the send side of the insert connector and running the signal into a recording device, such as a multitrack recorder or DAW (Digital Audio Workstation).
Signal Routing
When using channel inserts, you can route signals and apply effects simultaneously.
You can use a Y-splitter after the channel insert to run that channel through whatever effects you want, then connect the signal to a different device such as a multitrack recorder.
In other words, you can use channel inserts for applying effects and as direct out simultaneously.
Let’s go back to the previous example of using a de-esser to eliminate sibilance on a vocalist.
In this case, you would connect the external de-esser to the mixer using the channel insert. Then use a Y-splitter at the effect’s output to send the modified signal back to the mixer and use the other side of the Y-splitter to send the signal to a different device, such as a recorder or DAW.
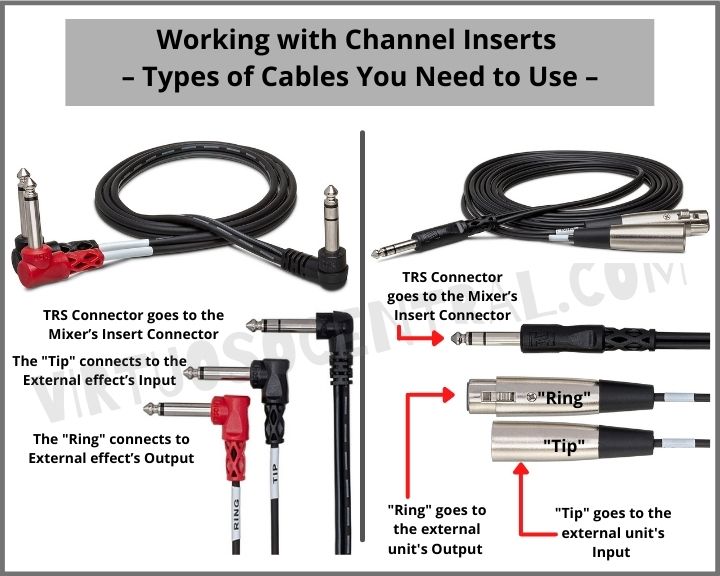
Working with Channel Inserts – Types of Cables You Need to Use
As we’ve said, channel inserts are similar to other features you’ll find on a mixing board.
They’re also unique in many specific ways, though. This means you’ll often need a specific kind of cable for optimal use of your inserts.
This mostly pertains to TRS cables. TRS cables stand for ‘tip,’ ‘ring,’ and ‘sleeve.’ They look very similar to regular 1/4″ cables, but they’re somewhat different.
TRS cables act like three cables in one. You can plug in the cable up to the first ring, which is the Tip, to solely send a mono signal. The ring and sleeve can be used to receive a mono signal after it has gone through a signal processor.
If you’re going to use TRS cables to split the signal from your channel insert, you will need a TRS to Dual TS Y-splitter for unbalanced signals or a TRS to Dual XLR Y-Splitter for balanced signal. The one you would need depends on the type of connector your external device uses. You can check your device’s specifications to know which cable to get.
How To Use Inserts On A Mixer – Making The Connection
We’ll round things out with a couple of real-world examples so you can see channel inserts in action. This will give you some concrete illustrations you can rely on in your own mixes.
The first scenario is hooking up your mixer to a compressor. To do this, you’re going to use a TRS Y-splitter. This will let you split the signal coming out of your channel insert.
Next, take the tip-side cable and plug it into the compressor’s input. Take the other (ring-side) and run it into the output. Now you’ve got a compressor patched in, using only one input.
If you want to use the channel insert as a direct output, simply plug the TRS cable in halfway. This way, a signal is sent out but not returned.
Channel inserts are so useful once you get used to using them. They come in handy in everything from live sound to studio sessions, letting you use all your effects without having to use up all your return channels.
They also ensure that your effects are in-line and in the mix, so you’re guaranteed that your compressors, EQs, and reverbs show up the way you intend them to.
What Comes After Learning How To Use Inserts On A Mixer?
There’s so much to know when it comes to mastering audio! Every area is its own unique discipline, with its own rules and laws.
For more audio engineering tips and tricks, make sure to check out the rest of our informative blog articles here.
