When a speaker stops producing sound, there could be several reasons why. In this post, I will explain a couple of methods of how to test a speaker to know if it’s working or not. The procedures shown in this article also apply for testing a car speaker as well.

How to Test a Speaker
There are a couple of methods used for testing a loudspeaker. The first method involves using a multimeter, and the second using a 9 Volt battery. Both ways can let you know if the coil that is inside of the magnet still works or not. Let’s take a look at the first method.
How to Test a Speaker With a Multimeter
The first thing you need to do is to try to get the speaker out of the cabinet. The reason is that most speakers have a frequency crossover inside to separate the signal going to the tweeter and the one going to the speaker.
If you measure straight from the connection terminals, the reading from the multimeter is not going to be accurate because there are several electronic components in between.
After getting the speaker out, put it upside down to have easy access to the terminals where the coil is connected, and follow these steps:
- Check the label in the back of the magnet to see what is the impedance of the speaker. The most common are: 4Ω, 8Ω, 16Ω, and in some weird case, you could get a speaker with an impedance of 2Ω. The symbol “Ω” means Ohms, and it’s the unit used for measuring electrical resistance.
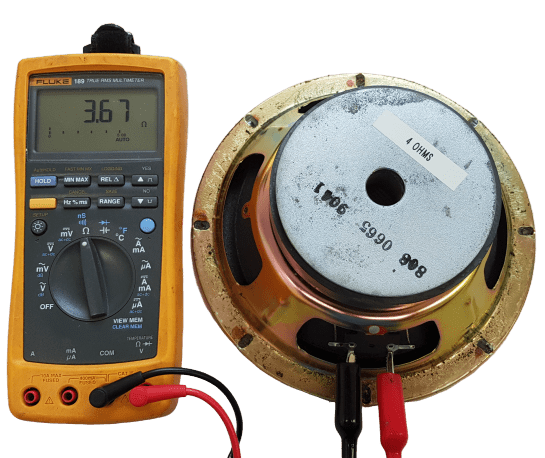
- Set the multimeter to read Ohms (resistance), and place one lead in the negative terminal and one in the positive terminal of the speaker. If everything is ok, you should have a resistance reading.

If your speaker has in the label 4 Ohms, your multimeter should read anywhere between 2 and 3.6 Ohms. The measured resistance of an 8 Ohms speaker can be between 4.8 and 8 Ohms. A 16 Ohms could have a resistance between 10 and 16 Ohms. In some cases, it can go as low as 8 Ohms and be considered good. The reason for such wide tolerances is due to something called “Direct Current Resistance or DCR” – and it’s defined as the measured resistance of an inductor. This resistance is dependent on the material used to make the wire used in the windings of the coil.
If your reading is a little resistance close to zero, it means that the coil is shorted internally. If the reading is a high value or “OL” as shown in some digital multimeters, then the coil is open circuit.

For example, if an 8Ω speaker reads 1.8Ω, it means that the coil was pushed outside its designed working parameters, heated up, and partially shorted inside. In a case like this, the speaker is damaged.
On the contrary, if an 8Ω speaker reads something like 50Ω, it means that the coil is also damaged due to excessive power applied to it. In a case like this, the loudspeaker is also damaged.
How to Test a Speaker With a Battery
In case you don’t have a multimeter and need to test a speaker to know if it works or not, you can use a 9 Volt battery to do so.
In this case, I also recommend taking the speaker out of the enclosure to make sure that you don’t apply voltage to the crossover circuitry that is inside the cabinet.
After getting the speaker out, hold it in one hand, and with the other hand, touch the terminals with the battery. Just make sure that the positive terminal of the speaker is connected to the positive side of the battery and the negative terminal to the negative side of the battery.

Another precaution is to touch the terminals of the loudspeaker with the battery for a short time, no more than 2 seconds or less, to avoid damaging the coil inside, especially if the speaker is of low wattage.
If the speaker is good, as soon as you touch the battery to the terminals, you should hear a sound, and the cone should move. If the coil is shorted or open, the cone will not move or generate any sound.
The method of testing a speaker with a battery is not as accurate as using a multimeter because sometimes the speaker could be partially damaged, and it would seem to be working but, in reality, is not good.
Another thing you can do is verify if there is a burnt smell when you get close to the cone. If you notice a smell like something is burned, then it’s likely that the coil overheated due to excessive power applied to the speaker.
How to Test a Tweeter
Tweeters come in different shapes and sizes, but most of them use a coil placed inside a magnet to generate the sound. Other types of tweeters, such as piezo, use piezoelectric crystal coupled to a mechanical diaphragm for sound to be produced.
To test a tweeter that uses a coil, follow the same steps as for testing a speaker. Don’t use the battery method to test a tweeter because it can damage the coil as it’s not as robust as a speaker’s coil.
To correctly test if a tweeter is good, follow these steps:
- Check the label in the back of the magnet to see what is the correct value.
- Set the meter to read Ohms and connect one lead to the negative terminal, and one lead to the positive terminal.
- Use the tolerances mentioned above to compare the measured values with the label value.
A shorted tweeter coil is going to read zero Ohms or any value close to zero. An open tweeter coil is going to read a high resistance or “OL (Out of Limit).”
Testing a Piezo Tweeter
When testing a piezo tweeter, we have to take a different approach. A multimeter is not recommended for testing it because the result might not be valid. To correctly test it, disconnect it from the crossover, and if possible, remove it from the cabinet.
Use a small amplifier to connect it. Play some music and slowly increase the volume until you hear a sound coming out of it. If you have increased the volume to a point where you should hear something, but there is no sound, then the piezoelectric crystal is damaged. If there is sound coming out of it, but it doesn’t sound good, then it’s partially damaged, and it needs to be changed.
Final Thoughts
In this post, I have explained how to test a speaker using a couple of ways. The first way is by using a multimeter, and the second is by using a battery. Both procedures should help you pinpoint if you have a problem with your loudspeakers.
If you are wondering how to test a car speaker, you can also use both methods to do that. In the article, I have also addressed the procedures for testing tweeters.
