In this era of intelligent technology, we have most of our digital tools in our pockets. The iPhone, and smartphones in general, can be used to make good quality audio recordings, whether you are using the onboard microphones or connecting the phone to a mixer.
These phones have good microphones that would work well for most people’s needs and can even pick up and record sound with a wide range of frequencies. But that doesn’t mean it would sound anywhere near as good as if you were getting the signal straight from the audio mixer.
There are several reasons why you would want to record the audio signal coming from external devices such as a mixer to your phone. One example would be to capture a clean audio signal from a live event such as a concert or seminar.
Another case would be if you are recording a podcast with several guests or if you are creating content for social media and are using several lapel microphones connected to a mixing board.
You would benefit from getting a straight feed from the mixing console in any of these cases. That way, you end up with a much better and cleaner sound.
There are several ways you can use to record audio from a mixer to an iPhone, but the six best methods are:
- By Connecting a USB Capable Audio Mixer to Your iPhone (Best Option)
- Using a multichannel audio interface
- Leveraging the Interface Capabilities of the iRig Stream
- Using an XLR to USB Signal Adapter
- With an External USB Sound Card
- Using a Line-Level Audio Adapter with Built-In Attenuation
Read on as we go into more detail on each one of these methods so that you figure out which one will work best for you.
Recording Audio from a Mixer to an iPhone – Step By Step Instructions
If you want to capture and record external audio sources, such as from a mixer to your iPhone, you will need some extra equipment and a few connectors to achieve this.
The iPhone and iPad don’t support inputs from most mixers natively, so you have to look for other ways to make the connection.
Here are several ways to get the best-sounding audio from your mixer into the iPhone. Some of these methods are reasonably inexpensive and easy to perform, while some solutions may require a bit of effort, knowledge, and investment on your end.
1. By Connecting a USB Capable Audio Mixer to Your iPhone
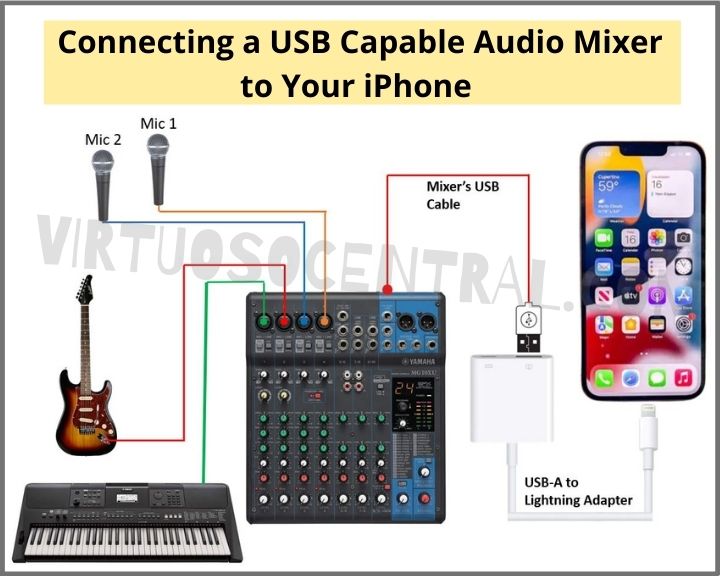
If you have a USB-capable audio mixer, this method is very inexpensive and easy to follow. A USB-capable audio mixer has everything it needs inside to output a digital stream of the audio signal through a USB cable. It basically works as a built-in audio interface between the analog signals and your iPhone.
This is what you will need to make the connection if you choose this method [Links to Amazon]:
- USB-A to Lightning Adapter or a USB-A to USB-C Adapter (MFI Certified)*
- USB Cable to connect to the mixer
- An Audio Recorder App or DAW installed on your device (GarageBand Works)
*Please Note: You need to figure out the type of connector your device uses so that you get the correct adapter. For example, the iPad Pro now comes with USB-C instead of the usual Lightning connector. This also applies to some iPhone versions. Some newer models use USB-C, while others still use the Lighting port. I have included links for both types. Choose the right one for you.
Steps for Making the Connection
Follow these steps to send audio from a mixer to iPhone or iPad. You can also use the diagram below as a reference.
- With the audio mixer turned off, Plug the mixer’s USB cable at the back.
- Connect the other side of the USB-A coming from the mixer to the Lightning-to-Camera adapter. You can either choose the Lightning-to-Camera adapter or the USB-C multi-adapter, depending on the model of your iPad. The adapter also allows you to charge your device while the other device is connected, making it more feasible to use for more extended events.
- At this point, you can connect the adapter to your phone
- Turn on the mixer and wait for the device to show the pop-up message saying “Audio Device Connected.”
- On the pop-up message, you can either select “Turn on Monitoring” to connect a pair of headphones to the mixer and monitor what is being recorded on GarageBand or select “Cancel” if you don’t want to monitor the audio on the mixer side but on the iPad itself connecting headphones to it.
- You don’t need to download any drivers. Your iPhone or iPad should establish the connection immediately. If it doesn’t automatically connect, you might need to go to the mixer’s manufacturer site to download the drivers. This can happen if the mixer you are using is slightly old.
To configure GarageBand with your audio mixer, go to the last section of this article, where I explain how to configure it correctly to capture and record a stereo audio signal.
Connection Diagram
2. Using a Multichannel Audio Interface
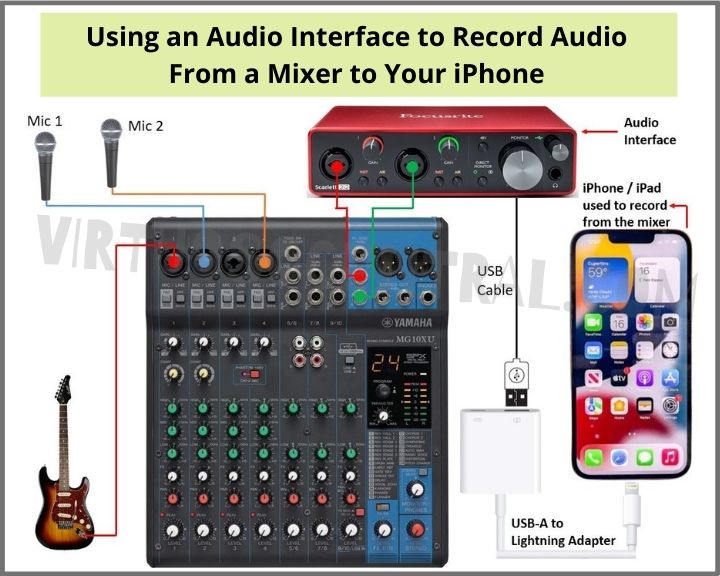
The second method to record audio from a mixer to an iPhone is to use a USB audio interface. This is a bit more complicated in terms of getting power as these devices rely on the bus power from your computer, and your iPad or iPhone isn’t powerful enough to do that efficiently.
To solve this issue, you will need to use a powered USB hub that gets power through a wall adapter rather than relying on power from the USB bus.
When using this method, you need a few accessories and cables to make the connection. This is what you will need [Links to Amazon]:
- A USB audio interface
- A USB hub with an external power supply
- Depending on your device, a USB-A to Lightning Adapter or USB-A to USB-C Adapter – Needs to be MFI Certified.
- USB Cable to connect to the audio interface – Usually supplied with the audio interface
- TRS balanced audio cable or XLR balanced audio cable – To bring the audio signal from the mixer to the audio interface.
- An Audio Recorder App or DAW installed on your device (GarageBand Works)
Please Note: The latest generation audio interfaces like the Focusrite Scarlett are USB-C native, which means that if you are using an iPad or iPhone that has a USB-C charging port, and your USB hub data cable is also USB-C, you wouldn’t need to get the USB to Lightning adapter. In that case, you would go straight from the hub to the phone.
You can even use the phone or iPad’s charger to charge the device while recording. That way, you don’t run out of battery while recording.
Step-by-Step Process for Making the Connection
- First, connect the USB Hub’s external power supply to an electrical outlet.
- Now, connect USB to Lightning adapter to your iPhone or iPad.
- At this point, attach the hub’s data cable to the USB to Lightning adapter.
- Connect the audio interface’s USB cable to the hub. You should see the interface turn on.
- A few seconds later, you should see a pop-up appear on the device saying “Audio Device Connected.”
- The audio interface then needs to be connected to the audio mixer. We can do this using XLR cables, or you can use quarter-inch TSR or TS audio cables, depending on what kind of throughputs your mixer uses. I will not go into detail on how to connect the mixer to the audio interface because I have already covered this topic in another article. Click the link to check it out if you need to.
- At this point, you can configure GarageBand on your device to start recording. Once you do that, you will see the input signal level on your phone’s display, and after that, you just need to adjust the volumes, and you’re good to go. To configure GarageBand, you can see the procedure in the last section of this article.
Diagram for Making the Connection
3. Leveraging the Interface Capabilities of the iRig Stream
The iRig Stream is a 2-channel audio interface designed for mobile devices like iPhone, iPad, or Android. It also works with Mac and Windows computers. This device consumes so little power that your phone or tablet can power it on the go, with no need for external power adapters.
It connects the analog signal coming from any audio mixer using RCA connectors, making it a versatile tool for capturing a stereo or mono signal and recording it to your iPhone or iPad with the included app or GarageBand if you prefer.
Here is what you will need if you decide to use this method [Links to Amazon]:
- iRig Stream Interface
- Download and install the iRig Recorder 3 LE. You can also use GarageBand or any other DAW of your choice.
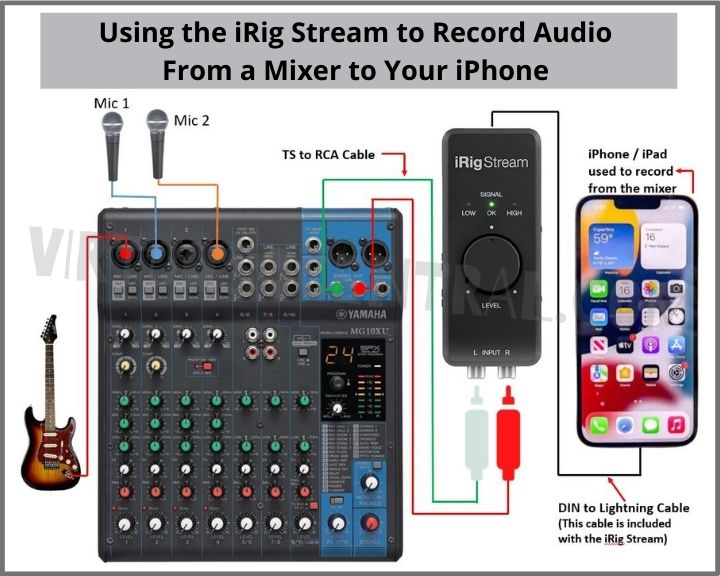
- Audio Cables – Male TS to Male RCA or Female XLR to Male RCA. The audio cable you choose will depend on which output is used from your mixer.
This is an excellent option if you efficiently want to connect a mixer to an iPhone. It’s a simple setup process:
- Take the included Lightning or USB-C cable and connect one side to the iRig stream and the other side to your iPhone or iPad. This also works with Android devices.
- Locate an available line-level output in the audio mixer. You can use the output labeled “CTRL ROOM,” “CR OUT,” “STEREO OUT,” “AUX SEND,” or “REC OUT” if you have an older mixer.
- Run a cable with the correct connector to the iRig Stream from the mixer. Depending on the line-level output you chose, you would need to use an XRL to RCA or TS to RCA cable.
- You should start to see an input on your iPhone which means you’re good to go. However, before you hit the record button, you need to perform an audio check to ensure good sound levels.
- If you use multiple microphones in a podcast setting, ensure all microphones are at the proper sound level.
- Adjust the signal on your mixer first, as it’s the primary device in the audio chain.
- Now, move on to the iRig interface, adjust the primary signal using the knob on the device to make sure that the recorded audio isn’t too high or too low.
If you’re in doubt, consider having the signal a bit lower as you can increase the volume post-production without any distortion. But please, keep in mind that having it too low may cause you to need to remove some hiss when boosting volume, too, so make sure the audio signal is at least audible before you start recording.
You can perform a few tests before recording to ensure a correct volume.
Follow This Diagram for Your Reference
4. Using an XLR to USB Signal Adapter
This method is somewhat limited because you can only record a single channel or mono signal. These types of adapters can only handle one channel.
The reason is because they are originally designed to connect XLR microphones to a computer. But if you have one of them lying around, it can be used to send an audio signal from a mixer to the iPhone or iPad.
The setup procedure will be very similar to the second method, but in this case, we are only dealing with a single channel.
Please Note: This method is not as good or practical as the first three methods presented in this article. Buying one of these adapters will cost you almost the same as purchasing an audio interface. But I decided to include it so that you have all the options available to determine which works best for you.
Here is what you need to follow these steps easily:
- XLR to USB Signal Adapter – The best two adapters are the Shure X2U and the Pyle PDUSBPP10
- XLR Cable
- USB to Lightning Adapter
- USB Cable
- Broadcaster app, DAW, or recording app
Making the Connection
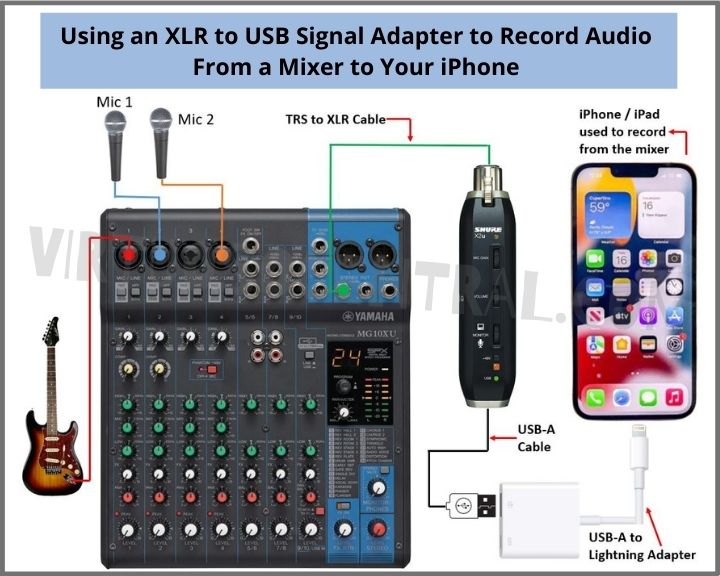
- Start by connecting an XLR cable from one of the mixer’s XLR outputs into the input of the XLR signal adapter
- Connect one end of the USB cable into the XLR signal adapter and the other to the USB to Lightning Adapter.
- At this point, you can connect the USB to Lightning dongle to your iPhone or iPad the same way we did in the first method.
The good thing is that your phone or tablet can power the signal adapter without needing an external power supply. However, it’s recommended to get the USB to Lightning dongle with the charging port so that your phone stays charged while recording.
This XLR signal adapter is also helpful in some other cases. For example, you can connect a condenser studio microphone or regular dynamic mic on the go to your computer without an interface.
Diagram for Making the Connection
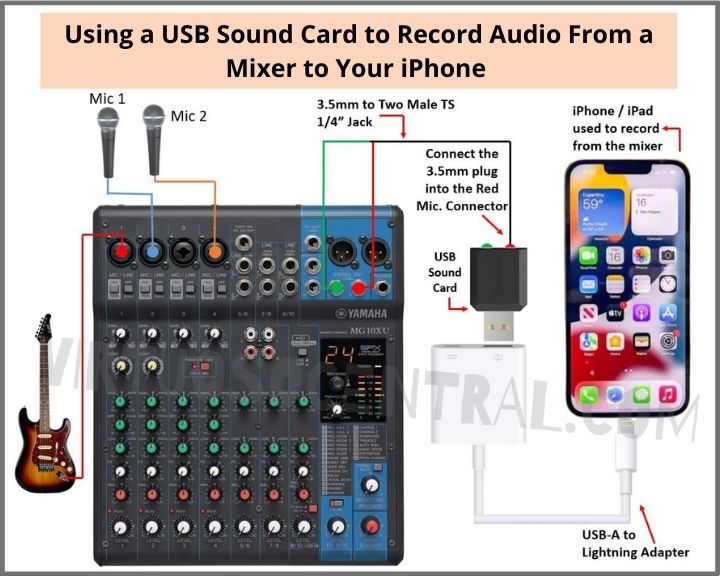
5. Record Audio From Mixer to iPhone With an External USB Sound Card
Using an external USB sound card isn’t the best method to connect the mixer to iPhone because you don’t have much control over the audio signal. Still, it’s one of the most convenient ones if you already have one lying around, making it a more viable option for many people. These sound cards are relatively inexpensive online too.
If you decide to use this method, here are the components and cables you’ll need to make the connection:
- A USB sound card
- USB to Lightning Adapter
- Depending on the output you choose in your mixer, you need one of these cables:
Connecting Everything Together
- Plug the USB sound card into the USB to lightning adapter.
- Connect the adapter to your iPhone or iPad. You will see a message pop up that tells you that your audio device has changed.
- You can use two options here to connect your mixer to your iPhone.
- If your mixer has RCA output, you can use a stereo RCA to 3.5mm audio jack. Connect the 3.5 mm jack to the red microphone port on the soundcard. Plug the RCA wires in the “Record Out” port of the mixer, and it should start giving you a signal on your iPhone or iPad.
- If you decide to use the main XLR output or the “Stereo Out” or any other Aux or SUB outputs in the audio mixer, you need a 3.5 mm to XLR cable or the 3.5 mm to ¼” Jack. Please note that the cable you use here will depend on the output capabilities of your mixer. Connect the 3.5mm jack into the red microphone jack of the USB sound card, and the XLR or ¼” Jack plugs in the corresponding output in your mixer. At this point, you should start getting an audio signal on your iPhone or iPad.
Connection Diagram
Here is a diagram that you can use for your reference that shows the connections
6. Using a Line-Level Audio Adapter With Built-In Attenuation
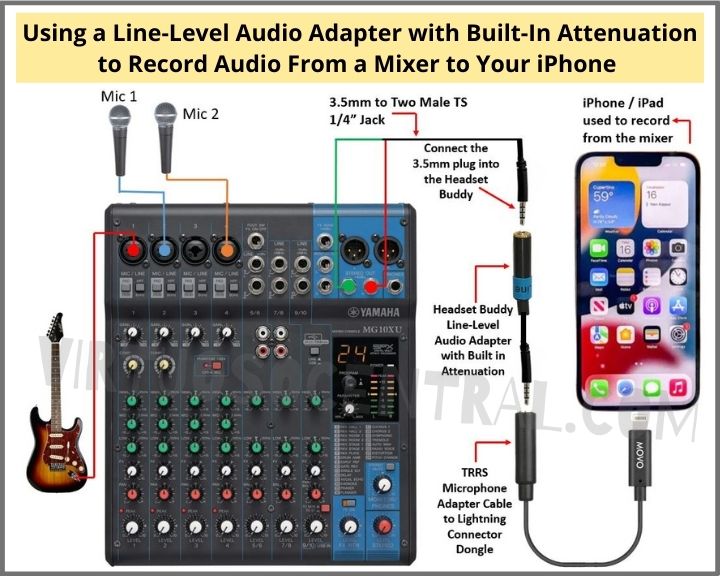
The last method you can use to send audio from a mixer to an iPhone or iPad is by using an adapter that takes the line-level signal coming from the mixer, then attenuates it so that it can be used adequately.
Using this method is very simple but is somewhat limited because you don’t have much control over the signal coming into your device.
The reason why the audio signal coming from the mixer needs to be attenuated is because if you connect it straight to the iPhone, it will overload the device, and the resulting sound will be distorted and impossible to comprehend.
To avoid this, you can use a line-level audio adaptor to solve the issue. These adapters work by knocking down the signal to a point where the iPhone can take the signal without distortion. Technically speaking, it attenuates the signal by -20 dBV.
If you feel that this method works best for you, here are a few things you will need to make it work [Links to Amazon]:
- Headset Buddy
- TRRS to Lightning Connector Dongle
- Depending on the output you choose in your mixer, you need one of these cables:
- Download and install an input level recording application such as bossjock jr on your iPhone. This will allow you to set the input level. It shows you the input level on the screen, and you can adjust it easily.
- A DAW program such as GarageBand or the one of your choice.
Hooking Up Everything Together
- Start by connecting the TRRS to Lightning dongle to your iPhone or iPad
- Next, connect the Headset Buddy to the TRRS to Lightning dongle
- At this point, you need to bring the audio feed from the mixer to connect it to the Headset Buddy. As mentioned previously, you need to choose an output from the mixer. It can be the one labeled “CTRL ROOM,” “CR OUT,” “STEREO OUT,” “AUX SEND,” or “REC OUT” if you have an older mixer.
- The input level on your mixer can change depending on how loud the mix is. Keep in mind that eventhough the audio mixer may show that the audio levels are fine, this can be different at the input of the iPad or iPhone.
- The key to setting the audio level is knowing where it should be without peaking. This is where the bossjock jr app comes in to keep in check the input audio level so that it never is too low or to high. A good rule of thumb is to keep the audio level in the green area of the meter. Never allow the audio level to go beyond the yellow level.
- Do a test recording to make sure the level are good before recording the event’s audio.
- Open the DAW app such as GarageBand, and start recording the audio coming into your phone from the audio mixer.
Diagram for Making the Connection
Here is the diagram you can use as a reference to make the connection
Setting Up an Audio Capturing Device With GarageBand
As mentioned earlier in the article, you can record the audio coming into any audio capturing device such as a mixer, audio interface, iRig interface, XLR to USB converter, or USB audio card to your iPhone or iPad using Apple’s GarageBand app.
But before you start recording, it needs to be configured to record the audio in stereo mode. Follow these steps to configure it:
- Press the plus button “+” in the top right-hand corner of GarageBand’s main window.
- Scroll until you see the “Audio Recorder” option, select “Voice,” and wait until the track settings window opens.
- On the lower left side of the window, select the “Channel” option.
- A small window opens where you can select how many channels you want to use in your recording. Since you are taking the audio signal from a mixing console, select the “Stereo” option.
- If you want to monitor the recording through the mixer, on the lower-right side of the window, under Monitor, select “On.”
You may need to use a decent set of headphones coming from your iPhone, iPad and not just from the monitor out of the mixer, as the signal may be different once the phone has processed it.
Looking for More Help?
Most people have access to their phones 24/7, so doing your recording on your iPhone may seem like the best option. You can record audio from mixer to iPhone with any of the above options we mentioned, but we recommend using a dedicated device like the iRig for the best results.
We hope that these methods help you out in your audio recording journey. You can also check out our article on mixing and mastering tips if you can’t get the audio sounding just right.
