If you have tried connecting an effects processor to a mixer for the first time, you most likely felt confused about the procedure.
You might have asked which send and return to use, pre-fader or post-fader? Should I use the external effect send or Aux Send?
When connecting an effects processor to a mixer, the best way is to route the signal to the processor using a post-fader send, then bring the processed or “wet” signal back to the mixer using a stereo channel.
Connecting the external effects unit to the mixer this way will provide you with many advantages, such as being able to EQ the effect, route it to the monitor mix as necessary, and give you more control over the effect’s signal path in your mixer, to name a few.
In this post, I will show you how to connect an effects processor to a mixer using two different methods, plus provide you with connection diagrams for your reference, let’s get started.
Getting to Know Your Mixer’s Send/Return Section
Before we continue, let me clarify what pre-fader and post-fader terms stand for.
Pre-fader means that an Aux Send taps into the channel’s incoming signal at a point before the channel fader. Meaning that if the channel fader is up or down is not going to affect the level of the signal going out on the “Send” connection.
On the other hand, post-fader means that the signal going out on the “Send” connection follows the channel fader, meaning that if the fader is down, there will be no signal at the “Send” connection, and if it’s up, there will be a signal at the level set by the fader.
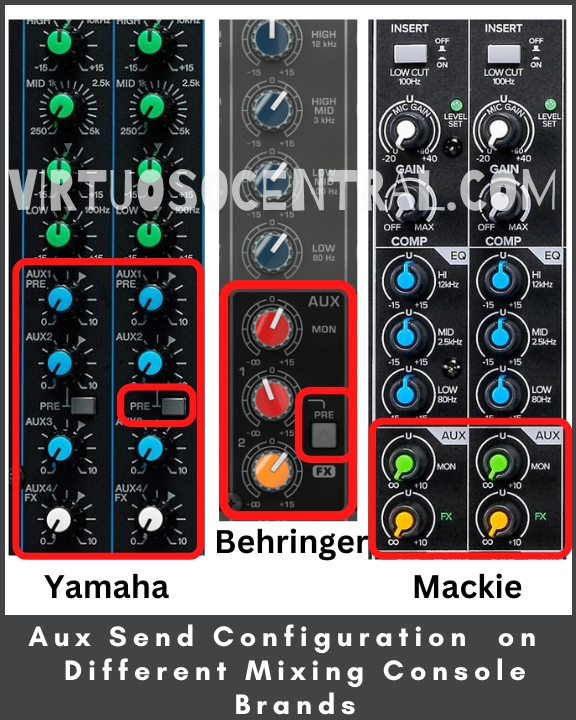
The image below shows you the Aux Send configuration on different mixing console brands.

Most analog mixers with 12 channels or more will provide you with at least one pre-fader and one post-fader Aux Sends. In most cases, they can have more. Sometimes Aux Sends come with a switch to either use them as pre- or post-fader Aux Sends.
For setting up an effect processor, the best practice is to use a post-fader Aux Send to have the most control over the effect and how it’s routed through the mixer.
This is because when you fade out the channel, you want the effect to fade out along with it; you don’t want the channel signal to go away but the effect to stay on. It doesn’t sound natural in live sound. It sounds weird because you’ll only hear the wet signal.
Locating the Pre- and Post-Fader Send/Return on a Mixer
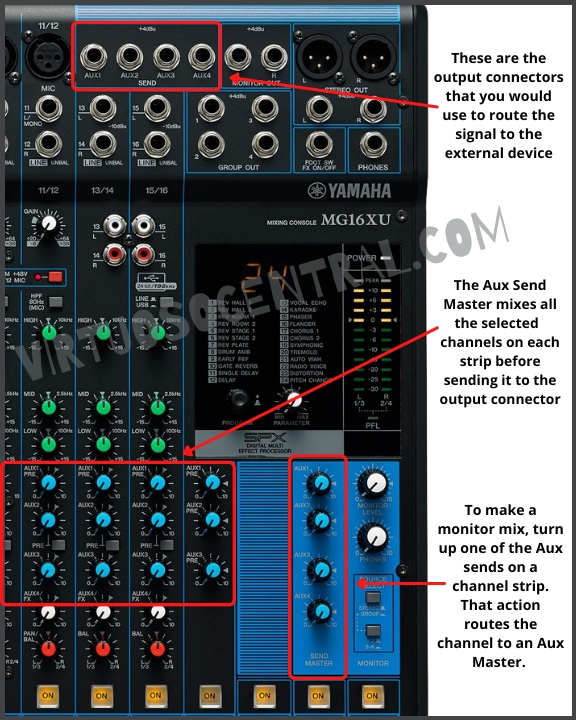
The image below is of a Yamaha MG16XU, a very popular and excellent analog mixer in the market. There you can see the typical Aux Send configuration used by most mixing console brands nowadays.

You’ll get two or four Aux Sends in a typical analog mixer. In the image below, we have Aux 1, and 2, which are “switchable” pre- or post-faders Aux Sends, meaning that by default, they are post-fader, but you can activate the switch and make them pre-fader if you want, and Aux 3 and 4 which are post-fader by default.
Also, notice that Aux 4 is also labeled FX. This is because this particular mixer comes with internal effects, but keep in mind that if you connect a cable to Aux 4 Send, the internal effects will be disabled, and you will be able to use Aux 4 as a regular post-fader Aux Send.
Connecting anything to the Aux Send labeled FX in any analog mixer will automatically disable the mixer’s internal effects.
Notice that each channel has a knob labeled Aux used to control the amount of signal from that specific channel to be sent to the effects unit. Also, notice that on the right side of the mixer, in the master section, there are other Aux knobs Labeled “Aux Send Master.”
For the signal to go out from the mixer to the effects unit, you need to have the Aux knob on the specific channel turned up, and the Aux Send Master knob also turned up.
To recap, when connecting an external effects unit, first locate a post-fader Aux Send on your mixer, then route the signal from the mixer into the effects unit.
Cables You Need to Make the Connection
To connect the mixer to the effects unit and back to the mixer, you need three 1/4″ TS Male to 1/4″ TS Male cables (link to Amazon). This type of cable is also known as a regular guitar cable.
The reason we are going to use regular guitar cables is that the cable runs are short, basically a few feet long. If the cable runs are longer than 10ft, use TRS or balanced cables.
We are using three cables because we need one line to carry a mono signal from the Aux Send on the mixer side to the Input of the effects unit (dry signal) and two cables to bring the signal from the effect units in stereo to the input of a stereo channel on the mixer (wet signal).
Steps to Connect an Effects Processor to a Mixer Using a Stereo Channel – Best Option
For this example, I will use a Yamaha MG16UX mixer to explain the procedure. The steps described here apply to any other mixer brand. The only difference could be minor differences in how other mixer knobs are labeled.
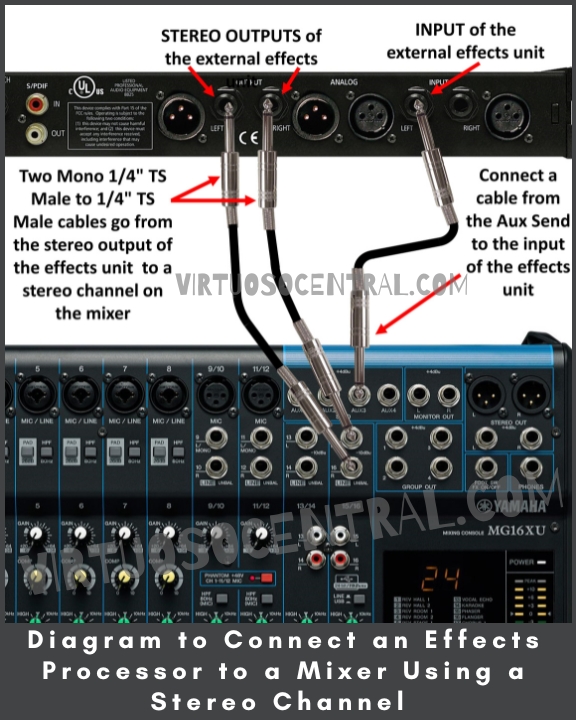
- After locating the Post-Fader “Aux Send” you want to use, connect one side of the 1/4” TS male jack to the corresponding Aux Send connector.
- In this case, I am using Aux 3. Aux 1 and 2 can also be used, but you must ensure that the pre-fader switch is not activated. Also, I am not using Aux 1 and 2 because they are usually used to set a monitor mix for musicians and singers.
- Take the other side of the 1/4″ cable and connect it to the input of the effects unit. If your effects unit comes with a stereo input (left, right), connect the cable to the left side, this tells the device that the incoming signal is mono.
- Connect one side of the other two 1/4″ TS cables to the stereo output of the effects unit, one to the left and one to the right.
- Take the other side of the cables and connect them to the left and right connectors on one of the stereo channels on your mixer.
- I like to use the last stereo channel closest to the master section. In the case of this example, it would be channel 15/16.
- Turn on the effects processor and choose an effect such as reverb or hall to run a test.
- Increase the Aux knob on the channels you want to have an effect to about halfway and turn the Aux Send Master to about halfway. For this example, I have plugged a microphone for testing and setting gains on channel 1. So, I need to turn up the Aux 3 knob on channel 1.
- Usually, effects units have a knob labeled “Input Trim,” “Trim,” or “Sensitive” that controls the amount of signal coming into it. If that’s the case, you want to make sure that you set it to a point where the input signal doesn’t exceed 0dB or Unity gain to avoid distortion in the signal.
- It is a good practice to have the audio level coming into the effects unit lower than 0dB to have better headroom.
- Set the correct gain on the stereo channel where the signal from the effects unit is connected. In my case, I need to set the correct gain on channel 15/16. To do this, you need to:
- Set the Master Faders to 0dB / U / Unity, depending on what’s labeled on your mixer.
- Set the volume fader on the stereo channel where the signal coming from the effects unit is connected to 0dB / U / Unity.
- Increase the fader volume on the channel where the mic you are using is connected.
- Locate and press the PFL button to activate it. It is located at the bottom of the channel strip next to the fader in every channel. In some mixers, a small LED lights up when pressed.
- Note: PFL stands for “Pre-Fader-Listen,” and it routes the audio signal from that channel to the VU Metter so that you can visually see and measure the strength of the audio signal on that specific channel.
- At this point, start talking into the mic and watch what is happening at the VU Meter. If you don’t see any movement in the VU Meter, slowly increase the gain on the stereo channel where the signal coming from the effects unit is connected until the loudest sections of the audio source are shown in the green area of the meter.
- Ideally, when setting the gain for effects, you want to be below 0dB or Unity (green LED). As long as you see a signal coming in and is below 0dB, that would be perfect.
- Once you have set the gain for the stereo channel where the signal from the effects unit is connected, depress the PFL button and increase the Aux knob for each channel you want with the audio effect.
- Run a sound test with all those channels to make the necessary adjustments so that it sounds balanced.
Remember, you can increase or decrease the amount of effect coming into the mixer by increasing or decreasing the fader, or if you want to increase or decrease the effect for a specific channel, you can do so with the Aux knob. In this example, it would be Aux 3.
A good practice is not to overdo an effect, meaning you don’t need to add a crazy amount of effect to your mics and instruments. Add a bit to make it sound better because, as the saying goes, if you can hear the effect, you added too much.
Adding too much reverb or any effect, in general, will make your signal sound too damp or too wet, as referred to in the sound industry.
Check out this article to learn how to set up your mixer to get the best sound possible.
Here is the diagram to connect an effects processor to a mixer leveraging a stereo channel on the mixer. Use it for your reference.

Connect an Effects Processor to a Mixer Using “Stereo Aux Returns”
The second option to connect an external effects unit to a mixing console is by using the “Stereo Aux Returns.” Although this is another option you can use, it’s not as practical as the previous one because you don’t have much control over the effect signal other than increasing or decreasing the amount of effect you add to a specific channel.
By connecting the effect to the stereo aux return, you can’t EQ the effect, mute it, route it, or control the gain. But sometimes, you don’t have enough stereo channels to use, so in such a case, you can opt for using this method.
Steps for Connect an Effects Processor to a Mixer Using Stereo Aux Returns
For this example, I will use the Behringer Xenyx X1832USB mixer to explain the procedure. The steps described here apply to any other mixer brand. The only difference could be minor differences in how other mixer knobs are labeled.
To make this connection, we’ll also need to use three 1/4″ TS Male to 1/4″ TS Male cables (also known as regular guitar cables) link to Amazon.
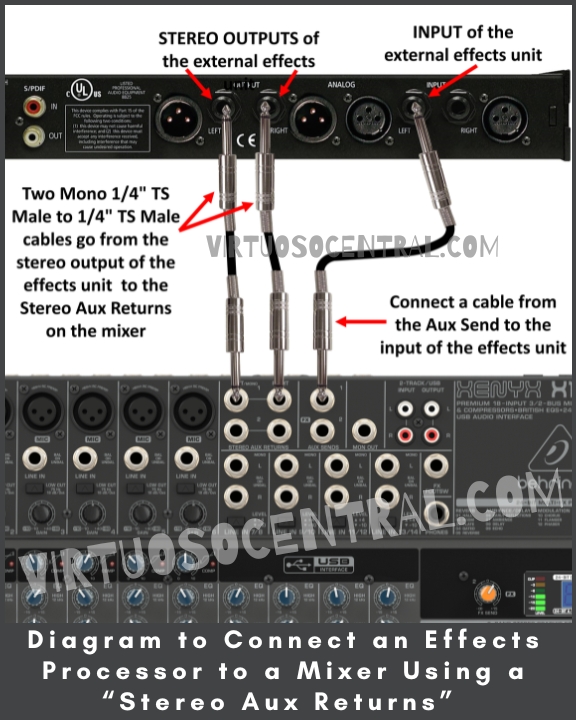
- Locate the “Aux Send” you want to use and connect one side of the 1/4” TS male jack to the corresponding Aux Send connector. In this case, I am using Aux 1.
- Connect the other side of the 1/4″ cable to the input of the effects unit. Connect the cable to the left side if your effects unit has a stereo input (left, right). Doing so makes the effects unit default to a mono signal.
- At this point, connect one side of the other two 1/4″ TS cables to the stereo output of the effects unit, one to the left and one to the right.
- Bring the other side of the cables and connect them to the left and right connectors of the “Stereo Aux Return 1.”
- Turn on the effects processor and choose an effect such as reverb or hall to run a test.
- Increase the Aux knob on the channels you want to have an effect to about halfway and turn the Aux Send Master to about halfway.
- In this case, Aux 1 knob for each channel and Aux 1 Send and Aux 1 Return.
- In the case of the Behringer Xenyx X1832USB and most mixers in this price range, you have two master knobs, the Aux Send and Aux Return (Masters). “Aux Send” controls the signal level going out to the effects unit, and the “Aux Return” controls the amount of Wet signal you input into the main mix from the effects unit.
- Run a sound test with all channels to make the necessary adjustments so that it sounds balanced.
Here is the diagram to connect an effects processor to a mixer using the stereo aux return connectors. Use it for your reference.

Final Thoughts
If you were wondering how to connect an effects processor to a mixer, I have shown you the two methods you need to know in this post.
I recommend using the first method because it leverages the flexibility of a stereo channel. Doing so will make your life easier when dealing with effects in live sound, as it will allow you to EQ the effect, mute it, route it, or control the gain.
But if you don’t have enough stereo channels and are in a pinch, you can opt for using the stereo aux returns method.
If you liked this article and want to know more about setting up PA systems, browse this site by clicking here, as I have several articles on this subject. Plus, you’ll find connection diagrams to help you understand things better. Thank you for reading my blog.
