Whether you have a large PA system with several loudspeakers for a concert venue or a small church sound system, having a loudspeaker management system (LMS), also referred to as a speaker management system (SMS), will take your sound reinforcement system to a whole new level.
This is because an LMS optimizes and enhances the sound output of a speaker system by processing the audio signal to ensure that the output is evenly balanced, clear, and free of distortion and feedback.
To add a speaker management system to your PA system, there are the 3 methods you can use:
- Full Range – For speakers that don’t require an active crossover.
- 2-Way – For full range + subs or bi-amped main speakers with no subs.
- 3-Way – For PA systems using bi-amped main speakers + subs.
Your configuration can be in Mono or Stereo, and the method you choose will depend on the type and size of your loudspeakers.
Keep reading because I will explain each method in more detail so that you can figure out which one will work best for your situation.
Also included in this article are easy-to-follow connection diagrams for each method to make the setup process straightforward. Let’s get started.
A Speaker Management System (SMS) Will Enhance Your Setup
Before we continue, let’s first explore some of the benefits of an SMS and why it will help you improve your PA system’s sound quality.
The primary function of an SMS is to ensure that the sound output is evenly balanced, clear, and distortion-free while helping prevent feedback.
This is achieved through advanced digital signal processing algorithms that allow for fine-tuning of parameters such as equalization, crossover filtering, time alignment, and limiting.
Modern speaker management systems like the ones manufactured by DBX come with AutoEQ™ features that use a microphone to “listen” to the room and use advanced algorithms to accurately and quickly set speaker levels and room EQ in seconds.
This makes the sound engineer’s job more accurate and allows for fast room adjustments without the need for lengthy and annoying broadcasts of pink noise.
A speaker management processor, with the help of the RTA Mic, “listens” for and anticipates potential feedback issues and adjusts speaker output automatically before it even has a chance to become a problem while never altering your sound.
With an LMS in place, sound engineers can rest assured that their sound is of the highest quality, making it ideal for use in various applications such as live performances, concerts, theater productions, and more.
Key Features of Loudspeaker Management Systems
The key benefits of using a loudspeaker management processor include the following:
Digital signal processing: The processing capabilities allow for precise equalization, crossover filtering, time alignment, and limiting, resulting in a more balanced and refined audio output.
Equalization: A loudspeaker management system allows you to fine-tune the frequency response of your speakers, ensuring that the sound is balanced and clear.
Crossover filtering: The system separates the audio signal into different frequency ranges and sends each range to the appropriate speaker. This helps prevent damage to the speakers and ensures the sound is clear and distortion-free.
Time alignment: The system synchronizes the arrival time of the audio signal at each speaker, improving sound quality and clarity. Very helpful for large venues and outdoor concert arenas.
Limiting: The system protects the speakers from damage by limiting the audio signal level while preventing distortion.
Feedback suppression: An SMS can be equipped with feedback suppression technology that helps to reduce or eliminate the feedback that can occur when the sound from a loudspeaker is picked up by a microphone and then amplified, creating a loop.
Ring-out feedback: Ring-out feedback is the process of testing a loudspeaker system for feedback frequencies and reducing or eliminating them. A loudspeaker management system can simplify this process by providing a graphical interface or automated tools that can quickly identify feedback frequencies and help to resolve the issue.
Best Loudspeaker Management Systems
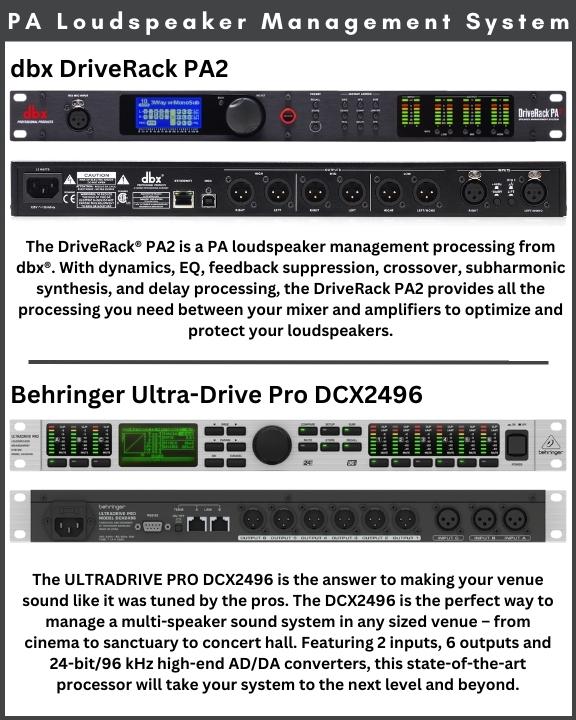
There are several SMS in the market, but the best loudspeaker management systems for most applications are the dbx DriveRack PA2 and the Behringer Ultra-Drive Pro DCX2496.
There are also software-based SMS that run on dedicated server computers and are intended for larger, more professional setups, which is beyond the scope of this article.
As for the setup process explanation and the setup diagrams referred to in this article, I will use the dbx DriveRack PA2 as the reference for each setup explained in this article.
The reason is that this is an excellent system used extensively in sound system setups, and I have used it for many years. It is the standard loudspeaker management processor used worldwide by most sound engineers offering professional features at an excellent price.
Without further ado, let’s continue with the three methods you can use to install it with your PA system.
Full Range Configuration
This configuration is the easiest to set up, and it’s suited for full-range systems that don’t require an active crossover.
In this case, the speaker management system will send a full range signal (20 Hz – 20 kHz) through one or more of the output pairs, usually the HIGH output.
There are several ways you can connect full-range speakers using this configuration; here are the most common ones:
- Standard – Uses a pair of full-range powered speakers.
- Standard and Subwoofer – Uses the sub as the crossover.
- All Outputs Full Range – All outputs send a full-range signal.
1. Standard Full Range Configuration
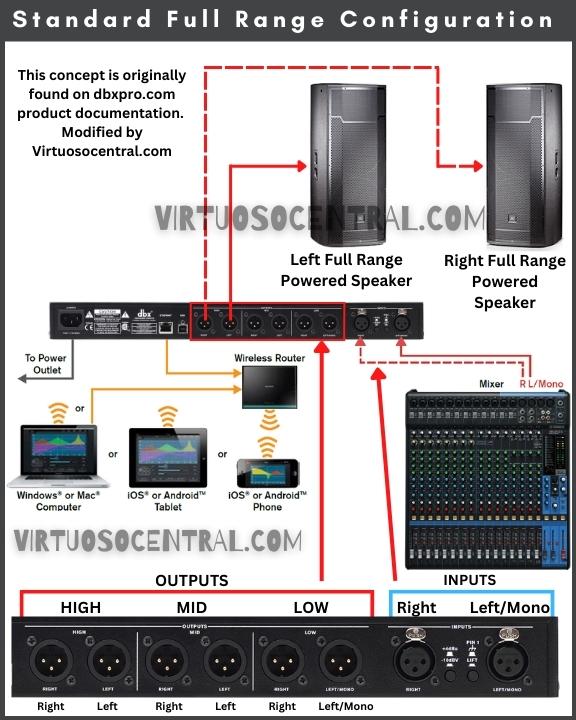
This method is ideal for small sound system setups with only a pair of powered or passive full-range speakers.
In this case, the SMS sends the full frequency range signal (20 Hz to 20 kHz) through the HIGH outputs only. The MID and LOW outputs will be deactivated and will not output any audio.
When using the DriveRack PA2, you can use the setup wizard so that it automatically adjusts the settings according to the size of your system.
Here are the steps you must follow if you choose this configuration method. As mentioned earlier, I will use the DBX DriveRack PA2 as the reference:
- With all the equipment turned off, connect your mixer’s output to the SMS’s left and Right input. If connecting in MONO mode, use only the left cable.
- Connect the Left and Right speakers to the corresponding connector in the HIGH Output section of the SMS.
- Turn on the equipment, run the Setup Wizard, choose MONO if you plan to connect your mixer via a single cable, or select STEREO if your mixer connects through a left and right stereo connection.
- In the wizard, select the speaker tuning preset that applies to your system. If your speaker model is not in the presets, you can choose the NOT LISTED option from the tuning list. You can use the control app to check the online database to see if the speaker tuning for your system has been added to the database.
- To avoid feedback, activate the Advanced Feedback Suppressor (AFS) to detect and eliminate offending frequencies before they become a problem.
Here is the diagram to connect your PA system to the speaker management system using the standard full-range configuration.
2. Standard Full Range and Subwoofer Configuration
This method is very similar to the first one, but it accommodates a system that includes subwoofers.
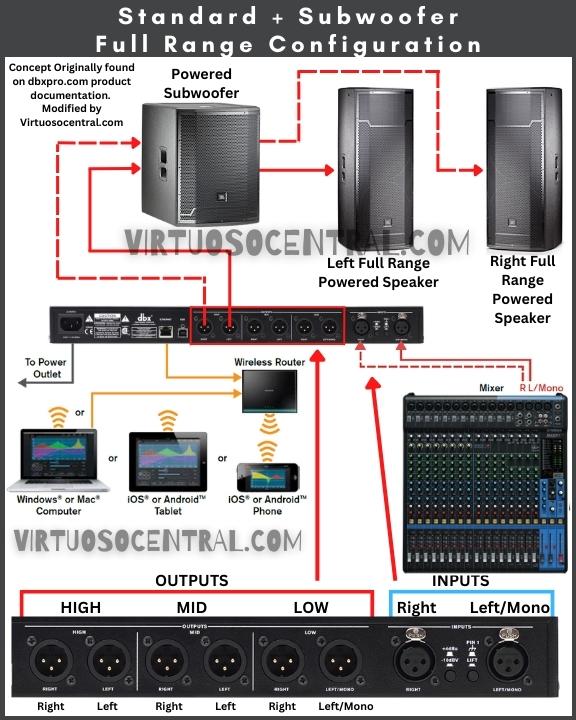
If your PA system uses a pair of full-range speakers and one or two subs that are meant to be integrated with the system, this method will work for your setup.
In this case, we will use the subwoofer’s crossover network to separate low frequencies.
But before proceeding with the setup, I recommend you check the setup wizard to see if your speaker and subwoofer are included in the speaker tunning list. If they are, it is better to connect the system using the 2-way configuration method explained in the next section. That way, you can take full advantage of the PA2 SMS features.
To make the connection, follow the same steps mentioned above, but connect the full range signal from the PA2 to the subwoofer’s input because the powered subwoofer(s) would use its crossover to separate the mid/high frequencies from the low frequencies.
With this setup, you can still utilize most of the features in the PA2, except the crossover and, in some cases, the limiters – as some powered speaker systems may have built-in limiters which cannot be defeated.
Here is the diagram showing the connections you need to make if using this configuration.
3. All Outputs Full Range Configuration
This configuration is uncommon because a more straightforward approach would be to use the “Standard Full Range Configuration” explained above and then daisy-chain the powered speakers or amplifiers.
In some rare cases, powered speakers or amplifiers don’t have the parallel connection feature that allows you to daisy chain them; in such a case, this would work perfectly fine.
Another reason would be if you needed to connect three pairs of stereo speakers while having more control over the speakers from your rack.
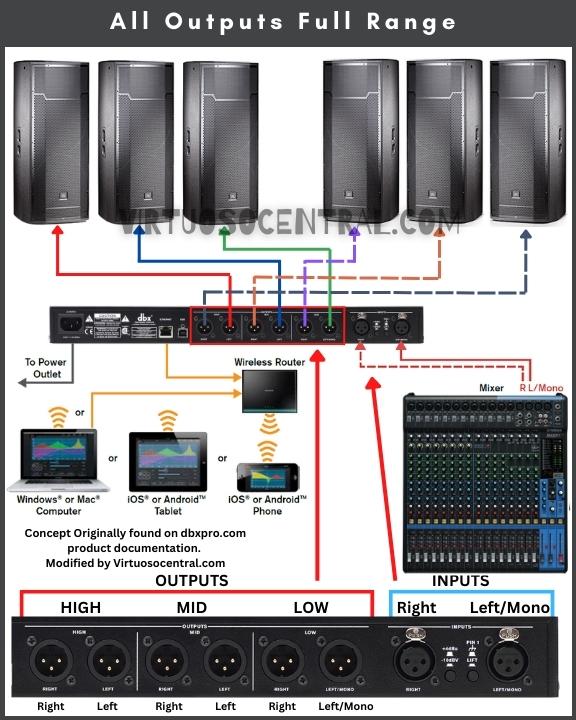
When using the PA2 for this configuration, the LOW, MID, and HIGH outputs will be operational and send a full-range signal ranging from 20 Hz to 20 kHz.
It’s worth mentioning that you can modify the crossover frequencies as desired. For instance, if your setup requires four full-range outputs and two subwoofer outputs, you can still utilize this configuration by adjusting the crossover settings such that the low frequencies are directed to the subs (using the LOW outputs), and the mid and high frequencies are sent to the main speakers (using the MID and HIGH outputs).
If this configuration method works for your setup, here are the steps you need to follow to make the connection:
- Make sure all the equipment is turned off.
- Connect your mixer’s output to the SMS’s left and Right input. For MONO mode, connect only the left cable.
- Connect the left and right outputs to the corresponding powered speaker or amplifiers (if using passive speakers). Remember that in this mode, all outputs from the speaker management processor will be full-range unless you make changes in the crossover settings.
- Turn on the equipment, run the Setup Wizard, choose MONO if you plan to connect your mixer via a single cable, or select STEREO if your mixer connects through a left and right stereo connection.
- If using the DriveRack PA2 LMS, you can choose preset 13, making all outputs full range.
- Next, you can experiment with different settings, such as the Advanced Feedback Suppressor (AFS), LIMITER, EQ, etc., to get the sound system running.
The image below shows the diagram for making this connection using the PA2 loudspeaker management processor.
2-Way Configuration
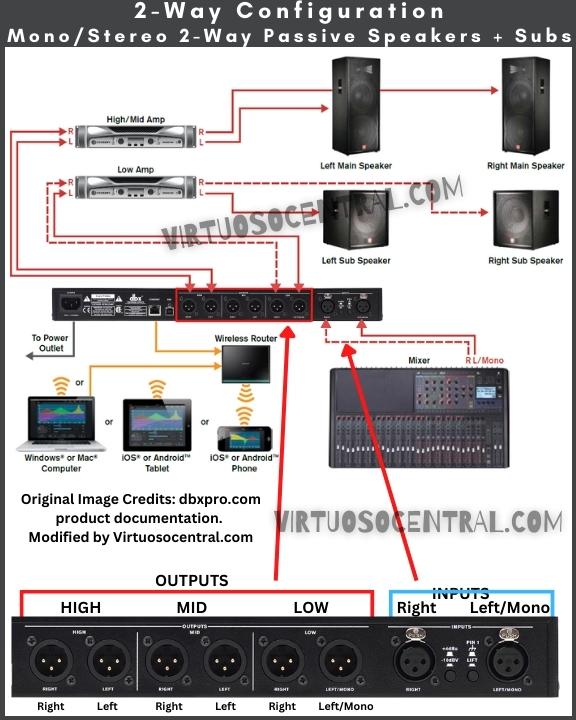
This type of configuration is suitable for systems using full-range main speakers in combination with subwoofers or bi-amped main speakers without subs.
In this case, the speaker management processor will divide the audio signal into two frequency bands and send the low frequencies to the subs and high/mid frequencies to the full-range mains or, in the case of bi-amped speakers, to the low-frequency drivers and high/mid-frequency drivers respectively.
When setting up the LMS for this application, only the LOW and HIGH outputs will be activated, while the MID outputs will be deactivated.
Follow these steps to make the connection:
- Make sure all the equipment is turned off before connecting anything.
- Connect the output from your mixer to the Left and Right input of the loudspeaker management system (LMS). If connecting in MONO mode, use only the left cable.
- Connect the left and right powered speakers or the left and right input of the Hi/Mid amp to the corresponding connector in the HIGH Output section of the LMS.
- If using the bi-amped configuration, connect the speaker to the amp.
- Run cables from the LOW Output to the left and right powered subwoofers or to the LOW amp.
- Turn on the equipment, run the Setup Wizard, and choose MONO if you plan to connect your mixer via a single cable, or select STEREO if your mixer connects through a left and right stereo connection.
- In the wizard, select the speaker tuning preset that applies to your system. If your speaker model is not in the presets, you can choose the “NOT LISTED” option from the tuning list. You can use the control app to check the online database to see if the tuning settings for your speaker system have been added to the database.
- If worried about feedback, activate the Advanced Feedback Suppressor (AFS) to detect and eliminate offending frequencies before they become a problem.
Here is the diagram showing the connections you need to make for a 2-way configuration.
3-Way Configuration
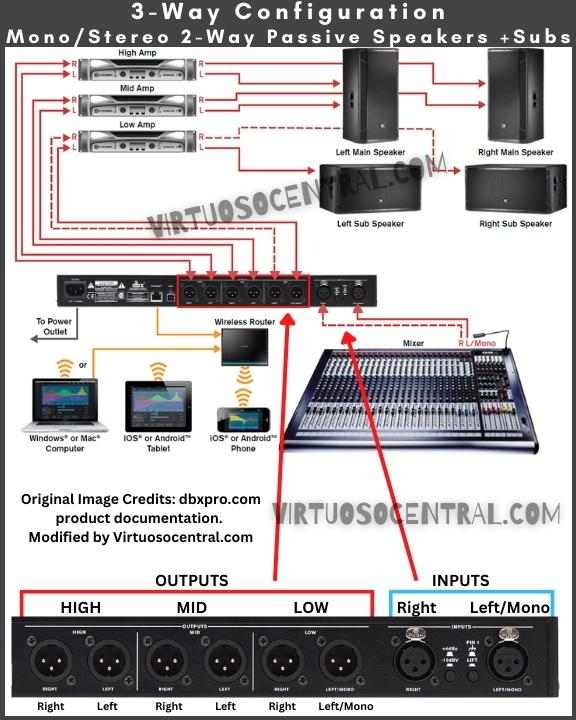
This setup is appropriate for systems utilizing bi-amped main speakers and subs. In this case, the speaker management processor will separate the signal into three frequency ranges Low, Mid, and High.
The low frequencies are sent to the subs via the LOW outputs, mid frequencies are sent to the main woofers through the MID outputs, and high frequencies are directed to the high-frequency drivers in the mains through the HIGH outputs.
This application is usually used in larger sound reinforcement systems with dedicated amplifiers for each frequency range. It can also be used for powered speakers with the correct type of transducer for the specified frequency range.
The connection is straightforward because all you have to do is route the correct signal to the proper component. Here are the steps to follow when using the 3-way configuration:
- Start by ensuring all the equipment is turned off before connecting anything.
- Take a pair of cables from the output of your mixer to the Left and Right input of the loudspeaker management system (LMS). If connecting in MONO mode, use only the left cable.
- Connect the LOW output of the LMS to the Left and Right subwoofer amplifier or to the powered subs depending on your system.
- Take a pair of cables and connect them from the MID output section of the LMS to the left and Right of the MID frequency amplifier or powered speaker with a mid-frequency transducer.
- Next, connect the HIGH output of the LMS to the Left and Right inputs of the high-frequency amplifier or to the powered loudspeaker with high-frequency transducers.
- If using separate amplifiers for each frequency range, at this point, connect the cables from the amplifiers to the different speakers, namely LOW, MID, and HIGH, respectively.
- If using the bi-amped configuration, connect the speaker to the amp.
- Turn on the equipment, run the Setup Wizard on the LMS, and choose MONO if you plan to connect your mixer via a single cable or select STEREO if your mixer connects through a left and right stereo connection.
- In the wizard, select the speaker tuning preset that applies to your system. If your speaker model is not in the presets, you can choose the “NOT LISTED” option from the tuning list. You can use the control app to check the online database to see if your speaker tunings have been added to the database.
- In the LMS wizard, select the 3-way configuration application to activate the crossover network.
- To make adjustments such as EQ, Limiter, or feedback suppression, refer to the manufacturer’s manual for your specific model.
- If worried about feedback, activate the Advanced Feedback Suppressor (AFS) to detect and eliminate offending frequencies before they become a problem.
It’s been said that a picture is worth a thousand words; for that reason, the connection diagram shows all the steps mentioned above but in a graphical way. Use it for your reference.
Final Thoughts
Adding a loudspeaker management system like the DBX DriveRack PA2 will significantly enhance and improve your PA system by allowing for precise control over each frequency band and channel.
This results in a clear, balanced, and optimized sound for your audience. The system will automatically compensate for room anomalies, adjust speaker levels and equalize the room, making setup and tuning much quicker and easier.
If the room or venue is prone to feedback, you can activate the Advanced Feedback Suppressor (AFS) to detect and eliminate offending frequencies before they become a problem.
By utilizing a loudspeaker management system, you can be confident that your PA system will deliver exceptional sound quality every time.
If you liked this article, consider sharing it with others, and don’t forget to visit our website to explore more articles like this one by clicking here. Thank you for reading my blog.
