Equalization of acoustic guitars for live music can be a daunting task, but it doesn’t have to be. It can become second nature as soon as you wrap your head around the basic fundamentals.
This article is geared more toward singer-songwriters, solo cover musicians, duos, or small bands. If you’d like to learn more about EQing guitar for bigger band setups or in a recorded mix, check out our other acoustic guitar EQ article here.
EQ Acoustic Guitar Using Your Onboard Preamp and a Mixing Console
Onboard EQ vs. Mixer EQ
When mixing your acoustic guitar for live sound, you have to consider exactly how you’re going to EQ. The most professional and best-sounding way is to use the mixer and focus on problem frequencies.
However, not everyone is a pro sound guy with a trained ear to pick out these exact frequencies. Sometimes it’s challenging to alter the EQ on your mixer while in the middle of a solo set, depending on the type of PA you use.
You can also use the onboard EQ that comes installed in acoustic guitars to wrangle the sound for a live gig. Even budget electric acoustic guitars often come with a 3-band EQ built into them, so you can at least do a basic mix with just your pickup. And, let’s face it, a basic mix is all many small-time working musicians need to produce an excellent sound to get people dancing and singing along.
In truth, once you know your way around your onboard EQ and your mixer, you should use both for every gig. You can find the ideal settings for the room at the start of your gig with the mixer, then make minor adjustments as changes in the room are made throughout your set like
- More or fewer people
- Furniture being removed
- A change in your playstyle for different times
- Adding or removing other performers, you can make space in the sound spectrum for voices and instruments.
Acoustic Guitar EQ Cheat Sheet – Using the Onboard EQ
Let’s assume your acoustic guitar has a basic 3-band onboard EQ like the ones shown in the image below.
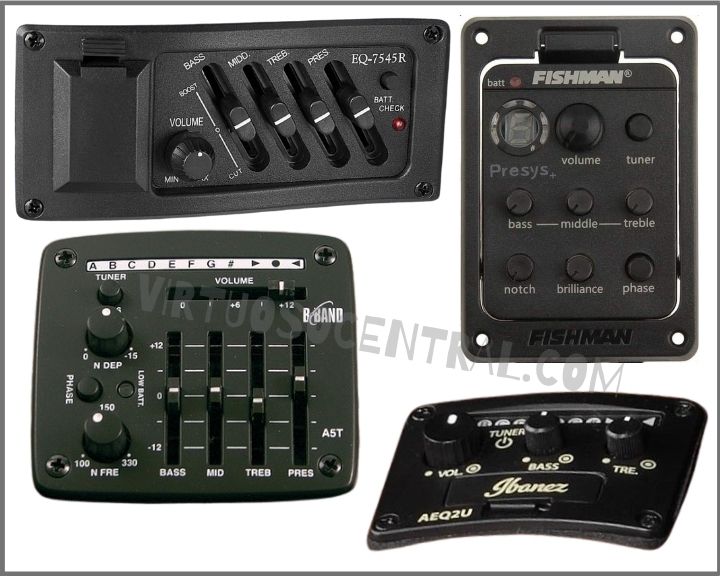
That means it has a dial or slider for Bass, Treble, and Mids. Great! Hopefully, you can use these to create a decent sound for your front-of-house speakers. Here is a detailed acoustic guitar EQ cheat sheet in the form of a flow chart to help you do so:
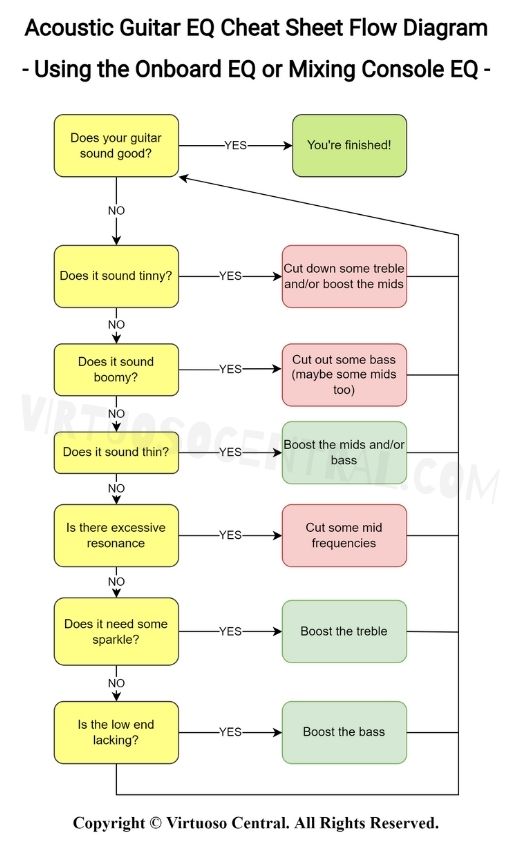
As you can see, basic onboard EQ is a little trial and error. You have to listen, play, and make adjustments until you get the sound you want.
The 12 O’Clock Principle
To start using your onboard EQ, it’s a good idea to have the dials set to 12 o’clock or if you have faders, set them to the middle. This should give the most neutral tone possible for your acoustic guitar. Then, you can use the above cheat sheet flow chart to improve the sound.
Of course, this is just a rule of thumb. Each guitar and pickup is a little different. So, once you learn a little about how your guitar sounds plugged into your PA system, you can take note of the settings you like and use that as a starting point.
A protip is not to assume that the same EQ will sound similar everywhere because acoustics change between venues, but you can take note of the EQ that works best for you and make the necessary adjustments as needed.
I could say the same thing about the EQ on the mixer. You could take notes of the settings but don’t assume that the next time you play will sound the same if you are in a different place. Just use those EQ settings as a base from which you can build.
Contour, Notch, Blend, Presence, and Resonance
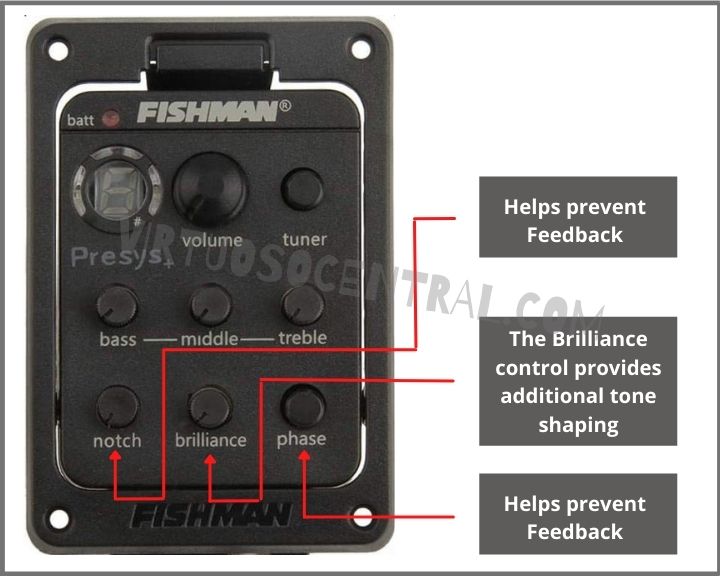
If you’re lucky enough to have a better onboard EQ for your acoustic guitar, you may have some extra EQ settings you can work with to perfect your sound. These usually exist to make EQing your guitar easier. You can use one knob to do several things at once.
Contour – This is a knob that controls how scooped the middle frequencies of the guitar will be. It may also simultaneously boost the treble and bass a little. This helps achieve the “smile EQ,” a commonly used starting point for guitar EQ. The higher the contour is set, the more scooped the mids will be.
Notch – This is one of the more complicated EQ knobs for onboard acoustic preamps. It allows you to pull out specific frequencies that are causing feedback. Most acoustic guitars have at least one frequency range that can cause this issue. If you notice feedback:
- Sweep for the problem frequency using the notch knob
- If you think you’ve found the problem, pull the fader up a little to hear more closely
- If you were right, pull the fader down to dampen that frequency in the mix.
Blend – Some acoustic guitars use both a mic pickup and an under-saddle pickup. The blend control indicates how much of each you would like to use in the mix. For example, with the knob set to 12 o’clock, you will get 50% of the sound coming from each pickup.
Presence – Presence adjusts the higher end of the treble spectrum frequencies. You can crank this a little for songs where the guitar is the main focus, but be careful not to overuse it. Too much presence can be tough on the ears of your audience.
Resonance – The resonance works like the presence but for lower frequencies. Not many acoustic guitars have a resonance control as the lower frequencies are not usually something you want to accentuate.
Fixing EQ on the Fly
Sometimes, you’ll spend an hour before your gig making sure the sound is perfect. Only to find three songs in, that something is way off. Don’t panic because this happens to everyone sometimes. That’s why the sound guy doesn’t just leave the mixing desk at big concerts.
When it comes to altering EQ during a set, the onboard system on your guitar can be a godsend. This is especially true if you have a notch knob, as you can find and pull out any overly resonated frequency that is causing feedback. This takes some practice, of course, and ideally, you’d like to isolate the sound into your foldback speaker while making any adjustments.
It’s not just feedback you may have to account for during a set, though. Let’s pretend you’re playing a gig in a beachside restaurant that has glass walls so people can enjoy the views. When you set up your EQ at the start, you likely pulled down both the highs and lows more than you usually would to avoid bouncing soundwaves when hitting the glass, as it is a very reflective surface.
Yet, when the restaurant is full, the frequencies you’ve pulled down are dampened naturally by the bodies in the room (or even curtains that move during the evening), so the sound will be completely different. You’ll definitely need to make changes to keep your guitar sounding full and not a muddy mess.
You don’t have to wait till you have a break. Strum a few chords and adjust the EQ on your pickup slightly between songs to get an idea of what is missing or boosted to high. You can still use the flowchart above to help.
Then, when you’re between sets, you can make more sweeping changes on the mixer.
Using Pedals for EQ
Pedals can be an excellent substitute for an onboard preamp EQ. Actually, pedal preamps are usually much more powerful and detailed than those built-in to acoustic guitars.
They can be a great buy if you have a cheaper mixer and want more control over your sound.
They’re also perfect for getting a more consistent sound if you often play gigs with different PAs. You can save presets for each PA and use them when you need them.
Pedal preamps are all-but-necessary for mic-only pickup guitars too. They allow you the stage control we’ve discussed earlier, which would not be possible without the pedal or having your mixer next to you on stage while you play.
Why Using a Mixer Is Better (But Also More Difficult)
So far, what we’ve discussed should help you EQ your guitar with your onboard preamp, but it’s no substitute for a full mixer EQ, depending on your mixer, of course.
Some low-end mixers only use 2-band or 3-band EQ on each channel, so there’s not much of a difference there other than visualizing the overall EQ when working with different instruments and voices.
Professional mixers with four, five, or six knob EQ allow you to identify and work with more narrow frequency ranges. And if using a digital mixer, you have an even broader EQ where you have more control over the frequency spectrum, which helps you with:
- Preventing feedback
- Building a more cohesive sound
- Boosting and dropping problem frequencies
To boil it down, a mixer is just a much more in-depth tool for you to use than an onboard EQ. So try not to overlook it. As we mentioned earlier, using both at the same time is usually the best option.
EQ Settings for Acoustic Guitar Using a Mixing Console
As mentioned in the previous section, it is much easier and more precise to implement EQ using a digital audio mixer because you have a more accurate parametric EQ for each channel. And the advantage you have is that you can pinpoint individual frequencies and either increase or decrease them very accurately as necessary.
Instead, using an analog mixing console will make EQing individual frequencies more difficult because one knob is usually responsible for a broader range of frequencies.
In this case, you would have to use your ears to identify the frequency you are trying to increase or decrease, which means that your ears need to be trained. Don’t worry, though, because, with a few pointers and some practice, you can learn how to EQ acoustic guitar for live performance.
Here are a few mixer EQ settings for acoustic guitars that can help you get started depending on the number of EQ knobs available.
EQ Acoustic Guitars Using a Three-Knob EQ Analog Mixer
Please know that if your analog mixer has three knobs for the EQ, you are limited to what you can do but can still get excellent results if the tones are balanced using the three EQ knobs.
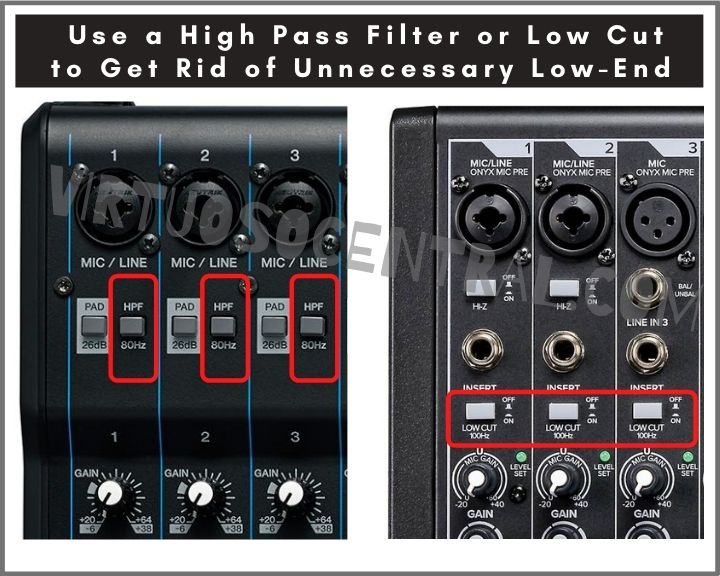
The first thing you need to do before setting up the EQ is to activate the high pass filter (HPF), also known as low cut. This is to eliminate unwanted low frequencies that produce an annoying low-end rumble. The HPF switch is usually located above the Gain knob, and it is labeled HPF or low cut. The image below shows you where to find the HPF switch on a mixing console.
The next step is to set the EQ to neutral. Basically, you need to set the High-frequency knob to the middle and do the same for the mid and low-frequency knobs. Doing this will help you get a neutral sound from which you can boost or decrease the EQ at specific frequencies, depending on what is needed.
If the guitar sounds muddy, meaning that its lower frequencies are unintelligible, try reducing the low-frequency knob a bit to get rid of the smeared sound by turning the knob counterclockwise by 1/4 turn from the center.
If, instead, it sounds muffled, meaning that it sounds like a thick blanket is covering the speakers, the most likely problem is that the highs and upper mids need to be boosted a bit. To fix this problem, all you have to do is increase the High-frequency knob clockwise, less than 1/4 turn from the center. Then, increase the Mid-frequency knob clockwise about 1/8 of a turn from the center.
Listen to the guitar as it comes out of the loudspeaker and make minor adjustments according to what is needed to make it sound as balanced and transparent as possible.
If the guitar sounds dull or dark, the EQ is weak at high frequencies. Try increasing the highs a bit more.
If your guitar’s sound is not cutting through the mix, meaning that it’s not punchy, increase the mid-frequency knob until the guitar is easy to hear with detail in the music. You might also have to increase the volume or gain a bit if the guitar still doesn’t cut through the mix.
How to EQ Acoustic Guitars Live Using a Four-Knob EQ Analog Mixer
Most professional analog mixing consoles have four or more EQ knobs to give you more control over the equalization.
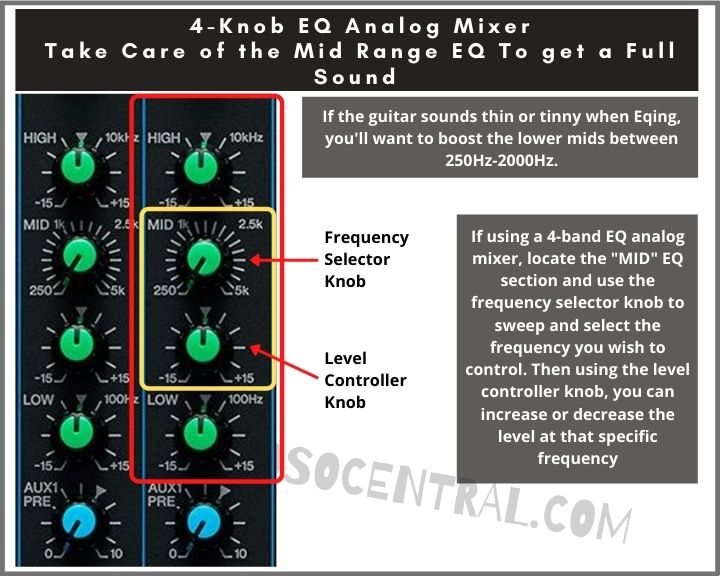
If your analog mixer has four knobs for the EQ, the second one under the high-frequency knob is a frequency selector. With that knob, you can select the frequency you want to adjust, then use the third knob down to increase or decrease the gain on that frequency. That way, you have more control over selecting which frequencies to EQ.
When EQing acoustic guitars, the first thing to do, as mentioned previously, is to activate the high pass filter to avoid problematic low frequencies and their harmonics.
Then, start by setting the HF (high-frequency) knob to the middle “0.” Make sure that the second knob down is also set to the center. Increase the third knob to about 50%. Set the fourth knob to 1/4 turn counterclockwise from the center.
At this point, you have a somewhat balanced EQ, but it might need some adjustment to make it sound better.
Ask the guitarist to start playing, and as you hear the sound coming out of the loudspeaker, slowly sweep the frequency selector knob (second knob from top to bottom) between the 250Hz and 2000Hz range. You want to pay special attention to this range because the warmness and fullness of the guitar’s sound is this range. The sound you are looking for is vibrant and full.
A good way to describe the sound you want to hear is that it has a sense of warmth and fullness and the notes sound authoritative with a sense of life about them. You want to achieve a well-balanced tone that blends with the rest of the instruments.
Take into consideration all of the tips mentioned previously and adjust the knobs until you have found a sweet spot that you like.
EQ Settings for Acoustic Guitars Using a Six Knob Analog Mixer Equalizer
The ideal analog mixer would have at least six knobs for the EQ. That way, you have more precise control over the frequencies you want to equalize.
With a six-knob EQ, the first one from top to bottom is for the high frequencies. The second one is the high-mids frequency selector. The third knob controls the high-mid frequency gain.
The fourth knob from top to bottom is the low-mids frequency selector, with the fifth knob being the gain control for the low-mids. The sixth knob is responsible for controlling the gain for the low frequencies.
As mentioned previously, the first step in your EQ setup is to activate the high pass filter to avoid unnecessary low frequencies that can dirty up the sound of your acoustic guitar.
Next, start by setting the HF knob to the middle; that way, you keep the brightness neutral so that the guitar doesn’t sound harsh. If later, after setting up the rest of the EQ, it sounds dull or dark, come back to the high-frequency knob and increase it 1/4 turn clockwise from the center to add more “air” or brightness to the sound
Next, set the second knob (high-mids frequency selector) to the center. Then, set the third knob (high-mids gain) to about 40%. You can increase the second and third knobs (from top to bottom) if you want to add more transparency to the sound. But don’t go overboard because it can end up sounding hard, making your audience feel uncomfortable due to the aggressiveness of the frequencies in this range.
The fourth EQ knob (low and upper-mids frequency selector) is responsible for the warmness and fullness of the guitar’s sound. Here we are dealing with the frequencies between 200Hz and 3000kHz.
Set the fifth knob to the center and slowly sweep the fourth knob (low and upper-mids frequency selector). Listen to how the guitar’s sound changes and stop sweeping the frequency selector when it sounds pleasantly spacious, with adequate reverberation at the upper mid frequencies.
Set the low-frequency knob to the middle “0” (twelve o’clock position).
I recommend keeping the EQ as flat as possible as long as it sounds good. If the acoustic guitar sounds tinny, boomy, or thin, try sweeping the upper-mids frequency selector until you find the offending frequency and use the boost/cut knob (fifth knob from top to bottom) to increase to boost or cut accordingly.
Get Gigging
To wrap it up, onboard EQ can be perfect for on-the-fly adjustments and getting a steady sound from your acoustic guitar. But they’re no substitute for a full mix on your PA.
Use both mixing methods together to get the best sound possible. Practice makes perfect, and you’ll find your mixes will get better at every gig, so keep up the hard work and keep on gigging.
