When running a PA system, things can and will go wrong. Sometimes it’s because of a major component failure, but most of the time, it is because of a simple error such as a device being turned off or being misconnected.
You could also have everything connected correctly, but you realize that there is no sound from the mixer to the speakers while the audience is waiting for the event to continue.
While it’s not always possible to prevent technical issues from occurring, having a plan for troubleshooting and fixing problems can help you minimize disruptions and get back to running your event smoothly.
Here are the 4 steps I follow for handling PA system technical issues when they arise:
- Start with the basics before moving on to more complex issues.
- Follow the signal flow and check the connections and components along the way.
- Use a quick, systematic checklist to help prioritize your troubleshooting efforts.
- Isolate one variable at a time to narrow down the potential causes of the problem
Following this four-step PA system troubleshooting method will give you the best chance of finding and fixing the problem fast. Let’s explore each one in more detail.
1. Start with The Basics Before Moving on To More Complex Issues
When things go wrong with a sound system, and you are in charge and in a time crunch, it’s easy to overlook simple things that could be the leading cause of the problem.
Instead of running around with no plan whatsoever, it is essential to calm down and start with the basics.
Check if Everything is Plugged In
Although you are confident that everything is plugged in, double-checking goes a long way because things can be overlooked, even if you are a seasoned sound engineer.
If one of the instruments or microphones seems to have no signal, make sure it is plugged in. It may seem obvious, but it is easy to overlook the simple act of plugging in an instrument in a high-pressure live performance environment.
To confirm that the device is plugged in, check the connections that go to the stage box or cable snake before considering any other potential issues.
Suppose you have checked the connections, and the instrument or mic is still not producing sound. In that case, it may be worth trying a different cable or checking the input on your amplifier or pedalboard to ensure it is functioning correctly.
Is There Power on the Outlets?
When setting up a PA system, you might overload a circuit breaker without knowing. You could be installing speaker systems and amplifiers to the same electrical circuit, which could be tripping a breaker on the main electrical panel.
In this case, you could check that the powered speaker or any other electric equipment is connected to an outlet and powered on. If it is, but the power indicator is off, it could mean that there is no power at that outlet. If this is the case, you should check if there is power coming from that outlet.
To check it, you can use a digital multimeter or voltage tester to make sure that there is power on the outlet. If there is no power, go to the breaker box to check, as the circuit could have been overloaded by the equipment, thus tripping the circuit breaker.
Is Everything Turned On?
While setting up, you or one of the assistants could have forgotten to turn on the piece of equipment that seems not to be working. Just go and double-check to make sure it is on.
You have no idea how often I have run into problems where there is no sound coming out of the speakers from the mixer to find out later that I had forgotten to turn on the powered monitors or main speakers.
So, although it could seem obvious and you could be sure that you did turn it on, just walk around and make sure that all the devices are connected to an outlet and turned on.
Is It Muted? Are the Volumes Up?
This is another little thing that can throw you off, especially if you are under pressure and in a time crunch to get on with the show.
The main fader or channel fader could be up, but the mute button engaged, not allowing the signal to go through.
The volume on the powered speaker or monitor could be down; thus, no sound comes out.
The Aux send knob that sends the signal to the monitors could also be down.
The main and sub-mix assignment switches could be disengaged, consequently not routing the audio signal to where it should go.
All these little things presented in these examples could create significant problems that you can overlook, especially if all eyes are on you and you are under pressure to carry on with the event.
This is why understanding the signal flow is critical for solving any issues. The next step explains in detail the signal flow you can use to find and fix problems with your sound system.
2. Follow the Signal Flow and Check the Connections and Components Along the Way
When setting up the sound system, try to keep a mental map of the signal flow to visualize the path that the audio signal takes from the source to the destination, and make sure to check the connections and components along the way.
If you are new to setting up sound systems, it would also help to make an actual sketch of the signal flow for each channel. That way, if you run into trouble, you can go back to the sketch and pinpoint specific places the problem could be located.
This is why it is highly recommended to allow enough time before the event starts to fix any issues that could arise all of a sudden.
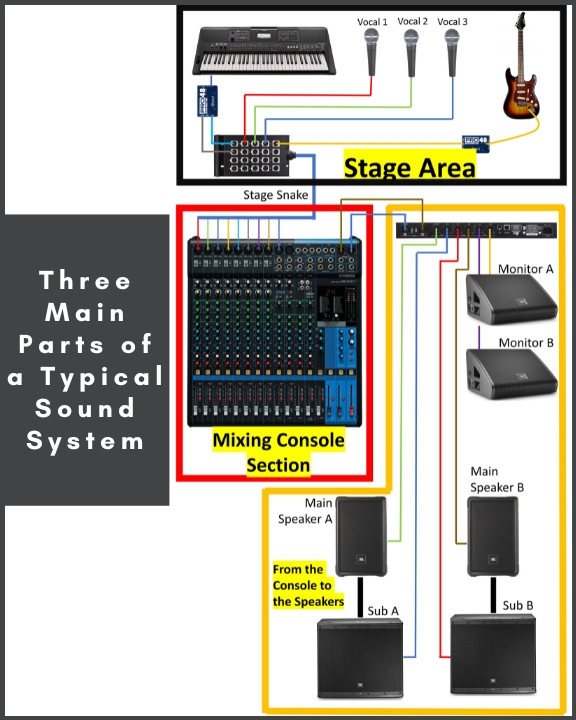
The following paragraphs are a rundown of the signal flow of a typical sound system.
Understanding the Signal Flow is Crucial for Troubleshooting
To troubleshoot any sound system issues effectively, it’s essential to understand the path the audio signal takes from the stage to the audience.
This signal flow can be broken down into three main parts:
- From the stage to the mixing console
- Inside the console itself
- From the console to the speakers, speaker processing, or amplifier, depending on your setup.
By understanding the signal flow, you can more efficiently identify and fix problems that could arise when setting up a PA sound system.
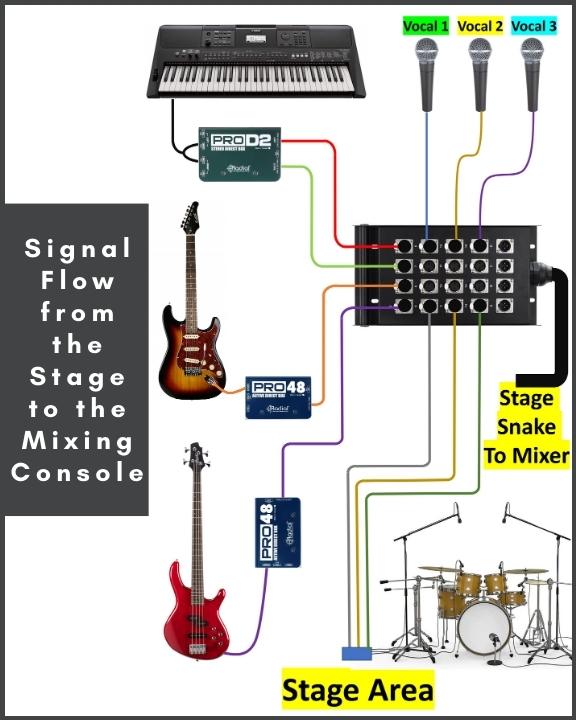
Signal Flow from the Stage to the Mixing Console
After the sound source itself, the audio signal is typically captured by a microphone or electronic pickup inside an instrument. From there, it must travel through a cable to reach the soundboard.
For a microphone, this typically involves an XLR mic cable that connects to a stage box, which helps to organize the cables running from the stage to the soundboard.
For instruments like guitars, and keyboards, a direct box is often used to convert the output signal from high impedance and unbalanced to low impedance and balanced. Here is an article that explains the DI Box in detail if you need to become more familiar with this device.
All the audio signals from the stage are typically gathered in a stage box or sub-snake, which helps to organize and consolidate the cables on stage so that you don’t have a cable mess. This is then connected to a snake, which can be either analog or digital.
An analog snake gathers all the mic and line inputs into a large cable that runs back to the soundboard.
A digital snake, on the other hand, includes preamps and analog-to-digital converters on the stage, which allows the audio signal to be transferred digitally back to the soundboard, reducing the number of cables needed.
Labeling and Documenting are Vital
As you can see, to go from the stage to the soundboard, there are several steps and components along the way that can fail unexpectedly. But if you know which path each specific audio signal takes, figuring out the problem is much easier.
This brings up another great piece of advice that will save you time. Always label and document your connections. Labeling the stage box and cables can and will save you time when you are in a hurry to figure out how to fix a problem.
You can use light color tape and a marker to label your cables, or you can buy multi-color cable labels to make things even better and easier to identify.
The image below shows in graphical form the typical signal flow from the stage area to the mixing console.
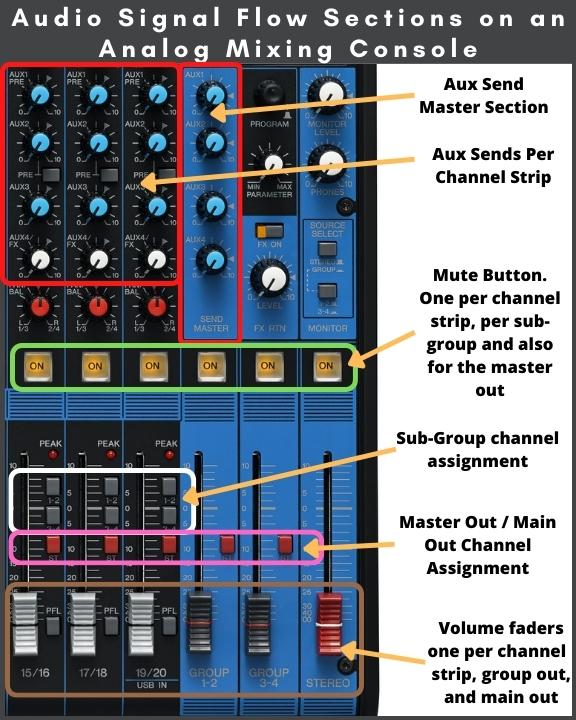
The Signal Flow Inside the Console Itself
The console can be considered the brain of the sound system as it can route, interrupt, and modify audio signals. Because it offers several functions, we can easily misconfigure the path of a signal causing problems.
The Input Section
Once we get to the console, we plug the microphones and line signals into the preamp section of the mixer. If we use a digital snake, the preamp section will be on stage but can be remote-controlled at the console.
Another control on the console that could affect devices connected to the input channels is the +48 VDC phantom power used to provide power to condenser mics and DI boxes through an XLR mic cable.
So, for example, if you have a guitar connected to an active DI box that needs +48 VDC to work, and for some reason, there is no sound coming through that channel, check to see if you have enabled the phantom power switch. The same can happen to a condenser mic if the phantom power is not enabled, the mic doesn’t work.
EQ, Compression, and Inserts
The channel path in a mixing console allows us to modify audio signals with EQ and compression, which are usually built into the channel strip.
We can also use inserts to send the signal to a separate piece of equipment for processing and bring it back to the same channel. This allows us to interrupt the signal flow and make changes to the audio.
If this is misconfigured, it can break the signal chain, and you won’t get any audio even if everything else is set up exactly right.
Aux, Sub-Groups, and Main Output
From there, we also have the Aux Sends, which can route the signal to external auxiliary devices such as monitors, or effects, having level controls over each channel individually, which is entirely separate from the main mix.
We also have our sub-group and main bus assignment, which connects the channel path to the bus path or the main output.
You also have the channel mute, and the way it works can vary depending on your mixer.
For example, on Yamaha consoles, there is an ON button, so for a signal on that specific channel to go through, it needs to be engaged, and it will be lit up when it’s working.
For most other console brands, when it’s lit up or engaged, the audio is cut. This can throw you off if you are unfamiliar with the mixing console you are using.
The final place to check on your console is the main output level or Main Outs, and it’s mute.
I don’t know how many times I’ve set everything up to realize that there is no sound from the mixer to the speaker, and after checking, I realize that the Main Outs mute button was engaged, or I forgot to turn the fader up to send the signal out to the speaker.
Knowing how the signal flows through the mixer can help you pinpoint possible misconfigurations in your sound system setup.
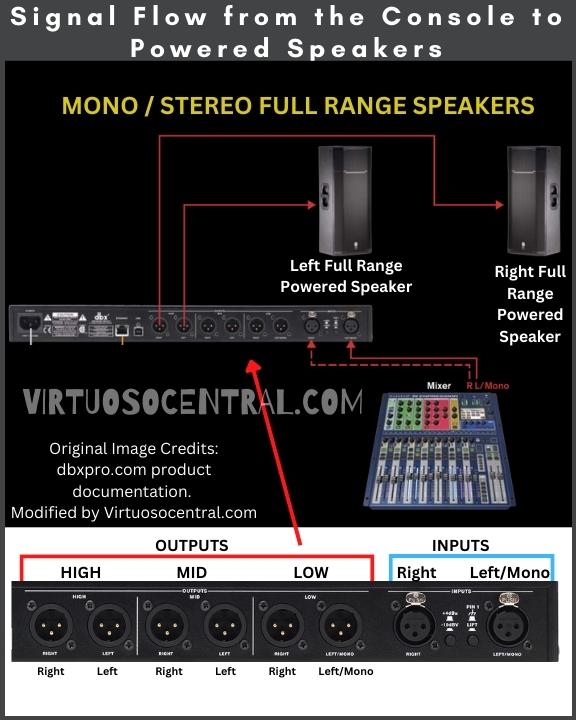
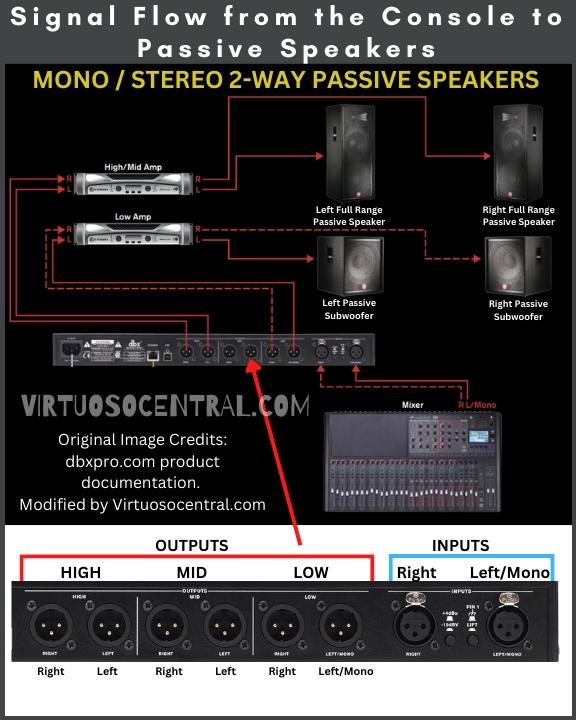
The Signal Flow from the Console to the Speakers
After the console’s main bus, we either go to processing inside the console through a matrix available on digital consoles, or the signal goes to a speaker system processor that distributes the signal and routes it to different components of our speaker system.
After the system processor, if our speaker system is passive, we must go first through the amplifiers and then to the speakers or straight to the speaker if using powered ones.
From what we have discussed in this section, the main goal is to help you get familiarized with the signal flow.
How you set up your system could be different but understanding the path a signal takes from its source to the audience through the speaker is vital for troubleshooting any sound system.
So, my advice is to be aware of each connection you are making so that you have a signal flow map in your mind so that you can go straight to the possible problem as it happens.
If you are new to setting up sound systems, here are a few guides that will help you to properly set up a PA system, mixer, stage monitor, and front-of-house speaker placement. Because doing things correctly will set you up for a successful signal flow through all these systems.
For a more fundamental look at mixing consoles to understand the ins and outs of it, check out this article.
3. Use a Systematic Quick Checklist to Help Prioritize Your Troubleshooting Efforts
Now that you know how the signal goes from the stage to the mixer to the audience, it’s handy to have a systematic checklist to help you troubleshoot the problem and help you figure out if you missed something while setting up or if something failed.
As you can see, there are many steps along the way where things can go wrong, and if you don’t work in an organized manner, you’ll waste time, and the event won’t go on.
I like to start at the brains of the operation, the mixing console because here I am in the middle of the signal flow. This is the checklist I follow when troubleshooting issues at the console.
Checks to Do at The Console
- Is the correct cable connected to the input channel? Check it against your input list
- Check if the phantom power is turned on, especially if you are using condenser mics and active DI Boxes
- Main output assignments switches.
- Sub-groups assignments switches (if used)
- Aux sends knob volume level. Check for each channel and the Master Aux (if used)
- Make sure channel inserts are patched correctly (if used)
- Check if mute buttons are engaged
- Make sure that the Main Outs fader is Up
- If using sub-groups, make sure the faders are up
- Check the output connection going from the mixer to the speaker system
- If you are having problems with wireless channels due to interference, change the channel
- If some channels work, but others don’t, compare settings between them. You can even swap input cables between channels to see if it fixes the problem. Do one change at a time.
- If using a digital mixer and a digital snake, try rebooting both in the correct order. Sometimes a simple boot can fix audio issues with digital mixers.
Checks to Do at The Stage – Chase the Signal Closer to the Source
When things don’t work, it’s good practice to find a midpoint in the signal flow to start there. A midpoint in the signal flow between the stage and the mixer is the stage box or snake because this is where all signals from the stage are connected and sent to the mixer.
Here is an example. If a guitar connected to the mixer through the DI Box doesn’t have any sound coming through the speakers, first, mentally, figure out its signal flow.
The signal flow in this example is as follows:
Guitar >> cable >> DI Box >> Cable >> Stage Box/Snake >> Mixer
A midpoint between the guitar and the stage box/snake is the DI box. To troubleshoot this signal flow, start by checking the signal before the DI Box.
If you get audio, then check it after the DI Box. If you keep getting an audio signal, continue the path. If you don’t get any audio after the DI Box, the problem could be the box itself or a cable.
So, finding a midpoint between the signal flow helps pinpoint problems
Here are some other checks you can do at the stage to troubleshoot problems:
- Start at one end and move systematically through following the signal chain
- Start your check at the snake/stage box and make sure your mics and signal cables are connected to the correct input. It’s always good to label things and have on hand an input list to guide you.
- If having problems with wired microphones, check the mic and XLR cable that connects to the stage box/snake.
- Find something that works and swap it with the one that doesn’t work to rule out cable issues or device issues. Do one change at a time.
- When using wireless mics, make sure batteries have enough charge in them. Change them if their charge is getting too low. Always have enough extra fresh batteries to last you through the show.
Troubleshooting Monitors
If you are having problems with monitors, is it only one or all of them? Answering this simple question can help you understand if it is a broader problem or a specific problem.
- If all monitors are not working, check the sends at the console and make sure that the monitor sends outputs are connected to the snake.
- Make sure that the volume level for the “channel sends,” and “master sends” are up.
- If using a distribution system, check that it is powered on and that input/output cables are connected.
- If the problem is on one of the monitors only, check that the signal cable is connected, that it’s powered on, and that the volume is up.
- If the problem persists, swap the signal cable with a different one. You can also use the signal cable of one of the working monitors. If it still doesn’t work, swap it with another working monitor, as the problem could also be the monitor itself being damaged.
Checks to Do at The Front of House Speakers/Amps
If everything else seems to be working, but you still have sound problems at one or several front-of-house speaker systems, here is a checklist you can follow to rule out problems at this stage of the signal flow.
- Make sure that the Main volume fader is up and unmuted
- Check that the Main bus assignment is correctly set
- Make sure that the output cable going to the speakers, amps, or speaker management system is connected to the correct plug
- If using powered speakers, ensure that they are turned on, that the volume is up, and that the signal cable is connected to the correct input
- If using passive speakers powered by an amplifier, check that the amp is on, the cable signal is connected, that there is actually a signal coming into the amp, and that the volume is up. Also, ensure that the cables going to the speakers are connected, and secured and that no visible damage is done to the cable.
- If using a speaker management system, check that it is turned on, the input/output cables are connected and make sure that the signal is present in the device.
After all these checks, if you don’t find anything obvious, you can start swapping cables to rule out bad ones. Just don’t forget to do one at a time and swap things back as you rule out problems to avoid having a mess.
As you check your connections, you need to know if a cable has failed or has a flaky connection. I use the Mackie Cable Tester to troubleshoot all my audio cables because it can quickly verify each pin via the 6-way switch, even with mismatched connectors.
With this cable tester, you can check the most used connector types in live sound and studio applications: XLR, 1/4” TRS and TS, 1/8” TRS and TS, RCA/Phono, Speakon, MIDI, and Banana.
If you don’t see the connector you need to test, plug in the included probes, and you can test continuity on any cable or non-active circuit. This works great for specialized or proprietary connectors. Remember to completely disconnect the cable from any system before using the cable tester to avoid damaging the equipment.
Also, working in an organized manner will help you keep things clear and the stage ready to continue with the event when the problem is fixed. Using checklists enables you to rule out things faster and have a record of what you have already checked so that you don’t run in circles as you troubleshoot.
4. Isolate One Variable at A Time to Narrow Down the Potential Causes of The Problem
To troubleshoot effectively, we need to be sure only to change one variable at a time.
For example, if we’re trying to identify a problem in the signal flow, we should try swapping out different components one by one.
If we change two components at the same time and the problem goes away, we can’t be sure which component was causing the issue. Instead, we should change one component, test again, and then move on to the next component if the problem persists.
This way, we can be sure to isolate the issue and not accidentally remove a working component from the signal flow.
Additionally, by following this process, we can keep track of what we have tested and the results. This can help us to identify the cause of the problem more efficiently.
Conclusion
When setting up a PA system and things go wrong, having a clear plan is key for solving any issue.
The four steps that can help you troubleshoot and fix the problem are:
- Start with the basics before moving on to more complex issues.
- Understand the signal flow to identify and fix potential problems efficiently.
- Use a quick, systematic checklist to help prioritize your troubleshooting efforts.
- Isolate one variable at a time to narrow down the potential causes of the problem
Don’t forget that the signal flow can be broken down into smaller sections to simplify troubleshooting. These sections are:
- From the stage to the mixing console
- Inside the console itself
- From the console to the speakers, speaker processing, or amplifier, depending on your setup.
Another thing I cannot stress enough is to work in an organized manner. This will help you keep things clear and have the stage ready to continue with the event when the problem is fixed.
To make things easier, use checklists to help you rule out things faster. Doing this will help you have a record of what you have already checked so that you don’t run in circles as you troubleshoot.
If you liked this article, consider sharing it with others, and don’t forget to visit our website to explore more articles like this one by clicking here. Thank you for reading my blog.