Podcasts rely only on audio to catch the audience’s attention. That’s the reason why all the top podcasts have one thing in common; they sound amazing. Of course, the message plays an important role, but when all is said and done, if the podcast sounds awful, no one will listen to it.
If you are a beginner looking to start a podcast or already have one and want to sound more professional, keep reading this post because we provide you with practical podcast tips and strategies for recording a better sounding podcast.
Top 10 Tips & Strategies for Recording Better Sounding Podcasts
Here are the best strategies and tips you can follow for recording your podcast and get high-quality audio consistently.
- Use the right podcast equipment – Consider Getting a Plug-and-Play Bundle
- A Good Microphone Can Make All the Difference
- Use The Right Pop Filter – It’s There for a Reason
- Use Good Microphone Techniques – Get Close to The Mic
- Try to Be Consistent With your Voice Timbre
- Monitor your Volume Levels – Don’t Distort the Signal
- Use an Audio Compressor to Get Consistent Volume
- The Room’s Acoustics Can Make or Break a Podcast
- Use a Backup Audio Recorder
- Edit The Podcast Before Releasing it
In the following sections, we go into more detail on each tip. Let’s get started.
Use the right podcast equipment – Consider Getting a Plug-and-Play Bundle

If you are a techie person, finding compatible gear to set up your studio will be easy. But, if you are not familiar with the ins and outs of audio equipment, this task can be overwhelming.
You have to decide the type of microphone you want – dynamic or condenser. Further, you need to determine if you’re going to use an audio mixer with the capability of connecting several microphones or have a simple setup using a single USB microphone.
Are you planning to have guests over the phone or use a conferencing platform like Zoom to have multiple remote guests on your podcast? Maybe you also want to include some sound effects to make your podcast more original. This and many other things you need to consider when choosing equipment to set up a podcasting studio.
Please understand that to start a podcast, you don’t need to have a professional setup or make a significant investment. You could start by using your smartphone or laptop. But if you have proved the concept and decide to invest in some equipment, make sure to get the right equipment.
Having the right recording equipment is one of the best podcast tips we can offer you because it will have the biggest impact on the overall quality of your podcast’s audio. It will also determine how flexible your setup is to accommodate and adapt to different situations.
If you are new to this, one thing you can do is start researching and reading articles about all the equipment you need to start your podcast.
Instead, if you feel like you don’t want to spend the time reading articles about selecting audio equipment, you can go around this issue and get a podcasting bundle with everything you need to get started right away on your podcast.
Check out the following links to see a complete list of equipment you need. We have divided it into two bundle categories basic and professional.
The basic is perfect for a solo podcaster and a guest. The professional bundle is ideal for podcasters that have three or more guests. It also offers the capability to receive phone calls and online guests on conferencing platforms such as Zoom, Skype, Microsoft Teams, etc. (links to Amazon).
Basic Bundle for Solo Podcaster
Here is the connection diagram for the basic bundle for a solo podcaster so that you can visualize the setup. This setup is done with the recomemded gear on the links above.

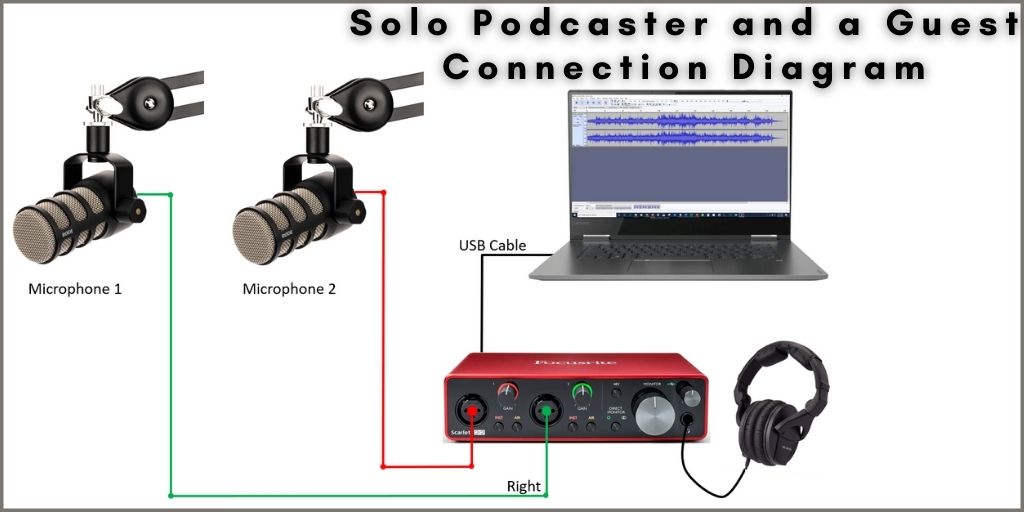
Basic Bundle for Solo Podcaster and One Guest
- Focusrite USB Audio Interface [Quantity 1]
- Audio-Technica Professional Studio Headphones [Quantity 1]
- Rode PodMic Dynamic Podcasting Microphone [Quantity 2]
- Gator Microphone Boom Stand For Podcasts [Quantity 2] [This stand includes the XLR cable for connecting the microphone to the Audio interface]
The following image is the connection diagram for the basic bundle for a solo podcaster with the ability to add a guest to the podcast. Use the diagram for your set up reference. This setup is using the gear recommended on the links above.

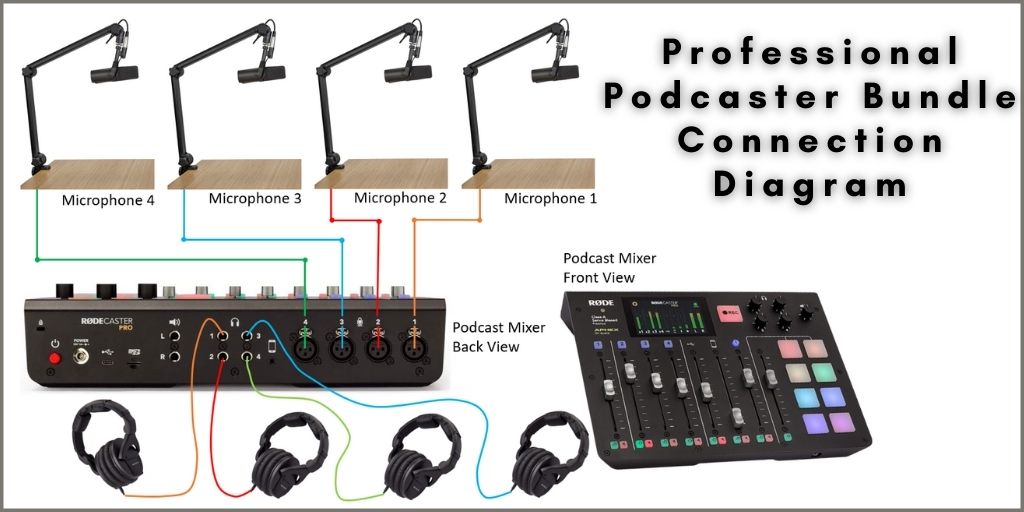
Professional Podcaster Bundle
- Rode RODECaster Pro Podcast Mixer [Quantity 1]
- Audio-Technica Professional Studio Headphones [Quantity 4]
- Shure SM7B Cardioid Dynamic Microphone [Quantity 4]
- Gator Microphone Boom Stand For Podcasts [Quantity 4] [This stand includes the XLR cable for connecting the microphone to the podcast mixer]
Here is the connection diagram for the professional bundle mentioned above. Use the diagram for your set up reference.

A Good Microphone Can Make All the Difference

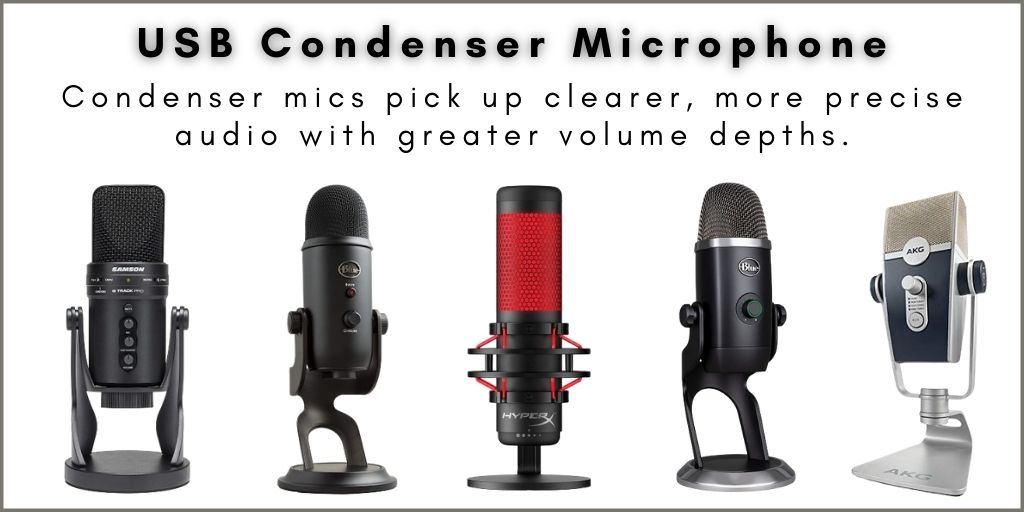
Maybe buying a podcasting bundle is an investment you don’t want to make at this moment. If that’s the case, you can get the best USB microphone for podcasting, depending on your budget. Next, all you have to do is connect it to your laptop and start recording with high-quality audio. Your audience will appreciate it a lot.
If you ask any professional podcaster for podcasting tips, they will all agree that a must-have for recording is a good quality mic, and there is a good reason for this.
The microphone that comes with your laptop is a small electret mic. Its membrane has a small surface area limiting its ability to pick up detailed sound vibrations.
By using a USB condenser microphone, your recorded audio will improve because it’s capsule is bigger and more sensitive to picking up even the smallest nuances in sound, immediately delivering higher quality sound for your podcast.
We have prepared a detailed guide on what to consider when choosing a mic for podcasting. Click the link to check it out.
Use The Right Pop Filter – It’s There for a Reason

One of the most annoying things you can have in a recording is popping sounds. They distract, and the sound is harsh to the ears.
As a podcaster, it’s your responsibility to make sure that your recordings sound as good as possible to deliver an excellent listening experience to your fans. Loud popping sounds are definitively a bad listening experience. Having great content and a good listening experience will have your fans coming back for every podcast release.
Popping sounds are produced by fast-moving air blasts from your mouth whenever you use words with hard letters, like B’s, P’s, T’s.
As its name implies, a pop filter is a device designed to slow down and dissipate fast-moving air blasts.
Pop filters come in different sizes and shapes. Depending on the microphone you decide to use for your recordings, it’s possible that it already brings one.
For example, the legendary Shure SM7B is a microphone used by podcast producers worldwide, one of which is Joe Rogan because it delivers an excellent tone. This mic includes a pop filter that is installed on the mic’s head.
Most condenser microphones don’t bring a pop filter. If that’s the case, getting a pop filter would be necessary to avoid getting plosive sounds while recording.
Most microphones are compatible with any pop filter available in the market. Still, it’s a good idea to make sure that the pop filter you decide to buy is big enough for your mic. Here are a few pop filers designed for condenser mics (links to Amazon):
Use Good Microphone Techniques – Get Close to The Mic
One of the easiest and most effective podcast tips we can give you for getting better sounding podcasts is getting closer to the mic while recording. A good rule of thumb is to leave no more than 6 inches between your mouth and the mic’s head.
You want to be close to the mic because if you are far away from the pickup capsule, the audio quality decreases rapidly.
Suppose the sound source is farther away from the microphone. In that case, it picks up ambient noise, degrading the overall sound quality as the sound waves become thinner, losing the sound’s fullness.
You want to get close to the mic, but not so much that the proximity effect could saturate the membrane inside the capsule, thus saturating the signal. Leave at least 2 inches but no more than 6 from the mic’s head.
Control Your Breathing Sound
When sitting close to the mic, it will pick up the sound when you inhale and exhale. If the breathing is too loud, it can be distracting, and for some people, it isn’t very pleasant.
A good breathing technique is to try smaller, slower breaths, but if you need to take a big breath, just look away from the microphone.
Try to Be Consistent With your Voice Timbre
The timbre of your voice defines your tonal character. As a professional podcaster, you want to keep your voice’s tone as consistent as possible.
When recording your podcast, you can speak with your natural voice or modulate your voice to give it a distinctive tone to capture your audience’s attention. Avoid overmodulating and make sure to be consistent with your vocal tone and style.
In case you didn’t know, voice modulation refers to the ability to control your voice when speaking by varying the tone, stress on words, pitch, and changing the speech rate.
This simple tip is important because your audience gets used to your voice’s timbre as it creates a bond between you and your listeners. Being inconsistent with your voice’s timbre and tone will negatively impact the overall quality of your podcast.
Monitor your Volume Levels – Don’t Distort the Signal
When recording your podcast, whether you are using a laptop or podcasting mixer, ensure that the signal levels are not distorting.
Audio distortion occurs when the signal’s volume is too high and falls outside the input’s dynamic range.
To avoid distortion in your podcast recordings, monitor the volume levels while recording. If using recording software, you’ll see the volume level scale represented in colors.
When the indicator is in the green area, it means that the signal volume is ok. The yellow means that the audio is louder but still is within the range. When the red indicator lights up, the volume is too high, and the resulting audio will be distorted.
Keep your volume in the green section for your normal conversational tone and only allow the yellow section if you need to add more emphasis to the conversation. The red will render your recording useless as it will sound distorted.
Also, make sure that your guest’s microphone levels are at the same level as yours. Even if everyone is talking simultaneously, make sure that the levels don’t peak into the red section.
The dynamics in a conversation can change from low to high in a second, so how can you keep the volumes consistent with all the mics? This takes us to the next podcasting tip, use an audio compressor for consistent volume levels.
Use an Audio Compressor to Get Consistent Volume
Keeping a consistent volume on a podcast from beginning to end screams professionalism. This small but often overlooked podcasting tip can make a huge difference in the overall listening experience.
If you use a good microphone, your voice will sound crisp and pleasant. But, what about the inconsistent volume levels? If you move away from the mic, the voice will sound thin. If you speak too loud all of a sudden or laugh loudly, all of these inconsistent volume levels will have your listeners reaching for the volume knob every few seconds.
Remember, podcasts are mostly consumed by people who are multitasking. Most of which use earphones to listen. Having very soft and all of a sudden loud levels in the recording is unacceptable.
Here is where the audio compressor comes in. An audio compressor is a device that creates a more leveled volume to your sound by amplifying the audio when it’s too low, normalizing it in others, and toning down the loud bits.
In other words, when used right, an audio compressor will create a consistent audio level throughout the whole recording while keeping intact the dynamics of the sounds.
Most modern audio mixers come with audio compressors. Podcasting mixers are designed to make a podcaster’s life much easier by providing compressor and limiter presets to create the most professional recordings.
Of course, you can take the raw recording with inconsistent audio levels and use any DAW (Digital Audio Workstation) software to normalize the levels. Still, it’s always a better practice to have raw recordings that have a consistent volume.
The Room’s Acoustics Can Make or Break a Podcast
You could have the best equipment to record your podcast and create the best content, but if the room’s acoustics is terrible, the sound quality will still be dreadful. Usually, the main problem in places with lousy acoustics is excessive echo.
There are different ways you can improve a room’s acoustics if you’re dealing with echo. One way is by using curtains on all the walls and carpet on the floors to absorb the sound. Another way is by using carpet on the walls and floors; the only problem is that it looks ugly and unprofessional.
Lastly, you can use absorption panels on the walls to help fix the echo problem. You can build your panels and add more personality to your recording room while reducing the echo at the same time.
Here is a tutorial I found on YouTube to make your own high-performance sound absorption panels very cheaply, still delivering excellent results.
If you rather have professional acoustic panels like those used in recording studios and don’t mind spending some money, choose professional-grade acoustic material.
Several kits come with everything you need to improve the acoustics of a room for recording. Here are some examples of what you can get depending on the size of the room (links to Amazon):
Record The Podcast in a Quiet Room
Another podcast tip to get better sounding podcasts is to record in a quiet room. One thing you want to avoid at all costs is recording in noisy environments.
If you live in a house with multiple people or have noisy neighbors, it can be difficult to avoid noise. You can try to use materials to seal the gaps on the doors and windows while recording. You can also try using thick curtains that can absorb sound.
Here is a good article that explains in more detail soundproofing techniques to avoid noise while recording.
Use a Backup Audio Recorder

Let’s be real; accidents can and will happen. You could make a mistake and forget to press the record button on your laptop. Or the hard drive can fail, making you lose the recording of your latest podcast that needs to be released tomorrow.
Although we can’t foresee an accident from happening, we can take preventive measures to reduce the risk.
Another excellent strategy from the list of podcast tips that can be a lifesaver is to use a backup recording device to ensure that you get a secondary audio file of your podcast.
Let’s say, for example, that you are interviewing someone like Gary Vee for your podcast, and you only got one shot because he is on a tight schedule.
When you are ready to edit the recording, it turns out that the audio file is incomplete because the lavalier mic you were using stopped working in the middle of the interview, or it was continually cutting off.
There is nothing to do, the interview is over, and you can’t arrange for a new one. This is why it’s essential to have at least two different audio recording devices recording simultaneously.
For cases like this, I highly recommend using a multitrack audio recorder like the Zoom H4n Pro, Zoom H6, or the Tascam DR-05X. These recorders come with stereo condenser mics to pick up the audio in great detail. Plus, they come with many excellent features.
One of the features that I like the most is the dual recording mode. When set to this mode, it automatically records a second audio take at a lower level in case the main audio recorded is too loud and distorted.
With all of these precautions, you will be sure to have the perfect audio take for editing your podcast. That way, your sound will be excellent, and your audience will appreciate it.
Bonus Tip – Do a Sync Clap Before each Take for easy synchronization
Here is a real-life example. Let’s say that you recorded a very important interview for your podcast. When editing, you realize that the main audio file is mostly good, but at the end of the recording, the guest’s response to your final question has a very low volume because he moved away from the mic.
In this case, you would need to overdub the main audio file with the backup recording.
A common practice used by content creators when using secondary backup recorders is to do a sync clap before each take. This practice makes everything much easier when overdubbing audio files for editing.
Press record on your laptop and multitrack recorder and get ready for your take. Then clap at the beginning before starting to speak, wait one second, and start recording your podcast. When editing, the clap can be used as a marker to know where to synchronize both audio files.
Edit The Podcast Before Releasing it
After you are done recording, edit your work before releasing it to the public. You want to catch any mistakes or any audio problems and fix them with your audio editing software. You wouldn’t turn in a report before checking it, right? The same principle applies to your podcast.
Look for any audio inconsistencies, delete the parts that are not useful and always try to keep the same time length for all your podcasts.
If you don’t have an audio compressor on your mixer and see the inconsistent volume levels, use available plugins on the DAW software to fix it. This ensures that your audio sounds professional.
Keep in mind that your ultimate goal should be to provide the best listening experience to your audience. This, combined with creating engaging content, will ensure your podcast’s success.