In the wake of the COVID-19 pandemic, our lives changed, and our daily routines got interrupted.
Everything from church services to live events got canceled, and the only way to continue was by doing live streaming.
Depending on what you want to achieve, setting up a live streaming system could cost thousands of dollars buying all those fancy cameras and video equipment gear.
If you have the budget, great, go right ahead! But what if you are a small congregation, a singer/songwriter, or a small band who has a small following but still wants to put on a show to live stream it but doesn’t have a budget to get a professional system?
Plus, don’t forget that using several DSLR cameras means that you need to have more people involved to get the right video shots.
Wouldn’t it be nice to have a live streaming system that one person controls and be able to get high-quality video and achieve all this by using a handful of equipment?
In today’s article, I present a complete solution to build a budget live streaming system using a couple of affordable PTZ cameras and joystick controllers.
Want to know more about this streaming system? Read on as we go into more detail on how to build it.
Low Budget Live Streaming System Set Up Overview
We want good quality but affordable PTZ cameras that deliver a good quality HD image, and plenty of zoom for setting up the live streaming system.
The way the system works is as follows. Two network PTZ cameras connect to a network switch. At the same time, one or two PTZ camera joystick controllers are also connected to the same network switch.
To get an extra video shot, you can use an HD Webcam to get a wide-angle view from the main stage or pulpit.
OBS Studio is used as the video switcher to prepare the video shot before it is sent to the live stream.
Keep in mind that OBS should be installed on a computer with a potent video card to simultaneously handle the transcoding of the video streams from two or three cameras.
Your stream destination can be Zoom, Microsoft Teams, YouTube, Facebook, Twitch, or any other streaming platform.
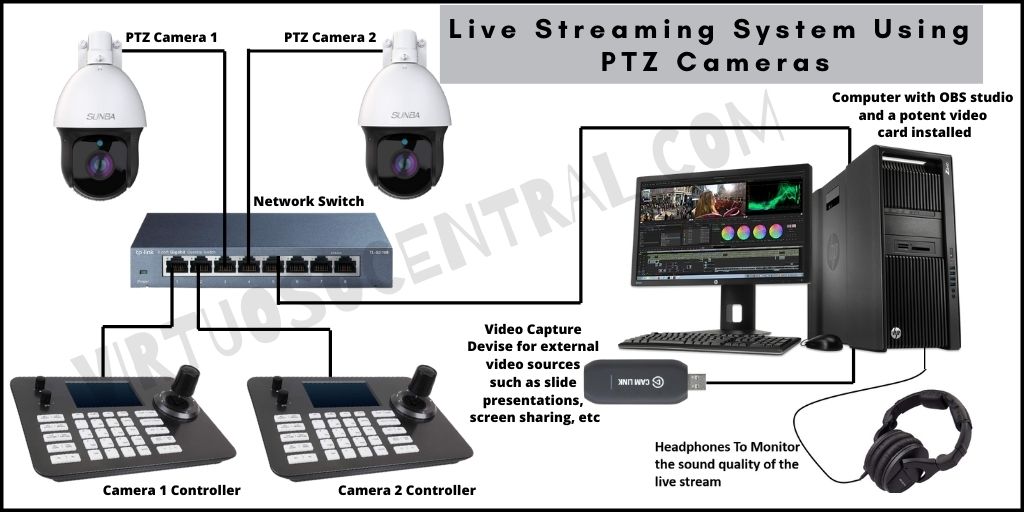
Equipment and Software You’ll Need for the Setup.
- OBS Studio – Free open source software for video recording and live streaming.
- VB-CABLE Virtual Audio Device – The virtual audio device forwards the audio signal to Zoom because OBS doesn’t have a way to do so as of May 2021.
- PTZ Cameras – 2 x SUNBA PTZ 25X 601-D25X (Link to Amazon)
- Wide-angle camera [optional] – Logitech HD Pro Webcam C920 (Link to Amazon)
- PTZ Camera Controller – 1 x LEFTEK Video Conference PTZ Controller (Link to Amazon). Adding a second controller is recommended for having an independent live feed and control of each camera.
- Network Switch – TP-Link TL-SG108 (Link to Amazon). Any gigabit switch with enough ports would work. The one suggested here is in case you don’t have one and need to buy it.
- Router with internet connectivity and a backup if possible.
- HDMI video capture card [optional] – Elgato Cam Link 4K (Link to Amazon). The capture card is suggested if you need to feed a video signal to OBS. For example, if you need to connect a laptop for a presentation from the pulpit or main stage and want to have it available as a video source in OBS for streaming.
- Miscellaneous Accessories – Network cables, audio cables, HDMI cable, and connector, etc.
- Fast internet connection for streaming the video feed.
Setting Up the Live Streaming System
The following sections explain the setup process, but before permanently installing the cameras and PTZ controllers, I recommend running a bench test to ensure everything is working correctly.
Installing The PTZ Cameras
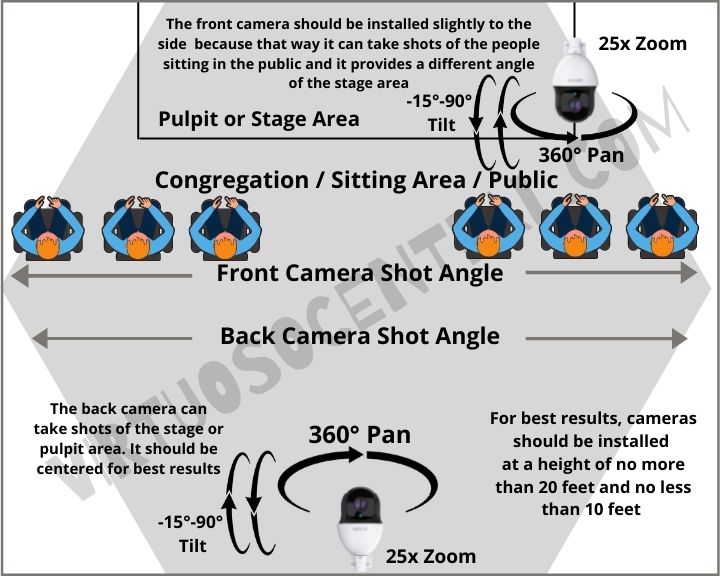
The cameras need to be installed in a place where there is a good view of the main stage. In our setup, we are using two cameras for better flexibility. One needs to be installed in the back of the sanctuary/venue and make sure it is centered. The other camera should be placed in the front and slightly to the side.
The camera in the back will be used to focus on the main stage or pulpit area. The one installed in the front would provide a different angle shot of the main stage area as well as the audience.
Having two cameras gives you more flexibility because you can prepare the shot before sending it to the live stream, and by having one in the front and another in the back, you can have a 360-degree view of the venue.
In our case, we are using the SUNBA PTZ 25X 601-D25X. This camera is one of the best budget PTZ cameras for live streaming. It offers a high-speed pan, tilt, and zoom with 360 degrees endless horizontal rotation, 15 degrees upward tilt, and 90 degrees downward movement, making it ideal for getting high-quality professional-looking video shots.
The Sumba camera delivers excellent results, and it’s capable of delivering 1080p HD video. But it is a budget-friendly camera, and it lacks some features, especially in low-light environments.
If your budget allows for it, I recommend the PTZOptics 30X-SDI. This is a professional-grade PTZ camera that offers 30X optical zoom, pan movement of ±340°, a field of view 60.7°(Wide) 2.28°(Tele) with a resolution of 1920 x 1080. Plus, it has simultaneous video outputs on 3G-SDI, HDMI, & IP Streaming.
Recommended Height and Installation Tips
Install each camera at the height of no more than 20 feet so that if you need to focus on a person’s face, it doesn’t seem like you are looking from the top.
Also, it would be best if you install them at the height of no less than 10 feet so that if people are walking around, it doesn’t affect the video shot.
Another critical factor you need to consider before deciding where to install the camera is that an RJ45 ethernet cable needs to go from the network switch through the PoE (Power over Ethernet) and connect to the camera’s back.
In other words, consider the place you are permanently installing the camera and how easy or difficult it will be to send the ethernet cable to reach the camera.
Below is a graphical representation of the PTZ camera installation you can use for your reference.
Using a Webcam for a Wide Angle Shot – Optional
Using a webcam is not necessary but can be helpful if you want to have an extra wide-angle shot. You could install a webcam such as the Logitech HD Pro Webcam C920 close to the computer you are using for streaming.
This wide-angle shot could be helpful in case you run into a problem with one of the PTZ cameras in the middle of a live streaming session.
Usually, in churches and live event venues, the PA system and all the equipment are located in the back. In that case, all you have to do is find a suitable position for the webcam so that you get the right shot.
With this camera, try to get a position you like and live it to be used when needed.
Provide Electric Power to The Cameras Via the PoE Injector
A good feature of the Sumba PTZ and the PTZOptics 30X-SDI cameras is that both accept PoE connections, meaning that you can send the power and data through the same ethernet cable.
This makes installation much easier because you don’t need to provide an electrical outlet where you decide to mount the camera.
Each Sumba camera comes with a regular power adapter that needs to connect to an outlet. You can use it this way, but I recommend using a PoE injector to make the installation process much more straightforward and cleaner.
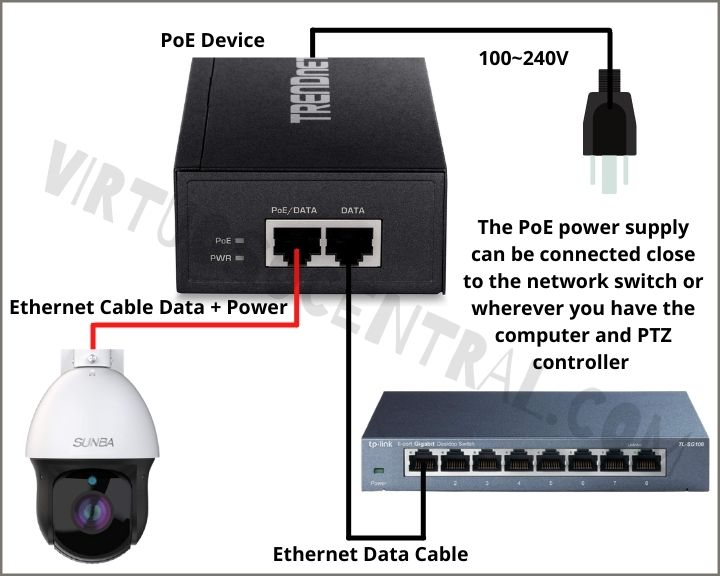
PoE stands for Power Over Ethernet, and what it does is that it supplies the necessary voltage to the camera through the same ethernet cable coming from the network switch.
The way you need to connect the PoE injector is as follows:
- First, plug in the PoE injector’s to an electrical outlet.
- Use a short ethernet cable to go from the network switch to the PoE’s input.
- From the PoE’s output, use another Ethernet cable to continue to the camera. This cable will now be providing the data stream and necessary power for the camera to work.
Please note that the Sumba PTZ 25X 601-D25X doesn’t come with a PoE unit. It only brings a regular power supply.
If you decide to use PoE instead of the regular power supply included with the camera, ensure that it can deliver at least 25W and 802.3at Standard.
Here are a few options that will work, links to Amazon:
- StarTech.com 4 Port Gigabit PoE+ Injector 802.3at – For up to 4 devices
- SUNBA High Power 802at/af Compliant PoE+ Injector – For only one camera
- TRENDnet Gigabit Ultra PoE+ Injector – For only one camera
If needed, here is the diagram for your reference on connecting the PoE unit.
Connecting the Cameras, Computer and Controller to the Network Switch
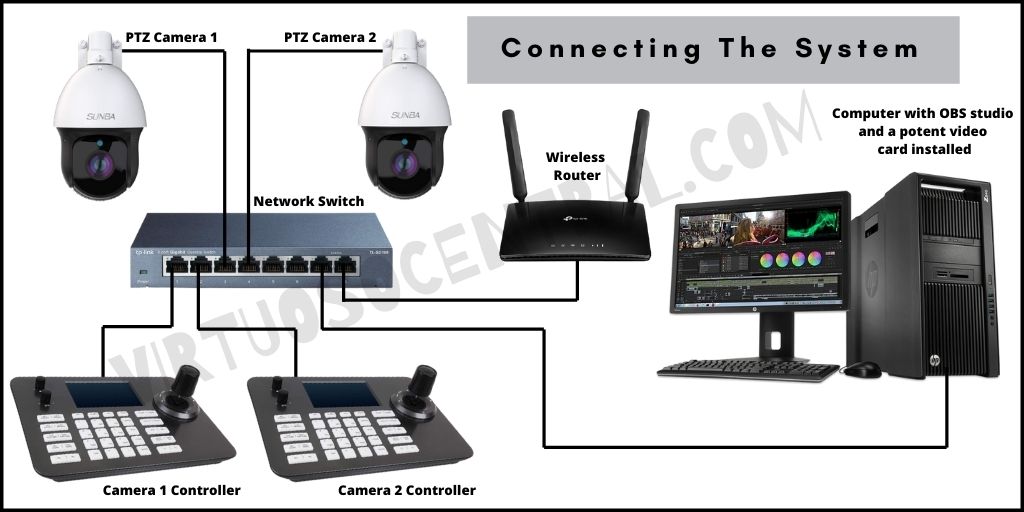
The connections are easy. All you have to do is use RJ45 CAT5 or CAT6 network cable to connect everything together.
- Start by connecting the router to the network switch
- Next, connect the computer, the controllers, and the PTZ cameras to the switch.
- If you decide to use the PoE adapter to provide power to the cameras, make sure to connect it correctly, and don’t forget to plug the PoE into the electrical outlet. If needed, check the diagram in the previous section.
Access Cameras Using Sumba’s Device Manager Software
All Sumba cameras have a factory default IP address which is 192.168.1.10. If you connect two or more cameras on the same network, you need to change the IP address because each device connected to the network requires a unique IP, or conflicts between devices will occur.
The easiest way to access the cameras to manage it or change the network settings is by using Sumba’s IP config tool called Device Manager.
The software comes in the CD-ROM bundled in the box, or it can be downloaded from the manufacturer’s website; here is the link.
Download and install Sumba’s device manager on the computer. The next step is to change the IP and make it static.
It’s worth mentioning that you don’t have to assign static IPs to each device in the small network we are building for the live streaming system as long as you use a DHCP router that assigns IPs automatically.
Still, I believe it is a much better practice to assign static IPs because that way, you will know the IP address of each device, which makes it much easier when trying to troubleshoot a problem. I highly recommend labeling each device with its static IP for faster access.
Assign Static IPs to the Cameras
The following steps explain how to change the IP and Gateway configuration of the cameras so that they work within the network.
- The first thing you need to do is to make sure that only one camera is connected. The reason for this is because if both cameras have the same IP, you will end up with an IP conflict, and you need to avoid that.
- Open the Device Manager software that you just installed and click on the “IP Search” tab located in the lower-left area of the window.
- After a few seconds, the camera should appear in the list of devices; click on it. If you don’t see it on the devices list, restart the camera by disconnecting the power adapter and reconnecting again after a few seconds.
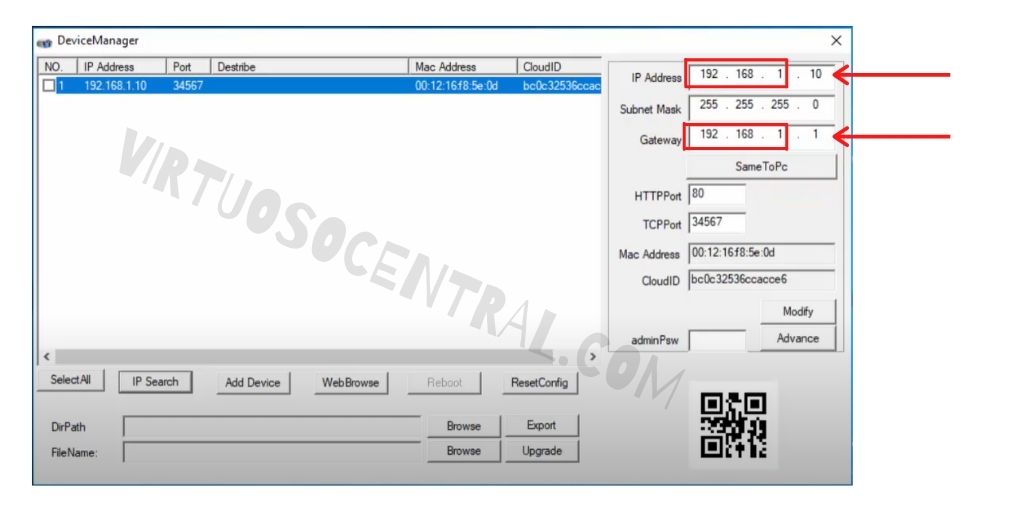
- On the upper-right area of the window, you have the IP Address, Subnet Mask, and Gateway. These are the numbers we need to change. Below is a screenshot for your reference.
- Next, you need to modify the Gateway on the configuration so that the camera is part of the same local network family.
- To find out what your Gateway IP is on Windows 10, right-click on the network icon found on the lower right corner of your screen and click on “Open Network & Internet Settings.”
- Under “Advanced Network Settings,” click on “Change Adapter Options.”
- In the new window that opens, double-click on the Ethernet adapter. On the new window that opens, click on “Details…” On the new window that opens, look for “IPv4 Default Gateway” and take note of it.
- Now that you know the Default Gateway go back to the device manager tool and change the Gateway of the camera to the corresponding value of the local network that we just looked up.
- Next, change the IP Address of the Camera. Make sure that the IP Address number you choose is part of the Gateway. For example, if the default Gateway is 192.168.1.1, the IP address must be 192.168.1.xx, where xx is any number between 2 to 255. I recommend choosing numbers that follow each other closely. For example, one camera can be 192.168.1.20, and the other camera 192.168.1.21, etc.
- After making the changes, make sure to click on “Modify” to save the changes on the camera.
- At this point, you can connect the second camera and repeat the procedure to assign the correct Gateway and IP Address to it.
Setting up the PTZ Controllers and Assigning Static IPs
To control the cameras, we will be using a joystick PTZ controller. The one we are choosing for this budget live streaming application is the LEFTEK Video Conference PTZ Controller.
It’s worth mentioning that the LEFTEK controller can be connected using PoE. So, if you get a powerful enough PoE injector, you can use it as a central power supply unit for the cameras and video controllers.
This controller plays the role of monitoring the video feed from the camera thanks to its 5-inch, 800 x 480 TFT LCD display while controlling the Pan, Tilt, and Zoom positions of the camera by using the joystick.
To navigate the menu options on the Leftek controller, use the joystick to go up, down, left, or right. The “ENTER” or select button is in the center of the joystick; all you have to do is press it.
Follow these steps to set up the controller and assign static IPs to the controllers:
- On the keyboard, press the “Menu” button to enter the main menu.
- Use the joystick to navigate the menu and select “Network Set.”
- In the options that open, navigate to “Type,” press “ENTER,” and select “STATIC.” That way, each device in your system has static IPs.
- Next, enter the IP for the video controller. In the previous example, we used IP 192.168.1.20 and 192.168.1.21 for the cameras. For the PTZ controller, we can use 192.168.1.22 and so on.
- In the “Mask” section (subnet mask), enter 255.255.255.0
- Following, enter the “Gateway” IP address. This is the same IP we used in the previous section. (Refer to step 6 in the last section – Assign Static IPs to the Cameras)
- In the “DNS” section, enter 8.8.8.8
- Next, navigate to “Save” and press “Enter” to save the settings.
If you decide to use two controllers, one for each camera, repeat these procedures for each controller, and don’t forget to use a different IP.
Adding the Cameras to the Leftek PTZ Controller
After the cameras and controller are on the same LAN network, you can add the cameras to control them using the joystick.
These are the steps to follow when adding the cameras to the controller:
- Press the “SEARCH” button to find the IP cameras that are in the LAN network.
- Use the joystick to go up, down, left, or right. The “ENTER” or select button is in the center of the joystick.
- Using the joystick, choose “SEARCH DEVICE” to find the IP cameras connected to your network.
- Once you see the IP cameras, navigate and choose “SELECT ALL,” then select “ADD” to add them to the device list.
- At this point, you can test each camera by using the joystick to pan, tilt, and zoom to see its video feed on the LCD screen.
- The controller assigns an ID number to each camera that you need to use when switching between them. To call a camera, push the “CAM” button and then enter the number of the camera you want to access. For example, we are using two cameras, one for the front, ID number 1, and one for the back, with ID number 2. To call camera one (front), push CAM, then number one on the keypad.
You can use two separate video controllers, one for each camera. The advantage of doing this is that you can have an independent video feed of each camera, and you can prepare the next video shot before sending it live.
If you decide to go this route, on step 4, instead of choosing “SELECT ALL,” only select one camera to add. Then repeat the same procedure on the other controller to add the second camera.
Using the Preset Feature on the Leftek Controller
After you have added the cameras to the controller and can operate them, you’ll quickly realize that there are video shots that you will use constantly. The Leftek controller allows you to store up to 99 preset positions that save time when getting a video shot ready. Here is how to store preset positions.
- Use the joystick to pan, tilt, and zoom until you get the desired video shot.
- On the IP PTZ controller keyboard, locate and press “SET PRESET” > “The preset number of your choice” > “ENTER.” For example, for preset 1, you would press the following buttons in this order: SET PRESET > 1 > ENTER. For preset 2: SET PRESET > 2 > ENTER, and so on up to 99.
- To recall a preset, press “CALL PRESET” > “The preset number of you want to call” > “ENTER.” For example, to recall preset 1, you would press the CALL PRESET > 1 > ENTER buttons. For preset 2: CALL PRESET > 2 > ENTER, and so on up to 99.
Extra Tip: It would be a good idea to create a spreadsheet or use a notepad to write down a short description of each preset for easy access during a livestream.
Installing and Setting up OBS and Needed Plugins
OBS Studio will be used as the video switcher to prepare the video shot, add effects, and mix multiple video sources.
Installing OBS Studio
Here are the steps to install and configure OBS Studio for our live streaming system:
- Go to OBS Studio’s official website and download it. Choose your operating system and go through the basic installation process.
- After it’s done installing, before clicking “Finish,” disable “Launch OBS Studio 26.1.1.” Now you can click “Finish” to complete the installation.
- Before launching OBS, search for it in the start menu, right-click on it, and select “Pin to Task Bar.”
- Once pinned to the taskbar, right-click the OBS icon, go to Properties >> Advanced, then enable “Run as Administrator,” then click Ok. Doing these steps will ensure that OBS always runs as administrator, which prevents some performance issues.
- Note: If you don’t have administrator privileges on the computer you are installing OBS, then ignore steps 2 through 4 and perform a regular install following the installation wizard.
- Next, launch OBS, and you will get a pop-up window, which is the auto-configuration wizard. Use the configuration wizard if you will use Facebook Live, YouTube, Twitch, or Twitter/Periscope for your stream, as it will prompt you to log into the platform of your choice and choose the best settings. Doing this will save you time because it will log in as soon as you open OBS.
- Note: If you are planning to use Zoom, Microsoft Teams, or any other streaming platform, jump to the next section.
- Select “Optimize for streaming, recording is secondary,” and click Next.
- On the “Base (Canvas) Resolution,” choose 1920 x 1080. On the FPS option, select “Either 60 or 30, but prefer 60 when possible,” click Next.
- In this step, you can choose the streaming service that you’ll be using. Click on the dropdown menu to select it and enter the required information to log into the platform. Make sure to enable “Prefer hardware acceleration” and “Estimate bitrate with bandwidth test.” This process can take some time, so be patient.
Make sure to set OBS to Studio Mode. With this mode, you will see a preview screen and a program screen. To enable studio mode, find the “Controls” section and click on “Studio Mode.”
Next, we need to install and set up a plugin on OBS to forward the audio signal coming from the audio mixer to the streaming platform.
Installing VB-CABLE Virtual Audio Device
By default, OBS Studio doesn’t have a way of routing the audio signal internally to Zoom. To do this, we need a plugin called VB-Cable virtual audio device.
Follow these steps to set up the VB-Virtual audio device:
- Download VB-Virtual Audio Device and follow the installation wizard to install the plugin. Make sure that OBS is not running. After the plugin installs, you need to restart the computer for the changes to take effect.
- Open OBS studio and look for the “Sources” section, which is in the lower-left area of the window.
- Click the “+” and select “Audio Input Capture.” On the new window that opens, select “Create New” and name the new capture you are creating. Be sure to enable “Make Source Visible,” then click “Ok.”
Adding the PTZ Cameras as Video Sources in OBS
To use OBS Studio as the video switcher between the PTZ cameras and webcam, they need to be added as video sources. Additionally, you need to add the video sources as scenes to use them between video shots. Here is how to do this
- Open OBS Studio and find the “Scenes” section located in the lower-left area of the window. You need to have at least one scene for the setup to work.
- Click the “+” button, and a new window called “Add Scene” opens. Name the new scene you are creating, and be sure to use a name that makes it easy to identify when doing the live stream.
- The newly created scene doesn’t have a source assigned to it. To assign a video source, select the scene we just created, and in the “Sources” area, click the “+” button and select “Media Source.”
- On the new window that opens, select “Create New” and give it a name. Be sure to enable “Make Source Visible,” then click “Ok.” Note: I recommend using a name that makes it easy to identify, for example, front camera, back camera, Cam1, Cam2, etc.
- Select the newly created video capture device and click on “Properties,” which is the gear icon located next to the minus sign.
- In the new window that opens, deselect “Local File” and make sure that “Restart playback when source becomes active” is selected.
- Lower the “Network Buffering” to 1MB by moving the slider to the left.
- Next, we need to tell OBS the RTSP address for the camera we want to link as a device.
- On the “Input” section, type the RTSP IP address in the following format rtsp://xxx.xxx.x.xx/1 where xxx.xxx.x.xx is the static IP address we assigned to the camera previously.
- In our example, we assigned 192.168.1.20 to the front camera, so in this case, the RTSP address would be rtsp://192.168.1.20/1
- Leave the “Input Format” section blank
- Further, in the “Reconnect Delay” section, use the slider to bring it down to 1S (1 second)
- Select “Use hardware decoding when available.” By selecting this feature, you will be telling your video card to perform some of the decoding tasks, which will make the system run smoother.
- Ensure to select “Show nothing when playback ends,” then click “Ok” to exit the setup.
If you are using more than one IP camera, you need to add another scene and repeat these steps for each camera until all of them have been added to OBS as media sources.
For USB cameras, you don’t add them as RSTP devices. In that case, you would add them as video capture devices.
Connecting the Live Audio Feed from the Mixing Console to OBS Studio
This setup is intended to be used for live church streaming or live events such as concerts, conferences, etc.
In this case, we are dealing with several microphones and even musical instrument signals mixed using the audio mixer.
After all the audio signals go through the mixing board, we need to connect a line from the soundboard to the computer’s audio input so that OBS can use it for streaming.
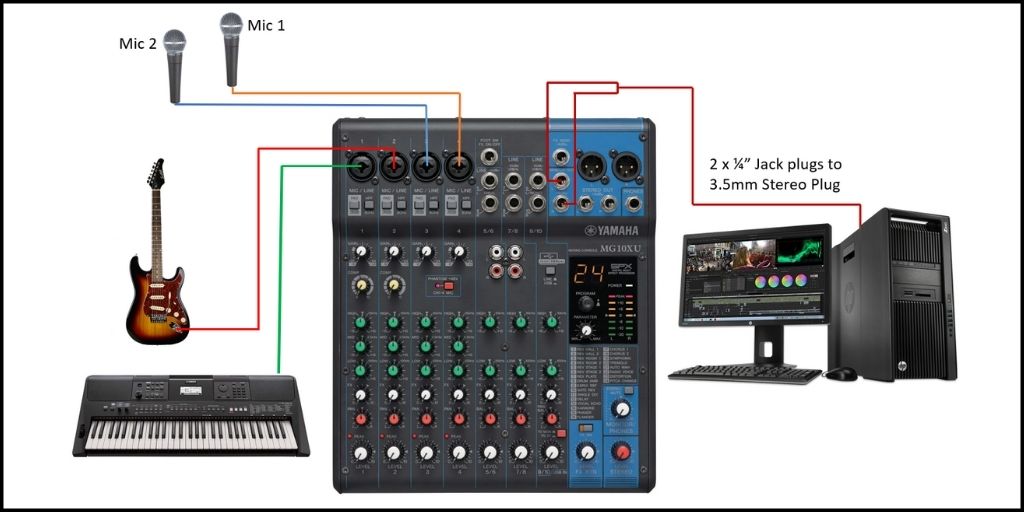
There are two approaches to do this. One is by connecting a stereo cable from the mixer to the PC’S audio input located in the sound card. This approach is intended for desktop PCs with a dedicated audio card that offers inputs and output connectors.
This approach doesn’t work well on laptops because a laptop uses the same 3.5mm jack for input/outputs; it doesn’t accept both simultaneously. Check out the diagram for your reference.
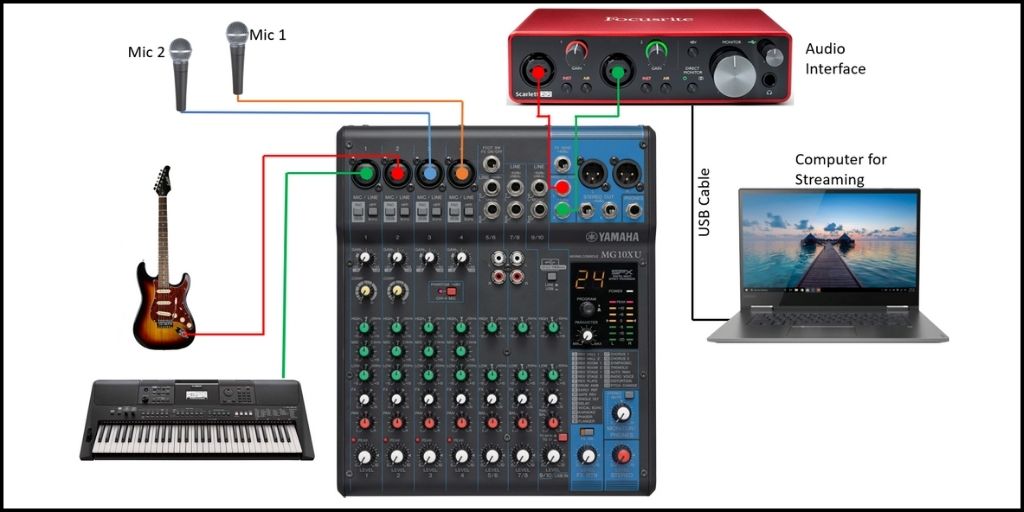
The second method is by using a USB audio interface. This method would work better for laptops and desktop computers because it uses an external device to convert external analog audio signals into digital.
For a more detailed explanation of connecting a mixer to an audio interface, click the link.
Here is the diagram of the connections you need to make.
Testing the Audio Feed from the Mixing Console
With everything connected and with OBS Studio running, play any audio from the mixer. If your connections are good and volumes set correctly, you should see in the “Audio Mixer” section in OBS signal coming through.
The meter should be showing the audio feed coming from the mixer. Make sure that the volume is between the green and yellow colors of the meter. Avoid going into the red because that means that the signal is too hot, and it will sound distorted.
Use a pair of headphones to listen to the incoming signal to assess if it is distorting or not.
In the OBS audio mixer, you will see a volume slider that you can use to lower or increase the signal level.
If it sounds distorted, try decreasing the volume on the mixer side until you see the signal bouncing between the green and yellow (on the OBS studio audio mixer)
Configuring Zoom to Work with OBS for Live Streaming Using PTZ Cameras
Now that we have configured OBS, it’s time to configure Zoom to accept the audio and video sources from OBS. Here is how to do it.
- The first thing to do is find the “Controls” section located in the lower-right corner of the window.
- Click on “Start Virtual Camera” to enable it. The virtual camera is the way OBS will send the video stream to Zoom.
- Next, open Zoom and log into the platform. Click on “Settings” >> “Video.” From the dropdown menu, select “OBS Virtual Camera.”
- We have already installed VB-CABLE Virtual Audio Device, so the next step is to assign it as the microphone. To do this, look for the “Audio” tab, and under the “Microphone” section, click on the dropdown menu and select CABLE Output (VB-Audio virtual cable).
- At this point, you should be able to see the video and audio feed coming from OBS.
Note: If you see that the audio and video are out of sync, or there is a delay in the video when compared to the audio, go to the next section to see how to fix it.
Fixing the Audio/Video Latency
In most cases, when the video feed comes from an IP camera and the audio is taken from the main audio mixer, you will see that the audio and video will be out of sync.
This happens because video takes longer to process and encode in OBS than audio does. Audio comes out faster than video, therefore the reason for them being out of sync.
The difference between the audio and video is usually a few milliseconds, but you can see and hear the delay.
There are three different ways to solve this issue:
- Feeding the audio signal from the mixing console straight to cameras [Best Option]
- Use the advanced audio properties in OBS to delay the audio signal coming from the mixing console
- Using the GStreamer plugin for RTSP sources – This plugin helps reduce latency differences between the audio and video feeds.
Feeding the Audio Signal to the Camera to fix Latency Issues
Feeding the audio signal to each PTZ camera is the best option for fixing latency issues. The reason is that the video and audio will be encoded together and sent through the IP protocol and decoded back once they reach the destination.
Although this is the best option, it is not the most practical. The reason is because you would need to send a physical cable from the mixing console to wherever each one of the cameras is installed. If the church or venue is large, sending a cable could be a real challenge.
Still, if this is feasible in your case, it will ensure that no latency is present between the audio and video feed.
The SUNBA PTZ 25X 601-D25X doesn’t have the feature to embed the audio feed, but the PTZOptics 30X-SDI does. This is where the features offered by the PTZOptics camera surpass the Sumba camera in every way.
Using the Advanced Audio Properties in OBS Studio
OBS has advanced audio features that you can set to fix the delay or latency issue between the video and audio. Here is how to fix the latency problem in OBS:
- Have someone talk through a microphone connected to the audio mixer from the front of the venue. Make sure that the mic is on a stand so that the person can clap. The clapping sound will be used as a physical indication when syncing the audio with the video.
- Use the PTZ camera to zoom into the person that is in the front.
- In OBS, under the “Controls” section, click on “Start Recording” and have the person in the front say a few words, then clap a few times, allowing a few seconds in between claps.
- Next, watch the video to see if the audio is leading or lagging.
- Go to View > Advanced Audio Options.
- In the new window that opens, you will see all the audio sources you have available. Locate the one that you are using to receive the audio feed from the mixing console.
- Then, find the “Sync Offset” section and increase the number to 200 ms. Repeat the recording to see if you need to increase or decrease the delay.
Remember that doing it this way is by trial and error, so it might take some time until you get it just right. Be patient, as it might take a few tries until the audio and video are synced.
Run a Streaming Test to Make sure It Works
Finally, the last step is to run a live stream to test if everything works well. Use a device such as a smartphone or a laptop to connect to Zoom, YouTube, Facebook Live, or any other platform you are using to test the streaming video and sound quality.
This is the workflow you can follow to test the whole streaming system:
- Open OBS
- Start virtual camera
- Make sure studio mode is selected
- Check the incoming audio and adjust the levels if needed. Avoid distortion or saturation from the mixer side
- Right-click the audio area in OBS, click the advanced audio properties, and on the new window that opens under “Volume,” you can boost or decrease the audio levels as needed.
- The audio input level can also be adjusted from sound control panel settings in Windows. Right-click the volume icon > open sound settings > input > device properties). The selected input device should be the Line In. If using a USB audio interface, make sure to select it for adjusting the volume.
- Verify that the PTZ controllers are turned on
- Confirm controls are working for the front and back cameras
- To see all the scenes in one window, open the multiview window feature in OBS (View > Multiview (windowed))
- If you have set camera presets on a spreadsheet, open it and have it handy
- Open and log into the streaming platform of your choice. It can be Zoom, Facebook Live, YouTube, etc.
- For the Mic/Line, it should be CABLE Output (VB-Audio virtual cable)
- To receive audio from Zoom, the speaker should be your computer’s audio card
- In the video or camera section, select the OBS Virtual Camera
- Unmute mic if a Zoom participant needs to be routed to the mixer
- Verify the audio feed from the computer to the soundboard
- Use OBS to switch shots and add graphics as needed
- Use the PTZ controllers to move cameras and call presets as needed
- Call Preset > number > enter
- You can also adjust the focus manually if needed (focus+ and focus-)
- You can use OBS to record the event; then, the video can be uploaded to YouTube or any other platform.