Wouldn’t it be nice to set up a wireless PA system for live sound without having a whole bunch of messy cables everywhere? Imagine how convenient that would be and how clean and professional your setup would look. Plus, you would minimize tripping hazards significantly.
Setting up a wireless PA system is as simple as substituting your cable runs from the mixer to the speakers, microphones, and instruments with pro-level wireless systems and adapters, transforming your loudspeakers into a high-performance wireless playback system.
Doing this can be pretty expensive if you have a large system, but think of it as an investment that’s well worth it, especially if you work with sound systems.
In This post, I will show you how to set up a wireless PA system, what you need, and how to connect everything using available devices in the market today.
1. Substituting Cable Runs from the Mixer to the Speakers with a Wireless System
The first thing you need to do when setting up a wireless PA system is to substitute the cable runs going from the mixer, speaker management system, or crossover network to the powered speakers or amplifier/speaker combination with a pro-level wireless speaker system.
I recommend the Alto Professional Stealth MKII-UHF system(link to Amazon), which stands out in the market today, delivering excellent results.
The advantage of this system is that you can replace hundreds of feet of console-to-speaker cabling without compromising audio quality. Additionally, you can quickly and easily expand to more speakers by getting extra receivers.
So, if you have a pa system for live sound with multiple speakers, this system will be a perfect fit for you.
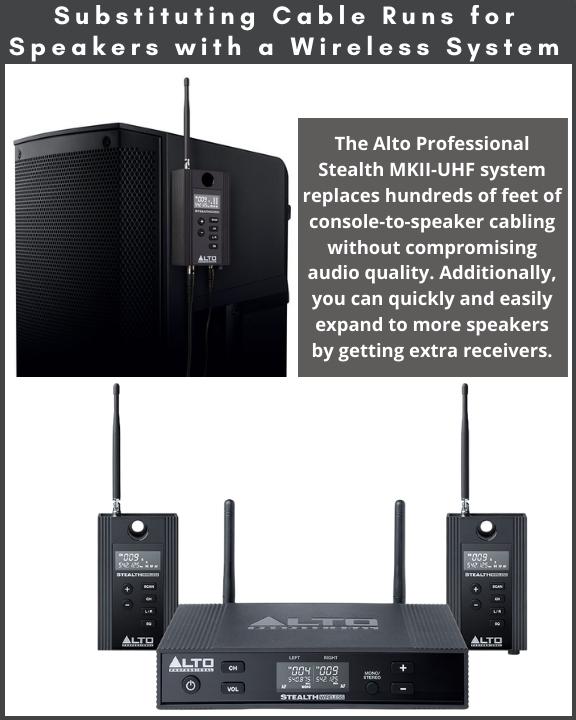
This is a game changer when connecting a mixer to active speakers or an amplifier/speaker combination because it cleans up messy cables and makes your setup more professional.
This is especially true for people who DJ at parties bringing their own equipment, or for people who rent out audio systems for parties and events.
One thing that stands out from the Alto Stealth wireless speaker system is its rock-solid UHF wireless connection, thanks to its true diversity reception feature, meaning that it delivers a more reliable performance making it appropriate for mission-critical applications such as a live sound setup.
Additionally, the system includes numerous pro-level features like auto frequency scan and synchronization, switchable stereo/dual mono operation, and built-in delay line functionality.
Steps For Substituting Cable Runs from the Mixer to the Speakers
- The first thing to do is turn off the mixer and the speakers before making any connections. That way, you avoid sudden pops that could potentially damage your equipment.
- Set the mixer’s master volume faders and speaker’s volume all the way down.
- Locate the “Main Out” or “Stereo Out” connectors in the mixing console.
- Choose between balanced XLR, 1/4” TRS, or unbalanced 1/4” TS jack plugs to connect the output of the mixer to the input of the transmitter of the Alto Stealth system. I recommend using balanced cables.
- Use the included XLR to TRS cable to connect the output from the receiver unit to the input of each powered speaker or to the input of the amplifier if using an amp/speaker combination.
- Now, you can turn on the mixer and the transmitter unit.
- Also, turn on each receiver unit and the powered speakers or amplifiers. Turn up the volume on the speaker halfway. You can adjust as necessary during the sound check.
- On the transmitter, set the mode to Mono or Stereo. If your mixer is stereo, choose the stereo mode.
- Press the “VOL” button on the transmitter unit to set the left and right channels’ volume at which it will broadcast.
- Press the “CH” button to select a broadcast channel on the transmitter for the left and right audio channels. The transmitter and receivers should synchronize but double-check to ensure the same channel number on the receiver units.
- Play some music on the mixer and slowly increase the main volume until you hear sound from the speakers.
- Adjust the volume of the speakers or transmitter unit until you are satisfied with it, and perform a sound check. Always leave enough headroom when setting up the volume structure between devices.
- Use the EQ knobs to adjust the highs and lows until it sounds like you want.
If you don’t have XLR, TRS, or TS patch cables on hand to make the connection and need to buy them, here are a couple of links to Amazon; you can choose the length according to your needs:
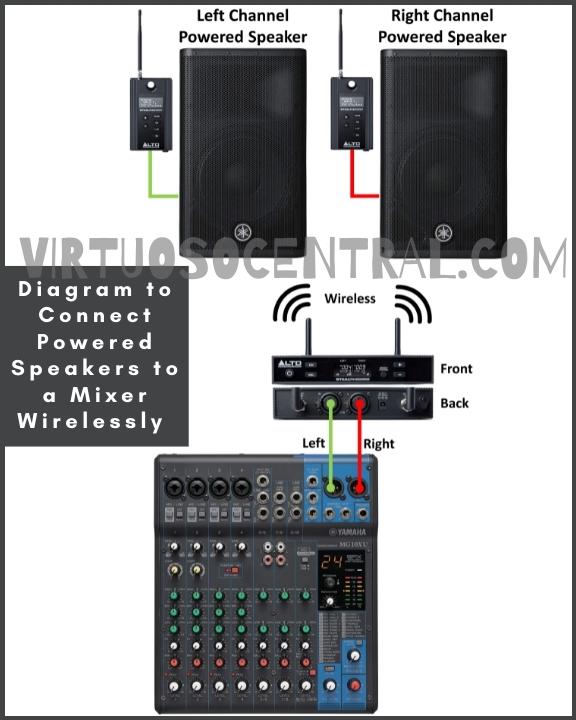
Here is a diagram for your reference on how to make the connection.
2. Set Up Wireless Microphones – Two Options
Getting rid of microphone cables is a step up when it comes to setting up a live sound system. They provide the freedom of moving around without wires being in the way while delivering excellent results without compromising sound quality.
When it comes to wireless microphones, you have two options to choose from. You can opt for using professional-grade wireless microphone systems, or if on a budget, use a Transmitter/Receiver Combo to convert your wired mics to wireless. Let’s explore each option.
Using Professional Grade Wireless Microphone Systems
These mic systems are very convenient as they come as one package you can install on a rack.
They are easy to set up, and if using a professional brand, such as Shure, Sennheiser, Audio-Technica, or AKG, you can be assured that the sound quality and reliability of the wireless connection will be top-notch when used within its specs.
If you don’t have wireless mics and need to buy them, stay away from cheap, unknown brands, as they will surely be a big headache down the road.
When dealing with wireless microphone systems, always choose known brands as they have years of experience designing and manufacturing wireless systems and don’t cut costs on crucial components.
The downside of professional-grade wireless microphone systems is that they cost several hundred dollars each. But what is guaranteed is the excellent results they deliver. Some examples are:
If you can make the investment, that’s great. That way, you set everything up on a rack and be ready to offer your clients the freedom of wireless mics. If this is outside your budget, use a transmitter/receiver combo, as presented in the next section.
Steps to Connect Professional-Grade Wireless Mics to Your Sound System
- Set the volume fader of the channel you will use on the mixer all the way down.
- Use a balanced XLR or TRS cable and connect one side to the channel input of the mixing console and the other side to the wireless mic’s output.
- Turn on the receiver unit as well as the microphone. Don’t forget to install the battery on the mic.
- Most likely, the mic and receiver will be synced. If not, press the Sync button and give it a few seconds for the devices to sync. Depending on the model you buy, some receivers don’t have a sync button. In that case, you would have to manually set the channel on the microphone (transmitter) and the receiver unit. Make sure you put both on the same channel.
- Increase the volume fader on the channel you are using on the mixer and start talking on the mic.
- Set the gain correctly for that channel and tune the EQ until it sounds like you want.
If you don’t know how to set the gain on a microphone, click the link as I explain the step-by-step process.
Also, if you want to learn how to EQ vocals, click the link, as I have devoted a whole article explaining the process in detail.
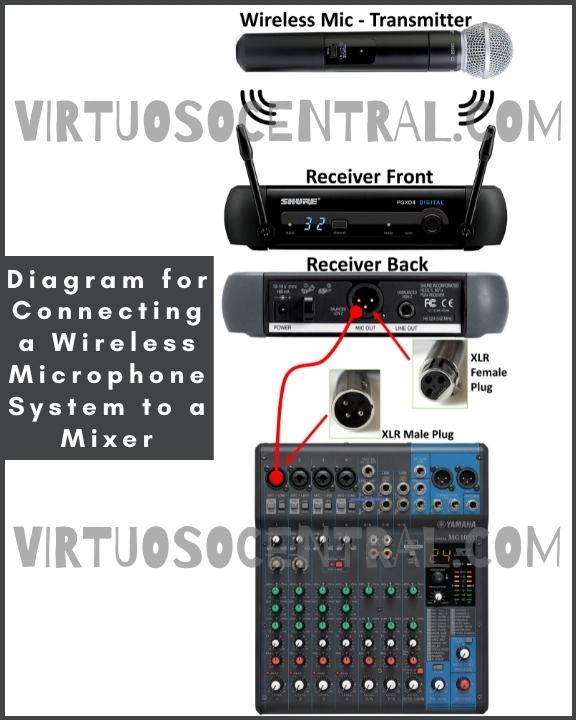
Here is the diagram for connecting a wireless microphone system to a mixer. Use it for your reference.
Using a Transmitter/Receiver Combo to Covert Wired Mics into Wireless
What if you don’t have the budget to buy professional wireless mics but want to have the freedom of being cable free on stage? Is there a way to convert your wired mics into wireless without spending a lot of money? Luckily, there are several options to do this.
You only need a Transmitter/Receiver Combo to convert your wired dynamic mics, such as the popular Shure SM58, into wireless.
If you do a quick search on Google or Amazon, many options will pop up. Just be aware that not all of them are reliable options. You need something that will deliver a stable wireless connection.
In my opinion, the best options that stand out are:
- Sennheiser XSW-D XLR Base Set
- It Provides up to 250ft range (75m) of rock-solid wireless connection with up to 5 hours of battery life on a single charge.
- You can switch between multiple transmitters linked to one receiver or configure any combination of transmitters and receivers depending on your need.
- The one-touch ease-of-use button simplifies the setup and can be used as a mute button from either transmitter or receiver.
- Alto Professional Stealth 1
- Provides 16 switchable UHF channels, which means you can simultaneously use up to 16 sets (transmitter/receiver) to convert up to 16 wired mics into wireless.
- It uses one AA battery and delivers up to 4 hours of continuous use. If you want to use it continuously without worrying about changing the battery, it can be plugged in using the included micro-USB cable.
- The USB power adapter is not included, but a phone charger can work. The Alto Stealth 1 is slim so that you can plug them next to each other on a mixing console or DJ mixer.
- Joyo MW-1
- Uses the 5.8Ghz band known to have strong anti-interference ability, longer transmission distance, and high stability within 100 feet range.
- It provides 4 switchable channels to use up to 4 sets at the same time. This is a rechargeable device, and it can deliver between 3 to 4.5 hours of use per charge.
- A downside of the Joyo MW-1 is that you cannot plug more than one receiver next to each other on a mixer due to its large diameter. You would have to leave a channel space between them if using more than one or use cable patches to go from the mixer to the receiver unit.
These three units can convert any wired dynamic mic into wireless for a fraction of the cost. Remember that you will need one set (transmitter/receiver) for each wired microphone you want to convert to wireless.
Steps to Convert Wired Mics into Wireless Using a Transmitter/Receiver Combo
- Always remember to set the volume fader of the channel you will use on a mixer all the way down when making a connection. This is to avoid sudden loud pops that could damage your equipment.
- Connect the receiver unit to the input channel on the mixer side.
- Take the transmitter unit and connect it to the microphone. It will go in the place you would plug the cable in.
- Turn on the receiver and transmitter units.
- If using the Sennheiser XSW-D, you don’t need to do any setup as it comes pre-programmed from the factory. Go to step 7.
- If using any other device, most likely, the units will be synced. If not, long press the channel selector button on both devices to pair them. Once paired, you can select between the available channels.
- Increase the volume fader on the channel you are using on the mixer and start talking on the mic.
- Set the gain correctly for that channel and tune the EQ until it sounds like you want.
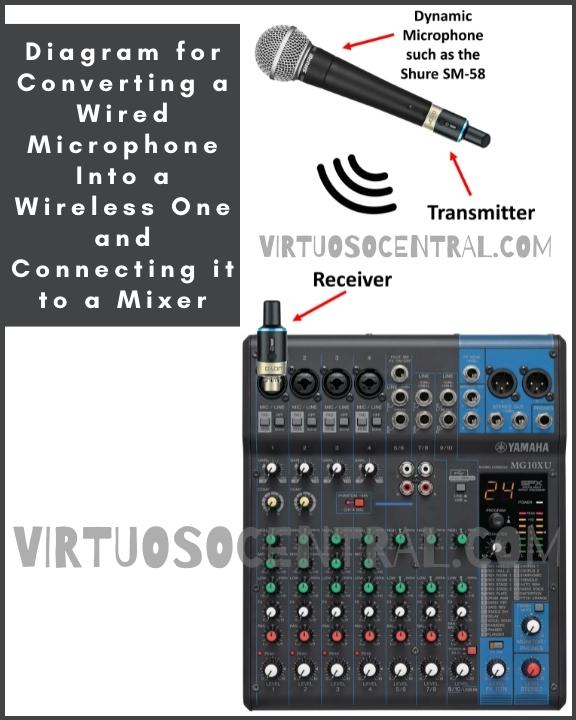
Here is the diagram for converting a wired microphone into a wireless one and connecting it to a mixer. Use it for your reference.
3. Use a Wireless Instrument System to Substitute Instrument Cables
You can substitute the on-stage cable with a wireless system for the guitars, bass, and any other pluggable instrument. This will allow the musician to move around on stage as part of the show.
Using a wireless instrument system is as easy as plugging it in, turning up the volume, and starting playing.
There are several options you can choose from. You can opt for rack-mounted professional systems from well-known brands such as the Shure BLX4R and Shure SLX14 or use the more practical plug-and-play rechargeable options such as the Sennheiser XSW-D or the Boss WL-20 Digital Wireless Guitar System.
The budget-friendly selections similar to the systems mentioned above are Westshell Wireless Instrument System, Lekato WS-50, and Joyo JW-03.
Steps to Convert Any Pluggable Instrument into Wireless to Substitute Instrument Cables
- Set the volume fader of the channel you will use on the mixer all the way down.
- If you connect your guitar to an amp before sending the signal to the mixing console, connect the receiver unit to the input of the guitar\bass amplifier, then route the signal to the mixer as you usually do.
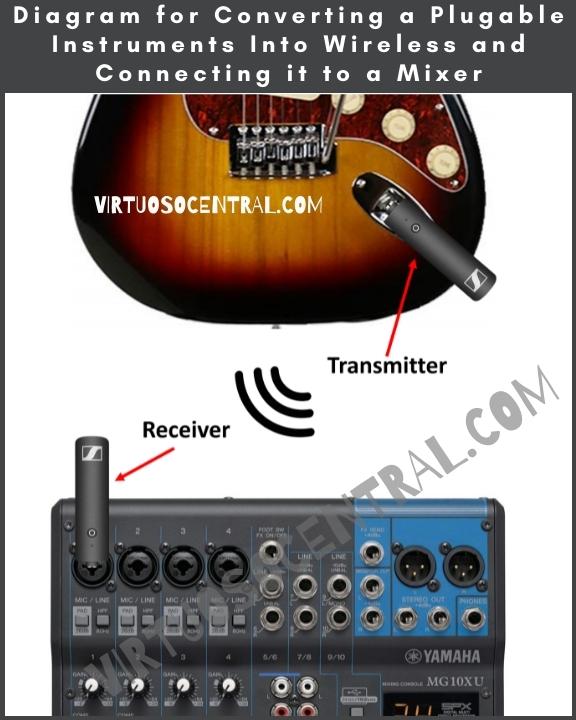
- If, instead, you go straight to the mixer, then connect the receiver to the input channel of your choice in the mixer. If using a rack-mounted system, you will need to run a patch cable from the mixer to the receiver unit. If using a plug-and-play option, connect the receiver to the channel.
- Take the transmitter unit and connect it to the instrument. It will go in the place where you plug the cable in.
- Turn on the receiver and transmitter units.
- Most likely, the units will be synced. If not, long press the sync button to sync the transmitter and receiver. If using a budget plug-and-play option, select the same channel on both devices to pair them.
- Increase the volume fader on the channel you are using on the mixer and let the guitar play to run a sound check.
- Set the gain correctly for that channel and tune the EQ until it sounds like you want.
As with microphones, you need to set the gain correctly for each instrument you connect to the mixer. It’s the same procedure. If you want to learn how to do this, click the link.
Also, if you want to expand your knowledge about how to set the EQ for instruments such as electric and acoustic guitars, bass guitars, etc., click the link to read the guide.
Here is the diagram for connecting a wireless instrument system to a mixer. Use it for your reference.
Final Thoughts
Now you have a clearer idea of how to set up a wireless PA system using devices available today. Wireless PA systems have a cleaner and more professional look. No messy cables to deal with, and the performance and audio quality are as good as using cables but without the hassle.
There is more that goes into setting up PA systems that I cover on this website. If you would like, browse the site to learn more by clicking here.