Live performance is the most authentic way of bringing your music to your audience. The live experience is directly dependent on your stage sound system set up as well on the quality of your audio equipment.
Setting up a stage sound system correctly will go a long way towards providing great entertainment for your audience. This article will give you some pointers to help do that, as well as some explanations of how sound systems work.

How a PA System Works
A PA (or public address) system is used to increase sound for your audience. This generally includes a microphone, mixer, and loudspeakers, all of which perform a specific function. The microphone converts sound pressure to voltage. Its magnetic force emits a small amount of voltage when someone produces vocal sounds into it.
This voltage is then modified and equalized on the mixing console, then is amplified by a powered loudspeaker or amplifier. The higher voltage is dispersed by the speakers, which increases the volume of the sound for the audience.
Sound Pressure Level (SPL) of speakers determines the volume of sound at given distances from the speaker. Speakers usually work together to amplify sound in a trapezoidal configuration, which allows for easier placement than a square or rectangle arrangement.
Before Setting Up a Stage Sound System
If you’re new to setting up a sound system, you may arrive at your first venue and think, “How do I set up a PA system for my band?” It’s OK to feel uncertain about this your first few times. Each venue is different, and with time you will learn tricks to adapt to each one.
You will also develop a system that works for you, that can easily be modified to fit each new setting. A basic rule of thumb to remember is to keep the speakers in front of the microphones (rather than behind) to prevent feedback.
Feedback is what happens when a microphone picks up too much of its signal. The amplifier then outputs a louder version of the signal, creating a feedback loop that can only be interrupted by muting the speaker or microphone. Similarly, you will want to do your best to keep the main amplification away from the microphones.
Equipment Needed for Setting Up a Stage Sound System
Let’s start with some brief descriptions of some of the equipment you’ll be using to set up the stage sound system for your band or live event.
The Mixing Console
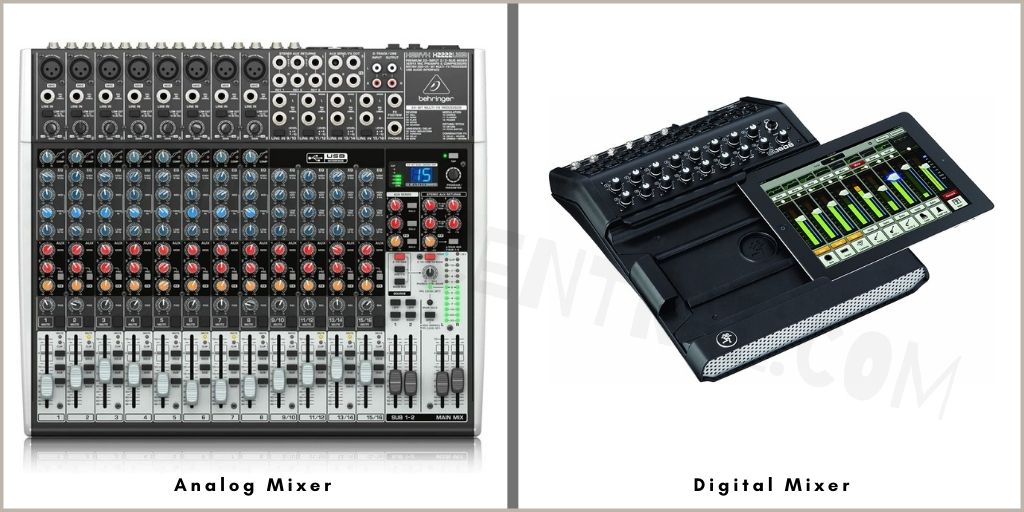
Mixers are used to combine multiple audio sources such as microphones and instruments to then manipulate the volume, frequency, and dynamics of the sound source. In a PA system, audio signals are increased to line level in the mixer.
Audio mixers come in different sizes. Larger audio mixers have several input channels that will accommodate more microphones and connections. They can be analog or digital. Analog mixers balance the tonal sound and carve out space in the sound profile for each instrument in the band. Most have a three to four parametric EQ (equalization), which changes the balance of different frequency components in an audio signal.
Digital mixers tend to be best for touring bands, since most require less gear to operate, and can be controlled wirelessly through dedicated apps. A sound engineer using this setup can move around a room or venue to make adjustments tailored to the audience’s perspective. It can also adjust monitors from the stage while listening to the musicians play.
To correctly use a sound mixer, you need to know the basics of mixing consoles, click the link to read an entire article that explains the ins and outs of audio mixers.
Microphones

Microphones capture the sounds produced by vocals, guitar amplifiers, drums, and any other sound source. Mics come in different shapes and forms. Some are designed for studio recording, while others are tuned explicitly for live performances.
For live performing vocals, there are two main types of mics from which to choose: dynamic and condenser. Dynamic microphones are usually best for live performances because they are less sensitive than condenser mics. Having low sensitivity means the mic is less prone to bleed and feedback during a stage performance.
Even so, many vocalists and sound engineers prefer customized condenser microphones because they deliver superior sound quality and clarity when compared to dynamic mics. Condenser mics pick up more details, including inflection and other nuances of the speaking or singing voice.
Additionally, you can use a microphone to get the guitar, bass, or keyboard amplifier’s sound in the PA system, rather than turning the guitar’s amps all the way up.
The Amplifiers
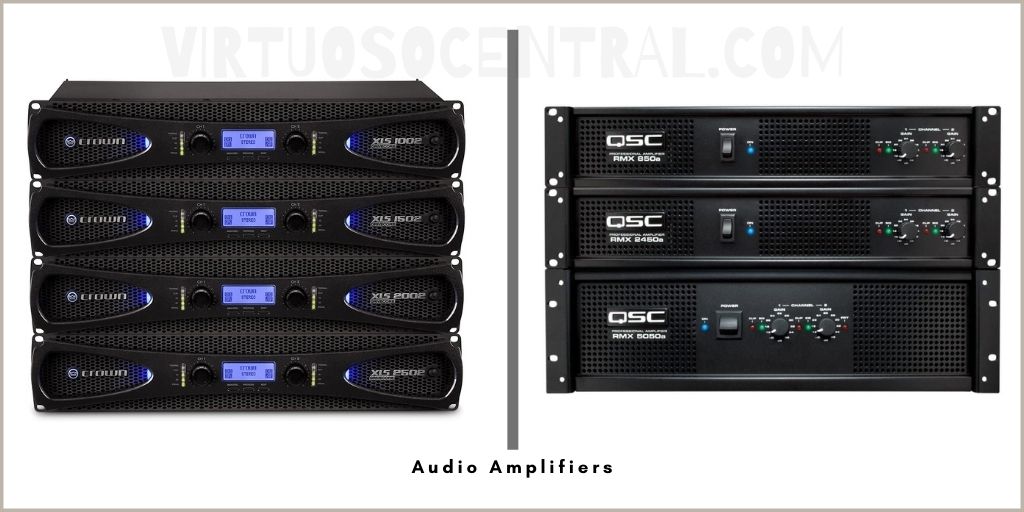
Once audio signals coming from microphones or instruments are mixed, equalized, and amplified to line level, they leave the mixer and continue their path to the amplifier. Audio amplifiers increase the signal further to the speaker level.
Increasing the volume to the next level is called gain staging. At this point, it has attained speaker level and is controlled with the amplifier’s level control. The amplifier’s high voltage causes the speaker to reproduce the original sound at a much higher level for the audience to hear.
The Main Speakers
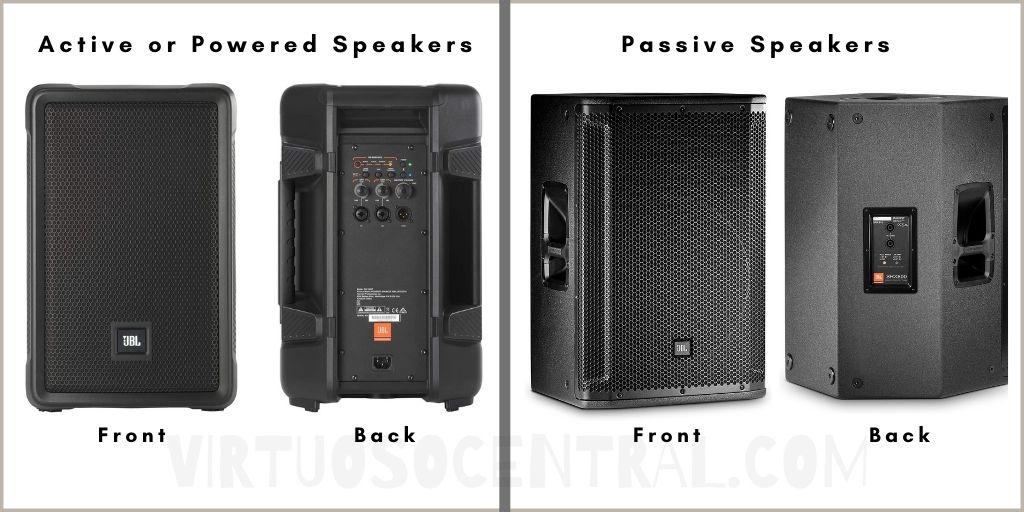
There are two different kinds of speakers, passive and active. Passive speakers have an amplifier as a separate device in a rack, usually located away from the speakers. In contrast, powered (or active) speakers have the amp in the cabinet with the speaker.
Active speakers are easier to use as they have built-in amplifiers matched to the speaker components (subwoofers, mid-range, and tweeters). They require only line-level input and no separate amplifiers to provide power.
Passive speakers, meanwhile, require amplification, speaker cables, and may require an external crossover and other signal processing. Bi-amped or tri-amped passive speaker will give you greater control over the speaker components, but they need a separate amplifier for each speaker part.
The Subwoofer
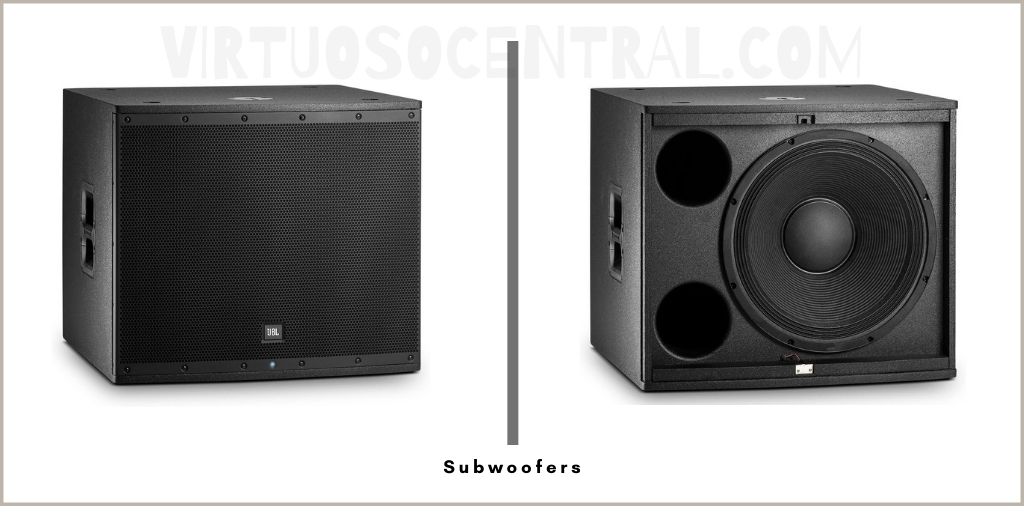
Whether you need a subwoofer when setting up a PA system for your band depends on the kind of instruments and music being played. Country and folk music generally do not require subwoofers, as the bass and kick drum for these types of bands don’t need additional amplification.
Rock, metal, pop, and hip-hop tend to sound better with subwoofers, however. A subwoofer extends frequency response and output for full-range speakers. These are speakers that amplify low frequencies. It’s often best to put subwoofers close together, as putting two together increases sound pressure level by 3 decibels (dB) and will not produce interference. Placing them near walls or corners also increases the perceived bass output.
Stage Monitors
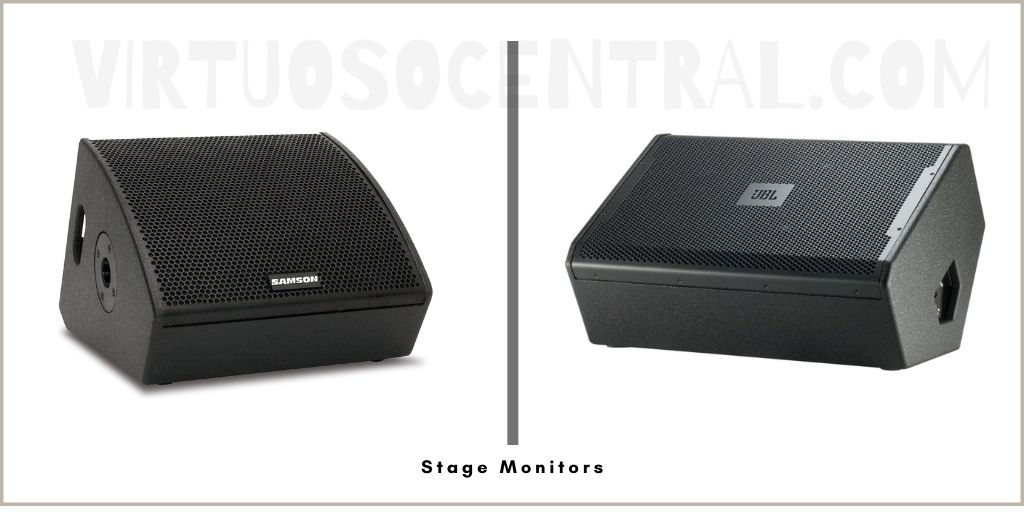
Wedge or stage monitors allow instrument players in the band to hear themselves as they play, by sitting on the floor and angling up toward the performers. Correctly placing monitors on a stage plays a vital role in reducing feedback.
Steps for Setting Up a Stage Sound System
Let’s say you’re setting up a sound system for a standard band, including vocalist, guitar, bass, keyboard, and drums. You’ll want to set up speakers, connect the mixer, and run microphones to start setting up the stage sound system. The following steps explain in detail how the set up is done. Let’s get started.
Positioning Main Speakers and Monitors
1. The first step before setting up a stage sound system is to decide the placement of the PA speakers. To achieve this, you must inspect the location. Check where the stage is located, survey the size, acoustics, and where the audience is going to be in the room. Check where the power outlets are located and verify that they are in good working order.
2. Once you have summed up the acoustics of the venue, and have an idea of where each performer is going to be on stage, set up the main speakers that are going to blast sound to the audience. We have dedicated a full article on speaker placement, click the link to learn more if you’d like.
If you plan on using subwoofers, place them at the front of the stage away from microphones to minimize feedback. Subwoofers have a spot in the top where mounting poles can be screwed into. Speakers will then be mounted on these poles.
If you are not going to use subwoofers, a pair of speaker stands with tops can be used instead. Make sure to tighten the set screw in the back that holds the speaker in place. Depending on the speakers’ weight and the height of the stands, you may want to have another person help mount the speakers.
Make sure to elevate speakers to the audience’s ears so they can hear better. Speaker sound travels farther when they are elevated.
Depending on the setup, there are many ways to raise speakers. The easiest to set up is by using a tripod speaker stands. Another way is by ground stacking, which is putting speakers atop each other in a tower. Scaffolding stands hold speakers at differing heights within a rack. Trussing is suspending speakers with cables.
Speaker height is critical because higher stands will transmit sound farther. The one caveat to this is that if the speakers are too high, there will be a loss of impact in the front row of the audience (but if they are too low, the front row will be deafened by loud sound).
3. Next, you should position your monitors effectively when setting up a PA system for your band. Usually, at least two are recommended, one on each side of the stage. If you have a third, you can set this up at the back of the stage. That way, it can cover the keyboard and drum players.
Running Power Drops on Stage
4. Once the main speakers and monitors are in position, run power drops (extension cords) to each side of the stage to run power cabling to the speakers and monitors. Power drops could also be used to power a guitar player’s foot pedals or any other equipment that needs to be connected to AC voltage.
When you are ready to run power to your sound system, connect your subwoofer(s), then run shorter power cables to the speakers. Make sure to have a roll of gaffer tape handy to secure any cables and prevent them from causing accidents.
One important tip when powering your stage sound system setup is to keep the power off until everything is connected to the mixer.
Setting Up the Mixing Console
5. At this point, find a convenient place to set up the mixing console. The mixer can go anywhere; it doesn’t need to be on the stage itself. Just keep in mind that if you set up the mixer far from the stage, you would need longer cable runs.
Nowadays, there are wireless digital mixers that are controllable using an iPad, such as the Behringer X AIR X18. If you get a digital mixer that is wireless capable, it can be placed on stage to connect all the vocals and instruments, then use the iPad/tablet from anywhere in the venue to control the audio.
6. Run all the cabling to connect all the audio sources such as microphones, guitars, and keyboards to the mixer. You can connect sources like a guitar or bass directly from the amp, using the line output provided in most guitar amps.
You could also use a microphone by placing it in front of the amplifier using a stand to send the signal to the mixer. To connect sources such as keyboards or electronic drums, use the line outputs straight to the mixer.
7. Make it a habit of keeping your setup organized because it will look professional. When setting up the stage for your band, try to keep cabling out of the band’s playing area as much as possible by keeping it to the sides and off stage, etc.
Take advantage of stands to wrap cables around to secure them and decrease the risk of tripping and tape if necessary. Triad orbit stands are great for this because they have a low profile, so they won’t be in the way.
8. One way to decrease clutter on stage is to get a stage box or multi-channel snake. With it, you can connect all of your microphones and audio sources with a shorter cable to decrease the number of wires everywhere.
Connecting the Mixer to the Speakers and Monitors
9. After all the mics and input sources are connected, it’s time to set up audio connections from the mixer to the main speakers and monitors. Run a line from the mixer’s left output to the left speaker. Do the same for the speaker on the right.
If you are setting up the sound system with subwoofers, they likely have an internal crossover or a “Pass Thru” connection. Use the pass-thru connection to connect the main speakers that go on top of the subwoofer.
After that, connect the monitors to mixers. We have dedicated a full article for explaining how to set up stage monitors, click on the link to read more.
Remember, it is vital to have all the performers pleased with the sound coming from the monitors because it is their reference during the performance. In some cases, you would have to relocate the monitor or adjust the volume until all the performers are happy with the sound.
Perform a Sound Test
10. After everything is connected, make sure the main volume on the mixer is all the way down. Start by turning on the audio mixer, then continue with the monitors and lastly, turn on the main speakers. Adjust the volume of the powered speakers to the middle, and do the same on the monitors. Later you can readjust the volumes as necessary.
If using power amplifiers and passive speakers, start by turning on the mixing console, then with the volume of the amplifiers all the way down, turn them on and slowly turn the volume up on the amps themselves. Set the volume level on the amplifiers to the middle and readjust as necessary during the sound check.
As pointed out by Ron, one of our readers, the reason you do it in this order is to “prevent any kind of popping or voltage spikes from equipment (such as the mixer) as it comes up from damaging the speakers.”
11. Play a track on one of the channels and start increasing the volume until you hear it on the speakers. Adjust the volume until you feel it is loud enough for the venue.
EQ Mics and Instruments, Check for Feedback
12. Perform a basic EQ on the mics, and lines. Ask the band to start playing and continue EQ each microphone and instrument connected to the mixer. Adjust the volume on the monitors until each performer can hear the mix.
13. If you start getting feedback, try to ring out the trouble frequencies, or reposition speakers and monitors to minimize feedback. An automatic feedback destroyer can be handy to help eliminate feedback. We have a full article on what can cause microphone feedback along with some tips on how to avoid it, click the link to read the post.
14. Allow enough time when setting up everything so that each mic is tested with the main speakers and monitors as well. Simulate a situation so that you know what is your volume headroom before feedback. In other words, slowly increase the volume of all microphones and generate a sound to see how the equipment behaves at higher volumes.
If you still see that you don’t have enough volume for your mix, you might need to reposition monitors and even the main speakers depending on how bad is the feedback.
Live Sound Setup Diagram
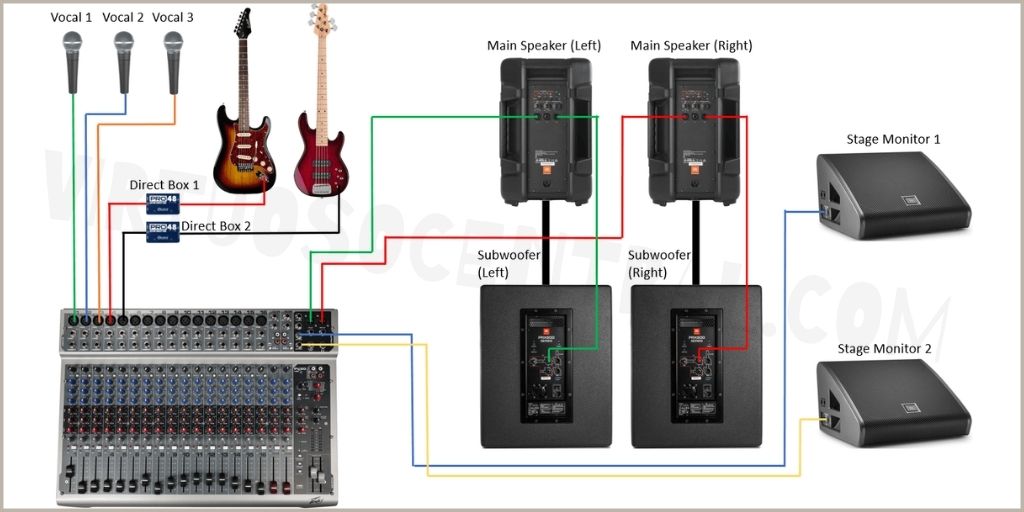
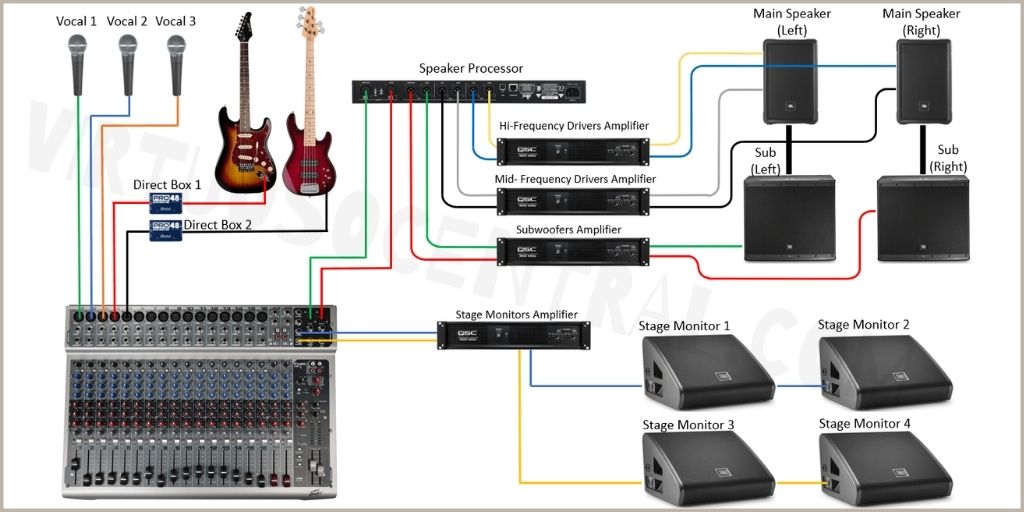
The images below are a couple of live sound setup diagrams. The first is using active speakers while the other is using passive speakers. In both set ups, I have included subwoofers for extending the low-frequency range.
If you are not going to use subwoofers, just omit that connection. Keep in mind that if you need a larger live sound system setup, you can easily daisy chain more speakers and subwoofers. This only applies if using powered speakers.
If instead you are using passive loudspeakers and you want to have a larger system, you would need to use a PA speaker management system that can accommodate your setup.
The following diagrams are simplified for understanding the signal flow.
Live Sound Setup Diagram Using Powered Speakers
Live Sound Setup Diagram Using Passive Speakers
Other Considerations
When setting up the stage for a band (as opposed to a single performer or karaoke artist, or musician), it’s essential to focus on gain staging and feedback prevention. More microphones and speakers increase the probability of feedback, so it’s vital to limit the stage setup to the minimum number that will do the job well.
Final Thought
Providing great musical entertainment for any venue starts with setting up the stage sound system for a band. Hopefully, reading this article has provided you with some tips and insights to make this process as seamless as possible.