You are done setting the PA system, and when you run a sound check, it doesn’t sound very good. You don’t know why so you start moving knobs and faders up and down to realize that you are making it worse.
If you are wondering what you need to do to set up a mixer to produce a good sound, here are the steps:
- First, you must set the correct gain for each channel.
- Second, you must set the proper EQ depending on the sound source
- Third, you should set the volume faders correctly to deliver a balanced mix.
Of course, this is easier said than done, and although several more factors play a crucial role in getting a good sound when setting up a mixer, these three are the main ones. Mess any of them up, and it will sound terrible.
In this post, I will cover these three aspects you need to master to produce a good sound when setting up a mixer. Let’s get started.
Setting Up the Gain for Each Channel
The gain is the single most important knob on the entire channel strip. If it’s set wrong, it will compromise the sound from the beginning, and you will not be able to fix it later in the signal chain, so this knob must be set correctly from the get-go.
But before I show you the steps to set the gain correctly, there are a few things you need to know.
Gain is Not the Same as Volume
Sometimes gain and volume are mistakenly confused and interchanged, but you need to know that gain is not the same as volume.
With volume, you can both increase and decrease the output level from a channel strip. In other words, you can control the loudness of that channel without affecting its tone.
When dealing with gain, you are only increasing the level of the incoming signal until the internal circuits of the mixer that make up the signal path, such as EQ, effects, etc., can work with it. In other words, gain conditions an input signal to an ideal electrical level so the mixer can use it. This also means that the gain can control the signal’s tone but not its loudness.
Here is a simple example to understand this concept. Audio mixers operate at what is called line level, which is electrically around one volt. A microphone, such as the popular Shure SM58, outputs a signal close to 1000 times lower than the line level.
So, for the mixer to use the signal coming from an SM58, it needs to increase it significantly to a point where the circuitry in the mixer can deal with it; otherwise, you’re just trying to process a whole bunch of noise and that’s where your gain control comes in.
Getting to Know Your Mixer’s Gain Knob
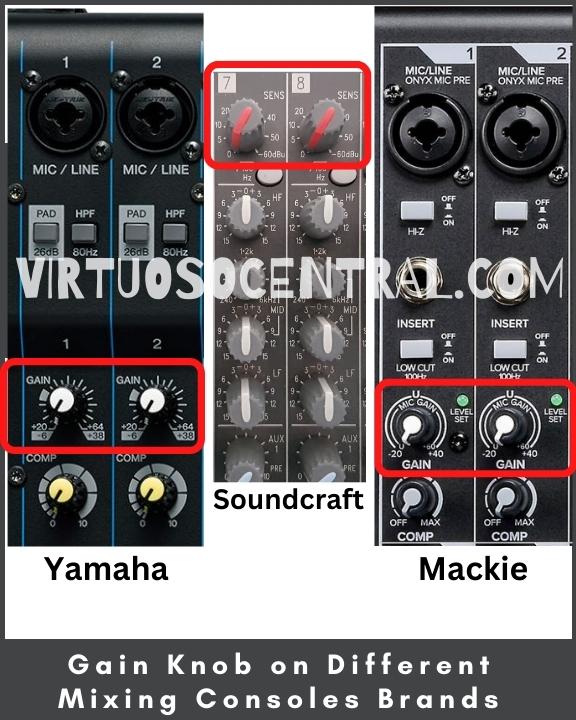
Depending on your mixer’s manufacturer, the gain knob could have various names. Gain can also be referred to as “Trim,” “Input Trim,” “Input Sensitivity,” “Sensitivity,” or “Gain Sensitivity.”
The gain Knob is usually the first knob on a channel strip (from top to bottom) located under the PAD switch.
Although they are labeled differently, they do precisely the same thing: to set the amount by which the channel’s preamp will amplify the incoming analog signal.
The image below shows a typical audio mixer channel strip highlighting the gain knob for your reference.
Gain Setting Procedure on an Audio Mixer – Steps to Follow
You must set the gain for every input channel you use to avoid distortion if the gain is too high or noise and insufficient audio level if set too low. These two scenarios will compromise your audio quality when setting up a mixer to produce good sound.
Follow these steps to correctly set the gain of each channel on your mixing console:
- Make sure the channel fader is all the way down while setting gain. This is to avoid sudden high volumes on your system in case the input level of the source signal is higher than expected.
- Set the Master Faders to 0dB / U / Unity, depending on what’s labeled on your mixer.
- Locate and press the PFL button to activate it. It is located at the bottom of the channel strip next to the fader in every channel. In some mixers, a small LED lights up when pressed.
- Note: PFL stands for “Pre-Fader-Listen,” and it routes the audio signal from that channel to the VU Metter so that you can visually see and measure the strength of the audio signal on that specific channel.
- At this point, for example, if you are setting the gain to a mic, start talking into the mic and watch what is happening at the VU Meter. If you don’t see any movement in the VU Meter, slowly increase the gain until the loudest sections of the audio source are shown in the yellow area of the meter. Ideally, you want to be as close as possible to 0dB or Unity (green or first yellow LED).
- Note: When setting the gain, never allow a signal to go into the red because it means that the signal is too loud and will distort. If the gain knob is all the way to the left (no gain) and your VU meter is in the yellow or red section, your source signal is too high, and you need to lower it at the source. This sometimes happens with active bass guitars and electric guitars using pedals or keyboards.
- Repeat the same procedure for each channel until all your input signals are as close to 0dB or unity as possible, never letting the loudest sections go beyond the yellow LEDs.
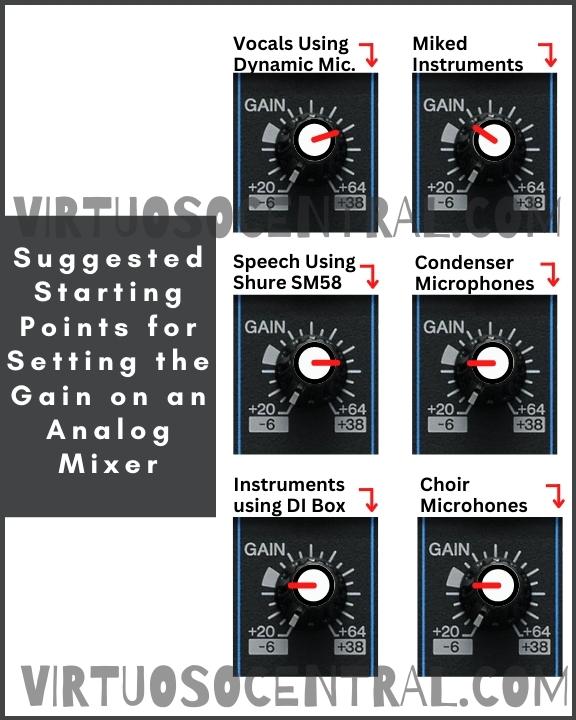
Here are some suggested starting points for setting the gain on an analog mixer. Remember, these are just starting points, which could vary from mixer to mixer and from different sound sources. Use them to start off but always use the gain setting procedure explained above to set the gain for each channel.
The image below also shows the gain knob position for each of the suggested gain settings.
- Vocals Using Dynamic Microphones: 2 o’clock
- Speech Using Shure SM58: 3 o’clock
- Instruments using DI Box: 9 o’clock
- Miked Instruments: 10 o’clock
- Condenser Mics: 9 o’clock
- Choir Mics: 9 o’clock
Set the Proper EQ Depending on the Sound Source
The second most important thing you need to do to get a good sound when setting up a mixer is to EQ each channel properly.
EQ is the short term for equalization. It is the process in which sound is mixed to provide an equal, balanced tone for the listener. This is done by manipulating the sound sources’ frequencies to either boost or decrease specific frequency envelopes so that it sounds clear.
The difficulty when equalizing different sound sources is that there is no such thing as one fits all EQ setting. To EQ, you need to develop your ear to recognize what “good sound” is.
Of course, some of this is down to personal preference, but there are some universally acknowledged truths that equate to bad sound. Essentially, you are trying to make the sound as clear as possible for the audience without sudden jumps or peaks in the mix.
Getting into the nitty-gritty details about equalizing specific sound sources goes beyond the scope of this article, but don’t worry, I have a 4000+ word article showing the procedure you need to follow and providing specific tips on how to EQ sound sources such as vocals, acoustic guitars, electric guitars, bass guitar, piano and keyboards, drums, etc. Plus, I explain in detail the EQ architecture of a mixing console so that you understand what each knob in the EQ does and how to use it properly. Click Here to check it out.
But here are a few quick, summarized tips to help set the proper EQ.
EQ Each Channel Individually
The best way to EQ a sound source is to hear it by itself. Some amateur sound engineers like to EQ while all channels are playing. This is the wrong approach because you first need to EQ each channel separately to make sure it sounds as clear as possible before doing it with all the channels simultaneously.
After each channel has been equalized individually, run a sound check with all the inputs playing to make minor adjustments as necessary to complement the mix.
First Cut, then Boost
The secret behind good equalization is to cut out problematic frequencies before boosting anything. The first step you must take when doing EQ is identifying unwanted frequencies.
Once you have identified problematic frequencies, try to cut them from the mix by lowering the EQ knobs. This cleans up the overall sound, giving the frequencies you want more clarity.
When doing a soundcheck in a venue, the best practice is to start with all the EQ knobs in your mixer set to 12 o’clock or 0 dB. That way, you can hear the incoming signal with a neutral EQ to identify which are the problematic frequencies to cut them out or what is lacking to boost it.
Use a High-Pass (Low-Cut) Filter
When mixing vocals, string instruments, acoustic guitars, and in some cases, electric guitars, always use a high-pass, also known as a low-cut filter, to eliminate any muddiness present in the audio signal.
When a signal sounds muddy, your audience can’t hear things clearly, and this is due to weak harmonics and a smeared time response in the lower frequencies.
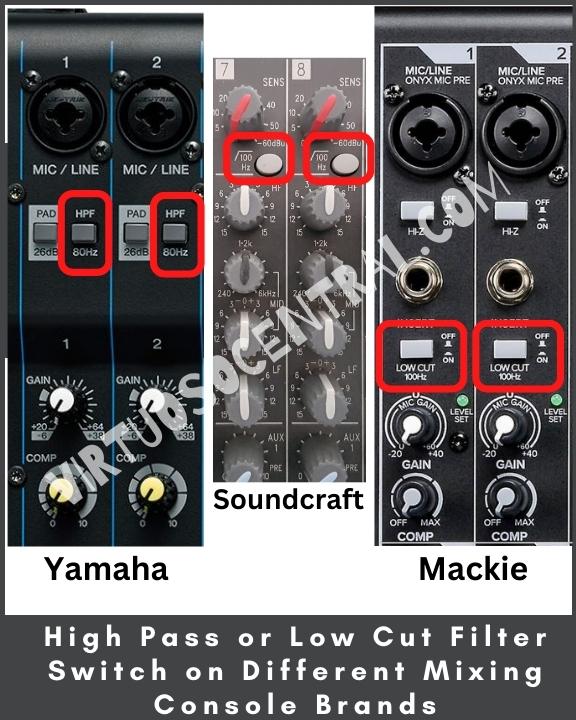
So, to clean up your mix, use the handy high-pass filter that comes with your mixer; it will help a lot. The sweet spot zone for high-passing or low-cutting sounds is 100 Hertz and below.
The high-pass filter switch is usually located above the gain knob or next to the PAD switch. I have highlighted it in the image below for your reference.
Make Small Incremental Changes as Necessary
After you have equalized each channel separately and run a sound check, things can change after the venue is filled with the audience. This is due to changes in the acoustic characteristics of the room, which are very dynamic and can change suddenly.
This means that adjustments are sometimes necessary throughout the show or event. If you must change the EQ or gain, always make small changes at a time.
Make sure that any changes are extremely slow and incremental. This can be hard if you are under pressure during a gig, but a sudden spike or change in sound will be more noticeable than the current one. You can make it far worse and may end up with feedback or low-end rumbling in the bass.
Besides, working slowly is usually all you need to make a sound correction. Even a slight tweak when doing EQ can have huge differences.
Additionally, keep it simple and focus on using one frequency range for the channel.
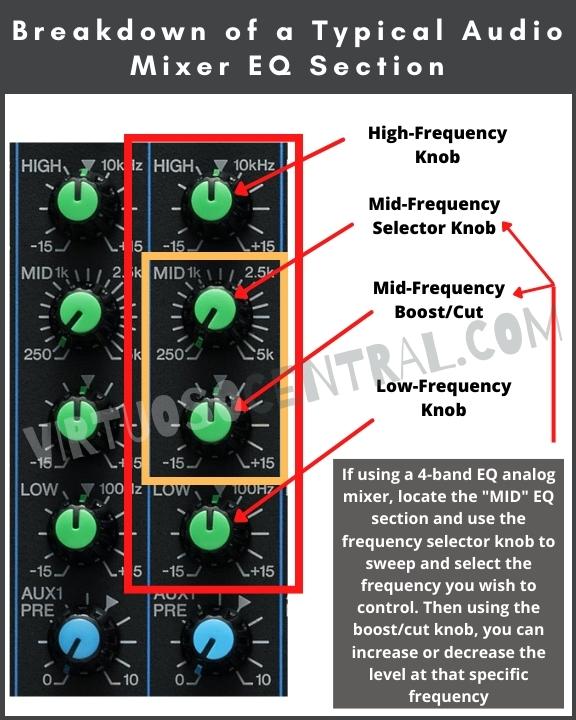
The image below shows a breakdown of a typical analog audio mixer EQ section.
Set The Volume Faders Correctly to Deliver a Balanced Mix.
After you have set the gain and equalized each sound source separately, it is time to have all the channels play so that you can adjust their volume to create a balanced mix.
A good practice is to sit back and hear how everything sounds together. That way, you can identify what channels need adjustment and make minor adjustments at a time until you find a well-balanced sound.
When listening to all the channels playing simultaneously, try to concentrate on listening to one sound source at a time to hear how it blends with others.
At this point, you might have to make slight EQ and volume adjustments to get a clear-sounding mix. Remember that the main goal is to deliver a well-balanced sound to your audience.
Here are a few more tips to look out for to get a balanced mix:
Pay Special Attention to the Vocals
The vocals are the most important part of the mix in a live sound or recording setup. Therefore, you must pay special attention to the main vocalist and backup singers. The instruments are also important, but as they are accompaniment, they can never overpower the vocals.
When setting up a mixer to produce a good sound, you’ll soon find that vocals are the hardest to get right because each vocalist has a unique tone. So, you might have to spend extra time making sure the vocals sound right. This goes from setting the EQ to finding their place in the mix.
Since vocals are the most important part of the mix, I devoted an entire article providing the best tips and mixer settings for vocals that you can check out by clicking here.
Dial-In Compression Settings, if Necessary
You might find that some instruments or vocals have a dynamic range that’s all over the place (dynamic range means the ratio between the softest sound to the loudest sound).
When listening to your mix, if you notice that a signal or sound is all over the place, you can use an audio compressor to lower its dynamics. Just remember, too much compression will cause a sound to seem dead and takes the character out of it.
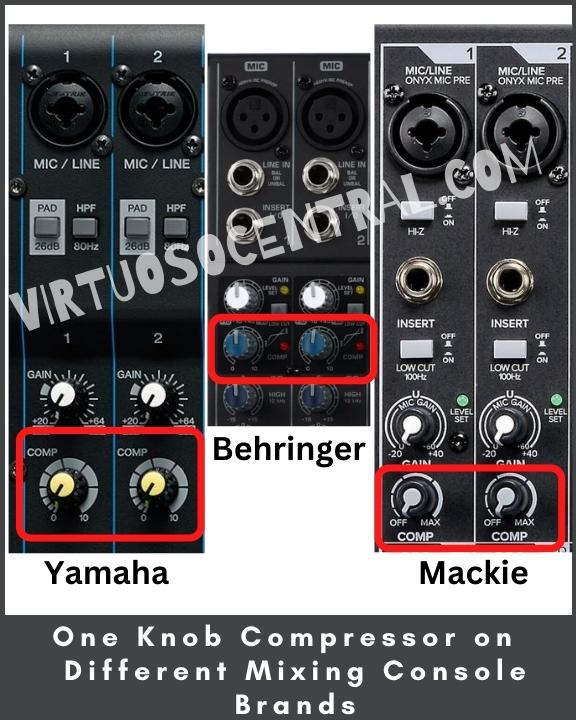
Most mixers have a one-knob compressor that you can use to help you even out the sound on a specific channel. To use it, have the offending channel play and increase the knob slowly until you don’t notice the changes between the soft and loud sounds as much. The image below shows you a typical one-knob compressor on a mixer.
To get better results, you need to use an external compressor as they have more settings, such as ratios and attack and release times, that gives you more control over the sound source.
There are several ratios that are considered sweet spots for your dial-in compression settings, including 3:1, 4:1, and 6:1. Be sure to go through your various attack and release settings so that you can find one that matches your need to get even, balanced sound from your mix.
Final Thoughts
If you were wondering how to set a mixer to produce good sound, in this post, I have shown you the three most important aspects you must do to get the best results. Always remember that the end goal is to produce the most natural, clear sound possible for the audience to enjoy. There is more that goes into setting up PA systems that I cover on this website. If you would like, browse the site to learn more by clicking here.