If you are a singer or musician, there will be times when you need to record your voice or instruments while a track or karaoke is playing in the background.
There are several ways of achieving this, but using Audacity is definitively one of the easiest ways. All you need is your computer with Audacity installed and a USB microphone for recording your voice or an audio interface for connecting your instrument.
In today’s post, I will show an easy way of how to record in Audacity while a track is playing in the background. I will also show you how to use multiple tracks to add as many voices as you want and edit each one without affecting others. Let’s get started!
Software and Equipment You’ll Need for the Setup
You will need to download and install the Audacity DAW software on your computer. It is a free open-source recording software. The provided link takes you to Audacity’s official website.
If you need to record your voice or acoustic instrument while the track is playing, you need to have a microphone connected to the computer.
If you don’t have a USB microphone and are looking to get one, here are a few examples that deliver studio-quality sound [links to Amazon]:
- Blue Yeti USB Mic
- AKG Pro Audio Lyra Ultra-HD Mic
- Audio-Technica AT2020USB+ Condenser USB Microphone
- Samson G-Track Professional USB Microphone
- HyperX QuadCast – USB Condenser Mic
- Mackie EleMent USB Condenser Mic
In some instances, you might want to connect a dynamic mic or an instrument directly to your computer. In that case, you would need an audio interface.
I have a complete article presenting the best audio interfaces on a budget; if you would like, click the link to check it out.
How to Record in Audacity While a Track is Playing – Step by Step
If you plan to use a USB microphone for recording vocals or an audio interface for connecting mics or instruments, make sure they are connected and powered up before opening Audacity.
1. Importing the Backing Track to Audacity
The first step is to bring the backing track to Audacity. There are two ways to do this: by clicking and dragging the audio file to the software’s main screen or going to File > Import > Audio > Select the audio track > then click OK.
Audacity supports .mp3, .wav, .aiff, .au, and .ogg audio files. If your audio file is different than the mentioned formats, you would have to convert it to one of the supported files.
2. Setting Up Audacity to Hear the Track While Recording
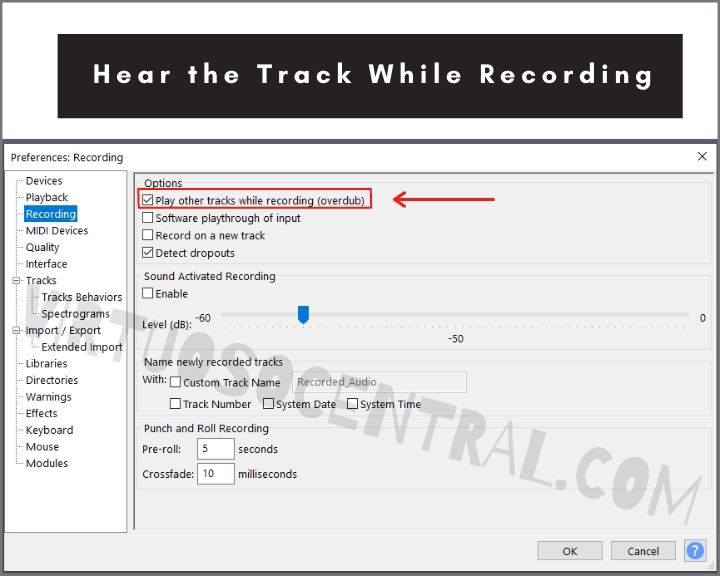
After the track is imported to Audacity, you want to ensure to enable the setting to hear the track on your headphones while recording. To do this, go to Edit > Preferences > Recording > under Options > select Play other tracks while recording (Overdub) > click Ok.

If you are recording your voice with a microphone, you must use headphones because otherwise, if you have got your speakers playing out in the background, the speaker sound will go back into the microphone, creating feedback.
3. Select the Recording and Playback Devices Audacity Will Use
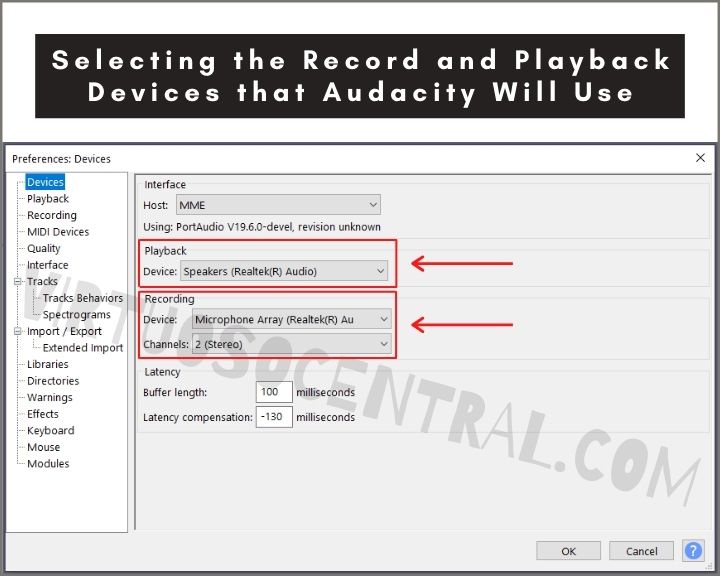
Before you start recording, you need to select the recording and playback devices that the program will use.
The easiest way to do this is by clicking on the microphone and speaker icon in the main window to select the recording ad playback device.
Another way is by going to Edit > Preferences > on the new window that opens, click on Devices. Look for the Playback tab, and on the Device section, select the one you want to use to connect the headphones from the dropdown menu. You can use your computer’s sound card or audio interface for connecting the headphones.
Next, look for the Recording tab, and on the Device section, select the USB mic or interface you plan to use as the audio capture device.

4. Add a Track to Start Recording – Overdubbing
Audacity by default starts recording at the end of the backing track when you press the record button. This doesn’t work if you are trying to do overdubs. You want that when you press the record button, the backing track starts playing so that you can record over it in a separate track.
You could change the settings in preferences so that a new track is added when you press the record button, and it starts recording from the beginning.
To do this, go to Edit > Preferences > on the new window that opens, click on the Recording tab >
Under options, select Record on a new track > then click OK.
Another way to make Audacity start recording from the beginning on a new track is by pressing and holding the Shift key and pushing the letter R on the keyboard, or by pressing and holding the Shift Key while clicking on the Record button to start recording.
Doing this will add a new track and start recording from the beginning while playing in the background for you to follow along.
Tip: Before you start recording, make sure the cursor is at the beginning of the backing track. You can press the Home key on your keyboard to move the cursor to the beginning or simply click on the beginning of the track to move the cursor.
If you were wondering how to record multiple tracks in Audacity, it’s straightforward. All you have to do is add as many tracks as you want. To do so, go to Tracks > Add New > then select Mono or Stereo track depending on what you need.
5. Edit The Recorded Tracks as Necessary
If you have an almost perfect take but made a mistake in a specific part of the recording, you don’t need to delete it and start over. If necessary, you could record in the middle of the track very easily.
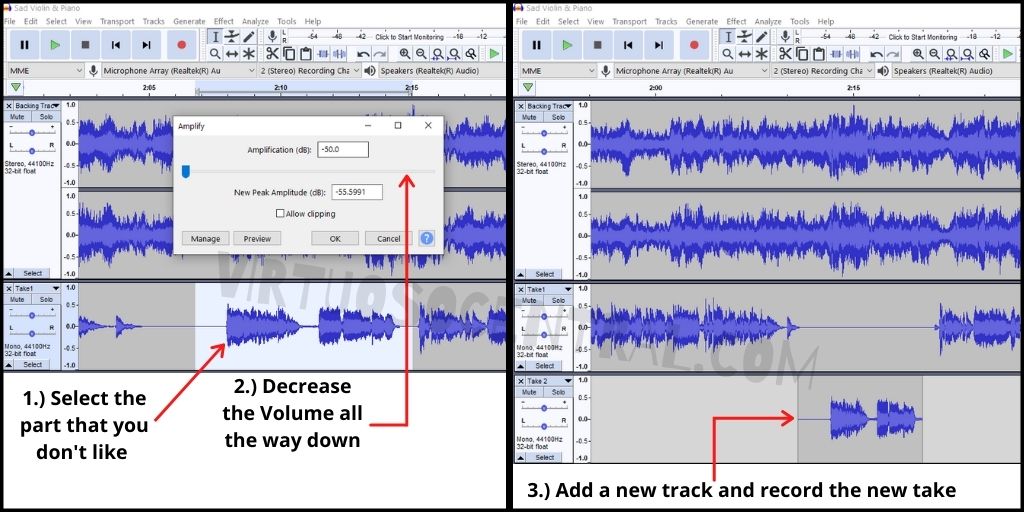
All you have to do is select the section you don’t like, decrease its volume level to cero, add another track and record only the section you don’t like. Here is how to do it.
The first thing you need to do is click on the track you want to edit to select it. Next, locate the area of the recording you don’t like. Then, click and drag your mouse cursor to choose the part you want to get rid of.
At this point, go to Effects > Amplify > On the window that opens, locate the slider and go all the way to the left to decrease the volume. Now, if you try to listen to the track, you will note that that part is gone.
The next step is to set the cursor where you need to start recording. Press and hold the Shift key while clicking the record button and it will add a new track and start recording at that precise point where you placed the cursor.
Tip: If you need to, you can mute any unwanted track by clicking on the Mute button located in the upper left corner of the channel you want to mute.

6. Change the Volume of Each Track as Needed / Add Effects
After you have all the takes you need, you can listen to the recording, and if required, you can adjust the volume of each track so that everything sounds balanced.
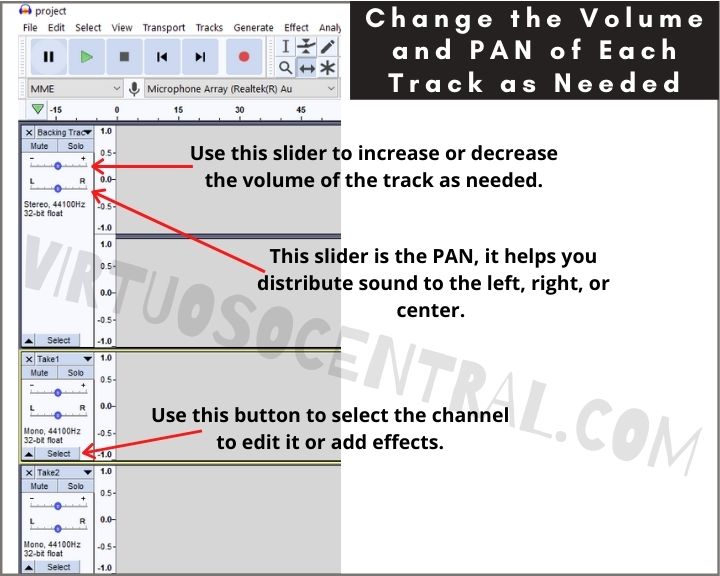
On the left side of each track, you will find a slider with a “+” or “-“used to increase or decrease the volume of that specific track.
The Pan slider, located underneath the gain slider, can help you distribute sound to the left, right, or center.
After you have set the gain of each track to what you want, you can add effects to any of the recorded channels.
To do so, select the track you want to add effects to and go to Effect and choose the one you like from the dropdown list.

7. Export the Recorded Project as an Audio File.
Once you are done with all the recording and editing of your project, it’s time to export it as a mixed audio file. To do so, go to File > Export > from the submenu select the file type. The most common is .Mp3.
Next, select the bit rate and give it a name. Finally, click on save to start the export. That’s it; you are done.
You can also save the file as a project if you want to make some changes later on by going to File > Save Project > Save Project As > Give it a name, then click OK.
Conclusion
By following the steps in this post, you will be able to record in Audacity while a track is playing in the background. You can also add as many tracks as needed and then edit each one to add effects.
Audacity is a very good DAW that can be used for your home studio, and the best of all is that it is free and open-source.