With the availability of cheap personal computers and recording gear, it is more accessible than ever to mix and record your own music.
But one of the most confusing parts of home or live recording is figuring out how to get the audio from an analog mixer into your computer. If you are reading this article, most likely, you are trying to figure out the best ways to do so.
Here are the top 3 proven methods you can use to record audio from a mixer to a computer:
- By connecting the mixer directly to the computer through a sound card or line-in to USB interface cable
- Connecting the computer to a USB mixing console
- Using an audio interface
Read on to learn more about each of these three methods in this complete guide we’ve put together. Let’s get started.
Requirements for Recording Audio from a Mixer to a Computer
The Computer
The first piece of equipment you will need is a decent computer. Both Mac and Windows work fine.
You will need a computer that has enough RAM and processing power. These are the biggest bottlenecks in terms of recording audio.
It doesn’t have to be the latest, top-of-the-line system on the market, but it needs adequate resources to work. I would stay away from Chromebooks or outdated equipment as they are very limited and can’t be upgraded most of the time.
These are the computer specs I recommend for recording audio from a mixer:
- PROCESSOR: you’ll want the fastest processor you can afford. The minimum I recommend is the Intel i5 processor.
- RAM MEMORY: no less than 8GB. The more, the better.
- STORAGE: a solid-state drive (SSD) no less than 250GB. If you can afford to buy or upgrade to NVME M.2 SSD, I highly recommend it because it will run smooth and lightning fast, which will be handy, especially when editing.
- OPERATING SYSTEM: I highly recommend 64-bit OS. Most digital audio workstation software runs on 64-bit operating systems.
- PORTS: you’ll need at least two USB ports. If it has more, it’s better because you’ll have more flexibility. If possible, a Thunderbolt connector is an excellent idea, especially if you decide to upgrade later.
The DAW
The second thing that you will need to record audio is a DAW. This stands for “Digital Audio Workstation.”
DAWs allow you to record multiple tracks simultaneously. This is useful when mixing, as it gives you control over the sound and levels of each track.
You can also apply effects such as equalization, reverb, and compression. DAWs also let you quickly edit tracks. So if you have an extra hit on the snare drum, you can just splice it out easily.
Digital Audio Workstations come in many different flavors and price ranges. For example, Audacity is completely free and open source. It is a popular choice for people just getting into recording.
GarageBand can also work if you are a Mac user, but keep in mind that it is somewhat limited. For beginners, it is an excellent choice.
For a step up in terms of functionality and ease of use, look into Reaper. You can use it as a free and fully functional demo for as long as you wish. And a full license only costs $60.
Other DAWs such as ProTools, Logic, Cubase, StudioOne, and FruityLoops are popular choices, as well.
The 3 Proven Methods for Recording Audio From a Mixer to a Computer
After you have your computer and DAW set up and ready to rumble, it’s time to connect the mixing console to your computer.
There are three options for achieving this, each increasing in quality and price.
1. Connecting the Mixer Directly to the Computer’s Sound Card
This is the simplest and cheapest option, assuming that you already have some kind of mixing board.
If it is an older board or lacks USB connectivity, this is the route you will have to take.
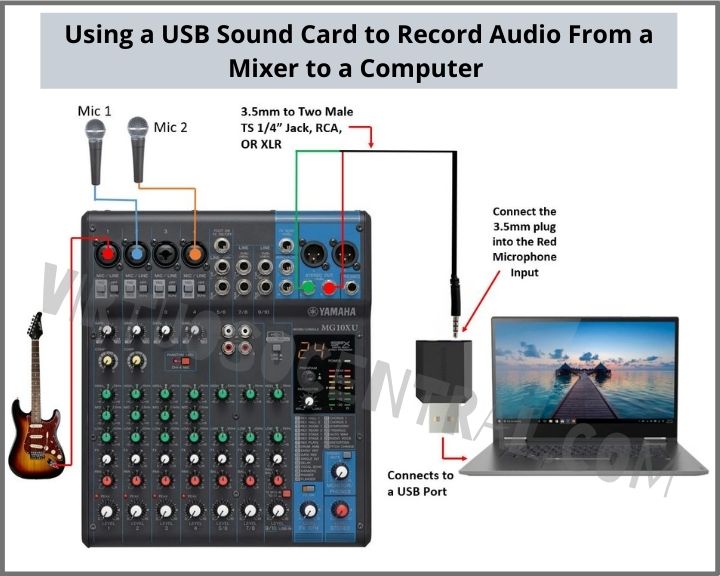
This method assumes that your computer has an onboard sound card with a microphone input connector. On most computers, this is a 3.5mm input jack.
Keep in mind that most newer model laptops don’t come with a microphone input anymore, so if you decide to use this method, you’ll need to get a USB sound card like the Sabrent AU-MMSA.
Another thing to remember is that these affordable USB sound cards only provide a mono line-in input, which means that they can only record a mono signal coming from the mixer.
Here is a diagram to help you figure out the connection.

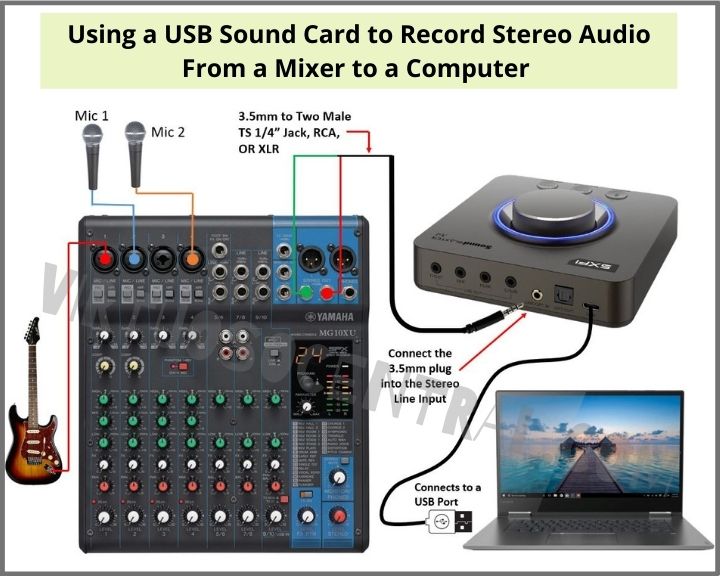
If you want a stereo line input for recording, you will need an external sound card with a stereo line-in connector.
Something like the Creative Sound Blaster X4 will work for connecting stereo line-in signals from the mixer to the computer for recording. The only downside is its price. For about the same amount, you can get an audio interface that does a better job at recording and offers more features.

Cables For Making the Connection
Depending on the output connections on your mixer, you will have to use different cables.
- If your mixer has RCA outputs, you will need a 3.5mm TRS Stereo Audio Jack to Two RCA
- You can also use two 1/4″ TS (mono) outputs. For this, you will need a dual 1/4″ TS to a single 3.5mm adapter cable.
- Lastly, if your mixer has XLR outputs, get a 2x female XLR to 3.5mm adapter cable.
Keep in mind that you should not skimp on cable quality. Cheap cables introduce noise and interference into your recordings.
A Cheaper and Effective Method Using a Line-In to USB Interface Cable.
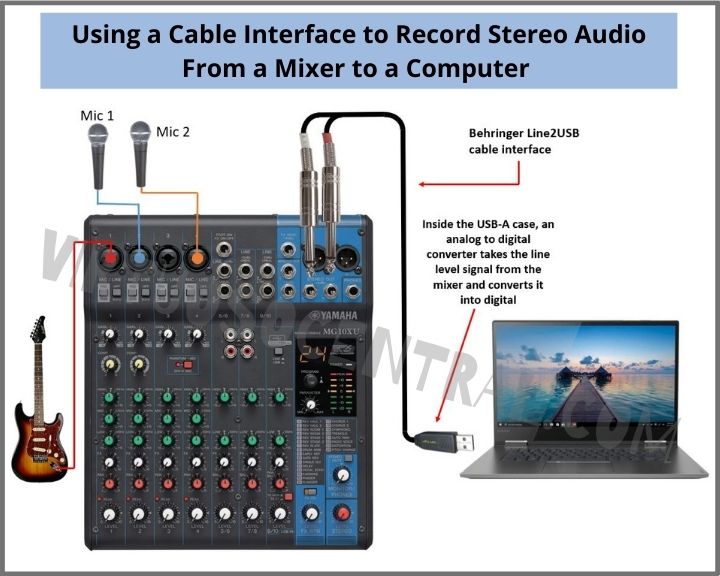
An alternative to external sound cards is to use something like the Behringer Line2USB cable interface. This adapter would work perfectly well because it accepts a stereo signal and connects it to the computer via a USB.
Inside the USB-A case, an analog to digital converter takes the line level signal from the mixer and converts it to digital so the DAW can record it in stereo mode.
The 6.6 foot (2 meters) cable comes with two mono 1/4″ jack connectors that you can easily plug into your mixer to bring the stereo signal to your computer.
This device is Plug-and-Play which means that you don’t need to download any drivers for it to work with your favorite DAW on Mac and Windows computers.
The digital audio output operates at 44.1 kHz and 48 kHz sample rates. And for your convenience, the Line2USB cable is also compatible with most 32-bit drivers and software.
Follow the connection diagram shown below to hook things together

Setting Up for Recording
To set this up for recording, create a track in your DAW and route the input to your soundcard. Use your mixer to adjust your levels until everything sounds good, and start recording.
The major downside of this method is that it does not allow you to multitrack. This means that whatever comes through the mixer will get recorded all on one track.
This can be mitigated by using a USB sound card that can accept a stereo line input. If using the Behringer Line2USB, it would send a stereo signal by default.
If you use this method, it will split your signal into left and right channels.
You can then pan your mixer tracks all the way to the left or right. Tracks on the left will be recorded into one stereo track and the same for the right side.
In your DAW, you can separate the stereo track into the left and right tracks and mix them separately.
Please keep in mind that this is not the best method for recording audio from a mixer to a computer, but it can work in a pinch or on a tight budget.
2. Using a USB-Capable Audio Mixing Console or Multitrack Recorder
If the sound card method is not working for you and you want better quality and control over your tracks, consider springing for a USB-capable mixing console.
These come in many input numbers and price ranges. Generally, they start at two simultaneous tracks and can go all the way up to forty-eight.
Mixing consoles are appealing for live sound recording, as they allow you to record audio from a PA system to a laptop.
When shopping for a USB-capable mixer, make sure to keep the number of simultaneous tracks in mind.
Not all USB mixers can multitrack with all of the inputs. Don’t make the mistake of buying a 16-channel USB mixer that can only record one stereo track.
Generally, the more you spend, the more tracks it will be able to record simultaneously.
Besides being able to multitrack, these mixers also allow you to route computer audio playback to the mixer.
If good sound quality matters to you, don’t skimp on the mixer either. Cheap mixers do not have high-quality microphone preamps and will sound noisy and dull. Go for trusted professional audio brands.
There are several excellent options on the market for USB-capable mixers. Yamaha, Allen & Heath, Tascam, and Mackie make several great options with differing numbers of inputs and outputs.
Some higher-end USB mixers can even act as DAW controllers, allowing you to record, pause, and play with the faders on a physical console. An example of this is the Tascam Model 12 and the Zoom LiveTrak L-12 for mixers that can really do it all affordably.
To record using a multitrack USB mixer, you will have to ensure that your DAW recognizes it as an input device.
- Connect all your instruments and microphones to the mixer
- Use the USB or Thunderbolt connector to connect the mixer to the computer
- Create a track for each input that you are recording.
- Make sure to assign each track to the proper input from the mixer.
- Then it’s as simple as pressing the record button and making the music happen!
3. Using a USB Audio Interface
Audio interfaces used to only be available in high-end recording studios. But in the past decade, manufacturers have put out affordable offerings for “prosumers” at home.
Audio interfaces are the preferred method for connecting a mixer to a laptop or pc for recording audio.
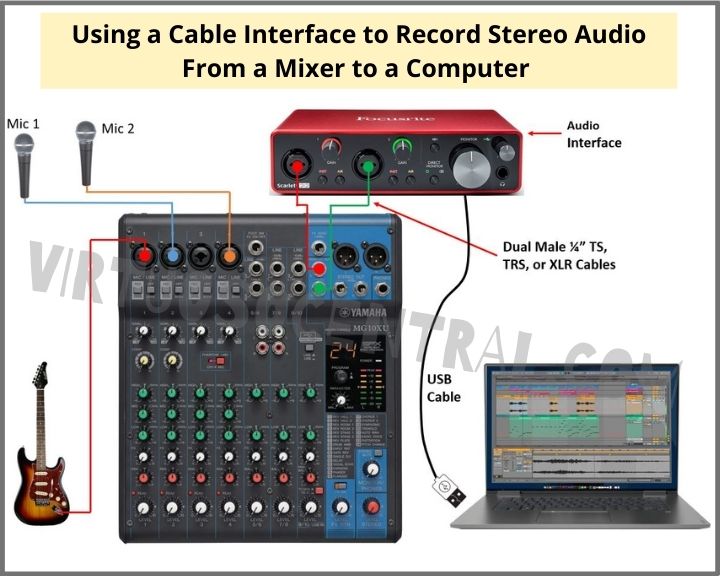
The easiest way is by getting the stereo output from the mixing console and connecting it to the audio interface. Here is how to do it:
- Find an available line-level output in the audio mixer
- Setup the audio interface to receive the signal from the mixer
- Use the proper cables (TS, TRS, XLR) to make the connection between the two devices
- Set the gains and levels correctly to get a clean signal for recording to avoid clipping and distortion
I am only presenting an overview because I have covered these steps in detail in another article. To check it out, click this link. The explanation includes pictures and a connection diagram.

Things to Consider When Choosing an Audio Interface
Audio Interfaces have much better microphone preamps than most standalone mixers and better analog-to-digital conversion rates.
While they don’t have all of the knobs and faders of a mixing console, the other advantages make them the go-to in the recording world.
Audio interfaces are also designed to be easy to route and connect to a DAW. They are usually USB powered, although some also have Thunderbolt connections.
They also come in a wide range of input numbers and prices. There are cheap 8-input interfaces and four-figure two inputs, so make sure to balance performance and features accordingly.
Audio interfaces also allow you to route playback audio through monitors or headphones. Some also have MIDI input/output connections that enable you to control virtual or hardware synths from your DAW.
Higher-end interfaces, such as the MOTU 8pre-es or Universal Audio’s offerings, allow you to run plugins from your daw within the interface, taking the strain off your computer’s processor.
Companies such as Focusrite, Audient, PreSonus, MOTU, and Behringer offer multiple sizes of interfaces. Features also vary, so shop carefully.
If your budget is limited now, but you plan to expand in the future, there are two things to consider when future-proofing your interface purchase.
The first is ADAT and/or SPDIF connections. These allow you to “chain” multiple interfaces or microphone preamps together. This basically expands your interface’s inputs.
You can start with a cheaper interface with fewer inputs, such as the Audient iD14. This is an example of a two-input interface with ADAT, allowing you to expand to ten inputs in the future with a separate preamp or interface.
Since audio interfaces usually interface with DAWs automatically, all you need to do to record multiple tracks is create the number of tracks you need. Then assign them to the inputs on the interface.
If you can only afford an interface with a limited number of inputs, be aware that you can still use a traditional mixer.
This is especially useful for recording things like drums, where you can put all of the drum mics into the mixer and then have it go to one input on your interface.
Recording For Everyone
Whichever method you choose, you now know the three best methods to record audio from a mixer to a computer. Remember, what’s most important is making the music happen.
Starting small and simple with restrictions can force you to become a better mix engineer. Going straight to a four-figure setup when you don’t even know how to create a track in your DAW will not make you better.
For more audio tips and in-depth how-to’s, make sure to check out the other articles on our blog.