Even the most outstanding performers attest that acoustic guitar mic placement can be pretty tricky. As an acoustic guitarist, you will eventually encounter the challenge of miking up your guitar.
Whether in a studio recording or live performance, there will come a time to mike up, even if you have a pickup. You can get a much fuller and more natural sound from a miked-up guitar, especially when compared to a piezo pickup.
Read on to learn how to mic an acoustic guitar in a studio setting or live performance.
Acoustic Guitar Miking Techniques for Studio Recording
Although miking in both studio and live performances use similar techniques, studio recordings are easier. The acoustic guitar mic placement is primarily constant, and the room is much smaller and quieter.
Here are a few essential factors you need to consider when miking an acoustic guitar in a recording studio:
The Guitar
First and foremost, you will need a quality acoustic guitar that will guarantee a fantastic sound.
This is not to say that you must have the best guitar at hand, but you genuinely have to manage your expectations. When content with the sound your guitar gives, you can set up your mic.
Also, ensure that the guitar is well-tuned. If you use one that has not been tuned well, it is pointless to record. New strings will always help you get a better sound, but break them in first.
The Room
This may come as a surprise to many, but the sound and shape of the room affect your recording.
Rooms in which most surfaces are hard, like a bathroom, reflect most of the sound, thus producing a sound that has quite a bit of character but is harder to control.
On the other hand, rooms with furniture will have much of the sound absorbed by the fabric and give a much tighter sounding recording.
Ensure that the studio has had effective acoustic treatment before recording. That doesn’t mean that you need to go out and spend a lot of money to treat the room. You can even make your own acoustic panels for very cheap.
The Microphone
You need to get the right tools if you want a job done well. This is no different when it comes to demystifying guitar miking techniques.
When you shop around for studio microphones, you’ll find that there are mics that cost $100 while there are other professional-grade mics that cost thousands of dollars. And the sound each type captures will be different.
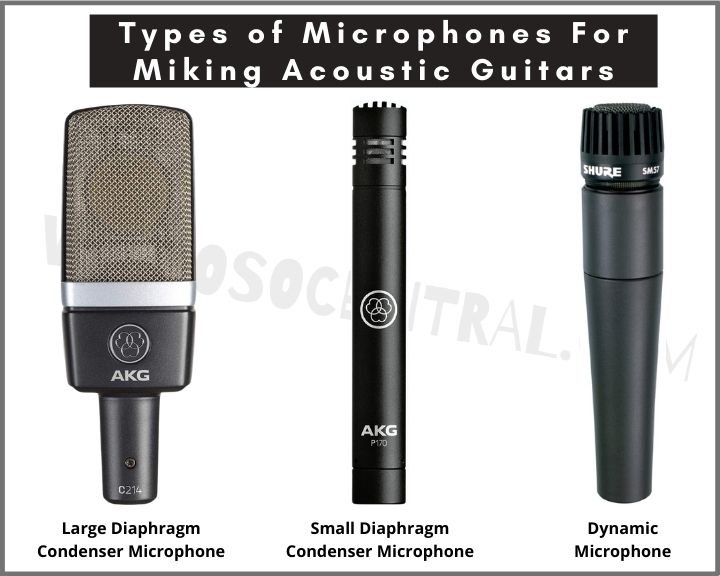
However, if you’re a beginner starting your recording journey, something like the AKG C214 or the Audio-Technica AT4041 would deliver excellent results without breaking the bank.
You would want to get a cardioid mic that picks up sound from the front while rejecting it from the back. In so doing, you will decrease noise and limit the impact of lousy room acoustics.
Keep in mind that if you choose condenser microphones, they will require phantom power, which is usually provided by the mixer, preamp, or audio interface. So make sure that the mic you plan to use is compatible with the rest of your equipment.
When it comes to choosing the correct mics for acoustic guitars, it is crucial to find the right balance of microphones for capturing the sound.
Combining a large and small diaphragm microphone is a good practice to ensure that you capture the full body sound.
With the large-diaphragm mic, you’ll pick up low and mid-frequency ranges while picking up the sound’s detail and brightness with the small diaphragm mic.
Remember that your job when miking acoustic sounds is to capture the original sound without any coloration. Doing this will ensure that you get a more balanced and accurate recording, keeping the original sound intact.

Microphone Placement
The debate as to whether to use one microphone (mono miking) or more (stereo); and where and how exactly they should be placed in a recording room has been on for ages.
You may wonder if you should put the microphone on your shoulder, on the floor, or even at a higher level to achieve the best results.
There is also the issue of how the mic placement may affect the recording of the different types of acoustic guitars. We will touch on this issue later in the article.
Mono Miking an Acoustic Guitar
Depending on the Type of Acoustic Guitar
The general rule of thumb for acoustic guitar mic placement is that each acoustic guitar type sounds different with different mic placements.
For instance, a dreadnought guitar throws more sound than a classical 00 size guitar, so the mic usually needs to be placed a little further away or higher for the latter.
To make this easier for you, keep the microphone at a constant spot, test it, then keep moving until you get the desired recording for that particular guitar.
Depending on the Type of Microphone
One vital thing to note when learning acoustic guitar mic placement is that some microphones are directional, focusing all the energy from the soundwaves through a mic diaphragm.
These mics pick up sound from only one direction. Therefore, depending on its position relative to the player, some sound characteristics may be inhibited or change the tone.
When using directional microphones such as the AKG C451B and the Neumann KM184, getting the guitar closer to the mic will produce a more bassy sound characterized by its fullness. On the other hand, moving the guitar further away from the mic would capture a thinner sound emphasizing the mid and high frequencies.
Listen through a pair of professional headphones as you play to monitor the sound, and moving around until you get the right spot will come in handy to help you get the tone you want.
Mic Placement Best Practices
Regardless of the mic or guitar type you use, one crucial thing to ensure is that you do not, under any circumstance, position the mic directly in front of the soundhole.
Doing this will make the guitar sound boomy, meaning that it will have an excessive bass sound around 125 HZ. In some cases, it could also sound bloated at 250 Hz, increasing the low-frequency resonances.
Therefore, keep the microphone at a reasonable distance from the guitar soundhole to avoid these issues.
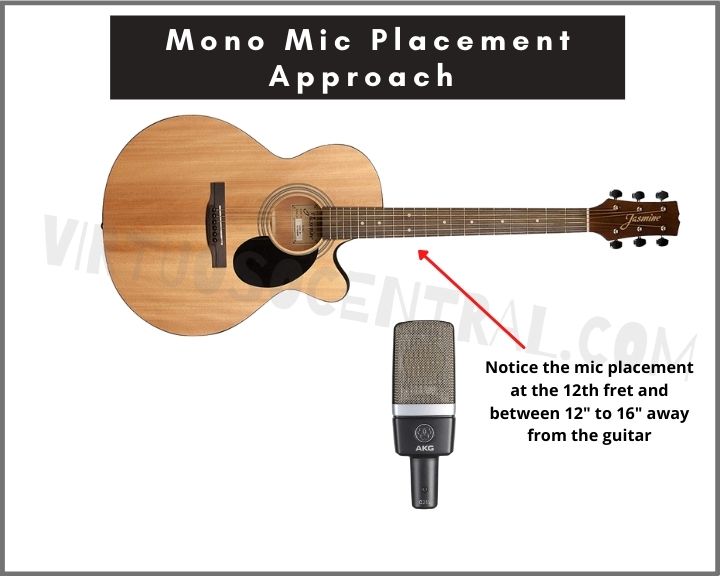
A good rule of thumb when miking an acoustic guitar used by most sound engineers is to place the mic between 12 to 16 inches and away from the 12th fret. The resulting sound will be balanced at the mid and low-frequency ranges with enough clarity at the high-end, capturing the instrument’s true tone.
The section between the soundhole and the neck is where the sound waves are more balanced, providing a more intelligible sound when picked up by a mic.
If you’d prefer a slightly heavier sound on the low frequencies but still sounds balanced, you can place the microphone above the soundhole (12″ to 16″) or slightly behind and below the bridge.
With this mic placement position, the captured sound will have strong fundamental frequencies relative to its harmonics, providing a fuller sound without being boomy.
To obtain a crisp midrange with lower bass response, place the microphone behind and below the bridge, aimed towards your hand. But keep in mind that miking an acoustic guitar using this mic position will also capture more finger and pick sounds, which could be the style you are going for. Think old Cat Steven recordings for this position.

Stereo Guitar Miking Techniques
Most mics for acoustic guitars are condenser mics because of their superior sensitivity. Condensers work great in the studio, but when miking an acoustic guitar for live performance, dynamic mics like the Shure SM57 deliver excellent sound while reducing the chance of feedback.
To find your preferred acoustic guitar mic placement, you can experiment with several condenser mic sizes and dynamic mics.
When recording at the studio, you can try using small and large-diaphragm condenser mics because each type will produce a different sound texture. To get the sound you want, you might want to mix and match different kinds of mics and try different positions until you find the tone you want.
For instance, you can try using a large-diaphragm condenser mic with a dynamic one or use two small-diaphragm condensers. At the end of the day, nothing beats experimentation.
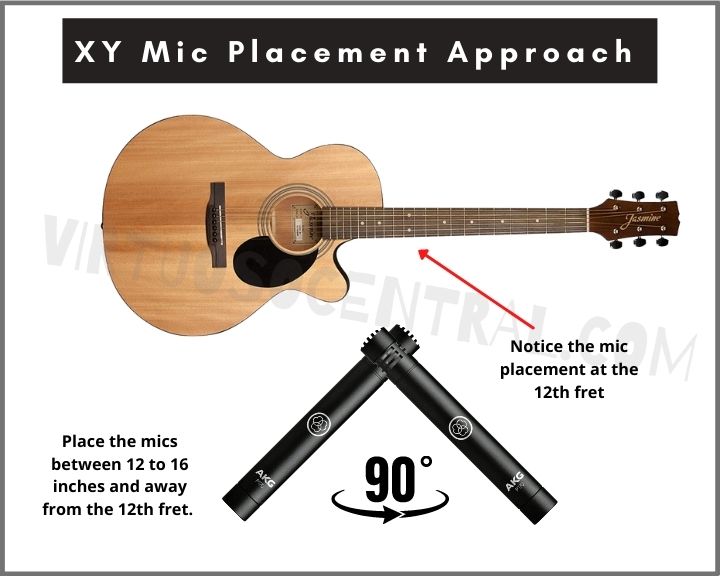
If you want a stereo sound when miking acoustic guitars, one of the best methods you can leverage is using the XY approach and panning each mic to the left and right according to the amount of stereo separation you want.
Another advantage of the XY mic placement approach is that you can EQ the signal from each microphone differently. That way, you have more alternatives for mixing your track in the DAW.
To make it easier to line up your mics in the XY method, use a stereo array spacing bar like the Rode S20 or the Gator Frameworks. You could also use two separate mic stands to have a wider stereo separation between the two mics.
If you feel extra adventurous, add a third (Z) microphone to the mix. Just be careful to line them up appropriately.

Guitar Miking Techniques for Live Performances
You cannot claim to know how to mic an acoustic guitar if you don’t learn guitar miking techniques for a live performance. Yet, the basic principles are much the same as for studio performances.
The type of guitar and microphones are all considered as in the studio. However, the difference now is that the room in live performances is much bigger, noisy, and may even be outside! So, in this case, how do you deal with the unpredictability of your sound?
You would be forced to consider a shock mount, different microphone combinations, and of course, mic placement.
Shock Mounts
A shock mount is a device that secures a microphone while isolating it from the stand or boom to which it is attached. This isolator shields the microphone from shock (mechanically transmitted noise) and secures it to its frame or boom arm.
You may need to consider getting one to achieve a much cleaner sound. Many studio setups use these too, but they become crucial for live performances with certain mics to stop huge pops in the PA if someone knocks the stand by accident. This can easily damage the speakers.
The Type of Microphone
Consider a small-condenser microphone with a hyper-cardioid pattern or a cardioid one, as it would likely reject most sounds from the sides and the back of the mic. It would also be more sensitive and would respond better to frequency.
This is the opposite of what you want in a studio setup. There’s usually too much noise in a live setup to use a large-diaphragm mic.
However, if there’s more external noise from the audience or other musicians on stage, consider using a dynamic mic like the Shure SM57 or a ribbon mic such as the Beyerdynamic M 160 which will deliver a warm, balanced classic sound.
Although the SM57 is considered a classic vocal mic, it shares many audio characteristics with some of the best dynamic guitar mics, and you’re likely to have one lying around.
The Mic Placement
A 98% effective way to make the guitar sound better is to have the mic pointing midway between the soundhole and the neck.
This was for the same reason mentioned earlier. Miking the guitar’s soundhole would most likely add a lot of unwanted low end, which is difficult to remove with EQ.
However, when miking acoustic guitars in live environments, it is a good miking technique to place it as close to the guitar as possible to avoid ambient noise (e.g., other instruments or audience noise) but never precisely in front of the soundhole. Just move the mic’s position slightly to the left or right to avoid excessive low ends.
If you need to move around the stage, try your best to keep a constant distance between the guitar and the mic to get a consistent sound for your audience.
Start Miking
All-in-all, for you to confidently know how to mic an acoustic guitar, you will need to practice acoustic guitar mic placement both in a studio and live performance setting. In both cases, remember that the type of mic and guitar can also contribute to the quality of sound you get.