Miking a drum kit can be tricky, but with the proper techniques and equipment, it is possible to capture the full sound of the drums and achieve a well-balanced and powerful mix.
There are several different ways to mic a drum set, but the four best techniques are:
- The Individual Microphone Method – Perfect for live sound.
- The Overhead Technique – Works excellent for recording.
- Room Microphone Method – Adds a sense of depth and realism.
- Hybrid Technique – Works for live sound and the studio.
Each method has its own set of advantages and disadvantages, and the choice will depend on the specific characteristics of the drum kit, the room acoustics, and the desired sound. So, choosing between these options will depend on what best suits your situation.
In this post, I will explain how to mic a drum kit using each one of these methods in more detail so that you can choose the method that best suits your needs. Let’s get started.
1. The Individual Microphone Method – Gives You More Control
The individual mic technique is a miking method used to capture the sound of each drum kit element, such as the kick drum, snare drum, toms, hi-hat, and cymbals, and it involves using a separate microphone for each drum and cymbal.
This drum miking method gives you the most control over the mix and the ability to isolate or accentuate specific drums and cymbals. For example, you may want to bring out the snare drum more in the mix, or you may want to reduce the amount of cymbal bleed in the kick drum microphone, etc.
An essential thing to remember is that it doesn’t matter how great your mic set is if the drum kit sounds terrible; your mic and your miking technique can’t perform miracles.
So before placing the mics, you need to concentrate on getting a great sound from the drum set, to begin with. With this in mind, let’s continue.
The Type of Mic Used for Each Drum Element Plays a Key Role
When using the individual microphone technique, choosing the right mic type and polar pattern for each drum and cymbal is essential, as the sound quality is directly affected by the mics used.
For example, a dynamic microphone with a cardioid polar pattern is a good choice for the kick drum, as it can handle the high SPLs and reject off-axis sound.
A condenser microphone with a cardioid or hypercardioid polar pattern is a good choice for the snare drum and toms, as it can provide a more detailed and accurate sound.
Also, a condenser microphone with a cardioid or super-cardioid polar pattern is a good choice for hi-hat and cymbals, as it can provide a more detailed and accurate sound and reject off-axis sound.
But please remember that having several condenser mics open-to-air for live sound situations can cause feedback problems. So, limit the usage of condensers and concentrate more on using dynamic mics when dealing with live sound. Condensers will give you excellent results in the studio, as the room’s acoustics is more controlled.
Microphone manufacturers produce drum mic sets with all the microphones you need to set up and get going. They have taken the time and resources to test and design the perfect mic match for each drum and cymbal.
Some examples are the AKG Acoustics Drum Set Concert 1, the Audio-Technica ATM-DRUM7, or the Samson DK707, to name a few.
But if you are a seasoned sound engineer, most likely you have tested many microphones and have come to have your go-to mics when miking up a drum set. But if you haven’t had the experience, going with a drum mic set is your best bet.
Mic Placement is Half of the Puzzle
When learning how to mic drums, it’s essential to note that the placement of the individual microphones is crucial for getting a good sound.
For example, the kick drum microphone can be placed in front of the outer head and inside the kick drum, pointing towards the beater.
The snare drum microphone should be placed above and pointing down at the snare drum, but you could also put a mic over and another under to capture the snare’s sound in more detail, and the tom-tom microphones should be placed above and pointing down at the tom-toms.
I will expand more on mic placement as we go through each individual element of the drum kit. But the thing that is important to note is that even though I can provide you with a specific mic placement guideline, you should always experiment with different mic distances and placements to get the tone you want.
FURTHER READING: How to EQ Live Sound
Kick Drum
Kick drums come in various sizes, and their size can have a significant impact on the sound and how it is miked.
Larger kick drums tend to have a deeper and more powerful sound, while smaller kick drums may have a tighter and more punchy sound. It’s essential to take the size of the kick drum into account when miking it and choose a mic technique that will effectively capture the sound of the specific drum.
Choose The Right Microphone
Dynamic microphones with a cardioid polar pattern are a good choice for the kick drum, as they can handle high SPLs (Sound Pressure Levels), reject off-axis sound, and capture the kick drum’s low-frequency sounds.
Microphones, such as the Shure Beta 52A or the AKG D112, are excellent choices for miking a kick drum from the outside. Thanks to their large diaphragm, these mics can accurately pick up low frequencies.
To mic the kick from the inside, using boundary condenser microphones with a half-cardioid polar pattern, such as the Beyerdynamic TG D71C or the Shure BETA 91A, is the way to go.
How to Place the Mic for Kick Drums
When it comes to miking a kick drum, you can use several mic positions, each one delivering a different tone.
One Mic In Front of the Resonant Head
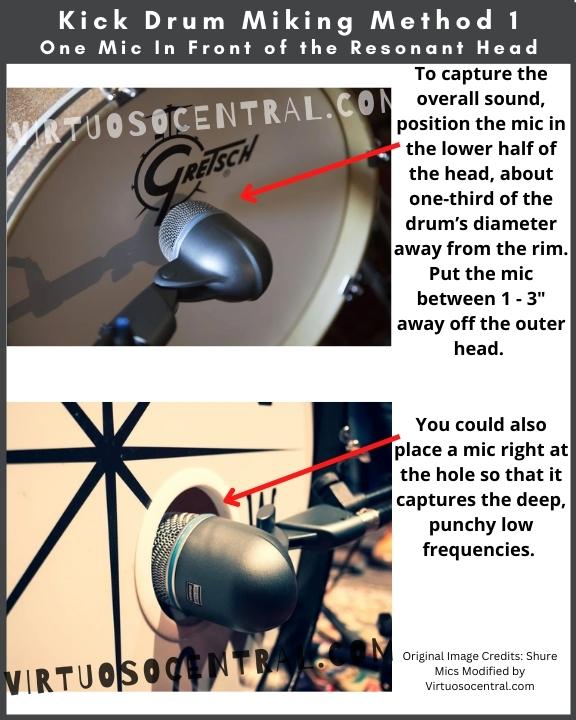
The most common drum mic position is to place a mic outside the front resonant head, but the sound you get will depend on where you place the mic. For a deeper sound, put it towards the center of the resonant head. For a tighter, more punchy sound, place it towards the rim.
A good place for the mic to capture the overall sound is to position it in the lower half of the head, about one-third of the drum’s diameter away from the rim. Make sure to put the mic between 1 – 3″ away off the outer head. For this miking method, you can use the Shure Beta 52A or the AKG D112.
If you have resonance on the front head, use a bass drum dampener to control them. This will help reduce the ring and sustain in the kick drum sound and make it sound punchier.
If your drum has a front resonant head with a hole, you could also place a mic right at the hole so that it captures the deep, punchy low frequencies.
Make sure to allow space for the air to escape. If the mic captures the air gust as they escape the hole, try putting the mic further inside the kick drum.
One Mic Inside the Kick Drum
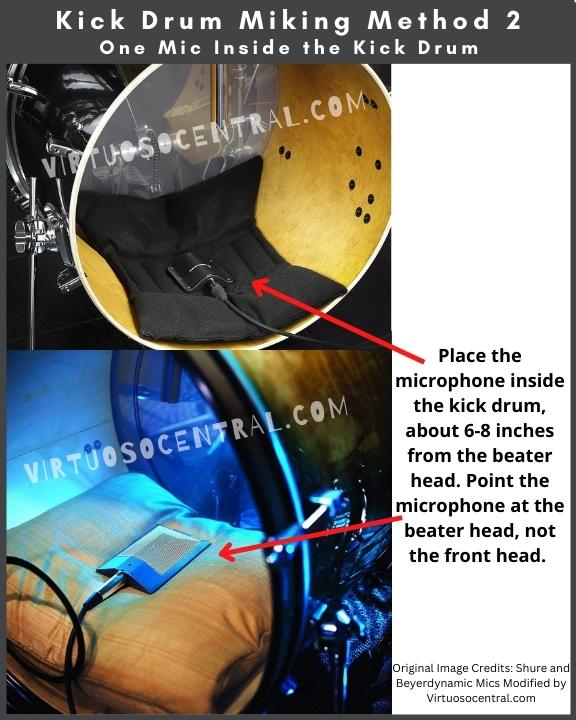
This method only works if your drum has a front resonant head with a hole. In this case, you have to put a pillow or drum damper inside the kick drum, and on top of the pillow, you place a boundary mic.
The mics I recommend for this method are the Beyerdynamic TG D71C or the Shure BETA 91A.
Place the microphone inside the kick drum, about 6-8 inches from the beater head. Point the microphone at the beater head, not the front head. This will help capture the beater’s low-frequency sounds and avoid capturing resonances from the front head.
One advantage of this miking technique is that it keeps the bleed from other drums and cymbals to a minimum and will give you lots of low ends because the pillow will act as a dampener, reducing resonances in the front head.
One Mic Outside and One Inside
This technique is a hybrid of the two mentioned above. It’s a great option because it allows you to mix the two mics to get a big, fat sound by increasing the level of the boundary mic or get a tighter, more pointy sound by increasing the volume of the external mic.
In this case, I would use a Shure SM57 for the external mic because it naturally rolls off some of those sub-frequencies that are being picked up in detail by the mic inside the kick drum and use any of the two inside boundary mics mentioned previously, as they will capture the low frequencies in great detail.
Snare Drum
There are two ways to mic a snare drum, by placing a mic over the top of the snare or by using two mics, one over the top and one under the snare.
Placing a Mic Over the Top
This is the most common miking technique for snare drums, as it captures a good representation of the sound, but as with everything else, mic placement has a lot to do with the sound you’ll get.
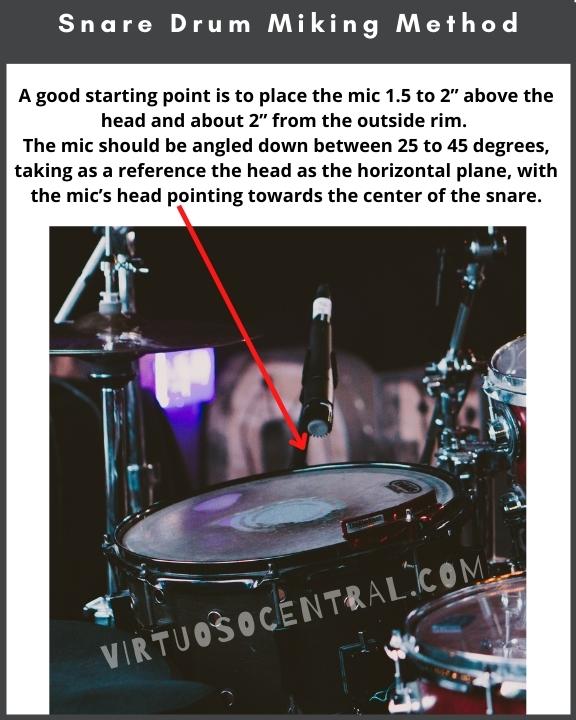
There is no exact formula for miking snares, and you should experiment to get a sound that works for you, but a good starting point is to place the mic between 1.5 to 2” above the head and about 2” from the outside rim. The mic should be angled down between 25 to 45 degrees, taking as a reference the head as the horizontal plane, with the mic’s head pointing towards the center of the snare.
Placing a Mic Over and Under the Snare Drum
To capture more of the snare’s buzz or wire sound, consider adding a second microphone underneath the drum.
Position this second microphone 2 to 4” inches away from the drum and point it toward the snare wires. Experiment with combining this under-snare microphone with the primary over-snare microphone and try reversing the polarity of the under-snare microphone. Use the setting that yields the most low-end frequency for your desired sound.
Microphone Choice
You can use several mics, but I have found that what works best for snare drums in live sound are: the Shure SM57, Audix i5, and the Beyerdynamic M201 TG if you like a naturally boosted low-end when miking snares.
Another excellent easy-to-mount option is the Sennheiser e604 which delivers crisp highs, balanced mids, and clear lows.
For recording, you can use a small diaphragm condenser mic, and the Audio-Technica Pro 37 is one of the best choices for this purpose.
Another thing you can try is to use a condenser and a dynamic mic next to each other, then blend the two tones on the mixer to get a signature sound.
Whatever mic you choose, make sure it has a cardioid or hypercardioid polar pattern to get a more detailed and accurate sound while rejecting bleed from other drum elements and feedback.
FURTHER READING: How to Set Up a Wireless PA System for Live Sound
Toms
When it comes to miking toms, there are many options you can choose from. But the method used by most sound engineers and that delivers the best results is placing the mic near the outer rim of the tom head, pointing down.
Microphone Position
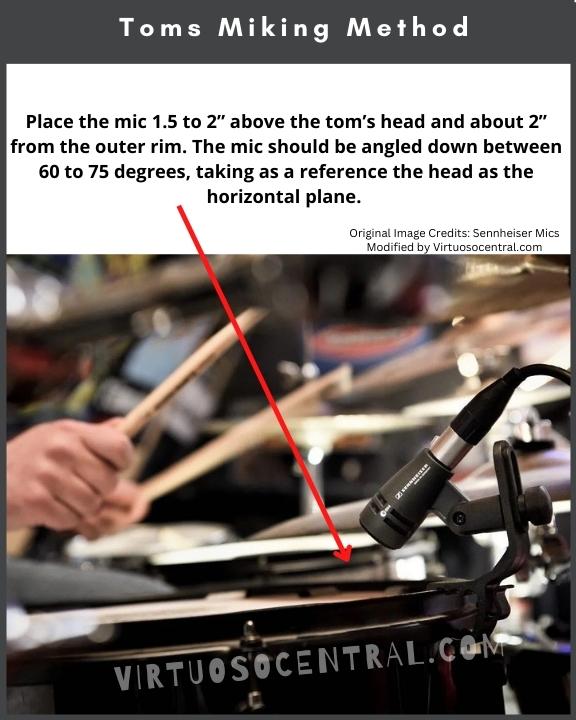
A good starting point is to place the mic 1.5 to 2” above the tom’s head and about 2” from the outer rim. The mic should be angled down between 60 to 75 degrees, taking as a reference the head as the horizontal plane.
There is no exact formula for miking any drum element, and the toms are no exception. This is why experimenting is vital. Use these suggestions as a starting point and go from there.
With this technique, you need to consider the position of the cymbals. If the cymbals are too close to the toms, you’ll have difficulty isolating the sounds from both drum elements. So, try to get the cymbals as far as possible from the toms as possible, but make sure it is ok with the drummer.
Microphone Choice
I recommend using mics with a cardioid polar pattern for miking toms, as they tend to reject high-frequency sounds from behind much better than a hypercardioid or supercardioid mic. And you would usually have a cymbal above the tom. For this reason, a cardioid pattern mic will give much better results.
For live sound situations, I like to use the Sennheiser e604 because it is a low-profile mic that delivers excellent sound, slightly emphasizing the highs and upper mids while providing open and clear lows.
Another thing I like about this mic is its clip-on holder, which helps you mount it in seconds, right on the rim of the toms. You can position it any way you want, and wherever you clip it on will sound strong and warm, keeping the dynamics of the sound.
You could also use the Shure SM57, which will also deliver excellent results, but because this is a bigger mic, you would need to place it on a stand, making it a bit inconvenient.
For the studio, you can use the Sennheiser MD 421 II, or the Audio-Technica AE3000, both delivering fantastic sound.
Hi-Hat and Cymbals
The Hi-Hat and cymbals tend to be loud elements of the drum set and depending on the music style and the drummer’s style, in some cases, if overhead mics are used, you don’t even need to mic them.
But it is also good to have the flexibility and option of emphasizing the hi-hat or cymbal sounds if necessary. For this reason, putting a mic on the hi-hat should be considered.
Mic Placement Over the Hi-Hat
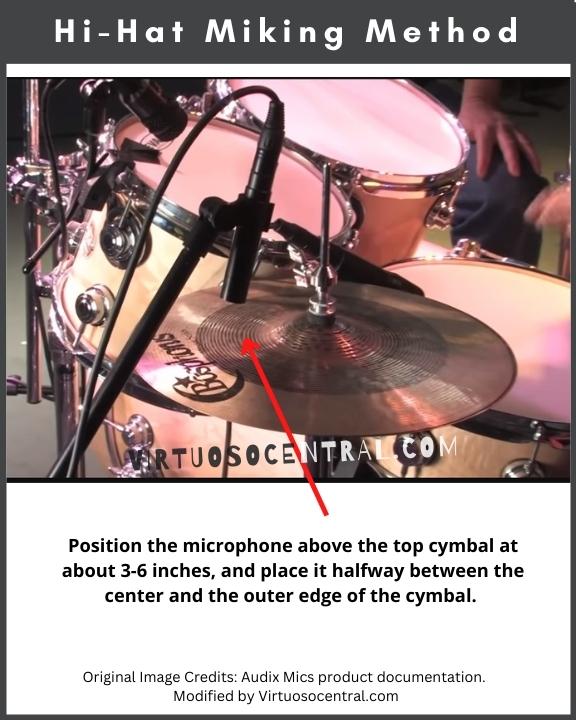
When miking the hi-hats, position the microphone above the top cymbal at about 3-6 inches, and place it halfway between the center and the outer edge of the cymbal. This will allow you to capture the sound of the hi-hats clearly and accurately while avoiding poppy and ringing sounds when the cymbals open and close.
Choosing a Mic for the Hi-Hat
For the hi-hat, condenser microphones with a cardioid or super-cardioid polar pattern are a good choice, as they provide a more detailed and accurate sound in the upper frequencies and reject off-axis sound.
Industry-standard choices include the Shure SM81, Shure SM137, or the Audio-Technica AT4053B. These choices will deliver an excellent high-frequency response, translating into a crisp, crystal clear hi-hat tone.
Cymbals Mic Placement
For the cymbals, if overhead mics are used, don’t add an individual mic, as the overhead mic will do the job. But if you want to mic each individual cymbal, use the Shure SM81 and place it 4 to 6 inches above the cymbal and halfway between the center and the outer edge of the cymbal to capture the full tone.
FURTHER READING: How to Set Up a Stage Sound System
2. The Overhead Drum Set Miking Method – Works Great for Recording
The overhead miking technique is a standard method used to capture the overall sound of a drum kit in live sound situations and the studio. This technique involves using a pair of overhead microphones, typically placed a few feet above the drum kit and aimed down at the drums.
This technique is useful when you need to capture a balanced sound of the drum kit, and it provides a good representation of the drums and cymbals as they are heard from the audience’s perspective.
It’s also suitable for capturing the natural room sound and ambiance. This technique is often used as the primary source of the drum sound in the mix, with the individual drum microphones being used to add more definition and control to specific elements of the drum kit if needed.
Microphone Placement When Using This Method
It’s important to note that the placement of the overhead microphones is crucial for getting a good sound. Here are three approaches you can use.
Overhead Spaced Mics
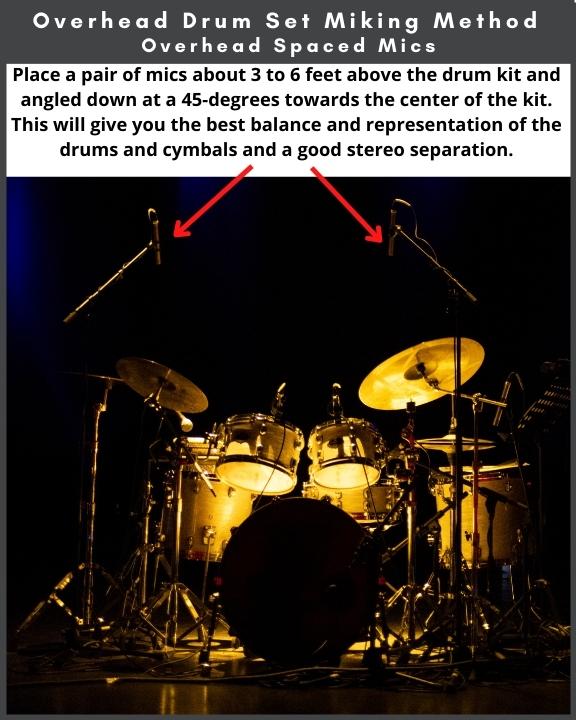
The first and most common approach is the overhead-spaced microphone technique, in which the microphones are placed about 3 to 6 feet above the drum kit and angled down at a 45-degree angle towards the center of the kit. This will give you the best balance and representation of the drums and cymbals and a good stereo separation.
You can also use a kick drum mic to accentuate the lower frequencies because the overhead mics will miss the low frequencies in detail due to the distance from the mic.
For this method, you can use a matched pair set of mics, such as the AKG C414 XLII, which will deliver excellent results. If your budget allows for it, the go-to mic used by many studios for miking drums is the Neumann U87 Ai and the Audio-Technica AT5045 mics.
The Eddie Kramer Technique
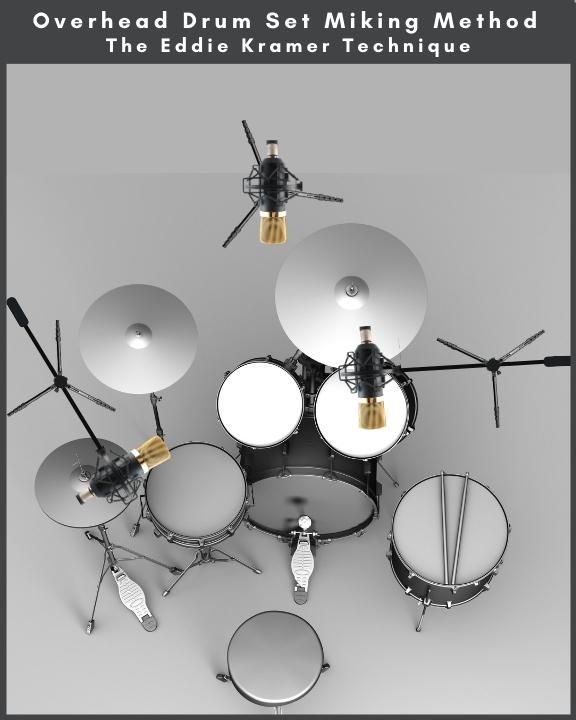
Another approach is to use the 3-mic technique developed by the legendary producer and sound engineer Eddie Kramer who has worked with artists such as Jimi Hendrix, Led Zeppelin, Rolling Stones, the Beatles, and more.
With the 3-mic technique, the mics are positioned overhead on the left, center, and right, in a triangle shape over the drums. In addition to the overhead mics, another mic is placed on the kick drum to capture the lower frequencies.
For the three overhead mics, you can use the Shure KSM44A, and for the kick drum, the Shure BETA 52A.
Glyn Johns’s method
The third approach is to use Glyn Johns’s method, also a legendary producer who worked with the Rolling Stones, Eric Clapton, the Eagles, the Who, the Beatles, etc.
In this approach, three to four mics are used. The first mic should be positioned above the kit, pointing towards the center of the snare drum at about 4 feet. The second mic should be positioned next to the floor tom, pointing across the kit towards the hi-hat, and should be placed around 6 inches above the floor tom’s rim.
To achieve a balanced sound, these two microphones should be positioned equidistant from the center of the snare drum and panned in a way that spreads the drum kit’s sound evenly across the stereo field.
This technique works great with most condenser mics, but using three AKG C414 XLII or Neumann U87 Ai would be an excellent choice.
The overhead technique is a great way to capture the overall sound of a drum kit and provides a good balance between the different drums and cymbals. It’s a widely used technique in the studio, but you can also use it in live sound situations as long as you can control the bleed from other instruments and the feedback. With the proper microphone placement, it can result in a natural and well-balanced drum sound.
3. The Room Microphone Technique – Adds a Sense of Depth and Realism
The room microphone technique is used when you want to capture the ambient sound of a drum kit in a live sound situation or in the studio.
This technique involves using additional microphones placed in the room, away from the drum kit, to capture the natural sound reflections of the room and to add a sense of space, depth and realism to the overall drum sound which can help to fill out the mix.
It’s also important to note that the room microphone technique works well when used in conjunction with other techniques, such as the overhead technique and the individual microphone technique.
This allows you to capture the overall sound of the drum kit, the individual elements of the drum kit, and the ambient sound of the room, giving you a well-rounded and balanced drum sound.
Microphone Placement and Choice
When using this technique, it is essential to place the microphone to capture the sound as it develops in the room.
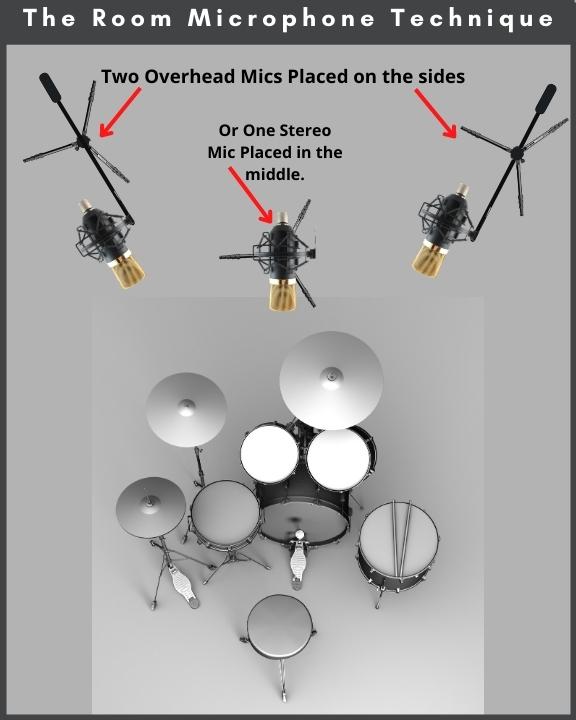
A good starting point to capture the overall sound of the drum kit is to position a pair of microphones 4 to 6 feet in front of the drum set and about 2 to 4 feet above the floor.
Stereo ribbon microphones like the AEA R88 or the Royer Labs SF-12 are particularly well suited for this task because they deliver a warm, well-balanced tone, as they can capture the full sound of the drum kit in high quality without over-emphasizing specific frequencies.
Another mic placement method that can work well for the room miking technique is to use a matched pair large diaphragm set of mics, such as the AKG C414 XLII, and place them in the X-Y stereo or A-B stereo configuration. Then position the pair of mics 4 feet or more in front of the drum kit and about 2 to 4 feet from the floor.
Moving the mics farther away from the drum set will sound more spacious and give the impression of a larger room. The closer they are to the set, the smaller the impression of space.
4. The Hybrid Technique – Works for Live Sound and In the Studio
With the hybrid technique, you combine different miking techniques to capture the sound of a drum kit whether in the studio or in a live sound situation.
This technique can include using overhead microphones, individual microphones for each drum and cymbal, and room microphones to capture the room’s ambient sound.
This miking method helps capture a more balanced and natural sound of the drum set. By combining microphone types, polar patterns, and positions, you can achieve a more detailed and accurate sound of the drum kit and have more flexibility during the mixing and mastering process.
When using the Hybrid technique, it’s essential to choose the right microphone type and polar pattern for each individual drum and cymbal.
For example, using a dynamic microphone with a cardioid polar pattern for the kick drum, a condenser microphone with a cardioid or hypercardioid polar pattern for the snare drum and toms, and a condenser microphone with a cardioid or super-cardioid polar pattern for hi-hat and cymbals.
Then, you can use overhead microphones, such as condenser or ribbon microphones, to capture the overall sound and balance of the drum kit, and room microphones to capture the ambient sound of the room.
It’s also important to note that when using the individual microphone technique, the placement of the microphones is crucial for getting a good sound and avoiding feedback.
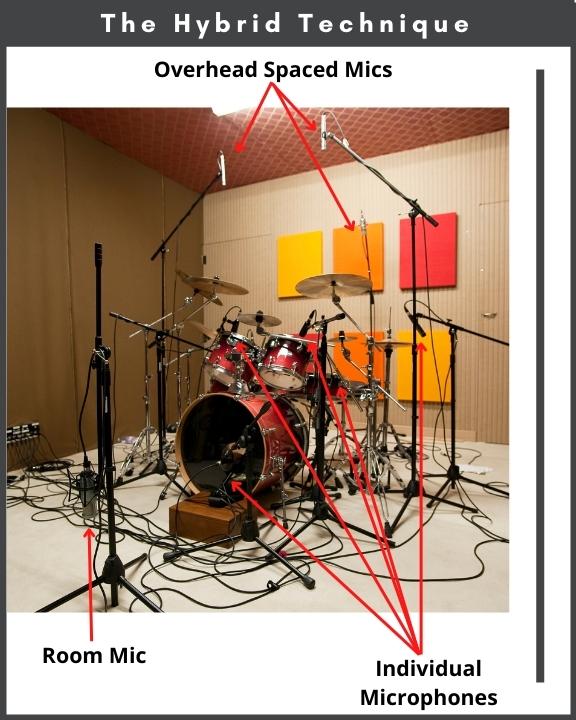
When dealing with live sound the individual microphone technique allows for more control over the mix and the ability to isolate specific drums and cymbals. It requires more microphone inputs and careful microphone placement but can result in a more detailed and accurate sound of the drum kit.
The overhead microphone should be placed a few feet above the drum kit, spaced to the left and right of the drum for good stereo separation and angled down at a 45-degree angle towards the center of the kit.
The Room microphones should be placed in the best location to capture the desired sound, such as at the back of the room, a few feet from the drum kit, or to the left and right side of the stage.
The hybrid drum miking method is a powerful tool for capturing a more balanced and natural sound of the drum set. By using a combination of microphone types, polar patterns, and positions. This technique gives you more flexibility during the mixing and mastering process.
Tips to Avoid Feedback in Live Sound When Using Microphones on Drum Kits
Feedback is your number one enemy when using several microphones on drum kits in live sound situations. Here are a few tips to help you avoid it:
Use Directional Microphones:
Using directional microphones, such as cardioid or super-cardioid, helps reject off-axis sound and focus on the sound coming directly from the drums, thus helping you reduce feedback.
Use Subtractive Equalization:
Use equalization to reduce or remove problematic frequencies that are most likely to cause feedback. For example, reducing the level of specific high frequencies can help to reduce feedback caused by cymbals or snare drum.
Use Drum Shields for Isolation
Isolating the drums from other instruments and sound sources can help to reduce feedback. For example, using a drum shield around the drum set can help to reduce the sound coming from other instruments and sound sources.
Good examples of drum shields are the Pennzoni DS6D, or the Pennzoni DS4 acrylic shields will help you reduce the loudness of the drum set, helping you produce better mixes.
Use a Feedback Suppressor
A feedback suppressor can help you reduce feedback by analyzing the audio signal and identifying the frequency range of the feedback, then automatically reducing or eliminating the gain in that specific frequency range.
Something like the DBX AFS2 or the Behringer FBQ1000 is a perfect companion when dealing with live audio situations, as it can help you virtually eliminate feedback.
Positioning
Placing the microphones correctly, in the right distance and angle, can help to minimize feedback. For example, placing the kick drum microphone inside the drum and pointing it towards the beater can help to reduce feedback caused by the other drums and cymbals.
Monitor Levels
Keeping an eye on the monitor levels and making adjustments as needed can help to prevent feedback.
Test the sound system before the performance, this will allow you to identify potential feedback issues and make adjustments to prevent them.
It’s important to note that feedback can be caused by a variety of factors, including the room acoustics, the sound reinforcement system, and the position of the microphones. Therefore, it’s important to be aware of these factors and to make adjustments as needed to reduce the risk of feedback.
Summary
In this article, I have shown you how to mic a drum set using different techniques for capturing the full sound for live sound and in the studio.
- The Individual Microphone Technique involves using individual microphones for each drum and cymbal, such as a microphone on the kick drum, snare drum, toms, hi-hat, and cymbals. This technique allows for more control over the mix and the ability to isolate specific drums and cymbals.
- The Overhead Technique uses two or more overhead microphones, typically placed a few feet above the drum kit and aimed down at the drums. This technique captures the overall sound of the drum kit and provides a good balance between the different drums and cymbals.
- The Room Microphone Technique involves in using additional microphones placed in the room to capture the ambient sound of the drums. This can add a sense of space and realism to the overall drum sound.
- And finally, the hybrid method combines the above techniques to capture a more balanced and natural sound of the drum set, giving you more flexibility during the mixing and mastering process.
It’s also important to note that the drum sound can vary based on the room acoustics and the sound reinforcement system, so it’s always a good idea to do a sound check before the performance and adjust accordingly.
And don’t forget to experiment with different techniques and equipment to find the best approach for your specific situation.
If you liked this article, consider sharing it with others, and don’t forget to visit our website to explore more articles like this one by clicking here. Thank you for reading my blog.