More than 2 million couples get married every year in the United States. These are joyous occasions and are the perfect time to celebrate with your nearest and dearest.
And boy, do they love to show their affection! In fact, on average, wedding guests spend over $800 per wedding on travel, accommodation, gifting, and clothes!
In the past year, though, we have unfortunately seen fewer people traveling safely to celebrate weddings together due to the global COVID-19 pandemic.
Thankfully, it is still possible to share your special day with the ones you love and keep a recording for yourself! Want to know more?
Then you’re in the right place! Read on to find out everything you need to know about how to livestream a wedding.
What is Livestreaming and Why Use It?
Livestreaming allows you to share videos in real-time. This is a bit like watching live TV programs.
There are many benefits to watching a wedding on a livestream, especially when people’s travel options are limited. This means you can share your special day anywhere in the world, so you can even expand your guest list!
It is also possible to record a livestream, meaning that you can record the wedding event to enjoy in the future, as well as sharing it on your big day.
With that in mind, let’s take a look at some of our top tips for livestreaming a wedding.
Three Methods You can Use to Livestream a Wedding
Depending on your budget and how professional you want the livestream to be, there are three options you can choose from.
- Building a Pro live video streaming setup
- Using your phone or table
- Hiring a professional videographer
Suppose you are tech-savvy and can handle dealing with several audio and video equipment. In that case, you can opt for a pro setup that will provide the best DIY results, and it doesn’t have to cost thousands of dollars. Plus, you can also use the system for any future event you decide to livestream
Instead, if you choose a more straightforward method, you don’t need a lot of equipment to stream your wedding. In fact, you can do it directly from your smartphone. However, professional equipment will produce a better image and audio quality.
Some people also choose to hire a professional videographer when filming a wedding live. This guarantees a good quality stream, and they may even be able to provide their recording equipment. It also means that your friends and family at the wedding will be free to enjoy the day without distractions.
One thing to keep in mind is that this tutorial article assumes that you have a photographer in charge of taking pictures. This post only explains methods for livestreaming the event.
This is What You’ll Need Depending on the Method You Choose
DIY Professional Live Video Streaming Setup
With a professional DIY method, you will need several pieces of audio and video equipment. This setup will deliver the best quality and will be the most flexible.
One of the main objectives is to provide the best possible experience to the viewers that could not make it to the event.
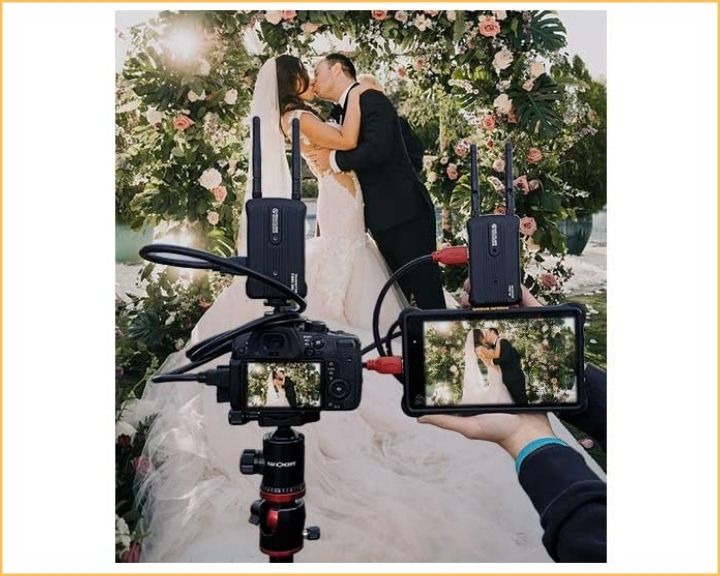
The good thing about this setup is that you will have a wireless transmitter and receiver to connect the DSLR camera. That will give you the freedom to walk around the venue without having cables hanging around.
Cables are necessary, but they are annoying, plus they are tripping hazards that you don’t want to deal with.
To pull this off using this method, you need at least two people. One to be the cameraman to walk around and get all the video shots, and the other person to take care and monitor the livestream.
These are the equipment you’ll need for this setup. I provide links to Amazon if you want to check them out. I’ll also include a diagram to show you how to set them up.
This is the gear you’ll need:
- DSLR camera with HDMI output.
- 512 Gb micro SD card for the camera to record a backup on the camera at 1080p. If you decide to shoot at 4k you would need one 512Gb memory card for every 1.5 hours of recorded video – The recommended one is the SanDisk 512GB Extreme micro SDXC as it writes data at speeds of up to 90MB/s. Make sure that the camera you are planning to use is capable of reaching such speeds.
- 3-Axis Gimbal Stabilizer for Cameras – the recommended stabilizer is the Zhiyun Weebill S.
- A shotgun microphone for the camera that way it can pick up high definition sound.
- Hollyland Mars 300 5G Wireless HDMI Video Transmission System. The transmitter connects to the camera, and the receiver connects to the video capture card or switcher.
- To power the transmitter unit, you need the Sony NP-F style batteries – the recommended one is the NP-F550 RAVPower battery charger with the battery pack. The receiver unit can be powered by the included AC adapter or, if you prefer, by the same battery type.
- A Replacement battery kit for the camera. RAVPower makes some of the best replacement battery packs for the different camera brands. Make sure to get one that is compatible with your camera.
- Short 0.5 ft or 1ft HDMI cables for the connections, you’ll need at least two – The recommended one is the Monoprice HDMI cable. Choose from 0.5 or 1 ft cable.
- Video capture card – The recommended one is ElGato Cam Link 4K. It can broadcast live via DSLR, camcorder, or Action Cam. The resolution is 1080p at 60 fps or 4k at 30 fps. It connects to the computer via USB 3.0 for a faster transfer rate. For compatibility issues with the specific camera you want to use, check here.
- A portable computer with the following specs:
- Processor – you’ll want the fastest processor you can have access to. The minimum I recommend is the Intel i5 processor.
- RAM memory – no less than 8Gb. The more, the better.
- Storage – a solid-state drive (SSD) with no less than 500Gb free if you plan to record the stream on the computer, which I highly recommend to have more redundancy.
- Operating system – I recommend a 64-bit OS.
- Ports – you’ll need to make sure that the computer you chose has enough ports as well as the type of ports you’ll need. It needs to have a minimum of two USB 3.0 ports. If it has more, it’s better because you’ll have more flexibility.
- A strong internet connection and a backup if possible.
Steps to Follow for Setting Up a Professional DIY Livestream
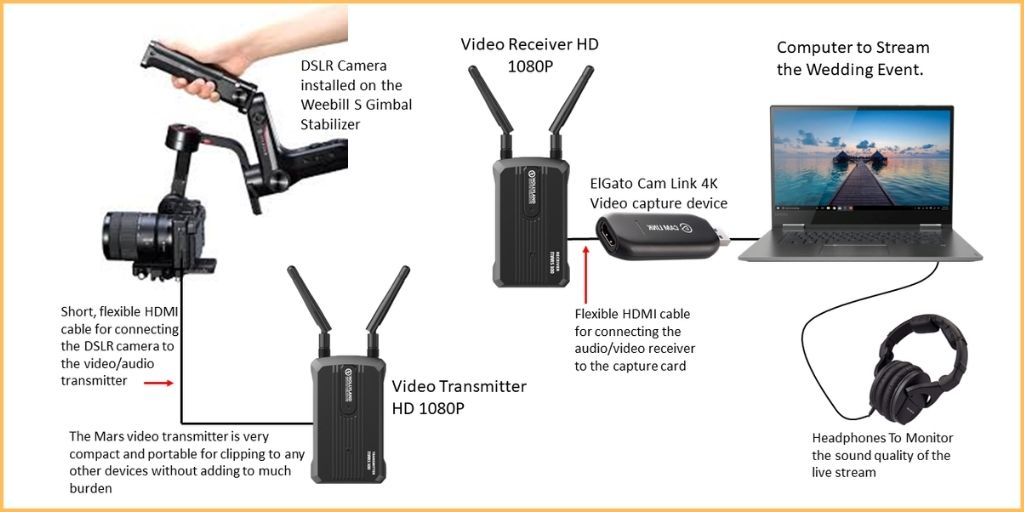
Use the diagram below for your reference.
Camera Side Setup
- Make sure to charge all the batteries you need. This includes the replacement batteries for your camera and wireless devices. My recommendation is to always have as many batteries as possible because the last thing you want is to run out of power when you need it the most.
- Install the memory card of the DSLR camera. The micro SD card needs to be empty and formatted by the device. When dealing with memory cards, one crucial piece of advice is not to use cheap, after-market brands because it will be a disaster waiting to happen. Memory cards from known brands are expensive for a reason; they are reliable. Another piece of advice is to have backup memory cards just in case you run out of space.
- It’s time to install a shogun microphone to the camera. I recommend these types of mics because you want the audio quality to be as good as the video you’re shooting, as it is 50% of the experience. Selecting the right mic for your camera will depend on your budget and quality. Here a list of the top 5 mics for DSLR cameras; click the link to check it out.
- Install the camera in the gimbal stabilizer. If you don’t know how to use the Zhiyun Weebill S stabilizer, you can watch a tutorial on YouTube. A stabilizer is a must tool to get professional-looking video shots. There won’t be any bumps in the video with this tool, and your audience will thank you for that.
- Connect the Hollyland Mars 300 transmitter to the camera. Use a short HDMI flexible cable to connect the HDMI Out from the camera to the Transmitter’s HDMI Input. The unit is compact and lightweight, and it should be easy to clip it to the side of the camera or on the gimbal itself. It comes with a shoe mount adapter to secure it to the camera.
Now is time to set up the system on the computer side. This is where you’ll receive the camera’s signal and connect it to the computer to stream it.
Computer Side Setup
- Connect the Hollyland Mars 300 receiver to the AC power adapter.
- Use a short, flexible HDMI cable to connect the receiver unit to the ElGato video capture card.
- Connect the video capture card to an available USB port. I recommend using a USB 3.0 port for better transfer speeds. The ElGato Cam Link 4K is a plug-and-play device, so you don’t need to install any drivers for it to work.
- Download and install El Gato’s “4K CAPTURE UTILITY” For Windows or MAC, here is the link. In the “Select Your Product” drop-down menu, choose “CAM LINK 4K.” In the “Select Your System” drop-down menu, select your operating system.
- This program will record on your hard drive everything that is being streamed. My recommendation is not to skip this step because if the internet connection fails during the ceremony, you can still upload it later for people to watch. Plus, it will give you an extra layer of redundancy if the memory card on the DSLR camera fails.
- Open the streaming platform you want to use, whether Facebook Live, YouTube, Zoom, or any streaming platform. If you have a reliable internet connection with enough bandwidth, you can even livestream the wedding to multiple platforms.
- Go into the streaming platform settings and click on “Video” to select the ElGato capture card as your video source. Make sure also to select “HD” or the highest quality possible for your stream. Just make sure that your internet connection can handle it. Here is where testing everything to fine-tune the setup plays a critical role.
- Run a test with all of the equipment to see how it performs and also to rule out any potential problems.
Expanding the Setup Using a Video Switcher
If you want to go a step further, you can add a couple of cameras to have different shot angles. Going this route will require you to have a team of people to pull it off. Besides, you’ll need a video transmission system per camera being used.
This will also require to use a video switcher so that you can change between video feeds. One of the best video switchers on the market today that doesn’t break the bank is the Blackmagic Design ATEM Mini HDMI Live Switcher.
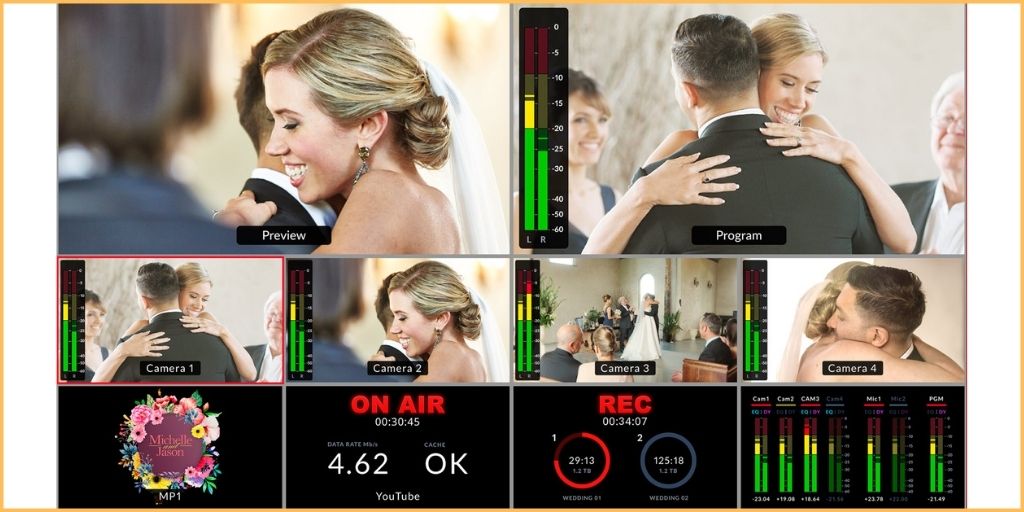
Using the ATEM mini, you can connect up to four cameras or video feeds and use a USB cable to connect it to any computer.
The best part is that the PC will see it as a built-in webcam, so all streaming software for social media platforms will work without a problem!
Another remarkable feature of the Blackmagic ATEM mini is that you can have an audio line connected straight from the main audio mixer, so whatever comes out of the main PA system will be streamed as well. This provides a lot of flexibility when dealing with audio signals.
Using the ATEM Software Control provides you with the Fairlight audio mixer allowing you to change the EQ and dynamics before sending the signal to the streaming platform.
The ATEM Mini includes 4 standards converted HDMI inputs, USB webcam out, HDMI out, DVE for a picture in picture, transition effects, green screen chroma key, 20 stills media pool for titles, and free software control.
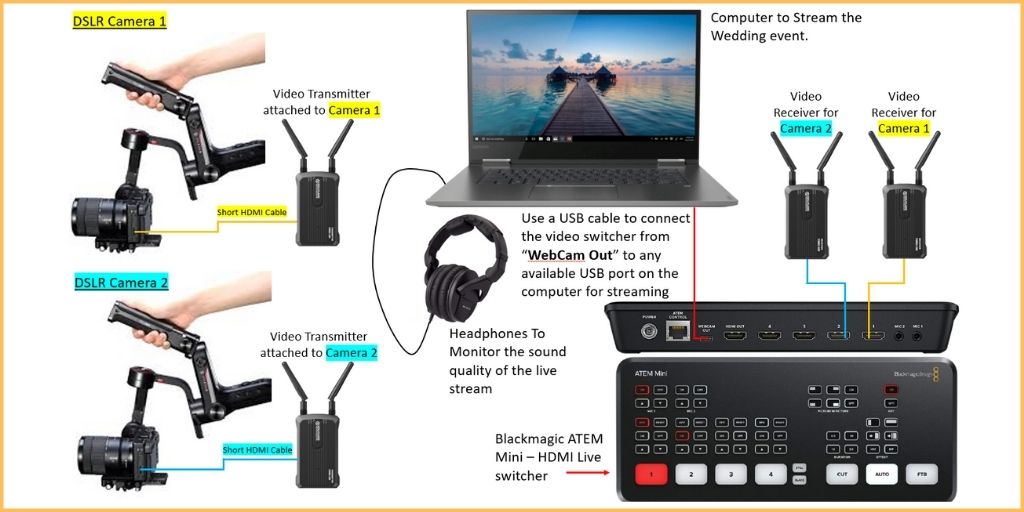
Here is a diagram for setting up a livestream using the Blackmagic ATEM Mini. Use it for your reference.
Using Your Phone or Tablet For Livestreaming a Wedding – Simpler Method
Now that I have shown you the DIY professional method, it might seem intimidating to deal with all of the equipment.
You might want a simpler, more straightforward method that does require investing a couple of thousand dollars just to stream your cousin’s wedding.
So here we go… read on to learn how to stream a wedding using your iPhone, Android phone, or tablet. This method can also deliver excellent audio and video experience to the people who couldn’t make it to the event.
This is what you’ll need:
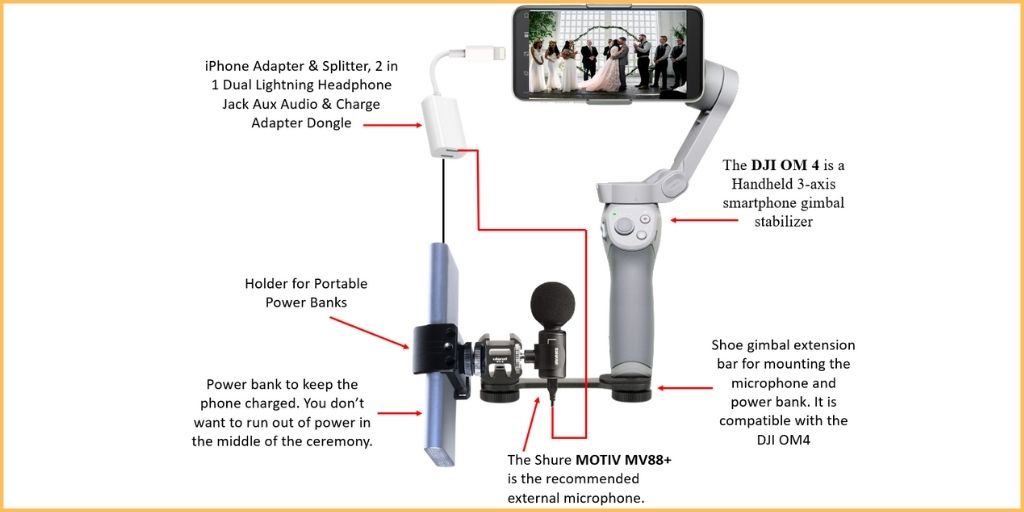
- A smartphone – It could be an iPhone or Android with enough memory to store the entire ceremony. If your phone doesn’t have enough space, you’ll need to expand the storage using a Micro SD card – the recommended one is the SanDisk 512GB Extreme micro SDXC as it writes data at speeds of up to 90MB/s. Make sure your phone is compatible.
- The DJI OM4 handheld 3-axis smartphone gimbal stabilizer – Highly recommended to avoid sudden bumps in the shot.
- External microphone for better audio quality – Highly recommended. For iPhone or Android smartphones, the best option is the Shure MV88+.
- Power bank to keep the phone charged. You don’t want to run out of power in the middle of the ceremony.
- Any additional accessories for connecting everything. For a setup exactly as shown in the diagram below, you’ll need:
- 1 x Triple cold shoe gimbal microphone mount extension bar – Check Price on Amazon
- 1 x Holder for the portable power bank – Check Price on Amazon
- 1 x double lightning splitter, if using an iPhone – Check Price on Amazon
- Lastly, a strong internet connection and a backup, if possible
Steps to Follow for Using Your iPhone or Android for Livestreaming a Wedding
- Verify that your phone and power bank are fully charged and ready to go.
- Your smartphone must have enough storage space to record what you are streaming. That way, you have redundancy in case you run into problems due to the internet connection while streaming.
- Install the external microphone pointing in the direction of the lens.
- Now it’s time to install the phone to the gimbal stabilizer. With the stabilizer, the livestream will be smooth and free of sudden bumps typically found in amateur videos.
- Connect the smartphone to the power bank to keep the phone fully charged during the livestream. When streaming, the battery charge decreases rapidly.
- At this point, connect to the streaming platform you want to use and test to make sure that it works well and that your internet connection is reliable.
- Don’t forget to allow HD quality video and audio on the platform so that your viewers watch the ceremony in high-quality video.
- Run the test several times to pinpoint and find any issues ahead of time.
Give Your Equipment a Test Run
Before your wedding livestream, it is a good idea to give everything a test run. You might want to do this at the wedding rehearsal or at another time.
When testing your equipment, you should:
- Practice setting up the camera where you want it and check if the position works throughout the wedding (you might want to record your rehearsal for this)
- Practice walking the camera through the service
- Ensure the internet connection is reliable
- Check that all of your equipment is fully charged up and remains on charge before the wedding
Giving your equipment a test run will highlight any issues that need fixing. This will ensure that everything goes smoothly on the day of the event.
Pay Attention to the Sound
Watching a wedding live is all well and good, but your remote guests won’t know what is going on if they can’t hear you. This is why it is worth thinking carefully about the audio equipment that you want to use.
It’s straightforward to record high-quality audio on your iPhone. This does require careful positioning, though, so this is something you should test out in your practice run.
Make sure to use a different device to monitor your livestream. That way, you can know if the audio is distorting or if the video feed is lagging.
This requires a little more setting up, but it will make all the difference to the people watching at home.
Send Out the Link in Advance
There are many great livestreaming platforms that you can use to bring people together on your big day. It is worth doing some research to find one that works for you.
When choosing a platform, make sure you go for the one you have some experience using. This will ensure that things run smoothly on the day. A lot of high-quality streaming platforms also offer technical support, which can be helpful if it’s your first time streaming.
In order to invite people to the stream of your wedding, you usually send out a link to the livestream. When you do this, make sure you provide details about the date and time that your livestream is due to start.
It’s a good idea to start the stream a little while before the ceremony begins. This gives people a chance to get set up at home, and it’ll make them feel like they’re arriving with the other guests, which is a nice touch!
A Word of Caution Regarding Privacy
You should publicly avoid sharing the link to your livestream so that only people on your guest list can access it. Make sure that you share a ‘private’ link as well, rather than a public one. This means that your guests won’t be able to share it with anyone else.
It is a good idea to do a practice run with your link sharing shortly before your wedding. This will allow you to troubleshoot any issues with the streaming platform or connectivity.
Get Ready to Share Your Special Day!
Now you know exactly how to livestream a wedding (and do it well!), you’ll be able to share your special day with all of your loved ones – no matter where they are.
Don’t forget to ask your videographer to save a recording of the stream as well, so that you can cherish it forever.
For more tips on capturing great live sound on your special day, check out these top tips.