Knowing how to EQ live vocals is essential to get good results in your live mix. When you put a microphone in front of a vocalist, don’t expect it to sound good without adjusting the EQ, no matter how talented the singer is.
The frequency components that make up the voice need to be adjusted so that the best features of the voice are noticeable in the mix.
To achieve this, the voice needs to be equalized correctly. A correct equalization is the secret for providing an excellent sound experience to your audience.
In any live sound setup, the vocals are the most important part of the mix but tend to be the hardest to get right. In today’s article, I am going to present a few tips on how to EQ live vocals, plus I provide a few mixer settings for vocals to get you started with your mix.
How to EQ Live Vocals – Helpful Tips to Get You Started
To get the best results when equalizing live vocals, you must do six fundamental things:
- Start with flat EQs – Reset the EQ on the mixing console
- Cut out the low-end rumble – Use the high-pass filter
- Remove problematic (“hot”) frequencies – Add warmth to the sound
- Take care of the proximity effect
- Balance the upper mid-range frequencies
- Boost frequencies where is needed – Add Presence.
Start with flat EQs – Reset the EQ On the Mixing Console
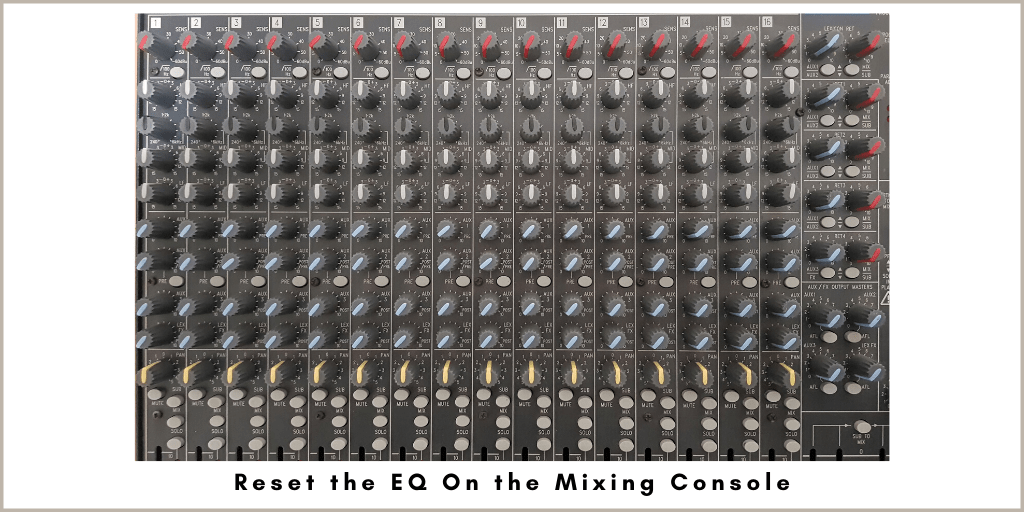
The first step to EQ live vocals correctly is to reset the EQ of each channel. That way, you don’t start with frequency imbalances. Most of the time, it’s not necessary to boost frequencies but to cut them instead.
By starting with a reset EQ, you can start with a balanced sound, and then you can pinpoint if any frequency needs to be boosted or reduced.
An important aspect to keep in mind when it comes to EQ is that less is better. If you can get away with no EQ at all, that is ideal, but that rarely happens.
This principle applies to live audio setups as wells as when recording. Many sound engineers do not use any EQ when laying down tracks in the recording studio. Just keep that in mind when EQing live vocals.
To reset the EQ of a mixing board, turn each knob to the center position (12 o’clock position) that’s labeled “U” or “0.”
FURTHER READING: Mixing Console Basics
Cut Out the Low-End Rumble
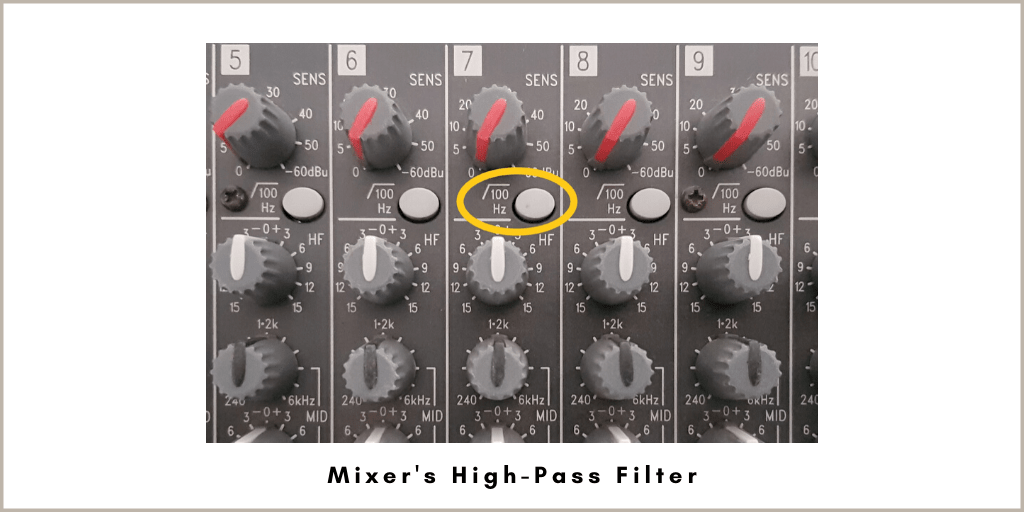
The fundamental frequencies of vocals are between 100Hz-300Hz. Even adult males with deep voices don’t go below 85Hz. All this means is that any frequencies below 80Hz should be cut out when equalizing vocals.
Start by applying the mixer’s high-pass filter on any channel that doesn’t need low-end frequencies, which are most of them.
In most audio mixers, you can find the high-pass filter switch under the gain knob. Make sure to activate it for all the channels where vocal mics are connected.
Only bass-heavy sounds use the low sub-frequency range. Such instruments are guitars, bass, and drum kicks.
Decrease Problematic Frequencies
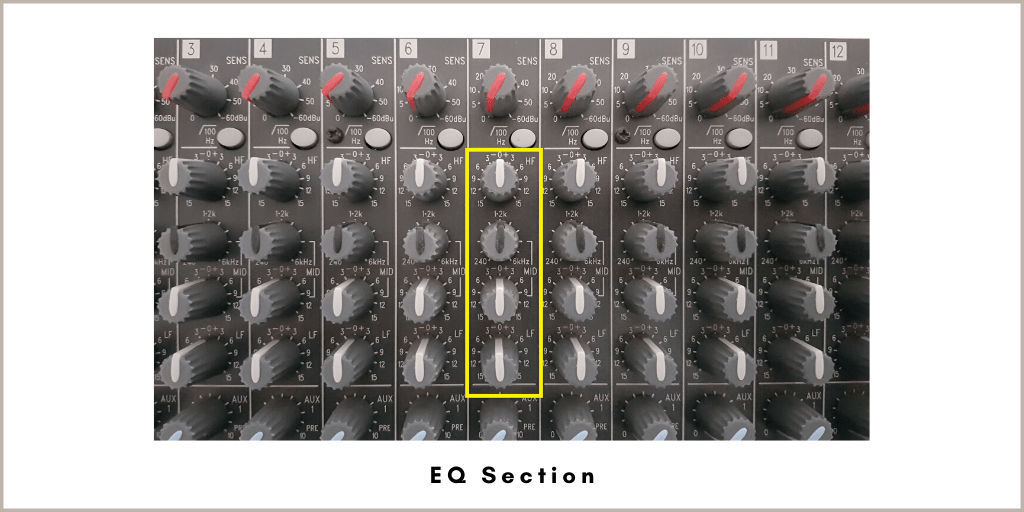
Problematic or hot frequencies are all that stand out and don’t blend well with the rest of the mix. For example, If “P’s” sound plosive, that means that the channel is excessive on the mid-bass around 250 Hz. Try cutting around 200Hz-250Hz.
What to Adjust if Vocals Sound Muddy or Boomy
When vocals sound “muddy,” it means that it lacks clarity and transparency. Most likely, due to low-frequency resonances that create a congested, smeared, and confusing sound.
If in your mix vocals sound muddy or boomy, try adjusting the frequencies between 220Hz-350Hz. Don’t aggressively cut frequencies in this area because you could eliminate part of the warmth of the vocal’s sound.
Remember that although muddy frequencies are present between 200Hz – 350Hz, those frequencies are also part of the fundamental frequencies that bring out the warmth in a voice.
I would recommend delicately cutting anything between 200Hz – 600Hz to avoid destroying warm tones in vocals.
Carefully Balance the EQ to Avoid Vocals Sounding Boxy or Thin
Another critical area to EQ carefully are the frequencies between 350Hz – 600Hz. An emphasis around those frequencies will make the vocals sound “Boxy,” meaning that they will have resonances as if the vocals were enclosed in a box.
If those frequencies were reduced too much, vocals would sound “hollow,” meaning that they would sound thin.
Be careful when adjusting frequencies between 350Hz to 600Hz. Adjust until you find a sweet spot.
Decreasing Sibilance In Vocals
Additionally, it’s also critical to reduce frequencies that are too bright and are prone to produce voice sibilance. In case you didn’t know, sibilance is the hissing sound that’s created with “s” sounds. If high frequencies are boosted, vocals are likely to produce sibilance, and believe me, that sound is annoying for the audience.
Frequencies between 5kHz – 10Khz need to be adjusted carefully to avoid a sibilant sound. Start with the EQ set to “0” or “U” (12 o’clock position), and have the vocalists sing. If you hear that the “s” sounds too exaggerated and bright, decrease the high frequency knob labeled “High” or “HI” counterclockwise until the sibilant tone is eliminated from the vocal sound. Make sure to keep a balance between brightness and warmness in the voice.
Remember that the whole idea when equalizing live vocals is to produce a well-balanced sound that enhances the best features of the voice. Vocals must sound clear and pleasant for the audience to hear.
FURTHER READING: Best Live Condenser Vocal Mic
Take Care of the Proximity Effect
The proximity effect is a phenomenon that happens when a voice source gets too close to a microphone. What happens is that as the voice source gets closer, the low frequencies increase, producing a bass-heavy sound on the vocals affecting the intelligibility of the sound.
The frequencies that are boosted by the proximity effect are between 80Hz – 200Hz. We have taken care of all the frequencies below 80Hz by applying the mixer’s high-pass filter, now is time to adjust anything between 80Hz and 200Hz using the EQ.
Getting Rid of the Proximity Effect
Before using the EQ to take care of the proximity effect, make sure that the singers don’t get too close to the microphone. Of course, to avoid feedback, the closer the better, but there is a limit on how close to place a mic to the sound source. If it’s too close, the proximity effect can ruin the mix.
A good rule of thumb for live performances is to place the microphone between 4 to 6 inches away from the mouth, then start equalizing the voice.
Occasionally, there will be singers that will almost kiss the mic; if that’s the case, you have to adjust the EQ to avoid the proximity effect.
Find the low-frequency knob labeled “Low” and decrease (turn it counterclockwise) the gain on those frequencies to relieve some of the low frequencies. By doing that, you might have to compensate on the mid and high frequencies to get a natural sound.
It might take you a few tries until you get it right. The goal is to make the vocals sound clear, crisp, and warm.
FURTHER READING: Portable PA Systems For Outdoor Events
Balance the Upper Mid-Range Frequencies
The upper mid-range or high-mid frequencies are the “Nasal Frequencies” and are located between 1kHz – 3.5Khz. They need to be carefully balanced because if there is an excessive buildup in this area, vocals will sound “harsh” or “grating.”
In contrast, if the upper mid-range frequencies are too low, vocals will sound “muffled” as if the sound is covered with a blanket. It will give the impression that the vocals are far away and not present in the mix.
There is no magic formula, or one setting fits all kind of deal to EQ live vocals. Each venue will be different, the same is with each voice. All you need to know are the basics and theories behind how things work so that you can adapt it to your setup.
By practicing and training your ears, you will get better over time.
FURTHER READING: 6 Tips for Choosing the Best Portable PA System for Live Music
Boost Frequencies Where is Needed to Add Presence to the Voice
In a live mix that contains several instruments, it is critical to bring out the vocals in the mix. It can be achieved by slightly increasing the “presence range of frequencies,” which are between 4kHz – 6 kHz.
Presence is responsible for the clarity and definition of voices. Increasing this range of frequencies can make the music sound detailed and closer to the listener.
On the other hand, Reducing the 4kHz – 6kHz content of frequencies makes vocals sound more distant and transparent.
When mixing all instruments and vocals, try not to clutter the “presence” range of frequencies so that vocals cut through the mix with clarity and detail.
FURTHER READING: How to Set Up a Stage Sound System
Visual Representation of The EQ Settings For Live Vocals
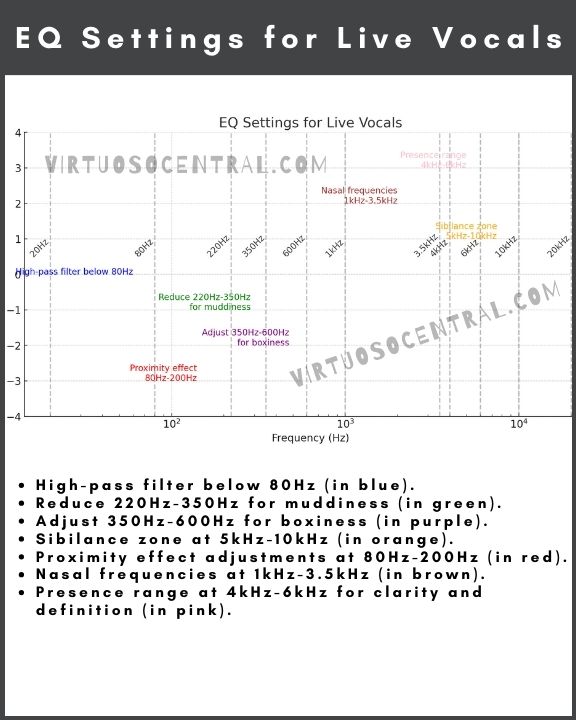
The following graphic serves as a quick reference guide for EQing live vocals.
The horizontal axis represents the frequency range, with each line marking a specific frequency.
The annotations indicate the key points and recommendations for adjusting these frequencies during live vocal mixing:
- High-pass filter below 80Hz (in blue).
- Reduce 220Hz-350Hz for muddiness (in green).
- Adjust 350Hz-600Hz for boxiness (in purple).
- Sibilance zone at 5kHz-10kHz (in orange).
- Proximity effect adjustments at 80Hz-200Hz (in red).
- Nasal frequencies at 1kHz-3.5kHz (in brown).
- Presence range at 4kHz-6kHz for clarity and definition (in pink).
Mixer Settings for Vocals
All of the tips mentioned in this article are easier to implement using a digital audio mixer because you have a more precise parametric EQ for each channel. You can pinpoint individual frequencies and either increase or decrease them very accurately.
If you use an analog audio mixer, it’s more difficult to EQ individual frequencies because one knob can be responsible for a broader range of frequencies.
In this case, you would have to use your ears to identify the frequency you are trying to increase or decrease.
Here are a few mixer settings for vocals that can help you get started.
EQ Live Vocals with a Three-Knob EQ Analog Mixer
If your analog mixer has three knobs for the EQ, you are limited to what you can do. I would recommend to set the High-frequency knob to “0” (12 o’clock position) and do the same for the mid-frequency knob.
If you are equalizing the mic for a male singer that has a low pitched voice, try reducing the low-frequency knob a bit to get rid of the muddy sound. If it’s a female singer, you can leave the low frequency knob to “0” (12 o’clock position).
Listen to the voice as it comes out of the loudspeaker and adjust it according to what is needed. If the voice sounds dark, it means that the EQ is weak at high frequencies. Try increasing the highs a bit.
If instead, the sound of the voice is not punchy, try increasing the mid-frequency knob.
On the other hand, if the voice sounds muddy, decrease the lows a bit.
How to EQ Live Vocals with a Four-Knob EQ Analog Mixer
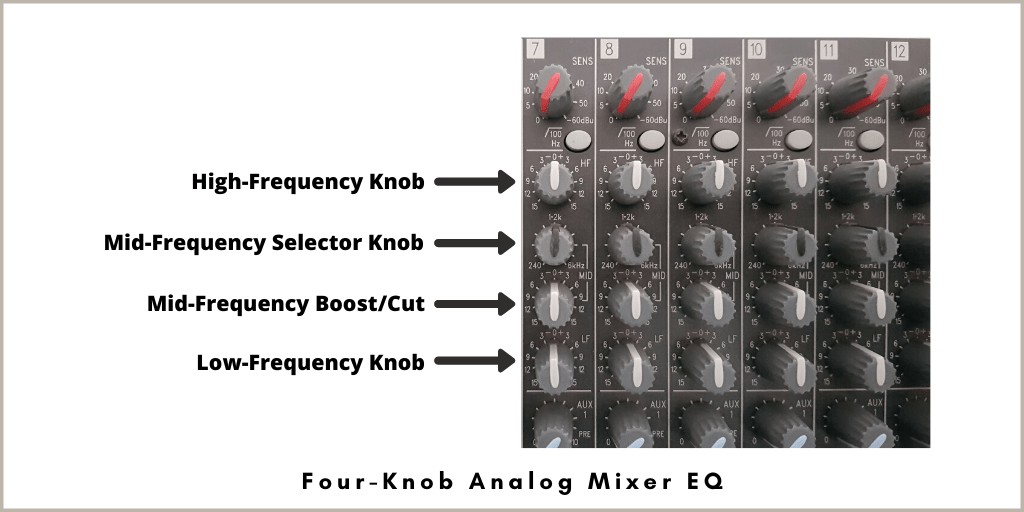
If your analog mixer has four knobs for the EQ, the second one under the high-frequency knob is a frequency selector. With that knob, you can select the frequency you want to adjust, then use the third knob down to increase or decrease the gain on that frequency. That way, you have more control over the selection of frequencies to EQ.
Start by setting the HF (high-frequency) knob to the middle “0.” Make sure that the second knob down is also set to the center or 12 o’clock position. Increase the third knob to about 50%.
Set the fourth knob to the center if it’s a female singer, or to 40% if it’s a male singer with a low pitched voice.
As you hear the sound coming out of the loudspeaker, increase or decrease the frequency selector until you can clearly listen to the voice with a well-balanced tone.
Take into consideration all of the tips mentioned previously and adjust the knobs until you have found a sweet spot.
EQ Settings for Vocals Using a Six-Knob Analog Mixer Equalizer
The ideal analog mixer would have at least six knobs for EQ. That way, you have more precise control over the frequencies you want to equalize.
With a six-knob EQ, the first one, from top to bottom, is for high frequencies. The second one is the high-mids frequency selector. The third knob is the one that controls the high-mid frequency gain.
The fourth one from top to bottom is the low-mids frequency selector, with the fifth knob being the gain control for the low-mids. The sixth knob is the one responsible for controlling the gain for the low frequencies.
Start by setting the HF knob to “0” (12 o’clock position); that way, you keep the bright sound neutral so that the vocals don’t sound harsh.
Next, set the second knob (high-mids frequency selector) to “0” (12 o’clock position) .
Then, set the third knob (high-mids boost/cut) to about 50%, do the same to the fifth knob (low-mids boost/cut).
Set the low-frequency knob to the middle “0” (twelve o’clock position).
At this point, have a singer start singing and sweep the high-mids frequency selector up and down slowly and listen to how the voice changes.
My recommendation is to keep the EQ as flat as long as it sounds good. If the voice sounds too “nasal,” try sweeping the high-mids frequency selector until you find the offending frequency and use the boost/cut knob to increase or decrease it.
If the voice sounds “boxy,” “hollow,” or “thin,” use the low-mids frequency selector to find the offending frequency to boost or cut accordingly.
Takeaway
If you don’t know how to EQ live vocals, don’t worry. With the tips provided in this article and enough practice, you can learn the ins and outs of equalizing vocals and instruments. First, get used to your mixer’s controls and start practicing until your ear is trained.