Getting a great electric guitar sound starts with dialing the correct EQ at specific frequencies. That’s why knowing how to EQ is an art, as it is a science, and it all starts with applying basic EQ techniques.
It doesn’t matter if you have the best guitar and sound gear; if the EQ is not set correctly, your sound will be off, and if you are a guitarist or sound engineer, you need to know how to eq electric guitar.
If you are wondering what you need to do to EQ an electric guitar, here are the steps:
- Cut the sub-bass frequencies 80Hz and below using a high pass filter.
- Cut the resonant frequencies between 400Hz-1kHz.
- Boost the “body” frequencies between 200-500Hz as necessary to add weight to the sound.
- Add or remove the “presence” frequencies between 1-3kHz as needed to get a clear tone.
Of course, this is easier said than done, and although several more factors can play a crucial role in getting a good electric guitar sound, these four are the main ones when dealing with EQ. Mess any of them up, and your guitar will sound terrible.
In this post, I will go through each of these four steps to help you EQ an electric guitar to get the best sound possible.
Plus, I have included suggested EQ settings to get you started and a cheat sheet for your reference. Without further ado, let’s get started.
1. Cut Out the Sub-Bass Frequencies with a High-Pass Filter
The first thing that you must do is get rid of unwanted frequencies below 80Hz. The reason for getting rid of these frequencies is because, in most cases, and depending on the instrument, they can cause more problems than good, as they are responsible for the low-end rumble that dirties up the EQ.
This is due to low-end harmonics generated when the lower notes are played on the guitar.
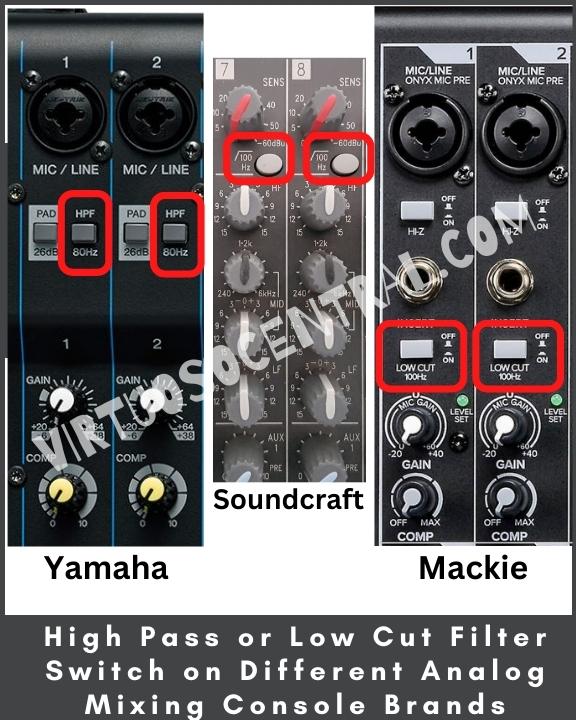
To cut out the sub-bass frequencies, if you use a digital mixer, you can set a high-pass filter (also known as a low-cut) with a cut-off frequency set at 80Hz.
If you have an analog mixer, there is a small switch above the gain knob labeled HPF or LOW CUT. When engaged, it activates a low-pass filter, cutting everything below 80Hz.
Another reason for getting rid of the low-end frequencies is that an electric guitar’s fundamental frequencies are between 82.4Hz for E2 and 1318.51Hz for E6. This is calculated by setting A=440Hz as the reference.
These numbers are without taking into consideration all the harmonics. So, cutting out anything below 80-100Hz makes sense to help you get a clean start when setting EQ for an electric guitar.
After passing the signal through the filter, you will be glad to hear that any residual low-end harmonics are gone. This will go a long way toward making the electric guitar sound as clean and crisp as possible.

Related: 6 Ways to Mic a Guitar Amp That Will Give You the Best Tone
2. Cut the Resonant Frequencies Between 400Hz-1kHz.
Electric guitars resonate at around 600Hz, so cutting out this frequency using a bandpass filter is necessary.
Using a bandpass filter with a center frequency set at 600Hz will smoothly decrease and cut out that chosen part of the frequency spectrum.
If using a digital mixer, decreasing this range of frequencies is relatively easy because you can use a bell or peaking equalization filter, also known as a bandpass filter, set within this range of frequencies.
To start, locate the 600Hz frequency and decrease it slowly. You’ll notice on the mixer’s screen that the adjacent frequencies are also slightly reduced below and above 600Hz.
This is because as you lower the 600Hz frequency, the digital mixer uses it as the center frequency. So, by decreasing that center frequency a bit, it will also slightly lower the range of frequencies around the center frequency, rounding off the sound, which is excellent for the end result.
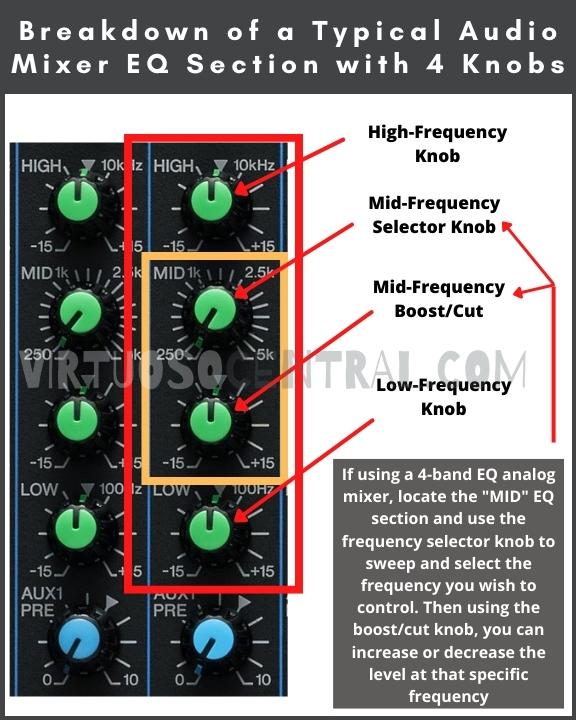
If using an analog mixer, you’ll need one with a four-knob EQ section to achieve the same results. This is so that we can choose the center frequency.
The image below shows the EQ section of a typical analog audio mixer with a four-knob EQ.

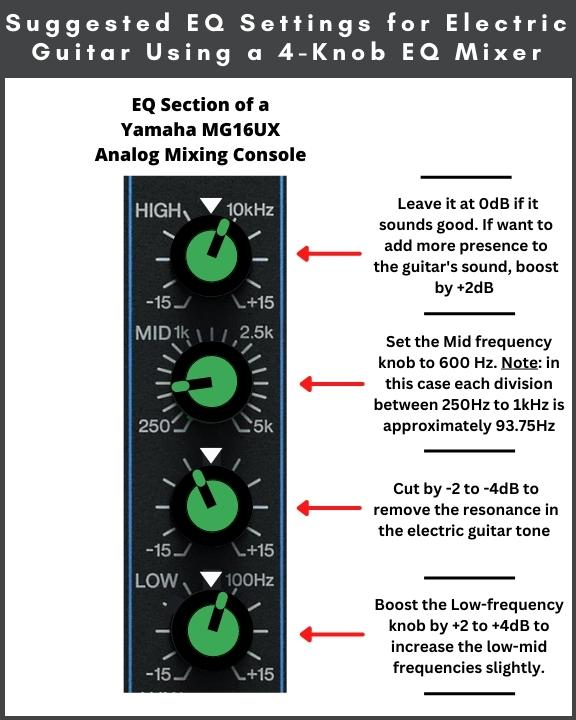
The analog audio mixer I use for this example is the popular Yamaha MG16XU. Notice that the second knob down is set at 600Hz.
Also, note that the MG16XU has a bandpass filter with center frequencies selector between 250Hz to 5kHz, which means you can also test different cut-off frequencies.
Depending on your mixing console, the frequency range available on the mixer would be different but end up giving you the same result. All you have to do is use the frequency selector to set it at 600Hz.
Then, use the third knob to either boost or reduce the level of the frequencies at and around the selected center frequency. For this example, I have cut it by -2dB.
In the image below, I have set the EQ with starting points so you can use it to set the EQ for the electric guitar on your analog mixer.
You can use the suggested starting points provided here, but at the end, you need to use your ears to make adjustments as necessary to make sure it sounds good with your setup. These are just starting points to get you started on equalizing the electric guitar.

Related: Guitar Amp Settings for Rock
3. Boost the “Body” Frequencies Between 200-500Hz Only if Necessary
Remember that when equalizing any sound source is always better to reduce the gains at specific frequencies rather than to boost. But in some cases, when cutting some frequencies as we did in the previous step, some wanted frequencies are also removed.
When setting the EQ for an electric guitar, if the guitar sounds thin and needs more body, you can slightly increase the range of frequencies between 200-500Hz, as they add weight to the guitar’s sound if it is too thin.
With a digital mixer, use a bandpass filter and slightly increase the 300Hz frequency. You’ll notice on the mixer’s screen that the adjacent frequencies are also slightly increased below and above 300Hz.
In essence, our center frequency is 300Hz, so by increasing that center frequency a bit, it will also slightly raise the range of frequencies around the center frequency, rounding off the sound, and making it sound fuller.
Doing this with an analog audio mixer is more complex. The reason is that unless you have a 6-knob mixer like the ones used in recording studios, in which you have a low-mids center frequency selector, you most likely won’t be able to pinpoint a specific frequency.
In this case, the best you can do is boost the Low-frequency knob by +2 to +4dB to increase the low-mid frequencies slightly.
Most analog mixers use a shelving filter for the Low and High EQ knobs. A shelving filter is a linear filter that boosts or cuts all frequencies above or below a set cut-off frequency.
In the case of the Yamaha MG16XU, the cut-off frequency for the low-frequency knob is 100Hz. This means that if you increase the low-frequency knob, you’ll increase the gain at frequencies above 100Hz but below 250Hz, which is the starting frequency for the Mid-Frequency selector.
So, by increasing the low-frequency knob slightly, you’ll also increase the frequencies between 100-250Hz.
I know this sounds confusing and could be hard to understand, but with analog mixers, there is no way around this. That’s why digital mixers are more accurate when dealing with EQs.
In summary, for this step, all I am trying to say is that you can turn the low-frequency knob clockwise a bit to gain some of the fundamental frequencies in the guitar by adding some “body” and “weight” to the guitar’s tone.
Related: Guitar Amp Settings for Blues
4. Boost or Cut the “Presence” Frequencies Between 1-3kHz to Get a Clear Tone.
In most cases, the frequencies between 1-3kHz can stay at 0dB, meaning that they are not boosted or cut, and you should get a nice tone.
But if the guitar is piercing through the mix, making an annoying ringing noise, your problematic frequency will likely be 3kHz. If this is the case, cut the 3kHz frequency until the piercing tone disappears.
With a digital mixer, use a bandpass filter with a center frequency set at 3kHz, then decrease that frequency by -2 to -4dB as necessary.
If you lose some brightness, add a high shelf with its starting frequency set at 4kHz. Remember that a shelf filter will linearly increase or decrease all frequencies simultaneously. Increase the high shelf EQ filter by +2dB and adjust it as necessary to add some air and brightness to the guitar’s tone.
If using an analog mixer, as with the previous steps, is less precise than with a digital mixer. Although the High-frequency knob uses a shelf filter, the cut-off is usually set between 8-10kHz. So, if you get a piercing guitar sound, you can lower (counterclockwise) the High-frequency knob by -2dB.
I would start setting the high-frequency knob at 0dB, then adjust it only as necessary. If you need more brightness, increase it by +2dB. Going beyond this point will make the guitar sound harsh.
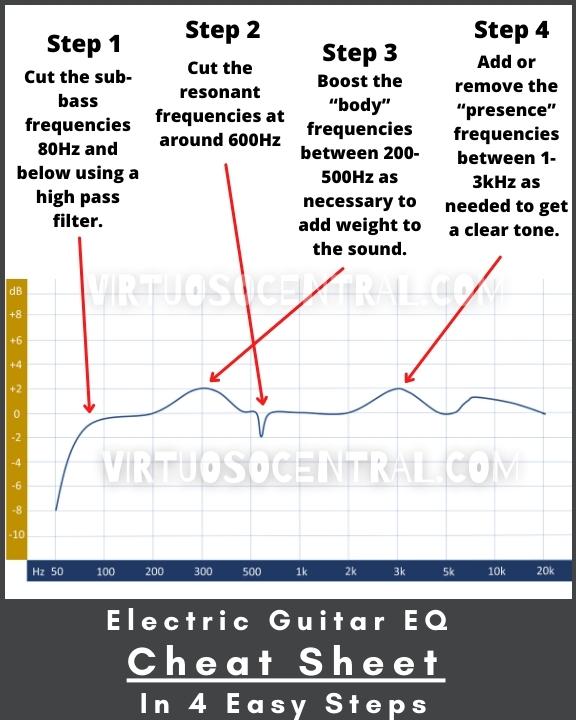
The Cheat sheet below shows these four steps is summary, with a graphical representation of how these settings would look in a digital audio mixer. Use it for your reference, and please remember that this is not an exact science.
When dealing with EQ, you have to make your own adjustments to make things sound good, as many other factors can affect the tone of your guitar.

Related: Guitar Amp Settings for Metal
Conclusion
As a sound engineer or guitarist, knowing how to EQ electric guitar is crucial, whether you are EQing live sound or in the studio. I have shown you four easy steps to equalize the electric guitar and sound good.
These steps work whether you are miking the guitar amp or going straight to the mixer through a DI box.
In summary, to EQ an electric guitar, you must:
- Get rid of the sub-bass frequencies below 80-100Hz using the high-pass filter included with your mixer.
- Cut the resonant frequencies between 400Hz-1kHz, specifically at 600Hz.
- Boost the “body” frequencies between 200-500Hz only if the guitar sounds thin and you want to add more weight to the sound.
- Boost or cut the “presence” or “brightness” frequencies between 1-3khz to get a clear tone.
I hope this article was helpful to you. Visit the site to explore more articles like this one by clicking here. Thank you for reading my blog.