Equalizing acoustic guitars is not very difficult, but it requires trained ears and knowing a few concepts that will get you the best results.
The problem when setting up the EQ for acoustic guitars is that small changes can make a big difference in the overall sound. And if the changes you make are the wrong ones, you can end up with a thin, weak, lifeless sound that just doesn’t cut it.
Here are a few rules for acoustic guitar EQ settings that will help you get the best sound possible:
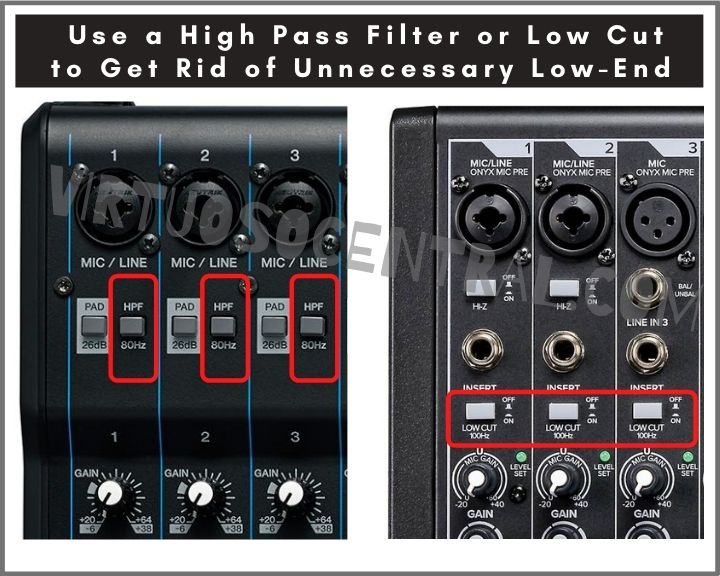
- Get Rid of Unnecessary Low-End by Using a High a Pass Filter
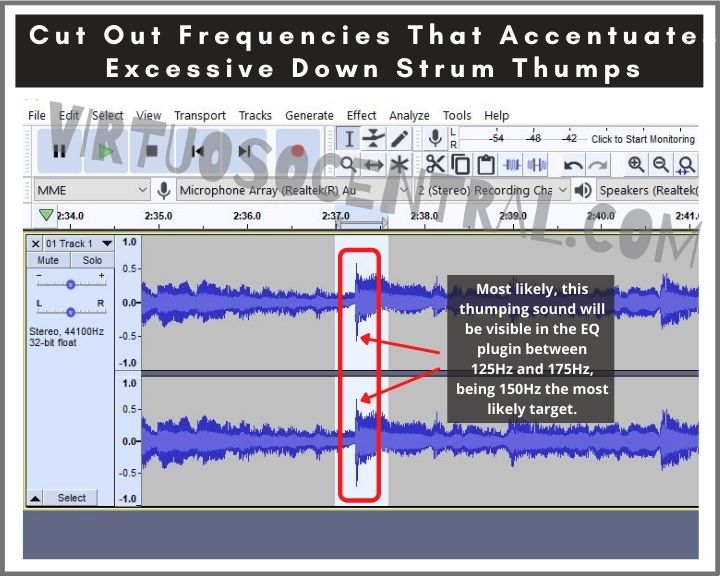
- Cut Out Any Frequencies That Accentuates Excessive Down Strum Thumps
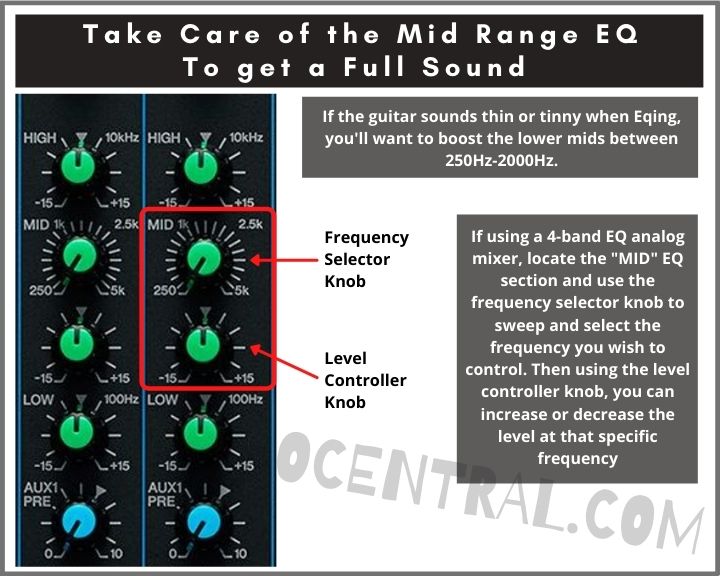
- Take Care of the Mid Range EQ – To Get a Full Sound vs. Thin Sound
- Add Sparkle and Shine in the High Range – “Boost the Air”
In this article, I will show you how to EQ acoustic guitar for recording. Read on to get the most out of your recordings at home.
Dealing With EQ – The Difference in the Studio Vs. Live Performance
If you’re used to playing live gigs with an acoustic guitar, you’ve probably dabbled with the EQ already. Most pickups in acoustic guitar come with basic three-band EQ controls that allow you to modify the highs, mids, and lows. But, when we’re working in a studio setting, you have to go deeper than that.
You’ll need to figure out which specific frequencies are causing issues with your sound and pull them down. On the other hand, you may need to boost different frequencies to get more body or sparkle.
When working on EQ in a studio, you need to either boost or cut frequencies depending on the tone you want to achieve. And in most cases, you don’t need to deal with specific frequencies but rather a range of frequencies that are an integral part of the Highs, Mids, and Lows.
On the other hand, when equalizing an acoustic guitar for live performance, your priority is to make the sound balanced and natural while avoiding feedback.
Remember that when dealing with live sound, in many cases, you need to ring out specific frequencies that can cause feedback, so your job is to avoid losing the fullness of the guitar’s sound while avoiding feedback.
If that sounds a little terrifying, don’t worry. We’ll make what you have to do clear in the following sections of this article.
A Few Things to Consider Before Setting Up Your EQ
Yes, this article is about the best EQ settings for acoustic guitar, but there’s no point trying to get a lousy take to sound good. It just won’t work no matter how many filters, effects, and EQ settings you change. So, you need to set up everything right in the first place.
Here are a few tips you can follow for getting the best raw, natural sound from your acoustic guitar before setting up the EQ for recording:
- Make sure you use the correct microphone placement
- Try different miking techniques using mono or stereo XY configuration until you figure out which works best for you and your guitar.
- If you’re using the built-in pickup, try one take with the onboard EQ set to neutral and one set to how you usually play in a live setting. You can use both to play around when editing in the post-mix to see what sounds better.
- Use open to air mics and a piezo pickup at the same time. Record each on a separate track on your DAW because having the best of both worlds never hurt anybody. You can blend the two or just pick your favorite to work with afterward.
- Practice Until you get it right. EQ can’t be a solution for bad playing. Many professional studios get session musicians to replay parts after the artist leaves. This may not be a luxury you have in your home studio.
Now that we know the basics of getting the best sound from the source let’s dive into how to EQ acoustic guitars when recording in the studio.
1. Get Rid of Unnecessary Low-End by Using a High Pass Filter
Most mixers, even budget-friendly ones, come with a high pass filter. If recording straight to your DAW without going through a mixing console, a high pass filter plugin is usually included in most DAWs. If yours doesn’t have one, there are plenty of free options available for download that do a fine job filtering out unwanted low frequencies.
The purpose of a high pass filter is to cut out any frequencies below a certain point in a recording. The lowest frequency an acoustic guitar in standard tuning creates is around 80Hz. So, anything below 80Hz when setting up your guitar’s EQ should be cut out because it is likely to develop a low-end rumble.
All kinds of things can create sounds below 80Hz when you’re recording. Some examples are air conditioner hum, booming from an unreliable mic or pickup, or rumble inside the guitar itself, which you will want to cut out.
Also, if your acoustic guitar recording exists inside of a band mix, feel free to roll the high pass filter up higher than 80Hz. Other instruments create a more pleasing ambiance with their overtones in that range than acoustic guitars do. You’ll want to give them space in that frequency range so they shine in the mix.
At the very least, you should set the filter to cut out from around 50hz and below. You may not notice much of a difference while listening back on your headphones, but this is a sure-fire way to avoid any issues when listening back to the track later on a system with subwoofers.

2. Cut Out Any Frequencies That Accentuates Excessive Down Strum Thumps
When guitarists are strumming, there is often a push in specific frequencies around 150Hz. That’s not necessarily a bad thing for live performances, nor do you want to remove it from the mix entirely because by doing so, you could get rid of the warmness of the guitar sound.
But, it’s a fantastic idea to soften the impact of the affected frequencies.
You’ll probably notice a spike on the overall track that will make it easy to identify exactly where this is happening. Once you find the spot, listen to it and the surrounding few seconds with the fader of your EQ plugin up and active.
You should see which frequencies spike for that small part of the track. All you have to do is pull each of those frequencies down a little until you get a desirable even tone.
Most likely, this thumping sound will be visible in the EQ plugin between 125Hz and 175Hz, being 150Hz the most likely target.
If you’re having trouble hearing the frequency while looking at the frequency spectrum analyzer, give those frequencies a boost first. This will allow your ear to hone in on the frequency before lowering them to a more neutral position.
You usually only have to do this once and then apply that EQ to the whole track, but sometimes the thumping can be in a slightly different range if the guitarist moves their strumming hand positioning during the recording. So keep that in mind while you analyze the track.
Now, if the guitar is going through a mixer before going through the DAW, you might want to sweep the frequencies between 125Hz and 175Hz until you find the problematic one and slightly lower the level to avoid spikes on the track in the first place.

3. Take Care of the Mid Range EQ To Get a Full Sound Instead of a Thin Sound
If you have a recording that already sounds good right off the bat, you may still have to do a bit of EQ in the lower mid-range frequencies between 250Hz and 2000Hz. You want to pay special attention to this range because the warmness and fullness of the guitar’s sound is here.
Also, by correctly equalizing the mid frequencies on the acoustic guitar will help to clean up the mix, leaving some space for other instruments or vocals as well.
A good rule of thumb is to carefully reduce the 320Hz, 640Hz, and 1.2kHz ranges, as these are positions in which many acoustic guitars give excessive resonance from their fundamental frequencies.
These are also octaves of each other, so if you cut down one, you generally won’t have much to worry about by bringing them all down.
We should mention that this is just an overarching rule that doesn’t apply to every guitar. You may have to play around to figure out the best mid-range acoustic guitar eq settings for your particular instrument.
If your acoustic guitar sounds thin or tinny when EQing, you’ll have to approach the EQ differently. In this case, you’ll want to cut down on the Upper Mids between 3kHz-8kHz, while boosting the lower mids between 250Hz-2000Hz and the bass frequencies around 80Hz-200Hz.
Making those changes will give you more warmth and help avoid disruptive overtones shining through the overall mix from the guitar.
In general, the mid frequencies are often overemphasized in acoustic guitar recordings, so it’s imperative to give them at least a small cut to allow space for the highs and lows to come through more in your track.

4. Add Sparkle and Shine in the High Range – “Boost the Air”
Your basic acoustic guitar EQ settings are all but complete by this time. The track should sound pretty decent. Yet, if you want to add more presence to emphasize the guitar’s clarity and give it a sense of openness, airy and spacious, there’s a simple solution for this.
You just have to boost the frequencies that interact with the strumming noise. For acoustic guitars, this is usually around the 5kHz to 8kHz range. Again, this won’t be the same for every recording or every type of guitar, so you’ll have to take it as it comes and figure out exactly where it is for yourself.
To help you figure out what would work for your specific guitar, try making some changes in the 5kHz to 8kHz range until you hear that it sounds more spacious and open.
Rinse and Repeat
Just like any other part of sound design, you’ll have to practice over and over again to get it right. That includes each individual track.
I’d recommend you save your first EQ edit in a separate folder, take and break, then start from scratch a second time.
Once you’ve finished the second attempt, compare and contrast what you’ve done. Which sounds better? What did you do differently? Could you take ideas from both and make a third mix even better? Remember that practice makes perfect.
Moving Forward with Your Learning
Now that you know the basics of how to eq acoustic guitar for recording, you’ll need to learn more about EQ as a whole, how instruments interact with each other, and tackling live sound. Lucky for you, we have plenty of articles covering these topics, such as: