When setting up a PA system, sometimes it’s necessary to daisy chain active speakers if you want to have several loudspeakers produce sound with the same input signal.
For instance, this method applies if you need to distribute more than one monitor on stage or if you need to extend the number of active speakers and subwoofers throughout the venue for better sound dispersion.
In this article, I will explain how to daisy chain active speakers so that you can easily set up a PA system with several loudspeakers. I have also included a diagram showing the signal flow when daisy-chaining powered speakers for your reference. Let’s get started.
How to Daisy Chain Speakers – A Straightforward Process
Daisy-chaining powered speakers is a straightforward process. All you have to do is locate the correct connectors at the back of the speakers then run signal cables between them.
Most active or powered speakers have one or more “Input” plugs. Usually XLR or ¼” phone jacks. They also come with a connector labeled “Thru,” “Mix Output,” or “Link Output.” This connector is the one that we need to use for daisy chain speakers.
Internally the active speaker has electronic circuitry that takes the incoming signal and distributes it to the internal amplifier as well as to the “Thru” or “Mix Output” connector without audio loss.
Steps for Daisy Chain Active Speakers
- Before connecting any cables to the speakers, first, position them where you need them in the venue. Additionally, set up the monitors you want to daisy chain in the stage.
- Make sure everything is in the “Off” position before starting the setup.
- Locate your main speakers and run cables from the “Main Output” of the mixer to them.
- At this point, you should have the “Left” and “Right” speakers connected to the mixer.
- Starting with the “Left-side” speaker, find in the back the “Thru,” “Mix Output,” or “Link Output” connection.
- Run a cable (usually an XLR) from the “Thru” connector to the “Input” of the next speaker in the left-side chain.
- Next, locate the “Right” speaker and run a cable from the “Thru” connector to the “Input” of the next speaker on the right-side chain of speakers.
- Repeat steps 6 and 7 for the number of speakers you want to have on each side. You can run as many speakers as you want, as long as the cable runs are not too long to avoid picking up “Hum” noise.
- Set the “Volume” knob of each speaker to the “exact” same level. If your speakers have an equalizer, make sure to set the EQ to precisely the same value on all of the speakers to avoid unbalanced tones in the sound. (I am assuming that all of the speakers are of the same brand and model)
- After everything is connected, turn the power “On” and play music to test and make sure that it sounds the way you want. Make the necessary adjustments until you get a clean, balanced stereo sound.
These procedures also apply for daisy chain monitors on stage. If you want a more detailed explanation of how to set up stage monitors, click on the link as I have dedicated a full article to explain it.
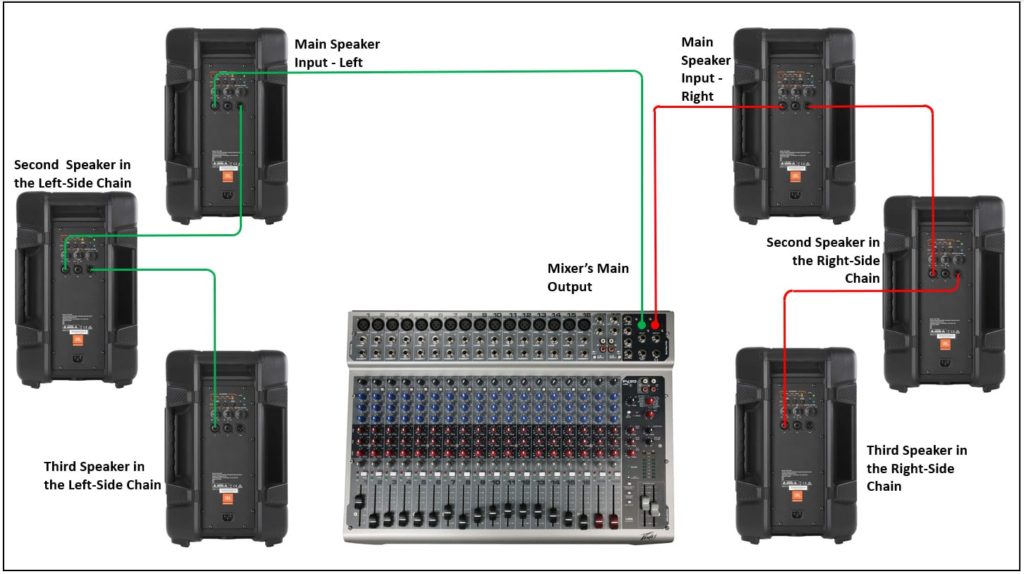
Daisy Chain Powered Speakers Diagram
The following is a diagram to help explain the steps mentioned above visually for easier understanding.

READ: How to Set Up a Stage Sound System
Daisy Chain Powered Subwoofers
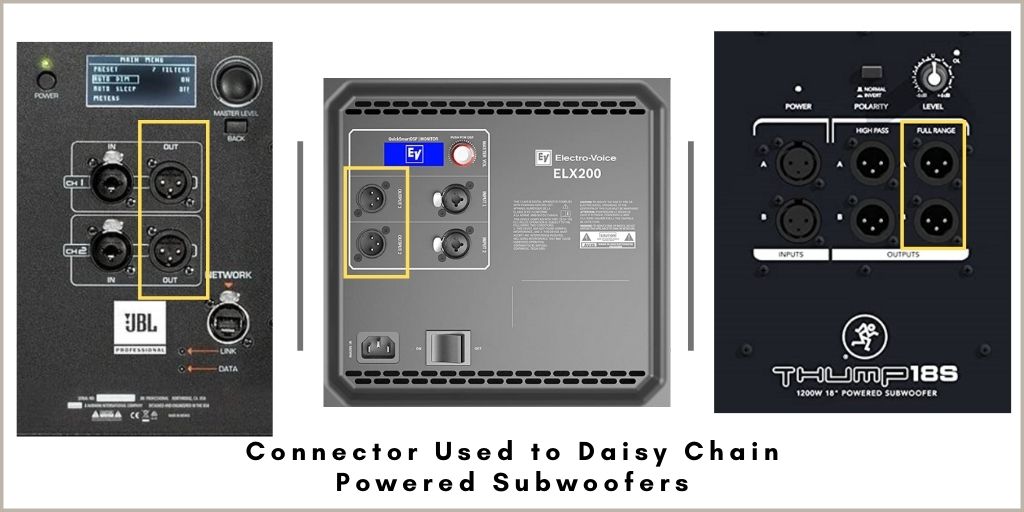
Just as active speakers have a connection for daisy-chaining several of them together, powered subwoofers do as well. The principle is the same, a signal coming from the mixer, crossover, or speaker management system is looped out for connecting another device. That way, you can produce sound with the same original signal coming from the mixing console.
The image below shows you a few examples of the back of several powered subwoofers so that you have an idea of what connectors to look for to daisy chain several units.

Steps for Daisy Chain Powered Subwoofers
- As always, I recommend making sure that everything is in the “Off” position, to avoid any damage while connecting.
- Place the subwoofers in the correct position where you need them in the venue.
- If you are using the “Aux Send” on your mixer for sending the audio signal to the subwoofer, run a cable from the “Aux Send” connector to the “Input” of the subwoofer. If instead, you are using a PA management system or crossover, connect a cable from that device to the sub’s “Input.”
- Just as with active speakers, locate the connector labeled “Thru” or “Output” and run another cable to the “Input of the next subwoofer in the chain.
- Repeat the procedure for the number of subwoofers you want to daisy chain.
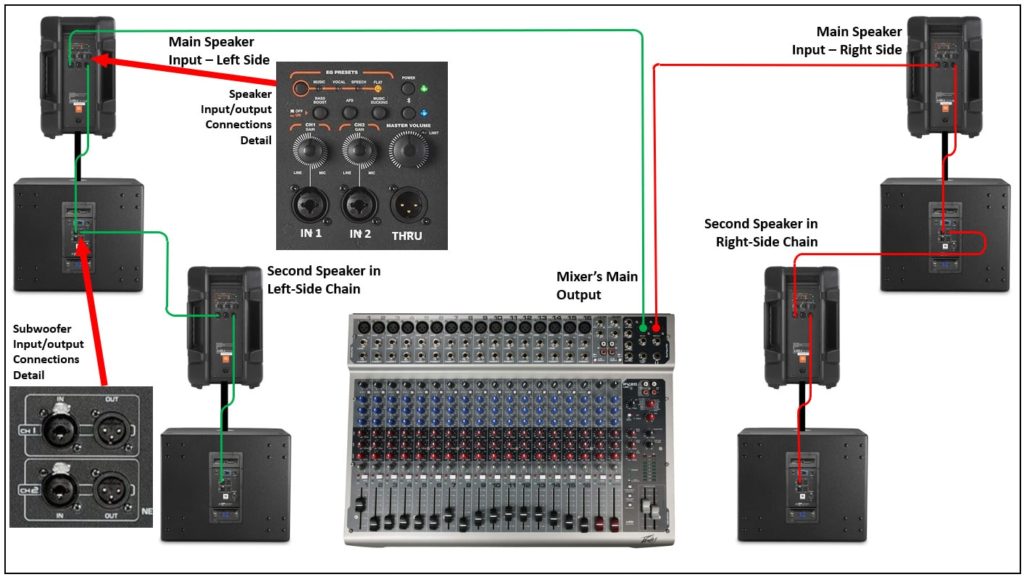
It is common to see powered speakers, also called “tops” as part of a speaker/subwoofer combo. Most speaker brands offer companion subwoofer that you can get for a more straightforward setup and better tonal balance.
If that’s the case, the setup would similar as if you where connecting only powered speakers with the only difference that a signal path must be provided to the subwoofer to work.
Please refer to the image below to follow the signal flow on how to daisy chain several speaker/subwoofer combos.

READ: Best PA Systems For Live Bands
How Many Speakers Can I Daisy Chain Together
As long as the speakers are active, meaning that they have an internal amplifier and have the input and output connections to do so, you can daisy chain as many speakers as you want together.
If instead, you have passive speakers, meaning that they need external amplifiers to function, you would have to know the impedance of your amp.
Final Thoughts
In this article, I explained how to daisy chain active speakers, as well as daisy chain powered subwoofers. With the step-by-step procedure and the included connection diagrams, you should be able to daisy chain any powered PA speaker system. This enables you to increase the size of your PA system set up for any of your events.