So, you have a microphone with an XLR connector and want to connect it to the computer, but you are not sure how to do so? In this post, I will present three methods that explain step by step how to connect an XLR microphone to a computer.
Whether it is a dynamic or condenser mic, you will be able to use it with your computer to record, stream, or simply get better audio with your Zoom or Skype calls.
A Couple of Things to Consider Before We Start
Connecting an XLR microphone to a computer is not as simple as attaching a cable from the mic to the PC’s 3.5mm mic/headset input.
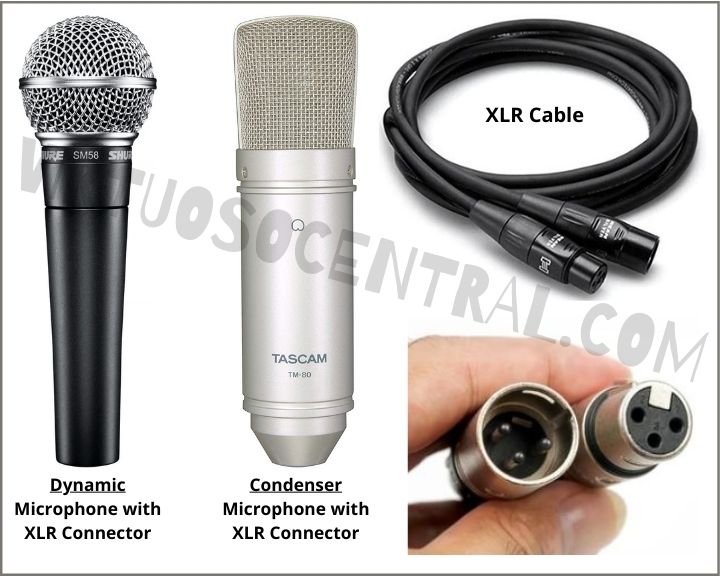
First, you will need to figure out if the mic is a condenser or dynamic. Condenser microphones are commonly used in professional and home recording studios. They have a wide frequency range and are known for being very sensitive in picking even the most subtle nuances in sound. This means they will pick up clearer, more precise audio with greater volume depths.
Dynamic mics are the ones you have most likely seen used with PA systems or in karaoke bars. This, however, does not mean it is a cheap or low-quality choice. Dynamic microphones are highly versatile and can deliver excellent results.

It is essential to know that condenser microphones need a +48V DC voltage called phantom power to work. Your PC by itself doesn’t provide this voltage, but in this post, I will show you what you need to make it work with your computer.
Instead, if it is a dynamic mic, in most cases, the audio signal level coming out of it is very low, and it needs to be boosted before the computer can appropriately use it.
Taking these details into consideration, the three methods for connecting an XLR mic to a computer, whether it is a condenser or dynamic, are:
- Using an XLR-to-USB Signal Adapter
- With the use of an audio interface
- Using a USB to XLR microphone cable converter – This method works only with dynamic microphones
1. Using an XLR-to-USB Signal Adapter
Using an XLR to USB signal adapter to connect a microphone to a computer is one of the easiest ways to do so. These devices are plug-and-play, so they don’t require drivers to work. All you have to do is connect the mic to the adapter, then connect the adapter to the computer.
An excellent feature of these types of adapters is that they have phantom power, which means that you can use them to connect condenser microphones as well. They also come with an integrated preamp with gain controls to adjust the signal strength. This feature comes in handy when connecting dynamic microphones such as the Shure SM58 or the SM7B, as they need a preamp to increase the signal strength to line level.
The monitor mix controls the blending of the mic’s signal and playback audio, which comes in handy when recording with backing tracks.
Basically, the XLR to USB signal adapter works as a simple one-channel audio interface with basic controls. But don’t get fooled by its simplicity, it gets the job done, and it does it well.
Here are the best two XLR to USB signal adapters (links to Amazon):
These are the steps you need to follow to connect an XLR mic to a PC using a USB signal adapter:
- Connect one side of the included USB cable to the signal adapter and the other side to the computer’s USB port.
- After a few seconds, you should see a pop-up message on your computer saying the connected device is installed and ready to use.
- Using an XLR microphone cable, connect the female connector to the microphone, and the male connector to the adapter. I recommend using a long enough cable so that the USB signal adapter stays close to the computer in a safe area. Don’t place it on the floor to not step onto it. Here are a few suggestions for 6ft, 10ft, and 15ft XLR cables.
- If your mic is a condenser, turn on the +48V phantom power switch to provide power to the microphone.
- At this point, right-click the speaker icon on the lower right corner of your Windows PC, and click on “Open Sound Settings.”
- On the new window that opens, under “Input – Choose your input Device,” click on the drop-down menu to select the signal adapter as your input device.
- Next, open the software or application where you want to use the XLR microphone to run a test. If you speak or sing onto the mic and don’t see the signal level on the screen, you might have to go into the software settings and select the USB adapter as your input device.
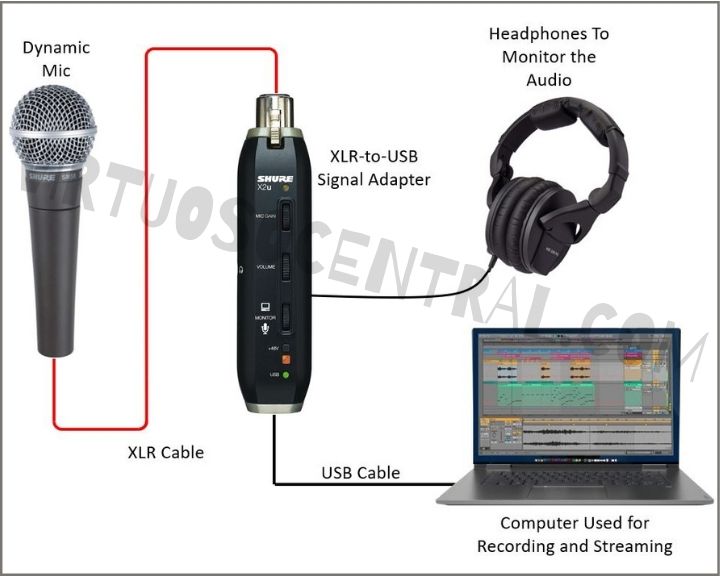
The following diagram provides visual representations of the connections you need to make for connecting either a dynamic or condenser microphone with an XLR connector to your computer using a USB signal adapter.

If you only need to connect an XLR mic to a computer for recording vocals or use it for streaming, this works perfectly well. The only downside is that you can only connect one channel to the computer, and with a few more bucks, you could get an audio interface with at least two channels with gives you more flexibility.
2. Connect an XLR Mic to a PC Using an Audio Interface
The best way to connect an XLR microphone to a Windows or Mac PC is to use an audio interface. This device takes the analog XLR signal from the microphone and converts it to a stream of digital bits to be used by the computer to stream it, record it, or use it in a video conference.
Using an audio interface will give some advantages over other methods because it comes bundled with software you can install and use to do many things, including edit and add sound effects to your voice and instruments.
Plus, most of them come with at least two input channels which you can use to connect another microphone or a musical instrument if you choose to do so.
An audio interface can be used to connect condenser and dynamic microphones. Thanks to its phantom power, preamp, gain controls, and monitoring capabilities, you can set up a simple yet powerful home recording studio with the bundled software.
Click the link for a list of the best audio interfaces available in the market today that will have you recording or streaming using your XLR microphone in no time. The list provides different price ranges you can choose from depending on your budget.
The following steps show you how to connect an XLR mic to a PC using an audio interface:
- The first thing to do is connect the power supply to the audio interface. Keep in mind that newer model interfaces don’t use a power adapter because they are powered from the USB-C or Thunderbolt port.
- Connect the USB cable to the computer. If your interface gets its power from the USB port, it also uses the same port for sending and receiving data.
- After a few seconds, you should see a pop-up message on your computer saying that the connected device is installed and ready to use. If you get an error message, don’t worry. All you have to do is go to the manufacturer’s website to download and install the necessary drivers for your specific model.
- Using an XLR microphone cable, connect the female connector to the mic and the male connector to one of the audio interface inputs.
- If you are using a condenser mic, turn on the +48V phantom power switch to power up the mic.
- Next, right-click the speaker icon on the lower right corner of your Windows PC, and click on “Open Sound Settings.”
- On the new window that opens, under “Output – Choose your output Device,” click on the drop-down menu and select the audio interface as your output device. This will enable you to monitor your recording using a pair of headphones.
- Now look for “Input – Choose your input Device,” click on the drop-down menu, and select the audio interface as your input device.
- Increase the gain until you see a healthy signal level under the “Test your microphone.” Make sure it doesn’t go beyond 75%. That way, your audio signal will sound clean and distortion-free.
- Next, open the software or application where you want to use the XLR microphone to run a test. If you speak or sing onto the mic and don’t see the signal level on the screen, you might have to go into the software settings and select the USB adapter as your input device.
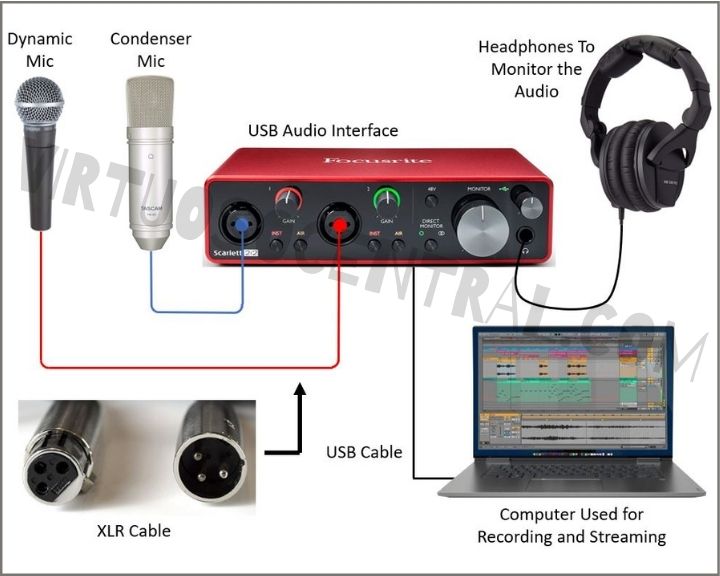
The diagram below provides visual representations of the connections you need to make to connect an XLR mic to a pc using an audio interface.
This setup works for dynamic mics such as the world-famous Shure SM58 or any XLR condenser microphone as well. Plus, you could connect another mic or an instrument with the extra available channel if you prefer.

3. Connect a Dynamic Mic to PC Using a USB to XLR Microphone Cable Converter
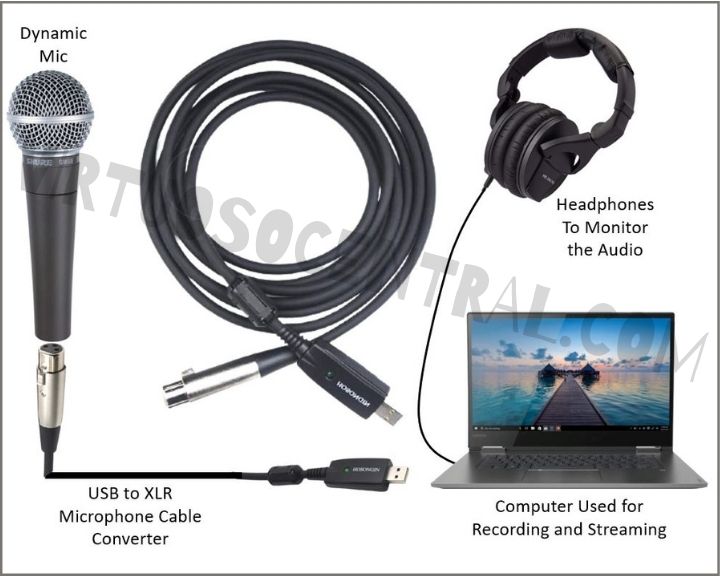
By far, the easiest and most cost-effective way of connecting a dynamic mic to a PC is by using a USB microphone cable link. This is basically a cable with a female XLR connector on one side, and on the other side, it has a USB port.
The USB is not just a regular port. Inside it has a small analog to digital converter that acts as a sound card when connected to the computer. The small circuit is powered from the USB port, takes the analog signal from the mic, boosts it, converts it to digital, and feeds it to the USB data bus.
The USB mic cable is plug-and-play and supports USB 2.0/1.1; no driver or software installation is required. It is as simple as connecting the XLR connector to the dynamic mic and the USB port to the computer.
Here are a couple of suggestions if you would like to go this route (links to Amazon):
Please Note: USB microphone cables don’t work with condenser microphones because they don’t provide phantom power to energize the mic. If you have an XLR condenser mic and want to connect it to a computer, please use any of the two aforementioned methods.
Here are the steps to connect a dynamic mic to a pc using a USB microphone cable link:
- Connect the female XLR connector to the dynamic microphone.
- Next, connect the USB port to the computer.
- As this is a plug-and-play device, you should see a pop-up message on your computer after a few seconds saying the device is installed and ready to use.
- Right-click the speaker icon on the lower right corner of your Windows PC, and click on “Open Sound Settings.”
- On the new window that opens, under “Input – Choose your input Device,” click on the drop-down menu and select the USB mic cable as your input device.
- Next, run a test on the software or app where you want to use your mic.

Final Thoughts
Connecting an XLR mic to a pc, whether it is a dynamic or condenser microphone, is a simple process if you have the right tools. In this post, I have presented three easy ways to do so.
Choose the one that is more practical to you. With that said, my recommendation is to use an audio interface because it is more flexible. Plus, you get added benefits with the included software.
If you need to connect another mic or instrument later on, you can because it has two input channels. Additionally, you can use a pair of headphones to monitor your voice.
Explore our site for more articles like this one. Thank you for reading this blog.