If you are in the recording or live performance business, chances are you’ve worked with a mixer. But sometimes mixers don’t have enough inputs, leaving you in a bind.
Often, doubling up on microphones and inputs does not work when you have, for example, multiple vocalists who cannot share a microphone. So, you need a way to expand your current mixer’s capabilities.
Luckily, there are several ways to connect two mixers together to give you all the inputs you need to finish the show or recording session.
Here are the top 4 methods you can use to connect two mixers together:
- Using a Stereo Pair Input on the Main Mixer
- Connecting to Line-Level Inputs
- Using the Effects Return
- Using the Tape-In or 2-Track Input on the Main Mixer
Keep reading if you want to learn more about each of these four methods in this complete guide we’ve put together. Let’s get started!
Main Reasons to Connect Two Mixers Together
There are several reasons why you would consider connecting two mixers together, whether it is a live set up or in the recording studio.
This article will focus on the two main reasons: running out of input channels on the main mixer and sending an audio signal from one location to another.
1. Running Out of Input Channels on the Main Mixer
Let’s say, for example, your mixer has eight channels. But the band has a full drum kit, two guitars, a bass, a keyboardist, and two vocalists.
You can guess that those inputs will get used up really quickly, probably before you can even plug in the keys or the guitar amps. Being able to connect to another mixer gives you more channels to work with.
2. Sending an Audio Signal from One Location to Another
An example of this is if a band brings their own mixer. This happens a lot if a band is mixing their own in-ear or wedge monitors. Their instruments and microphones will all be hooked up to their own on-stage mixer.
In order to run the band’s sound through the main PA system, you will need to be able to connect their mixer to yours.
Regardless of the reason, the mechanics to connect two mixers together are the same. The route you take just depends on your specific scenario.
The Basics of How to Connect Two Mixers Together
Before we get into the weeds of connecting two mixers, we should lay out the intention behind it.
This article will refer to the second mixer as the “sub-mixer.” Meaning that it is sending all its signals to one or two channels on your main mixer.
The sub-mixer could be used, for example, to mic up a complete drum kit if it has eight inputs, which gives you plenty of microphones to use on a full kit.
You will then be mixing the kit on the sub-mixer to control the EQ and levels. After the sub-mixer mix sounds good, you will be sending that to one or two channels on the main mixer.
That way, your main mixer inputs are not getting eaten up by eight drum microphones. If it also has eight inputs, that leaves you six or seven for your other instruments and vocalists.
This also gives you an advantage of controlling the drums (or whatever is on the sub-mixer) as its own separate group in the mix, with one fader. Very convenient for recording or live shows!
A Few Things to Consider
Before you start plugging in cables, there are a few things that you need to take into consideration when you connect two mixers together.
Is There a Snake in The Signal Chain?
Not the reptile kind of snake, but a stage snake. An audio snake is an input box on the stage that allows you to run a single cable from the stage to the main mixer instead of a spaghetti bowl of XLR and 1/4″ cables.
If there is a snake in your PA set up, you will have to route it to one of the mixers. It does not change the number of inputs, but it does make connecting to the stage much simpler.
For example, let’s say you have a 16-channel snake. You can use the first eight channels for mics, guitars, keyboards, and the other eight channels for miking the drum set.
In a case like this, you would connect channels 1-8 to the main mixer and 9-16 to the sub-mixer. Then you would connect the sub-mixer to the main mixer, and you would have your full set up ready to go.
Types of Cables You Need to Make the Connection
There are two primary types of cables in the audio world that we use to connect two mixers together.
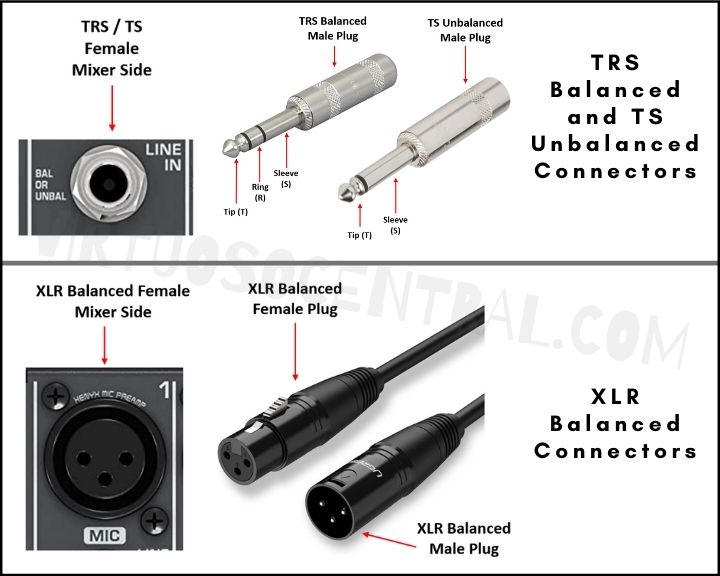
The first is balanced cables. The most recognizable is the XLR or microphone cable.
There are also 1/4″ TRS (tip-ring-sleeve) cables that can be used for the same purpose, for jacks that are not XLR connectors.
Balanced cables have three wires inside: a tip, a sleeve, and a ring. This “grounds” the signal, ensuring it stays pristine and clear over long distances.
On the other hand, unbalanced cables only carry two wires: the tip and the sleeve. This leaves the signal ungrounded (hence, unbalanced).
These are not ideal for sending audio over long distances, as the signal will degrade and be subject to interference from radio frequencies and dirty power.
If you plan to connect two mixers together, make sure that you are using balanced cables whenever possible. Unbalanced will work in a quick pinch, but they are intended more for instruments such as guitars into amplifiers.
To sum it up: if your mixer outputs have 1/4″ jacks, use TRS 1/4″ cables. If they have XLR jacks, use XLR cables.
Line-Level Vs. Mic-Level Input – Which One Should You Use?
Many mixers will have the option of a line-level or microphone-level input on their channels via a switch or toggle.
A line-level input is a hot signal that is sent from a mixer or instruments such as synthesizers.
A microphone-level or instrument-level input is a lower-level signal. These generally have less volume or gain to not feedback on the PA system.
When you connect your sub-mixer, you will want to use the line-level input on your main mixer. This gives you a hot signal that will be easier to work within your main mix.
If you use an instrument/mic-level input, you will need to be careful not to clip the signal due to higher gains present on these input channels. In such a case, you need to bring the gain down and make sure you leave enough headroom for the loudest parts of the presentation.
Figure Out If You Need a Mono or Stereo Signal
A mono signal will be more than sufficient in most live sound circumstances. This only uses up one input on your main mixer.
However, if you are using effects or want a stereo mix for recording, you will have to send two outputs from your sub-mixer into two inputs on your main mixer.
If you want to get really fancy with it, you can do a full stereo mix with your sub-mixer, panning instruments, or microphones however you want. This will be preserved if you hard-pan your main outputs on the sub-mixer.
Let’s use the drums as an example again. Say you want your kick and snare in the center, your toms panning towards the right, and your overhead cymbal mics hard-panned left and right.
You will need to mix the drum kit like this on your sub-mixer, panning the microphones appropriately.
As you send your stereo outputs, make sure to hard-pan the left and right 100% clockwise and counterclockwise, respectively.
When you plug those sub-mixer outputs into your main mixer, you will then need to hard-pan the left and right channels again on the input channels.
This also applies to the final output stage of your main mixer. Hard panning left, and right makes sure that the signals go in the direction they need to go. Leaving the knobs at the center creates a mono audio image.
Choose Which Output You Will Use on the Sub-Mixer
Some mixers can send outputs from each channel directly. This is not ideal for these situations, as it will still take up the same number of channels on your main mixer.
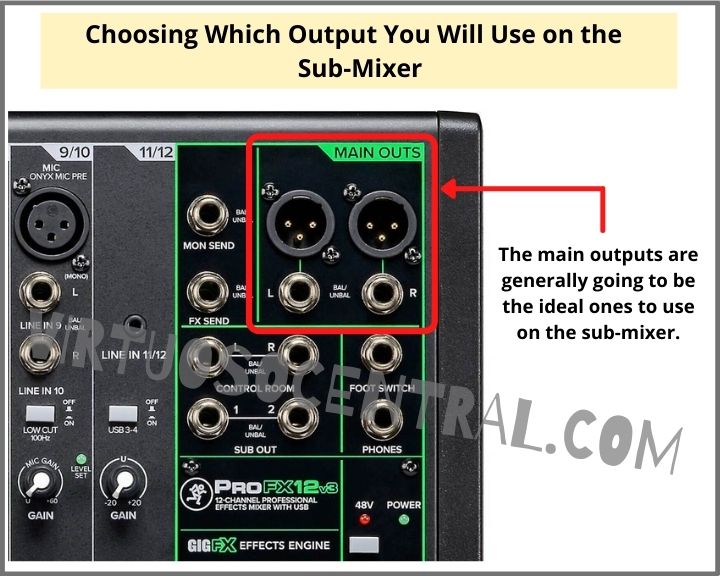
Most mixers can also send a sub-mix out. If you are using the sub-mixer on stage for a band’s monitors, you will need to decide whether to use the sub-mix or the main outputs.
The main outputs will generally be the ideal ones to use on the sub-mixer. They have balanced outputs and will “sum up” the rest of the inputs and send them out as a group to the main mixer.
Choose Which Input Channels You Will Use on the Main Mixer
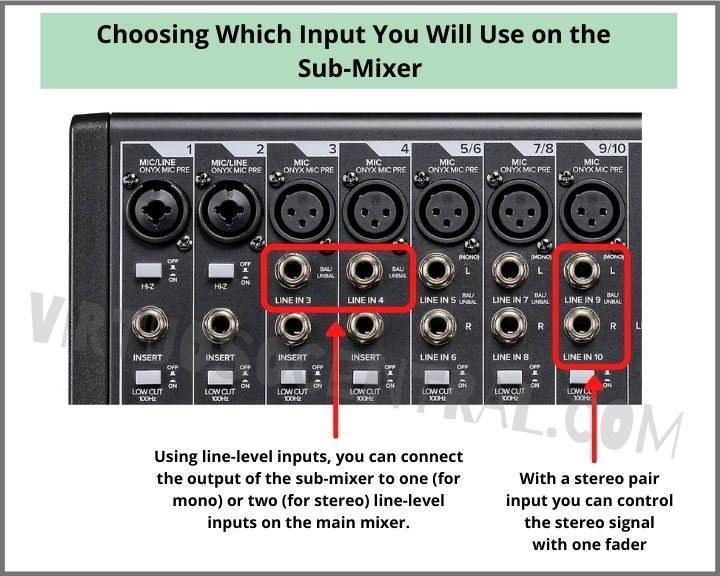
This comes down to personal preference and workflow. Generally, it’s easier to just use the first or last input channels on the main mixer.
That way, the sub-mixer channel is not stuck in the middle of your other channels, leading to confusion.
Keep the input channels together if you are running stereo inputs from a sub-mixer. It will save you a lot of headaches down the road and make getting the volumes and EQ to match much easier.
Four Simple Methods to Connect Two Mixers Together
Now that you’ve learned the ins and outs of using a sub-mixer and the main mixer together let’s talk about connecting them.
We touched on this briefly in the previous section, but let’s look at the four easiest ways to connect two mixers together.
1. Using a Stereo Pair Input on the Main Mixer
This is the most straightforward method to connect two mixers if you are using stereo mode.
In this case, you will be using the unbalanced main stereo output on the sub-mixer and a stereo pair input on the main mixer.
As stated before, most mixers will use XLR outbound connectors for their main stereo outputs. These would typically run out to the PA speakers, but in this case, we are going to use the main output TS/TRS female connectors.
Use this method if both mixers are close to each other. For long runs, please refer to the last section of this article that explains how to connect two mixing consoles together if they are far from each other using a long cable.
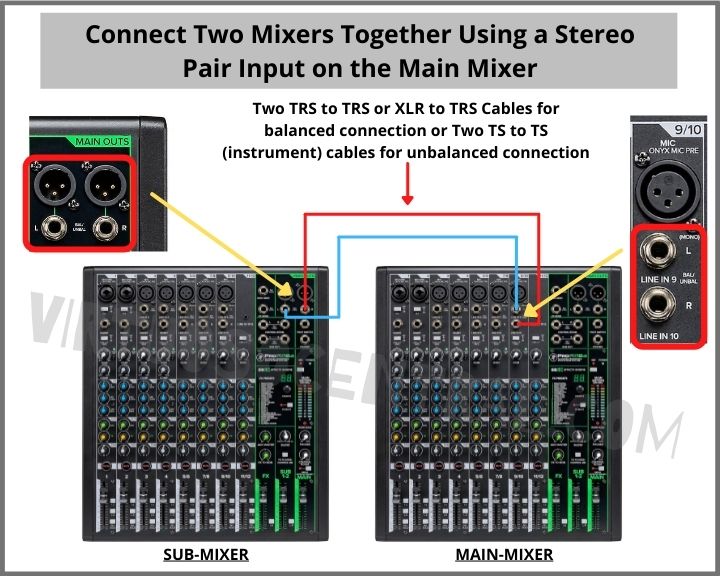
You’ll need two Male to Male TS cables for this connection. These cables are also known as instrument cables.
You’ll connect two male TS cables to the stereo out on the sub-mixer. Then, connect the other end of the wires to a stereo pair input on the main mixer.
Stereo pair input channels are usually the last two or four channels in a mixer. They are typically labeled 9/10, 11/12, etc., meaning that they are stereo pair inputs that are controlled by a single fader.
Then all you need to do is adjust the levels and EQs. The advantage of using this method is that you can control the stereo signal coming from the sub-mixer with one fader, making it much easier to have control over your mix.
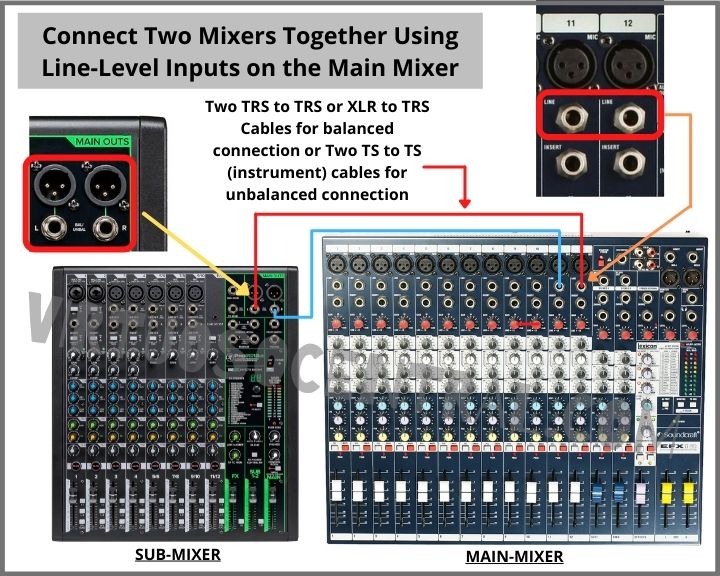
2. Connecting to Line-Level Inputs on the Main Mixer
This method works for mono or stereo signals. It is the same, in principle, as the method above, except you are connecting the output of the sub-mixer to one (for mono) or two (for stereo) line-level inputs on the main mixer.
If choosing this method, you need to decide if you need a mono or stereo signal. If you choose mono, all you need to do is bring one output from the sub-mixer and connect it to a line-level input making sure that the PAN is set to the center. That way, the audio signal is mirrored on both channels simultaneously.
If you decide to go with a stereo signal, you need to connect the left output from the sub-mixer to one channel, then pan it left. Next, take the right output from the sub-mixer, connect it to the following input channel, and pan it to the right.
Then all you have to do is adjust the levels and EQs of both channels to match each other. Make sure that one is not louder than the other, or your stereo image will be off.
This way, you can control the stereo signal coming from the sub-mixer using two faders.
Remember to use either an XLR or a TRS balanced cable to connect the mixers together. If one or both of your mixers only has a 1/4″ jack out, make sure you are still using a balanced cable.
3. Using the Effects Return on the Main Mixer
This is a bit more “advanced” of a trick and is best if your main mixer does not have a lot of inputs to work with. Also, not all mixers have an effects return. But if they do, it can free up even more channels for your main mixer.
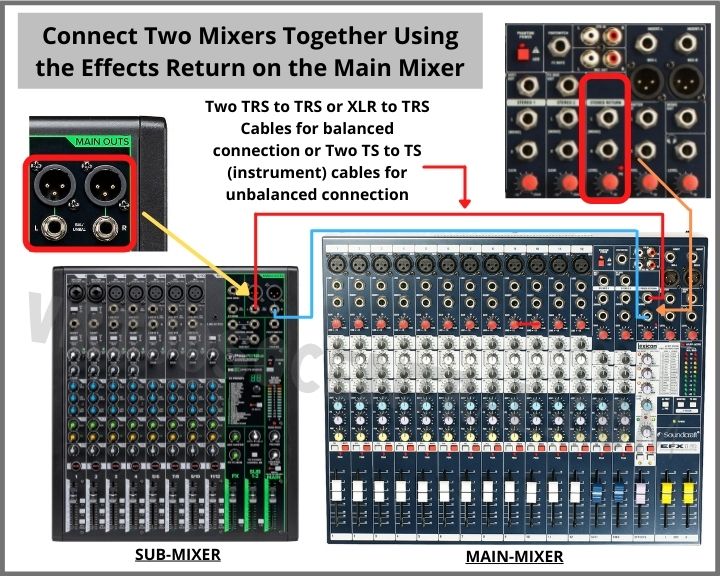
In this case, you will be using the main stereo output on the sub-mixer and the effects return on the main mixer.
The principle of the “Effects Return” on a mixer is to send a signal from the mixing console to outboard effects, such as a reverb or delay unit. This is useful for live vocals and instruments to give it space.
The signal is returned from those outboard effects, back into the board, and given its own “channel.”
If you connect the outputs of your sub-mixer to the effects return inputs on your main mixer, you can effectively use the effects return “channel” as another input.
If your main mixer has an effects return, it should also have a separate fader or knob to control the levels of the mix.
This can be done in mono or stereo, as a mixer with an effects return will have stereo ins and outs.
The only real downside to this method is that you cannot use outboard effects on your main mixer, and you won’t have EQ on that channel.
So plan carefully if you need to connect two mixers together using this method. Only use this technique if you can’t use methods 1 and 2.
4. Using the Tape-In or 2-Track Connector on the Main Mixer
The last method you can use to connect two mixers is using the tape-in connector.
The tape-in connection, also known as the 2-Track input, is usually found in older mixing boards, and it is intended for connecting devices with RCA outputs such as tape players, CD players, MP3 players, etc.
Please keep in mind that this is not the best option because you will have limited control over the signal that is coming from the sub-mixer. Basically, the only control you’ll have is volume.
I decided to include this method in this article so that you have all the options available. That way, you can choose the one that is right for you.
Another thing you need to know is that the tape-in connection is not a balanced signal, so you will need to use an unbalanced output in the sub-mixer.
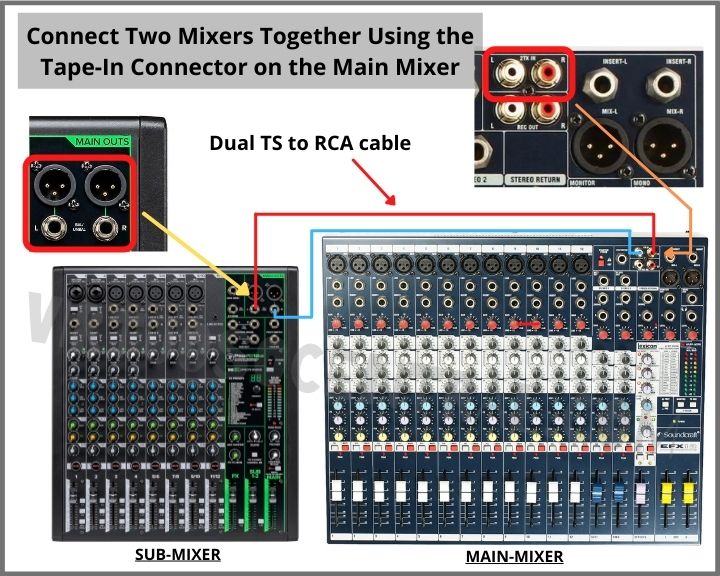
To make this connection, you need a dual TS to RCA cable. Then you need to locate a TS output connector on the sub-mixer. The best one to use is the unbalanced main output, usually located next to or below the main XLR connectors.
Plug the TS cable to the left and right channels, respectively, and connect the other side of the cable to the RCA Tape-In input on the main mixer.
Set the volume and signal levels in the sub-mixer, then use the tape-in volume knob to control the gain of the signal.
The tape-in signal goes straight to the main bus in the mixer, meaning that you can’t EQ it, use compression, effects, or any other tool with it. This is why I don’t recommend using this method to connect two mixer boards together.
Use this method only if there are no other channels available on the main mixer or you are in a real pinch.
How to Connect Two Mixers Together If They Are Far From Each Other – Pro Tip
If your mixers are going to be a long way away from each other, for example, from the main stage or pulpit to the sound booth all the way in the back, you will need a way to connect them.
With balanced XLR cables, this is not a problem at all. You can chain XLR cables together and go up to 200 feet with no signal loss or degradation.
You can use TRS or unbalanced cables if you don’t have XLR output available; however, this becomes a bit trickier, as they cannot simply snap together. And unbalanced cables introduce more noise the longer they get.
If you find yourself in this situation, invest in a stereo DI box. There is a wide range of DI box prices and features, but even a basic passive DI box will help solve your long cable run issues.
Something like the Radial ProD2 will work perfectly well, and it has two channels you can use to send a stereo signal.
In case you don’t know, DI stands for direct injection and is meant to take an unbalanced 1/4″ input and convert it to a balanced XLR output.
It will work fine with balanced cables as well. That way, you can send the signal through long runs without worrying about noise and signal degradation. To learn more about DI boxes, click this link.
Mixer Connection Methods, Demystified
Regardless of the method you choose to connect two mixers together, make sure that your audio gear is high-quality. This includes the mixers, cables, DI boxes, and whatever else you are using in your signal chain.
For more audio engineering tips and tricks, make sure to check out the rest of our informative blog articles.