There are three ways of connecting a microphone to a laptop for recording. Each depends on the type of recording you want to do and your budget. If you want to record your voice for a podcast or as a solo singer using backing tracks, then your setup would be different than a soloist guitarist or a small band that has more than one instrument.
The three ways of connecting a microphone to a laptop for recording are:
- Using a USB Microphone
- With an audio interface
- Using a regular mixer with USB connectivity.
First Option: Using a USB capable Microphone
This is the easiest and most cost-effective way of capturing audio and recording it in a laptop, but it also is the option that has more limitations. First, you need to know what are you trying to accomplish.
If all you need is to record spoken word for a podcast or capture your voice as a solo singer using backing tracks, then this is your best option.
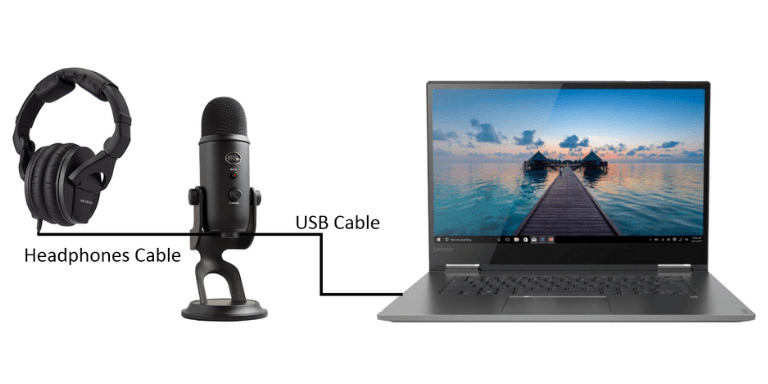
Nowadays there are some awesome USB microphones that provide all the controls and features to achieve this. For example, the YETI from Blue Microphones provides an output to connect headphones with volume control so that you can monitor what you are recording while performing the recording.
Another great feature is the different pickup patterns it provides. It offers cardioid, Omnidirectional, bidirectional, and stereo pickup providing incredible flexibility, allowing you to record in ways that would normally require multiple microphones and input channels. It also includes a gain control knob to set the appropriate gain needed for your recording.
Here are some other popular USB microphones that can be used for recording in your laptop: Rode NT-USB, Samson G-Track Pro, TONOR Q9 USB Microphone.
In most cases, as soon as you connect the microphone to the laptop, it will automatically install the drivers and your computer will detect the microphone. In some limited cases, you would have to download the driver from the manufacturer’s website, but most modern mics like the ones mentioned above, automatically install the drivers.
Another important tool you need for recording is a recording application software. There are many options either paid or free. Apple computers include Garage Band which can be used for recording and capturing audio.
If you are a Windows or Linux user, there is an excellent completely free software called Audacity this is the link to the Audacity website. This software easy to use, plus there are tons of tutorials on YouTube that teach you the ins and outs of the program.
Diagram for Connecting a USB Mic to your Laptop for Recording

Second Option: Using an Audio Interface
This option assumes that you already have a microphone either dynamic or condenser with an XLR cable, but have no way to connect it to your computer.
In simple terms, an audio interface is a hardware device that connects to your computer via USB cable and allows audio connections such as microphones, or musical instruments. Then transforms the analog signal into a digital signal than can be recorded by your computer.
Audio interfaces expand the capabilities of your computer to be able to handle a stream of signals. They can be single-channel or multi-channel interfaces.
If you are a singer and instrument player who wants to record your music but don’t have the knowledge or budget to build a home recording studio, all you need is your laptop, an audio interface, and a microphone with its cable to be able to create beautiful recordings.
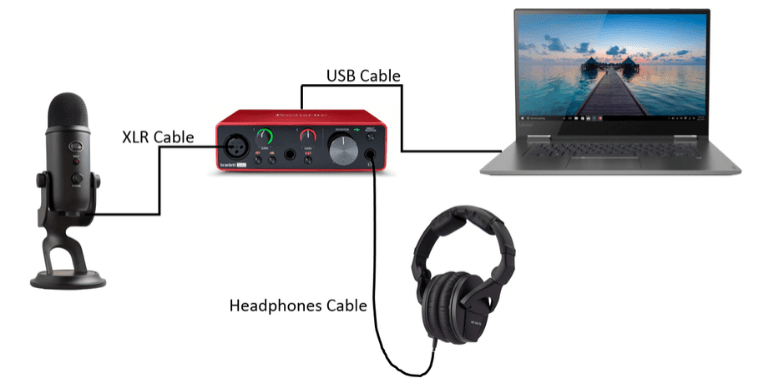
Most audio interfaces include the necessary software so that you don’t have to purchase any other software. A great audio interface used by thousands of musicians to record their demos is the Focusrite Scarlett Solo. It has one XLR input channel for a microphone and one input to plug in your instrument.
It also has a headphones output so that you can monitor yourself while recording. As most modern audio interfaces, the Scarlett Solo comes bundled with the necessary software to create professional-sounding recordings.
Here are some other popular audio interfaces: PreSonus Studio 24c, BEHRINGER U-Phoria UM2, M-Audio AIR 192|4. All of these units including the Scarlett Solo are phantom power capable.
What this means is that the interface includes a 48 Volts supply to power condenser microphones. Remember, all condenser microphones require 48 Volts to operate.
Diagram for Connecting an Audio Interface to Your Laptop for Recording

Third Option: Using a Regular Audio Mixer With USB Connectivity.
This is the least popular option because audio mixers could be more complicated for beginners. With all the functions and features it can be overwhelming if you don’t have the experience. The good thing about a mixer is that it offers more channels if you are in the need of connecting many microphones and instruments.
Basically this option is more suitable for larger groups or musicians who need to connect more than one instrument plus vocal microphones.
Just as audio interfaces come bundled with the necessary software, an audio mixer with USB connection also includes a copy of the software needed for effortlessly connecting a microphone or any other sound source to a laptop for recording
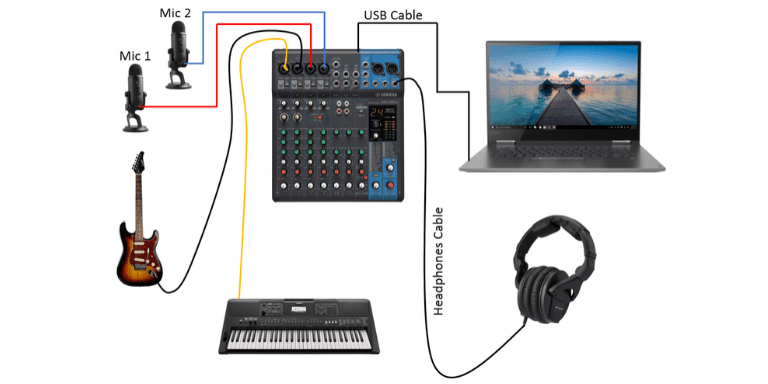
A popular USB audio mixer is the Yamaha Mg10Xu, it has a total of 10 channels of which four are XLR connections for microphones, and six 1/4 inch jack connectors. It also included 24 SPX digital effects and 3 band equalizer for each one of the XLR microphone channels. It is phantom power capable for condenser microphones and it’s built to last.
Other popular audio mixers with USB capability are the Mackie Mix Series Mix12FX, Alesis MultiMix 8 USB FX, and Behringer Xenyx Q802USB.
Diagram for Connecting a USB Audio Mixer to Your Laptop for Recording

Conclusion
If you are in the need of connecting a microphone to a laptop for recording, I have presented three affordable options that would give you great results.
If all you want is to record your voice, I highly recommend a USB microphone, if you need an extra channel for your instrument or a second microphone, then chose an audio interface. If a group is what you need to record, then chose the USB audio mixer.
I hope that this post helps you figure out what equipment you need as you embark on your recording journey. If you have any questions or comments, please leave a comment in the comments section and I will respond within three business days.