If you’re playing a gig on a large venue, arena, outdoor festival, or big stage, you’ll face the need to run your guitar amp through the PA system.
This is so that the guitar can be heard in settings where the amp alone won’t be enough.
It’s no secret; guitar players love their amps, and it’s tough for them to get past using one on a live stage.
Sticking a microphone in front of the speaker’s cone has been the go-to technique for miking a guitar amp. Just shove a mic against the speaker grill, and you’re good to go.
But using amplifier DIs is another way live sound engineers connect the guitar amp to the mixer, and for a good reason.
An amplifier DI, also called direct out, is an essential tool intended to capture the signal coming from the guitar amp before it goes to the speaker, eliminating the need for a microphone.
DIs do a critical job. They convert weak, high impedance signals from a guitar with magnetic pickups to a balanced line-level, low impedance signals that are compatible with your mixer.
Going Direct Vs. Using a Microphone: Which is Better?
As mentioned, there are two ways to connect a guitar amp to a mixer:
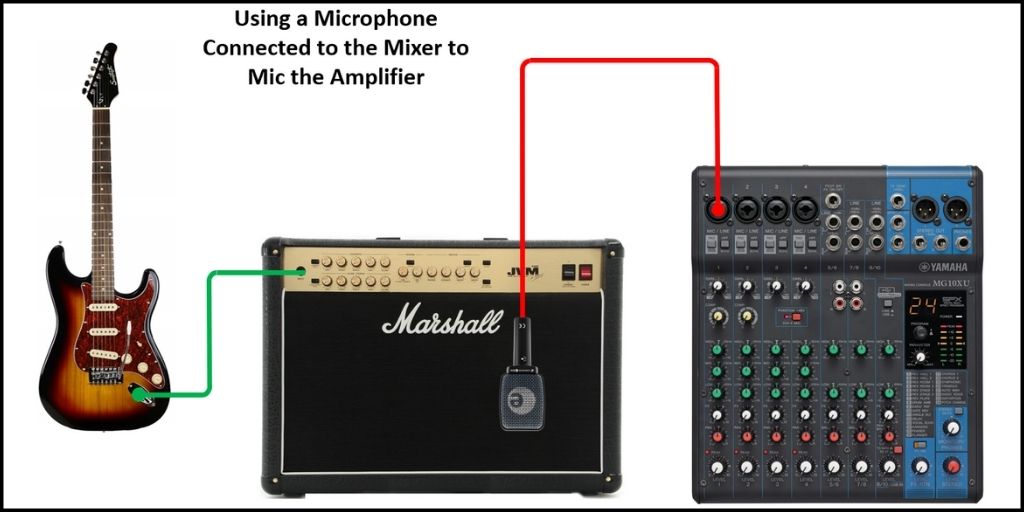
Method 1 – Using a microphone connected to the mixer to mic the amp
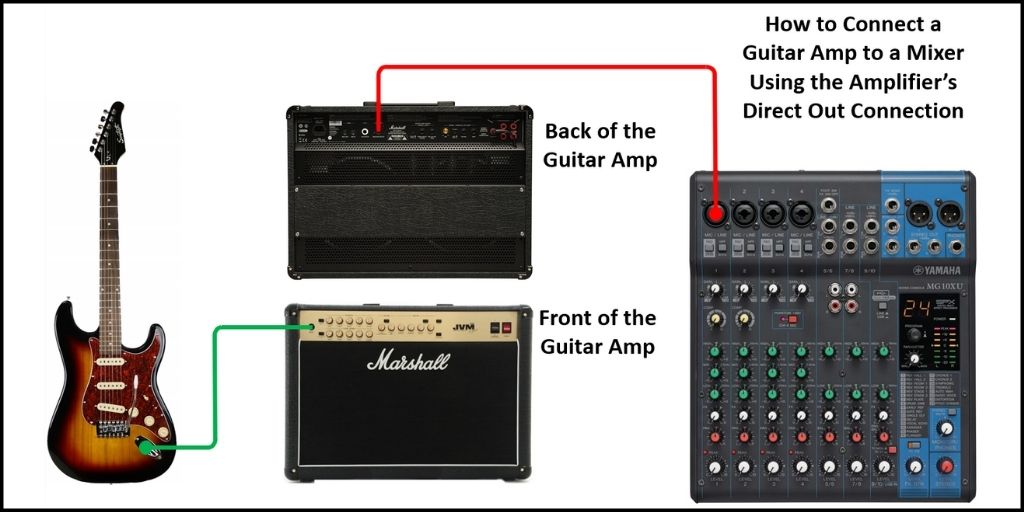
Method 2 – By using the amplifier’s direct output connection
This article will give you a basic run of each method and help you decide which is best for you, whether you’re a guitarist or a soundman.
Method 1 – Using a Microphone to Mic the Amp
Placing a mic on the amp is usually the simplest and most reliable way to accommodate every aspect of the guitarist’s setup, from the guitar itself to effects pedals, amp head, and even the cabinet.
When miking an amp, the most important thing to consider is the type of microphone you’re using. A good cardioid mic is your best bet, and the overall choice for most sound engineers is the Shure SM57.
This excellent mic is hard to beat in sound quality and durability. It captures the full essence of the guitar’s tone and is exceptionally hardy and resistant to weather conditions.
Regarding placement, it should be mounted on a short stand, ensuring that the head of the mic is 1 to 3 inches away from the grill and directly facing the speaker’s cone.
If a mellow tone is what you want to emphasize, with the mid and high frequencies standing out, place the mic’s head at the center of the speaker. To minimize the higher frequencies and get a fatter, warmer tone, place the mic closer to the speaker’s edge.
Another thing to consider is the angle between the mic and the speaker’s cone. To get the right angle, start by placing the mic in front of the speaker at 90 degrees (perpendicular), then slowly angle it towards 45 degrees to locate the sweet spot where the sound is even and smooth.
If you decide to use this method to connect your amp to a mixer, remember that there are several ways to mic a guitar amp. You can do it with one, two, or more microphones, with each technique delivering a different tone.
3 Tips to Consider Before Placing the Mic
If you decide to go with this method to connect a guitar amp to a mixer, there are a few things that you should consider to get the best tone possible. Overlooking these simple tips can greatly impact the sound.
1. Dial the Tone You Want on the Amp First
You should first dial in the EQ on the guitar amp until you get the tone you want before placing a mic in front of the cabinet.
You want to have the guitarist set his preferred EQ so that the sound coming from the amp’s speaker is exactly what he wants to hear. The reason is because trying to fix the sound later on the mixer side will be a problem no matter how well you equalize it.
Remember that when miking anything, you want the source to sound as intended before placing the mic. That way, you avoid many problems when equalizing the guitar amp on the mixer.
The following links provide you with starting EQ settings for your guitar amp for clean sound, rock, blues, and metal. These starting points can get you started, and from there, you can experiment to get the tone you want.
2. Know Where the Speaker is Located on the Cabinet
As you will find out when miking a guitar amp, where you place the mic will significantly affect the sound you get. For this reason, you need to know exactly where the speaker is located in the amplifier or cabinet you’re miking up, so you know where the center and sides are.
In most guitar amps, the speaker is centered in the cabinet. But depending on the amp you’ve got, sometimes it’s hard to tell. It may be off-center, up, or diagonal, so you want to look at it before placing the mic.
With most guitar amps, locating the speaker is simple because there is usually an open grille in the back from where you can identify the speaker’s position.
In other cases, the amp is completely sealed, and the front grille is made from a dense, heavy-duty cloth that makes it hard to see inside.
In such a case, you could use a flashlight like the one on your smartphone to light the grille to see inside. Then you can see the speaker and locate its center.
Another option is to use your fingers to feel the speaker’s edge, helping you figure out where the center is.
Don’t just assume that the speaker is always at the center; spend a minute and make sure you know where it’s located.
3. Watch Out for the Proximity Effect When Placing the Mic
Sometimes it’s easy to forget about the proximity effect that happens when you place a directional microphone up on a sound source, which can significantly change the tone.
The closer the mic gets to the sound source, the more bottom end you’ll get. As you pull the mic back, you’ll get a more balanced even tone. So remember to play with the proximity effect to your advantage to help you get the tone you are looking for.
To read an in-depth explanation of how to mic a guitar amp and get suggestions of the best microphones for miking amps, click the link.
Use the diagram below to help you visualize the connection.

The bottom line is that by using this method to connect a guitar amp to a mixer, you’ll get the most natural and warm tones a guitar can produce.
This technique also has some disadvantages such as signal bleed from other instruments, but if your goal is to achieve a mellow, balanced front house sound, capture the guitar’s full essence, and take advantage of the main PA system, this is the way to go.
Method 2 – By Using the Amplifier’s Direct Out Connection
Most guitar amps have an XLR or ¼ inch Jack output connector at the back called a direct out. This outputs a line-level signal that can be used to connect the amp to the mixing console or recording device.
The direct output connection sends the signal from the amplifier’s circuitry before it goes to the speaker, meaning the signal fed into the recording device or PA system is the sound produced by the guitar amp itself.
In other words, any tone processed by the guitar amp and pedals is the same one being output at the line level. Any sound you’re making is going to the front-of-house mixing console or recorder.
This means that 100% of the audio signal is transferred when using the amp’s direct-out connection.
The amplifier direct-out connection works in the absence of a microphone.
What does an amplifier DI do?
An amplifier DI allows you to directly connect your instrument to a mixing console, audio interface, or professional recorder, thus bypassing the need for a microphone.
The primary function of the amplifier’s DI is to perform line balancing and impedance matching/bridging.
It converts the unbalanced line output of a guitar or keyboard into a low-level balanced signal to minimize unwanted sound degradation due to interference and hum.
How to Set Up and Use an Amplifier DI with a Mixing Console?
Step 1
To set up and use an amplifier DI to connect it to a mixer, you’ll need an ordinary microphone cable. Identify the XLR output on your amplifier.
Connect the female end of the microphone cable to the XLR output. It’s advisable to do this with the equipment powered down.
The gain on your mixing console should also be turned all the way down and the channel completely muted before you connect.
It’s also advisable to ensure that phantom power on your channel is off. Amplifier DIs don’t need phantom power. In fact, if you’re using an older design DI you could potentially harm the output.
Step 2
The next step is to identify the XLR input on your mixer. Connect the male end of the mic cable to the XLR input. Keep in mind that you run the risk of overloading the preamp on some mixing consoles by running directly into XLR input.
That’s because some amplifier DIs have high output gain such that even with the gain on the mixer side all the way down, you still have too much signal coming in.
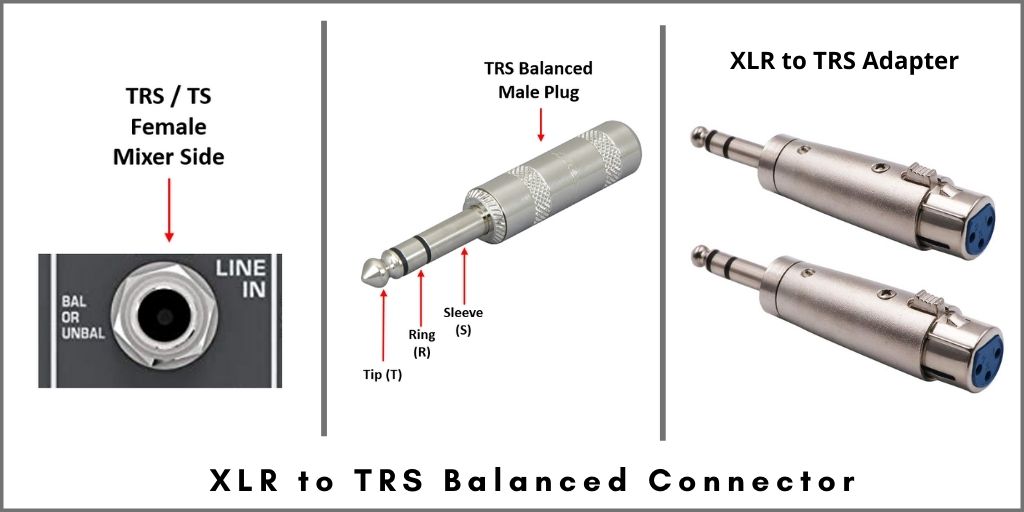
If this is the case with your console, it’s advisable to use a female XLR-TRS sleeve adapter like the one shown in the image below.
The adapter converts the XLR connector to a ¼ inch TRS (Tip, Ring, Sleeve) balanced connector to maintain the balanced line-level signal but with another type of connector with higher input impedance.
Using a TRS plug allows you to safely connect to the ¼ inch input on your mixing console. The result is balanced sound and better audio simply because you’ll be bypassing the microphone preamp, which in most cases can add unwanted sound coloration.

Step 3
The final step is connecting your instrument to the amp. Again, be sure that the channel’s volume is turned all the way down to avoid sudden noise transients.
Now, turn up the guitar’s amp volume and ensure that there’s sound coming from the amplifier.
If the amp has a master volume, in some cases, you have to turn it up as well so that a signal comes out of the DI. This is because some master volumes are positioned before the DIs. If no sound is coming from the amp, there will be no sound going to the DI.
Next, play your guitar and slowly turn up the master volume to confirm that all the connections are working well.
Check out the diagram below which shows the connections you need to do to connect a guitar amp to the mixing console using the direct output feature.

Mixer Gain Setting Procedure
- Press the solo/PFL button. The solo light will blink to show you that you’re in mixer gain setting mode.
- Next, adjust the trim/gain level to around 9/10 o’clock, then play your guitar. If it’s too loud, keep changing the gain until you find the ideal sound level for your instrument. This will vary from one guitar to another.
You’ll find that running directly into the XLR or microphone output will need a relatively low gain setting; otherwise, you risk overloading the mixer’s input.
Advantages of Using Amplifier DIs
- It saves you money because you won’t need to buy a separate DI box
- Simple and quick setup. All you need is a single XLR or microphone cable. Plug it in, and you’re good to go. The more the wires, the more the connections you need to make, and the more things can go wrong.
Disadvantages of Amplifier DIs
- You risk overloading the input of some mixing consoles. This is often the case with cheaper entry model mixers. To fix this issue, you need to run an XLR-TRS adapter into your mixer’s line level.
- Because amplifier DIs are added as a secondary feature of the amp, they tend to be of lower-quality, unlike external, professional DI boxes.
- You won’t get the same tone as if you use a mic to pick up the amp’s sound.
The Best Way to Connect an Electric Guitar to a Mixer
Using an amplifier DI or an external DI box to connect your electric guitar to the mixer is quite frankly the easiest and cleanest way to get sound. Simply plug it in, and you’re set.
You don’t have to worry about signal bleed or degradation from poor miking techniques or someone walking by and knocking off the mic stand. You also don’t have to worry about the mic coloring and changing your sound.
Although a DI is the cleanest and most straightforward, it’s not necessarily the best for connecting electric guitars to an audio console. You’d honestly be giving up all the warm tones a guitar can produce.
Electric guitars tend to sound thin, plucky, and unnatural when connected directly to the mixer using an external DI box or the amp’s DI.
Just know that the guitar’s electronics, including its coil microphones, don’t capture the authentic sound we’re used to hearing from the instrument. This is because as the speaker inside the amp vibrates to generate the sound, the guitar’s tone is developed as it travels through the air.
If you are looking for a warm, natural tone, miking your amp is the way to go. This is not to say that going direct isn’t ideal in some cases, though. It all depends on your setup and what you are trying to accomplish.
Bottom Line
Above all else, the most important thing is to play and record your guitar in a way that doesn’t undermine your creative flow. There are no hard and fast rules when choosing to either go direct or with a microphone.
Every guitar player has different needs, so take your time to experiment with both and see what works for you.