Connecting a bass guitar to a mixing console or PA system is a bit tricky because you are dealing with an instrument that produces a sound mainly in the lower frequency spectrum, which means that if you don’t do it correctly, you could end up with a saturated mix.
There are 4 easy ways to connect a bass guitar to a mixer:
- Using a DI-Box to go from the bass guitar to the mixer.
- Miking the Amplifier with a Mic connected to the mixing console.
- Leveraging the Amp’s direct connection or line out if available.
- Using a wireless system for bass guitars.
All these methods work and will deliver excellent results whether you are performing live or in the studio, but in some cases, one method will work better than the other, depending on the situation.
In this article, I will explain each one of these methods in detail so that you can decide which will work better for you. Plus, I will provide connection diagrams and some pro tips that, if implemented, you will end up with a beautiful mix with no saturation.
So, without further ado, let’s start explaining how to connect a bass guitar to a mixer or PA system.
1. Using a DI-Box to Go from the Bass Guitar to the Mixer
Using a Direct Insertion box (DI-Box) is the easiest way to connect a bass guitar to a mixing console because you only need a couple of cables, and the procedure is simple.
Before we continue, let me explain some basic information about the DI-Box. You can skip to the next section if you already know this information.
The DI-Box is Like the Swiss Army Knife of Live Sound
A Direct Insertion Box, or DI-Box for short, is a versatile piece of equipment that solves two key issues that are problematic in live sound or in the studio: impedance mismatch and external noise.
A DI-Box transforms a signal from high to low impedance without degrading the signal itself while gaining signal strength at the input of the mixing console.
It also changes an unbalanced to a balanced signal, meaning that it takes a two-conductor unbalanced line like the guitar cable to convert it to a three-conductor balanced line like the XLR cable, so you don’t have to worry about external noise getting into the line. This is a must when you have long cable runs.
I say external noise because an unbalanced cable acts like an antenna, and it could pick up RF noise. But if the noise comes from the signal itself due to a ground loop, then, in some cases, the DI-Box can also help you fix the issue.
For instance, if you have a ground loop noise coming from your bass guitar or amplifier signal, this noise will also be noticeable on the output of the direct box. To get rid of a ground loop hum or buzz from a signal, you need to break the ground loop.
Most direct boxes come with a “ground lift” switch intended to break the ground loop noise in your signal. In most cases, the hum goes away by just flipping the ground loop switch. Still, there are instances where it is more complicated to eliminate the ground loop buzz.
In such a case, the best and easiest solution is to use an inline ground loop isolator such as the IceCube IC-1 Line Hum Eliminator (link to Amazon), as it will filter the 50-60Hz buzz from the sound signal.
To learn more about the DI-Box, click the link, as I have an entire article explaining everything you need to know about this fantastic piece of equipment.

The Easiest Option Doesn’t Always Mean Better Sound
Now, getting back to the subject, I need to point out that although a DI is the cleanest and most straightforward way to connect a bass guitar to an audio mixer or PA system, it’s not necessarily the best way, acoustically speaking.
The reason is that you’d give up all the warm tones a bass guitar can produce. Bass guitars tend to sound thin and unnatural when connected directly to the mixer using an external DI box or the amp’s DI because the bass’s electronics, including its coil microphones, don’t capture the authentic sound we’re used to hearing from the instrument.
This is because when the bass guitar is connected to an amp, as the speaker inside the amp vibrates to generate the sound, the bass’s tone is developed as it travels through the air.
If you are looking for a warm, natural tone, miking your amp is the way to go, this method will be explained in the next section.
This is not to say that going direct isn’t ideal in some cases. It all depends on your setup and what you are trying to accomplish.
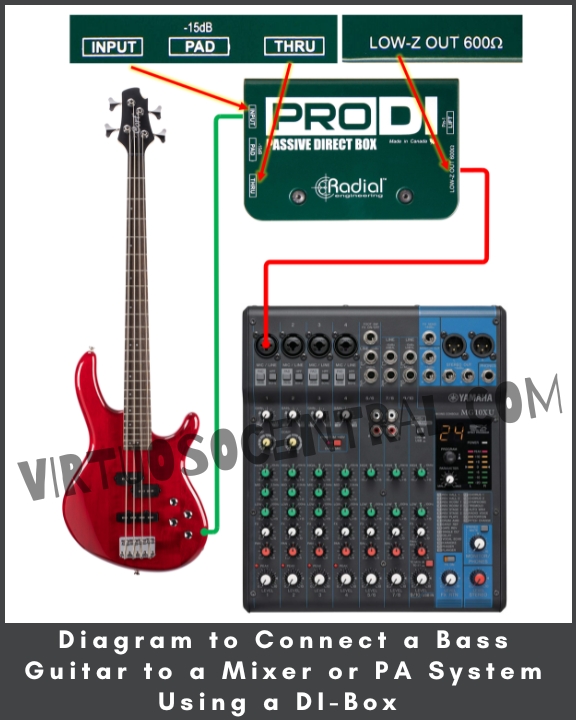
Steps to Connect a Bass Guitar to a Mixer Using a DI-Box
Connecting a bass guitar to a mixer using a DI-Box is a simple process. Here are the steps:
- Before we start, always ensure the mixer’s main fader is down while making any connection. That way, you avoid sudden pops or high volumes on your system in case the input level of the source signal is higher than expected.
- Use a 1/4″ TS to 1/4” TS cable (regular guitar cable) and connect one end to the bass guitar.
- Connect the other side to the high-impedance input of the DI-Box.
- Locate the Balanced output on the DI-Box, usually located on the opposite side of the input, and connect an XLR cable.
- Take the other side of the XLR cable and connect it to one of the inputs of the mixing console or PA system.
- It is essential at this point to set the gain on the mixer correctly to avoid saturation in the signal later on. In the last section of this article, I explain step by step how to set the gain.
- Adjust the EQ until you get a balanced tone for the bass guitar.
If you don’t know how to adjust the EQ for the bass guitar, click the link as I provide some tips on how to do so. If you are unfamiliar with how to equalize sound on an audio mixer, I recommend you read the whole article, as I explain a bit of the theory behind the equalization process for different sound sources.
Here is the diagram to make the connection. Use it for your reference.
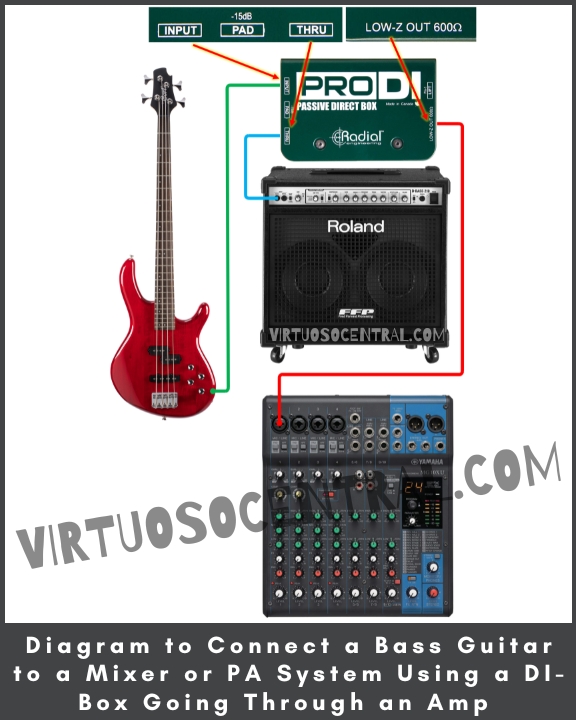
Here is another diagram showing the connection of a bass guitar to a mixer or PA system using a DI-Box but using the Thru feature to connect the amp before the signal goes to the mixer. Use it for your reference.
2. Miking the Amplifier with a Mic connected to the mixer
Although miking a bass amp sounds weird, this is the best option to connect a bass guitar to a mixer or PA system in live sound, but with some caveats.
Your setup and the venue where you are setting your PA system are the factors that will determine if this option is viable or not.
If the space on stage is limited, or the venue is prone to feedback, then the first option with the DI-box might work better. But if you want to capture the natural sound that we have come to like from a bass guitar, then miking the amp is the way to go.
Another advantage of using this method is that the bass player can use the amp as a personal monitor to hear himself while on stage. Plus, the bass player can set the EQ as he always does, making it more familiar to him.
How to Position the Mic in Front of the Bass Amp
Mic placement is the most critical part when miking a bass amplifier. This is very important because the sound characteristics will be directly related to where you place the mic in relation to the amp’s speaker.
There are two things to consider in this case, the distance from the mic’s head to the amp and the angle at which the mic faces the amp’s speaker.
Distance Between the Mic’s head and Speaker’s Cone
Even an inch difference in distance can significantly impact the tone produced.
This is because the closer you move the center of the speaker’s cone, the more highs and mid-highs you’ll get in the Bass’s tone, and the more you move away from the center of the speaker’s cone, the more bottom ends and lower mids you’ll get.
Placing the mic at either edge of the speaker cone will pick up a muffled and bassy tone.
When miking a bass amp, the recommended mic position is directly in front of the speaker’s cone, four to ten inches away from the amp’s grille. That’s because this position will produce the most vivid representation of the bass amp’s tone while avoiding picking up other instruments on stage, as well as the proximity effect.
Don’t place the mic too far because you may get a “distant sound,” and the mic might even pick up other background noises you don’t want.
If you have a condenser mic, make sure to lower your gain at the mixing board as they are more sensitive than dynamics, and you could end up with distortion.
I would recommend having both the condenser and dynamic microphones next to each other in front of the speaker’s cone for that fuller, warmer sound or a combination of a ribbon and a dynamic mic for a vintage mellow sound.

Angle Between The Mic and Speaker’s Cone
Aside from distance, the angle at which the mic faces the speaker also influences the tone.
If you position your mic directly in front of the amp’s speaker (perpendicular) and notice that the tone is emphasized in the high and mid tones, placing the mic at an angle from the speaker’s cone can help correct that. All you have to do is move the mic closer to the edge of the speaker.
To do this, start by placing your mic directly in front of the speaker’s cone (at 90 degrees), then slowly angle it (towards 45 degrees) until you find that ‘’sweet spot’’ where the tone is smooth and even.
As you move outside the 90-degree angle, you’ll notice a drop in the high and mid frequencies while the low frequencies will be accentuated.
As mentioned earlier, if you want that muddy, bassy tone, you’ll need to move the mic away from the center of the speaker’s cone and to the side.
Recommended Mics for This Setup
For this setup, you will need a microphone connected to the mixer and a small mic stand (links to Amazon). The microphones I recommend for miking a bass amp are:
- Shure SM57 – Budget-friendly option delivering balanced tone accentuating high frequencies
- Sennheiser e609 Silver – Easy to install, balanced sound, budget-friendly
- Sennheiser e906 – Great overall tone offering a three-position switchable presence filter
- The Audix i5 – Designed for instruments delivering an accurate sound reproduction
- Beyerdynamic M160 – Overall winner. It delivers excellent bass response, warm mid-ranges, and silky-smooth highs combined to produce a unique vintage sound.
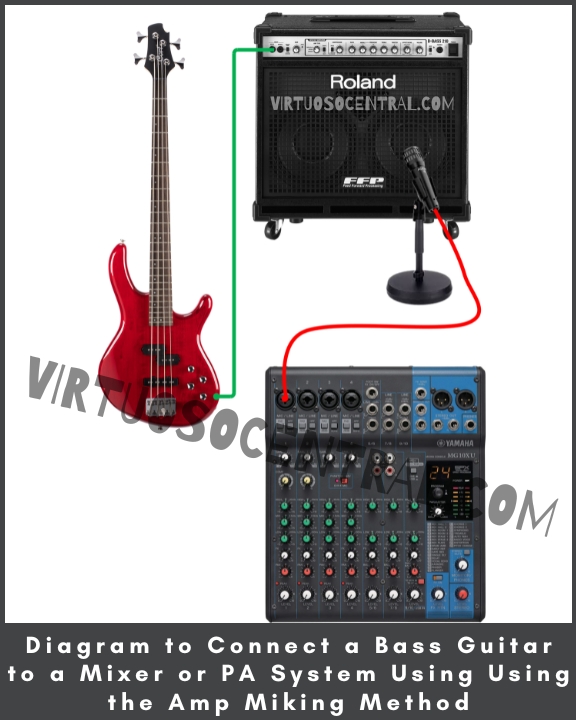
Steps to Connect a Bass Guitar to a Mixer Miking the Amp.
- Place the bass amp on stage as needed
- Connect the microphone you’ll use to mic the amp to the mixing board. Make sure to lower the volume fader on that channel and mute it to avoid popping noise while installing it.
- Install the mic on the stand, and place the mic stand in front of the speaker’s cone four to ten inches away from the grille.
- Let the bass player connect his bass to the amp and set his EQ as he needs.
- Ask the bass player to start playing, unmute the channel where the mic is connected, and slowly increase the volume on the channel.
- You might need to adjust the mic’s position until you find a tone that works for you.
- Set the gain for that channel as described in the last section of this article.
Here is the diagram showing the connections you need to make.
3. Leveraging the Amp’s Direct Connection, if Available
This method is very similar to the first one explained in this article. The only difference is that you will use the bass amp’s internal DI instead of an external one.
Most bass amps come with a balanced “Line Out,” usually located at the back of the amp. You can use this connector to run a cable to the mixer, thus connecting the bass guitar’s signal to the mixer.
The procedure is straightforward, and you will only need an XLR-to-XLR or TRS-to-TRS cable, depending on the type of connector your amp offers. Check your amp to see which kind of connector it uses.
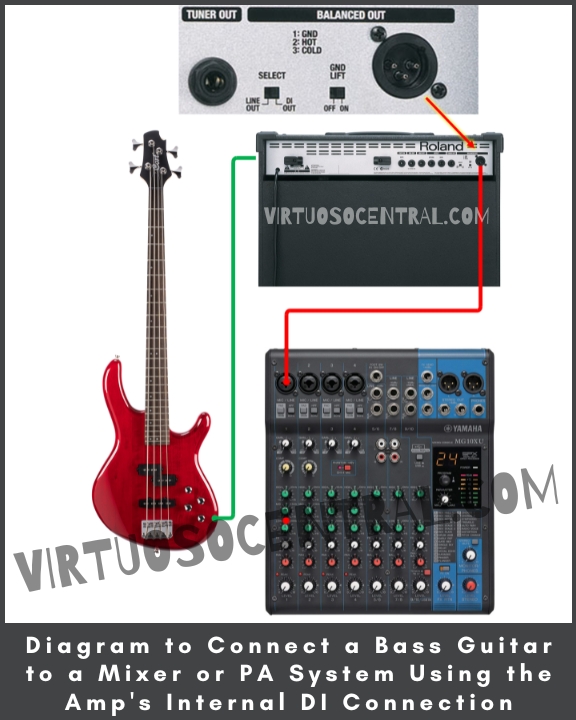
Steps for Connecting a Bass Guitar to a Mixer Using the Amp’s Internal DI
- Make sure the fader for the channel you are going to use on the mixer is all the way down while making any connection.
- Check your amp to know what cable you need to use. In most cases is going to be an XLR-to-XLR cable.
- Connect one end to the “Line Out” of the amp and the other to the input of the mixer.
- Turn on the amp and tell the bass player to start playing, then slowly increase the volume fader until you hear the signal from the PA speakers.
- As with all the methods explained in this article, it is essential at this point to set the gain and EQ on the mixer correctly to avoid saturation in the signal later. In the following section, I explain how to set the gain step by step.
- Adjust the EQ until you get a balanced tone for the bass guitar.
Below is the diagram to help you make the connections.
4. Using a Wireless System for Bass Guitars
Another option you can use for connecting your bass guitar to a mixer is to use a wireless system. Nowadays, there are several systems that you can use, but be aware that not all are of good quality.
The last thing you want is to have an unstable signal when on stage. That is why I like to stick to the well-known brands that have a good reputation and that you know for a fact that their systems work as advertised.
Something like the Sennheiser XSW-D, or the Line 6 Relay G50 would work perfectly well, providing you with the advantage of being wire-free and delivering excellent sound with no interference or drops within its specified range.
Steps for Connecting a Bass Guitar to a Mixer Using a Wireless System
- Before connecting anything to the mixer, first check that the fader for the channel you will use on the mixer is down.
- Connect the receiver unit to the power source.
- Use a 1/4” TS to TS cable or an XLR-to-XLR cable, depending on what the receiver uses, to go from the receiver’s output to the input channel on the mixer side.
- Turn on the receiver.
- Connect the transmitter to the bass guitar with the provided cable or connect the transmitter straight to the bass, depending on your model.
- Turn the transmitter on.
- Make sure the transmitter and receiver are on the same channel.
- Turn the volume on the channel you are using up slowly and start playing
- Adjust the gain, volume, and EQ to get a nice tone.
Pro Tips to get the Best Sound on the Mixer
Setting Up the Gain on The Mixer for the Bass Guitar
As mentioned previously, setting the correct gain for the bass guitar on the mixer is a must, or you could end up with a saturated mix because the bass guitar has its fundamental frequencies in the low-frequency band. For that reason, here are the steps to set the gain:
- Before setting up the gain, make sure to mute all other channels in the mixing console so that the readings you get on the VU meter are accurate. Also, to avoid sudden high volumes on your system in case the input level of the source signal is higher than expected.
- Set the Master Faders to 0dB / U / Unity, depending on what’s labeled on your mixer.
- Find and press the PFL button to activate it. The PFL button is usually located at the bottom of each channel strip next to the fader. In some mixers, a small LED lights up when pressed.
- Note: PFL stands for “Pre-Fader-Listen,” and it routes the audio signal from that channel to the VU Metter so that you can visually see and measure the strength of the audio signal on that specific channel.
- Next, have the bass player start playing and watch what is happening at the VU Meter. If you don’t see any movement in the VU Meter, slowly increase the gain until the loudest sections of the audio source are shown in the green area of the meter. Ideally, you want to be as close as possible to 0dB or Unity (usually the last green LED).
- Note: When setting the gain, never allow a signal to go beyond the yellow and into the red because it means that the signal is too loud and will distort. If the gain knob is all the way to the left (no gain) and your VU meter is in the yellow or red section, your source signal is too high, and you need to lower it at the source. This usually happens with bass guitars or any other bass-heavy instrument.
- Once you have set the gain correctly for the bass guitar, your signal should always be in with the green LEDs on the VU meter.
Avoid Excessive Dynamic Range
The dynamic range of a bass guitar could be all over the place – dynamic range means the ratio between the softest and the loudest sound.
To avoid this, and to have a more stable signal, use an audio compressor to even out the differences between the softest and loudest sounds.
Most mixers include a one-knob audio compressor, and digital mixers have a full-blown compressor with all the settings you need to get a stable sound.
If an audio compressor is available with your mixer, I strongly recommend using it to minimize the difference between the softest and loudest sounds.
Although a one-knob audio compressor like the ones found in analog mixers can help to even out the sound a bit, the truth is that they are very limited in what they can do because they don’t have the controls a standalone compressor has. For that reason, if available, use an external compressor to get better results.
A workaround for this issue is to use a pedal compressor on the bass guitar. Something like the MXR Bass Compressor, the Ampeg Opto Comp Optical Compressor Pedal, or the Seymour Duncan Studio Bass Compressor Pedal would deliver outstanding results.
Conclusion
If you were wondering how to connect a bass guitar to a mixer or PA system, in this article, I have shown four methods to do so:
- You can use a DI Box to go straight from the bass guitar to the mixer
- Use a mic to pick up the sound from the bass’s amp and send the signal to the mixing console, which delivers the most natural sound
- Leverage the amp’s internal DI box to send the signal from the “Line Out” to the mixer.
- Lastly, you can use a wireless system to connect the bass guitar to the mixer or PA system
Any of these methods will also work in the studio for recording, delivering excellent results.
One thing you need to remember is that setting the gain is a must to get a good sound, and if possible, consider using an audio compressor to minimize the excessive dynamic range of the signal.
I hope this article was helpful to you. Visit the site to explore more articles like this one by clicking here. Thank you for reading my blog.