This website uses cookies to improve and personalize your visit. Learn more about cookies. Got It

  • Skip to primary navigation
  • Skip to main content
  • Skip to primary sidebar

Virtuoso Central

  • About Us
  • Contact
  • Privacy

Tutorials

Big Lights, Small Budget: How to Rock With Cheap Stage Lights

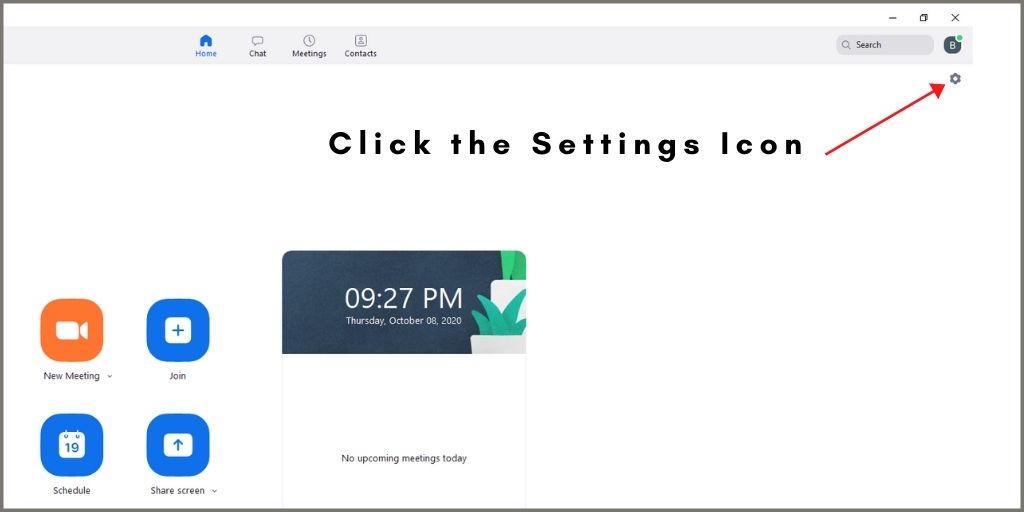
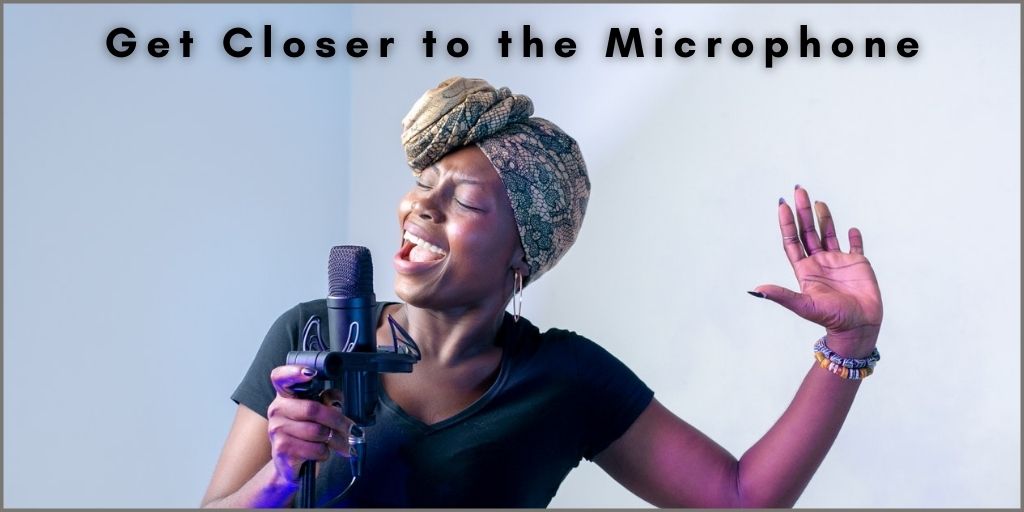
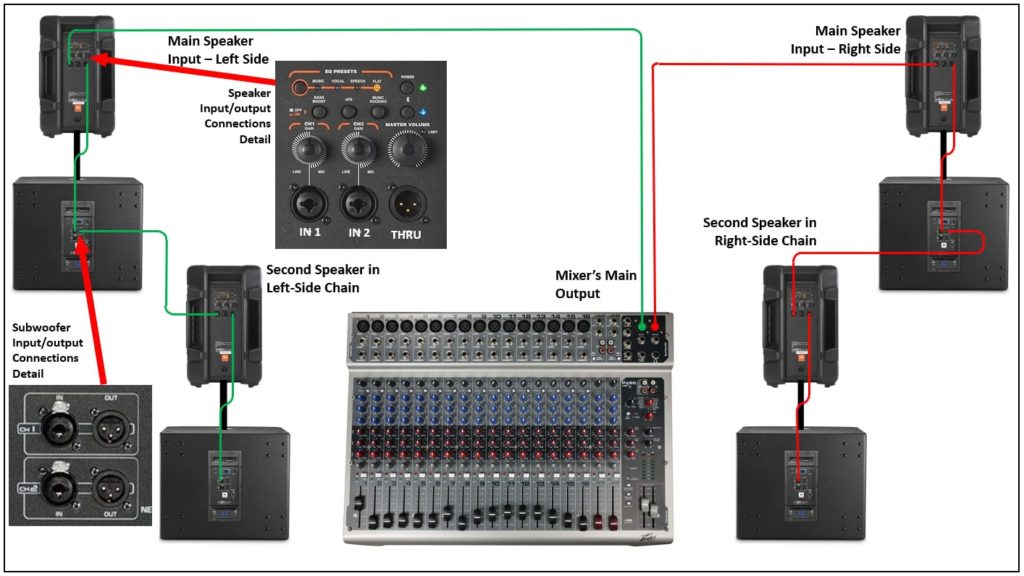
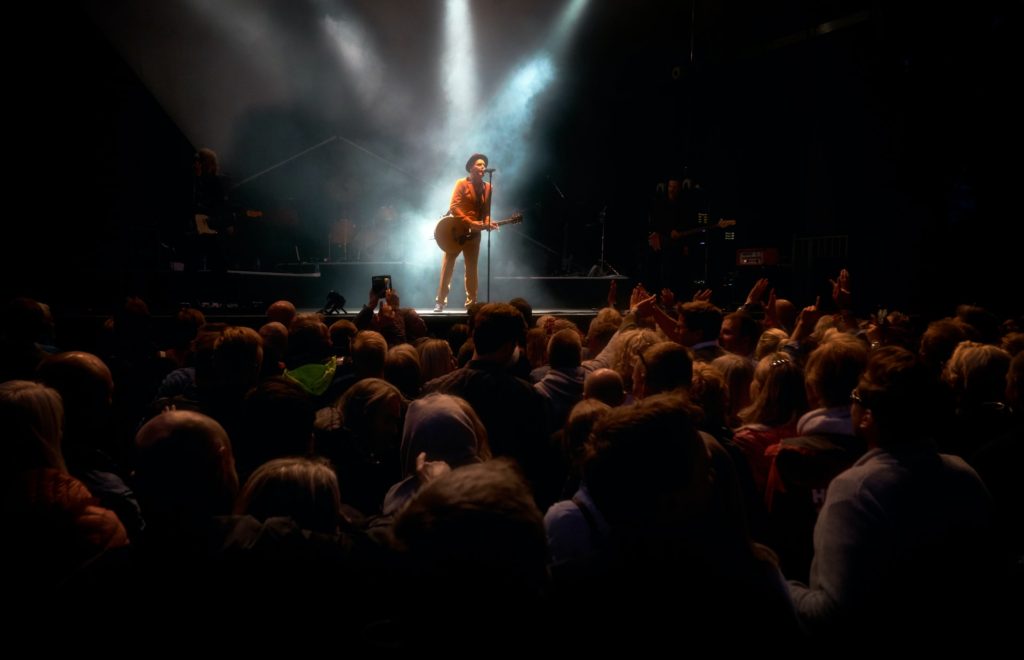
Your fingers are tired from all the practicing. You have finally crawled from the dungeon that is your practice space. Your instrument is set up, and the amps are in place. The soundcheck is finally done, yet as you look out at the crowd filing into the venue, something is missing. 

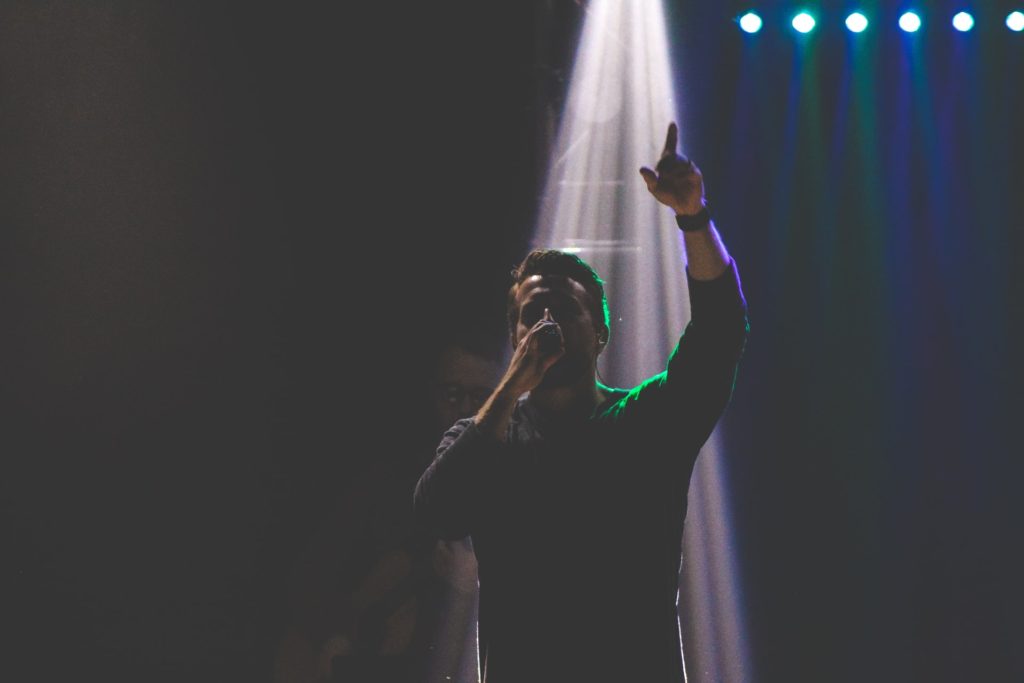
That something is lighting. Even at the smallest of events, a set of cheap stage lights can make your performance be more professional and make the audience think they are at a stadium-sized event.

In this post, we give you our best tricks for making cheap stage lights look professional. Read on to find out!


Stage Wash

The easiest and cheapest method to light your stage is with a wash. A wash is one color that fills the whole area. It can even be done with a single light. 

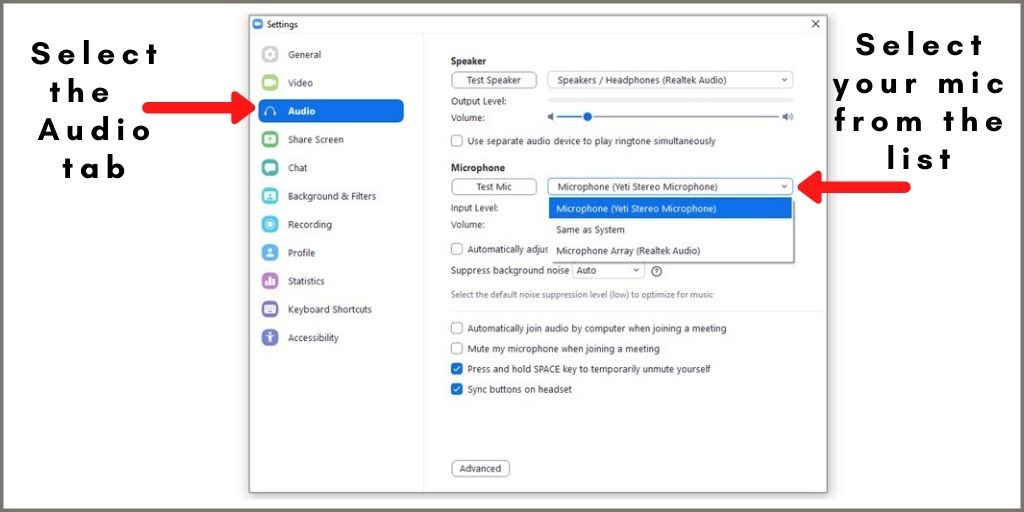
If the lights are not mounted, play around with where you want to put them. The stands will need to be in a place that does not obstruct the audience’s view and does not impede your performance. 

Ideally, choose a light that can change color. Take a little time beforehand to prepare the light color changes to match the mood of the song. Avoid an all-white light wash, as it will look like the show has ended and will be less than flattering to the band. 

Here are a few examples of some affordable stage wash lighting that can help your performance look professional (links to Amazon):
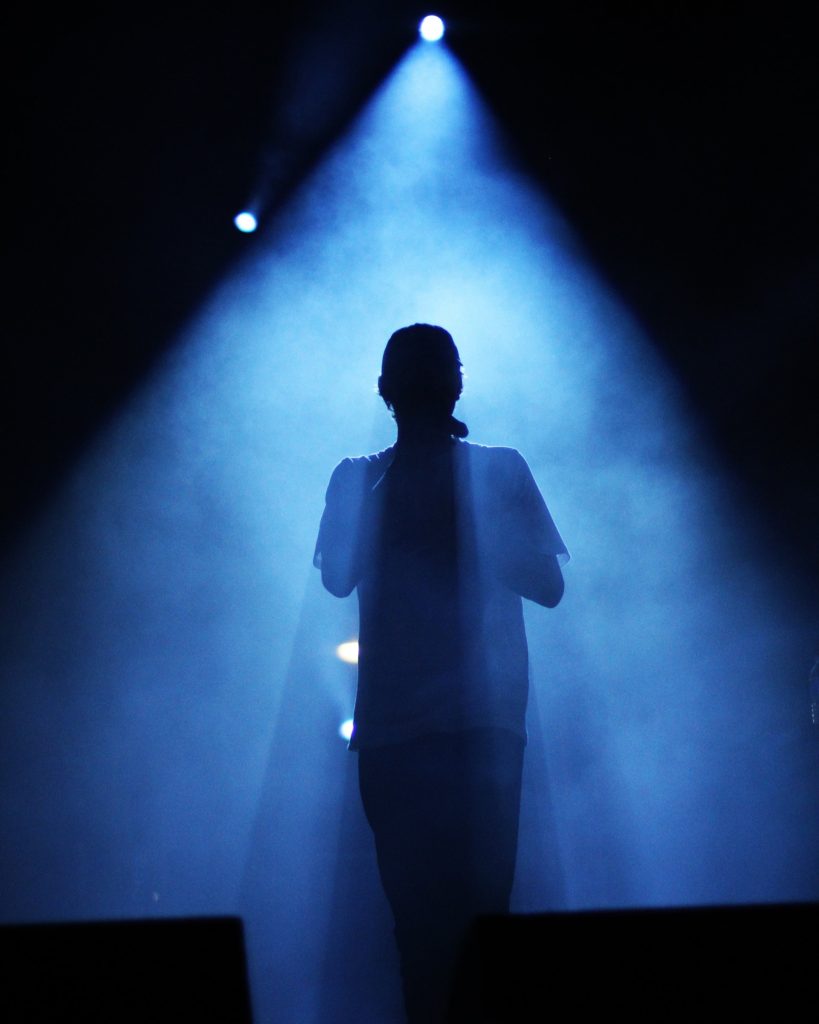
  • 24 LED RGB Stage Wash Light Bar
  • 24 LED 96W RGBA Stage Wash Light
  • 108 LED 20″ 25W Wash Light Bar

Backlighting

Backlighting is the process of lighting a person or object from behind. This technique is used a lot in photography and video as it stops the focus of the piece from looking flat, or from having them look like they are floating in mid-air. Just a little backlight combined with lighting from the front can make a huge difference.

Backlights can be colored or white. Don’t make them too intense, as the glare onto the audience will obscure the performers. Experiment with the best place to position them before the concert.

To achieve this lighting effect on stage, you can use par wash lighting. You could place them on the floor looking up towards the subject. If instead, you use a stand to place the par lights, make sure they are looking down behind the subject and select the light color that goes well with the song’s mood.

Most par lights need to be plugged into a power outlet to work. Nowadays, you can find wireless par lights with a rechargeable battery inside that can last up to 15 hours. That way, you have more flexibility in where you want to place them on stage.

Here are the links for both the wired and wireless ones:

  • Wired RGBP 18 LED Par Lights (Includes 4 pcs)
  • Wireless Battery Powered RGBW 24 LED Par Lights (Includes 4 pcs)

Cheap Stage Lights With Fixtures

One great way to get a professional stage look is to use cheap stage lighting as fixtures on stage. Not only can this look exceptionally cool, but it can also have the illusion of making the stage appear much bigger than it actually is. 

Lighting does not even have to be expensive. You can use strip lights from a hardware store or colored neon. Placing it behind the band will also add a very flattering backlight.

Of course, for those with a bit more of a budget, the band logo in lighting would always look good. That also does not have to break the bank, depending on how you do it. 

Another way to add more lighting effects to your stage without breaking the bank is by using a set of LED beam spotlights. These types of lights come as a set, including a tripod stand for easy and quick setup.

The spotlights can also be used as strobes if you want. They have built-in sound-activated programs that include several effects to make one complete show.

If one set is not enough to light the whole stage, you can get two or more sets and connect them in daisy chain form to synchronize them with the sound.

Here are a couple of examples of LED beam spotlights sold as complete sets that include the tripod stand:

  • Set of LED Mobile Stage Lighting Spotlights
  • LED Spotlights Lighting System

Light Individual Members

Another way to make your setup look professional with the minimum number of stage lights is to light each member individually. Of course, this only works with smaller ensembles and may get expensive if you play in a ten-member function band. However, for a small band of around 2 – 5 people, it can make a real difference. 

The beauty of this setup is that you can hide and boost individual members’ presence at different points by merely varying the lighting. This can help you pick people out for a solo or hide any auxiliary members needed.

Choose lights that can switch between white light and color so that you can alter the mood. If you have a little extra in your budget, you may want to buy another light to cast a wash over the stage, so you have a constant backdrop.

To light individual members, you could use a spotlight or a par light like the ones mentioned previously in the article.


Create Texture

For smaller venues and DIY setups, adding texture to stage lighting can be a great addition to your set up. This doesn’t mean having colored lights circling across the carpet like in cheap disco lighting. Instead, create some filters to sit in front of your light to add some odd shapes and effects. 

One easy idea is to have a card with slits cut in. Light will shine through like sunlight through a window blind, creating dynamic lines on your stage. With the right positioning, it could even make your set up look bigger. 


Uplights

Uplights are a great way to create some atmosphere, especially if your budget is limited. Uplighting is the process of shining a light from below up towards the target. It can create dramatic upwards shadows and give an eerie, horror effect when done on individual performers. 

The main trick with uplighting is to make sure it does not get in the way of performances. Guitarists with pedalboards and equipment may find misplaced uplighting a real annoyance, especially if it shines directly into their eyes whenever they look down.

You may decide to use one uplight on your main singer and turn it on for intimate pieces and solos.

To achieve this effect on the band, place the lights on the floor in front and away from the performer at an angle that doesn’t shine directly into their eyes.

If you want the beam of light to be narrow, bring the light closer to the subject. For a broader light effect, move the par light further away. Just keep in mind that the light effect can be lost if the light source is too far from the target.

Make sure to take the time to try different positions ahead of the event to find the best placement for the lights.

Here is an example of an affordable uplight pack that can be used to achieve this and other light effects, as shown in this article:

  • 36 RGB LED Uplight Sound Activated (8 pack)

Moving Lights

Moving lights can be tricky on a budget. Done wrong, they can distract from the performance. But done right, they can add depth and excitement.

Use moving lights to scan the audience and crowd. Focussing on one band member may look jittery and unprofessional if you are not using a professional rig. Instead, focus on adding impact and effect to the whole room.

You may wish to combine this with some of the textures discussed before. A low-cost laser set up would be ideal for this. If you can manage to combine it with a smoke or haze effect, you will have another excellent layer to your performance. 

The following is an example of an affordable moving light:

  • 12 LED RGBW Sound Activated Moving Head

Setting Up

Lighting is usually the last thing a band would think of, especially when doing a DIY gig. However, it shouldn’t be, and if you plan your whole stage setup with lighting in mind and use a few of these tactics, you can get great results from cheap stage lights. 

If you found this article useful, then check out our other handy blog posts. For anyone setting up their own gig or concert, you must read our article on how to choose the correct PA system, so your sound matches your professional lighting set up. 

Understanding Audio Gear Specifications: A Musician’s Guide

As a musician, getting the best quality sound out of your equipment is extremely important. Bad volume levels, improper mixing, and inferior audio quality can all ruin even the best performances and recordings. 

And unless you’re a trained engineer, the mind-boggling amount of different specifications on your audio gear can be a minefield to work your way through.

Luckily, we’ve put together a handy guide for the most common audio gear specifications. If you are shopping for audio gear and need assistance with the jargon, read on!


Frequency Response

Every sound that we hear is comprised of different frequencies. A whistle has a much higher frequency than a bass guitar, for example. Frequencies are measured in Hertz (Hz). The human ear can perceive frequencies between 20-20,000 Hz.  

Different instruments and even voices fit within various frequency ranges. And not all audio equipment can handle everything equally well. Let’s look at microphones first.

Frequency Response in Microphones

The average vocal microphone has a frequency response from about 50-18000 Hz. This covers a pretty decent range on the human hearing spectrum while cutting out some of the low-end interference from breath or wind noise. 

In comparison, a kick drum microphone will generally have a much lower frequency response, going down to 20 Hz or even below (sub-bass frequencies), while cutting out some of the mid-range and leaving some high end for the “attack” of the beater.

Going further, every microphone will have its own different frequency response. A high-end vocal condenser microphone might have more “presence” in the high and mid-range frequencies. In contrast, a bass cabinet microphone will have more in the lows. 

Frequency Response in Speakers

Speakers also have specified frequency responses, divided by what type of speaker it is. A subwoofer (low end) generally lies between 20-200hz, while a tweeter (high end) will be tuned to the 2k+ range. Horns cover the range in between.

Frequency responses are represented as a curve on a graph. Generally speaking, the flatter the curve, the flatter and more “accurate” the frequency response is. This is best for speakers, while microphones tend to be more specialized in their application.


Impedance

Impedance is crucial when matching PA speakers or guitar cabinets to amps, as well as making sure your inputs (instruments, microphones) are at the correct levels.

Simply defined, impedance is the resistance a circuit has to voltage. Impedance is measured in Ohms. The most common audio gear impedance scenarios you’ll encounter are with speakers and amplifiers. 

The most important thing to note about impedance is that it should match from source to receiver. If your PA speaker has an impedance of 8 ohms, match the amplifier’s output to that. This is the easiest way to match your audio gear correctly.

Another specification you might run across while shopping for pro audio gear is “Hi-Z” and “Lo-Z.” These are indicators of the impedance of a microphone or instrument and let you know what kind of cables to use and what to plug them into.

Impedance in Microphones

Microphones are generally Lo-Z. This means that they have a low impedance. Lo-Z cables are also called balanced because they have a third negative wire. This is most obvious with an XLR (microphone) cable, which has three prongs inside, one for each wire. 

Low impedance cables are better at rejecting noise, making them the best option for live performance and recording studios.

Lo-Z audio gear is generally plugged directly into the receiver, like a microphone being plugged into a mixing board.

Hi-Z audio gear lacks that third wire and only has two. The most common Hi-Z gear is guitars and other amplified instruments. 

To connect a high impedance (Hi-Z) source such as an electric guitar to a low impedance receiver like an audio mixer, you need a device called a “Direct Insertion Box or DI box.”

The DI box takes an unbalanced, high impedance signal and converts it to a low impedance, balanced audio signal. This helps a lot in reducing picked up noise in long-run cables.

We have a full article explaining everything you need to know about the DI box; click the link if you’d like to read more.


Decibels and Watts

One of the most confusing aspects of buying any kind of amplified pro audio gear is translating the watts printed on the box to the actual volume it can produce in real life. 

Many PA and instrument speakers will proudly boast statements like 1000 watts, which seems like a lot to a casual shopper. But if you look closely at the box, there is often an asterisk, noting that this is “peak” handling. 

Let’s break it down: watts are how much “work” the speaker can do. Air is much harder to move than a liquid or solid, so even the best speakers are inefficient. 

Speakers with a higher SPL rating or sensitivity (measured in decibels) will more efficiently handle the wattage from an amplifier and put out more volume. 

The 1000 watts rating at “peak” handling just means that it can briefly put out its maximum SPL (think loud peaks in the audio). This applies to both amplifiers and speakers. 

The rest of the time, it will be operating at RMS or program power. This is the “actual” power the speaker can handle and the amplifier can deliver continually without getting damaged. 

So when you’re shopping for audio gear and need something loud, look for speakers and amplifiers with a higher RMS and SPL, not the watts that the box boasts. And remember what measures the loudness of a speaker is its SPL rating and not the wattage.


Get Connected

If there’s one necessary evil of audio gear, its cables. Every instrument, DI box, amplifier, speaker, and interface use cables of some kind to pass signal. But not every cable is the same.

The most common cables are 1/4″ jack cables. These are mainly seen with instruments such as guitars and synthesizers, and speaker cables. 1/4″ patch cables are also used to connect different sound gear together. 

Speaker cables are specifically built to pass the signal from an amplifier to a speaker. The wiring inside is generally of larger diameter so that it can handle higher currents.

Speaker cables and instrument cables have two wires inside, one to pass signal and the other to ground. These are specified as “tip-sleeve” cables, and you can tell by looking at the jack: there will be one black line near the tip. 

Some 1/4″ cables are “tip-ring-sleeve” (or TRS). These contain a third negative wire. You might have noticed this is similar to the microphone (XLR) cables we mentioned earlier. They will have two black lines near the tip instead of one. 

This is because TRS and XLR cables are considered “balanced” due to that third negative wire inside. Balanced cables can be run for long lengths without losing signal quality. In contrast, regular tip-sleeve cables will degrade the signal. 

If you would like to know more about balanced versus unbalanced cables, check out our other handy guide. 


Audio Gear Overload?

If you have any more questions or would like more information, we have a variety of articles on quite a few pro audio gear topics. Feel free to contact us at any time if you have any questions. 

Audio 101: Should You Use a Compressor or a Limiter?

Expert use of audio compressors and limiters is what sets a pro-level mix apart from the rest. Whether you are working in the recording studio or mixing live sound, knowing how best to utilize compressors and limiters is vital.

While they are somewhat similar and related to each other, they both perform vastly different functions as tools in your mix arsenal. 

Do you find yourself wondering about these differences and the best application of either tool? We’ve compiled a handy guide. Read on for more information! 


Ratios

The most important difference of note between a compressor and a limiter is how they handle ratios. But what are ratios?

Audio levels are measured in decibels (dB). In audio compressor terms, a ratio is expressed by “decibels in” to “decibels out.”

When using an audio limiter or compressor, the first step is to set the threshold, which is the point at which the device will kick in and attenuate your signal.

A 4:1 ratio on a compressor means that for every four decibels above the compressor’s threshold, it will output one decibel. The higher the ratio, the more the volume of the signal is reduced. 

Limiters have ratios that usually approach infinity to one. In simple terms, this translates to your audio signal hitting a brick wall and stopping instead of getting “smoothed” out like a compressor. 

To sum it up: a ratio “squeezes” the volume peaks of your signal down and makes the louder parts quieter. A limiter is much more aggressive than a compressor in this regard.

Different audio sources are best suited to different levels of compression and different genres of music. A soft indie rock vocal won’t require massive levels of compression, while a driving rock bass guitar might benefit from a limiter.  


Makeup Gain

After the volume peaks are tamed by adjusting the threshold and ratio on either your compressor or limiter, you might find that your overall volume has gone down. 

This is where the gain knob on your audio compressor or limiter comes into play. Makeup gain raises your signal back up to a good level and will also cause your vocal or instrument to sound much more consistent in volume. 

Think of the threshold as the ceiling, and gain as the floor. If you raise your gain and lower your threshold, your signal’s dynamics will be squished into a smaller range. This will increase the perceived loudness of your mix.  


Dynamic Range

By working with the ratios, gain, and threshold, you can play with the dynamic range of any recorded vocal or instrument. 

Dynamic range is the “spectrum” of volume your signal has. Certain genres of music and instruments benefit from more or less dynamic range. 

For example, a hard rock vocal run through an audio compressor may have a high ratio, low threshold, and high makeup gain, to make even the quieter parts of the vocal sound as loud as the loudest parts. 

The hard rock song likely has a fairly limited dynamic range. This is a stylistic choice to make the song sound aggressive and in-your-face.

On the opposite side of the spectrum, orchestral music generally has a very wide dynamic range to capture all the instruments’ nuances and score. 


Attack and Release

Another major difference between audio compressors and limiters is how the attack and release works.

Attack is basically how fast or slow the compression/limiting will kick in. A faster attack will clamp down on transients (such as a snare drum hit), while a slower one will let the initial transient through while compressing the signal afterward. 

Release is the inverse: how quickly the compressor or limiter will stop working and “release” the signal. 

Limiters will generally have a significantly faster attack and release in comparison to compressors. This is because of how each device is intended to be used. 


What Does An Audio Limiter Do?

While limiters and compressors are fairly similar, their primary functions are very different. 

The “brick wall” effect of a limiter is often used at the “end” of a mix, after the rest of the instruments and vocals have been processed with compressors, equalization, and other effects.

Limiters are used mainly in the mastering process. This is because the “brick wall” effect of a limiter works really well for the very last step in audio mixing. Limiters also help every track on an album stay at a consistent volume. 

You can set the limiter’s threshold to a specific target value (such as CD levels or streaming services), then use the makeup gain to adjust the final dynamic range of the song.

Too much limiting can completely ruin a mix, however. The infamous Metallica album “Death Magnetic” is known mostly for being a casualty of the “loudness wars,” pushing commercial music to be louder than the competition through limiting.

Aim for a reasonable dynamic range for the genre and creative vision of the project. Remember that many digital streaming platforms also apply their own limiting to keep every track at the same volume. 


What Does An Audio Compressor Do?

Compressors are primarily used on individual tracks to even out volume issues and shape their “character.”

Snare drums are an excellent example. Even the best drummers don’t make every single snare hit at the exact same volume. 

By applying compression, you can “even out” the snare drum volume and make even the super-quiet ghost notes pop out, while the rim shots won’t blast the listeners’ ears. 

Furthermore, using the attack and release knobs, you can also shape the snare’s sound by allowing the transient hits and the resonance of the drum shine through in different ways. 

And finally, there are various types of compressors that impart their own tonal qualities onto your tracks and have different features. Master mix engineers have an entire armada of compressors.

This is because compression can be “layered” onto instruments or groups of instruments, instead of using the same compressor for every single instrument and vocal track. 


The Final Word

When you are mixing audio, you will likely find yourself using compressors much more often than limiters. Limiters are best suited for the mastering step, which is generally considered a specialized area of audio mixing.

However, at the end of the day, use the tool that is best for the job. If you’re just getting started with recording and mixing, check out our guide on home recording setups.

Top 7 Tricks for Recording Live Sound at a Concert

68% of music fans attend concerts. That’s because there’s no better experience in the world than a concert. Hearing your favorite songs performed live, the adrenaline a show brings, and connecting with other music fans is an addictive feeling.

Since so many people love concerts, they will want to experience the live show setting in the comfort of their own homes. This is where concert recording and live albums come in.

Live albums offer a sense of authenticity that you can’t get in a recording studio. You hear the cheering crowd and the band connecting with their fans while listening to your favorite songs.

Are you a band recording your first live album? If so, you’ll want to know these 7 concert recording tricks to get the best sound ever.


1. Live Audio Gain Staging is Very Different From Studio Gain Staging

First things first, many aspects of the live sound recording process are different from the studio.

Gain staging is a perfect example. In case you don’t know, gain staging is the act of setting the gain for each amplification stage to achieve a target system volume. The goal of proper gain staging is to achieve the best sound without distortion and noise.

The benefit of recording in the studio is the engineer can adjust the levels later. While this is possible with live albums, you won’t get that authentic listening experience. That’s why you need to get your gain staging perfect when recording live music.

First, understand the preamp you’re using. The preamp sends signals to just about every device used in a live setting. During recording, the signal is sent from the preamp to either the DAW (Digital Audio Workstation) or any other recording method you’re using.

Some preamps have gain control features, while others have a fixed gain level.

Your output master settings are also important. It’s advised to set your master outputs at 0 dB and scale back when necessary. Some engineers prefer to set their master outputs to -10 dB. If you choose this option, you may need to make up the lost gain with crossovers and equalizers.


2. Use a Vocal Rider

A common issue with live recording is inconsistent vocal volume. One of the reasons is because the vocals can bleed during a live recording.

In case you didn’t know, in audio terminology, bleed happens when a sound leaks from one audio source to another. For example, if the guitar mic picks the sound of the snare drum, the sound from the snare drum is bleeding or leaking into the guitar mic.

Using audio compressors don’t help much in achieving consistent vocal volume and controlling this issue manually using faders is tedious and inaccurate.

However, there’s a solution. Use a vocal rider with your DAW recording software. This is a plugin that automates your vocal mix. All you have to do is set your vocal volume threshold and the rider does the rest of the work for you.

It raises or lowers the volume of the vocal mix in real time without adding any sound coloring to the track.

Unlike a vocal rider, an audio compressor could change the dynamics of the sound so much that the accuracy of the performance can be compromised.

The most popular and the best is the Waves Vocal Rider and it’s compatible with most DAW software, including Pro Tools, Cubase, Ableton, FL Studio, Cakewalk, etc. For a full list of supported hosts check this link.

Another key factor to get a consistent vocal tone is by choosing the best microphone for live vocals. Whether you are using dynamic or condenser mics, make sure you use a quality mic to ensure the vocal’s sound quality.

Waves Vocal Rider Demo

Video Credits: Charles Potashner

3. Use Multiband Compression Sparingly

When it comes to audio compression, multiband (MB) compression is favored by many musicians and front of house (FOH) engineers because you can reduce the dynamic range on a set of frequencies.

In other words, if you want to accentuate details from a specific instrument (such as a drum cymbal) it won’t overpower the snare or other sound because a multiband compressor very accurate.

However, using compression may also accentuate bleed. But a few simple live sound recording techniques will ensure you can still use MB compression without your tone bleeding.

Let’s use the drums as another example. Place your mics in a particular way to pick up less cymbal bleed. Your mic placement depends on your kit setup; for blanket advice, place the mics in front of your toms and place your cymbals behind the toms. That way, you get the accents of the cymbals without them taking over your drum tone.


4. Utilize Subtractive EQ

Subtractive EQ is ideal for a live setting because it removes frequencies and accentuates the tone of the instruments. This is different than additive EQ, which boosts the frequency of a specific channel.

Too much additive EQ in a live setting can make certain channels sound too brittle and can cause bleeding.

If you need to boost anything, focus more on proper mic setups, ensure your amps and heads are functioning properly, or adjust your master outputs.


5. Ensure the Drums Are Cohesive

Drums are captured through multiple mics. If not miked properly, some drum parts can have odd tones or may even sound weak or too overpowering. For best practices, use a combination of open, closed, and overhead mics.

The way you mic a kit depends on the drummer and style of music. But you’ll typically want to keep the mics close to the toms, a mic inside or directly outside the kick drum (depending on if the kick drum has a hole), and overhead mics above the cymbals,

Placement is also important; for example, place the mic a good distance from the snare to avoid the snare taking over the recording.

Keep in mind, drum tone also has a lot to do with the final product. Ensure the drums are properly tuned and sound good during soundcheck.


6. You May Need Overdubs

Ideally, you want your live performance to sound exactly the way the crowd at the show heard it. But not every band or FOH engineer is perfect, even if they know how to record live sound. You may need to overdub the recording.

Overdubbing is essentially re-recording over some parts of the performance.

For example, let’s say the guitars are a little quieter than what you would like. Don’t be afraid to redo the guitar solos so they’re more noticeable on the album.


7. Don’t Always Be Afraid of the Bleed

There will inevitably be some bleed on a live album; therefore, a little bit of bleed in a live album isn’t always bad. If subtractive EQ can’t fix it, then leave it be. Live albums aren’t supposed to be polished, and that’s what makes them special.

When it comes to live recording, the tone is the most important quality. Conducting a proper soundcheck for all band members is key to achieving the best live tone.

However, when recording a live concert it needs to sound good in the end. If the product comes out with too much bleed, you may need to apply subtractive EQ.


Use These Concert Recording Tips to Create the Best Live Album

While these concert recording tips are useful, there’s always more information to learn in the realm of live recording. For example, the proper gear and set-up will also impact the way your live album sounds. Here’s how to select the right gear for your band.

Tips for Achieving the Best Sound Quality with Your Audio Mixer

Are you looking at your mixer with all its knobs and sliders and wondering how to get the best sound quality out of your music? Have you spent hours trying to work it all out but aren’t getting any closer to audio that sounds professional?

It’s easy to feel overwhelmed when it comes to learning sound engineering, especially if you’re attempting to learn it all on your own.

No worries though, we’ve got you covered. Keep reading to find out our best tips for achieving the best sound quality with your audio mixer.


The Audio Mixer’s Role

You might call it a mixing board, mixing console, or even soundboard. However, it’s purpose is still the same. The purpose of an audio mixer is to take two or multiple audio signals and join them together to produce one or more output signals. 

Have you ever been to a live concert and thought the sound quality was on point? Well, somewhere, there was an engineer at a mixing board, ensuring all of the individual sound sources meshed together in one harmonious end product. 

The sound engineer used a mixer to filter and optimize the sound by adjusting levels and enhancing sound with equalization and effects.


Audio Mixer Basics

When you first look at mixer, it might seem like there are a thousand different things going on. When in fact, there’s actually a lot of repetition when it comes to soundboards.

An audio mixer has multiple channel strips and is usually numbered going left to right.  At the top of each channel strip is the signal input. As a live signal enter the mixing board, it travels down the strip through all the different controls and a fader at the bottom. The signal is then carried over to the master part of the board and then travels out to speakers.

All the channel strips have the same controls. No matter if you’re working with a soundboard with four channels or 100 channels, it’s all the same. Once you learn how to use one channel strip, you’ve learned how to work them all.


Learning the Soundboard

Nowadays, digital mixing boards have become very popular, albeit usually more expensive than their analog counterparts. However, regardless of whether you’re using an analog or digital mixer, they both mix sound the same.

The differences you’ll most likely see between the two are digital mixers tend to have a slightly different configuration and programming capabilities. Analog mixers tend to be easier to use and are a great place to start when first learning how to mix

At the very top, or what you might consider the “rear” of your soundboard, are your audio inputs. They’re the entry point for your live sound feed, like a guitar or microphone. Typically these audio inputs will either be XLR, 1/4″ audio jack, or an RCA.

Next, you have a gain control or sometimes called a trim control. The gain control adjusts the level for the incoming signal and activates the preamp, which turns the tiny input signal into a much larger signal.

After the gain control is the compressor. A compressor raises the volume on the quiet signal and lowers the volume on the loud signal. This allows for a smaller dynamic range and allows easier mixing.

Following the compressor’s control are the equalization controls. These allow you to adjust and control your treble, mids, and bass frequencies for each channel. 

Your auxiliary channels come after and are commonly referred to as the “aux” channels. Aux channels give you the ability to send a secondary feed of the audio channel to another device. Next, you have your assigned and pan controls. This function directs specific channels to one or two of the stereo outputs.

And lastly, there is your fader slider. This control gives you the ability to lower or raise the presence of each individual channel as it goes into the final output. 

sections of a mixer

Mixing Professional Sound Quality

So now you’ve got the soundboard functions down, let’s get into how to mix properly. Before you can produce a quality mix, you need to make sure that the sound source is on point. If the sound coming into the mixer is subpar, then the sound going out won’t sound good no matter what you do.

When possible, try using balanced XLR cables instead of unbalanced TR cables. This is because balanced cables help stop noise issues that can occur from external interference. These cables help transmit the audio signal from one spot to another, delivering a better quality signal.

Once you have quality signals coming in, work on getting the sound balance right. For example, it won’t matter how well you mix and eq your vocals if the guitar part is completely overpowering them. It is very important to get your sound balance right before you begin mixing anything else.

Now that you have your sound balance right work on panning and assigning sounds or signals to your outputs or speakers. This gives space to the various sounds being mixed and gives the sounds greater definition.

Tips for Equalizing Sound Like a Pro

If you wish to highlight or give a signal a little bit of sparkle, use your equalizing controls to do so. The channel’s EQ shapes the incoming signal’s frequency content to either boost wanted frequencies or decrease problematic ones.

  • If the signal is not clear, you can try increasing the treble (high frequency), and your sound will get crisper and bright. If you decrease it, the sound gets more flat. Be moderate with the highs because too much emphasis in this frequency range can produce sibilance on the vocals and produce a piercing, screechy sound that can be hard on the ears.
  • Increase the mids, and the core of your sound becomes more enhanced. These frequencies add fullness and warmth to the sound.  Mid-range frequencies are between 250 Hz and 6000 Hz. It’s a good practice to be mindful of this range as well. If you go too heavy on these frequencies, your mix will sound harsh and uncomfortable. In other words, it will sound aggressive and abrasive with a metallic touch.
  • Does your mix sound thin? To solve it, increase the low frequencies carefully, avoiding sounding boomy. Too much bass, and it will sound thick and muddy, lacking articulation and clarity. If it’s too boomy or muddy, decrease the low-frequency knob until you can clearly hear the mix with a balanced tone.
  • When listening to your mix, if you notice that a signal or sound is all over the place, you can use your compressor to lower its dynamic. Just remember, too much compression will cause a sound to seem dead and takes the character out of sound.

Eliminate Background Noise

As mentioned earlier, if the sound coming into the mixer is subpar, then the sound going out will sound just as subpar. Background noise, whether it be traffic outside or echo bouncing off the walls, can really muddy up your overall sound quality.

Recording in a soundproof room with blankets on the wall or a sound booth is one way to deal with unwanted noise coming into your mixer. This is called “treating” your recording area. Other things like turning off fans or noisy electronics will help as well.

Ready to Mix

You don’t need a super fancy mixer to get a professional sound quality. Once you have a good understanding of the equipment you’re using, you can do a lot with a little. Just remember to have good quality sound coming into your audio mixer.  

If you’re not sure what sound gear and set up is needed for a live band, check out our guide here.

How to Improve the Sound Quality on Zoom for Music

Our lives have changed dramatically since the start of the Covid-19 pandemic. Now we are limited in what we can do as social distancing is still a problem in many places worldwide.

If you take music classes or are part of a band or music group, rehearsing might only be possible using the Zoom app. The only problem is that it doesn’t sound too good, especially if you use the default settings and the onboard microphone on the laptop or phone.

In this post, I will show you a few tips on how to improve the sound quality on Zoom for music.


Improve Your Sound Quality on Zoom for Music

Here are a few tips you can try to improve your sound on Zoom for playing or singing live.

  • Avoid using the onboard mic, if possible, get an external USB Condenser microphone
  • Configure Zoom for high-quality audio for playing instruments or singing
  • Improve the acoustics of the room to avoid echo
  • Get closer to the microphone

Let’s delve in each one of these tips in more detail.


Use an External USB Condenser Microphone

It’s no secret that onboard microphones are not that great. Some are better than others, but overall they can’t deliver good quality sound.

One of the reasons is that the onboard mic’s capsule is tiny, limiting its ability to pick up sound vibrations. The small membrane also is very limited to picking up the detailed nuances in sound when playing a musical instrument or singing.

Condenser mics pick up clearer, more precise audio with greater volume depths.

By using a USB condenser microphone, your audio will improve drastically because it’s capsule is bigger and very sensitive to picking up even the smallest nuances in sound, immediately delivering higher quality sound on Zoom for music.

Here are a few examples of USB condenser mics that you can use to help you improve your sound quality for music on Zoom (links to Amazon):

  • Blue Yeti USB Mic
  • AKG Pro Audio Lyra Ultra-HD Mic
  • Audio-Technica AT2020USB+ Condenser USB Microphone
  • Samson G-Track Professional USB Microphone
  • HyperX QuadCast – USB Condenser Mic
  • Mackie EleMent USB Condenser Mic

Configure Zoom for High-Quality Audio for Music

Zoom added a new feature that enables your computer to send high-quality audio. This function optimizes Zoom audio for the highest quality music. This is ideal if you are using the platform for music lessons or for performing with an instrument.

Keep in mind that by choosing this option it can increase CPU utilization and consume greater bandwidth.

Here are the steps you need to follow to configure Zoom for high-quality audio:

  1. If you have a USB condenser microphone, connect it to the computer you are planning to use. Now it’s time to select it as the default for Zoom meetings.

2. To select the USB mic as the default go to the “Settings” in the Zoom main menu, as shown in the image below.

3. Click on the “Audio” tab to open the audio settings.

4. On the right side, where it says “Microphone,” select yours from the drop-down menu. In most cases, as soon as you connect the USB mic, Zoom will automatically find it and set it as your default.

5. Where it says “Speaker,” you can select if you want to use your computer’s speakers or use headphones. Select your choice from the from the drop-down menu.

6. Under the microphone section, Deselect “Automatically Adjust Microphone Volume.” The reason is that Zoom uses an algorithm to keep your volume as constant as possible for video conferencing, which is suitable for the spoken word. For music, you want the sound’s dynamic range to be as real as possible, hence the reason for deselecting this option.

7. Next, click on the “Advanced” tab and select “Show in-meeting option to “Enable Original Sound” from microphone.”

This option automatically disables Zoom noise suppression, removes high-pass filtering, and removes automatic gain control.

Keep in mind that this setting is recommended for playing music and studio-like environments with higher quality mics (USB Condenser Mic), speakers, or audio interfaces. This is what we want to improve the sound quality on Zoom for music.

If you are in noisy environments, don’t use this option because all the noise will be passed to the other end.

8. Lastly, make sure to select “High fidelity music mode.” This option optimizes Zoom audio for the highest quality. This is ideal if you are using the platform for music lessons or for performing with an instrument. By choosing this option, expect an increase in bandwidth use, which means that your internet connection should be fast enough.


Improve the Acoustics of the Room to Avoid Echo

If you use an excellent mic and your configuration is spot on, but the room’s acoustics is poor, the sound quality will still be terrible. Usually, echo is the main problem in places with poor acoustics.

Echo happens when sound waves that move through the air hit hard surfaces and bounce back. To stop the echo, you need a way to absorb the sound waves so that they can’t bounce back and forth within the room.

There are different ways you can improve a room’s acoustics. One way is by using curtains on the wall and carpet on the floors to absorb the sound. Another way is by using carpet on the walls and floors. The only thing is that it might look ugly.

Additionally, you can use absorption panels on the walls to help reduce echo. You can build your panels to add more personality to your room while helping to reduce the echo. Here is a tutorial I found on Youtube to make your own high-performance sound absorption panels very cheap that deliver excellent results.

Video Credits: DIY Perks

If you rather have professional acoustic panels like the ones used in recording studios and don’t mind spending some money, choose professional-grade acoustic material.

There are several kits that come with everything you need to improve the acoustics of a room. Here are some examples of what you can get depending on the size of the room (links to Amazon):

  • Acoustimac DMD
  • ADW Acoustic Panels
  • Primacoustic London
  • JBER Acoustic Studio Foam

Get Closer to the Microphone

Getting closer to the mic is a simple but effective tip to improve Zoom’s sound quality, whether you are playing music, taking lessons, or singing.

As the sound source gets farther away from the mic’s pick up capsule, the quality decreases rapidly. If the sound source is farther away from the mic, it picks up ambient noise, degrading the sound quality as the sound waves become thinner, losing the sound’s fullness.

You want to get close to the mic but not so much that it could saturate the membrane inside the capsule.

If you are singing and your voice is strong and loud, make sure to leave between 6 to 8 inches from the mic’s head and your mouth. Also, I recommend monitoring your microphone volume on the Zoom app not to saturate the sound. Never allow the signal to clip because it will sound distorted on the other end.

When playing an instrument, place the microphone as close as possible without it being in the way. Placing it between 1 to 3 feet away from the instrument is a common practice to pick up all the performance nuances.


Final Thoughts

It is possible to get good sound quality for music with the Zoom app. All you have to do is follow these helpful tips. By leaving the default settings on Zoom, you limit the audio quality that the platform can deliver.

Make sure you change the settings and have a decent microphone that can pick up all the music’s nuances that are being played.

Avoid excessive echo by limiting the sound waves to bounce back and forth. Lastly, make sure to get as close as possible to the microphone but always monitoring the volume levels so that the audio doesn’t distort.

Got questions? Leave a comment or contact us, we’ll be happy to help.

Selecting the Proper Sound Gear and Set-Up for a Live Band

Are you ready to wow your audience with a live band that sounds just right?

Whether you’re interested in managing your own band’s live gear or you’re transitioning into a live audio career, there’s a lot to consider in terms of putting on a show with enviable acoustics.

For instance, there are endless options when it comes to amplification of your live band. You can choose from simple self-contained personal pa systems to large systems with multiple components and serious power.

Read on to learn all about live gear and how to decide which equipment to choose for your own unique setup. By the end of this guide, you might just be a live audio pro.


Mixers

The mixer is the central hub of your pa system. Whether we’re talking about a simple eight-channel mixer with a few basic controls like gain and equalization, or a 64 channel mixer with advanced features onboard, it’s essential to have a mixer that can take advantage of the acoustics of your performance venue.

Basically, a mixer takes all of your various inputs like microphones, line-level instruments, and playback devices and disperses them into main outputs and monitor outputs. This creates a balanced sound. The main outputs go to the various speakers and subwoofers if you are using them. The audio that comes out of these speakers is what the audience hears.

The monitor outs, or the monitor mix, goes to the performers on stage so they can hear themselves and hear each other. Having two separate mixes is important because usually, the performers need a different mix than what the audience needs to hear.

Since the mixer is the central audio hub of your pa system, we have dedicated a full article explaining each control in more detail.

Unpowered Mixers

If the mixer is unpowered, it does not have its own internal amplifier. If you choose this option, you will need to either use an external amplifier with passive speakers or active speakers that contain their own power amplifiers.

Powered Mixers

Unlike the unpowered mixer, a powered mixer has its own power amplifier. If you are using a powered mixer, it is important that you only connect it to passive/unpowered speakers. IF you connect a powered mixer to an external power amp or to active speakers, it is highly likely that you would permanently damage your equipment.


External Rack Effects Units

While many modern mixers have internal digital effects processors, you may still choose to use certain pieces of outboard rack gear for compression, feedback suppression, or various external effects. These might include reverb, delay, and chorus for example.

External effects units are normally connected using channel inserts or auxiliary channels on your mixer.

Active Speaker Cabinets

Active speaker cabinets have their own internal power amps. These are ideal if you’re looking for a compact setup. You don’t have to worry about lugging around a rack with a power amp along with your speakers and other pa equipment.

Keep in mind that active speakers are meant to receive line-level signals, so be sure not to run the output from a powered mixer into an active speaker.

Passive Speaker Cabinets

Passive speakers do not contain their own power amp. Therefore, they need to be fed by a powered mixer or an external power amplifier.

One advantage of passive speakers is that you can have a spare power amp in case your external power amp fails. This is far more practical than having spare active speakers on hand.


The Monitor Mix

Depending on the size of the venue and your budget, the front of house engineer (AKA yourself) may also handle the monitor mix. This is often accomplished by setting up a monitor mix for each performer during soundcheck. Then, each monitor mix is adjusted during the performance.

Adjusting the monitor mix for each performer individual is vital because this enhances the band’s sound overall. For instance, if your vocalist hears too much of the drums and not enough of the base, her vocals might sound too punchy. In short, it’s very important to invest in quality onstage monitors for a live show.

In-Ear Monitors

In-ear monitors use a wireless receiver which is battery powered. The performer can adjust the overall volume via a control on his or her own receiver.

There are a couple of important advantages to using in-ear monitors. Since they are earbuds instead of speakers, they can help clean up the stage. In other words, they can help prevent bleed and feedback, and the performers can get clearer audio feedback.

Wedge Monitors

Although they are an old school approach, some performers prefer wedge monitors. These are onstage speakers that face the performers instead of facing the audience.

Some performers don’t like in-ear monitors because they feel too isolated or that they are losing the connection to their audience. If your band collectively prefers to be more engaged with the audience, wedge monitors may be best.

You can check out our article about setting up stage monitors by clicking the link.


All In One pa systems for Your Live Band

All in one pa systems, also called solo pa systems, are a very modern and very compact approach to live audio gear. They feature a basic mixer, power amp, and a set of speakers in a single unit.

They are popular thanks to their portability, affordability, and easy setup. Many all-in-one pa systems feature at least two XLR/Line inputs with at least basic EQ and reverb.

It is not uncommon to find these units equipped with Bluetooth as well as an auxiliary input. You can use them for playing backing tracks or music between sets. Many of these all-in-one pa systems are expandable as well. This means that if you land a gig at a larger venue, you can hook two of them together to accommodate a larger audience.


Time to Jam

Now that you know how to choose and set up the gear for a live band, what else piques your interest in terms of audio gear?

Whether you’re an audiophile and a musician or you’re studying to be an audio engineer, our site is a great resource for all of your audio needs.

Come back to our blog regularly to learn more about the latest audio gear and for tips on which brands and products to choose for your setup. Feel free to contact us with any questions about audio gear in general, or to inquire about where you can order the gear we promote.

How to Set up a Surround Sound System

You can enjoy a remarkable home theater experience by learning how to work with surround sound.

Surround sound allows you to bring the movie experience home. However, the process of setting up the system can seem like rocket science to some people.

Although surround sound is a high-tech audio solution, there’s no need for it to prove confusing. A few helpful tips can make the setup process easier.

To learn how to set up a surround sound system, keep reading.

Image Credits: Chauhan Moniz

Connecting Your Gear

To build the best surround sound system, start by gathering all your supplies. It’s helpful to think about the components that will make your system setup more enjoyable. For instance, you may prefer to set up a wireless surround sound system (Link to Amazon).

When setting up your surround sound system, it’s helpful to begin by making sure that you have everything that you need. At a minimum, you’ll need:

  • A surround sound receiver (Link to Amazon)
  • A TV or video projector
  • A wire stripper
  • Connector cables and speaker wire
  • Speakers and a subwoofer

Depending on your desires, you may also want a few other items. For instance, you might want to install:

  • A Media streamer such as a Fire TV Stick, Roku Streaming Media Player, or Apple Tv, etc. (Links to Amazon).
  • A cable or satellite box
  • Blu-ray Disk player
  • DVD player

A label printer can also make the installation process more organized.


Getting Into the Setup

As you start laying out the components, think of your home theater system in terms of paths. Your paths will determine what you want to get out of your system, such as a surround sound system for your TV.

You may want a basic 5.1 system or a high-tech surround sound system with Bluetooth connectivity. Either way, your mission is to make sound travel along the pathways from the sources to your video devices and speakers.

Accordingly, think of components such as your cable box or streaming boxes as starting points. Likewise, think of your TV or projector and speakers as endpoints. It’s your job to get audio and video signals from the starting points to the endpoints.

To enjoy surround sound, you’ll want at least a TV, an AV receiver, a DVD or Blu-ray player, and a media streamer. You’ll also want a minimum of five speakers and a subwoofer.

You can buy the speakers and subwoofer as separate units, or you can get a home theater system that includes the satellite speakers plus the subwoofer (Link to Amazon). In such cases, the system comes like a kit including the cables for the connections.

Instead, if you are an audiophile, you might want to choose the speakers, subwoofer, and surround receiver separately. If that’s the case, make sure to match the impedance and wattage of the speakers to the amplifier.

Incidentally, this last point brings us to types of surround sound formats. Five speakers and a subwoofer is the format for surround sound 5.1.


Surround Sound Configurations

If you’ve been researching about surround sound, you’ll notice commentators refer to it as surround sound 5.1, 7.1, and 9.1. These numbers reference the speakers included in the system.

Surround sound 5.1 is the standard configuration for DVD, Blu-ray, and streaming content providers. This setup includes five speakers – front left, front right, center, rear left, and rear right speakers plus a subwoofer. This kind of system is an excellent setup for beginners.

The next level in surround sound is 7.1. This system has the same setup as surround sound 5.1. However, it also includes an additional right and left side speakers.

Next, there’s surround sound 9.1. It includes the same setup as 7.1. However, it also has two additional speakers mounted a few feet above the left and right speakers.

This setup provides sound at altitude. It creates an immersive experience by delivering music across another sound axis.


How to Set up a Surround Sound System

Some people express that the center speaker of a surround sound is optional. This group believes that the left and right speakers can handle sound fine.

However, the center speaker anchors the on-screen dialogue. It also serves as a connection between sounds that flow from the left to right speakers, or vice versa.

For example, imagine a boat zooming from the left to the right of the screen at high speed. Without a center speaker, you may notice a gap in your sound field as the boat passes.

Place the Front-Left, Center, and Front-Right Speaker at Ear Level

To start your set up, place the center speaker either above or below your screen. If possible, place it at ear level to get the best results.

If you’re installing speakers near your monitor, make sure that they’re shielded. If not, your speakers could cause video distortion in some cases.

Also, try to position the left and right tweeters at ear level. This positioning will give you the best results for high-frequency sound.

It is recommended to leave some space (1-3ft) between the screen and the left and right front speakers.

If your TV is 65” or more, it’s not necessary to leave any space; just place the speakers at the edge of the screen.

The Rear, Side, and Top Satellite Speakers Provide Extra Dimensions of Sound.

As you consider speaker positions, it’s also helpful to think about the purpose of the additional speakers. The goal is to provide an extra dimension of sound for the left and right channels.

The rear speakers should be placed behind the audience, and if possible, at a height looking down.

If you are setting up a 7.1 or 9.1 surround sound system, place the side and top speakers also at a height looking down. That way, you’ll get a better dimension of sound

The Subwoofer Complements the Full-Range Frequency Response of the Surround Sound.

Now, you’re ready to position the subwoofer. You can use the subwoofer to complement the full-range of audio frequencies that the satellite speakers can’t. The subwoofer delivers a fuller bass signal that fills the room.

The placement of the subwoofer is not as critical as the other speakers. You can place it on the side or front of your setup. Depending on the type of subwoofer you have, in some cases, by placing it at the front, it will give you better acoustic results.  

By using a sub in this manner, you’ll leave your other speakers free to handle high and midrange frequencies. A subwoofer is entirely capable of handling all the low frequencies you throw at it. You’ll enjoy a more dynamic range of sound because the bass can go lower than a regular full-range speaker.


Taking Surround Sound to the Next Level

Now that you’ve figured out how to set up surround sound 5.1, 7.1, and 9.1, there’s another level.

Dolby Atmos is a step up from 9.1 surround sound. It’s a divergence from traditional channel-based audio.

It allows sound to engulf the user in three dimensions. With Atmos, you can experience sound coming from everywhere, including from above.

This design frees you from the constraints of traditional surround sound technology. It allows you to hear sounds in a way that best serves your viewing experience.

To set up Dolby Atmos, you’d need to add either two or four ceiling or elevation speakers to your existing surround sound setup. This format will also change your surround sound designation. For instance, if you have Dolby 5.1 with two speakers for Atmos, you’d have a 5.1.2 configuration.


Keep Your Audio Skills Honed

Now that you’ve learned how to set up a surround sound system, your journey is just beginning. When you love movies and music, however, there’s always more to learn.

Virtuoso Central is your source for all things related to sound accessories, equipment, and instruments. If you’re looking for buyer’s guides, feel free to browse our list of the latest best products on the market.

At Virtuoso Central, you can enjoy extensive reviews of the accessories, gear, and instruments. You can also read informative articles that dive into the detailed aspects of working with sound.

To keep learning more great info about working with sound, visit our blog. If you have questions, feel free to get in touch.

How to Choose the Right Amplifier for Your Speakers

If you’re just getting started with building your system, there are a couple of tips you’ll want to know. For example, how do you choose the right amplifier for your speakers? When you’re new to a topic, it can be overwhelming to know all the little details that will help you out. Luckily, we’ve got you covered.

A good rule of thumb is to choose an amplifier that delivers at least the same amount of power as the RMS or continuous (program) power that the speaker can handle. It is a better practice to choose an amplifier that is twice the RMS or continuous power because that way, you will have more headroom. 

There is more to it than just selecting the number of watts. Follow along, as I’ll explain the concept in more detail, and you’ll find exactly what you’re looking for to get started with your setup.


Matching the Right Amplifier to Speaker’s Wattage – Speaker Impedance Matching

Covering Basic Terminology

Let’s look at the basic terminology used with amplifiers as it will help you understand the concept better.

  • Watts: Watts measures power. In this case, our power is amps x volts.
  • Ohms: Ohms measures resistance. We’re keeping this as simple as possible, without throwing in equations, but it relates to Ohm’s Law.
  • Speaker Impedance: It’s measured in Ohms and refers to the resistance that the speaker presents to the amplifier. It’s not a constant value, and it changes depending on the frequency of the signal applied to it.
  • Sensitivity: To keep this simple, the higher the sensitivity, the less power you need.

Why Matching the Right Amplifier to Speaker’s Wattage is Important

When you jump into audio forums and message boards or check articles on how to set things up, it can get confusing quickly with all the fancy jargon and equations thrown at you. It’s easy to get overwhelmed when all you wanted to know was, should speaker wattage be higher than amps, or vice versa? Am I right?

The first question to ask is, why do you need to match your speakers and amp? There are two reasons.

  1. By matching your speakers and amp, you won’t damage your speakers or amplifier.
  2. By matching your amp with your speakers, you’ll get a rich, clean sound without awkward distortion.

What else do you need to know?

  • Your amp is an electrical unit that helps you increase a signal.
  • Your speakers take the electrical signal from the amplifier and turn it into sound energy.

So, you need an amp for power. You need speakers to push the sound out. Watts measures power, Ohms measures resistance. You match these up, so you get a clean, rich sound without damaging any component.

Let’s move on to the next part, which explains how to match them by choosing the right amplifier for your system.

READ: Speaker Wattage Explained


How to Choose Amplifier for Speakers

I always recommend checking the specifications from the manufacturer before attempting to match amplifiers to speakers. If possible, use the same manufacturer for both units and see what their recommendations are.

Okay, so, let’s talk about matching your amplifier to your speaker’s wattage.

When you’re matching amps to a speaker’s wattage, you want an amp that can push two times the amount of power the speaker can handle continuously. That way, you have more headroom, and you don’t have to drive the amplifier to its limits.

Be careful not to increase the volume on the amplifier all the way up, because if it delivers twice the power, a speaker can handle it could easily burn the coil. Run the amp at about 60 to 70% of the total power, and you will get rich, clean sound without any distortion. That way, your speaker will run happily as well as your amplifier.

If you don’t feel comfortable connecting your speakers to an amp that is twice as powerful fearing that they’ll burn if you don’t have control over the volume, then the best option for you would be to choose an amplifier that delivers at least the same amount of power as the RMS or continuous power that the speaker can handle.

For instance, if you have 300 Watt speakers, what size amp should you choose? The answer is, ideally, an amplifier that delivers 600 Watts, running it at 60 to 70% of its maximum volume. You also have the option of using an amp that provides at least 300 Watts, but you have to make sure not to run the amplifier at its clipping point.

Recommended Amplifier Power for Speaker Chart

Speaker RMS Power RatingMinimum Recommended Amplifier Power (RMS) Ideal Recommended Amplifier Power (RMS)
50 Watts50 Watts100 Watts
100 Watts100 Watts200 Watts
200 Watts200 Watts400 Watts
300 Watts300 Watts600 Watts
500 Watts500 Watts1000 Watts
1000 Watts1000 Watts2000 Watts

Amplifier Headroom

Another essential fact to keep in mind when choosing the right amplifier for loudspeakers is the headroom. Oh yeah, and what’s headroom?

Headroom is a term used to describe the amount of power your amplifier can continuously deliver before distorting the sound. In other words, the ability to provide enough power without driving the amp into its clipping point.

When it comes to audio speakers and amplifiers, if your amp can’t deliver enough power to the speaker, it will start to distort before providing the energy needed to make the speaker work to its full potential.

Think about this…you see a tall guy walking toward a doorway. You know he’s got X amount of clearance to get through without hitting his head. An average doorway is 6.6’ – so what happens when basketball player Yao Ming walks toward that door, who happens to be 7.6’? Right, he meets resistance.

Same thing with headroom in audio. You have X amount of power available from the amplifier; if the speaker needs more to work to its full potential, then it doesn’t matter if the amp is at its maximum, it wouldn’t be able to deliver enough output level.

You always want to have enough headroom so that the amp works within its ideal area.

Matching the numbers of watts is only half of the story; you also need to match the impedance between the amplifier and speaker as well.

Okay, now let’s go deeper into impedance. Keep reading to find out how it affects the amplifier’s power.


The Speakers’ Impedance is Key When Choosing an Amplifier – Speaker Impedance Matching

So, what is speaker impedance, and how does it affect the amplifier’s power? Well, we learned earlier that impedance is the measure of the resistance that the speaker presents to the amplifier.

Why is it important to know? Because mismatching the impedance between speakers and amps can create too much of a load for the amplifier, causing it to overheat and stop working.

Let me give you a visual. The little creek down the way is happily flowing along, but then a beaver builds a dam and starts to slow the water’s flow down. This is the same thing as your energy resistance with ohms.

Your signal is moving along happily, and then it meets resistance. You don’t want too much friction; you’d prefer a clean flow of water without it. It’s a happy balance. That’s why matching an amplifier to the speaker’s impedance is so essential.

Connecting Speakers in Parallel

Speakers can be connected in parallel (the most commonly used) and series (rarely used). It is always recommended to connect speakers of the same impedance to avoid mismatches.

When connecting speakers in parallel, the total impedance will be decreased each time another one is added to the amplifier. The most common speaker impedances are 16 Ohms, 8 Ohms, and 4 Ohms.

When connecting speakers in parallel, the connection goes from the positive terminal of the first speaker to the positive terminal of the second speaker. And the negative terminal of the first speaker to the negative terminal of the second speaker, and so on depending on the number of speakers you want to connect.

The following diagram illustrates what I explained in the previous paragraph.

Ready for an example?

Let’s say that you have two 8-Ohms speakers. If you connect them in parallel, you will end up with 4 Ohms of total impedance. If this is the case, then your amplifier should be capable of handling 4 Ohms at the RMS value of the loudspeakers.

Let’s do it again. This time let’s say that you want to connect four 8-Ohms speakers. After connecting them in parallel, you will end up with a total impedance of 2 Ohms.

Basic math, forget all the fancy equations the internet throws at you, and keep it simple. But instead of getting into more details, I’ll leave you with this handy chart.

Quick Reference Chart for Speaker Impedance Matching

Number of Speakers Connected in ParallelRated Impedance of Each SpeakerTotal Impedance as Seen by the Amplifier
24 Ohms2 Ohms
28 Ohms4 Ohms
216 Ohms8 Ohms
34 Ohms1.33 Ohms
38 Ohms2.67 Ohms
316 Ohms5.33 Ohms
44 Ohms1 Ohm
48 Ohms2 Ohms
416 Ohms4 Ohms

Here’s a key to understand

How much current flows, but there’s a pesky detail to throw in here… because the resistance is actually with the speakers, the numbers you see on the amp are really about how they work with the speakers (usually in the form of speaker range) and what’s optimum to work with. But to continue the concept of flows, keep these basic thoughts in mind.

  • An amplifier connected to a low impedance speaker (4 Ohms or 2 Ohms) needs to put out a higher current, that’s why lower impedance speakers are harder to drive and consume more power.
  • The same amplifier connected to a higher impedance speaker (8 Ohms or 16 Ohms) puts out less current to drive the speaker.

So, when passing a signal from the amp to the speaker, you want those numbers to match as closely as possible. So, you’re aiming for equal.

Remember our chart of the common speaker loads in parallel configuration? By selecting a speaker configuration with a specific impedance and making sure that the amplifier can deliver the amount of power at that impedance will create an easy flow of power exchange between the two units.

This is why the loudness of a sound system should never be deduced from the amount of power a speaker can handle or the power an amp can deliver. Loudness is an entirely different story.

It’s measured in dB (Decibels), and it’s referred to as SPL (Sound Pressure Level). Check out what SPL is in audio and why you need to pay attention to this metric when defining the efficiency of a loudspeaker or amplifier.

READ: Best PA Systems For Live Bands


Final Thoughts

All of that to say, don’t stress yourself out. When it comes time for matching amplifier to speaker’s wattage, remember the basics and don’t get caught up on, he said/she said on all the different audio forums.

Learn the foundation of these details first, because once you understand them, you’ll be a step ahead of those left scratching their heads from getting too many different answers. And when it comes time to figure out how to choose an amplifier for speakers—you’ve got this.

How to Hook Up a Subwoofer to a PA System

When it comes time to set up equipment, it can be intimidating if you haven’t done it before. No worries, we’re going to show you how to hook up a subwoofer to a PA system with three different methods, so you can see that it’s a job you can easily tackle.

When doing a live sound subwoofer setup, we’ll first look at using an external crossover or PA management system. Then, we’ll take a glance at how to add a sub leveraging the active crossover that comes with any powered subwoofer, and lastly, by using a sub-mix. This is achieved with your mixing console by using the “Aux Send” or “Auxiliary Mix” option. Ready to get started?


How to Hook Up a Subwoofer to a PA System: Live Sound Subwoofer Setup

There are three methods to add a subwoofer to a PA system:

  • Using an external crossover or PA management system
  • Leveraging the active crossover that comes with a powered subwoofer
  • By Setting up a Sub-Mix using the Mixing Console

Let’s take a closer look at each one of these options in more detail.


Method 1 – Using a Crossover or PA Management System

If you’re looking for an easy way to hook up a subwoofer to a PA system, this is the first method I’d go with, especially if setting up passive subwoofers. In fact, it’s the system that most rely on. It’s easy to set up, and it’s reliable. The idea is to feed the signal through, then break it into different frequencies, while sending them to the appropriate places.

With crossovers, you’ll have one of two options. Use the active one that most likely came with the powered subwoofer or opt for an outboard if you’d prefer more control. Crossovers come in differing variations, depending on how complex you want to get with 2, 3, and 4 ways systems.

So, basically, you’re going to feed your full frequency signal into your crossover, and this then sends the different frequency signals to each speaker and your low frequencies to your subwoofer.

Diagram for Adding a Subwoofer Using an External Crossover

The following image is a diagram showing the signal flow and connections your need to make to add a subwoofer to your PA system using the external crossover method.

Diagram for adding a subwoofer  using an external crossover or PA management system

READ: Difference Between Active and Passive Speakers


Method 2 – Leveraging the Active Crossover that comes In a Powered Subwoofer

If you are using active speakers and subwoofers for your PA system set up, using the active crossover included would be the best way to add a sub to your live sound. This is not going to cost extra because the crossover is included inside the subwoofer.

Most active subwoofers come with an internal active crossover that you can use for your advantage. It allows you to connect the full range signal coming from the main outputs of the mixing console, and internally, it separates the frequencies that go to the sub’s power amplifier and the loop signal that goes to the tops.

Just to clarify, “tops” refers to the full-range powered speakers that usually go on top of the subwoofer’s cabinet.

Adding a subwoofer to powered speakers by using the sub’s active crossover is very easy. All you have to do is connect the signal cable coming from the audio mixer to the subwoofer’s input channel. Then from the output loop, connect a cable to the full range speaker. Select the cutoff frequency you want, and that’s it.

I have dedicated a full article of the best powered speakers with their companion subwoofers. These speaker/subwoofer combos deliver exceptional quality, excellent sound, and are very easy to set up.

The following image is an example of the connectors you need to look for when adding an active subwoofer to your PA system.

Diagram for Adding a Subwoofer Using its Internal Crossover

I have also included a connection diagram to make it easier for you to follow the signal flow and have your PA system set up ready in no time.

Diagram for adding a subwoofer using its internal active crossover

READ: How to Daisy Chain Active Speakers


Method 3 – By Setting up a Sub-Mix using the Mixing Console

If you want more control over those low frequencies for extra bass and thump, you may like choosing which specific signals to send to the subwoofer. In this case, you’re going to opt for a sub-mix.

You’ll see the terms “Auxiliary Mix” and “Aux Send” used interchangeably. It’s just another expression, so don’t let that jar you when you’re learning how to hook up a subwoofer to a PA system. Different people use different words, but it’s all the same here.

Another reason people may choose this method of live sound subwoofer setup is the concern with muddiness. If there’s a problem with the mix or filters, and too much low is pumping through without the correct adjustment, the sound can get a little muddy, which basically means that the sound is not clear delivering weak harmonics, and a smeared time response.

Okay, ready to get started? Now, while you’ll most likely use method one, you may move around a lot and have a sound guy really involved in the mix, but that means you probably have engineers who focus on this. Otherwise, for simplicity’s sake, stick with the first method.

In this case, you’re going to feed your signal out to your subwoofer via the “Aux Send.” This is ideal when you have a lot going on, have a big ole mixer, and a lot of mics. This has to do with the frequency range of the different mics, voices, and instruments. With a lot going on at one time, this allows you to pull out and adjust only the areas needed going to the subwoofer.

The image below shows you a typical analog mixer with the “Aux Send” highlighted for easier reference. Basically, you would connect a cable going from the “Aux Send Output Connectors” to the subwoofer’s input.

Then you would increase or decrease the Aux knob on each channel depending on which one you want to send to the subwoofer.

Lastly, there are “Aux Send Master Volume Control” knobs that increase or decrease the volume level for all of the selected channels.

This connection scheme gives you the most control over what goes to the subwoofer, helping you have a cleaner mix avoiding muddiness in the sound.

Adding a subwoofer setting up a sub-mix using the mixing console

READ: Mixing Console Basics


Which method should you choose?

Choose the one that is more practical for you. If you have passive speakers, method 1 would be the best option. The reason is that with an external crossover, you would be able to divide the frequencies in Hi, Mids, and Lows, then send the corresponding frequency to each amplifier.

Instead, if you are using powered or active speakers, method 2 would be perfect for you. Just make sure that the subwoofer you purchase comes with an active crossover.

The third method works perfectly well if you need more control over which channels go to the subwoofer. That way, you get a cleaner mix avoiding any muddiness in the sound.

Please understand that the Sub-Mix method could work perfectly well either with an external or internal crossover. It just gives more flexibility and control over the signal path.


When Learning to Hook Up a Subwoofer to a PA System, Learn the Basics First

I suggest getting comfortable with the basics before jumping into everything else. Here’s why. Build your foundation, have something easy to rely on, and fall back on. Then, when your confidence has grown, you’re more used to working with your equipment, you can then expand and experiment from there.

Like anything, when you’re learning something new, learn the basics, know them inside and out, and build from there.

The following links are easy to read articles that explain the essential knowledge you need for setting up a PA system. I have also included some recommended PA systems that could make your setup easy, still delivering excellent sound.

READ: How to Set Up a Stage Sound System

READ: Public Address System Components – Everything You Need to Know

READ: How to Position PA Speakers

If you have any questions or comments, please let us know in the comments section below. Thank you for reading my blog.

  • « Go to Previous Page
  • Page 1
  • Page 2
  • Page 3
  • Page 4
  • Page 5
  • Go to Next Page »

Primary Sidebar

Search

Guides & Tutorials

  • Choosing a Portable PA System
  • How to Be a Better Singer
  • Build a Budget Live Streaming System Using PTZ Cameras
  • How to Get the Best Audio Quality on YouYube
  • Setting Up Stage Monitors
  • Mixing Console Basics
  • How to Position PA Speakers
  • Stage Sound System Set-Up
  • How to EQ Live Vocals
  • How to EQ Live Sound
  • Daisy Chain Active Speakers
  • Zoom Audio Settings for Music
  • How to Livestream a Wedding
  • Improve Your Livestream Audio Quality
  • Microphone Preamp Buying Guide

Featured Posts

Treblab X9 Pro: Tough Earbuds, Big Performance

Escape the Noise: Best Affordable Noise-Canceling Headphones

How to Combine Passive and Powered Mixers

What is a Ground Loop? – 5 Simple Ways to Fix the Buzz and Hum

Disclaimer

VirtuosoCentral.com is a participant in the Amazon Services LLC Associates Program, an affiliate advertising program designed to provide a means for sites to earn advertising fees by advertising and linking to Amazon.com.

Home  About  Contact  Disclaimer  Privacy

Copyright © 2019-2025 Virtuoso Central. All Rights Reserved.