Your precious memories stored in VHS tapes are at risk. Research has shown that VHS tapes can deteriorate in as little as 10 years due to magnetic decay. That’s considering it’s stored in an ideal environment with a humidity between 40-50% and temperatures between 64-70°F (18-21°C).
If you haven’t converted your family’s early memories to digital files, you should do it as soon as possible. And if you are reading this post, you are considering the importance of doing so before it’s too late.
This post will show you a couple of methods you can use to convert your VHS tapes to digital and store them permanently in a format that won’t lose quality over the years and can be easily shared with friends and family with the push of a button.
Additionally, I will show you the devices you need to turn your old tapes into digital videos by yourself at home, saving you hundreds, even thousands of dollars if your collection is quite large. Let’s get started.
Two Simple Ways to Convert Your Old VHS Tapes to Digital
Turning your old tapes into digital videos is an easy task if you have the correct tools. The two best methods are:
- Using a video/audio capture device – Needs a computer
- Using a standalone digital video capture/recorder – No computer needed
Please note that you need to have a VCR to play the tapes and convert them to digital. The information presented in this post also applies if you want to convert your old camcorder tapes, Video8, Hi8, or any other analog or digital video recordings. Still, you need to play these tapes to convert them using the capture device or recorder.
Basically, the way we will do this is to take the analog video/audio signal coming from the VHS player, digitize it, and store it in either the universal H.264 digital video format or MP4 video format. Choosing a video format to store your VHS videos will depend on the type of converter you select.
These formats are ready for Windows and Mac computers. They are also supported by Android smartphones, iPhones, iPads, smart TVs, and any video editing software of your choice.
Want to upload the converted videos to social media or the cloud? No problem, the converted digital files can be used in any social media platform, including YouTube.
1. Using a Video Capture Device to Convert VHS Tapes to Digital Format
In this case, the purpose of using a video capture device is to take the video and audio feed from the VRC player, digitalize it, encode it to H.264 or MP4 digital video format and transmit it to a computer through the USB cable.
Most video capture cards used for converting VHS to digital come with bundled software offering simple tools that allow you to trim the beginning and end of the captured video. Some also include enhancement tools to bring back to life old videos.
Here is a list of the best VHS to digital video/audio capture devices available in the market today (links to Amazon):
To connect the video capture with your VCR, follow these steps:
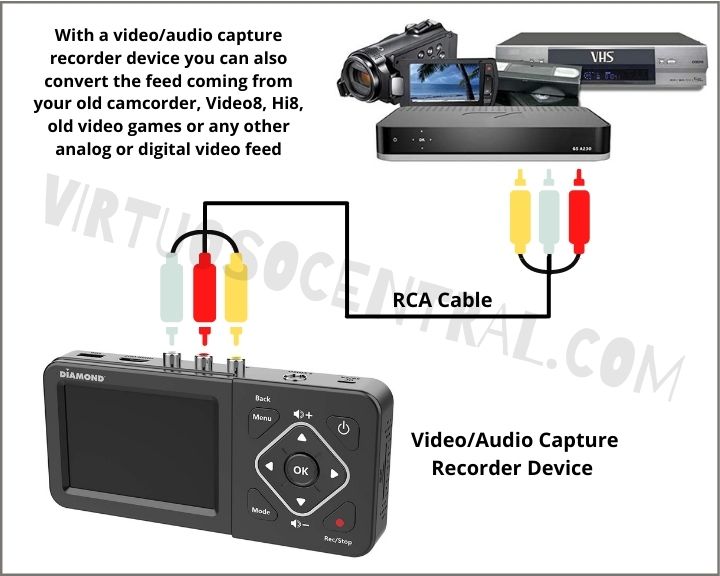
- Using the included RCA cable, plug the yellow, red, and white cables into the corresponding connector on the VCR player.
- The other side of the RCA cable, connect it to the video capture card as shown in the diagram below.
- On your computer, install the included software.
- Connect the USB cable from the capture device to the computer. After a few seconds, you should see a pop-up message on your computer saying that the connected device is installed and ready to use.
- Open the application software you installed, and follow the on-screen instructions to select the screen resolution and video format of your choice. The most common is MP4.
- If there are no on-screen instructions, go to settings and select the correct on-screen resolution and video format.
- Turn the VCR on and insert a VHS tape to start playing.
- Click the record button to convert the video/audio feed from the VCR into digital format.
- Run a short test to make sure everything works as intended.
- At this point, you can start playing each tape through the converter to change it to digital format.
- Once the VHS tape has been converted, save the video file with the name of your choice.
- Repeat steps 6-10 for each VHS tape that you wish to convert into digital format.
Connection Diagram to Convert VHS Tapes to Digital Format Using a Capture Device

2. Using a Standalone Digital Video Capture/Recorder to Convert VHS Tapes to Digital
Another way to turn your old VHS tapes into digital videos without the need for a computer is by using a standalone digital video capture and recorder.
Basically, this device comes with everything you need inside a small form factor. It accepts any input source with RCA Composite or S-Video and offers HDMI output with a 1280x720p60 resolution if you want to connect it to a TV.
Standalone converters feature a 3.5” LCD display for preview and playback. You can record directly to an SD card or USB Flash Drive plus it comes with built-in speakers to monitor the audio as it is recorded.
If you are looking for an easy way to convert your old VHS tapes to digital without the need for a computer and dealing with software installations, using a standalone digital video converter is your best choice. Here are the best ones available in the market today (links to Amazon):
If you decide to go this route, here are the steps to connect the video capture/recorder with your VCR:
- Using the included RCA cable, plug the yellow, red, and white cables into the corresponding connector on the VCR player.
- The other side of the RCA cable, connect it to the video capture/recorder device as shown in the diagram below.
- Connect the included power supply to the wall and use the USB cable to feed power to the unit.
- Turn on the video capture device.
- Go to the menu and scroll down until you find Video Source and select AV if you want to use RCA cable or S-Video to use the S-Video connection. You can also use the menu to change the language, time, and other settings such as aspect ratio and video format.
- You can use either an SD card or a USB flash drive to record the signal feed. It is also possible to use an external hard drive as long as it has its own power supply.
- To select the type of memory you are going to use, go to the menu and scroll down until you find Default Storage Device. Choose between SD or USB.
- Insert an SD card or flash drive into the corresponding slot.
- Please note: the device might ask you to format the memory card or flash drive. Doing so will erase anything stored on the card or flash drive. Please make sure you don’t have any critical information on them before accepting to format.
- Turn the VCR on and insert a VHS tape to start playing.
- Click the record button to convert the video/audio feed from the VCR into digital format.
- Run a short test to make sure everything works as intended.
- At this point, you can start playing each tape through the converter to change it to digital format.
- Once the VHS tape has been converted, save the video file with the name of your choice.
- Repeat steps 9-13 for each VHS tape you wish to convert to digital format.
Note: This procedure can be used to convert to digital format any video source from devices such as camcorders, Video8, Hi8, even old video game consoles can be connected to this device, and because it outputs HDMI, you can see the video feed in bigger TV screens. Just know that when the HDMI cable is connected, the 3.5” screen turns off.
Connection Diagram to Use a Standalone Video Converter
Standalone Video Converter Review
Tips to Get Better Results When Converting your VHS Tapes to Digital Format
To get the best possible video quality, your VHS player needs to be in good condition. This means that its magnetic heads need to be clean and calibrated.
To clean the heads is pretty simple. All you have to do is use a VHS head cleaner, insert it into the VHS player and let it run for a few minutes. Then you would remove it and play your tapes.
You’ll know if the heads need alignment if the video that is being played flickers and you see lines on the screen. In some cases, flickering video with lines is also due to the tapes being damaged. But most of the time, flickering lines on the screen are a tell-tale sign that the tape path needs calibration.
Calibrating or aligning the heads is a more complicated process than cleaning the heads. To do this, you would need to find a technician who has the tools and knowledge to do it.
If you are up to calibrating it yourself, you can find some video tutorials on YouTube that walk you through the process of aligning the tape’s path using a TV and a screwdriver. But please keep in mind that if the process is not done correctly, the problem could worsen or even damage the heads.
Aligning the Tape Path on a VHS Player – D.I.Y
Here is a video I found on YouTube in12voltvids channel showing the process on how to align the tape path.
If your old VCR has mechanical issues such as tapes that won’t play, rewind, fast forward, or eject, it might need repair or replacement.
Nowadays, due to VCRs not being popular because they are old technology, it might be hard to find a place to fix it, and it might not be worth it. If that’s your case, then buying a new one would be the most cost-effective way.
If you are in the market for buying a new VCR, here are the links to the most popular brands available on Amazon:
How to Store Your Digital Video Library
Once you are done converting your VHS tapes to digital, it is vital to have at least three different backups. Digital data can be lost easily if not stored properly. Viruses, hard drive failures, ransomware attacks, accidental computer damage, etc., can destroy your important data. And if you don’t have a backup in place, you lose it all.
Let’s say you store all of your VHS collection on a hard drive. Then one day, you decide you want to watch your videos, and when it is connected to your computer or TV, it gives you an error. Or the drive gets damaged by accidentally dropping it. What to do now? If you don’t have a backup, your data is lost.
This is why it is recommended to have at least three separate backups, and one of those backups should be in a different location, ideally in the cloud. You can have your data stored on a computer. Then as a second layer of backup protection, you can have an external hard drive as cold storage.
In case you don’t know, cold storage refers to the storage of inactive data that is rarely used or accessed. In other words, your cold storage hard drive should be offline, not connected to any computer, and only accessed every few months to ensure the drive’s health.
The last recommended layer of data protection to store your newly converted VHS tapes to digital is to use cloud storage.
Services such as Google Drive, Microsoft’s One Drive, Apple’s iCloud, pCloud, etc., can be used to store your important data in the cloud. This will protect you against losing important files in case of computer viruses, ransomware attacks, accidental computer or hard drive damage, etc.
If the free options don’t provide you with enough space, you can easily upgrade for a few dollars a month, and believe me, when the time comes, you will be glad you did.
Taking these precautions with your digital data will ensure that you always have a backup if the worst happens.
Final Thoughts
When it comes to converting your precious memories stored on decaying VHS tapes, you are racing against time. The longer you wait, the worst it will get.
If your VHS collection is older than 10 years old, then you should consider converting your VHS to digital as soon as possible,
If you already have a VCR player, all you have to do is follow any of the two options presented in this article and do it as a weekend project. You will be glad you did once you know that your memories are safe on two, even three, different digital storage devices.