This website uses cookies to improve and personalize your visit. Learn more about cookies. Got It

  • Skip to primary navigation
  • Skip to main content
  • Skip to primary sidebar

Virtuoso Central

  • About Us
  • Contact
  • Privacy

Tutorials

How to Combine Passive and Powered Mixers

If you’re part of a growing band, you might already be familiar with the challenge of needing more audio channels than your equipment currently supports. Perhaps you’ve been using a passive mixer paired with a couple of powered speakers for your performances. But with your band’s expansion, the demand for more channels arises.

While purchasing a new mixer might not be in your budget right now, there’s good news. Remember that powered mixer you occasionally used in the past? It might just be the solution you’re looking for.

Indeed, you can utilize your powered mixer to enhance the channels of your passive mixer and vice versa. However, caution is vital. Making the connection without the right precautions could harm your equipment.

In this article, we’ll guide you through various methods to seamlessly integrate a powered mixer, effectively increasing the channel count on your passive mixer, or use a passive mixer to increase the number of available channels in your powered mixer.

Before we delve into the detailed steps, it’s essential to grasp some foundational concepts to ensure a safe and efficient connection. Let’s dive in!

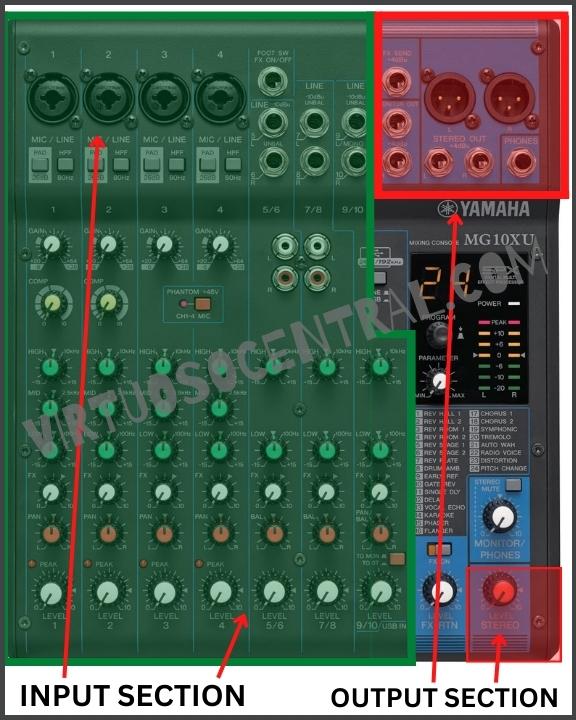
Getting to Know Your Powered Mixer’s Input/Output Structure

If you’re looking to connect a powered mixer to a passive one to expand the number of channels, understanding the input/output structure of your audio mixers is essential to ensure that both your mixers work in harmony without causing damage to any of the devices.

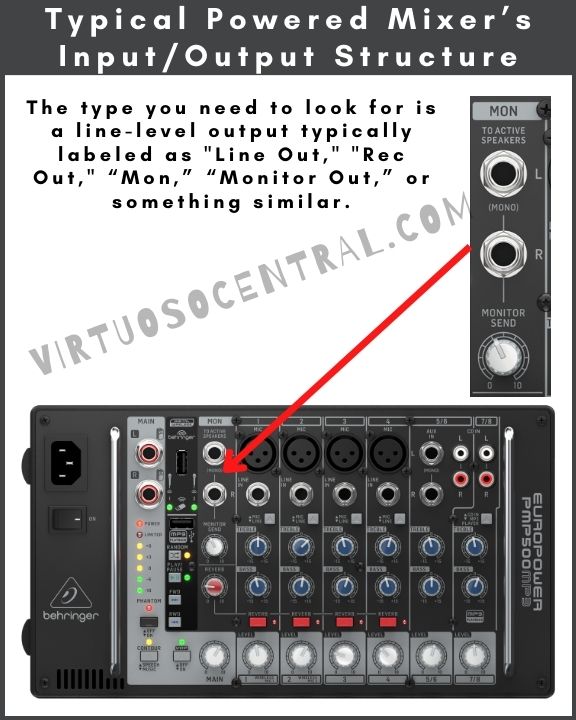
Before connecting anything, the first thing you need to do is to check if your powered mixer has a line-level output that you can tap into to get the signal coming out of it at line level.

Please be very careful NEVER to connect the powered output to a line-level input on a passive mixer, as this will permanently damage the passive mixer and possibly the powered one as well.

To correctly combine passive and powered mixers, always take the following aspects into consideration before making any connections:

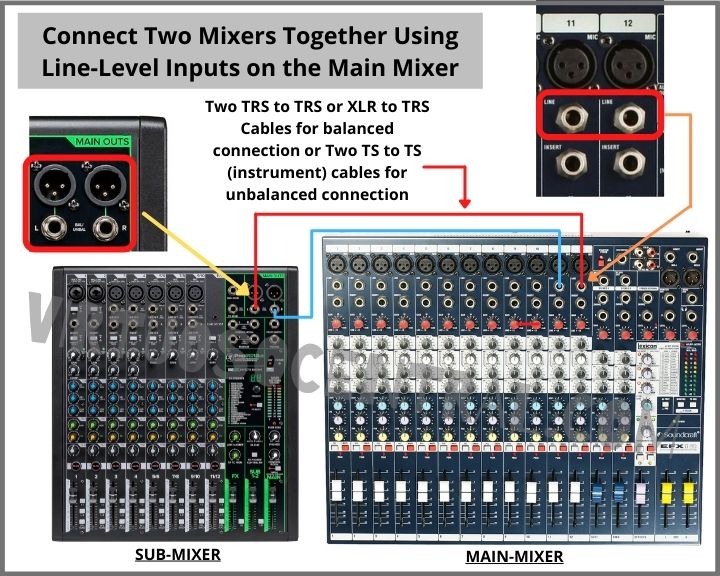
  1. Identify the Outputs on Your Powered Mixer: Most modern powered mixers will have various outputs. These can include speaker outputs, monitor outputs, effects send, and line-level outputs. The type of output you’ll be most interested in is the line-level output. This output carries a signal that’s suitable for connecting to the line-level input of another device, like your passive mixer. It is typically labeled as “Line Out,” “Rec Out,” “Mon,” “Monitor Out,” or something similar.
  2. Differentiate Between Powered and Line-Level Outputs: A powered mixer, as the name suggests, amplifies the sound, and the output is intended to be connected to speakers. It’s crucial to distinguish between these powered speaker outputs and line-level outputs. Connecting an amplified (speaker) output to a passive mixer’s line-level input is a sure recipe for damaging the equipment.
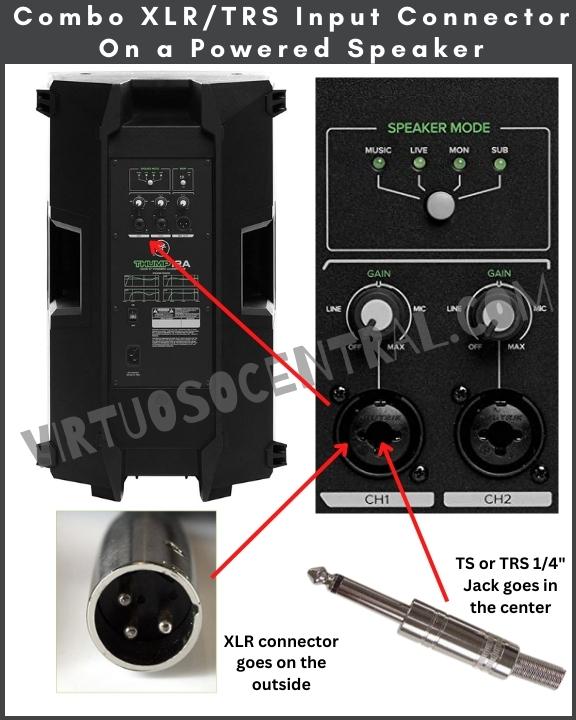
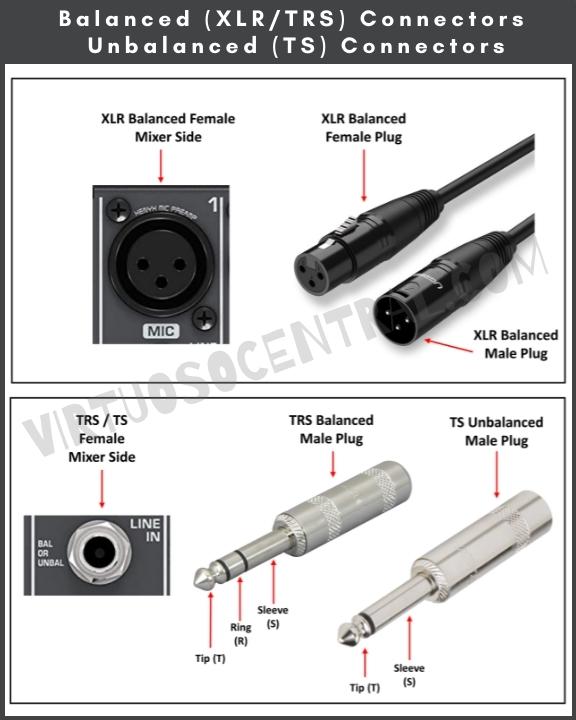
  3. Check for Balanced or Unbalanced Outputs: Some powered mixers will provide both balanced and unbalanced line-level outputs. The balanced outputs (often using XLR or TRS jacks) help reduce interference over long cable runs, while unbalanced outputs (often RCA or TS jacks) are more common in consumer-grade equipment. Determine which type you have, as this will dictate the type of cable you’ll need to make the connection.
  4. Understand the Signal Flow: When you’re expanding your channels by connecting two mixers, it’s crucial to know how the signal flows. The idea is simple: you want the main mix from your powered mixer to feed into one of the line-level inputs of your passive mixer. This way, you can blend the sound from both mixers and achieve a more extensive mix.
  5. Safety First: As already emphasized, never connect a powered (amplified) output to a line-level input. The excessive power from the powered output can cause irreversible damage to the circuits of a passive mixer, which is designed to handle much lower signal levels.

The image below shows the typical input/output structure of popular powered mixers. Pay special attention to the highlighted area, as it shows the line-level output you need to look for on your powered mixer.

Understanding Your Passive Mixer’s Input/Output Structure

To correctly use a passive mixer to combine it with a powered mixer, always take the following aspects into consideration before making any connections:

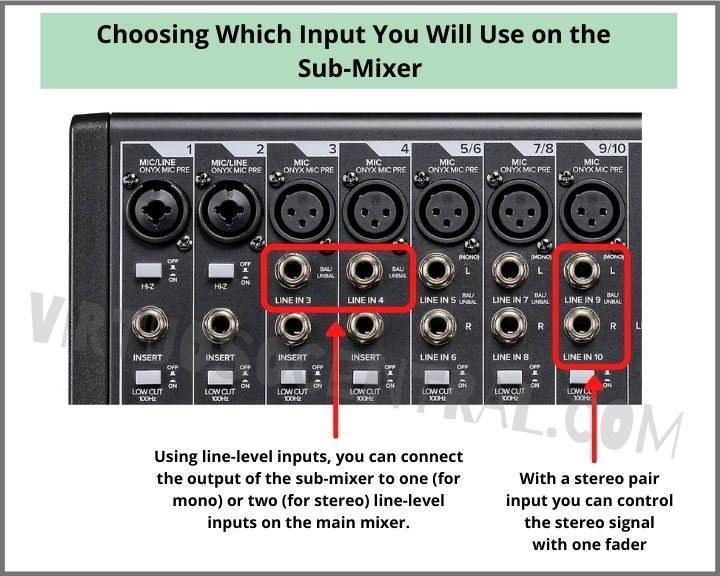
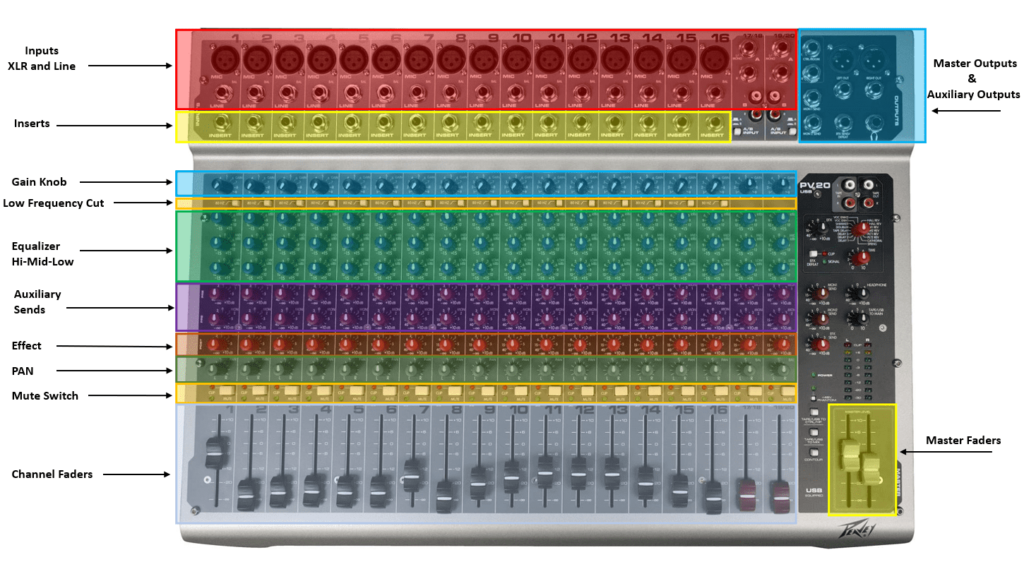
  1. Identify the Inputs on Your Passive Mixer: Passive mixers will have a variety of inputs to cater to different sound sources. These can range from microphone inputs, line-level inputs, stereo inputs, and perhaps even phono inputs. The most common types you’ll encounter are mic inputs (usually XLR) and line-level inputs (often 1/4″ TRS or RCA jacks).
  2. Distinguish Between Mic and Line-Level Inputs: While it might seem trivial, it’s essential to understand the difference. Mic inputs are designed for signals from microphones, which are typically weaker and need more pre-amplification. Line-level inputs, on the other hand, are meant for signals from devices like CD players, keyboards, or even other mixers, as is the case in this article.
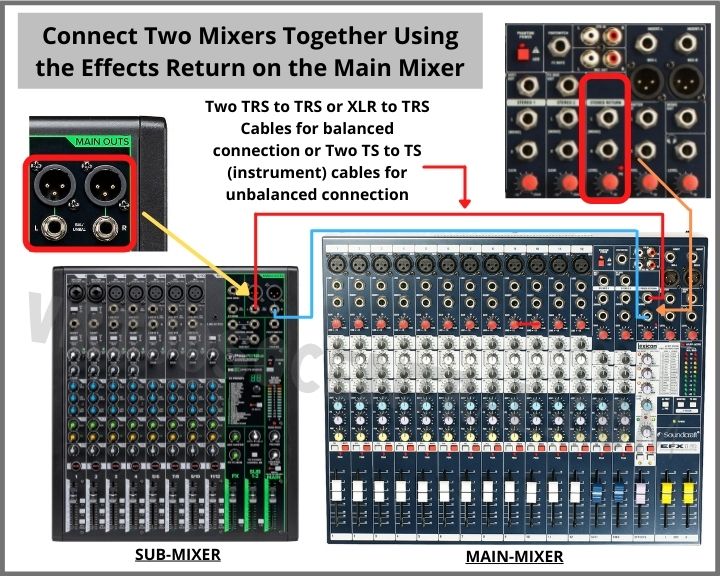
  3. Locate the Outputs: If your goal is to use a passive mixer to increase the channel count on a powered mixer, you would need to connect the output of the passive mixer to an available input channel in the powered one. Typically, you would use the main mix outputs, control room outputs, auxiliary sends, and sometimes sub-group outputs. For connecting to another mixer, like a powered mixer, you’ll most likely use the main mix outputs or auxiliary sends.
  4. Understand Signal Routing Options: Many passive mixers come with routing options like bus assignments, pan controls, and auxiliary sends. Getting to know these will allow you to direct your sound sources to specific outputs or effects with precision.

If you are not too clear about the different parts of an audio mixing board, here’s an article that provides you with the mixing console basics that will help you get familiarized with the different sections and knobs that make up a mixing board.

The image below shows the typical input/output structure of a few popular passive mixers. Pay special attention to the highlighted area, as it shows the line-level inputs and outputs you need to look for on your passive mixer. Keep in mind that they might be labeled differently on your mixer.

sections of a mixer

This is What You’ll Need to Make the Connection

Before starting to make the connection, make sure you have the necessary cables on hand. The type of cables you would use will depend on your mixers.

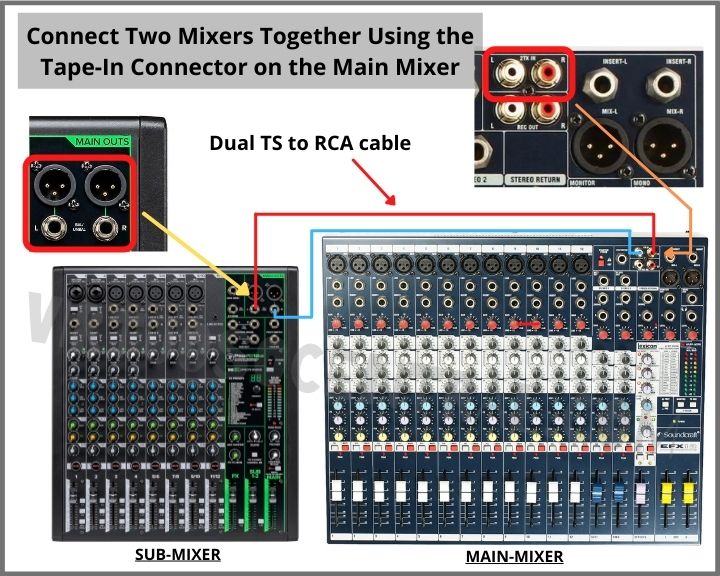
Most powered mixers use ¼” Jack connectors to route signals out of the “Line Out,” “Mon,” or “Monitor Out.” You might also have a “Rec Out,” which uses RCA connectors. If using ¼” jack Connectors, it will most likely be an unbalanced TS cable.

In some cases, more professional powered mixers offer balanced XLR or TRS cables to route line-level signals out of the mixer.  

If you are not sure which type your mixers use, you can always check the manufacturer’s specifications in the manual or on their website.

Here is a short explanation of each type and a few suggestions you can buy if you don’t have the cables on hand.

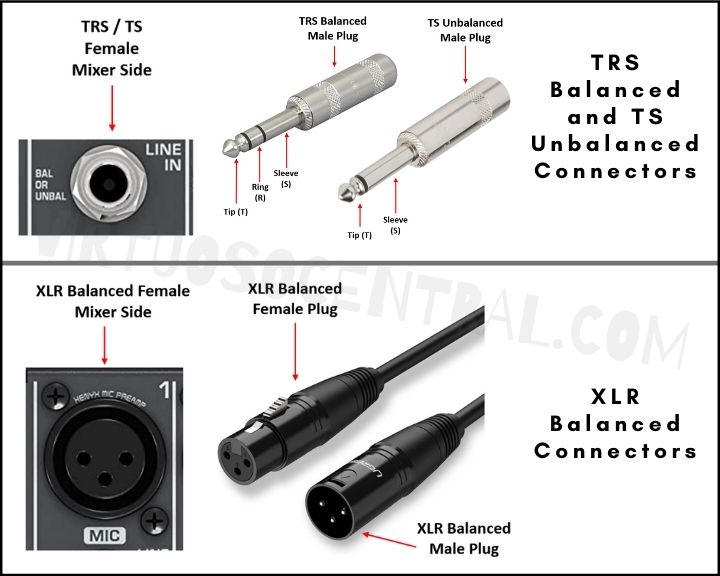
Balanced XLR and TRS

XLR: XLR connectors can be either male or female and have three pins in a round shape. They’re mainly found on professional sound gear and mics. They’re popular choices for balanced cables.

Here are a few suggestions of XLR cables you can get:

  • Amazon Basics XLR Cable
  • Audio Technica XLR Cable

TRS: The TRS connector looks like the end of the headphones you plug into devices. Some might know it as a jack plug. “TRS” means tip, ring, sleeve. The tip (T) carries the main signal, often linked to a red cable. The ring (R), typically linked to a black cable, carries an opposite signal. The sleeve (S) is for grounding or protection.

These are a few TRS cables you can grab to make the connection:

  • HOSONGIN ¼” TRS Male to Male Patch Cable
  • Monoprice ¼” TRS Male to Male Cable

Unbalanced TS and RCA

TS: The TS connector has two parts: tip and sleeve. It uses two conductors. The long, thin part is the ground, while the pointy tip carries the sound. This will be the most likely cable you’ll need to make the connection, as is widely used in the industry for carrying line-level signal out of one mixer to connect it to another.

Here are a few TS cables you can buy if necessary:

  • Dual 1/4″ TS to dual 1/4″ TS
  • Hosa Dual 1/4″ TS to dual 1/4″ TS

RCA: You’ve likely seen this plug on stereo gear. Sometimes called a phono connector, it has a small bump at its end that you plug in. It’s thinner at the tip than a typical TS connector.

  • Hosa Dual 1/4″ TS to Dual RCA
  • Roland Dual 1/4″ TS to Dual RCA Cable

Preliminary Setup

Before physically connecting the mixers, a few preliminary steps will ensure a safer and more efficient setup.

Positioning: Arrange both mixers so that their input and output points are easily accessible. This minimizes the hassle when making connections.

Ventilation: Ensure there’s adequate space around and especially between the mixers. This allows for proper ventilation, reducing the risk of overheating, which can damage the equipment or degrade audio quality.

Power Down: Starting with both mixers powered off is a crucial step. This precaution prevents potential electrical surges that might damage the equipment. Additionally, it can prevent sudden loud noises or feedback, which could harm the speakers or, more importantly, the ears of anyone present.

Steps For Making the Connection

Connecting the mixers is straightforward, but precision is key to avoid potential damage.

  1. Start by making sure both mixers are powered off.
  2. On the powered mixer, turn the main volume down. Locate the ¼” main output jacks where you connect the speakers and use electrical tape to cover it so that none of your bandmates accidentally connect it to the mixer to avoid equipment damage.
  3. Identify the line-level output you will use to send the signal from the powered mixer to the passive mixer. Remember that it’s typically labeled as “Line Out,” “Rec Out,” “Mon,” “Monitor Out,” or something similar.
  4. Use the correct cable and connect it to the line-level output. Most likely, you will be using a Dual 1/4″ TS to dual 1/4″ TS.
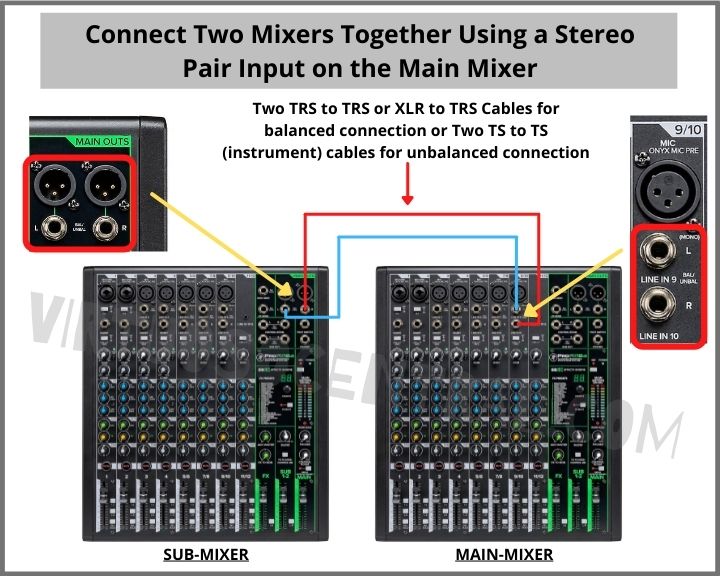
  5. At this point, you need to identify an available input channel on the passive mixer to receive the signal coming from the powered mixer and connect the cable. I recommend using a stereo channel.
  6. Turn on both mixers and play a sound source on the passive mixer while slowly increasing the volume on both mixers until you hear the sound coming out of the speakers.
  7. At this point, set the mixers to produce a good sound by adjusting the gain, volume, and EQ as necessary. Always monitor the VU meter to make sure the signal is not saturating. It should always be in the green or yellow area at maximum.

The Other Way Around – Connecting a Passive Mixer to Expand a Powered Mixer Channel Count

A passive mixer does not amplify the signal; it only combines audio signals at line-level. By connecting a passive mixer’s output to a powered mixer, you effectively expand the number of channels you can mix.

The powered mixer then amplifies the combined signals for output to the speakers. This setup is useful for situations where the number of inputs on a powered mixer is insufficient for your needs.

Here are the steps to connect a passive mixer to a powered mixer to expand the channel count:

  1. Ensure you have the appropriate cables, as mentioned previously, typically XLR or 1/4-inch cables.
  2. Connect the output of the passive mixer to an input channel on the powered mixer using an XLR or 1/4-inch cable. The passive mixer’s output will typically be labeled as “Main Out,” “Stereo Out,” or something similar.
  3. Adjust the volume levels on the passive mixer. This step involves setting the individual channel levels and the master output level to ensure a clean signal is sent to the powered mixer. Never allow the signal to saturate, meaning that the VU meter should never get above the green or yellow LEDs, or “0dB.”
  4. On the powered mixer, set the level for the channel to which the passive mixer is connected. Start with a lower setting to avoid sudden high volume or feedback.
  5. Test and adjust by sending audio through the passive mixer and adjusting the levels on both mixers. Your goal is to balance the sound from the channels of both mixers, ensuring there’s no distortion and that the mix sounds cohesive.
  6. Fine-tune EQ and effect as necessary. To know how here’s an article that explains how to EQ different sound sources.
  7. Continuously monitor the sound through headphones or speakers connected to the powered mixer. Adjust as needed during use.

Real-Life Example – From One of Our Readers

I got an email from one of the readers of my blog asking me the following question:

“I currently use a Behringer Xenyx X1222USB analog mixer for our main live PA system. However, as our band has grown, we need more input channels. I also own a Behringer PMP500MP3 powered mixer, which I primarily use at home. I’m wondering if I can integrate the PMP500 as a sub-mixer into the main Xenyx system, utilizing its line-level stereo inputs.”

Following what is explained in this article, this is what I responded:

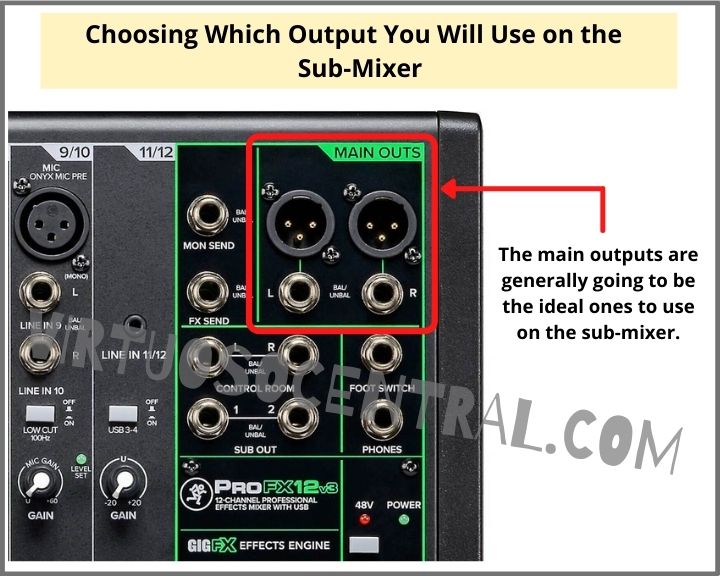
“If you check out the PMP500 powered mixer, you’ll notice that it offers a monitor output labeled “MON” that provides a line-level signal.

This output (MON) is a line-level output usually used to connect active speakers on stage to serve as monitors. Please look at the image below.

For this connection, you would need a Dual 1/4″ TS to dual 1/4″ TS stereo interconnect cable to go from the MON outputs (L and R) to the Xenyx mixer. You could use channel 11/12, as it is a stereo channel by default. 

You would need to keep the MAIN volume on the PMP500MP3 all the way down, meaning at “0.” Then you can use the LEVEL knobs on each channel to dial in the volume for each channel and use the MONITOR SEND knob as the main volume going to the Xenyx mixer. 

Before you begin, ensure that all the channel levels and the MONITOR SEND are set at “0” to start with, then slowly increase the volume until you get a signal on the Xenyx mixer. Please, make sure that the MAIN knob stays at “0” while using the powered mixer to avoid damaging the amp. Also, I would recommend using tape to cover the 1/4″ main output jacks where you connect the speakers so that none of your bandmates accidentally connect it to the mixer to avoid equipment damage.” 

Conclusion

Connecting a passive mixer to a powered mixer or vice versa can offer a multifaceted approach to sound mixing by increasing input options, offering more control over sound sources, and promoting cost efficiency.

By following the right connection procedures and cautionary measures, as explained in this article, you can effectively optimize your sound setups and manage multiple audio sources with precision and ease.

For more articles like this one, visit my site at virtuosocentral.com

How to Connect a Powered Subwoofer to Passive Speakers

Adding powered subwoofers to an existing PA sound system with passive speakers is easier than you might think.

The are several ways to achieve this, but the easiest and more straightforward method of connecting a powered subwoofer to passive speakers is to take the audio signal from the main outs of the mixer, feed it into the powered subwoofer first, then use the internal crossover of the sub to feed the amplifier that powers the passive speakers.

So basically, the subwoofer sits between the mixer and the amplifier that feeds the passive speakers.

The advantage of using this method is that you can integrate a subwoofer into an existing system without needing to use Aux Sends, Subgroups, or external frequency crossover. And it only takes a couple of extra XLR or TRS cables.

In this post, I will show you a couple of ways you can use to connect a powered subwoofer to passive speakers. Best of all, you can do it in just a few minutes using a couple of cables. If you have powered speakers instead and want to add subwoofers, check out this article as I explain that process in detail. Let’s get started.

Two Simple Methods to Connect Powered Subwoofers to Passive Speakers

The first method is by having the powered subwoofer sit before the amplifier that powers the passive speakers. Basically, the signal from the mixer goes first to the sub, then continues its path to the amp.

The second method is by connecting the mixer to the amplifier first, then using the line-out of the amplifier to send the audio signal to the powered sub. Please note that this method only works if the amplifier that powers the passive speakers has a line out for each channel. If it doesn’t, you must use the first method.

Before we continue with the step-by-step process to make the connection using any of the two methods, there are a few things we need to know, which I explain in the following sections.

Getting to Know Your Subwoofer’s Input/Output Structure

If you look at the back of your active subwoofer, you will notice several XLR or XLR/TRS Combo connectors used to receive and send signals to and from the sub (Check the image below for your reference).

Active subwoofers have a built-in feature called a “Frequency Crossover.” A crossover, also labeled X-Over for short, is an electronic frequency-dividing network that splits a full-range audio signal into several bands, namely Highs, Mids, and Lows. 

The subwoofer takes on the low frequencies and sends out the Mid/High frequencies to be amplified by the full-range tops or passive speakers, as is the case in this article.

In other words, to add a subwoofer to an existing PA system that uses passive speakers and an amplifier, we need to take the signal coming straight from the mixer, split it up into lows, mids, and highs using the sub’s crossover network to feed the correct frequency to each component.

To simplify things and connect a powered subwoofer to passive speakers, we take advantage of the built-in crossover feature that the powered sub already has, minimizing complexity while getting excellent results.

Powered Subwoofer’s Input-Output Structure

Getting to Know Your Passive Speakers Amplifier’s Input/Output Structure

As mentioned previously, leveraging the amplifier’s line-outs is the second method we can also use to connect powered subs to an amplifier that powers passive speakers.

Basically, with this method, you would leave the connection the way it is. All you would have to do is to locate the line-outs on the amplifier, then run cables from there to the powered sub’s input.

This method is perfect if you have a sound system already installed in a fixed location, such as a church or an event hall.

To locate the line-out on the amplifier, look in the back, as they are usually found next to the input channel. They are labeled “Line Out,” “Link/Out,” or “Thru/Out,” depending on the manufacturer. See the image below for your reference.

Amplifier’s Input-Output Structure

Cables You Need to Make the Connection

To connect the mixer to the powered subwoofer, you need to use balanced TRS or XLR cables, depending on the type of connector your subwoofer uses.

Most subwoofers come with balanced XLR/TRS Combo connectors for the input and XLR for the output (output meaning going to the Tops or, in our case, going to the amplifier that powers the passive speakers).

Some brands only use XLR for the input and output. So before picking up cables to make your connection, always check your powered subwoofer to know what cables to use.

Always use a balanced XLR or TRS connection when going from your mixer to the subwoofer, as it helps to avoid noise in lines, thus delivering better audio quality.

If you don’t have these cables on hand and need to buy them, here are a couple of links to Amazon. You can choose the length according to your needs, but please check what type of connectors your subwoofer uses before buying:

  • Balanced XLR Cable
  • Balanced TRS Cable

Steps for Connecting a Powered Subwoofer to Passive Speakers

Now that you know the input/output structure of your powered subwoofer and amplifier and have the correct cables on hand, it is time to proceed with the connection. Here are the steps for both methods.

Method 1 – Subwoofer Before the Amplifier

  1. Before starting, confirm that all your equipment is turned off and that all the volume knobs and faders are down. This is to avoid sudden loud pops that could potentially damage your equipment.
  2. Set the subwoofers on stage or where you need them at the venue and plug them into the closest power source.
  3. Locate the “Main Outs” or “Main Outputs” on your mixing console and plug the XLR or TRS cables, one to the left channel and one to the right channel. Note: the type of connector you use will depend on your subwoofer’s input connector type. 
  4. Take the other side of the left channel cable and plug it into the left subwoofer’s input. Do the same for the right channel subwoofer.
  5. Take another XLR-to-XLR cable and plug one side into the left subwoofer’s “High Pass Output.” Take the other side of the cable and plug it into the “amplifier input” that feeds the passive speakers. Repeat the same process to connect the right channel sub.
  6. Connect the passive speakers to the amplifier.
  7. At this point, turn all the equipment on and set the volumes and gains to a proper level to run a test.

Here is a diagram depicting the connections you need to make using method 1. Use it for your reference.

Diagram for Connecting a Powered Subwoofer to Passive Speakers where the subwoofer sits before the amplifier leveraging the sub's crossover - Method 1

If you don’t like having a bunch of cables all over the place messing up your setup, did you know you could connect most of your PA system wirelessly? If it sounds interesting, check out this article as I explain the process of connecting your PA system Wirelessly in detail.

Method 2 – Using the Amplifier’s Line Outs

  1. As always, I recommend turning off all the equipment before making any connections. Also, don’t forget to turn down all the volume knobs and faders. That way, you avoid sudden loud pops that could damage your equipment.
  2. Connect your passive speakers to the amplifier. Then connect the mixer’s main outs to the amplifier’s input. Basically, you want to connect your passive speakers as you always do.
  3. Set the subwoofers on stage or where you need them at the venue and plug them into the closest power source.
  4. Locate the “Line Out” or “Link/Out” on the amplifier and plug an XLR or TRS cable into each channel. One to the left channel and one to the right channel. Note: The connector you use will depend on your amplifier line outs and the subwoofer input. 
  5. Take the other side of the cable coming from the Line Out of the amplifier and plug it into the subwoofer’s input. Repeat the same process to connect the other sub if you have one.
  6. At this point, turn all the equipment on and set the volumes and gains to a proper level to run a test.

PLEASE NOTE: Never connect the output of the amplifier (the side that connects to the speakers) to the sub’s input, as this will immediately damage both of your equipment. Make sure you are taking the line going to the subwoofer from the connector labeled “Line Out,” “Link/Out,” or “Thru/Out.” If you don’t see this on the back of your amplifier, next to or below the input connector, your amp doesn’t have this feature, and you can’t connect the powered subwoofer using this method. In that case, as mentioned previously, you need to use method 1.

Here is a diagram showing the connections you need to make when using method 2. Use it for your reference.

Diagram for Connecting a Powered Subwoofer to Passive Speakers where the amplifier sits before the subwoofer - Method 2

Final Thoughts

Now you know if you were wondering how to connect a powered subwoofer to passive speakers. And as you can see, it is an easy task. I hope this post was helpful to you.

There’s so much to know when it comes to mastering audio! For more audio engineering tips and tricks, check out the rest of our informative blog articles here. 

2 Easy Ways to Connect Powered Speakers to a Mixer

Connecting powered speakers to a mixer is a straightforward process you can easily do. In this post, I will show you two easy ways you can use to achieve this.

The first method uses cables, and the second uses a wireless system to avoid having cables all over the place.

Before we get into the nitty-gritty details of how to connect powered speakers to a mixer, if you want the quick answer, here it is: All you need to do is run a couple of XLR or TRS balanced cables from the mixer’s main output to the inputs of each one of the speakers, one to the left and one to the right channels.

If you are not familiar with an audio mixer and audio equipment in general, the answer I just gave you could be hard to understand. That’s why I will go into more detail to show you the proper procedure to achieve this in no time. Plus, I will provide you with easy-to-follow connection diagrams to make it as easy as possible. Let’s get started.

Choosing The Correct Type of Connection

Before we go any further and start connecting things, we need to know what type of connection we want to use to get the correct cables.

There are different types of connectors used in audio equipment, but the most widely used are XLR and 1/4” Jack plugs for Balanced or Unbalanced connections.

If you already know the difference between balanced and unbalanced signals and the types of connectors used for each, you can skip to the next section. If not, read this section, as this is important to know when connecting a powered speaker to a mixer or any other audio equipment.

XLR Connector

The XLR is a style of audio connector that is used primarily for professional audio connections. It has three pins for carrying the signal, positive (red), negative (black), and Ground (cable shield).

XLRs are balanced connections meaning that they cancel out noise. The advantage of balanced signals is that they reject noise from RF or ground loop interference.

This is a must if your cable runs going from the mixer to the speaker are more than 10ft long. The image below shows an XLR connector, both male and female.

1/4″ Jack Connector

This style of connector is also known as a phone jack plug. It was used initially for telephone switchboards and today is still widely used to carry analog audio signals. There are two versions of it, the 1/4″ balanced TRS connector (Tip, Ring, Sleeve), and the 1/4″ unbalanced TS connector (Tip, Sleeve)

The image below shows both versions of a 1/4” jack plug for your reference.

Image showing Balanced XLR/TRS and  Unbalanced TS Connectors

Now that you know the two types of connectors there are for connecting a mixer to powered speakers, you can choose the one that is more convenient for you.

I recommend you use balanced TRS or XLR as this will always be better to avoid noise in lines, thus delivering better audio quality.

If you don’t have these cables on hand and need to buy them, here are a couple of links to Amazon; you can choose the length according to your needs:

  • Balanced XLR Cable
  • Balanced TRS Cable

Getting To Know Your Mixer’s Output Channel Section

Mixing consoles have lots of knobs and several input and output connectors. If you don’t know the basics of a mixing board, looking at one can be pretty intimidating because each knob and connector has its function, and you wouldn’t know where to start.

But don’t feel intimidated because audio mixers are actually straightforward to follow. A mixing console is divided into two main sections: the input and output sections.

The input section is composed of each channel strip, and the output section is composed of the “Main Outputs,” “Subgroup Outputs,” and “Auxiliary Outputs.” In the image below, I have divided the input and output sections of a mixer, the one in green is the input section, and the red is the output section.

Image showing the Input and Output sections on an audio mixing board

Of course, there is more going on with each channel strip which is beyond the scope of this article, but if you are interested in learning more about the basics of mixing consoles, click the link as I have a dedicated, easy-to-follow article that explains this in more detail. 

For the scope of this article and to correctly connect the mixer to powered speakers, we will concentrate on the mixer’s “Main Output.”

Before going any further, you need to locate the Main Output XLR or TRS connector on the mixer’s output section, which we will use to run the signal to the powered speaker.

The image below shows the Main Output connector you need to find on your mixer. This is where you will connect the two cables going to the speakers.

Image showing a Few Examples of Main Outs on Different Audio Mixer Brands

Getting To Know Your Powered Speaker’s Input Section

Now that you know where to get the output signal from the mixer, it is time to locate the input channel on your powered speaker to which you will connect the signal coming from the mixer.

Most powered speakers have two input channels and offer a wide range of input connectors you can choose from to connect your equipment.

We will use either the XLR or TRS connector to make our connection. In most cases, powered speakers come with a Combo XLR/TRS input connector (See the image below for reference).

The combo XLR/TRS connector is the one we will use to connect the cable from the mixer to the speaker.

If you decide to use an unbalanced TS connector because that’s the cable you have and your run is short, connect it to the same plug where you connect the TRS, as shown in the image below.

Please Note: Your speaker may have a MIC/LINE switch on top or under the GAIN/VOLUME Knob. If it does, make sure to switch it to Line. This is because the speaker has a gain structure that makes it more sensitive for mics, as they need more gain to work correctly. But because we are connecting the speaker to a mixer with a line-level signal, it requires less boost.

Image showing a combo XLR/TRS Input Connector On a Powered Speaker

Steps to Connect Powered Speakers to a Mixer – Using Cables

  1. Before we start connecting cables, I recommend turning off the mixer and the speakers. That way, you avoid sudden pops that could potentially damage your equipment.
  2. Bring the master volume faders in the mixer down. Turn the volume down on the speakers as well.
  3. Next, connect the cables to the Main Output of the mixing console—one to the left and one to the right channel.
  4. Take the other side of the left cable and connect it to the left speaker. Do the same for the right-side speaker.  
  5. Now that everything is connected, turn on the speakers and the mixer.
  6. Set the volume on each speaker to the middle.
  7. If your mixer uses faders, bring the left and right channel faders to “0” (0 dB) or “U” (Unity Gain). If the mixer has a knob for the master volume, turn it halfway.
  8. Play some music or use a microphone connected to the mixer to check the volume structure of the setup by slowly increasing the volume slider until you hear sound coming from the speakers adjusting it to suit your needs.
  9. Use the EQ knobs to adjust the highs and lows until it sounds like you want.

The image below shows the connections you need to make to connect two powered speakers to a mixer. If you need to expand your setup to connect four powered speakers to a mixer, I have an article explaining the procedure in detail. Click the link to check it out.

Image showing a diagram to Connect Powered Speakers to a Mixer Using Cables

Connect Powered Speakers to a Mixer Wirelessly

Up to this point, I have covered connecting the speakers using cables. But what if you want to have a setup with no cables to avoid tripping hazards or to have the freedom to place the speakers anywhere you desire in a venue? To do this, you need a wireless audio system for active speakers, such as the Alto Professional Stealth MKII-UHF system (link to Amazon).

The advantage of this system is that you can replace up to 200 feet of console-to-speaker cabling without compromising audio quality. Moreover, you can quickly and easily expand to more speakers by getting extra receivers.

This is a game changer when it comes to connecting a mixer to active speakers because it cleans up messy cables and makes your setup more professional.

This is especially true for people who DJ at parties bringing their own equipment, or for people who rent out audio systems for parties or events.

Steps to Connect Powered Speakers to a Mixer Wirelessly

  1. As mentioned previously, I recommend turning off the mixer and the speakers before starting to make any connections. That way, you avoid sudden pops that could potentially damage your equipment.
  2. Make sure that the master volume faders in the mixer and the speakers’ volume are all the way down.
  3. Locate the “Main Out” or “Stereo Out” connectors in the mixing console.
  4. Choose between XLR or 1/4” TRS jack plugs to connect the output of the mixer to the input of the transmitter of the Alto Stealth system.
  5. Use the included XLR to TRS cable to connect the output from the receiver unit to the input of each powered speaker.
  6. After connecting the XLR cable to the speaker, turn the volume on the speaker halfway and turn it on. Also, turn on each receiver unit.
  7. Now you can turn on the transmitter unit and the mixer.
  8. On the transmitter, set the mode to Mono or Stereo. If your mixer is stereo, choose the stereo mode.
  9. Press the “VOL” button on the transmitter unit to set the left and right channels’ volume at which it will broadcast.
  10. Press the “CH” button to select a broadcast channel on the transmitter for the left and right channels. Make sure to choose the same channel number on the receiver units.
  11. Play some music on the mixer and slowly increase the main volume until you hear sound from the speakers.
  12. Adjust the volume of the speakers or transmitter unit until you are satisfied with it and perform a sound check.
  13. Use the EQ knobs to adjust the highs and lows until it sounds like you want.

Here is a diagram for your reference on how to make the connection.

Image showing a diagram to Connect Powered Speakers to a Mixer Wirelessly

Final Thoughts

Now you know how to connect powered speakers to a mixer, and as you can see, it is a straightforward process as long as you know where to connect it to. I hope this post was helpful to you.

There’s so much to know when it comes to mastering audio! For more audio engineering tips and tricks, make sure to check out the rest of our informative blog articles here. 

Guitar Amp Settings for Rock – A Comprehensive Guide

Emulating your favorite rock artists with your existing gear can be a challenge. Getting your EQ settings on your amp right can help significantly with this.

Rock music is probably the broadest reaching genre of music with the most sub-genres. Many modern styles of music, such as indie, pop, and even metal, have their roots in rock music.

That makes it difficult to put a lid on exactly what the best amp settings for rock are. As such, we will discuss what you can change to suit your style.

This article will cover all the best guitar amp settings for rock to get you off to a rolling start. Read on to master rock tone on any amp.

A General Starting Point

For the sake of an easy starting point, we want to create a light overdrive with decent sustain and a present, crunchy tone. The following settings will be an excellent place to start for most amplifiers to make such a sound.

  • Gain or Drive: +7
  • Bass: +5-6
  • Mids: +7
  • Treble: +5

All amps differ slightly, so you may have to experiment a little. Play a few chords and listen as you play, then adjust one knob at a time. This will allow you to hear how the adjustment impacts your sound.

This image shows the settings as they need to be set on a guitar amplifier to get an authentic rock tone.

The Right Amp

Since rock music is so varied, the range of appropriate amps is also huge. If you don’t use pedal or rack effects, it’s a good idea to use an amp with two or more channels so you can switch between tones during your performances.

You could use the separate channels to run one clean and one dirty. You’ll find that many popular rock songs switch to an overdriven channel for choruses. It’s important you’re able to do the same.

You could go for a Vox AC30 or a Marshall Plexi for quality British tone. Fender Hot Rods are the perfect American tone amps for rock. As we mentioned, there’s plenty of variety available. Even if your amp is only good for clean tones, you can use pedals to create an incredible rock sound.

Using Effects

Some amplifiers come with onboard effects that will allow you to build the perfect rock tone. Other times, you’ll have to use stompboxes or rack effects. In any case, here are a few of the essential effects you should consider.

Overdrive

Overdrive is arguably the most critical effect for classic and hard rock. It allows you to create crunchy rhythm lines and push lead lines to soaring new heights. Even if your amp has a decent overdrive channel, you can use an overdrive pedal too. This allows you to introduce different levels of overdrive mid-song.

A classic example of a high-quality overdrive pedal is an Ibanez Tube Screamer.

Distortion

Distortion pedals are often confused with overdrive. Yet, to put it in simple terms, distortion pedals give a hotter output and create a much more saturated and heavy tone. Steer clear of distortion for rock unless you want to play one of its heavier sub-genres.

Fuzz

Fuzz also works similarly to overdrive. Picture fuzz as overdrives little brother. It creates overdriven effects by concentrating on melodic overtones. Generally, it’s less heavy and more bright.

A couple of classic fuzz pedals that deliver excellent overdrive are the Electro-Harmonix Op-amp Big Muff Pi and the Dunlop FFM3 Jimi Hendrix™ Fuzz Face®. Any of these effects will create overdriven melodic overtones.

Reverb

Many high-end vintage amps have reverb built into their clean channels. While it’s okay to use a bit of reverb with overdrive, it can often cause feedback issues.

However, using reverb is necessary to get those clean tones you’re familiar with from plenty of your favorite rock artists like the Rolling Stones.

Delay

Delay comes in several different forms. Tape delay is one of the more favorable types used in rock music. These pedals recreate vintage tape echo machines, so they excel at building a classic rock soundscape.

A digital delay is a more modern approach to the delay effect, which records a sound and replays it at specific intervals that you can adjust. Many guitarists use this type of delay for their lead lines.

Editing Your Guitar Amp Settings for Rock

If you’ve got your amp and effects all sorted, it’s time to start messing with your EQ to get the exact tone you’re after. Let’s take a quick look at what each setting does.

Drive/Gain

This is how hard your tubes get pushed. Solid-state amps recreate the same effect by using discrete components. Therefore, the gain will increase your volume and the saturation of distorted overtones. In short, if the drive is cranked, the amp is overdriven.

To adjust your sound with the drive or gain knob, turn it up to increase the overdrive and down to decrease it.

When using a two-channel amp, you’ll need the gain pulled back on one of the channels to achieve a clean tone. In this case, you should turn the volume knob up on the clean channel to counteract the loss of volume from the drive being set lower. This is especially true for tube amps.

Bass

We suggested setting the bass at around 12 o’clock as a neutral setting in the low end is a good starting point. You don’t want your notes to clash with your bass player, nor do you want the very bottom end of your notes to be the most present part of your playing. This can sound very muddy.

However, you may want to boost the bass a little if you play hard rock to get a better chug from palm-muted strums.

Mids

The middle frequencies are arguably the electric guitar’s best. They don’t have much to contend with within a typical band setting and fill out the overall sound. This is why rock guitarists tend to have the mids boosted a little in the EQ.

Again, if you play a heavier sub-genre of rock, you could choose to scoop them instead to allow for a crisper chug and give room for the treble and bass to shine.

Treble

It’s rarely a good idea to crank the treble settings on your amp to 11. It creates an uncomfortable harshness. Yet, if you feel like the high end lacks a little, or want a little more crispness for your solos, feel free to boost the treble a little.

Be Aware of Your Pickups

Single-coil, rail, and humbucking pickups all work great for rock music. But, you should be aware that each will impact the overall tone of your setup. Ideally, we’d recommend single-coil pickups for classic rock and humbuckers for hard rock.

You should also take note of which pickup position you use most. You might find the perfect amp settings for your bridge pickup, but they won’t work for your neck pickup. It may be a good idea to take note of the settings for each.

The same applies if you use several different guitars. Don’t assume your Les Paul will sound the same as your Stratocaster with the same EQ settings on your amp. Experimentation is key. Just make sure you have done all the experimenting before taking your gear on stage.

Learn More

Although the guitar is often the centerpiece of performance, getting the electric guitar amp settings for rock right doesn’t complete the picture.

Your whole band has to sound on point to get noticed. Luckily, we have plenty of articles dedicated to getting the perfect PA settings. Check out these related articles to help you out.

  • How to EQ Acoustic Guitar for Live Sound
  • How to Use an AUX Send on a Mixer
  • Mixing Console Basics

How to Connect Speakers to an Amplifier – Everything you Need To know

Setting up amplifiers and speakers for a PA or entertainment system can be tricky. And if done incorrectly, it can damage the speakers, amplifier, or both.

If you are new to setting up sound systems, you can easily get lost trying to navigate through the different cables, connectors, and concepts you need to know when researching how to connect speakers to an amplifier. 

Of course, you can consult a professional if you get completely stuck. But before you get there, read on to learn everything you need to know about how to connect speakers to an amplifier efficiently and effectively.

Concepts You Need to Know Before Connecting Speakers to an Amplifier

Setting up speakers and amplifiers in more than just physically connecting cables between them. There is preparation that goes before making the connection.

For instance, you need to choose a suitable amplifier for your speakers by matching the amp’s and speaker’s wattage and impedance.

If these concepts are new to you, don’t worry; here, we explain what you need to know in an easy-to-understand way so that it makes sense. You need to learn a few details to help you understand the hows and whys for connecting up your amp to speakers.

Determining the Power Handling Capability of the Loudspeakers

When dealing with speakers there are several specifications you need to take into consideration and power rating or wattage is one of them. The power rating spec is measured in watts and you’ll find it on a label attached to the magnet. Some examples are 1000W, 800W Peak, 350 RMS, etc.

The speaker’s power rating or wattage is the total continuous power that can be dissipated by the coil inside the magnet in the form of heat without burning out.

You need to be careful because some manufacturers use the peak power that the speaker can handle for only a few seconds as an advertisement hook to mislead the buyer into thinking that the number written in the label refers to the continuous power the speaker can handle. You need to look for the continuous, or root mean square (RMS) value which is the real amount of power the speaker can handle continuously without being damaged.

Power ratings generally relate to voltage, current, and resistance or impedance. If you want to learn more about speaker wattage and power handling, I have written an article that explains it in more detail. Click the link to check it out.

Determining the Impedance of the Loudspeakers

Before we continue, let’s clarify what is impedance when dealing with speakers and amplifiers. To put it in the simplest terms possible, impedance is the resistance that the speaker presents to the amplifier. Impedance is denoted by Ohms and the Ω sign.

When connecting a loudspeaker to an amplifier you need to make sure that the impedances match or you can run into problems such as the amplifier overheating or speakers coils being damaged.

A lower speaker impedance means that there will be more power flowing from the amplifier. In contrast, a higher impedance speaker will have less power flowing from the amplifier.

To give you an example with numbers consider two speakers, one is 4Ω the other is 8Ω. The 4Ω speaker will draw more current than the 8Ω speaker when using the same amplifier. Meaning that the 4Ω will consume more power than the 8Ω will.

This is why when you check an amplifier’s specs you will see information such as Watts @ 8 ohms: 450W, Watts @ 4 ohms: 650W, Watts @ 2 ohms: 1200W. As you can see as the impedance of the speaker decreases, the power draw increases.

Matching the Speaker’s Input and Amplifier’s Output Power

A common mistake people make when matching the speaker’s power handling and the amplifier’s power output is to assume that the loudspeaker’s wattage needs to be greater than the amp’s power output. This cannot be further from the truth.

For an audio amplifier to work correctly, it needs to have enough headroom. When I say headroom I mean that it needs to run at no more than 80% of its maximum power delivery capabilities.

The reason is that when an amp is overdriven beyond its maximum capabilities, it will clip, when it clips parts of the waveform act like it they were a DC power source which can easily damage the coils of a loudspeaker.

A good rule of thumb is to choose an amplifier that delivers at least the same amount of power as the RMS or continuous (program) power that the speaker can handle. A better practice is to choose an amplifier that is twice the RMS or continuous power because that way, you will have more headroom to avoid clipping territory.

TIP: Please keep in mind you can also connect a speaker with low power handling to an amplifier that delivers a higher output as long as you keep the output power from the amp controlled to a point where it delivers a maximum of twice the RMS or continuous power of what the speaker can handle.

I have written an article explaining in more detail everything you need to know about matching the right amplifier to the speaker’s wattage and impedance. Click the link to check it out.

Handy Chart for Recommended Amplifier Power for Speakers

Speaker RMS Power RatingMinimum Recommended Amplifier Power (RMS) Ideal Recommended Amplifier Power (RMS)
50 Watts50 Watts100 Watts
100 Watts100 Watts200 Watts
200 Watts200 Watts400 Watts
300 Watts300 Watts600 Watts
500 Watts500 Watts1000 Watts
1000 Watts1000 Watts2000 Watts

Power the Amplifier Will Deliver into the Loudspeaker – Based on the Speaker’s Impedance

As mentioned previously, matching impedances between the speakers and amplifiers is crucial for the correct operation of the audio system.

Depending on the speakers’ impedance, the amplifier will deliver more or less power to achieve the same sound pressure level (SPL).

In case you didn’t know, Sound Pressure Level (SPL) is the measure used to determine the loudness of a speaker.

This is why the loudness of a sound system should never be deduced from the amount of power a speaker can handle or the power an amp can deliver. Loudness is an entirely different story.

To put it in simple terms, an amplifier connected to a low impedance speaker (4 Ohms or 2 Ohms) needs to put out a higher current, that’s why lower impedance speakers are harder to drive and consume more power.

The same amplifier connected to a higher impedance speaker (8 Ohms or 16 Ohms) puts out less current to drive the speaker.

So, when passing a signal from the amp to the speaker, you want your impedance numbers to match as closely as possible.

For optimum power transfer when you connect speakers to an amplifier, the amplifier’s impedance should be equivalent to the total impedance of the speaker elements.

This is why it is always a good idea to check the manufacturer specifications for both the speaker and the amp to know exactly what your system’s limitations are.

Steps For Connecting Speakers to an Amplifier

  1. Before making any connection, turn off your amplifier. This will prevent loud clicks, pops, thumps, etc., that might cause damage to your speakers as you make the connection or produce unpleasant noise.
  2. Make sure you have the right cables and cable connectors.
  3. For the best operation and protection of your gear, ensure you match the impedance of your speakers in your amplifier.
  4. Consider the mode of the amplifier and connect appropriately as per the equipment’s user manual.
  5. Connect the cables to the amplifier and speaker; make sure you connect the correct polarity from the speaker to the amp when using the various connectors.
  6. Lastly, the final step is to turn on the power amp and slowly raise the gain.

How to Set Up Amplifier and Speakers’ Cables for Home Systems 

Most home audio systems come with everything you need to make the installation. In case they don’t you would have to get the speaker wires to make the connection between the speaker and the amplifier.

Most brands use standard plugs or connectors to make a connection between the amp and the speaker. In some cases, high-end brands such as Bose, use proprietary connectors on the amp and speakers side.

For easy and quick setup, most speaker wires are color-coded. Red is positive and black in the negative. Sometimes, the positive wire has a single stripe, dashed lines marker, or a printed label. 

Before inserting the wires into your speaker, strip them first to expose the copper strands. Next, twist the strands tightly so that no strand is left by itself. You have to make sure all strands become one single wire before inserting it into the speaker or amp.

The last thing you want is a strand shorting between the positive and negative because it can damage your amp.

The cables do not need any special shield, as the signal from the amplifier to the speaker is still low and cannot be tapped. However, you can consider different gauges of wire cable.

The higher the power the cable will carry and the longer the cable will run, you need to consider a heavier gauge. Typically, this is between 10 and 14 gauge.

For easy connection to your speakers, some speaker wires have special connectors. The following are the types of connectors available:

  1. Spade connectors (Mostly used insede the speaker cabinet)
  2. Pin connector
  3. Banana plugs
  4. Push Connectors

When it comes to speaker terminals, spade connectors and banana plugs are used for binding post terminals, while pin connectors are used for spring clip terminals. You can separately buy these connectors and install them on bare speaker wires.

Speaker Wires/Cables for Live Music, Live Sound, and Audio Recording

Usually, PA systems will use Speakon connectors or ¼” Jacks to connect amps to speakers. This is due to the movable nature of PA systems. It doesn’t make sense to connect with stripped wires. 

This often makes connections as simple as plugging the L channel into the left front-of-house speaker, R Aux into the right foldback, etc.

Before you buy an amplifier, check the connection type of your speakers. You can always purchase adapters or mixed connection cables, but it’s more convenient to have matching inputs and outputs.

If you are lucky, your home system will also use these types of connections or RCA leads to make life easier.

Connecting Multiple Speakers to an Amplifier

You can’t just plug in as many speakers as you’d like your amp. There are a few considerations to make first.

Calculate the Combined Impedance of the Loudspeakers You Want to Connect.

Remember, amplifier channel combinations vary. They can have:

  • A single mono channel
  • Two channels, known as stereo 
  • Even more channels (the output of each of the extra channels could also be mono or stereo themselves)

When calculating speaker impedance, you need to consider each channel. In the end, the left and right channels on a stereo amp become independent.

Calculating total speaker impedance is similar to calculating total resistance in an electrical circuit, as you will learn below.

Series Connection

If you connect your speakers in series, you need to add each speaker’s impedance. The total is the overall impedance. 

For example, if you have two speakers with an impedance of 4Ω each, the total is 8Ω. The speakers would work well if you have an amp with an 8Ω output impedance.

Parallel Connection

In parallel, the impedance calculation is different. The total impedance reduces as you continue adding more speakers to the circuit. 

If we used the speakers in the previous example and reconnected them in parallel, the total impedance would be 2Ω instead of 8Ω. In such a case, you need to be extra careful when connecting speakers in parallel because the impedance can be too low for the amp.

All in all, ensure that when connecting speakers to an amplifier, the total speaker impedance is not be lower than the amp’s output impedance. It can be slightly higher, but you will struggle to get your ideal volume then.

Reference Chart for Parallel Speaker Impedance Matching

Number of Speakers Connected in ParallelRated Impedance of Each SpeakerTotal Impedance as Seen by the Amplifier
24 Ohms2 Ohms
28 Ohms4 Ohms
216 Ohms8 Ohms
34 Ohms1.33 Ohms
38 Ohms2.67 Ohms
316 Ohms5.33 Ohms
44 Ohms1 Ohm
48 Ohms2 Ohms
416 Ohms4 Ohms

Operating Modes of Power Amplifiers – Stereo, Parallel, Bridge Mono

There are three main ways power amps connect to speakers. These are stereo, parallel, and bridged modes. Let’s take a closer look at them.

Stereo Operation

Most modern amplifiers are Stereo meaning that they have left and right channels powered independently. You can consider each amp channel to be a separate amp, combined into a single package to make one amp. 

Being that both channels are independent of each other, in some cases and depending on the amp, you could run different loudspeaker configurations with different impedances and power outputs simultaneously. 

When working with a stereo amplifier, you will have two inputs at the back where you can connect the signal coming from the mixer or speaker management system. They are usually labeled “Channel 1, ” “Channel 2,” or “Left” and “Right.”

Then, each output from the amplifier connects into two speakers (left and right) facing the audience, or to monitors on stage, if it’s through the AUX channel. 

Often the mixer will allow separate mixes for the L and R channels, allowing the sound engineer to create a unique stereo sound.

Parallel Operation

In parallel operation, the same signal is fed through both the L and R channels. When using an amp in parallel mode, you are basically feeding a mono signal two both channels.

An example of using an amp in parallel mode is when you have a mixer that has only one output (mono signal mixer) and you want to connect it to a stereo amplifier.

In such a case, you would use a “Y” splitter cable to receive the mono signal from the mixer and split it into two to send the same signal to both channels on the amp.

Bridged Mono Operation

The idea behind the bridged mono mode in amplifiers is to make a more powerful amp by combining a two-channel amp into one. This configuration is usually used for powering subwoofers as they require lots of power to work, especially when using large 18″ subs. 

The way bridged amps work is by taking the input signal and splitting it into two identical signals. Then internal circuitry takes one of the split signals and reverses its polarity. Next, the original signal is fed to one channel amp, and the inverted signal is fed to the other channel amp.

When connecting a speaker to a bridged amp, the cables are connected across the two positive leads. This is why you have to make sure to enable bridged mode on the amp before attempting to connect anything by activating the dip switches located on the back of the amplifier. 

Amps vary, so you might need to look up your manual for exact details of your amp’s requirements.

Daisy-Chaining Power Amplifiers

Let’s say that you want to connect a mixing console to four separate amplifiers. In other words, you want to daisy chain several amplifiers together using the same audio signal coming from the mixer. How would you do that?

There are two approaches you can use to achieve this. The first method uses different outputs from your mixer to connect to each amplifier. The second method is to daisy chain the amps themselves using their buffered unused input connectors.

Some mixers have two main outputs, one using XLR and one using TRS connectors. You could use the XLR outputs to connect to one amp and the TRS to connect to the other amplifier.

This method is somewhat limited, and it depends on the type of amplifier you have. If your amp only has one input per channel and doesn’t offer buffered extra inputs, this is the only method you have to use.

The second approach is to daisy chain the amps themselves. If you look at the input for each channel in the back, you’ll notice that most modern amplifiers have XLR inputs as well as TRS and, in some cases, even RCA inputs.

These are all connected internally using a buffer circuit. The unused inputs can also be used as outputs to the next amplifier. You will need an XLR to TRS adapter cable to make the connection.

Next, connect the TRS to any unused input on the first amp channel and then use the XLR male to connect to the following amplifier and so on until you have daisy-chained all the amplifiers you need.

You don’t have to worry about impedance mismatches because these inputs are buffered.

You can also read more on daisy-chaining active speakers here.

Setting the Correct Gain Control or Input Sensitivity on Amplifiers

If you correctly set the gain on your amplifier, you are assured of quality sound from your speakers. The gain control adjusts how much you have to increase the volume on the source to reach the amplifier’s full power.

The key is finding the right balance for your speaker. If you set the gain too high, you will introduce distortion into the sound. Whereas if you put it too low, then you’re defeating the amp’s purpose in the first place.

Even though manufacturers make amps with different designs and have specific instructions for using them, a general technique works well with any amplifier.

Here is what you need to do to set the correct gain control or input sensitivity on an amplifier:

  1. The first step is to turn the amp’s gain entirely down.
  2. Input some audio signal and play the loudest part of the track or performance.
  3. Then increase the gain (volume) until you see that the amplifier will start clipping or distort the signal.
  4. Next, reduce the volume until the distortion disappears, and make sure to allow enough room for the loudest part of the performance or track you want. 

Every audio signal should now be clear. The system should be more forgiving of some extra hard hits from a drummer or an inexperienced singer not backing off the mic enough for big notes.

What Next?

Now that you have learned how to connect speakers to an amplifier, can you set up a connection by yourself? We hope you can, but if not, feel free to ask through our contact page.

You could also check out some of our other articles dedicated to setting up music gear, by visiting the home page.

How to Connect the Focusrite Scarlett 2i2 to an iPhone or iPad

These days, it is easier than ever before to record music from the comfort of your home. As equipment and software become better, you need less to make great stuff! 

That being said, it is still worthwhile to invest in an audio interface such as the Focusrite Scarlett 2i2. This interface won’t break the bank, but it will make your recordings higher quality. 

If you’re making music with your laptop, all you need is your interface, laptop, a DAW (Digital Audio Workstation), a microphone, and maybe a USB adapter, depending on what kind of laptop you have. 

However, if you don’t have a laptop or desktop computer or would rather use your iPhone or iPad, don’t worry because you can easily connect the Scarlett 2i2 interface to your iPhone or iPad Pro.

Keep reading to learn how to connect your Focusrite Scarlett 2i2 to an iPhone or iPad Pro. It’s easier than you might think!

Why Connect Your iOS Device to Your Scarlett 2i2?

There are a few reasons why you might choose to record with an iPad Pro or iPhone instead of a personal computer.

If you don’t have a personal computer, you might not want to make the investment right away. And even if you do have one, you might find it easier to work with the touch screen user interface of iOS DAWs.

Some people swear by the specific recording setup they like to use, but at the end of the day, you can make great music with any DAW, even something basic like Garageband. 

In fact, Garageband for the iPad and iPhone is a highly versatile app with an easy-to-learn user interface and more features than the desktop version you may have used before. 

Don’t let the fear of having the wrong setup get you down. Simply connect your Scarlett 2i2 to an iPhone or iPad and start creating!

You Might Also Like: How to Connect a USB Mic to an iPhone or Any Other SmartPhone

Two Ways for Connecting the Focusrite Scarlett 2i2 to an iPhone or iPad

Connecting the Scarlett 2i2 straight to your iPhone or iPad wouldn’t work in most cases because the interface needs more current than what your device can supply.

If you have a 3rd Gen Focusrite Scarlett 2i2, you can connect it directly to an iPad Pro using the included USB-C cable, and the device will be able to power it because the new generation interfaces consume little power, and the iPad Pro can handle it.

Instead, if you have a 2nd Gen 2i2 interface, not even the iPad Pro will be able to power your interface by itself. Unless the interface uses an external power adapter, you will need to provide power for the interface to turn on

When it comes to the iPhone, it can’t power either the 2nd or 3rd Gen Scarlett 2i2 because its battery cannot deliver enough power for the interface to work.

To solve this issue, the interface needs to get the power from another source and only use the phone’s port to send and receive the data.

There are two ways of supplying power to the Focusrite Scarlett 2i2 to connect it to an iPhone or iPad:

  1. Using a PowerBank – Perfect for a Mobile Setup
  2. With a charger that delivers enough current to power the interface while charging the phone.

I assume that you already have an iPhone or iPad and the interface in this post.

If you don’t have an audio interface, I recommend the Focusrite Scarlett 2i2 3rd Gen interface, but the 2nd generation will also work if you already have one. The difference is that the third generation comes with USB-C, and it consumes less power than the previous generation interface [Link to Amazon].

You don’t even need to install any drivers because the interface is plug-and-play.

The Scarlett is an affordable, tried-and-true interface and has long been a go-to for musicians everywhere.

1. Connecting the Scarlett 2i2 to an iPhone Using a PowerBank

This method works best if you want the flexibility of a mobile setup to record on the go.

Another advantage of using this method is that you provide power to the phone or tablet. That way, you don’t run out of battery in the middle of the recording session.

One thing you need to take into consideration is to get a power bank or portable charger with enough capacity to last the time you need.

This is What You’ll Need for the Setup

  • A PowerBank with Enough Capacity
  • To connect your Focusrite Scarlett 2i2 to an iPhone or iPad, you’ll need a Lightning to USB 3 camera adapter – Please note that the adapter needs to have both the USB-A and Lightning charging port to connect to the PowerBank and interface at the same time.
  • Lastly, you will also need your phone or tablet’s charging cable.

Please Note: The adapter mentioned above is made for cameras, but it is a must-have for any musician working with an iPad or iPhone. Not only can you use it to connect your interface to your iOS device, but also to hook up your MIDI keyboard as well!

A new adapter retails at around $39. If you have an older Apple USB adapter, you can make that work too. However, you will need a USB splitter and a Y cable to get power to your interface.

Making the Connection and Setting Things Up

  1. Connect the Lightning to USB 3 camera adapter to your iPhone.
  2. Use your phone’s charging cable to connect from the power bank to the charging port on the adapter.
  3. Next, connect the USB cable from the interface to the USB-A port of the adapter.
  4. Unlock the phone and follow the on-screen instructions to finish the setup.
  5. Open GarageBand or any other application you wish to use the interface and run a test to ensure it works well.
  6. Setting the input audio levels on the interface is essential to avoid distortion or clipping of the incoming signal.

The following diagram shows the connections you have to make to connect your interface to an iPhone using a power bank to power both devices. Use it for your reference.

diagram to know how to connect the scarlett 2i2 interface to iPhone using a power bank

2. Connect the Focusrite Scarlett 2i2 to an iPhone Using a Charger and an Adapter

Another way of using the Scarlett 2i2 with an iPhone is by using the Lightning to USB 3 camera adapter and a power brick that delivers enough current to use the interface and phone simultaneously. Most fast phone chargers should work well with the interface.

This approach is not as mobile as the previous method but works perfectly well.

Adapters and Accessories You’ll Need for the Setup

  • A Phone charger with enough output power to charge the phone and run the interface simultaneously.
  • As with the previous method, you’ll need a Lightning to USB 3 Camera Adapter – The adapter must have the USB-A port and Apple’s Lightning port or USB-C for charging, depending on the device you have. Please check your device’s port before purchasing.
  • You’ll also need your iPhone or iPad’s charging cable.

Making the Connection

  1. Connect the adapter to your iPhone or iPad’s charging port.
  2. Connect the charger to the wall and use your phone’s charging cable to go from the charger to the corresponding port on the adapter.
  3. Attach the USB cable from the Scarlett 2i2 interface to the USB-A port of the adapter.
  4. Unlock the phone and follow the on-screen instructions to finish the setup.
  5. Open your favorite application or DAW to run a test. GarageBand should work great for any recording.
  6. It is important to check the input audio levels on the interface to avoid distortion or clipping on the incoming signal.

The diagram below can help you visualize the connection you need to make. Use it for your reference.

Diagram for connecting the Scarlett 2i2 to an iPhone Using a Charger and an Adapter

Bonus Tip – Connect an Audio Interface to an iPad Pro with USB-C

There is a simple method for connecting an audio interface, whether it is the Scarlett 2i2 or any other USB-C interface, to an iPad Pro that I will discuss in this article. And it is by leveraging a powered USB-C hub with pass-through charging.

The idea behind using this method is to use the hub to supply the necessary current that the interface needs and use the iPad’s USB-C port to send and receive the digital audio signal sent from the interface while charging it simultaneously.

This is What You Need for this Setup.

  • A USB-C Hub with pass-through charging to provide power to the iPad Pro and interface.
  • You will also need the iPad’s USB-C charger that will help power the audio interface and charge simultaneously.
  • USB-C to USB-A cable, usually supplied with your interface.

Connecting All the Components to Your iPad Pro

  1. First, connect the USB-C hub to your iPad Pro
  2. Connect your iPad’s USB-C charger to the Type-C charging port on the USB-C hub.
  1. Next, connect the iPad’s USB-C charger to the electrical outlet.
  2. At this point, you should see a notification letting you know that the device it’s charging. As mentioned earlier, the benefit of charging the iPad while recording is so that it doesn’t run out of power in the middle of a recording session.
  3. Take the corresponding USB cable and plug one side to the back of the interface and the other end to the appropriate port of the USB-C hub.
  4. If prompted to finish the setup on your phone, unlock it and follow the on-screen instructions.
  5. Run a test on any application where you want to use the interface to make sure it works.

Here is a diagram I have prepared that can serve as a reference showing the connections you need to make if you decide to use this method for connecting an audio interface like the Scarlett 2i2 to an iPad Pro.

Diagram to Connect an Audio Interface to an iPad Pro with USB-C

Connect Your Focusrite Scarlett 2i2 to an iPhone or iPad Pro 

By plugging your iOS device into your interface, you’re almost all the way to owning a cheap and totally functional home studio.

We hope you’ve enjoyed this guide on how to connect your Focusrite Scarlett 2i2 to an iPhone or iPad Pro. As you can see, the process is quite simple and rewarding. 

Once you’ve got your interface connected to your iOS device, you can start making music to your heart’s content. 

For more informational posts like this one, make sure to check out the rest of the articles in our blog by clicking here.  

How to Connect Two Mixers Together – 4 Simple Methods

If you are in the recording or live performance business, chances are you’ve worked with a mixer. But sometimes mixers don’t have enough inputs, leaving you in a bind.

Often, doubling up on microphones and inputs does not work when you have, for example, multiple vocalists who cannot share a microphone. So, you need a way to expand your current mixer’s capabilities.

Luckily, there are several ways to connect two mixers together to give you all the inputs you need to finish the show or recording session.

Here are the top 4 methods you can use to connect two mixers together:

  1. Using a Stereo Pair Input on the Main Mixer
  2. Connecting to Line-Level Inputs
  3. Using the Effects Return
  4. Using the Tape-In or 2-Track Input on the Main Mixer

Keep reading if you want to learn more about each of these four methods in this complete guide we’ve put together. Let’s get started!

Main Reasons to Connect Two Mixers Together

There are several reasons why you would consider connecting two mixers together, whether it is a live set up or in the recording studio.

This article will focus on the two main reasons: running out of input channels on the main mixer and sending an audio signal from one location to another.

1. Running Out of Input Channels on the Main Mixer

Let’s say, for example, your mixer has eight channels. But the band has a full drum kit, two guitars, a bass, a keyboardist, and two vocalists.

You can guess that those inputs will get used up really quickly, probably before you can even plug in the keys or the guitar amps. Being able to connect to another mixer gives you more channels to work with. 

2. Sending an Audio Signal from One Location to Another

An example of this is if a band brings their own mixer. This happens a lot if a band is mixing their own in-ear or wedge monitors. Their instruments and microphones will all be hooked up to their own on-stage mixer.

In order to run the band’s sound through the main PA system, you will need to be able to connect their mixer to yours. 

Regardless of the reason, the mechanics to connect two mixers together are the same. The route you take just depends on your specific scenario.

The Basics of How to Connect Two Mixers Together

Before we get into the weeds of connecting two mixers, we should lay out the intention behind it.

This article will refer to the second mixer as the “sub-mixer.” Meaning that it is sending all its signals to one or two channels on your main mixer.

The sub-mixer could be used, for example, to mic up a complete drum kit if it has eight inputs, which gives you plenty of microphones to use on a full kit. 

You will then be mixing the kit on the sub-mixer to control the EQ and levels. After the sub-mixer mix sounds good, you will be sending that to one or two channels on the main mixer.

That way, your main mixer inputs are not getting eaten up by eight drum microphones. If it also has eight inputs, that leaves you six or seven for your other instruments and vocalists.

This also gives you an advantage of controlling the drums (or whatever is on the sub-mixer) as its own separate group in the mix, with one fader. Very convenient for recording or live shows!

A Few Things to Consider 

Before you start plugging in cables, there are a few things that you need to take into consideration when you connect two mixers together.

Is There a Snake in The Signal Chain?

Not the reptile kind of snake, but a stage snake. An audio snake is an input box on the stage that allows you to run a single cable from the stage to the main mixer instead of a spaghetti bowl of XLR and 1/4″ cables.

If there is a snake in your PA set up, you will have to route it to one of the mixers. It does not change the number of inputs, but it does make connecting to the stage much simpler.

For example, let’s say you have a 16-channel snake. You can use the first eight channels for mics, guitars, keyboards, and the other eight channels for miking the drum set.

In a case like this, you would connect channels 1-8 to the main mixer and 9-16 to the sub-mixer. Then you would connect the sub-mixer to the main mixer, and you would have your full set up ready to go.

Types of Cables You Need to Make the Connection 

There are two primary types of cables in the audio world that we use to connect two mixers together.

The first is balanced cables. The most recognizable is the XLR or microphone cable. 

There are also 1/4″ TRS (tip-ring-sleeve) cables that can be used for the same purpose, for jacks that are not XLR connectors.

Balanced cables have three wires inside: a tip, a sleeve, and a ring. This “grounds” the signal, ensuring it stays pristine and clear over long distances.

On the other hand, unbalanced cables only carry two wires: the tip and the sleeve. This leaves the signal ungrounded (hence, unbalanced).

These are not ideal for sending audio over long distances, as the signal will degrade and be subject to interference from radio frequencies and dirty power.

If you plan to connect two mixers together, make sure that you are using balanced cables whenever possible. Unbalanced will work in a quick pinch, but they are intended more for instruments such as guitars into amplifiers. 

To sum it up: if your mixer outputs have 1/4″ jacks, use TRS 1/4″ cables. If they have XLR jacks, use XLR cables.

Line-Level Vs. Mic-Level Input – Which One Should You Use?

Many mixers will have the option of a line-level or microphone-level input on their channels via a switch or toggle.

A line-level input is a hot signal that is sent from a mixer or instruments such as synthesizers. 

A microphone-level or instrument-level input is a lower-level signal. These generally have less volume or gain to not feedback on the PA system.

When you connect your sub-mixer, you will want to use the line-level input on your main mixer. This gives you a hot signal that will be easier to work within your main mix.

If you use an instrument/mic-level input, you will need to be careful not to clip the signal due to higher gains present on these input channels. In such a case, you need to bring the gain down and make sure you leave enough headroom for the loudest parts of the presentation.

Figure Out If You Need a Mono or Stereo Signal

A mono signal will be more than sufficient in most live sound circumstances. This only uses up one input on your main mixer.

However, if you are using effects or want a stereo mix for recording, you will have to send two outputs from your sub-mixer into two inputs on your main mixer.

If you want to get really fancy with it, you can do a full stereo mix with your sub-mixer, panning instruments, or microphones however you want. This will be preserved if you hard-pan your main outputs on the sub-mixer.

Let’s use the drums as an example again. Say you want your kick and snare in the center, your toms panning towards the right, and your overhead cymbal mics hard-panned left and right.

You will need to mix the drum kit like this on your sub-mixer, panning the microphones appropriately.

As you send your stereo outputs, make sure to hard-pan the left and right 100% clockwise and counterclockwise, respectively. 

When you plug those sub-mixer outputs into your main mixer, you will then need to hard-pan the left and right channels again on the input channels.

This also applies to the final output stage of your main mixer. Hard panning left, and right makes sure that the signals go in the direction they need to go. Leaving the knobs at the center creates a mono audio image.

Choose Which Output You Will Use on the Sub-Mixer

Some mixers can send outputs from each channel directly. This is not ideal for these situations, as it will still take up the same number of channels on your main mixer.

Most mixers can also send a sub-mix out. If you are using the sub-mixer on stage for a band’s monitors, you will need to decide whether to use the sub-mix or the main outputs.

The main outputs will generally be the ideal ones to use on the sub-mixer. They have balanced outputs and will “sum up” the rest of the inputs and send them out as a group to the main mixer.

Choose Which Input Channels You Will Use on the Main Mixer

This comes down to personal preference and workflow. Generally, it’s easier to just use the first or last input channels on the main mixer. 

That way, the sub-mixer channel is not stuck in the middle of your other channels, leading to confusion. 

Keep the input channels together if you are running stereo inputs from a sub-mixer. It will save you a lot of headaches down the road and make getting the volumes and EQ to match much easier. 

Four Simple Methods to Connect Two Mixers Together 

Now that you’ve learned the ins and outs of using a sub-mixer and the main mixer together let’s talk about connecting them. 

We touched on this briefly in the previous section, but let’s look at the four easiest ways to connect two mixers together.

1. Using a Stereo Pair Input on the Main Mixer

This is the most straightforward method to connect two mixers if you are using stereo mode.

In this case, you will be using the unbalanced main stereo output on the sub-mixer and a stereo pair input on the main mixer.

As stated before, most mixers will use XLR outbound connectors for their main stereo outputs. These would typically run out to the PA speakers, but in this case, we are going to use the main output TS/TRS female connectors.

Use this method if both mixers are close to each other. For long runs, please refer to the last section of this article that explains how to connect two mixing consoles together if they are far from each other using a long cable.

You’ll need two Male to Male TS cables for this connection. These cables are also known as instrument cables.  

You’ll connect two male TS cables to the stereo out on the sub-mixer. Then, connect the other end of the wires to a stereo pair input on the main mixer.

Stereo pair input channels are usually the last two or four channels in a mixer. They are typically labeled 9/10, 11/12, etc., meaning that they are stereo pair inputs that are controlled by a single fader.

Then all you need to do is adjust the levels and EQs. The advantage of using this method is that you can control the stereo signal coming from the sub-mixer with one fader, making it much easier to have control over your mix.

2. Connecting to Line-Level Inputs on the Main Mixer

This method works for mono or stereo signals. It is the same, in principle, as the method above, except you are connecting the output of the sub-mixer to one (for mono) or two (for stereo) line-level inputs on the main mixer.

If choosing this method, you need to decide if you need a mono or stereo signal. If you choose mono, all you need to do is bring one output from the sub-mixer and connect it to a line-level input making sure that the PAN is set to the center. That way, the audio signal is mirrored on both channels simultaneously.

If you decide to go with a stereo signal, you need to connect the left output from the sub-mixer to one channel, then pan it left. Next, take the right output from the sub-mixer, connect it to the following input channel, and pan it to the right.

Then all you have to do is adjust the levels and EQs of both channels to match each other. Make sure that one is not louder than the other, or your stereo image will be off.

This way, you can control the stereo signal coming from the sub-mixer using two faders.

Remember to use either an XLR or a TRS balanced cable to connect the mixers together. If one or both of your mixers only has a 1/4″ jack out, make sure you are still using a balanced cable.

3. Using the Effects Return on the Main Mixer

This is a bit more “advanced” of a trick and is best if your main mixer does not have a lot of inputs to work with. Also, not all mixers have an effects return. But if they do, it can free up even more channels for your main mixer. 

In this case, you will be using the main stereo output on the sub-mixer and the effects return on the main mixer.

The principle of the “Effects Return” on a mixer is to send a signal from the mixing console to outboard effects, such as a reverb or delay unit. This is useful for live vocals and instruments to give it space.

The signal is returned from those outboard effects, back into the board, and given its own “channel.”

If you connect the outputs of your sub-mixer to the effects return inputs on your main mixer, you can effectively use the effects return “channel” as another input.

If your main mixer has an effects return, it should also have a separate fader or knob to control the levels of the mix.

This can be done in mono or stereo, as a mixer with an effects return will have stereo ins and outs. 

The only real downside to this method is that you cannot use outboard effects on your main mixer, and you won’t have EQ on that channel.

So plan carefully if you need to connect two mixers together using this method. Only use this technique if you can’t use methods 1 and 2.

4. Using the Tape-In or 2-Track Connector on the Main Mixer

The last method you can use to connect two mixers is using the tape-in connector.

The tape-in connection, also known as the 2-Track input, is usually found in older mixing boards, and it is intended for connecting devices with RCA outputs such as tape players, CD players, MP3 players, etc.

Please keep in mind that this is not the best option because you will have limited control over the signal that is coming from the sub-mixer. Basically, the only control you’ll have is volume.

I decided to include this method in this article so that you have all the options available. That way, you can choose the one that is right for you.

Another thing you need to know is that the tape-in connection is not a balanced signal, so you will need to use an unbalanced output in the sub-mixer.

To make this connection, you need a dual TS to RCA cable. Then you need to locate a TS output connector on the sub-mixer. The best one to use is the unbalanced main output, usually located next to or below the main XLR connectors.

Plug the TS cable to the left and right channels, respectively, and connect the other side of the cable to the RCA Tape-In input on the main mixer.

Set the volume and signal levels in the sub-mixer, then use the tape-in volume knob to control the gain of the signal.

The tape-in signal goes straight to the main bus in the mixer, meaning that you can’t EQ it, use compression, effects, or any other tool with it. This is why I don’t recommend using this method to connect two mixer boards together.

Use this method only if there are no other channels available on the main mixer or you are in a real pinch.

How to Connect Two Mixers Together If They Are Far From Each Other – Pro Tip

If your mixers are going to be a long way away from each other, for example, from the main stage or pulpit to the sound booth all the way in the back, you will need a way to connect them.

With balanced XLR cables, this is not a problem at all. You can chain XLR cables together and go up to 200 feet with no signal loss or degradation.

You can use TRS or unbalanced cables if you don’t have XLR output available; however, this becomes a bit trickier, as they cannot simply snap together. And unbalanced cables introduce more noise the longer they get.

If you find yourself in this situation, invest in a stereo DI box. There is a wide range of DI box prices and features, but even a basic passive DI box will help solve your long cable run issues.  

Something like the Radial ProD2 will work perfectly well, and it has two channels you can use to send a stereo signal.

In case you don’t know, DI stands for direct injection and is meant to take an unbalanced 1/4″ input and convert it to a balanced XLR output.

It will work fine with balanced cables as well. That way, you can send the signal through long runs without worrying about noise and signal degradation. To learn more about DI boxes, click this link.

Mixer Connection Methods, Demystified

Regardless of the method you choose to connect two mixers together, make sure that your audio gear is high-quality. This includes the mixers, cables, DI boxes, and whatever else you are using in your signal chain.

For more audio engineering tips and tricks, make sure to check out the rest of our informative blog articles. 

How to Record Audio From Mixer to Computer – Top 3 Methods

With the availability of cheap personal computers and recording gear, it is more accessible than ever to mix and record your own music. 

But one of the most confusing parts of home or live recording is figuring out how to get the audio from an analog mixer into your computer. If you are reading this article, most likely, you are trying to figure out the best ways to do so.

Here are the top 3 proven methods you can use to record audio from a mixer to a computer:

  1. By connecting the mixer directly to the computer through a sound card or line-in to USB interface cable
  2. Connecting the computer to a USB mixing console
  3. Using an audio interface

Read on to learn more about each of these three methods in this complete guide we’ve put together. Let’s get started. 

Requirements for Recording Audio from a Mixer to a Computer

The Computer

The first piece of equipment you will need is a decent computer. Both Mac and Windows work fine.

You will need a computer that has enough RAM and processing power. These are the biggest bottlenecks in terms of recording audio.

It doesn’t have to be the latest, top-of-the-line system on the market, but it needs adequate resources to work. I would stay away from Chromebooks or outdated equipment as they are very limited and can’t be upgraded most of the time.

These are the computer specs I recommend for recording audio from a mixer:

  • PROCESSOR: you’ll want the fastest processor you can afford. The minimum I recommend is the Intel i5 processor.
  • RAM MEMORY: no less than 8GB. The more, the better.
  • STORAGE: a solid-state drive (SSD) no less than 250GB. If you can afford to buy or upgrade to NVME M.2 SSD, I highly recommend it because it will run smooth and lightning fast, which will be handy, especially when editing. 
  • OPERATING SYSTEM: I highly recommend 64-bit OS. Most digital audio workstation software runs on 64-bit operating systems.
  • PORTS: you’ll need at least two USB ports. If it has more, it’s better because you’ll have more flexibility. If possible, a Thunderbolt connector is an excellent idea, especially if you decide to upgrade later.

The DAW

The second thing that you will need to record audio is a DAW. This stands for “Digital Audio Workstation.”

DAWs allow you to record multiple tracks simultaneously. This is useful when mixing, as it gives you control over the sound and levels of each track.

You can also apply effects such as equalization, reverb, and compression. DAWs also let you quickly edit tracks. So if you have an extra hit on the snare drum, you can just splice it out easily.

Digital Audio Workstations come in many different flavors and price ranges. For example, Audacity is completely free and open source. It is a popular choice for people just getting into recording. 

GarageBand can also work if you are a Mac user, but keep in mind that it is somewhat limited. For beginners, it is an excellent choice.

For a step up in terms of functionality and ease of use, look into Reaper. You can use it as a free and fully functional demo for as long as you wish. And a full license only costs $60. 

Other DAWs such as ProTools, Logic, Cubase, StudioOne, and FruityLoops are popular choices, as well. 

The 3 Proven Methods for Recording Audio From a Mixer to a Computer

After you have your computer and DAW set up and ready to rumble, it’s time to connect the mixing console to your computer. 

There are three options for achieving this, each increasing in quality and price. 

1. Connecting the Mixer Directly to the Computer’s Sound Card

This is the simplest and cheapest option, assuming that you already have some kind of mixing board.

If it is an older board or lacks USB connectivity, this is the route you will have to take. 

This method assumes that your computer has an onboard sound card with a microphone input connector. On most computers, this is a 3.5mm input jack.

Keep in mind that most newer model laptops don’t come with a microphone input anymore, so if you decide to use this method, you’ll need to get a USB sound card like the Sabrent AU-MMSA.

Another thing to remember is that these affordable USB sound cards only provide a mono line-in input, which means that they can only record a mono signal coming from the mixer.

Here is a diagram to help you figure out the connection.

If you want a stereo line input for recording, you will need an external sound card with a stereo line-in connector. 

Something like the Creative Sound Blaster X4 will work for connecting stereo line-in signals from the mixer to the computer for recording. The only downside is its price. For about the same amount, you can get an audio interface that does a better job at recording and offers more features.

Cables For Making the Connection

Depending on the output connections on your mixer, you will have to use different cables. 

  • If your mixer has RCA outputs, you will need a 3.5mm TRS Stereo Audio Jack to Two RCA
  • You can also use two 1/4″ TS (mono) outputs. For this, you will need a dual 1/4″ TS to a single 3.5mm adapter cable. 
  • Lastly, if your mixer has XLR outputs, get a 2x female XLR to 3.5mm adapter cable. 

Keep in mind that you should not skimp on cable quality. Cheap cables introduce noise and interference into your recordings. 

A Cheaper and Effective Method Using a Line-In to USB Interface Cable. 

An alternative to external sound cards is to use something like the Behringer Line2USB cable interface. This adapter would work perfectly well because it accepts a stereo signal and connects it to the computer via a USB.

Inside the USB-A case, an analog to digital converter takes the line level signal from the mixer and converts it to digital so the DAW can record it in stereo mode. 

The 6.6 foot (2 meters) cable comes with two mono 1/4″ jack connectors that you can easily plug into your mixer to bring the stereo signal to your computer.

This device is Plug-and-Play which means that you don’t need to download any drivers for it to work with your favorite DAW on Mac and Windows computers.

The digital audio output operates at 44.1 kHz and 48 kHz sample rates. And for your convenience, the Line2USB cable is also compatible with most 32-bit drivers and software.

Follow the connection diagram shown below to hook things together

Setting Up for Recording

To set this up for recording, create a track in your DAW and route the input to your soundcard. Use your mixer to adjust your levels until everything sounds good, and start recording.

The major downside of this method is that it does not allow you to multitrack. This means that whatever comes through the mixer will get recorded all on one track. 

This can be mitigated by using a USB sound card that can accept a stereo line input. If using the Behringer Line2USB, it would send a stereo signal by default.

If you use this method, it will split your signal into left and right channels.

You can then pan your mixer tracks all the way to the left or right. Tracks on the left will be recorded into one stereo track and the same for the right side. 

In your DAW, you can separate the stereo track into the left and right tracks and mix them separately. 

Please keep in mind that this is not the best method for recording audio from a mixer to a computer, but it can work in a pinch or on a tight budget. 

2. Using a USB-Capable Audio Mixing Console or Multitrack Recorder

If the sound card method is not working for you and you want better quality and control over your tracks, consider springing for a USB-capable mixing console.

These come in many input numbers and price ranges. Generally, they start at two simultaneous tracks and can go all the way up to forty-eight. 

Mixing consoles are appealing for live sound recording, as they allow you to record audio from a PA system to a laptop. 

When shopping for a USB-capable mixer, make sure to keep the number of simultaneous tracks in mind.

Not all USB mixers can multitrack with all of the inputs. Don’t make the mistake of buying a 16-channel USB mixer that can only record one stereo track.

Generally, the more you spend, the more tracks it will be able to record simultaneously. 

Besides being able to multitrack, these mixers also allow you to route computer audio playback to the mixer. 

If good sound quality matters to you, don’t skimp on the mixer either. Cheap mixers do not have high-quality microphone preamps and will sound noisy and dull. Go for trusted professional audio brands. 

There are several excellent options on the market for USB-capable mixers. Yamaha, Allen & Heath, Tascam, and Mackie make several great options with differing numbers of inputs and outputs.

Some higher-end USB mixers can even act as DAW controllers, allowing you to record, pause, and play with the faders on a physical console. An example of this is the Tascam Model 12  and the Zoom LiveTrak L-12 for mixers that can really do it all affordably. 

To record using a multitrack USB mixer, you will have to ensure that your DAW recognizes it as an input device.

  1. Connect all your instruments and microphones to the mixer
  2. Use the USB or Thunderbolt connector to connect the mixer to the computer
  3. Create a track for each input that you are recording.
  4. Make sure to assign each track to the proper input from the mixer. 
  5. Then it’s as simple as pressing the record button and making the music happen! 

3. Using a USB Audio Interface

Audio interfaces used to only be available in high-end recording studios. But in the past decade, manufacturers have put out affordable offerings for “prosumers” at home.

Audio interfaces are the preferred method for connecting a mixer to a laptop or pc for recording audio. 

The easiest way is by getting the stereo output from the mixing console and connecting it to the audio interface. Here is how to do it:

  1. Find an available line-level output in the audio mixer
  2. Setup the audio interface to receive the signal from the mixer
  3. Use the proper cables (TS, TRS, XLR) to make the connection between the two devices
  4. Set the gains and levels correctly to get a clean signal for recording to avoid clipping and distortion

I am only presenting an overview because I have covered these steps in detail in another article. To check it out, click this link. The explanation includes pictures and a connection diagram.

Things to Consider When Choosing an Audio Interface

Audio Interfaces have much better microphone preamps than most standalone mixers and better analog-to-digital conversion rates. 

While they don’t have all of the knobs and faders of a mixing console, the other advantages make them the go-to in the recording world. 

Audio interfaces are also designed to be easy to route and connect to a DAW. They are usually USB powered, although some also have Thunderbolt connections.

They also come in a wide range of input numbers and prices. There are cheap 8-input interfaces and four-figure two inputs, so make sure to balance performance and features accordingly. 

Audio interfaces also allow you to route playback audio through monitors or headphones. Some also have MIDI input/output connections that enable you to control virtual or hardware synths from your DAW. 

Higher-end interfaces, such as the MOTU 8pre-es or Universal Audio’s offerings, allow you to run plugins from your daw within the interface, taking the strain off your computer’s processor. 

Companies such as Focusrite, Audient, PreSonus, MOTU, and Behringer offer multiple sizes of interfaces. Features also vary, so shop carefully. 

If your budget is limited now, but you plan to expand in the future, there are two things to consider when future-proofing your interface purchase.

The first is ADAT and/or SPDIF connections. These allow you to “chain” multiple interfaces or microphone preamps together. This basically expands your interface’s inputs. 

You can start with a cheaper interface with fewer inputs, such as the Audient iD14. This is an example of a two-input interface with ADAT, allowing you to expand to ten inputs in the future with a separate preamp or interface.

Since audio interfaces usually interface with DAWs automatically, all you need to do to record multiple tracks is create the number of tracks you need. Then assign them to the inputs on the interface. 

If you can only afford an interface with a limited number of inputs, be aware that you can still use a traditional mixer.

This is especially useful for recording things like drums, where you can put all of the drum mics into the mixer and then have it go to one input on your interface. 

Recording For Everyone

Whichever method you choose, you now know the three best methods to record audio from a mixer to a computer. Remember, what’s most important is making the music happen.

Starting small and simple with restrictions can force you to become a better mix engineer. Going straight to a four-figure setup when you don’t even know how to create a track in your DAW will not make you better.

For more audio tips and in-depth how-to’s, make sure to check out the other articles on our blog.

How to Record Audio from a Mixer to iPhone or iPad – 6 Best Methods

In this era of intelligent technology, we have most of our digital tools in our pockets. The iPhone, and smartphones in general, can be used to make good quality audio recordings, whether you are using the onboard microphones or connecting the phone to a mixer.

These phones have good microphones that would work well for most people’s needs and can even pick up and record sound with a wide range of frequencies. But that doesn’t mean it would sound anywhere near as good as if you were getting the signal straight from the audio mixer. 

There are several reasons why you would want to record the audio signal coming from external devices such as a mixer to your phone. One example would be to capture a clean audio signal from a live event such as a concert or seminar.

Another case would be if you are recording a podcast with several guests or if you are creating content for social media and are using several lapel microphones connected to a mixing board.

You would benefit from getting a straight feed from the mixing console in any of these cases. That way, you end up with a much better and cleaner sound.

There are several ways you can use to record audio from a mixer to an iPhone, but the six best methods are:

  1. By Connecting a USB Capable Audio Mixer to Your iPhone (Best Option)
  2. Using a multichannel audio interface
  3. Leveraging the Interface Capabilities of the iRig Stream
  4. Using an XLR to USB Signal Adapter
  5. With an External USB Sound Card
  6. Using a Line-Level Audio Adapter with Built-In Attenuation

Read on as we go into more detail on each one of these methods so that you figure out which one will work best for you.

Recording Audio from a Mixer to an iPhone – Step By Step Instructions

If you want to capture and record external audio sources, such as from a mixer to your iPhone, you will need some extra equipment and a few connectors to achieve this.

The iPhone and iPad don’t support inputs from most mixers natively, so you have to look for other ways to make the connection.

Here are several ways to get the best-sounding audio from your mixer into the iPhone. Some of these methods are reasonably inexpensive and easy to perform, while some solutions may require a bit of effort, knowledge, and investment on your end.

1. By Connecting a USB Capable Audio Mixer to Your iPhone

If you have a USB-capable audio mixer, this method is very inexpensive and easy to follow. A USB-capable audio mixer has everything it needs inside to output a digital stream of the audio signal through a USB cable. It basically works as a built-in audio interface between the analog signals and your iPhone.

This is what you will need to make the connection if you choose this method [Links to Amazon]:

  • USB-A to Lightning Adapter or a USB-A to USB-C Adapter (MFI Certified)*
  • USB Cable to connect to the mixer
  • An Audio Recorder App or DAW installed on your device (GarageBand Works)

*Please Note: You need to figure out the type of connector your device uses so that you get the correct adapter. For example, the iPad Pro now comes with USB-C instead of the usual Lightning connector. This also applies to some iPhone versions. Some newer models use USB-C, while others still use the Lighting port. I have included links for both types. Choose the right one for you.

Steps for Making the Connection

Follow these steps to send audio from a mixer to iPhone or iPad. You can also use the diagram below as a reference.

  1. With the audio mixer turned off, Plug the mixer’s USB cable at the back.
  2. Connect the other side of the USB-A coming from the mixer to the Lightning-to-Camera adapter. You can either choose the Lightning-to-Camera adapter or the USB-C multi-adapter, depending on the model of your iPad. The adapter also allows you to charge your device while the other device is connected, making it more feasible to use for more extended events.
  3. At this point, you can connect the adapter to your phone
  4. Turn on the mixer and wait for the device to show the pop-up message saying “Audio Device Connected.”
  5. On the pop-up message, you can either select “Turn on Monitoring” to connect a pair of headphones to the mixer and monitor what is being recorded on GarageBand or select “Cancel” if you don’t want to monitor the audio on the mixer side but on the iPad itself connecting headphones to it.
  6. You don’t need to download any drivers. Your iPhone or iPad should establish the connection immediately. If it doesn’t automatically connect, you might need to go to the mixer’s manufacturer site to download the drivers. This can happen if the mixer you are using is slightly old.

To configure GarageBand with your audio mixer, go to the last section of this article, where I explain how to configure it correctly to capture and record a stereo audio signal.

Connection Diagram

Diagram for Connecting a USB Capable Audio Mixer to Your iPhone

2. Using a Multichannel Audio Interface

The second method to record audio from a mixer to an iPhone is to use a USB audio interface. This is a bit more complicated in terms of getting power as these devices rely on the bus power from your computer, and your iPad or iPhone isn’t powerful enough to do that efficiently.

To solve this issue, you will need to use a powered USB hub that gets power through a wall adapter rather than relying on power from the USB bus.

When using this method, you need a few accessories and cables to make the connection. This is what you will need [Links to Amazon]:

  • A USB audio interface
  • A USB hub with an external power supply
  • Depending on your device, a USB-A to Lightning Adapter or USB-A to USB-C Adapter – Needs to be MFI Certified.
  • USB Cable to connect to the audio interface – Usually supplied with the audio interface
  • TRS balanced audio cable or XLR balanced audio cable – To bring the audio signal from the mixer to the audio interface.
  • An Audio Recorder App or DAW installed on your device (GarageBand Works)

Please Note: The latest generation audio interfaces like the Focusrite Scarlett are USB-C native, which means that if you are using an iPad or iPhone that has a USB-C charging port, and your USB hub data cable is also USB-C, you wouldn’t need to get the USB to Lightning adapter. In that case, you would go straight from the hub to the phone.

You can even use the phone or iPad’s charger to charge the device while recording. That way, you don’t run out of battery while recording.

Step-by-Step Process for Making the Connection

  1. First, connect the USB Hub’s external power supply to an electrical outlet.
  2. Now, connect USB to Lightning adapter to your iPhone or iPad.
  3. At this point, attach the hub’s data cable to the USB to Lightning adapter.
  4. Connect the audio interface’s USB cable to the hub. You should see the interface turn on.
  5. A few seconds later, you should see a pop-up appear on the device saying “Audio Device Connected.”
  6. The audio interface then needs to be connected to the audio mixer. We can do this using XLR cables, or you can use quarter-inch TSR or TS audio cables, depending on what kind of throughputs your mixer uses. I will not go into detail on how to connect the mixer to the audio interface because I have already covered this topic in another article. Click the link to check it out if you need to.
  7. At this point, you can configure GarageBand on your device to start recording. Once you do that, you will see the input signal level on your phone’s display, and after that, you just need to adjust the volumes, and you’re good to go. To configure GarageBand, you can see the procedure in the last section of this article.

Diagram for Making the Connection

Connection diagram for Using an Audio Interface to Record Audio From a Mixer to Your iPhone

3. Leveraging the Interface Capabilities of the iRig Stream

The iRig Stream is a 2-channel audio interface designed for mobile devices like iPhone, iPad, or Android. It also works with Mac and Windows computers. This device consumes so little power that your phone or tablet can power it on the go, with no need for external power adapters.

It connects the analog signal coming from any audio mixer using RCA connectors, making it a versatile tool for capturing a stereo or mono signal and recording it to your iPhone or iPad with the included app or GarageBand if you prefer.

Here is what you will need if you decide to use this method [Links to Amazon]:

  • iRig Stream Interface
  • Download and install the iRig Recorder 3 LE. You can also use GarageBand or any other DAW of your choice.
  • Audio Cables – Male TS to Male RCA or Female XLR to Male RCA. The audio cable you choose will depend on which output is used from your mixer.

This is an excellent option if you efficiently want to connect a mixer to an iPhone. It’s a simple setup process:

  1. Take the included Lightning or USB-C cable and connect one side to the iRig stream and the other side to your iPhone or iPad. This also works with Android devices.
  2. Locate an available line-level output in the audio mixer. You can use the output labeled “CTRL ROOM,” “CR OUT,” “STEREO OUT,” “AUX SEND,” or “REC OUT” if you have an older mixer.
  3. Run a cable with the correct connector to the iRig Stream from the mixer. Depending on the line-level output you chose, you would need to use an XRL to RCA or TS to RCA cable.
  4. You should start to see an input on your iPhone which means you’re good to go. However, before you hit the record button, you need to perform an audio check to ensure good sound levels.
  5. If you use multiple microphones in a podcast setting, ensure all microphones are at the proper sound level. 
  6. Adjust the signal on your mixer first, as it’s the primary device in the audio chain.
  7. Now, move on to the iRig interface, adjust the primary signal using the knob on the device to make sure that the recorded audio isn’t too high or too low.

If you’re in doubt, consider having the signal a bit lower as you can increase the volume post-production without any distortion. But please, keep in mind that having it too low may cause you to need to remove some hiss when boosting volume, too, so make sure the audio signal is at least audible before you start recording.

You can perform a few tests before recording to ensure a correct volume.

Follow This Diagram for Your Reference

Connection diagram for Using the iRig Stream to Record Audio From a Mixer to Your iPhone

4. Using an XLR to USB Signal Adapter

This method is somewhat limited because you can only record a single channel or mono signal. These types of adapters can only handle one channel.

The reason is because they are originally designed to connect XLR microphones to a computer. But if you have one of them lying around, it can be used to send an audio signal from a mixer to the iPhone or iPad.

The setup procedure will be very similar to the second method, but in this case, we are only dealing with a single channel.

Please Note: This method is not as good or practical as the first three methods presented in this article. Buying one of these adapters will cost you almost the same as purchasing an audio interface. But I decided to include it so that you have all the options available to determine which works best for you.

Here is what you need to follow these steps easily:

  • XLR to USB Signal Adapter – The best two adapters are the Shure X2U and the Pyle PDUSBPP10
  • XLR Cable
  • USB to Lightning Adapter
  • USB Cable
  • Broadcaster app, DAW, or recording app

Making the Connection

  1. Start by connecting an XLR cable from one of the mixer’s XLR outputs into the input of the XLR signal adapter
  2. Connect one end of the USB cable into the XLR signal adapter and the other to the USB to Lightning Adapter.
  3. At this point, you can connect the USB to Lightning dongle to your iPhone or iPad the same way we did in the first method.

The good thing is that your phone or tablet can power the signal adapter without needing an external power supply. However, it’s recommended to get the USB to Lightning dongle with the charging port so that your phone stays charged while recording.

This XLR signal adapter is also helpful in some other cases. For example, you can connect a condenser studio microphone or regular dynamic mic on the go to your computer without an interface.

Diagram for Making the Connection

Diagram for Using an XLR to USB Signal Adapter to Record Audio From a Mixer to Your iPhone

5. Record Audio From Mixer to iPhone With an External USB Sound Card

Using an external USB sound card isn’t the best method to connect the mixer to iPhone because you don’t have much control over the audio signal. Still, it’s one of the most convenient ones if you already have one lying around, making it a more viable option for many people. These sound cards are relatively inexpensive online too.

If you decide to use this method, here are the components and cables you’ll need to make the connection:

  • A USB sound card
  • USB to Lightning Adapter
  • Depending on the output you choose in your mixer, you need one of these cables:
    • 3.5mm Stereo Audio Jack to Two RCA
    • 3.5mm Stereo Audio Jack to Two ¼” Jack
    • 3.5mm Stereo Audio Jack to Two XLR  

Connecting Everything Together

  1. Plug the USB sound card into the USB to lightning adapter.
  2. Connect the adapter to your iPhone or iPad. You will see a message pop up that tells you that your audio device has changed.
  3. You can use two options here to connect your mixer to your iPhone.
    • If your mixer has RCA output, you can use a stereo RCA to 3.5mm audio jack. Connect the 3.5 mm jack to the red microphone port on the soundcard. Plug the RCA wires in the “Record Out” port of the mixer, and it should start giving you a signal on your iPhone or iPad.
    • If you decide to use the main XLR output or the “Stereo Out” or any other Aux or SUB outputs in the audio mixer, you need a 3.5 mm to XLR cable or the 3.5 mm to ¼” Jack. Please note that the cable you use here will depend on the output capabilities of your mixer. Connect the 3.5mm jack into the red microphone jack of the USB sound card, and the XLR or ¼” Jack plugs in the corresponding output in your mixer. At this point, you should start getting an audio signal on your iPhone or iPad.

Connection Diagram

Here is a diagram that you can use for your reference that shows the connections

Connection Diagram Using a USB Sound Card to Record Audio From a Mixer to Your iPhone

6. Using a Line-Level Audio Adapter With Built-In Attenuation

The last method you can use to send audio from a mixer to an iPhone or iPad is by using an adapter that takes the line-level signal coming from the mixer, then attenuates it so that it can be used adequately.

Using this method is very simple but is somewhat limited because you don’t have much control over the signal coming into your device. 

The reason why the audio signal coming from the mixer needs to be attenuated is because if you connect it straight to the iPhone, it will overload the device, and the resulting sound will be distorted and impossible to comprehend.  

To avoid this, you can use a line-level audio adaptor to solve the issue. These adapters work by knocking down the signal to a point where the iPhone can take the signal without distortion. Technically speaking, it attenuates the signal by -20 dBV.

If you feel that this method works best for you, here are a few things you will need to make it work [Links to Amazon]:

  • Headset Buddy
  • TRRS to Lightning Connector Dongle
  • Depending on the output you choose in your mixer, you need one of these cables:
    • 3.5mm Stereo Audio Jack to Two RCA
    • 3.5mm Stereo Audio Jack to Two ¼” Jack
    • 3.5mm Stereo Audio Jack to Two XLR  
  • Download and install an input level recording application such as bossjock jr on your iPhone. This will allow you to set the input level. It shows you the input level on the screen, and you can adjust it easily.
  • A DAW program such as GarageBand or the one of your choice.

Hooking Up Everything Together

  1. Start by connecting the TRRS to Lightning dongle to your iPhone or iPad
  2. Next, connect the Headset Buddy to the TRRS to Lightning dongle
  3. At this point, you need to bring the audio feed from the mixer to connect it to the Headset Buddy. As mentioned previously, you need to choose an output from the mixer. It can be the one labeled “CTRL ROOM,” “CR OUT,” “STEREO OUT,” “AUX SEND,” or “REC OUT” if you have an older mixer.
  4. The input level on your mixer can change depending on how loud the mix is. Keep in mind that eventhough the audio mixer may show that the audio levels are fine, this can be different at the input of the iPad or iPhone.
  5. The key to setting the audio level is knowing where it should be without peaking. This is where the bossjock jr app comes in to keep in check the input audio level so that it never is too low or to high. A good rule of thumb is to keep the audio level in the green area of the meter. Never allow the audio level to go beyond the yellow level.
  6. Do a test recording to make sure the level are good before recording the event’s audio.
  7. Open the DAW app such as GarageBand, and start recording the audio coming into your phone from the audio mixer.

Diagram for Making the Connection

Here is the diagram you can use as a reference to make the connection

Diagram for Using a Line-Level Audio Adapter with Built-In Attenuation to Record Audio From a Mixer to Your iPhone

Setting Up an Audio Capturing Device With GarageBand

As mentioned earlier in the article, you can record the audio coming into any audio capturing device such as a mixer, audio interface, iRig interface, XLR to USB converter, or USB audio card to your iPhone or iPad using Apple’s GarageBand app.

But before you start recording, it needs to be configured to record the audio in stereo mode. Follow these steps to configure it:

  1. Press the plus button “+” in the top right-hand corner of GarageBand’s main window.
  2. Scroll until you see the “Audio Recorder” option, select “Voice,” and wait until the track settings window opens.
  3. On the lower left side of the window, select the “Channel” option.  
  4. A small window opens where you can select how many channels you want to use in your recording. Since you are taking the audio signal from a mixing console, select the “Stereo” option.
  5. If you want to monitor the recording through the mixer, on the lower-right side of the window, under Monitor, select “On.”

You may need to use a decent set of headphones coming from your iPhone, iPad and not just from the monitor out of the mixer, as the signal may be different once the phone has processed it.

Looking for More Help?

Most people have access to their phones 24/7, so doing your recording on your iPhone may seem like the best option. You can record audio from mixer to iPhone with any of the above options we mentioned, but we recommend using a dedicated device like the iRig for the best results.

We hope that these methods help you out in your audio recording journey. You can also check out our article on mixing and mastering tips if you can’t get the audio sounding just right.

How to Set Up a Simple PA System for a Small Band or Solo Artist

The worst thing that could happen during your performance, other than misspelling the name of the city you’re in, is a gear failure. Popping speakers, audience members yelling they can’t hear you; cords being tripped over and broken, there’s a lot that can go wrong! 

While there’s certainly quite a lot of work involved with setting up a band pa system, there has to be a simple PA system setup that works! 

While there’s no “guaranteed perfect setup” that will work in every venue for every band, there is plenty you can do to make the process easier. The best part is that you don’t even need any experience with PA equipment.

Here are the 10 steps you need to follow to set up a simple PA system for a solo artist or small band:

  1. Choose the Right Portable PA System
  2. Check the Room Layout & Get Organized
  3. Position and Set Up the Speaker System
  4. Position the Microphones and Stands on stage
  5. Set Up Your Mixer to Be Within Your Reach
  6. Connect the Speaker, Mic, and Instruments with the Correct Type of Cables
  7. Run Power Drops to the Equipment
  8. Organize Your Cables to Prevent Mid-Show Tripping
  9. Power On Your Gear Carefully
  10. Perform a Sound Test

Read on as we go in more detail in this how-to guide on the ten steps you can take to set up a simple PA system for a solo artist or small band. 

1. Choose the Right Portable PA System – A Good Simple PA System Setup Begins with the Right Gear

Your setup will only be as good as the gear you buy. That’s not to say that you need to blow your entire budget to sound good. There’s plenty of great equipment available at affordable prices. The onus lies in knowing what to look for. 

First, consider your needs. As you’re a solo artist or a small band, it’ll likely be you, your bandmates if you have any, and whatever venue staff offer to help. Until you get a dedicated road crew, go with portable equipment. Don’t let the size of some portable PA systems fool you; a good portable set can pack a heck of a punch!

When considering how powerful you want your speakers to be, keep in mind the Sound Pressure Level (SPL), not the system’s wattage. The SPL, which is measured in decibels, indicates how loud your speakers will be. The decibel level you aim for should depend on the types of venues you’ll be performing in; small venues range from 80-100+ dB, give or take. 

In terms of sound quality, you’re going to need to look at the frequency range of your setup. In all, your setup should be capable of reproducing all frequencies between 20Hz-20kHz.

If you’re looking for a few recommendations, the Bose L1 Compact, Bose L1 Pro8, JBL EON One, Yamaha StagePas 600BT, Yamaha STAGEPAS 1K, and Electro-Voice Evolve 50, are excellent starter setups that I’ve reviewed before, click the links if you’d like to read the reviews.

These setups possess many features you should look for when shopping for your PA setup: easy to store/carry, compact size that won’t dominate the stage, and solid sound quality. 

I also have a complete guide on how to shop for gear properly!

2. Check the Room Layout & Get Organized – Get the Lay of the Land Before You Start Setting Up

It’s always a good practice to get some idea of the venue before you start setting up. Not only do you need to consider acoustics and equipment placement, but you’ll also need to ensure that everything can be powered or that you don’t end up putting yourself in the wrong place!

Start by meeting with the venue staff. Talk with management to get an overview of the performance ahead of you. The venue may have restrictions in place on where things can be placed (and a lot of the time, this is for safety reasons), so make sure you listen carefully.

It also helps to get an idea of where the audience will be, especially in a restaurant or cafe setting where they may be seated and spread out more. 

Next, you’ll want to locate electrical outlets. Before entering the venue, get a running total in your head of how many plugs you’ll need. Find outlets for each close to where you will need them. Additionally, try to determine how many power drops (extension cables) you’ll need.

A good tip is to make sure that the outlets work before you unpack and set up everything. To do this, you can use a simple outlet tester such as the Sperry Instruments GFI6302. With this tester, you can ensure that the wiring is correct and that the outlet has power before you start.

If you can, try to mark general locations for where you’d like everything to go. Use something that can be moved around just in case you start setting up and reconsider the layout.

3. Position and Set Up the Speaker System – Consider Your Speaker Setup Very Carefully!

As someone that’s set up many a band PA system, let me tell you: good speaker placement is vital. Always remember that speakers don’t just “blast sound”; they disperse it across an area. Each speaker has its own dispersion pattern and can project sound efficiently throughout that space.

For a live performance, especially as a solo artist or small band providing its own sound system, you’ll want speakers with a broad dispersion pattern to cover a larger area with the minimum number of speakers.

Broad dispersion speakers also sound better, providing a more enveloping sound for your audience. While narrow-dispersion speakers project further, their sound quality is lessened, and their projection area isn’t as wide.

This is where portable PA systems like the Bose L1 Compact, Electro-Voice Evolve 30M, or the Bose L1 Pro8 outperform regular PA speakers. This is because the array enclosure is designed to deliver 180 degrees of usable horizontal coverage, ensuring that your audience hears the sound super clearly no matter where they are in the room.

Thanks to this capability, the speakers generate high-quality, crystal clear, and even sound throughout the room.

Most people find it hard to believe that clear and loud sound emanates from such small systems. If you use a pair of any of the speakers mentioned previously in a room packed with about 300-400 people, everyone would hear the sound clearly.

I have personally used a pair of the Bose L1 Compacts for setting up the PA system for an acoustic band, and the sound is not only clear but also of superior quality. Pretty much everyone who buys any of these PA systems greatly enjoys pushing it to its limits at gigs.

When placing your speakers, make sure they face the crowd and space them out just enough to cover the main audience area. When in doubt, aim both speakers towards the rear-middle of the room. Ensure that any speakers are in front of you and a safe distance from where you and any other band members will stand.

Basic PA System Setup Diagram

Basic PA System Setup Diagram For Solo Artist
Basic PA System Setup Diagram for a Small Band

4. Position Your Microphones and Stands to Avoid Feedback

In placing your microphone stands, consider feedback. The closer a microphone is to a speaker, the higher the chance of ear-piercing feedback! This is why, when you placed your speakers, you put them to the front and to the side of where you and your bandmates would be.

When placing the stands, try to find a balance between the space everyone will need to move around while performing and the safe space needed to prevent feedback. 

When considering these “bubbles” of space around your mic stands, make sure you consider how much movement each band member will be capable of during a show. You won’t need to worry about a drummer wandering in front of a monitor, but make sure any singers have enough room to move around without hitting a feedback minefield. 

If you have wired mics, make sure you place stands and designate “bubbles” concerning the lengths of the cables you have. While cables aren’t as much of a problem with wireless mikes, take care to advise anyone using them to watch where they wander.

5. Set Up Your Mixer to Be Within Your Reach

If you’re a small band or a solo performer, chances are you don’t have a dedicated sound technician. Handling the sound mixing during a live performance is possible on your own, thankfully. Of course, you’ll need to make sure the mixer is close enough for you to use. 

Considering the bubbles I discussed above, place your mixer somewhere you and other band members can easily reach. If you have a band member that tends to stay in one place, like a drummer or pianist, try tasking them with sound mixing, and set up the mixer near them. This will ensure that someone will always be close if you need to tweak your audio mid-performance. 

If you’re not that versed on how to properly configure and use a mixing board, I’ve got you covered! 

6. Connect Your Equipment, but Consider Your Audio Cables Carefully

Your gear is placed; now it’s time to hook it all together. Connecting audio cables might sound straightforward, but there’s quite a bit that goes into connecting cables to get the best audio quality. 

For starters, is your cable balanced or unbalanced? An unbalanced cable has a positive connection, as well as a grounded connection for shielding. A balanced cable, however, has an additional negative connection.

In layman’s terms, balanced cables are more stable and produce better sound quality over long distances. 

Using XLR cables, connect your microphones to your mixer, and your mixer to the speakers. If you have musical instruments like guitars, you’ll want to use unbalanced TR cables or balanced TRS cables. 

7. Run Power Drops to Your Equipment

Now that your audio equipment is connected, you can work on running power to your gear. A key thing to remember during the PA system setup is not to turn anything on before everything is connected. We’ll get to the reasons why later. 

In the meantime, start running drops between your setup components. As you connect power cables, try to lay them neatly with audio cables. We’ll be returning to them in the next step. 

8. Organize Your Cables to Prevent Mid-Show Tripping!

Time for some cable management. Your band sound system likely has a tangle of cables heading in every direction. Leaving it in this state as you perform is asking for trouble! As you connected power cables, you hopefully did so in a way that kept them consolidated with your audio cables. 

Survey these cable bundles and consider the walkways that you, your bandmates, and venue staff will be using. Using gaffer’s tape, you can safely create “walkways” over cables spanning busy areas.

At the same time, try to mark out where cables are in spaces that might not be traveled as much. If someone tries to take a shortcut, don’t let them trip!

Don’t just leave cables in disorganized lumps, even if they’re out of the way. This will make packing up much harder. As best you can, try to organize grouped sections of cable neatly. 

If it is within your budget, try getting wireless systems so you don’t use too many cables to set up the PA system. You can even connect the speakers to the mixer wirelessly. If you want to know how to do this, here is an article that explains the process in detail, and believe me, it is very simple.

9. Power On Your Gear Carefully

The order in which you power up the components of your setup greatly matters. If you turn something on out of order, you might be greeted with a loud POP! To avoid damaging your equipment, you’ll need to follow a specific order.

This process typically begins with any outboard effects; equipment that alters your sound from outside the mixer. Effects units, equalizers, preamplifiers, and other equipment like this should be powered on first. Anything else going into your mixer, like your mics, need to be switched on too. 

Next, fire up the mixer itself. After this, you’re free to power on your speakers or amplifiers. 

If using a simple PA system setup consisting of one Bose L1 Compact powered speaker, one microphone, and one instrument, don’t turn on the speaker until everything is connected to the speaker’s back.

You also want to make sure that the volume knobs are turned all the way down to avoid unexpected noise before turning on the speaker system.

Powering down your equipment requires the same care but effectively in reverse. When your show ends, shut down your amplifiers and speakers and wait for a minute or two.

Amplifiers need to store power to operate, and it’ll take a brief moment for them to discharge. Once you’ve waited for the discharge, continue the process in reverse—power down your mixer, followed by any outboard equipment. 

Remember: last on is first off.

10. Perform a Sound Test

Now that you know how to set up a PA system for a solo artist or small band, all that remains is tweaking and testing your setup before your big show. This stage of the process is extremely vital, so make sure that you take your time!

This final stage should begin with some additional feedback prevention. To start, only keep microphones powered on when they’re going to be used. Additionally, keep little space between your mouth or instrument and the microphone. Too much space lets in errant sound waves. Here is a complete guide for correct microphone handling.

Now we can begin equalizing your band PA system. If you’re a solo act, position yourself in place near your mic and mixer. If this is a band act, have everyone take their places but don’t let anyone start playing yet. 

With your mixer, cut any unwanted frequencies from the feed. Just powering above these by turning the wanted frequencies up will sound cacophonous and mess up your performance.

Next, have each member of the band individually play so that you can hear them through the sound system. Adjust the frequency bands as needed to balance each instrument and vocalist.

If you’re having issues finding a balance, have each member play the loudest part of the set first, followed by the softest. This method should help you get a good idea of the range you’ll need for the venue to make everyone heard.

Use the same method when testing together as a band, alternating between quiet and loud segments. Take your time to get the sound right.

While you’ll have chances to fix it later, doing so mid-performance can be jarring; picture it from your audience’s perspective; what if you suddenly got louder just as your loudest song was coming up? Make any adjustments during your show gradually to avoid this.

Looking for More Help for Your Big Show?

Your band’s PA system is vital, but it doesn’t need to be overly complicated to blow the roof off the venue! With careful consideration to your gear and the proper setup, any simple PA system setup can be fine-tuned to almost any small to medium venue.

Your audio equipment might be ready for the performance, but do you feel ready? If you’re feeling a little jittery or just looking for some advice, check out my guide on how to be a better singer!

  • Page 1
  • Page 2
  • Page 3
  • Interim pages omitted …
  • Page 5
  • Go to Next Page »

Primary Sidebar

Search

Guides & Tutorials

  • Choosing a Portable PA System
  • How to Be a Better Singer
  • Build a Budget Live Streaming System Using PTZ Cameras
  • How to Get the Best Audio Quality on YouYube
  • Setting Up Stage Monitors
  • Mixing Console Basics
  • How to Position PA Speakers
  • Stage Sound System Set-Up
  • How to EQ Live Vocals
  • How to EQ Live Sound
  • Daisy Chain Active Speakers
  • Zoom Audio Settings for Music
  • How to Livestream a Wedding
  • Improve Your Livestream Audio Quality
  • Microphone Preamp Buying Guide

Featured Posts

Treblab X9 Pro: Tough Earbuds, Big Performance

Escape the Noise: Best Affordable Noise-Canceling Headphones

What is a Ground Loop? – 5 Simple Ways to Fix the Buzz and Hum

How to Set Gain on an Audio Mixer – Easy Method

Disclaimer

VirtuosoCentral.com is a participant in the Amazon Services LLC Associates Program, an affiliate advertising program designed to provide a means for sites to earn advertising fees by advertising and linking to Amazon.com.

Home  About  Contact  Disclaimer  Privacy

Copyright © 2019-2025 Virtuoso Central. All Rights Reserved.