This website uses cookies to improve and personalize your visit. Learn more about cookies. Got It

  • Skip to primary navigation
  • Skip to main content
  • Skip to primary sidebar

Virtuoso Central

  • About Us
  • Contact
  • Privacy

Informational

7 Factors to Consider When Choosing Microphones for Podcasting

When you click on a link and then land on a web page, you start to make very quick judgments about the quality of the content. If the website is poorly designed and looks amateur, you are likely to click away after only a few seconds.

The same is true for the sound quality of your podcast. Some microphones for podcasting are cheap, and therefore the quality of the recorded sound is poor. That is an alarm signal for the listener and may prompt them to disregard your podcast.

Today the listener is bombarded with audio content. So if your podcast is going to make the cut, you need to read about 7 factors to consider when choosing microphones for podcasting. We also share our top picks of microphones for podcasting.


1. What Are You Recording?

Are you going to be recording mainly speech sounds and dialogue? Do you plan to record music regularly? Are there more specific sounds you wish to capture, such as bird songs or other sounds in the natural world?

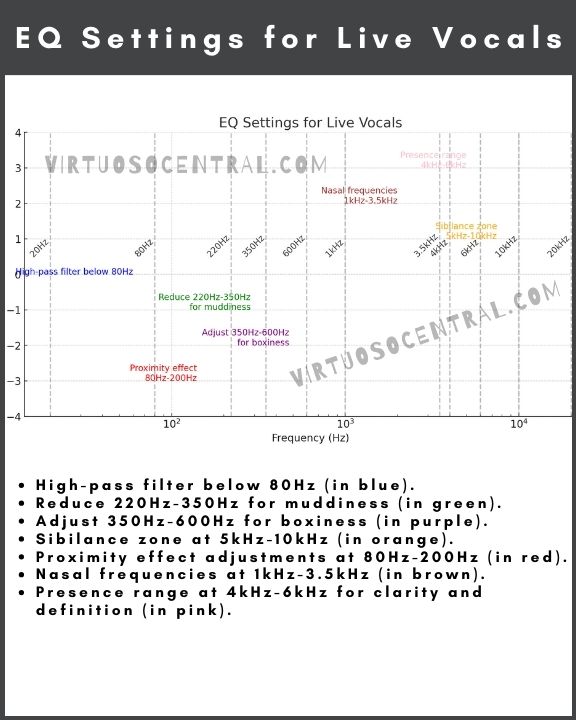
The purpose of such questions is to prompt you to think about the frequency spectrum of the types of sounds you will be recording compared to the frequency response of your microphone.

Some microphones are more sensitive to high-frequency sound, while others are better at picking up lower base frequencies. As a reference, speech frequencies are typically from about 250Hz up to 6kHz.

2. Where Are You Recording?

Your location will make a difference in the type of microphone that is best suited for your needs.

For example, will you be recording indoors under ‘quiet’ conditions? Do you intend to record sounds outside in the presence of competing noise? 

The purpose of these questions is to encourage you to think about the polar sensitivity of the microphone. This refers to the spatial sensitivity of the microphone in all directions.

Some microphones are designed with a directional pattern (cardioid) that is more sensitive to the front of the microphone.

Other microphones are designed with a more omnidirectional pattern that will pick up sounds at the periphery as well as at the front. There are several other variations.

Give careful consideration to whether you want to include or exclude environmental sounds. If your aim is to capture speech as your primary sound while recording outdoors and you don’t want interference from environmental sounds, you will be better served with a more directional polar pattern like hypercardioid or shotgun.

3. Know Your Impedance

A microphone is a transducer. This means it will convert one form of energy into another. The input energy is movement caused by sound pressure waves, which is then converted by the microphone into an electrical signal. 

This electrical signal will be an alternating current that is then fed into another device for further processing. Typically that device is a preamp. You can think of the impedance like a sort of electrical resistance. 

The important point to consider when choosing your microphone is how the impedance of the microphone compares with the device that will receive the microphone signal.

These must be appropriately matched for the electrical signal to flow optimally and with the least distortion. The output impedance (microphone) should have a ratio of 1:5 with the load impedance (preamp).

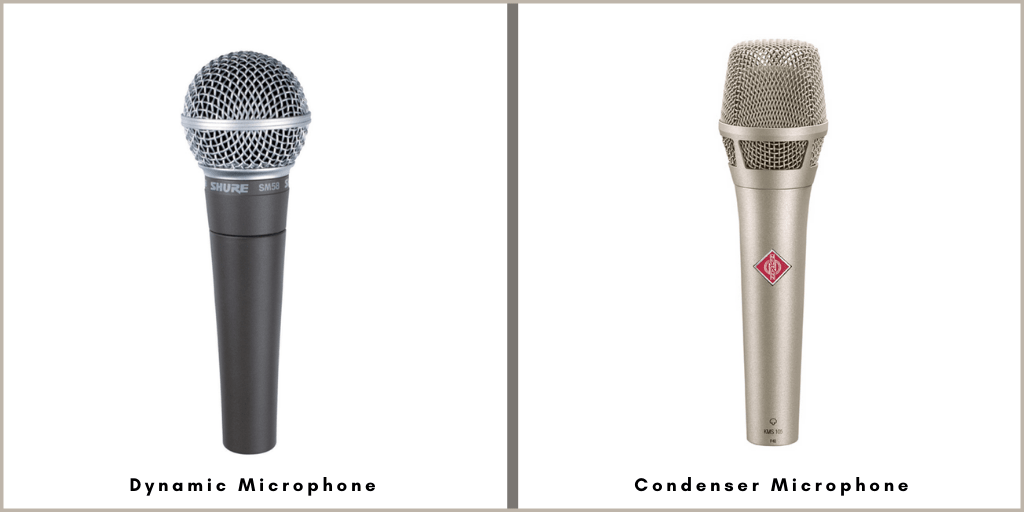
4. Dynamic Versus Condenser

In general terms, you could say that dynamic microphones have a broad frequency range and are robust microphones. They don’t require a separate power supply. They are pretty flexible in their usage and are fairly inexpensive. 

A condenser microphone is more delicate, yet it is more sensitive to variations in sound level and frequency. Condenser microphones require a separate power supply and tend to be used for recording music and other complex sound mixes.

For a more comprehensive discussion on the subject, check out this helpful guide on the differences between them here.

5. Professionals Don’t Pop

In speech, there is a group of sounds called plosives and refer to the way the sound is formed and created within the human oral cavity.

An example of such a sound is the letter ‘P.’ When this sound is made, there is an expulsion of air that can cause a popping sound through a microphone.

A quality microphone set up will have some acoustically transparent foam protecting the microphone externally, or there will be a layer inside the microphone.

A popping sound on your recording will lead the listener to believe your recordings are being made in the basement by an amateur. This type of filter is referred to as a pop filter.

6. Microphones for Podcasting – Connections

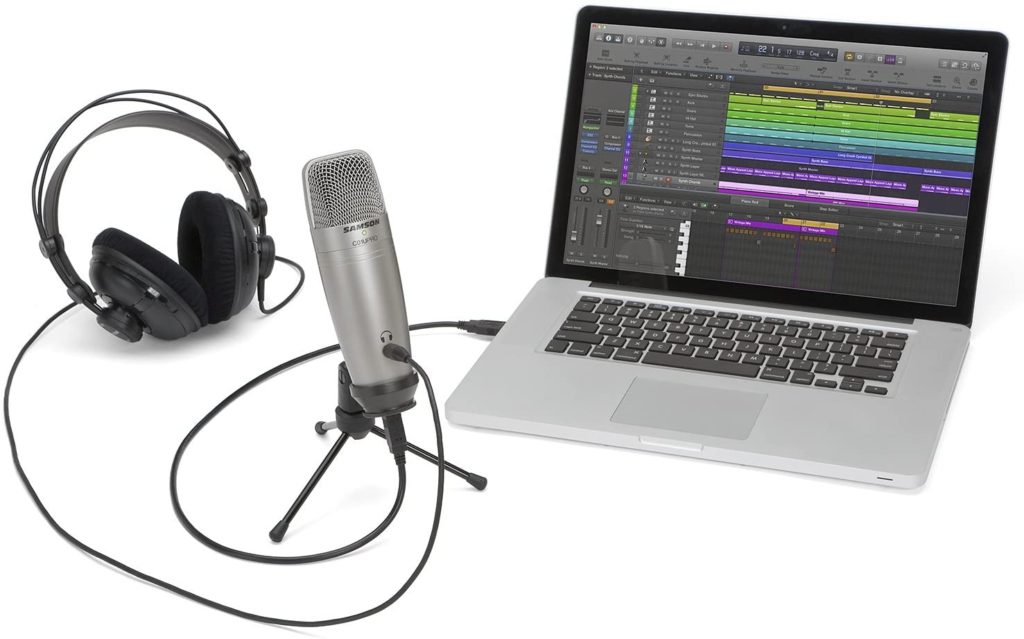
You will need to think about the trade-off between functionality, convenience, and quality of audio recordings. USB connections are very convenient and will give you a good quality recording.

However, the limitation is that these microphones only use one channel, which means the recorded electrical signal shares the same channel with the supply current. This means that there can be noise and distortions in the signal.

XLR connections use two conductors to send the signal, which means that you can have a cleaner signal. Not only that, but an XLR connection will allow you to connect to more sophisticated equipment for processing your recording.

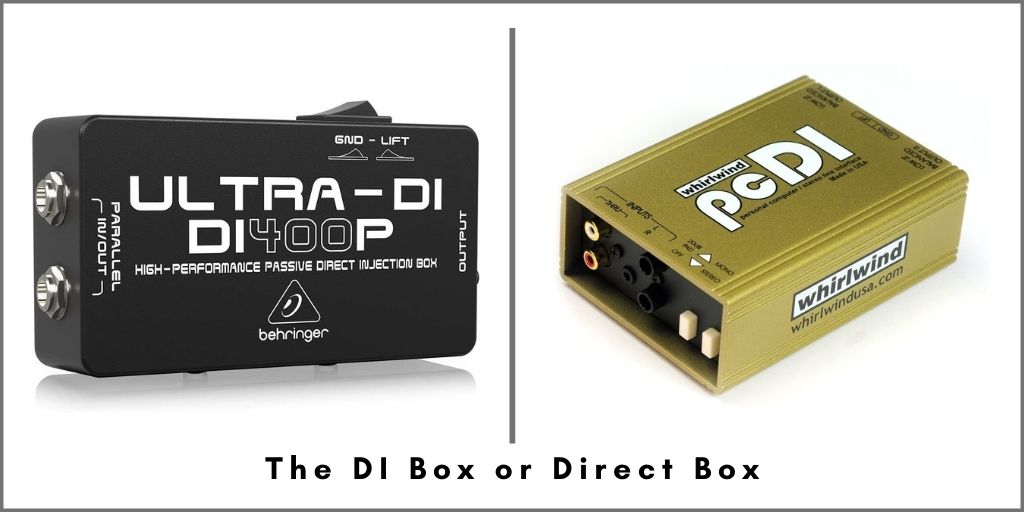
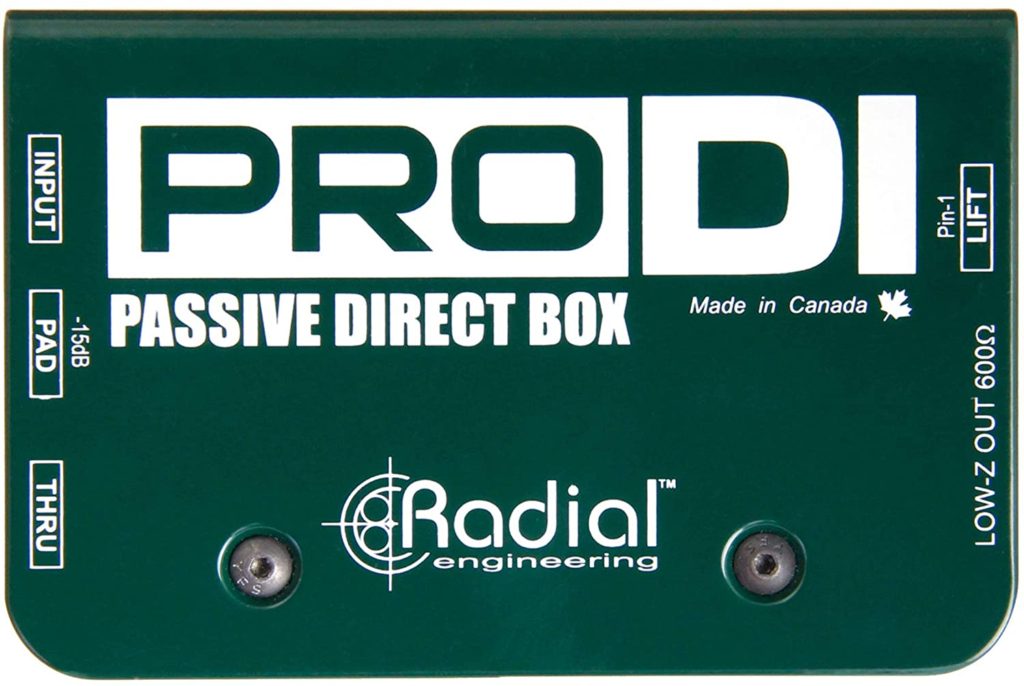
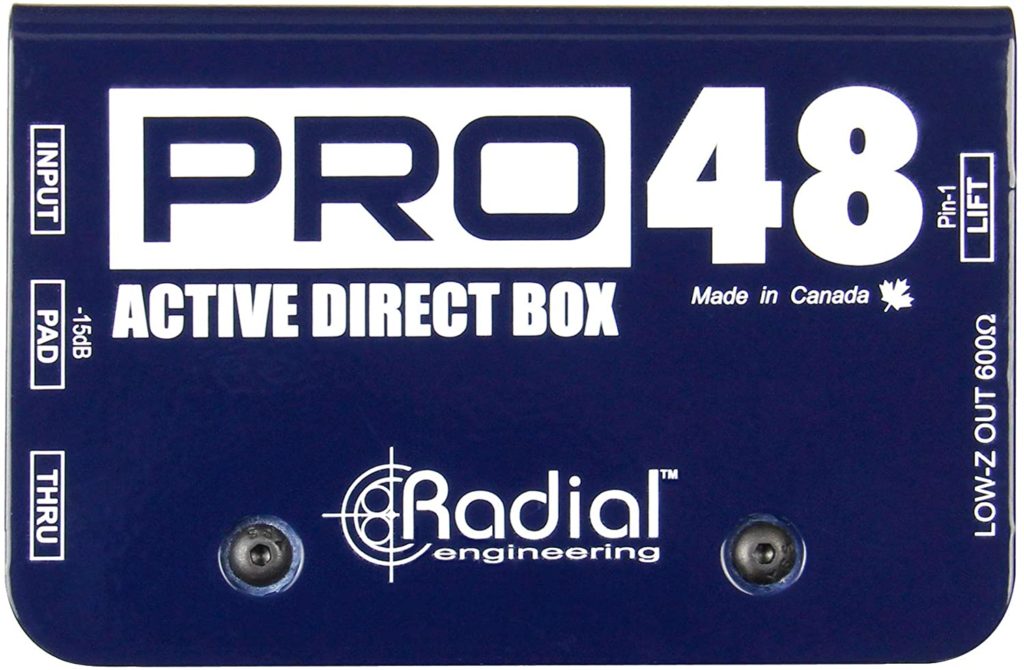
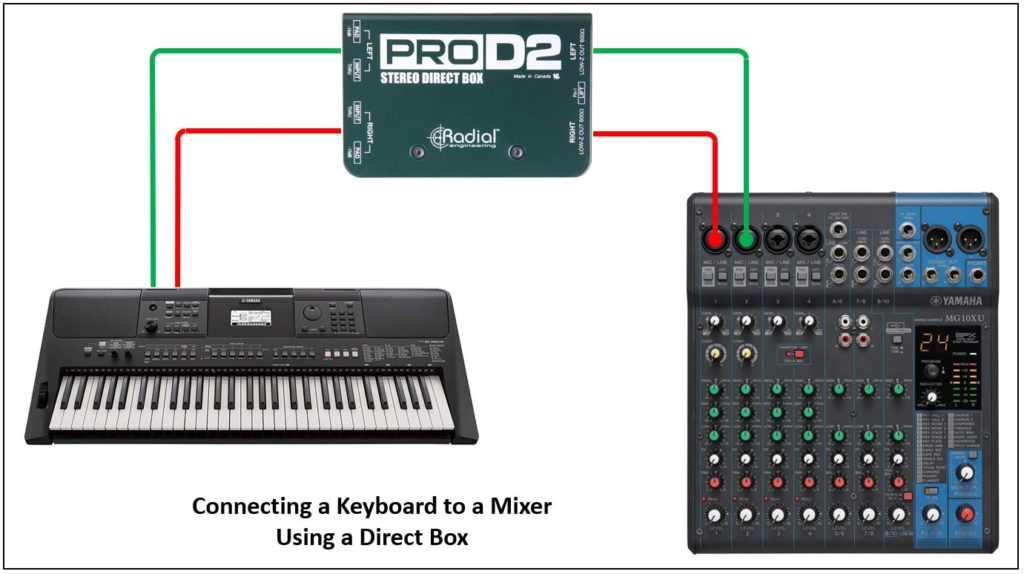
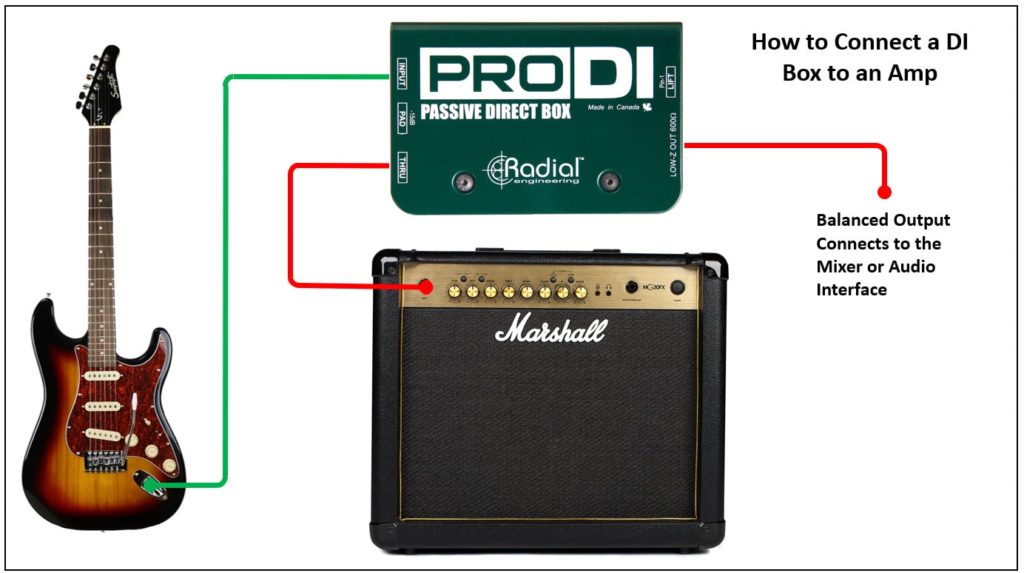
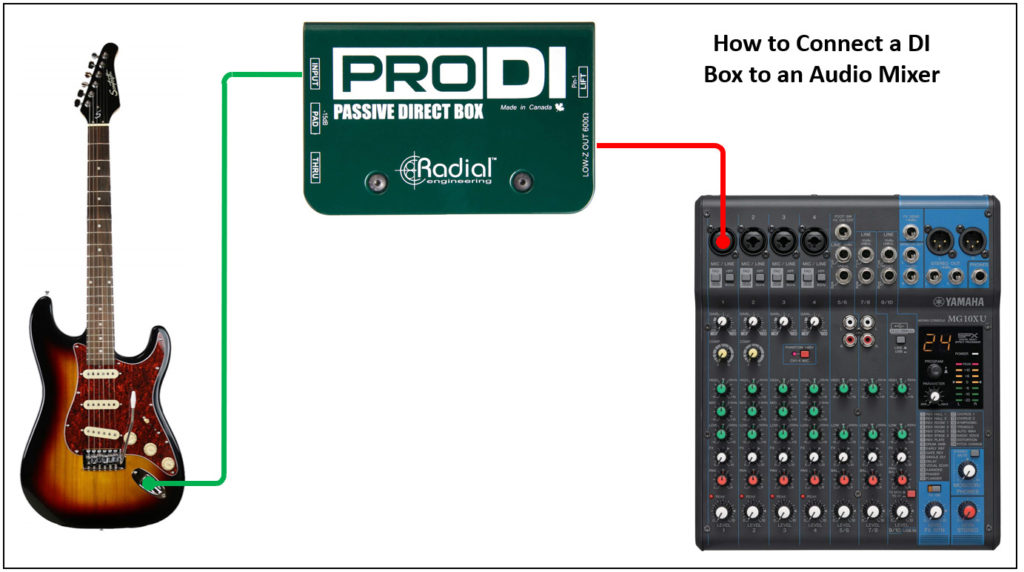
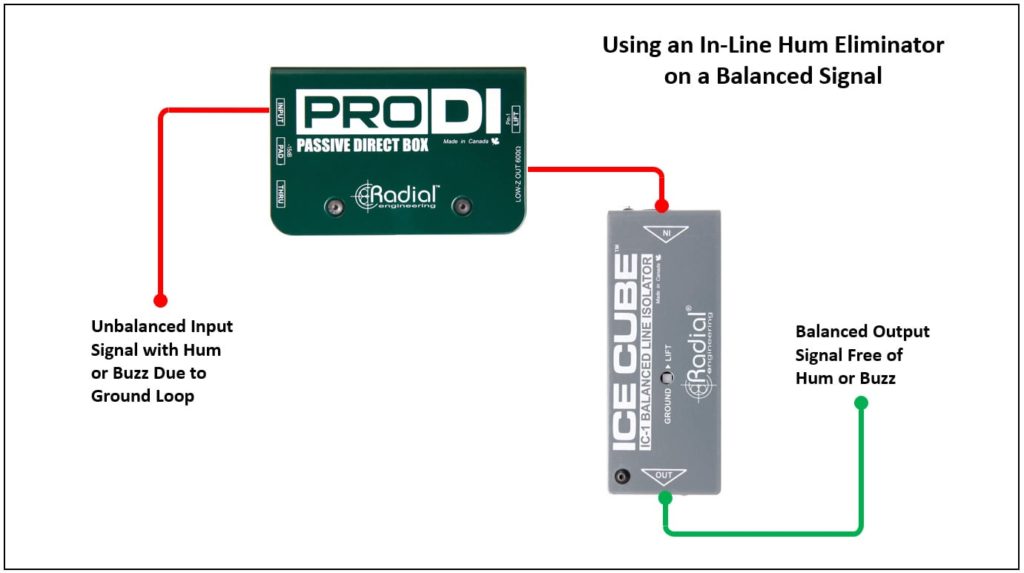
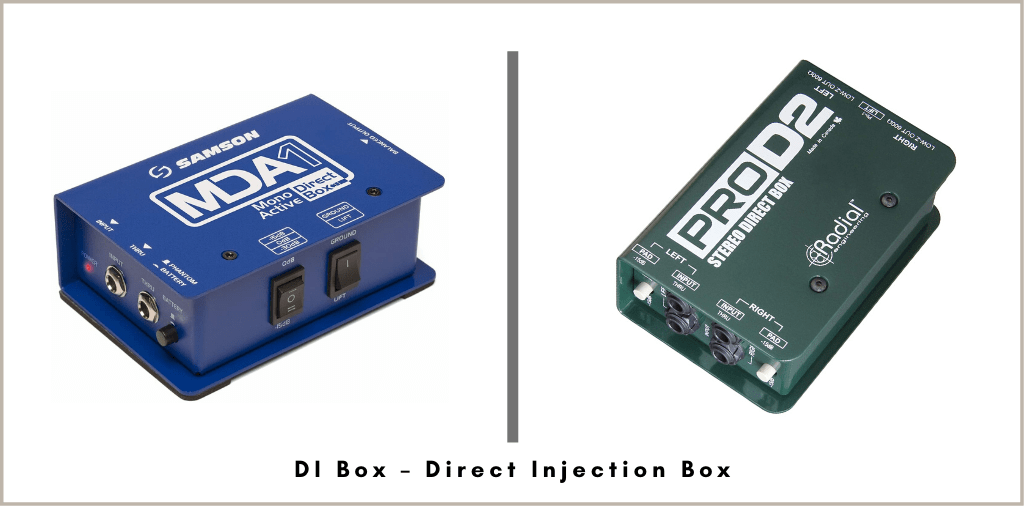
When it comes to connections, it is good to understand the role of a DI box, so with that in mind, check out this helpful explanation here.

7. Drop Factor

You won’t read this on any specification sheet. Yet, it is good to be practical. The reality is that you will knock or drop your microphone at some point.

So it is good to think about how you are going to set up your system. Will it be permanently located and in a stable fixed position? Will you be mobile with it or moving it frequently?

Consider the durability and robustness of the microphone that you need. As a general rule, dynamic microphones tend to be more robust and durable than other types.


Need Any Help?

In this article, you have read about 7 important factors you need to consider when reviewing microphones for podcasting. Remember, quality sound starts with the microphone itself. There is no benefit to using an amazing computer and amplifier if the source signal is poor from a cheap microphone. 

If you consider these factors, you will see that you will be able to choose the right microphone for your needs and balance quality with price.

You can also check our article on our top microphone picks for podcasting.

If you have questions or are interested in our buying guide, then you can get in touch here.

Everything You Need to Know about the DI Box

So you are getting started into the world of sound systems, but don’t know what a DI box is? What does it do, or how to connect it in your set up? Well, you’ve come to the right place.

One of the most basic pieces of equipment used for audio is the DI Box. A DI box or direct box plays an important role when connecting different equipment to a mixing board, amplifier, or recording device. It helps to condition the incoming signal to get a clear sound.

It is one of the most essential tools in sound and something everyone should invest in. So what makes it so unique? Let’s start with the basics.


What is a DI Box?

A DI box is a device that takes a high impedance, unbalanced input signal and converts it to a low impedance, balanced output signal without degrading the signal itself.  

DI stands for Direct Insertion, and it’s the type of input available in the direct box. The purpose of a direct insertion box is to take a two-conductor unbalanced line to convert it to a three-conductor balanced line. It also takes high impedance signals to change them to low impedance.

A DI box works to match the impedance and signal strength between two devices. That way, you get the best response possible from your instrument when connected to an audio mixer, digital audio recorder, or audio interface.

Just for clarification, in case you don’t know the concept, impedance refers to the resistance a circuit presents to an AC signal, and it’s represented by the letter “Z.” For example, the audio coming from an electric guitar is an AC signal. Examples of high impedance unbalanced signals (High Z) are electric guitars and electric bass.


What Does a DI Box Do?

You might be asking yourself, what is the point of using a DI box? Let me explain. As mentioned earlier, passive electric instruments only output high impedance unbalanced signals that are prone to picking up noise.

Cables with TS and RCA connectors are unbalanced and have the disadvantage that they act as an antenna. This means that they can introduce all kinds of noises to the sound signal, especially if the cable runs are long.

By using a DI box, your output signal becomes balanced and of low impedance. This is more advantageous because the sound can be sent using a three-conductor XLR cable, which is less vulnerable to picking up noise, delivering a cleaner signal.

Di boxes also prevent obnoxious noises that might ordinarily leak into sound equipment, like hums and buzzes. The direct input box is excellent for using it in the recording studio because it isolates the sound from being prone to picking up noise.


The Types of DI Boxes

The DI Box comes in two very different forms, passive and active. Both have their pros and cons. Let’s take a look at each one.

Passive Direct Box

Passive DI boxes use a balum transformer when going through the process of changing the sound from high-impedance and low-impedance.

A passive direct box also doesn’t require a power source. It doesn’t even so much as need batteries to operate. That also means it’s a fairly basic piece of equipment that can easily be managed but doesn’t contain a ton of incredible features.

If an instrument has a strong output, such as active guitars, bass, or keyboards, then it should be paired with a passive DI. Overall, a passive DI box is the more common form of direct box because it’s relatively inexpensive. That, and because they are very durable.

Here are a few examples of some of the best passive DI boxes available today (links to Amazon).

  • Radial Pro DI
  • Whirlwind IMP 2
  • Behringer Ultra-DI DI400P
  • Samson MD1
  • Radial ProD2 – Stereo Passive DI Box
  • Samson MD2 Pro – Stereo Passive DI Box

Active DI box

The major difference between passive and active is simple: an active DI box uses a preamplifier. This amplifier basically turns a weak signal into a strong signal, thus making it easier to work with.

Active direct boxes require power. Typically a 9V battery or 48V phantom power provided by the mixing console. If using the provided phantom power from the mixer, this voltage will be supplied by the XLR cable that goes from the mixer to the DI box.

If an output is weak, such as the signal coming from a passive electric guitar, or bass,  this is the direct box you’re going to need. As it will boost the weak signal as well as convert it from unbalanced into balanced, making it sound clear and strong, even if the output isn’t.

Active DI boxes are more expensive than others because they use more electronic components to achieve their purpose.

These are examples of some of the best active DI boxes available in the market today (links to Amazon)

  • Radial Pro48 – Requires 48V Phantom Power
  • Radial J48 MK2 – Requires 48V Phantom Power
  • Behringer Ultra-DI DI100 – Battery or Phantom Powered
  • Samson MDA1 – Battery or Phantom Powered
  • Mackie MDB-1A – Stereo DI Box – Requires 48V Phantom Power

Features to Look for in a DI Box                                                              

Input/Output Channels

One major thought to consider when buying a DI box is the number of input/output channels you’d need.

If you plan to connect a single channel instrument such as a guitar or bass, then a single-channel DI box is enough. If instead, you need to connect stereo signals like your keyboard, laptop, and tablet, a multi-channel direct box is required.

Throughput – Thru/Bypass

The Throughput on a direct input box is used to split the input signal through a 1/4 inch TS connector. The sound can then be amplified onstage as well as sent backstage to a PA system. It separates the sound and plays it in two (and sometimes more) places at once. Not all DI boxes have this, so it’s something to consider when looking them over.

A good example of when this comes handy is when a guitar player needs to send the signal to the main mixing console but also needs to connect the guitar to the onstage guitar amp. In such a case having the thru/bypass option, it’s ideal.

Ground Lift

Though one of the main purposes of the DI box is to remove signal noise, sometimes ground loops become a severe problem in the setup. By having a ground lift switch on the direct box, this problem can be solved as the ground lift helps remove the hum caused by the AC power line on the XLR cable.

Pad

PAD stands for Passive Attenuation Device, and as its name implies, the PAD function in a DI box reduces the level of a signal. In some cases, a signal’s strength is too high. If it’s connected to the audio mixer or digital audio recorder without attenuating it, the resulting sound will be distorted and not clear.

By activating the PAD switch, the signal strength is reduced by a fixed amount, usually between -10dB and -20dB.

This function is convenient, especially if connecting active instruments like a keyboard, active guitar, or active bass.

Polarity Reverse

Polarity reverse, also known as phasing, allows you to reverse pin 2 and pin 3 in the XLR cable by the flip of a switch. This function can be used as a recording technique to add signals that are out of phase, producing an interesting sound, especially for electric guitars.

In some cases, polarity reverse can also become handy when playing live on stage as it can help in reducing feedback.


Frequently Asked Questions About Direct Boxes

How to Use a Direct Box for Keyboard?

Many keyboards don’t have balanced connections, and most use unbalanced TS outputs, which tend to introduce noise to the signal.

When you need to connect the keyboard to an audio mixer, amplifier, or recording device, it’s always recommended to use balanced XLR or TRS connectors. That way, your signal’s strength is matched for better results.

This is where a multi-channel DI box, such as the Radial ProD2 Passive 2 Channel Direct Box is necessary for your setup. That way, you covert the unbalanced signal coming out of the keyboard to a balanced one going to the mixer or recording system.

The reason you want to use a multi-channel direct box is that keyboard signals are stereo (Left and Right channel).

To use a direct box for connecting a keyboard is straightforward. All you have to do is connect signal cables from the output of the keyboard to the input of the direct box. Then from the output of the DI box, run XLR cables to the input channels in the mixer, amp, or recording device.

The diagram below can be used as a reference for the setup.


How to Connect a DI Box to an Amp?

There are instances where you need to connect a DI box to an amp. An example would be if you need to send a guitar signal to a mixing console but also need to send the same signal to the guitar amp.

In such a case, all you have to do is connect the guitar to the “Input” of the direct box. Then use another cable to connect from the output labeled “THRU or BYPASS” to the input of the amplifier. The balanced output (XLR) is the one that goes to the mixer or recording device. 

Follow the connection diagram below to visualize the process.


What is the Best Way to Connect an Electric Guitar to a Mixer?

The best way to connect an electric guitar to a mixer is by using a DI box. This principle applies to any electric instrument that doesn’t have balanced outputs such as bass, electronic drums, keyboards, etc.

All you have to do is connect your guitar to the input of the direct box. Then, from the balanced output connector (XLR), attach an XLR cable to the input channel of the mixing console.

Just remember that unbalanced connections are of high impedance, decreasing the signal gain. Plus, by using them to connect the electric guitar to the audio mixers or interfaces, you could create signal unbalances due to impedance mismatches. This is why the best way to connect an electric guitar to a mixer is by using a DI box/direct box.

Here is an example of one of the best DI boxes for connecting an electric guitar to a mixer, the Radial Pro DI Passive Direct Box (link to Amazon).

I have included a diagram below for your reference to make it easier to visualize the connection procedure.


Does a DI Box Reduce Noise?

Yes, DI boxes can help in reducing external noises, but if the noise is coming from the signal itself due to a ground loop, then they don’t help much. For instance, if you have a ground loop noise coming from your guitar or amplifier signal, this noise will also be noticeable on the output of the direct box.

To get rid of a ground loop hum or buzz from a signal, you need to break the ground loop. Most direct boxes come with a “ground lift” switch, which is intended for breaking the ground loop noise in your signal.

In most cases, by just flipping the ground loop switch, the hum goes away. Still, there are instances where it is more complicated to eliminate the ground loop buzz.

In such a case, the best and easiest solution is to use an inline ground loop isolator such as the IceCube IC-1 Line Hum Eliminator (link to Amazon) as it will filter the 50-60Hz buzz from the sound signal.

The inline ground loop isolator should be connected before the signal goes to the audio mixer or amplifier. I have included a diagram for your reference; check it out below.


Final Thoughts

Now that you’ve learned what a DI box is, what it’s used for, and all the features to look out for in one, it’s time to enter the world of sound and get a DI box for yourself. You won’t regret it.

Dynamic vs. Condenser Microphones

For the first time microphone buyer, the choices can be daunting. Add to this the fact that everyone has their preference and opinion when using them, and getting sound, unbiased advice can become challenging. Luckily, we are here to help.

Below, we have prepared a quick, concise guide that will help you tell the difference between dynamic and condenser microphones. Let us help you with the tough decision by checking through the pros and cons. 


What is a Dynamic Microphone?

A dynamic microphone is a very common type of microphone. It is the one you have most likely seen used with PA systems or in karaoke bars. This, however, does not mean it is a cheap and nasty choice.

Dynamic microphones are extremely versatile. They operate by allowing the sound to hit a small diaphragm in the head of the microphone. The diaphragm vibrates a coil that is wrapped around a magnet, producing a magnetic field that transfers the signal. 

Most dynamic mics have a cardioid polar response pattern. This means that in general, they will only pick up sound sources placed in front of them, which is useful if you want to record or perform live but wish to minimize background noise. 

Pros and Cons of a Dynamic Microphone

Dynamic microphones are generally very durable, making them good for every day, on the road use. They do not require an external power source (known as phantom power) such as batteries, though condenser mics do.

They are generally less expensive and, as mentioned above, are useful for minimizing background noise. This makes them a good live microphone, and they can be convenient in outdoor recordings. 

The cons are that they will require an amplifier for output, and the choice of the amplifier can have a significant impact on the sound quality. They are also less sensitive than condensers, so if you want crisp vocals for ASMR style recordings, then they are probably not for you. 

Finally, they can have a considerable variation in frequency response depending on the make and model. 


What is a Condenser Microphone?

Condenser microphones are known as fragile and sensitive, though it does not always have to be the case. They pick up lots of nuances and sound from an environment, meaning they are ideal for some situations but too sensitive for others. 

Condenser microphones run on the electrical principle of capacitance. Inside the head, they have two metal plates, one a movable diaphragm and the other a fixed metal backplate. When sound waves hit the diaphragm, it moves, changing the distance (capacitance) between the two plates. 

The change in distance produces a change in the signal, and that is where the sound is produced. They can be very sensitive and can be omnidirectional (they pick up sound from all around). Because the plates inside have to be charged with electricity, they do require external power. 

Pros and Cons of a Condenser Microphone

In general, condenser mics have a greater frequency range and sensitivity than a dynamic microphone. This means they will pick up clearer, more precise audio with greater volume depths. This is due to them being powered, which also results in stronger signals without the use of a preamp. 

Downsides are that they require this “phantom power,” which makes them less appealing for use on the move. They are often more expensive and more fragile than dynamic microphones. 

The biggest strength, its sensitivity, is also its biggest downfall. They can distort easy, and often you can find annoying background noises in your recording that you did not even know were there.


What is a Ribbon Microphone?

The final type of microphone that you may come across is a ribbon microphone. They work by suspending a thin piece of metal or film between a magnetic field, which moves when sounds hit it. This is transferred to a signal.

Ribbon mics are quite expensive these days and fairly old fashioned. They have a sound associated with rock and roll records and black and white TV, which can be niche. However, they are very delicate and expensive, making them generally unsuitable as a live microphone. 


So Which Do I buy?

This all comes down to what your goals are and the environment in which you will be performing or recording. 

If you are looking to record instruments such as guitar and want crisp sounds without background interference, then choose a dynamic. This is also true of people who want to record vocals (singing) at home. If you are taking equipment on the road, then a dynamic microphone is a great choice due to its durability.

If you want an environmental sound or recording, then pick a condenser. They are good for podcasts when multiple people are in one room, or to pick up the ambiance of a situation. They make conversational level talk clear and crisp.


Big Mistakes

One rookie mistake is to think that because condensers are more sensitive and more expensive, they are better for recording. That may be true in a studio, but in real life, you will just pick up the sounds of traffic and dogs outside your house.

When it comes to layering these recordings into tracks, it will get messy. The loud frequencies may also destroy that microphone you have just forked out all that cash on. 


Getting the Environment Right

Once you have the microphone, the next step is to get your recording environment right. Do you need more help and advice choosing between dynamic and condenser microphones? We have lots of articles and guides on our blog to help you get your recording sounding professional.

Come and browse them today so you can sound like a virtuoso!

5 Tools Every Content Creator Should Have

One of the most critical aspects of streaming is delivering high-quality audio and video. Whether you’re a streamer, podcaster, or make videos for YouTube, the one place you can’t drop the ball is on production quality. People notice, and it leaves you looking unqualified to be streaming. But what are the best tools for streamers?

With the right tools, having crisp, clear audio and video is a breeze. Without it, your audience’s experience will be affected, and you’ll get complaints. Or worse yet, people will click away, leaving you with nothing but crickets on your streaming channel.

Are you sending out buzzing? A power source or cables usually cause that. What about too much background noise? Might want to change your location or check your mic settings if they’re too sensitive. But what else can you do?

Imagine a play-by-play that’s choppy. Ugh, no thanks. I’m out of there. Admit it, you hate it too. The easiest way to stop these nuisance issues in your audio and video is to be prepared ahead of time. If you’re considering getting into streaming, or create content for a YouTube channel, here are five tools for streamers and content creators you’ll want to check out.


Five Best Tools for Content Creators

Tools for streamers are varied and extensive, but you don’t need to go overboard. Here are a few essentials that will have you creating the best content in no time.

  • A good Microphone or Headset
  • HD Stream Webcam
  • Stream Deck
  • HD Capture Card
  • All-in-One Podcast Production Studio

This first four are great for streaming on Twitch or YouTube. The last option is perfect for podcasting.


A Good Microphone or Headset It’s Essential

Sound accounts for about half of the user’s experience. If your video looks perfect, but the sound sucks, that will affect the whole experience of your viewers. That’s why you, as a content creator, need to make sure you have a good microphone or headset, depending on your taste.

Don’t overlook this simple upgrade. You can easily check out your favorite online resources or Amazon and see what works within your budget. Be sure to check out our top picks for microphones that can serve well for live streaming, YouTube, or podcasting. Make sure to check out the reviews and see how others are using the equipment.

HD Stream Webcam

This piece of equipment is crucial. If you want to provide your viewers with the best possible experience, you want to have a quality cam. Wow your audience with solid video quality on your streaming, and they’ll be back for more.

Whether you’re streaming on Twitch, or you’re on YouTube, this is one investment you’ll be glad you made. If we were to recommend one product over the other, we’d have to go with the Logitech C922x Pro (link to Amazon).

It delivers superb video quality, and they are a company you can trust. They’ve been in the market for a while and are a trusted brand when it comes to gaming and computer accessories. With more than 3,000 strong reviews and ratings on Amazon, others agree this webcam is pure win.

Stream Deck

Let’s talk about relevance. As much as we hate to say this, you can be easily forgotten if you don’t cover all your bases. With that in mind, you need to be present on all platforms. When you’re a content creator, it’s just part of the deal.

The cool thing is that with a Stream Deck, the process is straightforward. Click the button, and wham, you’re on all your social platforms. It doesn’t get easier than that. The Elgato Stream Deck is top-notch for content creators (link to Amazon). With a 4.9 out of 5 stars, it doesn’t get much better.

Streamlining your workflow just got easier. Set keys, quick go-to, the solution doesn’t get any simpler. The best part, it detects your system and easily adapts. This is a no-brainer.

HD Capture Card

While we’re in Elgato’s wheelhouse, let’s mention another one of their excellent solutions. Their HD capture card is a great option. Still, because they offer multiple versions, they suggest you check out their quick quiz to help you figure out which capture card would work best for you based on if you’re streaming from a console, a Gaming PC, iOS, or even your camera.

We think the quick win if you don’t want to go through the entire process is to go with the Elgato Capture Card HD60 for the best bet (link to Amazon). What the card does is it records what’s going on with your screen and streams it at the same time. Think about how much easier this is. What’s awesome is that you’ve got great post-production footage later, without needing pricey hardware.

Portable Podcast Studio

Lastly, we’ve got one more thing worth considering when it comes to the best tools for content creators. Say you’re a podcaster or thinking about becoming one, setting up the equipment, or knowing which equipment to get can be frustrating because there are so many people giving you different information.

We say, make it easy on yourself, choose a company you can trust, like RODE. Know what they did? They created an all in one podcast solution. This takes all the hassle out of the process and simplifies the set up while giving you incredible quality.

With the RODECaster Pro starting a podcast is very simple. You get a production and recording system that delivers excellent audio quality. It can support up to four presenters while offering an easy way of connecting to smartphones to receive phone calls, USB, and Bluetooth sources.

It also features eight programmable pads offering instant playback of sound effects and jingles. The podcast can be recorded to a computer or to a microSD memory card that can be inserted in the unit. It is easy to use, and all of the controls are intuitive.

The delivery is excellent from a top-notch, well-known brand. When you want super audio quality, you can’t go wrong with the RODECaster Pro, which is an all-in-One Podcast Production Studio (link to Amazon).


Conclusion

There you have it, our top 5 tools for Twitch streamers, content creators, and anyone trying to get their audio, video game going. Another tip from Twitch themselves is to remember to chat and interact with those watching. It helps keep them watching longer when they feel included.

If you’ve been thinking about getting into streaming, there’s never been a better time. People are watching in droves, and with so many platforms, this media is blowing up everywhere, and the audience isn’t getting any smaller. In fact, they say that every year we’ll be watching more and more videos, so get in there and get creating! Now it will be easy since you know what tools to use to get set up.

Excellent audio and video don’t have to be a challenge, it’s just knowing what tools to use. Streaming should be fun, not a hassle. Be sure to pick up the gear mentioned above, and you’ll be on the road to a better streaming experience today.

How to Choose the Right Amplifier for Your Speakers

If you’re just getting started with building your system, there are a couple of tips you’ll want to know. For example, how do you choose the right amplifier for your speakers? When you’re new to a topic, it can be overwhelming to know all the little details that will help you out. Luckily, we’ve got you covered.

A good rule of thumb is to choose an amplifier that delivers at least the same amount of power as the RMS or continuous (program) power that the speaker can handle. It is a better practice to choose an amplifier that is twice the RMS or continuous power because that way, you will have more headroom. 

There is more to it than just selecting the number of watts. Follow along, as I’ll explain the concept in more detail, and you’ll find exactly what you’re looking for to get started with your setup.


Matching the Right Amplifier to Speaker’s Wattage – Speaker Impedance Matching

Covering Basic Terminology

Let’s look at the basic terminology used with amplifiers as it will help you understand the concept better.

  • Watts: Watts measures power. In this case, our power is amps x volts.
  • Ohms: Ohms measures resistance. We’re keeping this as simple as possible, without throwing in equations, but it relates to Ohm’s Law.
  • Speaker Impedance: It’s measured in Ohms and refers to the resistance that the speaker presents to the amplifier. It’s not a constant value, and it changes depending on the frequency of the signal applied to it.
  • Sensitivity: To keep this simple, the higher the sensitivity, the less power you need.

Why Matching the Right Amplifier to Speaker’s Wattage is Important

When you jump into audio forums and message boards or check articles on how to set things up, it can get confusing quickly with all the fancy jargon and equations thrown at you. It’s easy to get overwhelmed when all you wanted to know was, should speaker wattage be higher than amps, or vice versa? Am I right?

The first question to ask is, why do you need to match your speakers and amp? There are two reasons.

  1. By matching your speakers and amp, you won’t damage your speakers or amplifier.
  2. By matching your amp with your speakers, you’ll get a rich, clean sound without awkward distortion.

What else do you need to know?

  • Your amp is an electrical unit that helps you increase a signal.
  • Your speakers take the electrical signal from the amplifier and turn it into sound energy.

So, you need an amp for power. You need speakers to push the sound out. Watts measures power, Ohms measures resistance. You match these up, so you get a clean, rich sound without damaging any component.

Let’s move on to the next part, which explains how to match them by choosing the right amplifier for your system.

READ: Speaker Wattage Explained


How to Choose Amplifier for Speakers

I always recommend checking the specifications from the manufacturer before attempting to match amplifiers to speakers. If possible, use the same manufacturer for both units and see what their recommendations are.

Okay, so, let’s talk about matching your amplifier to your speaker’s wattage.

When you’re matching amps to a speaker’s wattage, you want an amp that can push two times the amount of power the speaker can handle continuously. That way, you have more headroom, and you don’t have to drive the amplifier to its limits.

Be careful not to increase the volume on the amplifier all the way up, because if it delivers twice the power, a speaker can handle it could easily burn the coil. Run the amp at about 60 to 70% of the total power, and you will get rich, clean sound without any distortion. That way, your speaker will run happily as well as your amplifier.

If you don’t feel comfortable connecting your speakers to an amp that is twice as powerful fearing that they’ll burn if you don’t have control over the volume, then the best option for you would be to choose an amplifier that delivers at least the same amount of power as the RMS or continuous power that the speaker can handle.

For instance, if you have 300 Watt speakers, what size amp should you choose? The answer is, ideally, an amplifier that delivers 600 Watts, running it at 60 to 70% of its maximum volume. You also have the option of using an amp that provides at least 300 Watts, but you have to make sure not to run the amplifier at its clipping point.

Recommended Amplifier Power for Speaker Chart

Speaker RMS Power RatingMinimum Recommended Amplifier Power (RMS) Ideal Recommended Amplifier Power (RMS)
50 Watts50 Watts100 Watts
100 Watts100 Watts200 Watts
200 Watts200 Watts400 Watts
300 Watts300 Watts600 Watts
500 Watts500 Watts1000 Watts
1000 Watts1000 Watts2000 Watts

Amplifier Headroom

Another essential fact to keep in mind when choosing the right amplifier for loudspeakers is the headroom. Oh yeah, and what’s headroom?

Headroom is a term used to describe the amount of power your amplifier can continuously deliver before distorting the sound. In other words, the ability to provide enough power without driving the amp into its clipping point.

When it comes to audio speakers and amplifiers, if your amp can’t deliver enough power to the speaker, it will start to distort before providing the energy needed to make the speaker work to its full potential.

Think about this…you see a tall guy walking toward a doorway. You know he’s got X amount of clearance to get through without hitting his head. An average doorway is 6.6’ – so what happens when basketball player Yao Ming walks toward that door, who happens to be 7.6’? Right, he meets resistance.

Same thing with headroom in audio. You have X amount of power available from the amplifier; if the speaker needs more to work to its full potential, then it doesn’t matter if the amp is at its maximum, it wouldn’t be able to deliver enough output level.

You always want to have enough headroom so that the amp works within its ideal area.

Matching the numbers of watts is only half of the story; you also need to match the impedance between the amplifier and speaker as well.

Okay, now let’s go deeper into impedance. Keep reading to find out how it affects the amplifier’s power.


The Speakers’ Impedance is Key When Choosing an Amplifier – Speaker Impedance Matching

So, what is speaker impedance, and how does it affect the amplifier’s power? Well, we learned earlier that impedance is the measure of the resistance that the speaker presents to the amplifier.

Why is it important to know? Because mismatching the impedance between speakers and amps can create too much of a load for the amplifier, causing it to overheat and stop working.

Let me give you a visual. The little creek down the way is happily flowing along, but then a beaver builds a dam and starts to slow the water’s flow down. This is the same thing as your energy resistance with ohms.

Your signal is moving along happily, and then it meets resistance. You don’t want too much friction; you’d prefer a clean flow of water without it. It’s a happy balance. That’s why matching an amplifier to the speaker’s impedance is so essential.

Connecting Speakers in Parallel

Speakers can be connected in parallel (the most commonly used) and series (rarely used). It is always recommended to connect speakers of the same impedance to avoid mismatches.

When connecting speakers in parallel, the total impedance will be decreased each time another one is added to the amplifier. The most common speaker impedances are 16 Ohms, 8 Ohms, and 4 Ohms.

When connecting speakers in parallel, the connection goes from the positive terminal of the first speaker to the positive terminal of the second speaker. And the negative terminal of the first speaker to the negative terminal of the second speaker, and so on depending on the number of speakers you want to connect.

The following diagram illustrates what I explained in the previous paragraph.

Ready for an example?

Let’s say that you have two 8-Ohms speakers. If you connect them in parallel, you will end up with 4 Ohms of total impedance. If this is the case, then your amplifier should be capable of handling 4 Ohms at the RMS value of the loudspeakers.

Let’s do it again. This time let’s say that you want to connect four 8-Ohms speakers. After connecting them in parallel, you will end up with a total impedance of 2 Ohms.

Basic math, forget all the fancy equations the internet throws at you, and keep it simple. But instead of getting into more details, I’ll leave you with this handy chart.

Quick Reference Chart for Speaker Impedance Matching

Number of Speakers Connected in ParallelRated Impedance of Each SpeakerTotal Impedance as Seen by the Amplifier
24 Ohms2 Ohms
28 Ohms4 Ohms
216 Ohms8 Ohms
34 Ohms1.33 Ohms
38 Ohms2.67 Ohms
316 Ohms5.33 Ohms
44 Ohms1 Ohm
48 Ohms2 Ohms
416 Ohms4 Ohms

Here’s a key to understand

How much current flows, but there’s a pesky detail to throw in here… because the resistance is actually with the speakers, the numbers you see on the amp are really about how they work with the speakers (usually in the form of speaker range) and what’s optimum to work with. But to continue the concept of flows, keep these basic thoughts in mind.

  • An amplifier connected to a low impedance speaker (4 Ohms or 2 Ohms) needs to put out a higher current, that’s why lower impedance speakers are harder to drive and consume more power.
  • The same amplifier connected to a higher impedance speaker (8 Ohms or 16 Ohms) puts out less current to drive the speaker.

So, when passing a signal from the amp to the speaker, you want those numbers to match as closely as possible. So, you’re aiming for equal.

Remember our chart of the common speaker loads in parallel configuration? By selecting a speaker configuration with a specific impedance and making sure that the amplifier can deliver the amount of power at that impedance will create an easy flow of power exchange between the two units.

This is why the loudness of a sound system should never be deduced from the amount of power a speaker can handle or the power an amp can deliver. Loudness is an entirely different story.

It’s measured in dB (Decibels), and it’s referred to as SPL (Sound Pressure Level). Check out what SPL is in audio and why you need to pay attention to this metric when defining the efficiency of a loudspeaker or amplifier.

READ: Best PA Systems For Live Bands


Final Thoughts

All of that to say, don’t stress yourself out. When it comes time for matching amplifier to speaker’s wattage, remember the basics and don’t get caught up on, he said/she said on all the different audio forums.

Learn the foundation of these details first, because once you understand them, you’ll be a step ahead of those left scratching their heads from getting too many different answers. And when it comes time to figure out how to choose an amplifier for speakers—you’ve got this.

How to Hook Up a Subwoofer to a PA System

When it comes time to set up equipment, it can be intimidating if you haven’t done it before. No worries, we’re going to show you how to hook up a subwoofer to a PA system with three different methods, so you can see that it’s a job you can easily tackle.

When doing a live sound subwoofer setup, we’ll first look at using an external crossover or PA management system. Then, we’ll take a glance at how to add a sub leveraging the active crossover that comes with any powered subwoofer, and lastly, by using a sub-mix. This is achieved with your mixing console by using the “Aux Send” or “Auxiliary Mix” option. Ready to get started?


How to Hook Up a Subwoofer to a PA System: Live Sound Subwoofer Setup

There are three methods to add a subwoofer to a PA system:

  • Using an external crossover or PA management system
  • Leveraging the active crossover that comes with a powered subwoofer
  • By Setting up a Sub-Mix using the Mixing Console

Let’s take a closer look at each one of these options in more detail.


Method 1 – Using a Crossover or PA Management System

If you’re looking for an easy way to hook up a subwoofer to a PA system, this is the first method I’d go with, especially if setting up passive subwoofers. In fact, it’s the system that most rely on. It’s easy to set up, and it’s reliable. The idea is to feed the signal through, then break it into different frequencies, while sending them to the appropriate places.

With crossovers, you’ll have one of two options. Use the active one that most likely came with the powered subwoofer or opt for an outboard if you’d prefer more control. Crossovers come in differing variations, depending on how complex you want to get with 2, 3, and 4 ways systems.

So, basically, you’re going to feed your full frequency signal into your crossover, and this then sends the different frequency signals to each speaker and your low frequencies to your subwoofer.

Diagram for Adding a Subwoofer Using an External Crossover

The following image is a diagram showing the signal flow and connections your need to make to add a subwoofer to your PA system using the external crossover method.

Diagram for adding a subwoofer  using an external crossover or PA management system

READ: Difference Between Active and Passive Speakers


Method 2 – Leveraging the Active Crossover that comes In a Powered Subwoofer

If you are using active speakers and subwoofers for your PA system set up, using the active crossover included would be the best way to add a sub to your live sound. This is not going to cost extra because the crossover is included inside the subwoofer.

Most active subwoofers come with an internal active crossover that you can use for your advantage. It allows you to connect the full range signal coming from the main outputs of the mixing console, and internally, it separates the frequencies that go to the sub’s power amplifier and the loop signal that goes to the tops.

Just to clarify, “tops” refers to the full-range powered speakers that usually go on top of the subwoofer’s cabinet.

Adding a subwoofer to powered speakers by using the sub’s active crossover is very easy. All you have to do is connect the signal cable coming from the audio mixer to the subwoofer’s input channel. Then from the output loop, connect a cable to the full range speaker. Select the cutoff frequency you want, and that’s it.

I have dedicated a full article of the best powered speakers with their companion subwoofers. These speaker/subwoofer combos deliver exceptional quality, excellent sound, and are very easy to set up.

The following image is an example of the connectors you need to look for when adding an active subwoofer to your PA system.

Diagram for Adding a Subwoofer Using its Internal Crossover

I have also included a connection diagram to make it easier for you to follow the signal flow and have your PA system set up ready in no time.

Diagram for adding a subwoofer using its internal active crossover

READ: How to Daisy Chain Active Speakers


Method 3 – By Setting up a Sub-Mix using the Mixing Console

If you want more control over those low frequencies for extra bass and thump, you may like choosing which specific signals to send to the subwoofer. In this case, you’re going to opt for a sub-mix.

You’ll see the terms “Auxiliary Mix” and “Aux Send” used interchangeably. It’s just another expression, so don’t let that jar you when you’re learning how to hook up a subwoofer to a PA system. Different people use different words, but it’s all the same here.

Another reason people may choose this method of live sound subwoofer setup is the concern with muddiness. If there’s a problem with the mix or filters, and too much low is pumping through without the correct adjustment, the sound can get a little muddy, which basically means that the sound is not clear delivering weak harmonics, and a smeared time response.

Okay, ready to get started? Now, while you’ll most likely use method one, you may move around a lot and have a sound guy really involved in the mix, but that means you probably have engineers who focus on this. Otherwise, for simplicity’s sake, stick with the first method.

In this case, you’re going to feed your signal out to your subwoofer via the “Aux Send.” This is ideal when you have a lot going on, have a big ole mixer, and a lot of mics. This has to do with the frequency range of the different mics, voices, and instruments. With a lot going on at one time, this allows you to pull out and adjust only the areas needed going to the subwoofer.

The image below shows you a typical analog mixer with the “Aux Send” highlighted for easier reference. Basically, you would connect a cable going from the “Aux Send Output Connectors” to the subwoofer’s input.

Then you would increase or decrease the Aux knob on each channel depending on which one you want to send to the subwoofer.

Lastly, there are “Aux Send Master Volume Control” knobs that increase or decrease the volume level for all of the selected channels.

This connection scheme gives you the most control over what goes to the subwoofer, helping you have a cleaner mix avoiding muddiness in the sound.

Adding a subwoofer setting up a sub-mix using the mixing console

READ: Mixing Console Basics


Which method should you choose?

Choose the one that is more practical for you. If you have passive speakers, method 1 would be the best option. The reason is that with an external crossover, you would be able to divide the frequencies in Hi, Mids, and Lows, then send the corresponding frequency to each amplifier.

Instead, if you are using powered or active speakers, method 2 would be perfect for you. Just make sure that the subwoofer you purchase comes with an active crossover.

The third method works perfectly well if you need more control over which channels go to the subwoofer. That way, you get a cleaner mix avoiding any muddiness in the sound.

Please understand that the Sub-Mix method could work perfectly well either with an external or internal crossover. It just gives more flexibility and control over the signal path.


When Learning to Hook Up a Subwoofer to a PA System, Learn the Basics First

I suggest getting comfortable with the basics before jumping into everything else. Here’s why. Build your foundation, have something easy to rely on, and fall back on. Then, when your confidence has grown, you’re more used to working with your equipment, you can then expand and experiment from there.

Like anything, when you’re learning something new, learn the basics, know them inside and out, and build from there.

The following links are easy to read articles that explain the essential knowledge you need for setting up a PA system. I have also included some recommended PA systems that could make your setup easy, still delivering excellent sound.

READ: How to Set Up a Stage Sound System

READ: Public Address System Components – Everything You Need to Know

READ: How to Position PA Speakers

If you have any questions or comments, please let us know in the comments section below. Thank you for reading my blog.

How to Daisy Chain Active Speakers

When setting up a PA system, sometimes it’s necessary to daisy chain active speakers if you want to have several loudspeakers produce sound with the same input signal.

For instance, this method applies if you need to distribute more than one monitor on stage or if you need to extend the number of active speakers and subwoofers throughout the venue for better sound dispersion.

In this article, I will explain how to daisy chain active speakers so that you can easily set up a PA system with several loudspeakers. I have also included a diagram showing the signal flow when daisy-chaining powered speakers for your reference. Let’s get started.


How to Daisy Chain Speakers – A Straightforward Process

Daisy-chaining powered speakers is a straightforward process. All you have to do is locate the correct connectors at the back of the speakers then run signal cables between them.

Most active or powered speakers have one or more “Input” plugs. Usually XLR or ¼” phone jacks. They also come with a connector labeled “Thru,” “Mix Output,” or “Link Output.” This connector is the one that we need to use for daisy chain speakers.

Internally the active speaker has electronic circuitry that takes the incoming signal and distributes it to the internal amplifier as well as to the “Thru” or “Mix Output” connector without audio loss.


Steps for Daisy Chain Active Speakers

  1. Before connecting any cables to the speakers, first, position them where you need them in the venue. Additionally, set up the monitors you want to daisy chain in the stage.
  2. Make sure everything is in the “Off” position before starting the setup.
  3. Locate your main speakers and run cables from the “Main Output” of the mixer to them.
  4. At this point, you should have the “Left” and “Right” speakers connected to the mixer.
  5. Starting with the “Left-side” speaker, find in the back the “Thru,” “Mix Output,” or “Link Output” connection.
  6. Run a cable (usually an XLR) from the “Thru” connector to the “Input” of the next speaker in the left-side chain.
  7. Next, locate the “Right” speaker and run a cable from the “Thru” connector to the “Input” of the next speaker on the right-side chain of speakers.
  8. Repeat steps 6 and 7 for the number of speakers you want to have on each side. You can run as many speakers as you want, as long as the cable runs are not too long to avoid picking up “Hum” noise.
  9. Set the “Volume” knob of each speaker to the “exact” same level. If your speakers have an equalizer, make sure to set the EQ to precisely the same value on all of the speakers to avoid unbalanced tones in the sound. (I am assuming that all of the speakers are of the same brand and model)
  10. After everything is connected, turn the power “On” and play music to test and make sure that it sounds the way you want. Make the necessary adjustments until you get a clean, balanced stereo sound.

These procedures also apply for daisy chain monitors on stage. If you want a more detailed explanation of how to set up stage monitors, click on the link as I have dedicated a full article to explain it.

Daisy Chain Powered Speakers Diagram

The following is a diagram to help explain the steps mentioned above visually for easier understanding.

Daisy Chain Powered Speakers Diagram

READ: How to Set Up a Stage Sound System


Daisy Chain Powered Subwoofers

Just as active speakers have a connection for daisy-chaining several of them together, powered subwoofers do as well. The principle is the same, a signal coming from the mixer, crossover, or speaker management system is looped out for connecting another device. That way, you can produce sound with the same original signal coming from the mixing console.

The image below shows you a few examples of the back of several powered subwoofers so that you have an idea of what connectors to look for to daisy chain several units.

Connector Used to Daisy Chain Powered Subwoofers

Steps for Daisy Chain Powered Subwoofers

  1. As always, I recommend making sure that everything is in the “Off” position, to avoid any damage while connecting.
  2. Place the subwoofers in the correct position where you need them in the venue.
  3. If you are using the “Aux Send” on your mixer for sending the audio signal to the subwoofer, run a cable from the “Aux Send” connector to the “Input” of the subwoofer. If instead, you are using a PA management system or crossover, connect a cable from that device to the sub’s “Input.”
  4. Just as with active speakers, locate the connector labeled “Thru” or “Output” and run another cable to the “Input of the next subwoofer in the chain.
  5. Repeat the procedure for the number of subwoofers you want to daisy chain.

It is common to see powered speakers, also called “tops” as part of a speaker/subwoofer combo. Most speaker brands offer companion subwoofer that you can get for a more straightforward setup and better tonal balance.

If that’s the case, the setup would similar as if you where connecting only powered speakers with the only difference that a signal path must be provided to the subwoofer to work.

Please refer to the image below to follow the signal flow on how to daisy chain several speaker/subwoofer combos.

Daisy Chain Powered speaker-subwoofer combo Diagram

READ: Best PA Systems For Live Bands


How Many Speakers Can I Daisy Chain Together

As long as the speakers are active, meaning that they have an internal amplifier and have the input and output connections to do so, you can daisy chain as many speakers as you want together.

If instead, you have passive speakers, meaning that they need external amplifiers to function, you would have to know the impedance of your amp.


Final Thoughts

In this article, I explained how to daisy chain active speakers, as well as daisy chain powered subwoofers. With the step-by-step procedure and the included connection diagrams, you should be able to daisy chain any powered PA speaker system. This enables you to increase the size of your PA system set up for any of your events.

Public Address System Components – Everything You Need to Know

What is a PA system? Learn more about the Type of Public Address System You’ll Want

When it comes to public address system components, there are a few details you want to keep in mind, but before we get to that, let’s first get the most basic piece of information out of the way. For those who aren’t certain, PA stands for public address system. You’ll hear it referred to both ways.

Another thing to understand is a PA system isn’t a one and done kind of thing. There are different types of systems, components, and details you’ll want to consider. In a moment, we’ll break down the difference between things like all in one PA systems, modular PA systems, along with traditional systems.

First, it’s essential to understand how a system works and what you’ll need to know before setting one up. You probably don’t remember the days of needing to use a megaphone to announce something, which was an upgrade from yelling those details out.

But with advanced technology, a system was created to help broadcast your words and music louder and easier. That’s the PA system we’re all used to.


What you need to know about Public Address System Components

There are a few main pieces to a PA system. The fancy word is components, but basically, it just means the parts that make up the entire thing.

The main components of a public address system are:

  • Speakers – main speakers, subwoofers, and monitors
  • Amplifiers – Needed only if using passive speakers
  • Audio Mixer – Analog or Digital
  • Speaker Processor
  • Microphones – Dynamic or Condenser
  • Effects – only used if needed
  • DI Box – Direct Injection Box
  • Cables and Accessories.

Here is a good analogy to explain the concept. So, if you’re making a grilled cheese sandwich, the components would be bread, cheese, and butter. You still need to put the pieces together and cook them, but they are the ingredients you need to build your sandwich. It works the same way with a PA system. You need different parts that you’ll hook together to make it work.

Each piece plays a role in how the PA system works. We’re not going to get into precise details on picking out each of these things in this article. Instead, let’s stick with the basics, so it all makes sense when you start looking into this on your end.

When it comes time to hook up a PA system, you’ll want to read this article about setting up a stage sound system, as it digs into more in-depth detail. Still, it doesn’t make sense to get confused before that.

It is smarter to understand the basics. Once you have a foundation of understanding, it’s easy to go from there. The most significant element of hooking up a system is making sure things flow the right way.


Different Types of Public Address Systems

Okay, so you know that a PA system is also called a public address system. You’ve learned that different components go into setting up a system. Now, let’s look at the different types of systems you can choose from. Knowing about the three basic types will help you decide what will work best for your situation.

The three basic types of PA Systems are:

  • All in One packaged PA system
  • Modular PA systems
  • Traditional systems (note the components needed, just like we mentioned above: speakers, amplifiers, mixers, microphones, etc.)

All in One packaged PA system

Image Credits: Yamaha

If the thought of putting all the pieces together overwhelms you, a perfect choice would be the all in one package. This way, you don’t have to know if this piece works with that one, because they’ve done the work for you and sell it all together. It’s convenience at its best.

One of the benefits here is that they can usually package a pretty nice deal when it comes to cost since it’s preset.

Here are a few examples of some of the best all in one packaged pa system (links to Amazon):

  • JBL Professional EON208P
  • Fender Passport Event PA Speaker System
  • Yamaha Stagepas Portable PA System with Bluetooth
  • Peavey Escort 5000 Portable PA System

Modular PA systems

What about modular PA systems? Say you’re a one-person band and set up your equipment at different gigs. You move around a lot and need something quick, portable, and easy to use.

Consider a modular system if you want something that breaks down quickly, and you aren’t in search of ultrasonic superpowers!

Here are some examples of some of the best modular PA systems available in the market today (links to Amazon):

  • Bose L1 Compact
  • JBL Professional EON ONE
  • RCF Evox JMIX8
  • Yamaha STAGEPAS 1K
  • Electro-Voice Evolve 50

Traditional systems

Connection Diagram for Active Speakers

The traditional PA systems are a good choice if you love to get into the details of picking out just the right piece of equipment. If you’re going to geek out on the experience of selecting and comparing each component, then this is for you.

In a traditional PA system, you buy all the components separately and then connect them together.

You’ll also want to keep in mind that usually traditional PA systems are easier to expand if you need more power and control over your setup.

There you have it, a basic list of needs, the different types of systems, and a basic understanding of PA systems.

If you want to dig deeper into the components that make up a public address system, keep reading as I explain in more detail. Plus I have included block diagrams and wiring diagrams of passive and active PA systems that can help you visualize the concept.

READ: 6 tips for choosing the best portable pa system for live music

READ: Best Portable PA Systems For Outdoor and Indoor Events


What do I need for a PA system?

As mentioned earlier, the components you need for PA system either for the spoken word or live music are:

  • Speakers – either active or passive
  • Amplifiers – Needed only if using passive speakers
  • Audio Mixer – Analog or Digital
  • Speaker Processors
  • Microphones – Dynamic or Condenser
  • Effects – only used if needed
  • DI Box – Direct Injection Box
  • Cables and Accessories.

I don’t know about you, but sometimes learning something new can be confusing and frustrating when things are thrown at you all at once. It becomes information overload. Hopefully, by breaking down things to a fundamental level, you’ll have a solid foundation of useable information that you can build on.

When it comes to a public address system, components come in a few different types and pieces. Instead of digging into all of them at once, let’s first take a closer look at first component, speakers.


Speakers

Loudspeakers come in a lot of varieties, can be active or passive, and have different names. In the next part of the article, we’ll break down the rest of the pieces you’ll want to know about. For now, let’s focus on speakers.

One of the most important elements of your public address system is the speakers that you’ll use.

Speakers can be both active or passive. But what does that mean?

Active speakers have an amplifier in them, which means you don’t need to buy that extra piece of equipment. Passive speakers mean there is no amplifier in them, and you’ll need to add an amplifier to make it work.

Simple enough, right? But why would you want to choose one over the other? It comes down to how you’ll be using the system, pricing, and how much control you want over your system.

I wrote an article dedicated to the Differences Between Active and Passive Speakers, their Pros and Cons, so that you can have a full understanding of the concept.

Depending on your set up, you will use three types of speakers. They are your main speakers (also called tops), your subwoofers, and monitors. In a simple setup, you only need the main speakers.

Main Speakers (Tops)

When it comes to your main speakers, it’s going to come down to how loud they are, their frequency response, the size, shape, weight, and materials used to build them, which also play a role in their sound.

The first thing to consider is what you will be using the speakers for?

Speakers move air with vibration. This creates sound. There’s a bunch of science behind it, but let’s keep this basic. You’ll want to know how far you need your sound to travel, and what type of space you’re in. You’ll also want to know how loud the speaker needs to be to cover the area. This measure is called SPL (Sound Pressure Level)

You can always add a subwoofer if needed to extend your low range, but before going there, figure out your actual needs. With distance, there is sound dispersion, which means the dB levels will get lower the farther away the sound needs to travel. The suggestion is to set these speakers up at shoulder to head level for better sound dispersion.

If you feel overwhelmed with all the details I have talked about in this section, don’t worry, I have dedicated a full article to explain what SPL means in audio and also an article explaining why wattage in a speaker system doesn’t define how loud the system is. The links for those articles are below.

READ: What is SPL in Audio

READ: Speaker Wattage Explained

READ: How to Position PA Speakers

Subwoofers

Subwoofers extend your range, sort of. Subwoofers help with low-frequency sounds. Think bass and some drum sounds. They have a very heavy vibration. These can complement your main speakers and help distribute the sound if needed.

It will depend on how you’re using your PA system. Consider a one-person acoustic guitar singer probably won’t need to go that route. Still, if you play heavy rock, subwoofers will most likely be part of your system.

One other interesting thing to note is that some PA systems have these built-in. It’s going to depend on the size of the PA system you need, and what you’re using it for.

Monitors

Monitors are usually speakers that are for the band or entertainer’s use. These are smaller and typically face the band. It helps provide a sound reference, as generally most of the sound from the speakers is going away from them.

In very noisy situations, it can be hard to hear yourself or the band on stage without monitors. These are a simple fix to streamline your process. They are generally placed on the floor and are an option that allows the band to skip expensive in-ear monitoring systems.

Each type of speaker plays a role when it comes to the public address system. Components come in varying types, but by knowing how you’ll be using them, what range you’ll need, and what type of sound you’re looking for, you’ll be able to pick out the best speakers for your PA system.

READ: How to Set Up Stage Monitors


Amplifiers

Amplifiers increase sound. They quite literally boost the signal before sending it out through the speaker. Remember, some speakers (active) come with amplifiers in them. For this instance, we’re going to talk about a standalone amplifier.

If you have passive speakers, you’ll need an amplifier to power them. Consider how big of a venue you’re in, and how much power you’ll need. It’s important to know this so that you don’t end up with distorted sound.


Audio Mixers – Analog or Digital

When it comes to mixers, they act as the brain of your system. Sound signals go into it (inputs), signals are manipulated, then come out of it (outputs).

Mixers can look a little intimidating when you first see them, but just know that each knob or button does its part in getting the sound to come out at your preferred level. It creates a highway system. You take the signal from one place and send it off into another (ex: your speakers).

We’re not going to delve into this deeply, because I dedicated a full article about the types of audio mixers. You may have heard that there are two types of mixers, one is digital, while the other is analog.

A digital mixer may have preset effects, and with a push of a button, put things together for you, save settings, and so on. If you want more serious control of each sound, analog means it has a “do it yourself” vibe. One of the benefits of an analog mixer is the lower cost and ease of use.

READ: Mixing Console Basics


Speaker Processors – PA Speaker Management System

Another important public address system component is a loudspeaker management system. As explained in the Crutchfield website, a speaker processor or PA management system is a type of signal processor that is connected between the mixing console and the amplifiers of a passive PA system or powered speakers.

It combines many features but one of the most important ones is that it acts as a crossover to divide the incoming signal into highs, mids, and low frequencies.

A speaker processor becomes very useful if you have a passive PA system setup as it can help with signal routing function in large multi-speaker systems. It gives a lot of control over the system, plus it also protects your speakers from the damage that could be caused by sudden feedback.

Other helpful features provided by a PA speaker management system are audio compression, limiter, and equalizer.


Microphones

Most people know what microphones are, but there are a few things to consider when talking about microphones. You’ll want to know the type of polar pattern and frequency response of the microphone you’ll be using.

Another thing to consider is if you want a condenser or a dynamic mic. In most circumstances, you’ll probably look at a dynamic mic, unless you need your microphone for particular scenarios where you’ll want to pick up subtleties. Recording and live events is another area where you’ll want to compare microphone capabilities.

All these aspects, if taken into consideration when choosing the mic, will end up helping you get the best live sound possible and help you decrease feedback on stage.

If you want to learn more about how to choose the right microphone, read our Mic Buyer’s Guide.

READ: Best Live Condenser Vocal Mic

READ: Best Dynamic Vocal Mic for Live Performance


Effects

Effects play with your sound and add quality and dimension to it. You may not need it in a scenario like public speaking. Still, if you’re DJing or playing in a band, it can be a nice addition to add things like reverb, delay, or chorus, etc.

Audio effects are not necessary for all PA system setups. Still, most all in one PA systems and mixers come with several built-in effects from which you can choose from.


DI Box – Direct Injection Box

A direct injection box or DI box for short has the primary function of taking an unbalanced signal with a high-impedance and convert it to a low-impedance or balanced signal.

This enables you to connect a guitar or bass directly into the microphone preamplifier of a mixer or send a signal over long cable runs without losing volume and the high-frequency information in the signal.


Cables

If your cables come with your all in one system, you’re set, but what if you need to get your own? Let’s take a glance at the different cables you may hear mentioned when it comes to public address system components.

  • XLR – this is usually used for connecting microphones to the mixing console, but can also be used for connecting different components together, for example, for connecting the audio mixer to an active speaker, or between the mixer and the amplifier. XLRs are also used to connect effects, equalizers, and several other audio components. The signal that travels through an XLR is balanced, meaning that it’s less susceptible to picking up noise.
  • Jack – these are what you’ll plug instruments in with, along with a few other pieces, but while XLR offers balanced signal, jack cables do not.
  • Speakon – these are insulated cables that offer a tighter connection and help prevent damage or shortage issues.
  • RCA – these are used for inputs or output, and are usually found on mixers. RCA connectors are becoming obsolete and not used as much as they used to. Still, analog mixers offer a few channels with this type of connector.

Public Address System Block Diagram

The images below are for your reference. Here I include a couple of PA system block diagrams one for active and the other for passive PA systems. They can help you visualize the signal flow in both setups.

Active Public Address System Block Diagram
Active PA System Block Diagram
Passive Public Address System Block Diagram
Passive PA System Block Diagram

Public Address System Wiring Diagram

The following images are PA system wiring diagrams for active and passive systems. You can use them for your reference.

Active Public Address System Wiring Diagram
Active PA System Wiring Diagram
Passive Public Address System Wiring Diagram
Passive PA System Wiring Diagram

Takeaway

As seen in the article there are different types of systems, components, and details you’ll want to consider when choosing a PA system. You can choose from all in one PA systems, modular PA systems, and traditional systems.

Remember that each component that makes up a public address system plays a role in how the PA system works. And depending on which component you choose, the performance will be different.

How to EQ Live Vocals – Mixer Settings for Vocals

Knowing how to EQ live vocals is essential to get good results in your live mix.  When you put a microphone in front of a vocalist, don’t expect it to sound good without adjusting the EQ, no matter how talented the singer is.

The frequency components that make up the voice need to be adjusted so that the best features of the voice are noticeable in the mix.

To achieve this, the voice needs to be equalized correctly. A correct equalization is the secret for providing an excellent sound experience to your audience.

In any live sound setup, the vocals are the most important part of the mix but tend to be the hardest to get right. In today’s article, I am going to present a few tips on how to EQ live vocals, plus I provide a few mixer settings for vocals to get you started with your mix.


How to EQ Live Vocals – Helpful Tips to Get You Started

To get the best results when equalizing live vocals, you must do six fundamental things:

  1. Start with flat EQs – Reset the EQ on the mixing console
  2. Cut out the low-end rumble – Use the high-pass filter
  3. Remove problematic (“hot”) frequencies – Add warmth to the sound
  4. Take care of the proximity effect
  5. Balance the upper mid-range frequencies
  6. Boost frequencies where is needed – Add Presence.

Start with flat EQs – Reset the EQ On the Mixing Console

The first step to EQ live vocals correctly is to reset the EQ of each channel. That way, you don’t start with frequency imbalances. Most of the time, it’s not necessary to boost frequencies but to cut them instead.

By starting with a reset EQ, you can start with a balanced sound, and then you can pinpoint if any frequency needs to be boosted or reduced.

An important aspect to keep in mind when it comes to EQ is that less is better. If you can get away with no EQ at all, that is ideal, but that rarely happens.

This principle applies to live audio setups as wells as when recording. Many sound engineers do not use any EQ when laying down tracks in the recording studio. Just keep that in mind when EQing live vocals.

To reset the EQ of a mixing board, turn each knob to the center position (12 o’clock position) that’s labeled “U” or “0.”

FURTHER READING: Mixing Console Basics


Cut Out the Low-End Rumble

The fundamental frequencies of vocals are between 100Hz-300Hz. Even adult males with deep voices don’t go below 85Hz. All this means is that any frequencies below 80Hz should be cut out when equalizing vocals.

Start by applying the mixer’s high-pass filter on any channel that doesn’t need low-end frequencies, which are most of them.

In most audio mixers, you can find the high-pass filter switch under the gain knob. Make sure to activate it for all the channels where vocal mics are connected.

Only bass-heavy sounds use the low sub-frequency range. Such instruments are guitars, bass, and drum kicks.


Decrease Problematic Frequencies

Problematic or hot frequencies are all that stand out and don’t blend well with the rest of the mix. For example, If “P’s” sound plosive, that means that the channel is excessive on the mid-bass around 250 Hz. Try cutting around 200Hz-250Hz.

What to Adjust if Vocals Sound Muddy or Boomy

When vocals sound “muddy,” it means that it lacks clarity and transparency. Most likely, due to low-frequency resonances that create a congested, smeared, and confusing sound.

If in your mix vocals sound muddy or boomy, try adjusting the frequencies between 220Hz-350Hz. Don’t aggressively cut frequencies in this area because you could eliminate part of the warmth of the vocal’s sound.

Remember that although muddy frequencies are present between 200Hz – 350Hz, those frequencies are also part of the fundamental frequencies that bring out the warmth in a voice.

I would recommend delicately cutting anything between 200Hz – 600Hz to avoid destroying warm tones in vocals. 

Carefully Balance the EQ to Avoid Vocals Sounding Boxy or Thin

Another critical area to EQ carefully are the frequencies between 350Hz – 600Hz. An emphasis around those frequencies will make the vocals sound “Boxy,” meaning that they will have resonances as if the vocals were enclosed in a box.

If those frequencies were reduced too much, vocals would sound “hollow,” meaning that they would sound thin.

Be careful when adjusting frequencies between 350Hz to 600Hz. Adjust until you find a sweet spot.

Decreasing Sibilance In Vocals

Additionally, it’s also critical to reduce frequencies that are too bright and are prone to produce voice sibilance. In case you didn’t know, sibilance is the hissing sound that’s created with “s” sounds. If high frequencies are boosted, vocals are likely to produce sibilance, and believe me, that sound is annoying for the audience.

Frequencies between 5kHz – 10Khz need to be adjusted carefully to avoid a sibilant sound. Start with the EQ set to “0” or “U” (12 o’clock position), and have the vocalists sing. If you hear that the “s” sounds too exaggerated and bright, decrease the high frequency knob labeled “High” or “HI” counterclockwise until the sibilant tone is eliminated from the vocal sound. Make sure to keep a balance between brightness and warmness in the voice.

Remember that the whole idea when equalizing live vocals is to produce a well-balanced sound that enhances the best features of the voice.  Vocals must sound clear and pleasant for the audience to hear.  

FURTHER READING: Best Live Condenser Vocal Mic


Take Care of the Proximity Effect

The proximity effect is a phenomenon that happens when a voice source gets too close to a microphone. What happens is that as the voice source gets closer, the low frequencies increase, producing a bass-heavy sound on the vocals affecting the intelligibility of the sound.

The frequencies that are boosted by the proximity effect are between 80Hz – 200Hz. We have taken care of all the frequencies below 80Hz by applying the mixer’s high-pass filter, now is time to adjust anything between 80Hz and 200Hz using the EQ.  

Getting Rid of the Proximity Effect

Before using the EQ to take care of the proximity effect, make sure that the singers don’t get too close to the microphone. Of course, to avoid feedback, the closer the better, but there is a limit on how close to place a mic to the sound source. If it’s too close, the proximity effect can ruin the mix.

A good rule of thumb for live performances is to place the microphone between 4 to 6 inches away from the mouth, then start equalizing the voice.

Occasionally, there will be singers that will almost kiss the mic; if that’s the case, you have to adjust the EQ to avoid the proximity effect.

Find the low-frequency knob labeled “Low” and decrease (turn it counterclockwise) the gain on those frequencies to relieve some of the low frequencies. By doing that, you might have to compensate on the mid and high frequencies to get a natural sound.

It might take you a few tries until you get it right. The goal is to make the vocals sound clear, crisp, and warm.

FURTHER READING: Portable PA Systems For Outdoor Events


Balance the Upper Mid-Range Frequencies

The upper mid-range or high-mid frequencies are the “Nasal Frequencies” and are located between 1kHz – 3.5Khz. They need to be carefully balanced because if there is an excessive buildup in this area, vocals will sound “harsh” or “grating.”

In contrast, if the upper mid-range frequencies are too low, vocals will sound “muffled” as if the sound is covered with a blanket. It will give the impression that the vocals are far away and not present in the mix.

There is no magic formula, or one setting fits all kind of deal to EQ live vocals. Each venue will be different, the same is with each voice. All you need to know are the basics and theories behind how things work so that you can adapt it to your setup.

By practicing and training your ears, you will get better over time.

FURTHER READING: 6 Tips for Choosing the Best Portable PA System for Live Music


Boost Frequencies Where is Needed to Add Presence to the Voice

In a live mix that contains several instruments, it is critical to bring out the vocals in the mix. It can be achieved by slightly increasing the “presence range of frequencies,” which are between 4kHz – 6 kHz.

Presence is responsible for the clarity and definition of voices. Increasing this range of frequencies can make the music sound detailed and closer to the listener.

On the other hand, Reducing the 4kHz – 6kHz content of frequencies makes vocals sound more distant and transparent.

When mixing all instruments and vocals, try not to clutter the “presence” range of frequencies so that vocals cut through the mix with clarity and detail.

FURTHER READING: How to Set Up a Stage Sound System


Visual Representation of The EQ Settings For Live Vocals

The following graphic serves as a quick reference guide for EQing live vocals.

The horizontal axis represents the frequency range, with each line marking a specific frequency.
The annotations indicate the key points and recommendations for adjusting these frequencies during live vocal mixing:

  • High-pass filter below 80Hz (in blue).
  • Reduce 220Hz-350Hz for muddiness (in green).
  • Adjust 350Hz-600Hz for boxiness (in purple).
  • Sibilance zone at 5kHz-10kHz (in orange).
  • Proximity effect adjustments at 80Hz-200Hz (in red).
  • Nasal frequencies at 1kHz-3.5kHz (in brown).
  • Presence range at 4kHz-6kHz for clarity and definition (in pink).
The image serves as a quick reference guide for sound engineers and others involved in EQing live vocals.

Mixer Settings for Vocals

All of the tips mentioned in this article are easier to implement using a digital audio mixer because you have a more precise parametric EQ for each channel. You can pinpoint individual frequencies and either increase or decrease them very accurately.

If you use an analog audio mixer, it’s more difficult to EQ individual frequencies because one knob can be responsible for a broader range of frequencies.

In this case, you would have to use your ears to identify the frequency you are trying to increase or decrease.

Here are a few mixer settings for vocals that can help you get started.

EQ Live Vocals with a Three-Knob EQ Analog Mixer

If your analog mixer has three knobs for the EQ, you are limited to what you can do. I would recommend to set the High-frequency knob to “0” (12 o’clock position) and do the same for the mid-frequency knob.

If you are equalizing the mic for a male singer that has a low pitched voice, try reducing the low-frequency knob a bit to get rid of the muddy sound. If it’s a female singer, you can leave the low frequency knob to “0” (12 o’clock position).

Listen to the voice as it comes out of the loudspeaker and adjust it according to what is needed. If the voice sounds dark, it means that the EQ is weak at high frequencies. Try increasing the highs a bit.

If instead, the sound of the voice is not punchy, try increasing the mid-frequency knob.

On the other hand, if the voice sounds muddy, decrease the lows a bit.

How to EQ Live Vocals with a Four-Knob EQ Analog Mixer

If your analog mixer has four knobs for the EQ, the second one under the high-frequency knob is a frequency selector. With that knob, you can select the frequency you want to adjust, then use the third knob down to increase or decrease the gain on that frequency. That way, you have more control over the selection of frequencies to EQ.

Start by setting the HF (high-frequency) knob to the middle “0.” Make sure that the second knob down is also set to the center or 12 o’clock position. Increase the third knob to about 50%.

Set the fourth knob to the center if it’s a female singer, or to 40% if it’s a male singer with a low pitched voice.

As you hear the sound coming out of the loudspeaker, increase or decrease the frequency selector until you can clearly listen to the voice with a well-balanced tone.

Take into consideration all of the tips mentioned previously and adjust the knobs until you have found a sweet spot.

EQ Settings for Vocals Using a Six-Knob Analog Mixer Equalizer

The ideal analog mixer would have at least six knobs for EQ. That way, you have more precise control over the frequencies you want to equalize.

With a six-knob EQ, the first one, from top to bottom, is for high frequencies. The second one is the high-mids frequency selector. The third knob is the one that controls the high-mid frequency gain.

The fourth one from top to bottom is the low-mids frequency selector, with the fifth knob being the gain control for the low-mids. The sixth knob is the one responsible for controlling the gain for the low frequencies.

Start by setting the HF knob to “0” (12 o’clock position); that way, you keep the bright sound neutral so that the vocals don’t sound harsh.

Next, set the second knob (high-mids frequency selector) to “0” (12 o’clock position) .

Then, set the third knob (high-mids boost/cut) to about 50%, do the same to the fifth knob (low-mids boost/cut).

Set the low-frequency knob to the middle “0” (twelve o’clock position).

At this point, have a singer start singing and sweep the high-mids frequency selector up and down slowly and listen to how the voice changes.

My recommendation is to keep the EQ as flat as long as it sounds good. If the voice sounds too “nasal,” try sweeping the high-mids frequency selector until you find the offending frequency and use the boost/cut knob to increase or decrease it.

If the voice sounds “boxy,” “hollow,” or “thin,” use the low-mids frequency selector to find the offending frequency to boost or cut accordingly.

Video Credits: GLB Productions

Takeaway

If you don’t know how to EQ live vocals, don’t worry. With the tips provided in this article and enough practice, you can learn the ins and outs of equalizing vocals and instruments. First, get used to your mixer’s controls and start practicing until your ear is trained.

Types of Audio Mixers – Everything You Need to Know

The world of audio mixing is a broad and exciting subject. There are several types of audio mixers, and each type has its advantages and disadvantages.

The best artists in the world are always looking for the most advanced audio mixers in the market to create the best possible mixes. From concerts and live gigs to TV sets and recording studios, a sound mixer should provide top-notch audio quality for music, TV, podcasts, and film.

Charged with the responsibility of picking up sound signals from microphones, musical instruments, and other sources, a mixing console blends and tweaks two or more sound signals. Then it sends the polished audio to the loudspeakers, amplifiers, or recording systems.

There are different types of audio mixers available in the market today. But the three main ones are analog, digital, and powered audio mixers. In this article, we’ll walk you through the differences between the three types of mixing consoles, the advantages and disadvantages of each class, and everything in between.


Analog Mixers

Image Credits: Mackie

An analog mixer is what generally comes to mind when most people think of a mixing desk. It has a standard appearance, and a pretty unified layout such that any person with some knowledge operating a mixing desk can get hold of one and get going immediately.

Analog mixers use analog electronic devices to operate. They have one control per function, all of which are visible and accessible on the control panel.

You can quickly see what’s happening in the mixer and make adjustments where necessary. These mixers are perfect for live sound and for recording too.

Concerning cost, analog mixers generally cost less than their digital counterparts. Still, they lack the kind of automation you may need for complicated setups. Plus, they do not have wireless connectivity for remote control, which means you have to be at the board all the time.

Aside from that, analog mixers have less onboard sound effects than digital models. If you want to get advanced audio effects and sound processing systems, you have to buy external hardware  for that.


Advantages of Analog Mixers

With that said, analog mixers have numerous advantages. Some of these include:

  • They are cheap and inexpensive to buy
  • They are user-friendly. Once you get the hang of an analog mixer, you can efficiently operate any other analog mixer. First-time audio mixer users usually find it easier to learn and operate.
  • It is also straightforward to correct any problems with the flow of the sound. This is because all controls are visible and easily accessible on the control panel
  • Another perk worth mentioning is the fact that you can quickly and easily set up a live mix.

Disadvantages of Analog Mixers

Analog mixers also have some disadvantages, which include:

  • Depending on the number of channels, they could be bulky, which means carrying them from one place to another is a daunting task
  • The effects and audio processing features in analog mixers are very limited.
  • Due to their lack of wireless connectivity, most of the time, they require long cable runs, because it might not be practical to install them on stage
  • Unlike digital mixers, there’s no feature to allow you to recall or reprogram any of the previous gigs. This makes using an analog mixer tiring because you have to create new mixes each time you set up.

READ: How to Connect an Analog Mixer to an Audio Interface


Digital Mixers

Image Credits: Allen & Heath

Digital mixers have a wider variety of control functions. You can pre-program, save, and recall setups, which is convenient if you play with the same band regularly. This is also a plus for when you need to make a quick set up change in the middle of the event.

Most digital mixers also come with wireless connectivity to connect it to an iPad or smartphone for remote control. This means that you don’t have to be positioned in one place the entire time. You are free to walk all over the room while mixing on your phone or tablet, ensuring the music is heard everywhere.

It’s almost impossible to walk around when mixing from an analog device because you’ll need a bulky extension cable, commonly called a “snake,” which is also expensive to buy. But even with it, you’ll still have to stay in one spot.

With digital mixers, you have more onboard sound effects on every channel. You don’t have to buy separate audio equipment to get better sound effects and advanced signal processing features.

Most of the time, you can get upgraded effects and signal processing features by downloading updates from the manufacturer.

However, making any adjustments in a digital mixer may pose a significant challenge if you are not experienced with it. That’s because you’ll have to first browse through several menu options on the touchscreen before you can make any changes in a specific channel. And if you want to make more than one change at a go, you’ll have to pre-program the changes for faster access.


Advantages of a Digital Mixer

  • It’s easy to pre-program and recall settings whenever you want to use them. This is very convenient in large live setups when you need to change the atmosphere of an event quickly.
  • Digital mixers can accommodate more external sound sources even though they are smaller than their analog counterpart.
  • Furthermore, signals processed by digital mixers are more resistant to picking line noise.
  • Unlike analog mixers that have one control per function, digital mixers can perform a variety of tasks because each control offers several features for different purposes.
  • They can be used to perform multi-track recordings.
  • Finally, digital mixers are compact and portable, which makes carrying them from one point to another relatively easy.

Disadvantages of Digital Mixers

  • One of the most significant disadvantages of digital mixers is their cost. They are very expensive to acquire thanks to their sophistication and the fact that they can perform a variety of functions with just one device
  • Digital mixers are also difficult to operate. Even a veteran can be thrown off by the sheer amount of sophistication they have. Learning how to use and operate one digital mixer doesn’t mean you can automatically operate another digital mixer.

READ: Mixing Console Basics


Digital Mixer vs. Analog Mixer – What’s the Difference?

1. Pricing

Perhaps, the biggest difference between analog and digital mixers is their cost. While analog mixers are generally cheap, their digital brethren are expensive.

But digital mixers often come with many extras such as gates, effects, compressors, and many more signal processing features that justify the price difference.

2. Ease of Use

Analog mixers are usually easier to learn and operate even for beginners. Signal processing is straightforward because every input directly relates to the control it is fed into.

For instance, if you connected a guitar into input 1, then the entire control panel in channel 1 will affect the guitar and only that guitar.

Digital mixers, on the other hand, can be confusing. Even experienced people can get mixed up with all the customization going on; because you can route any input to any control.

For instance, if you connect a guitar to the first input, that input can be routed to any available output without physically connecting any cable to route the signal.

You can even assign or route a specific channel to any other channel using the touchscreen to send the commands.

Conversely, most digital mixers allow you to pre-program, save, and recall settings. This is hands down the most beautiful thing about digital models as it helps you save time in large event setups.

Take, for instance, bands that use the same music configuration for all their gigs, all they have to do is set up, plug in mics and instruments and recall their past settings, including their favorite sound effects. How cool, huh!

Likewise, venues that have several bands performing can also benefit from this cool feature. Because you can quickly save the settings of each band and recall them every time they come on stage.  

3. Sound Quality

Quality of sound is another big consideration when it comes to the analog vs. digital debate. At the high end of the pricing spectrum, digital mixers have just about matched the quality of sound produced by superior analog models.

However, at the bottom of the pricing spectrum, you’ll realize analog models are better in all aspects, especially sound-wise.

4. Availability of Spare Parts

Another thorny factor that most people overlook is the issue of repairs. Taking all things to consideration, an analog mixer that is about 30 years old will likely be repaired more easily than a digital one, as the parts used to manufacture are likely to still be available in the market today.

However, we’ve often heard of digital mixers that are only 5 years old that have needed repairs only to realize that the parts are not being produced anymore or there are no spares available to do the necessary repairs. That means that you would have to buy a new mixer.

Which one is Better? – Which One Should You Pick?

If you’re ever faced with the decision of whether to go digital or stick with analog, just know that one is not necessarily superior to the other. What works for a solo artist may not necessarily work for a bigger setup.

That being said, both analog and digital mixers are very popular. And all types of audio mixers have their unique advantages and disadvantages. It all comes down to your personal preference and for what you’ll be using the mixing console.

Video Credits: Kettner Creative

Powered Mixers

Image Credits: Yamaha

Another type of audio mixers are powered mixers. A powered mixer is basically an analog mixer but with the added advantage of built-in power amplifiers. Most powered mixers come with two amp channels and can be plugged in with two speakers or one speaker and one monitor.

They are usually easy to set up and use. They are also pretty compact, which means they are easy to transport.

Powered mixers also feature line-level outputs allowing you to add more powered speakers and monitors easily.

Advantages of Powered Mixers

  • Simple to set up and operation
  • Portability
  • All-in-one integration

Disadvantages of Powered Mixers

  • If one part of it fails, you’ll need to replace the whole unit
  • Unlike analog and digital mixers, you don’t get a variety of features

READ: How to Set Up a Stage Sound System


How to Choose the Right Audio Mixer Depending on Your Needs

Besides price, there are many other things to consider when choosing an audio mixer. And given the different types of audio mixers in the market today, we compiled some of the first and most important things to look for when shopping for one:

1. Purpose

What will you be using your mixer for? Recording, live plays, or both? If you’ll be using your mixer for recording, you should take into consideration the quality of mic preamp as well as the ability to pair up with a variety of external hardware.

If you’ll be using it for live play, you’ll want to make sure it’s compatible with your sound systems and can accommodate the needs of your band. Another critical consideration is ruggedness – weak and fragile equipment won’t last long, especially if you go from gig to gig.

2. I/O and Channels

How many mics will you connect to the mixer? For instance, if you’re using condenser mics, you’ll need to have mic inputs with phantom power.

If you’re using stereo instruments such as keyboards, you’ll need enough stereo inputs to connect them.

If you plan to connect guitars directly, you’ll need enough inputs to house them too. It’s always advisable to get enough I/O and channels to accommodate your current and future needs because bands tend to add gear and players over time.

3. EQ Needs

When recording in a studio, you’ll need to fine-tune the sound to enhance audio quality. Multiband equalizers and filters are required to create an excellent recording, and a digital mixer is the best choice in this case.

On the other hand, if all you’re doing is some simple sound mixing, basic control over high, mid and bass frequencies is all you need, then an analog mixer would be the best choice

4. Sound Processors and Effects

Do you heavily rely on external effects pedals, mic preamps, and other sound processing equipment to get better audio quality? If this is the case, you don’t need a unit with internal sound effects and processors.

That said, a mixer with internal sound effects and audio processing is a handy companion and makes for a compact and portable unit when performing live.

5. Buses and Signal Routing:

You’ll need more buses and signal paths if you’ll be using your mixer for large live events or multiple channel recordings. So consider that when buying your next audio mixer.


Takeaway

It all comes down to personal preference and what you intend to use an audio mixer for. We hope that this article on the different types of audio mixers will help you weigh the advantages and disadvantages of analog, digital and powered mixers and choose the right option for your needs.

  • « Go to Previous Page
  • Page 1
  • Interim pages omitted …
  • Page 7
  • Page 8
  • Page 9
  • Page 10
  • Page 11
  • Page 12
  • Go to Next Page »

Primary Sidebar

Search

Guides & Tutorials

  • Choosing a Portable PA System
  • How to Be a Better Singer
  • Build a Budget Live Streaming System Using PTZ Cameras
  • How to Get the Best Audio Quality on YouYube
  • Setting Up Stage Monitors
  • Mixing Console Basics
  • How to Position PA Speakers
  • Stage Sound System Set-Up
  • How to EQ Live Vocals
  • How to EQ Live Sound
  • Daisy Chain Active Speakers
  • Zoom Audio Settings for Music
  • How to Livestream a Wedding
  • Improve Your Livestream Audio Quality
  • Microphone Preamp Buying Guide

Featured Posts

Treblab X9 Pro: Tough Earbuds, Big Performance

Escape the Noise: Best Affordable Noise-Canceling Headphones

How to Combine Passive and Powered Mixers

What is a Ground Loop? – 5 Simple Ways to Fix the Buzz and Hum

Disclaimer

VirtuosoCentral.com is a participant in the Amazon Services LLC Associates Program, an affiliate advertising program designed to provide a means for sites to earn advertising fees by advertising and linking to Amazon.com.

Home  About  Contact  Disclaimer  Privacy

Copyright © 2019-2025 Virtuoso Central. All Rights Reserved.