This website uses cookies to improve and personalize your visit. Learn more about cookies. Got It

  • Skip to primary navigation
  • Skip to main content
  • Skip to primary sidebar

Virtuoso Central

  • About Us
  • Contact
  • Privacy

Informational

Audio 101: Should You Use a Compressor or a Limiter?

Expert use of audio compressors and limiters is what sets a pro-level mix apart from the rest. Whether you are working in the recording studio or mixing live sound, knowing how best to utilize compressors and limiters is vital.

While they are somewhat similar and related to each other, they both perform vastly different functions as tools in your mix arsenal. 

Do you find yourself wondering about these differences and the best application of either tool? We’ve compiled a handy guide. Read on for more information! 


Ratios

The most important difference of note between a compressor and a limiter is how they handle ratios. But what are ratios?

Audio levels are measured in decibels (dB). In audio compressor terms, a ratio is expressed by “decibels in” to “decibels out.”

When using an audio limiter or compressor, the first step is to set the threshold, which is the point at which the device will kick in and attenuate your signal.

A 4:1 ratio on a compressor means that for every four decibels above the compressor’s threshold, it will output one decibel. The higher the ratio, the more the volume of the signal is reduced. 

Limiters have ratios that usually approach infinity to one. In simple terms, this translates to your audio signal hitting a brick wall and stopping instead of getting “smoothed” out like a compressor. 

To sum it up: a ratio “squeezes” the volume peaks of your signal down and makes the louder parts quieter. A limiter is much more aggressive than a compressor in this regard.

Different audio sources are best suited to different levels of compression and different genres of music. A soft indie rock vocal won’t require massive levels of compression, while a driving rock bass guitar might benefit from a limiter.  


Makeup Gain

After the volume peaks are tamed by adjusting the threshold and ratio on either your compressor or limiter, you might find that your overall volume has gone down. 

This is where the gain knob on your audio compressor or limiter comes into play. Makeup gain raises your signal back up to a good level and will also cause your vocal or instrument to sound much more consistent in volume. 

Think of the threshold as the ceiling, and gain as the floor. If you raise your gain and lower your threshold, your signal’s dynamics will be squished into a smaller range. This will increase the perceived loudness of your mix.  


Dynamic Range

By working with the ratios, gain, and threshold, you can play with the dynamic range of any recorded vocal or instrument. 

Dynamic range is the “spectrum” of volume your signal has. Certain genres of music and instruments benefit from more or less dynamic range. 

For example, a hard rock vocal run through an audio compressor may have a high ratio, low threshold, and high makeup gain, to make even the quieter parts of the vocal sound as loud as the loudest parts. 

The hard rock song likely has a fairly limited dynamic range. This is a stylistic choice to make the song sound aggressive and in-your-face.

On the opposite side of the spectrum, orchestral music generally has a very wide dynamic range to capture all the instruments’ nuances and score. 


Attack and Release

Another major difference between audio compressors and limiters is how the attack and release works.

Attack is basically how fast or slow the compression/limiting will kick in. A faster attack will clamp down on transients (such as a snare drum hit), while a slower one will let the initial transient through while compressing the signal afterward. 

Release is the inverse: how quickly the compressor or limiter will stop working and “release” the signal. 

Limiters will generally have a significantly faster attack and release in comparison to compressors. This is because of how each device is intended to be used. 


What Does An Audio Limiter Do?

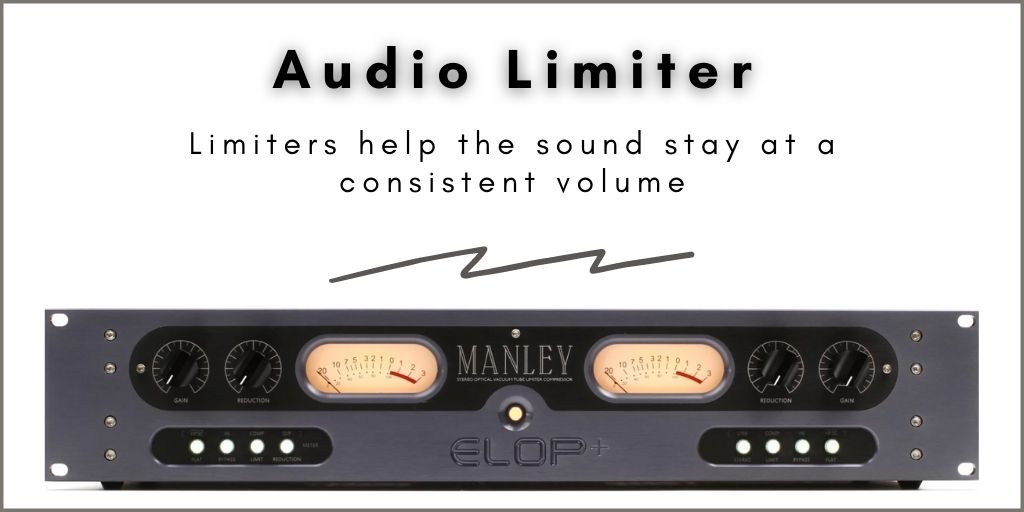
While limiters and compressors are fairly similar, their primary functions are very different. 

The “brick wall” effect of a limiter is often used at the “end” of a mix, after the rest of the instruments and vocals have been processed with compressors, equalization, and other effects.

Limiters are used mainly in the mastering process. This is because the “brick wall” effect of a limiter works really well for the very last step in audio mixing. Limiters also help every track on an album stay at a consistent volume. 

You can set the limiter’s threshold to a specific target value (such as CD levels or streaming services), then use the makeup gain to adjust the final dynamic range of the song.

Too much limiting can completely ruin a mix, however. The infamous Metallica album “Death Magnetic” is known mostly for being a casualty of the “loudness wars,” pushing commercial music to be louder than the competition through limiting.

Aim for a reasonable dynamic range for the genre and creative vision of the project. Remember that many digital streaming platforms also apply their own limiting to keep every track at the same volume. 


What Does An Audio Compressor Do?

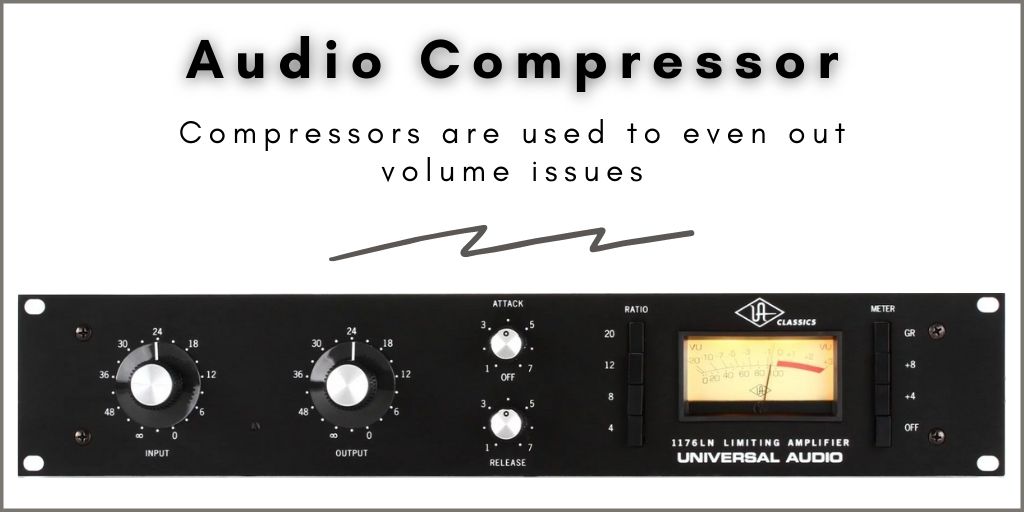
Compressors are primarily used on individual tracks to even out volume issues and shape their “character.”

Snare drums are an excellent example. Even the best drummers don’t make every single snare hit at the exact same volume. 

By applying compression, you can “even out” the snare drum volume and make even the super-quiet ghost notes pop out, while the rim shots won’t blast the listeners’ ears. 

Furthermore, using the attack and release knobs, you can also shape the snare’s sound by allowing the transient hits and the resonance of the drum shine through in different ways. 

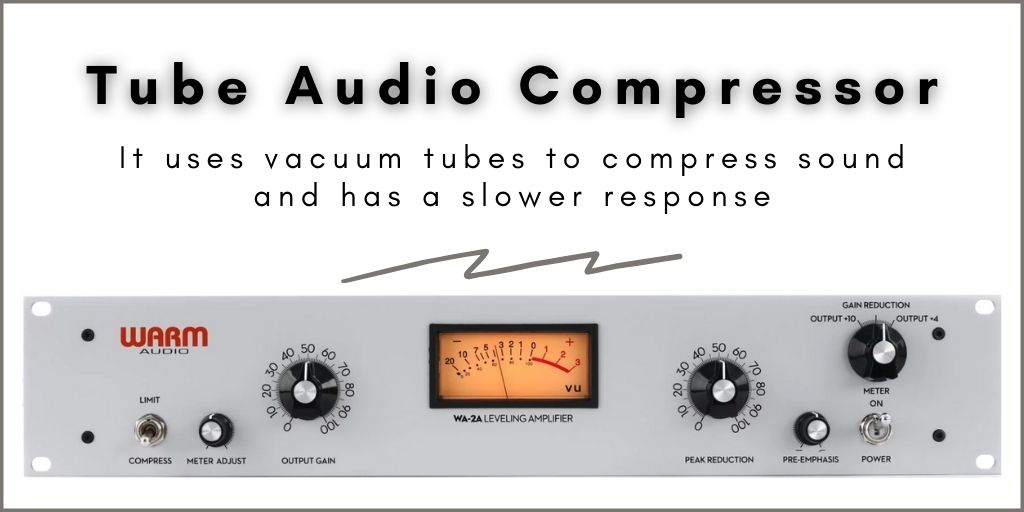
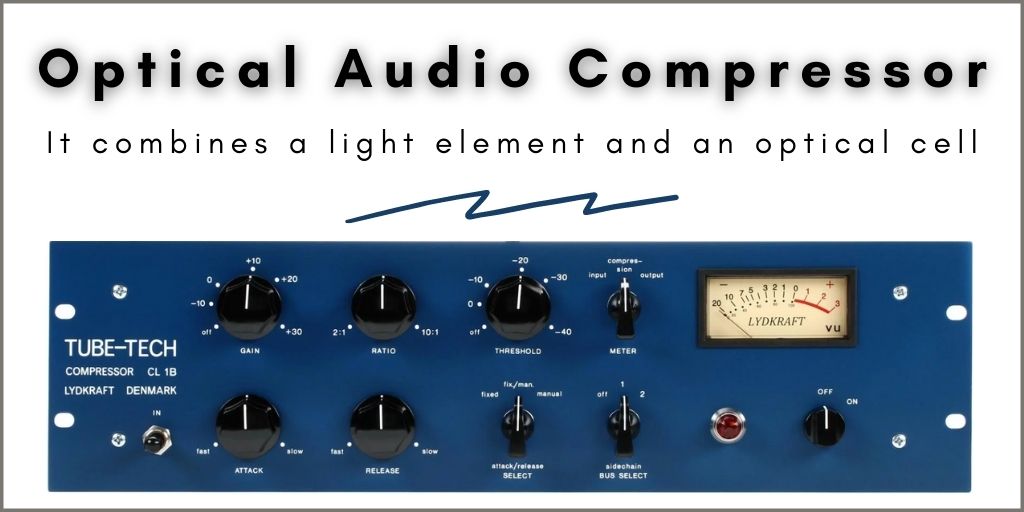
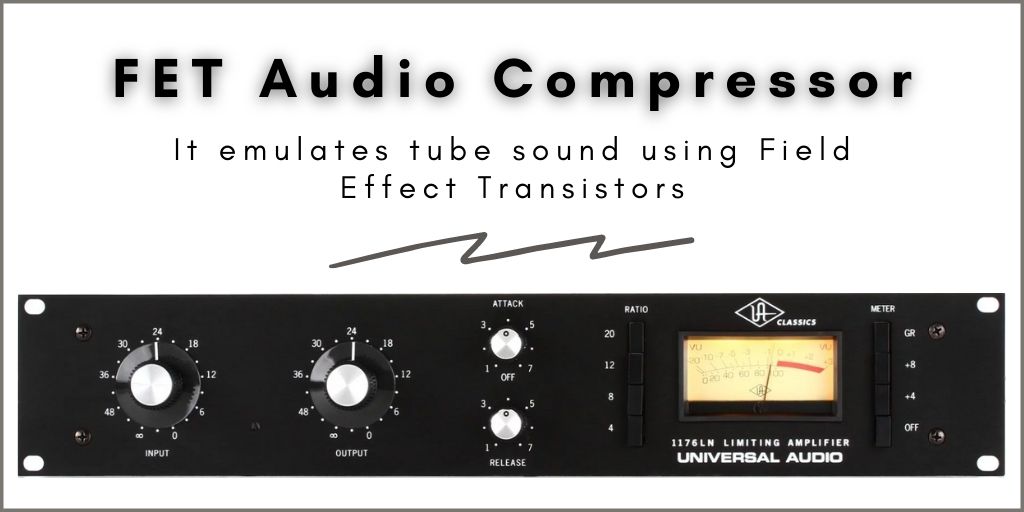
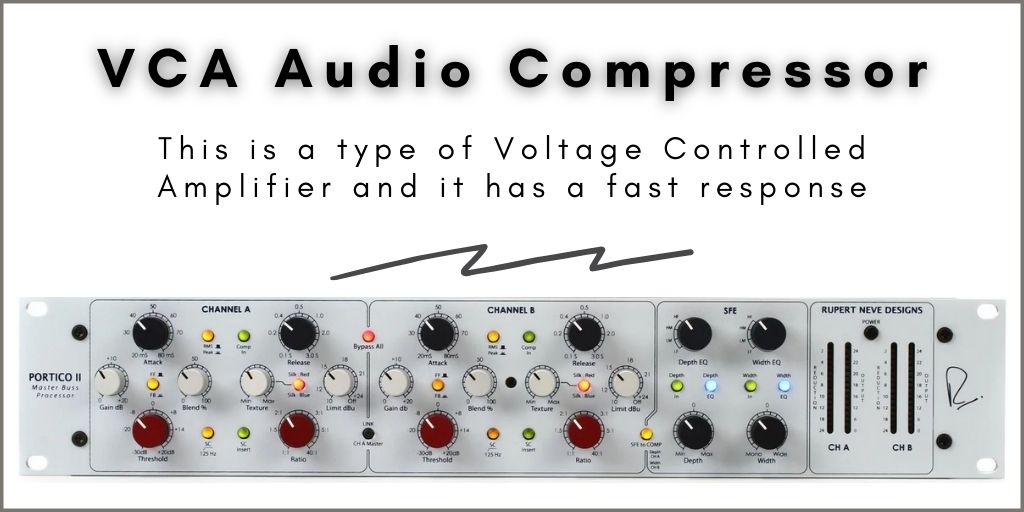
And finally, there are various types of compressors that impart their own tonal qualities onto your tracks and have different features. Master mix engineers have an entire armada of compressors.

This is because compression can be “layered” onto instruments or groups of instruments, instead of using the same compressor for every single instrument and vocal track. 


The Final Word

When you are mixing audio, you will likely find yourself using compressors much more often than limiters. Limiters are best suited for the mastering step, which is generally considered a specialized area of audio mixing.

However, at the end of the day, use the tool that is best for the job. If you’re just getting started with recording and mixing, check out our guide on home recording setups.

Top 7 Tricks for Recording Live Sound at a Concert

68% of music fans attend concerts. That’s because there’s no better experience in the world than a concert. Hearing your favorite songs performed live, the adrenaline a show brings, and connecting with other music fans is an addictive feeling.

Since so many people love concerts, they will want to experience the live show setting in the comfort of their own homes. This is where concert recording and live albums come in.

Live albums offer a sense of authenticity that you can’t get in a recording studio. You hear the cheering crowd and the band connecting with their fans while listening to your favorite songs.

Are you a band recording your first live album? If so, you’ll want to know these 7 concert recording tricks to get the best sound ever.


1. Live Audio Gain Staging is Very Different From Studio Gain Staging

First things first, many aspects of the live sound recording process are different from the studio.

Gain staging is a perfect example. In case you don’t know, gain staging is the act of setting the gain for each amplification stage to achieve a target system volume. The goal of proper gain staging is to achieve the best sound without distortion and noise.

The benefit of recording in the studio is the engineer can adjust the levels later. While this is possible with live albums, you won’t get that authentic listening experience. That’s why you need to get your gain staging perfect when recording live music.

First, understand the preamp you’re using. The preamp sends signals to just about every device used in a live setting. During recording, the signal is sent from the preamp to either the DAW (Digital Audio Workstation) or any other recording method you’re using.

Some preamps have gain control features, while others have a fixed gain level.

Your output master settings are also important. It’s advised to set your master outputs at 0 dB and scale back when necessary. Some engineers prefer to set their master outputs to -10 dB. If you choose this option, you may need to make up the lost gain with crossovers and equalizers.


2. Use a Vocal Rider

A common issue with live recording is inconsistent vocal volume. One of the reasons is because the vocals can bleed during a live recording.

In case you didn’t know, in audio terminology, bleed happens when a sound leaks from one audio source to another. For example, if the guitar mic picks the sound of the snare drum, the sound from the snare drum is bleeding or leaking into the guitar mic.

Using audio compressors don’t help much in achieving consistent vocal volume and controlling this issue manually using faders is tedious and inaccurate.

However, there’s a solution. Use a vocal rider with your DAW recording software. This is a plugin that automates your vocal mix. All you have to do is set your vocal volume threshold and the rider does the rest of the work for you.

It raises or lowers the volume of the vocal mix in real time without adding any sound coloring to the track.

Unlike a vocal rider, an audio compressor could change the dynamics of the sound so much that the accuracy of the performance can be compromised.

The most popular and the best is the Waves Vocal Rider and it’s compatible with most DAW software, including Pro Tools, Cubase, Ableton, FL Studio, Cakewalk, etc. For a full list of supported hosts check this link.

Another key factor to get a consistent vocal tone is by choosing the best microphone for live vocals. Whether you are using dynamic or condenser mics, make sure you use a quality mic to ensure the vocal’s sound quality.

Waves Vocal Rider Demo

Video Credits: Charles Potashner

3. Use Multiband Compression Sparingly

When it comes to audio compression, multiband (MB) compression is favored by many musicians and front of house (FOH) engineers because you can reduce the dynamic range on a set of frequencies.

In other words, if you want to accentuate details from a specific instrument (such as a drum cymbal) it won’t overpower the snare or other sound because a multiband compressor very accurate.

However, using compression may also accentuate bleed. But a few simple live sound recording techniques will ensure you can still use MB compression without your tone bleeding.

Let’s use the drums as another example. Place your mics in a particular way to pick up less cymbal bleed. Your mic placement depends on your kit setup; for blanket advice, place the mics in front of your toms and place your cymbals behind the toms. That way, you get the accents of the cymbals without them taking over your drum tone.


4. Utilize Subtractive EQ

Subtractive EQ is ideal for a live setting because it removes frequencies and accentuates the tone of the instruments. This is different than additive EQ, which boosts the frequency of a specific channel.

Too much additive EQ in a live setting can make certain channels sound too brittle and can cause bleeding.

If you need to boost anything, focus more on proper mic setups, ensure your amps and heads are functioning properly, or adjust your master outputs.


5. Ensure the Drums Are Cohesive

Drums are captured through multiple mics. If not miked properly, some drum parts can have odd tones or may even sound weak or too overpowering. For best practices, use a combination of open, closed, and overhead mics.

The way you mic a kit depends on the drummer and style of music. But you’ll typically want to keep the mics close to the toms, a mic inside or directly outside the kick drum (depending on if the kick drum has a hole), and overhead mics above the cymbals,

Placement is also important; for example, place the mic a good distance from the snare to avoid the snare taking over the recording.

Keep in mind, drum tone also has a lot to do with the final product. Ensure the drums are properly tuned and sound good during soundcheck.


6. You May Need Overdubs

Ideally, you want your live performance to sound exactly the way the crowd at the show heard it. But not every band or FOH engineer is perfect, even if they know how to record live sound. You may need to overdub the recording.

Overdubbing is essentially re-recording over some parts of the performance.

For example, let’s say the guitars are a little quieter than what you would like. Don’t be afraid to redo the guitar solos so they’re more noticeable on the album.


7. Don’t Always Be Afraid of the Bleed

There will inevitably be some bleed on a live album; therefore, a little bit of bleed in a live album isn’t always bad. If subtractive EQ can’t fix it, then leave it be. Live albums aren’t supposed to be polished, and that’s what makes them special.

When it comes to live recording, the tone is the most important quality. Conducting a proper soundcheck for all band members is key to achieving the best live tone.

However, when recording a live concert it needs to sound good in the end. If the product comes out with too much bleed, you may need to apply subtractive EQ.


Use These Concert Recording Tips to Create the Best Live Album

While these concert recording tips are useful, there’s always more information to learn in the realm of live recording. For example, the proper gear and set-up will also impact the way your live album sounds. Here’s how to select the right gear for your band.

Tips for Achieving the Best Sound Quality with Your Audio Mixer

Are you looking at your mixer with all its knobs and sliders and wondering how to get the best sound quality out of your music? Have you spent hours trying to work it all out but aren’t getting any closer to audio that sounds professional?

It’s easy to feel overwhelmed when it comes to learning sound engineering, especially if you’re attempting to learn it all on your own.

No worries though, we’ve got you covered. Keep reading to find out our best tips for achieving the best sound quality with your audio mixer.


The Audio Mixer’s Role

You might call it a mixing board, mixing console, or even soundboard. However, it’s purpose is still the same. The purpose of an audio mixer is to take two or multiple audio signals and join them together to produce one or more output signals. 

Have you ever been to a live concert and thought the sound quality was on point? Well, somewhere, there was an engineer at a mixing board, ensuring all of the individual sound sources meshed together in one harmonious end product. 

The sound engineer used a mixer to filter and optimize the sound by adjusting levels and enhancing sound with equalization and effects.


Audio Mixer Basics

When you first look at mixer, it might seem like there are a thousand different things going on. When in fact, there’s actually a lot of repetition when it comes to soundboards.

An audio mixer has multiple channel strips and is usually numbered going left to right.  At the top of each channel strip is the signal input. As a live signal enter the mixing board, it travels down the strip through all the different controls and a fader at the bottom. The signal is then carried over to the master part of the board and then travels out to speakers.

All the channel strips have the same controls. No matter if you’re working with a soundboard with four channels or 100 channels, it’s all the same. Once you learn how to use one channel strip, you’ve learned how to work them all.


Learning the Soundboard

Nowadays, digital mixing boards have become very popular, albeit usually more expensive than their analog counterparts. However, regardless of whether you’re using an analog or digital mixer, they both mix sound the same.

The differences you’ll most likely see between the two are digital mixers tend to have a slightly different configuration and programming capabilities. Analog mixers tend to be easier to use and are a great place to start when first learning how to mix

At the very top, or what you might consider the “rear” of your soundboard, are your audio inputs. They’re the entry point for your live sound feed, like a guitar or microphone. Typically these audio inputs will either be XLR, 1/4″ audio jack, or an RCA.

Next, you have a gain control or sometimes called a trim control. The gain control adjusts the level for the incoming signal and activates the preamp, which turns the tiny input signal into a much larger signal.

After the gain control is the compressor. A compressor raises the volume on the quiet signal and lowers the volume on the loud signal. This allows for a smaller dynamic range and allows easier mixing.

Following the compressor’s control are the equalization controls. These allow you to adjust and control your treble, mids, and bass frequencies for each channel. 

Your auxiliary channels come after and are commonly referred to as the “aux” channels. Aux channels give you the ability to send a secondary feed of the audio channel to another device. Next, you have your assigned and pan controls. This function directs specific channels to one or two of the stereo outputs.

And lastly, there is your fader slider. This control gives you the ability to lower or raise the presence of each individual channel as it goes into the final output. 

sections of a mixer

Mixing Professional Sound Quality

So now you’ve got the soundboard functions down, let’s get into how to mix properly. Before you can produce a quality mix, you need to make sure that the sound source is on point. If the sound coming into the mixer is subpar, then the sound going out won’t sound good no matter what you do.

When possible, try using balanced XLR cables instead of unbalanced TR cables. This is because balanced cables help stop noise issues that can occur from external interference. These cables help transmit the audio signal from one spot to another, delivering a better quality signal.

Once you have quality signals coming in, work on getting the sound balance right. For example, it won’t matter how well you mix and eq your vocals if the guitar part is completely overpowering them. It is very important to get your sound balance right before you begin mixing anything else.

Now that you have your sound balance right work on panning and assigning sounds or signals to your outputs or speakers. This gives space to the various sounds being mixed and gives the sounds greater definition.

Tips for Equalizing Sound Like a Pro

If you wish to highlight or give a signal a little bit of sparkle, use your equalizing controls to do so. The channel’s EQ shapes the incoming signal’s frequency content to either boost wanted frequencies or decrease problematic ones.

  • If the signal is not clear, you can try increasing the treble (high frequency), and your sound will get crisper and bright. If you decrease it, the sound gets more flat. Be moderate with the highs because too much emphasis in this frequency range can produce sibilance on the vocals and produce a piercing, screechy sound that can be hard on the ears.
  • Increase the mids, and the core of your sound becomes more enhanced. These frequencies add fullness and warmth to the sound.  Mid-range frequencies are between 250 Hz and 6000 Hz. It’s a good practice to be mindful of this range as well. If you go too heavy on these frequencies, your mix will sound harsh and uncomfortable. In other words, it will sound aggressive and abrasive with a metallic touch.
  • Does your mix sound thin? To solve it, increase the low frequencies carefully, avoiding sounding boomy. Too much bass, and it will sound thick and muddy, lacking articulation and clarity. If it’s too boomy or muddy, decrease the low-frequency knob until you can clearly hear the mix with a balanced tone.
  • When listening to your mix, if you notice that a signal or sound is all over the place, you can use your compressor to lower its dynamic. Just remember, too much compression will cause a sound to seem dead and takes the character out of sound.

Eliminate Background Noise

As mentioned earlier, if the sound coming into the mixer is subpar, then the sound going out will sound just as subpar. Background noise, whether it be traffic outside or echo bouncing off the walls, can really muddy up your overall sound quality.

Recording in a soundproof room with blankets on the wall or a sound booth is one way to deal with unwanted noise coming into your mixer. This is called “treating” your recording area. Other things like turning off fans or noisy electronics will help as well.

Ready to Mix

You don’t need a super fancy mixer to get a professional sound quality. Once you have a good understanding of the equipment you’re using, you can do a lot with a little. Just remember to have good quality sound coming into your audio mixer.  

If you’re not sure what sound gear and set up is needed for a live band, check out our guide here.

How to Improve the Sound Quality on Zoom for Music

Our lives have changed dramatically since the start of the Covid-19 pandemic. Now we are limited in what we can do as social distancing is still a problem in many places worldwide.

If you take music classes or are part of a band or music group, rehearsing might only be possible using the Zoom app. The only problem is that it doesn’t sound too good, especially if you use the default settings and the onboard microphone on the laptop or phone.

In this post, I will show you a few tips on how to improve the sound quality on Zoom for music.


Improve Your Sound Quality on Zoom for Music

Here are a few tips you can try to improve your sound on Zoom for playing or singing live.

  • Avoid using the onboard mic, if possible, get an external USB Condenser microphone
  • Configure Zoom for high-quality audio for playing instruments or singing
  • Improve the acoustics of the room to avoid echo
  • Get closer to the microphone

Let’s delve in each one of these tips in more detail.


Use an External USB Condenser Microphone

It’s no secret that onboard microphones are not that great. Some are better than others, but overall they can’t deliver good quality sound.

One of the reasons is that the onboard mic’s capsule is tiny, limiting its ability to pick up sound vibrations. The small membrane also is very limited to picking up the detailed nuances in sound when playing a musical instrument or singing.

Condenser mics pick up clearer, more precise audio with greater volume depths.

By using a USB condenser microphone, your audio will improve drastically because it’s capsule is bigger and very sensitive to picking up even the smallest nuances in sound, immediately delivering higher quality sound on Zoom for music.

Here are a few examples of USB condenser mics that you can use to help you improve your sound quality for music on Zoom (links to Amazon):

  • Blue Yeti USB Mic
  • AKG Pro Audio Lyra Ultra-HD Mic
  • Audio-Technica AT2020USB+ Condenser USB Microphone
  • Samson G-Track Professional USB Microphone
  • HyperX QuadCast – USB Condenser Mic
  • Mackie EleMent USB Condenser Mic

Configure Zoom for High-Quality Audio for Music

Zoom added a new feature that enables your computer to send high-quality audio. This function optimizes Zoom audio for the highest quality music. This is ideal if you are using the platform for music lessons or for performing with an instrument.

Keep in mind that by choosing this option it can increase CPU utilization and consume greater bandwidth.

Here are the steps you need to follow to configure Zoom for high-quality audio:

  1. If you have a USB condenser microphone, connect it to the computer you are planning to use. Now it’s time to select it as the default for Zoom meetings.

2. To select the USB mic as the default go to the “Settings” in the Zoom main menu, as shown in the image below.

3. Click on the “Audio” tab to open the audio settings.

4. On the right side, where it says “Microphone,” select yours from the drop-down menu. In most cases, as soon as you connect the USB mic, Zoom will automatically find it and set it as your default.

5. Where it says “Speaker,” you can select if you want to use your computer’s speakers or use headphones. Select your choice from the from the drop-down menu.

6. Under the microphone section, Deselect “Automatically Adjust Microphone Volume.” The reason is that Zoom uses an algorithm to keep your volume as constant as possible for video conferencing, which is suitable for the spoken word. For music, you want the sound’s dynamic range to be as real as possible, hence the reason for deselecting this option.

7. Next, click on the “Advanced” tab and select “Show in-meeting option to “Enable Original Sound” from microphone.”

This option automatically disables Zoom noise suppression, removes high-pass filtering, and removes automatic gain control.

Keep in mind that this setting is recommended for playing music and studio-like environments with higher quality mics (USB Condenser Mic), speakers, or audio interfaces. This is what we want to improve the sound quality on Zoom for music.

If you are in noisy environments, don’t use this option because all the noise will be passed to the other end.

8. Lastly, make sure to select “High fidelity music mode.” This option optimizes Zoom audio for the highest quality. This is ideal if you are using the platform for music lessons or for performing with an instrument. By choosing this option, expect an increase in bandwidth use, which means that your internet connection should be fast enough.


Improve the Acoustics of the Room to Avoid Echo

If you use an excellent mic and your configuration is spot on, but the room’s acoustics is poor, the sound quality will still be terrible. Usually, echo is the main problem in places with poor acoustics.

Echo happens when sound waves that move through the air hit hard surfaces and bounce back. To stop the echo, you need a way to absorb the sound waves so that they can’t bounce back and forth within the room.

There are different ways you can improve a room’s acoustics. One way is by using curtains on the wall and carpet on the floors to absorb the sound. Another way is by using carpet on the walls and floors. The only thing is that it might look ugly.

Additionally, you can use absorption panels on the walls to help reduce echo. You can build your panels to add more personality to your room while helping to reduce the echo. Here is a tutorial I found on Youtube to make your own high-performance sound absorption panels very cheap that deliver excellent results.

Video Credits: DIY Perks

If you rather have professional acoustic panels like the ones used in recording studios and don’t mind spending some money, choose professional-grade acoustic material.

There are several kits that come with everything you need to improve the acoustics of a room. Here are some examples of what you can get depending on the size of the room (links to Amazon):

  • Acoustimac DMD
  • ADW Acoustic Panels
  • Primacoustic London
  • JBER Acoustic Studio Foam

Get Closer to the Microphone

Getting closer to the mic is a simple but effective tip to improve Zoom’s sound quality, whether you are playing music, taking lessons, or singing.

As the sound source gets farther away from the mic’s pick up capsule, the quality decreases rapidly. If the sound source is farther away from the mic, it picks up ambient noise, degrading the sound quality as the sound waves become thinner, losing the sound’s fullness.

You want to get close to the mic but not so much that it could saturate the membrane inside the capsule.

If you are singing and your voice is strong and loud, make sure to leave between 6 to 8 inches from the mic’s head and your mouth. Also, I recommend monitoring your microphone volume on the Zoom app not to saturate the sound. Never allow the signal to clip because it will sound distorted on the other end.

When playing an instrument, place the microphone as close as possible without it being in the way. Placing it between 1 to 3 feet away from the instrument is a common practice to pick up all the performance nuances.


Final Thoughts

It is possible to get good sound quality for music with the Zoom app. All you have to do is follow these helpful tips. By leaving the default settings on Zoom, you limit the audio quality that the platform can deliver.

Make sure you change the settings and have a decent microphone that can pick up all the music’s nuances that are being played.

Avoid excessive echo by limiting the sound waves to bounce back and forth. Lastly, make sure to get as close as possible to the microphone but always monitoring the volume levels so that the audio doesn’t distort.

Got questions? Leave a comment or contact us, we’ll be happy to help.

What is an Audio Compressor? – Why is it Used?

What exactly is an audio compressor, and how does it work?

An audio compressor is a device that creates a more leveled tone to your sound by amplifying the audio in some places, normalizing it in others, and toning down the loud bits.

The goal is to create consistency through the entire piece you’re working with to have a smooth listening experience.

If your sound jumps around too much, it’s awkward to listen to. You want to give it a rich tone without over saturating some parts or squashing the personality out of it.


Why Use Audio Compressors?

An audio compressor is useful whether you are in the studio or playing live on stage. When you’re building a track in the studio, all the audio levels may not be even.

Say you’re a band, and each instrument lays a track. If one component drowns out the others, there’s no sense of balance, and the piece will be tilted to the louder noises.

What you do is equalize and adapt the noise levels so that they play in harmony with one another, and you create a finished product that offers a consistent listening experience.

Here is where the audio compressor comes in. It takes the signals and makes sure that the loudness is consistent and normalized throughout the track.

On the other hand, if a band is playing live on stage, an audio compressor comes handy to normalize the sound’s dynamic range before sending it to the amplifiers and speakers. You don’t want to have abrupt changes in the audio levels from low to high or vice versa.

By using a compressor, your sound will be smooth, delivering a professional sound experience to your audience.


What is Dynamic Range, and Why Does it Matter When Using Compressors?

Dynamic range refers to all the peaks and valleys of your sound signal. Now, compare the difference between those peaks and valleys. That’s your dynamic range.

Okay, so in audio, the dynamic range basically looks at your loudest and quietest areas, and within those points is your dynamic range.

The compressor deals with the peaks and valleys to determine when to normalize abrupt changes in audio levels. Depending on the compressor’s control settings and the audio signal’s dynamic range, the results will vary.

Signal-to-noise ratio is a fancy way of saying it. You want the sound to be undistorted. Have you ever gone to a loud concert, then tried to talk to your friend? The level of sounds (your voice and the massive concert speakers) don’t match, so you have to yell over the music to be heard. Your voice is the signal, while the speakers are the noise.

In the audio world, we use compression to deal with sudden volume changes so that they are normalized and more comfortable to listen to. How loud can you bring the noise up without losing clarity and causing distortion?

An audio compressor has multiple sections you need to understand. By looking at each of these briefly, you’ll become more familiar with the terminology, along with seeing what each does to help your live sound or recording. The cool part is that you can change things and how the sound comes across by adjusting different controls.


Get to Know Your Compressor’s Controls & Parameters

Input Gain

Input gain controls the volume level of your incoming signal. When you compress your audio, it changes the volume and makes it lower.

Threshold

When this is set, it creates a standard to follow. If the level gets louder than where you’ve set the threshold, it will be compressed. If it doesn’t reach that point, it doesn’t need to be compressed. So overall, the compressor will look at the peaks we spoke of earlier and bring them into the range you’ve set.

The threshold is measured in dB (Decibels). Let’s say you set the threshold to -24 dB if the incoming signal goes above that, the compressor will attenuate the signal to the ratio you have selected.  

Compression Ratio

This determines how much compression will be applied to the signal. When the ratio is equal, nothing happens, but as the ratio starts to change, it reads the amount of compression it needs to fix the problem. So, the bigger difference between numbers, the more compression will take place. For example, a 1:1 ratio won’t react. But a 4:1 signal will.

The compression ratio is also expressed in dB (Decibels). It tells you how much the signal will be compressed if it goes over the threshold level.

For instance, let’s say that the threshold level is set to -24 dB and the compression ratio to 4:1. If the audio signal goes 4 dB above the threshold level, it will be attenuated down to 1dB above the threshold. In this case, the compressor will output a signal that’s about -25 dB.

Another example lets say that the ratio is set to 2:1. If the signal goes above the threshold by 2dB, it will be attenuated down to 1 dB.

Universal Audio manufactures some of the best compressors in the market. Here is what they have to say about different ratio settings. A ratio up to 3:1 is considered moderate compression, 5:1 is a medium compression setting, 8:1 or more is regarded as strong compression. Anything above 20:1 is going to work as a limiter instead of a compressor.

Attack Time

Attack, what? Attack time. How long is this going to take? That’s exactly what it’s about. It’s about the length of time it takes to compress your signal, and how quickly it will react.

Release Time

How fast will it snap back after it’s finished? So, your volume went up too high, your noise peaks, and compression kicked in since it was over the threshold. Release time is about the amount of time it takes to “realease” and go back after that compression took place.

Knee

The knee sets how gentle or strong the signal is compressed. It’s divided into Hard knee, which is fast and direct, and Soft knee that is gradual and smoother. Think about a rollercoaster. Is it a straight up and down ride, or are they more rolling hills with gradual inclines and declines? A hard knee creates that fast up and down, and a soft knee creates the gently rolling hills.

Output Gain

Was the signal overly compressed? This “make-up” gain lifts the level back up when it went too low.

For example, if after a bass signal is compressed, the volume is too low when compared to the rest of the mix, the output gain is used to boost the signal so that it matches the rest of the mix.


Types of Audio Compressors

Tube

Tube compression is the granddaddy of compressors, something that both the Beatles and Motown relied on. As technology advanced, methods changed, so today, this has more of a vintage sound to it.

You’ll also hear this referred to as variable Mu. It works by how loud something is, then smooths it down. This has a slow attack time.

Optical

This combines a light element and an optical cell. Remember our talk about peaks and valleys? In this instance, the higher those peaks, the more the light responds, which creates a compression reaction in the optical cell. While the light aspect reacts very quickly, the cell is slower and smoother.

FET

FET stands for Field Effect Transistor. This works with the electrical element of the sound. There’s voltage and electrical charges, and it adapts the gain based on this overall component. What’s interesting is that the higher the voltage, the less resistance there is. This, in turn, reduces the gain. The history of FET came about as they started phasing out the large tubes, which meant smaller audio compressors.

VCA

VCA stands for Voltage Controlled Amplifier. Similar to FET, the difference is that this works with a circuit, while the FET works with the entire electrical field. This is more to tackle your peaks. Optical will offer you a smoother response, and this isn’t as popular as a choice for averaging out your sound or track.


Tips for Using Audio Compressors

  • After understanding what each control means and what it does, start playing around with different settings until you can hear how each parameter affects the sound.
  • It’s never a good idea to apply excessive compression to audio tracks weather you are working in the studio or playing live on stage. Be mindful and apply compression only to the channels that really need it and not to the entire mix, unless it’s really necessary.
  • Keep in mind that as the dynamic range of sound changes when compression is applied, the timbre and tonal characteristics of instruments and vocals will change. This is why we stress out not to apply excess compression.
  • Some audio mixers offer a one-knob compressor system to simplify setups in live events. If you are using this function on your mixer, make sure to get used to how it reacts with different sound sources. These compressors don’t have any parameters that you can change. They tend to be more linear. Spend some time getting used to it so that you know when to apply it if needed.

Few Helpful Pointers for Newbies

When you’re starting out, it’s easy to get bogged down into over reading and thinking you need to do it all at once. Instead, find something that works for you, at the level you are or one step up that you can grow into. Understand the fundamentals of how each thing works and why.

Consider the sound you’re hoping to achieve, whether it’s for vocals or musical instruments. There aren’t any right or wrong answers—it’s simply what sounds best to you and what you want your final output to sound like.

It comes down to the dynamic range, how you want it to sound, and what kind of personality you want your piece to have.


Final Thoughts

Wow, that’s a lot of different information all at once, right? Knowledge is good, but it doesn’t mean you need to jump in with both feet and invest in tons of equipment for each type of sound you’re working with.

What it means is that you understand there are different things used in different ways. You’ll start to recognize that terminology the more you hear it talked about.

What’s awesome about this is now it won’t sound like a foreign language when somebody talks about knee, and you’re looking down at your leg. You understand what attack time is, and you’re not thinking about a quarterback getting sacked on the football field.

The more you learn about audio, the more familiar the terminology becomes. Soon it will be second nature, and you’ll find yourself using these phrases without thinking about them.

You can keep it as basic as you’d like, or geek out on this stuff as much as it suits you. If you read this and get a little overwhelmed, step back, take a deep breath and remember, it just has to sound good. You don’t need to sit down and take an exam on the terminology and what it all means.

Selecting the Proper Sound Gear and Set-Up for a Live Band

Are you ready to wow your audience with a live band that sounds just right?

Whether you’re interested in managing your own band’s live gear or you’re transitioning into a live audio career, there’s a lot to consider in terms of putting on a show with enviable acoustics.

For instance, there are endless options when it comes to amplification of your live band. You can choose from simple self-contained personal pa systems to large systems with multiple components and serious power.

Read on to learn all about live gear and how to decide which equipment to choose for your own unique setup. By the end of this guide, you might just be a live audio pro.


Mixers

The mixer is the central hub of your pa system. Whether we’re talking about a simple eight-channel mixer with a few basic controls like gain and equalization, or a 64 channel mixer with advanced features onboard, it’s essential to have a mixer that can take advantage of the acoustics of your performance venue.

Basically, a mixer takes all of your various inputs like microphones, line-level instruments, and playback devices and disperses them into main outputs and monitor outputs. This creates a balanced sound. The main outputs go to the various speakers and subwoofers if you are using them. The audio that comes out of these speakers is what the audience hears.

The monitor outs, or the monitor mix, goes to the performers on stage so they can hear themselves and hear each other. Having two separate mixes is important because usually, the performers need a different mix than what the audience needs to hear.

Since the mixer is the central audio hub of your pa system, we have dedicated a full article explaining each control in more detail.

Unpowered Mixers

If the mixer is unpowered, it does not have its own internal amplifier. If you choose this option, you will need to either use an external amplifier with passive speakers or active speakers that contain their own power amplifiers.

Powered Mixers

Unlike the unpowered mixer, a powered mixer has its own power amplifier. If you are using a powered mixer, it is important that you only connect it to passive/unpowered speakers. IF you connect a powered mixer to an external power amp or to active speakers, it is highly likely that you would permanently damage your equipment.


External Rack Effects Units

While many modern mixers have internal digital effects processors, you may still choose to use certain pieces of outboard rack gear for compression, feedback suppression, or various external effects. These might include reverb, delay, and chorus for example.

External effects units are normally connected using channel inserts or auxiliary channels on your mixer.

Active Speaker Cabinets

Active speaker cabinets have their own internal power amps. These are ideal if you’re looking for a compact setup. You don’t have to worry about lugging around a rack with a power amp along with your speakers and other pa equipment.

Keep in mind that active speakers are meant to receive line-level signals, so be sure not to run the output from a powered mixer into an active speaker.

Passive Speaker Cabinets

Passive speakers do not contain their own power amp. Therefore, they need to be fed by a powered mixer or an external power amplifier.

One advantage of passive speakers is that you can have a spare power amp in case your external power amp fails. This is far more practical than having spare active speakers on hand.


The Monitor Mix

Depending on the size of the venue and your budget, the front of house engineer (AKA yourself) may also handle the monitor mix. This is often accomplished by setting up a monitor mix for each performer during soundcheck. Then, each monitor mix is adjusted during the performance.

Adjusting the monitor mix for each performer individual is vital because this enhances the band’s sound overall. For instance, if your vocalist hears too much of the drums and not enough of the base, her vocals might sound too punchy. In short, it’s very important to invest in quality onstage monitors for a live show.

In-Ear Monitors

In-ear monitors use a wireless receiver which is battery powered. The performer can adjust the overall volume via a control on his or her own receiver.

There are a couple of important advantages to using in-ear monitors. Since they are earbuds instead of speakers, they can help clean up the stage. In other words, they can help prevent bleed and feedback, and the performers can get clearer audio feedback.

Wedge Monitors

Although they are an old school approach, some performers prefer wedge monitors. These are onstage speakers that face the performers instead of facing the audience.

Some performers don’t like in-ear monitors because they feel too isolated or that they are losing the connection to their audience. If your band collectively prefers to be more engaged with the audience, wedge monitors may be best.

You can check out our article about setting up stage monitors by clicking the link.


All In One pa systems for Your Live Band

All in one pa systems, also called solo pa systems, are a very modern and very compact approach to live audio gear. They feature a basic mixer, power amp, and a set of speakers in a single unit.

They are popular thanks to their portability, affordability, and easy setup. Many all-in-one pa systems feature at least two XLR/Line inputs with at least basic EQ and reverb.

It is not uncommon to find these units equipped with Bluetooth as well as an auxiliary input. You can use them for playing backing tracks or music between sets. Many of these all-in-one pa systems are expandable as well. This means that if you land a gig at a larger venue, you can hook two of them together to accommodate a larger audience.


Time to Jam

Now that you know how to choose and set up the gear for a live band, what else piques your interest in terms of audio gear?

Whether you’re an audiophile and a musician or you’re studying to be an audio engineer, our site is a great resource for all of your audio needs.

Come back to our blog regularly to learn more about the latest audio gear and for tips on which brands and products to choose for your setup. Feel free to contact us with any questions about audio gear in general, or to inquire about where you can order the gear we promote.

What is Impedance in Audio? Input and Output Impedance Explained

What is impedance in audio? Are you confused about all the different terminology you’re stumbling across as you expand your audio knowledge? It can be frustrating to finally learn what something means, but then there are different levels, different types, and each one has its own set of rules.

Take impedance, for example; there’s measured, input, output, balanced, matched, and terminating. It’s enough to make you want to close the browser window and stop reading. We get it.

That’s why we’ve taken the things you need to learn and broken them down into straightforward, easy to understand explanations, no more frustration, no more getting lost. Follow along, and let’s learn about impedance today.


What is Impedance in Audio?

Before answering what is impedance in audio, you need to understand that an audio signal is a form of alternating current (AC). When dealing with analog sound equipment, the audio signal that goes in or out of the system is a level of AC voltage and current.

In audio devices, impedance is the measure of the resistance of a circuit to alternating current (audio signal). It’s measured in Ohms.

The “Z” symbol represents impedance. All audio equipment that receives an input and has an output will have impedance measurements, namely input, and output impedances. More on that later.

Impedance When Connecting Audio Devices Such as Mixers and Microphones.

When electric current travels through a conductor from one device to another, you would want to have a higher impedance at the input and a low impedance at the output.  

For instance, if you connect a microphone to a mixer, your microphone has an impedance of less than 200 Ohms. The input impedance of the XLR balanced connector of a mixer or preamp is between 1500 – 3000 Ohms. This ensures an excellent current flow between the two devices.

Impedance When Connecting Speakers and Amplifiers

When you buy audio equipment, you’ll sometimes notice that the equipment, such as speakers and amplifiers, have an impedance rating measured in Ohms. What this is telling you is the resistance that the speaker presents to the amplifier.

A lower speaker impedance means that there will be more power flowing from the amplifier. In contrast, a higher impedance speaker will have less power flowing from the amplifier. Mismatching the impedance between amplifiers and speakers can result in damages to the equipment. This is why correctly matching speakers and amplifiers is so important.


What is Input Impedance?

If your equipment receives an audio signal, it has input impedance. It recognizes the signal coming from the other piece of equipment. Where connected, it “sees” the output impedance from the other device. As the signal passes from one place to another, it’s called a load (load impedance).

What is Output Impedance?

If your equipment outputs an audio signal, it has an output impedance. When it sends a signal to the input impedance of the other device, the goal is for it to be balanced. You’ll also hear this referred to as equal or matched impedance.

Here’s an important piece of info, based on the distances that the signal has to travel. If there is a long distance for the sound to travel, you’ll want to be sure that your cables also match the impedance of the equipment.


What is Impedance Matching in Audio?

Impedance matching in audio equipment means that the output impedance from one device must be the same as the input impedance of the device that is connecting to. This ensures a good signal transfer between devices.  

Think of kids on a playground. When everybody gets along, things run smoothly. It’s the same thing when you’re trying to work with audio. When everything works together, life is easier.

Back in the day when audio equipment had vacuum tubes, impedance matching was crucial to ensure a good signal transfer between the different audio devices, especially in long cable runs. But in modern audio equipment, this is not a problem.

Is It Necessary to Match Impedances in Audio Systems?

Impedance matching has gotten easier over the years as audio equipment has advanced, and new components became available. Years prior, the way you needed to match equipment was different. The equipment itself was more sensitive to how things were connected. The industry has uncomplicated matters, which we’re all grateful for as you’re getting started.

The way your audio used to be hooked up, there was more power-driven to all the audio pieces, and impedance mismatched caused problems. Today, input impedances are higher, thanks to solid-state devices like integrated circuits and transistors.

With modern audio devices having a high enough input impedance, matching isn’t as critical as it used to be.


Takeaways:

When it comes to impedance, the important thing to remember is that it measures the resistance of a circuit to the incoming signal. Your input receives the signal, while your output feeds the signal. Impedance “Z” is measured in ohms.

It’s also important that your input impedance is high, and the output impedance is low when connecting audio devices such as mixers, effect, microphones, instruments, etc. Today’s equipment makes it easier than in the past thanks to solid-state devices.

How to Set up a Surround Sound System

You can enjoy a remarkable home theater experience by learning how to work with surround sound.

Surround sound allows you to bring the movie experience home. However, the process of setting up the system can seem like rocket science to some people.

Although surround sound is a high-tech audio solution, there’s no need for it to prove confusing. A few helpful tips can make the setup process easier.

To learn how to set up a surround sound system, keep reading.

Image Credits: Chauhan Moniz

Connecting Your Gear

To build the best surround sound system, start by gathering all your supplies. It’s helpful to think about the components that will make your system setup more enjoyable. For instance, you may prefer to set up a wireless surround sound system (Link to Amazon).

When setting up your surround sound system, it’s helpful to begin by making sure that you have everything that you need. At a minimum, you’ll need:

  • A surround sound receiver (Link to Amazon)
  • A TV or video projector
  • A wire stripper
  • Connector cables and speaker wire
  • Speakers and a subwoofer

Depending on your desires, you may also want a few other items. For instance, you might want to install:

  • A Media streamer such as a Fire TV Stick, Roku Streaming Media Player, or Apple Tv, etc. (Links to Amazon).
  • A cable or satellite box
  • Blu-ray Disk player
  • DVD player

A label printer can also make the installation process more organized.


Getting Into the Setup

As you start laying out the components, think of your home theater system in terms of paths. Your paths will determine what you want to get out of your system, such as a surround sound system for your TV.

You may want a basic 5.1 system or a high-tech surround sound system with Bluetooth connectivity. Either way, your mission is to make sound travel along the pathways from the sources to your video devices and speakers.

Accordingly, think of components such as your cable box or streaming boxes as starting points. Likewise, think of your TV or projector and speakers as endpoints. It’s your job to get audio and video signals from the starting points to the endpoints.

To enjoy surround sound, you’ll want at least a TV, an AV receiver, a DVD or Blu-ray player, and a media streamer. You’ll also want a minimum of five speakers and a subwoofer.

You can buy the speakers and subwoofer as separate units, or you can get a home theater system that includes the satellite speakers plus the subwoofer (Link to Amazon). In such cases, the system comes like a kit including the cables for the connections.

Instead, if you are an audiophile, you might want to choose the speakers, subwoofer, and surround receiver separately. If that’s the case, make sure to match the impedance and wattage of the speakers to the amplifier.

Incidentally, this last point brings us to types of surround sound formats. Five speakers and a subwoofer is the format for surround sound 5.1.


Surround Sound Configurations

If you’ve been researching about surround sound, you’ll notice commentators refer to it as surround sound 5.1, 7.1, and 9.1. These numbers reference the speakers included in the system.

Surround sound 5.1 is the standard configuration for DVD, Blu-ray, and streaming content providers. This setup includes five speakers – front left, front right, center, rear left, and rear right speakers plus a subwoofer. This kind of system is an excellent setup for beginners.

The next level in surround sound is 7.1. This system has the same setup as surround sound 5.1. However, it also includes an additional right and left side speakers.

Next, there’s surround sound 9.1. It includes the same setup as 7.1. However, it also has two additional speakers mounted a few feet above the left and right speakers.

This setup provides sound at altitude. It creates an immersive experience by delivering music across another sound axis.


How to Set up a Surround Sound System

Some people express that the center speaker of a surround sound is optional. This group believes that the left and right speakers can handle sound fine.

However, the center speaker anchors the on-screen dialogue. It also serves as a connection between sounds that flow from the left to right speakers, or vice versa.

For example, imagine a boat zooming from the left to the right of the screen at high speed. Without a center speaker, you may notice a gap in your sound field as the boat passes.

Place the Front-Left, Center, and Front-Right Speaker at Ear Level

To start your set up, place the center speaker either above or below your screen. If possible, place it at ear level to get the best results.

If you’re installing speakers near your monitor, make sure that they’re shielded. If not, your speakers could cause video distortion in some cases.

Also, try to position the left and right tweeters at ear level. This positioning will give you the best results for high-frequency sound.

It is recommended to leave some space (1-3ft) between the screen and the left and right front speakers.

If your TV is 65” or more, it’s not necessary to leave any space; just place the speakers at the edge of the screen.

The Rear, Side, and Top Satellite Speakers Provide Extra Dimensions of Sound.

As you consider speaker positions, it’s also helpful to think about the purpose of the additional speakers. The goal is to provide an extra dimension of sound for the left and right channels.

The rear speakers should be placed behind the audience, and if possible, at a height looking down.

If you are setting up a 7.1 or 9.1 surround sound system, place the side and top speakers also at a height looking down. That way, you’ll get a better dimension of sound

The Subwoofer Complements the Full-Range Frequency Response of the Surround Sound.

Now, you’re ready to position the subwoofer. You can use the subwoofer to complement the full-range of audio frequencies that the satellite speakers can’t. The subwoofer delivers a fuller bass signal that fills the room.

The placement of the subwoofer is not as critical as the other speakers. You can place it on the side or front of your setup. Depending on the type of subwoofer you have, in some cases, by placing it at the front, it will give you better acoustic results.  

By using a sub in this manner, you’ll leave your other speakers free to handle high and midrange frequencies. A subwoofer is entirely capable of handling all the low frequencies you throw at it. You’ll enjoy a more dynamic range of sound because the bass can go lower than a regular full-range speaker.


Taking Surround Sound to the Next Level

Now that you’ve figured out how to set up surround sound 5.1, 7.1, and 9.1, there’s another level.

Dolby Atmos is a step up from 9.1 surround sound. It’s a divergence from traditional channel-based audio.

It allows sound to engulf the user in three dimensions. With Atmos, you can experience sound coming from everywhere, including from above.

This design frees you from the constraints of traditional surround sound technology. It allows you to hear sounds in a way that best serves your viewing experience.

To set up Dolby Atmos, you’d need to add either two or four ceiling or elevation speakers to your existing surround sound setup. This format will also change your surround sound designation. For instance, if you have Dolby 5.1 with two speakers for Atmos, you’d have a 5.1.2 configuration.


Keep Your Audio Skills Honed

Now that you’ve learned how to set up a surround sound system, your journey is just beginning. When you love movies and music, however, there’s always more to learn.

Virtuoso Central is your source for all things related to sound accessories, equipment, and instruments. If you’re looking for buyer’s guides, feel free to browse our list of the latest best products on the market.

At Virtuoso Central, you can enjoy extensive reviews of the accessories, gear, and instruments. You can also read informative articles that dive into the detailed aspects of working with sound.

To keep learning more great info about working with sound, visit our blog. If you have questions, feel free to get in touch.

Types of Subwoofers: Everything You Need to Know

When purchasing speakers, the subwoofer is the component that takes your system from average to outstanding. In the home, it can give you the cinema experience when watching a movie or allow bone-crunching bass in your record collection.

When used for live sound setups, subwoofers deliver the extra punch needed so that your audience can enjoy the performance the way it is supposed to.

Choosing the best subwoofer is a challenging task. There are many models and designs on the market, and any advice given often comes down to personal preference. We discuss the types of subwoofers so that you can make an informed decision. 


What Defines a Subwoofer?

The subwoofer is the part of a speaker set that produces the lowest frequency ranges. In essence, it provides bass and the deepest of frequencies in your sound system. In a home theater sound system, it is the first component of a 5.1 surround sound system.

Subwoofers come in a couple of configurations, active and passive; let’s explain both.

Passive Subwoofer

Passive subwoofers are powered by an external amplifier. The amplifier must-have enough power to sustain bass effects through your subwoofer speaker. The size of your speaker will determine the amplifier required. 

Active Subwoofer

An active unit has the amplifier built into it. This means it will require its own AC power source. In sound systems for live performances as well as for home theatre set up, it is likely that the subwoofer will be active.

What is a Crossover?

When purchasing a subwoofer, you may read about a component called the crossover. The crossover is not concerned with speakers and sound distribution, but it is the circuit that decides what frequencies are routed to the subwoofer. Typically, frequencies between 80 to 100hz are sent to the subwoofers, with higher frequencies being sent to the rest of the speaker system.


Types of Subwoofers

Ported Subwoofers

When choosing a subwoofer, you may see many advertised as ported. This means that they have an extra hole, or port, that allows air to escape, often through a tube. It can really boost the bass level of the subwoofer.

The reason for this is that the extra escaping air also contains bass frequencies that would not often have an escape route. As such, you may hear these speakers referred to as ‘bass reflex’ speakers. They give a thick, rich bass sound. 

Sealed Cabinet

A unit without a port or passive radiator is a sealed cabinet. In this model, the bass only has one route to leave the cabinet. What may be lost in depth is compensated for in a more well-rounded sound, with fewer peaks and booms. 

Passive Radiator

Some subwoofers take the idea of a ported speaker one step further with a passive radiator design. They replace the port with two passive radiators that are not wired to the amp. Their movement allows sound to escape the speaker in a similar way to a port but with a much greater range of frequencies. 

This type of design allows for a big, wide-ranging sound in some fairly small speakers sets. They are great for people who want car audio with huge bass frequencies.

Subwoofers with passive radiators are very common in most Bluetooth speakers. By adding a passive radiator, you could get decent low-frequency rage even with small woofers, making it practical to design small cabinets that deliver big sound.  

Front and Down Firing Types of Subwoofers

Front and down-firing refer to the placement of the internal speakers within the subwoofer unit. Front-firing models will often have a speaker pointed forward. Sound will radiate to the front and sides of the unit.

Downward facing points the sound toward the front and ground. This is useful if speakers are raised on stands or placed on shelving.

Bandpass Subwoofers

These subwoofers are a more complex design and allow for clean, natural bass output within given frequency ranges. They allow you to specify the levels of bass you want to come through the speakers with great precision. 

Bandpass speakers have two chambers that are separated. Usually, only one part of the divide will have a port that releases any radiation from the front cone. 

This type of design is commonly used in professional live sound equipment such as line array systems used in large arenas. It is also frequently used in subwoofers cabinets designed for car audio.

Horn Loaded Subwoofer

Horn-loaded speakers tend to sound louder than their counterparts. Their sound is also more directional in the higher frequency bands. They do this by focusing sound that would otherwise have leaked and spread out in various directions, and channeling it through a longhorn speaker. 

For this reason, they are typically used in large venues where sound needs to go further and aim more precisely. They can often be found in quite small, compact sizes despite the range of equipment and sophistication required within. 


Choosing a Car Subwoofer

As well as the variations of subwoofers, special considerations must be given if you are choosing types of subwoofers for cars. Cars are small areas with strange internal shapes and have the addition of engine and road noise to contend with. Consider the placement and type of subwoofer before making a purchase.

For this reason, powered active units tend to work better in automobiles. This is because they allow more control and power, essential when on the road.

Car subwoofers tend to come in 8 and 10-inch models. A bigger speaker is not necessarily better, as it will distort in the shell of a small car. 10-inch subwoofers should be reserved for larger, family cars. 

Placement of Car Subwoofers

Again, this comes down to the size and model of the car. The two options are generally under-seat models and trunk placements. Both have some individual traits.
Placing the subwoofer under a seat will allow you more control and clarity of sound.

However, for anyone with passengers or a child in the back, bass pumping under your seat can be a little annoying. The trunk negates this, but you may lose some of the clarity if you are looking to purchase speakers that are clear.


Combining it with Other Speakers

Once you have the types of subwoofers narrowed down, all you need to do is combine it with the other parts of your sound system. If you need more advice and help with choosing the correct system, visit our blog at Virtuoso Central. We have lots of articles on everything you will need to purchase, pick, and place your ideal speaker set up.

Balanced vs. Unbalanced Cables – Everything you Need to Know

There are two types of audio connections used in the studio and live sound applications, balanced and unbalanced. So, what’s the difference between balanced vs. unbalanced cables? How do they work? Which one is better for audio applications? These and other questions will be addressed in today’s post.

In some cases, they are referred to as symmetrical and asymmetrical cables. When it comes to terminology, it’s easy to get confused when different sites use different words, but basically balanced refers to symmetrical cables and unbalanced refers to asymmetrical cables.

The words are used interchangeably based on who is talking about them. We’re going to stick with balanced and unbalanced throughout this article to keep things simple.

Let’s take a closer look at each individually, and then we’ll look at the differences to decide which is the best choice for your situation.


Balanced Connections

What are balanced cables?

Balanced cables have three conductors inside, one positive, one negative, and one ground conductor used for shielding.

The positive carries the original signal, and the negative carries an inverted copy of the signal that is 180° out of phase. The ground doesn’t have any signal; it is just used for shielding to protect the cable from external interference. 

Balanced cables help stop noise issues that can occur from external interference. These cables help transmit the audio signal from one spot to another, delivering a better quality signal.

How do balanced cables work?

It’s kind of neat how it works. Because there’s a good chance for interference to get into the signal, there is a process that it goes through to fix the issue. The catch is that it can’t do it on a single conductor because it wouldn’t work.

So, what it does instead is via a separate copper wire by sending the signal in differential mode. This basically takes the original signal, makes an inverted copy of it, and sends both signals on separate conductors.

As the cable gets to the other end, one of the signals is phased (inverted again), and both are summed, reinforcing each other and canceling out any picked up noise on the way.

This process “balances” the signal and makes the interference or noise less noticeable. But there’s something else worth noting. Both the transmitting and the receiving end need to be equipped for this. Pretty cool, right?

In case one side is not equipped with a balanced connection, you would have to convert it. To convert an unbalanced signal into balanced, you would need a DI Box, also called a direct box.

Balanced Cables Help Reduce Noise, Especially in Long Cable Runs

With super long cable runs, there is a good chance that the signal can pick up noise and interference because the cable itself acts as an antenna. By using a three-conductor balanced cable with twisted pairs to send the signal, you can significantly reduce interference and noise.


Types of Balanced Cable Connectors

XLR: The XLR connector comes in two forms, male and female. It is a 3-prong connector that has a circular shape at the end and is usually used by most professional audio equipment and microphones. When talking about balanced cables, these are the connectors most would think of.

TRS: Think of the plug end of your headphones that you plug into your equipment. This is a TRS connector. It’s also sometimes referred to as a jack plug. TRS stands for tip, ring, sleeve. The tip (T) is sometimes called the hot end (positive – red cable), and that’s where your signal is carried. The ring (R) is the negative – black cable carrying the inverted signal, and the sleeve (S) is the grounding or shielding conductor.

Difference Between TS and TRS Cables

Take a closer look at your jack plug. Does it have one ring or two? A TS cable will have one ring, where a TRS cable will have two rings. These rings are conductors for the signal. The TS cable has a positive and ground conductor. In contrast, the TRS has both a positive, a negative, and a ground conductor for shielding.


Unbalanced Cables

What is an unbalanced connection?

An unbalanced connection only uses two conductors, a positive and a grounding conductor.

Unbalanced cables and connections have to do with passing the audio signal straight through to the other piece of equipment, such as a mixer, without the benefit of balancing. That means it doesn’t change or manipulate the signal to adjust it.

How do unbalanced cables work?

Unbalanced cables are straightforward in design because they only have two conductors, one positive that carries the signal, and a ground that is used as a shield.

They send the signal from point A to point B, but as the signal travels through the conductor, interference, and noise is usually picked up. The reason is that the conductor itself acts as an antenna. This is the main disadvantage of using unbalanced cables.  

Although electronic equipment have filters at the input to get rid of unwanted noise, sometimes it can slip through. When it’s amplified, the noise will be noticeable and can distort the sound.

This is why it’s recommended that unbalanced cables only be used in shorter distances.

Unbalanced Cables Tend to Introduce More Noise to The Signal Than Balanced Ones.

Because interference comes from outside of the cable, and there isn’t a way to invert the signal on that third wire like a balanced cable, you tend to pick up more interference and noise, which is why they suggest you limit unbalanced cables to distances under 20 feet.

Types of Unbalanced Cable Connectors

TS: The TS in the TS connector stands for tip and sleeve. It works with two conductors, like the unbalanced wire mentioned above. The long narrow, slender tube portion is for the ground, and the tip that you generally plug in carries the signal.

RCA: This is the plug connector you’re used to seeing with stereo equipment. The RCA connector is sometimes called a phono connector as well. It generally has a little nub at the end that you plug in, and is narrower at the tip than your typical TS connector.


Frequently Asked Questions About Balanced and Unbalanced Cables

When it comes to audio connections and audio quality, which one is better, and why?

Generally, because of the quality of the signal being able to both travel at longer distances and with less distortion, balanced cables are the better choice.

Unbalanced cables have more noise issues and need to be used with shorter distances, which limits their usefulness in many instances.

It comes down to the compatibility of the equipment you’re using. Remember that both the sending and receiving end have to be compatible for it to work properly. Ease of use and the ability to quell excess interference makes balanced cables a win.

While very short unbalanced cables can have a strong signal, because of noise and interference in longer distances, it’s hands down easier to focus on balanced cables.

When it comes to the world of cables and connectors, there are always exceptions. For example, some keyboards only accept a TS connection and tend to use unbalanced cables. Just remember that not everything is an exact science and there will always be exceptions to the rule, but in general, you can trust that balanced cables are your best bet.

How to Connect Unbalanced Cables with Balanced Equipment?

To be able to connect unbalanced cables with equipment that has balanced inputs, you need to convert unbalanced signals into balanced ones.

There are instances where you need to send an unbalanced signal like the one from an electric guitar or electric bass for long runs. In such a case, all you have to do is use a device called DI Box or Direct Box to convert to the right type of connector. Click the link to read about this device as we have dedicated an entire article to explain it.


Final Thoughts

As you have read in the article, it’s recommended to use balanced cables whenever possible as they will deliver a cleaner sound signal.

Of course, there are some exceptions where using an unbalanced cable is more practical, but a good rule of thumb is, if the cable runs are going to be longer than 20 feet, you’ll be better off by using balanced cables.

To convert unbalanced cables into balanced, all you have to do is use a direct box to make the conversion.

  • « Go to Previous Page
  • Page 1
  • Interim pages omitted …
  • Page 6
  • Page 7
  • Page 8
  • Page 9
  • Page 10
  • Interim pages omitted …
  • Page 12
  • Go to Next Page »

Primary Sidebar

Search

Guides & Tutorials

  • Choosing a Portable PA System
  • How to Be a Better Singer
  • Build a Budget Live Streaming System Using PTZ Cameras
  • How to Get the Best Audio Quality on YouYube
  • Setting Up Stage Monitors
  • Mixing Console Basics
  • How to Position PA Speakers
  • Stage Sound System Set-Up
  • How to EQ Live Vocals
  • How to EQ Live Sound
  • Daisy Chain Active Speakers
  • Zoom Audio Settings for Music
  • How to Livestream a Wedding
  • Improve Your Livestream Audio Quality
  • Microphone Preamp Buying Guide

Featured Posts

Treblab X9 Pro: Tough Earbuds, Big Performance

Escape the Noise: Best Affordable Noise-Canceling Headphones

How to Combine Passive and Powered Mixers

What is a Ground Loop? – 5 Simple Ways to Fix the Buzz and Hum

Disclaimer

VirtuosoCentral.com is a participant in the Amazon Services LLC Associates Program, an affiliate advertising program designed to provide a means for sites to earn advertising fees by advertising and linking to Amazon.com.

Home  About  Contact  Disclaimer  Privacy

Copyright © 2019-2025 Virtuoso Central. All Rights Reserved.