This website uses cookies to improve and personalize your visit. Learn more about cookies. Got It

  • Skip to primary navigation
  • Skip to main content
  • Skip to primary sidebar

Virtuoso Central

  • About Us
  • Contact
  • Privacy

Informational

How to Connect a Guitar Amp to a Mixer

If you’re playing a gig on a large venue, arena, outdoor festival, or big stage, you’ll face the need to run your guitar amp through the PA system.

This is so that the guitar can be heard in settings where the amp alone won’t be enough.

It’s no secret; guitar players love their amps, and it’s tough for them to get past using one on a live stage.

Sticking a microphone in front of the speaker’s cone has been the go-to technique for miking a guitar amp. Just shove a mic against the speaker grill, and you’re good to go.

But using amplifier DIs is another way live sound engineers connect the guitar amp to the mixer, and for a good reason.

An amplifier DI, also called direct out, is an essential tool intended to capture the signal coming from the guitar amp before it goes to the speaker, eliminating the need for a microphone.

DIs do a critical job. They convert weak, high impedance signals from a guitar with magnetic pickups to a balanced line-level, low impedance signals that are compatible with your mixer.


Going Direct Vs. Using a Microphone: Which is Better?

As mentioned, there are two ways to connect a guitar amp to a mixer:

Method 1 – Using a microphone connected to the mixer to mic the amp

Method 2 – By using the amplifier’s direct output connection

This article will give you a basic run of each method and help you decide which is best for you, whether you’re a guitarist or a soundman.


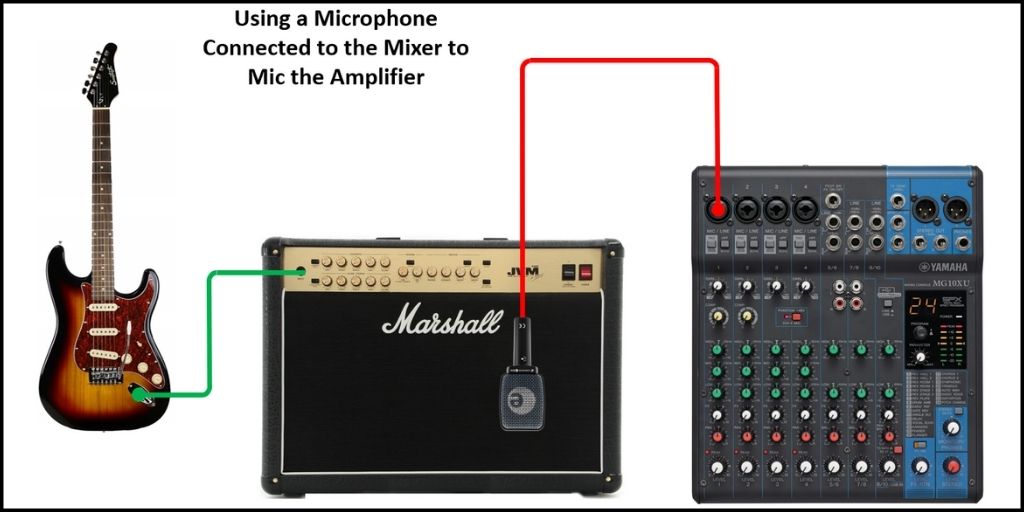
Method 1 – Using a Microphone to Mic the Amp

Placing a mic on the amp is usually the simplest and most reliable way to accommodate every aspect of the guitarist’s setup, from the guitar itself to effects pedals, amp head, and even the cabinet. 

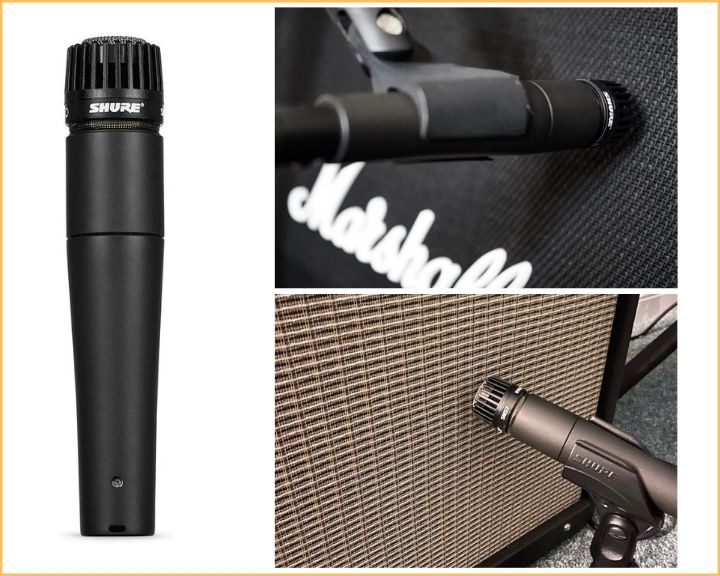
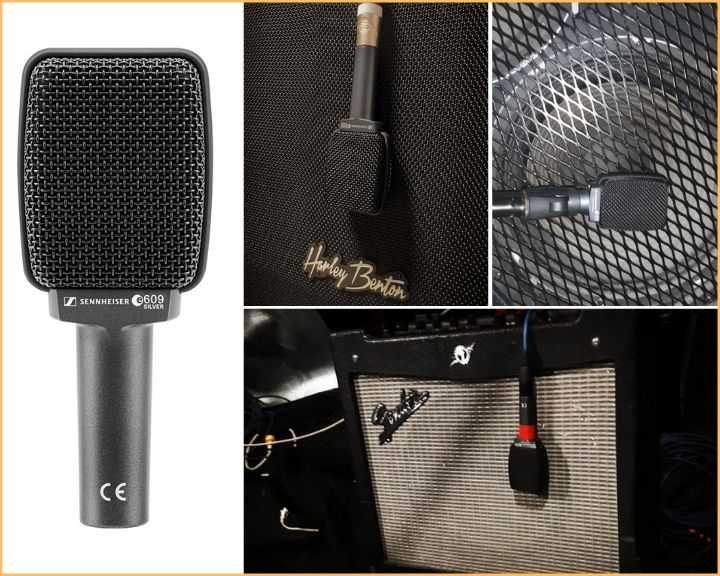
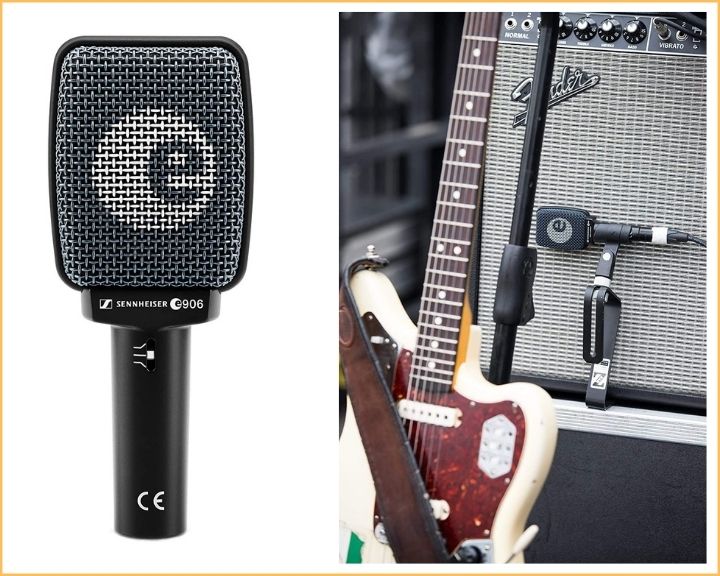
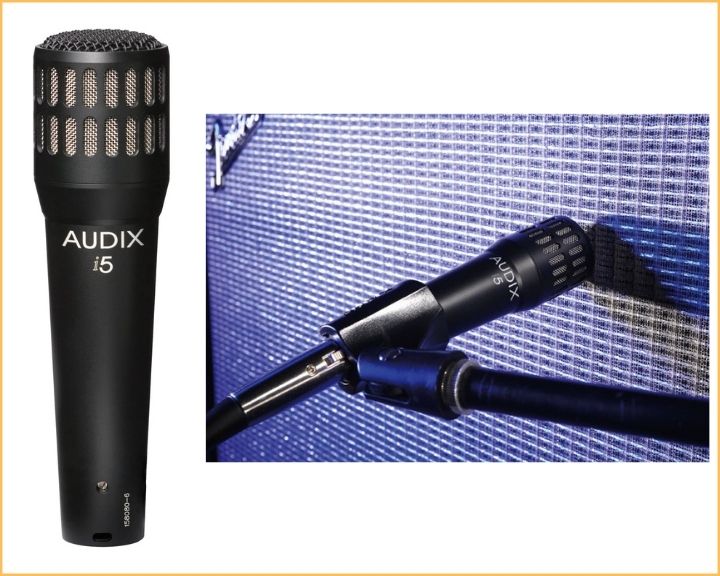
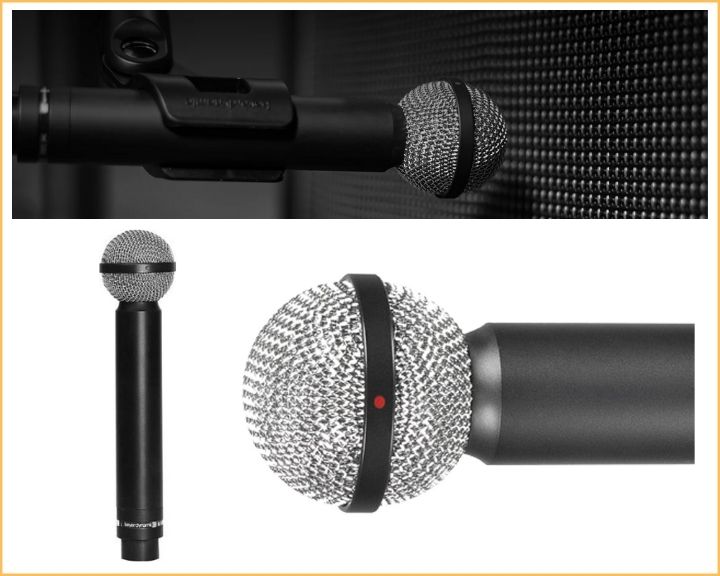
When miking an amp, the most important thing to consider is the type of microphone you’re using. A good cardioid mic is your best bet, and the overall choice for most sound engineers is the Shure SM57.

This excellent mic is hard to beat in sound quality and durability. It captures the full essence of the guitar’s tone and is exceptionally hardy and resistant to weather conditions.

Regarding placement, it should be mounted on a short stand, ensuring that the head of the mic is 1 to 3 inches away from the grill and directly facing the speaker’s cone.

If a mellow tone is what you want to emphasize, with the mid and high frequencies standing out, place the mic’s head at the center of the speaker. To minimize the higher frequencies and get a fatter, warmer tone, place the mic closer to the speaker’s edge.

Another thing to consider is the angle between the mic and the speaker’s cone. To get the right angle, start by placing the mic in front of the speaker at 90 degrees (perpendicular), then slowly angle it towards 45 degrees to locate the sweet spot where the sound is even and smooth.

If you decide to use this method to connect your amp to a mixer, remember that there are several ways to mic a guitar amp. You can do it with one, two, or more microphones, with each technique delivering a different tone.

3 Tips to Consider Before Placing the Mic

If you decide to go with this method to connect a guitar amp to a mixer, there are a few things that you should consider to get the best tone possible. Overlooking these simple tips can greatly impact the sound.

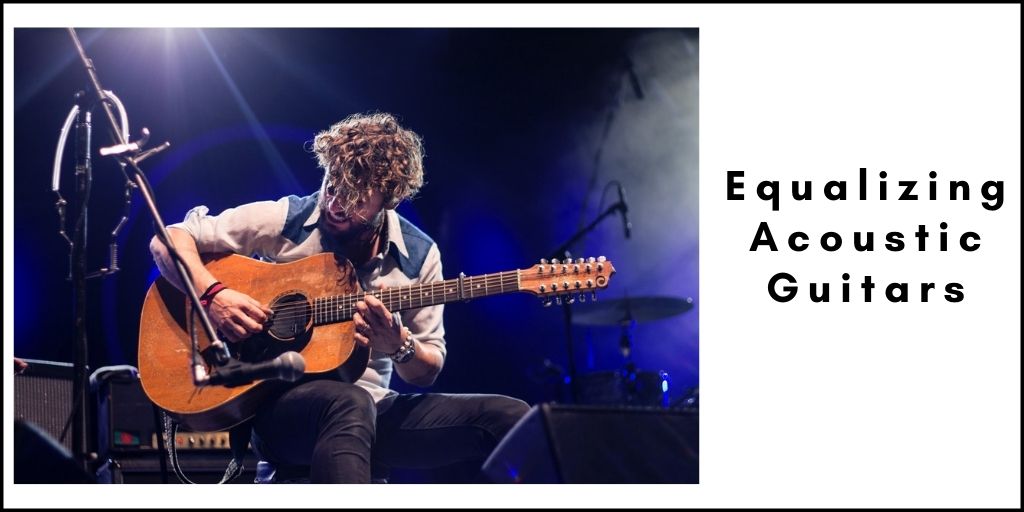
1. Dial the Tone You Want on the Amp First

You should first dial in the EQ on the guitar amp until you get the tone you want before placing a mic in front of the cabinet.

You want to have the guitarist set his preferred EQ so that the sound coming from the amp’s speaker is exactly what he wants to hear. The reason is because trying to fix the sound later on the mixer side will be a problem no matter how well you equalize it.

Remember that when miking anything, you want the source to sound as intended before placing the mic. That way, you avoid many problems when equalizing the guitar amp on the mixer.

The following links provide you with starting EQ settings for your guitar amp for clean sound, rock, blues, and metal. These starting points can get you started, and from there, you can experiment to get the tone you want.

2. Know Where the Speaker is Located on the Cabinet

As you will find out when miking a guitar amp, where you place the mic will significantly affect the sound you get. For this reason, you need to know exactly where the speaker is located in the amplifier or cabinet you’re miking up, so you know where the center and sides are.

In most guitar amps, the speaker is centered in the cabinet. But depending on the amp you’ve got, sometimes it’s hard to tell. It may be off-center, up, or diagonal, so you want to look at it before placing the mic.

With most guitar amps, locating the speaker is simple because there is usually an open grille in the back from where you can identify the speaker’s position.

In other cases, the amp is completely sealed, and the front grille is made from a dense, heavy-duty cloth that makes it hard to see inside.

In such a case, you could use a flashlight like the one on your smartphone to light the grille to see inside. Then you can see the speaker and locate its center.

Another option is to use your fingers to feel the speaker’s edge, helping you figure out where the center is.

Don’t just assume that the speaker is always at the center; spend a minute and make sure you know where it’s located.

3. Watch Out for the Proximity Effect When Placing the Mic

Sometimes it’s easy to forget about the proximity effect that happens when you place a directional microphone up on a sound source, which can significantly change the tone.

The closer the mic gets to the sound source, the more bottom end you’ll get. As you pull the mic back, you’ll get a more balanced even tone. So remember to play with the proximity effect to your advantage to help you get the tone you are looking for.

To read an in-depth explanation of how to mic a guitar amp and get suggestions of the best microphones for miking amps, click the link.

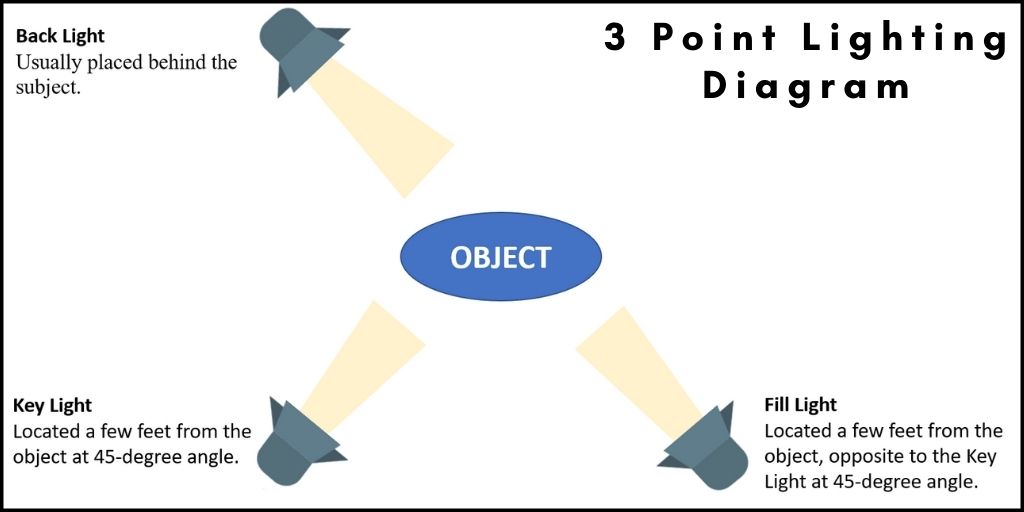
Use the diagram below to help you visualize the connection.

Diagram for connecting a guitar amp to an audio mixer using a microphone.

The bottom line is that by using this method to connect a guitar amp to a mixer, you’ll get the most natural and warm tones a guitar can produce.

This technique also has some disadvantages such as signal bleed from other instruments, but if your goal is to achieve a mellow, balanced front house sound, capture the guitar’s full essence, and take advantage of the main PA system, this is the way to go.


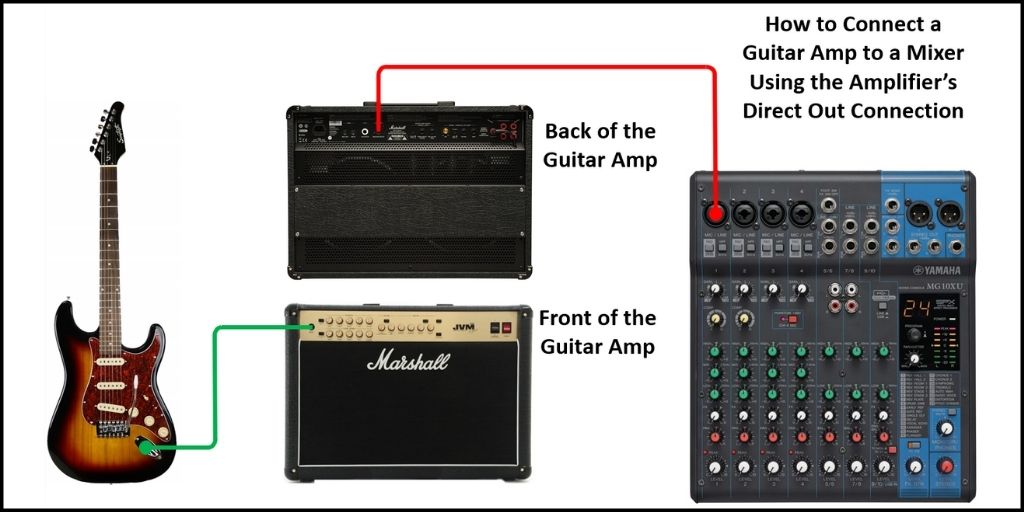
Method 2 – By Using the Amplifier’s Direct Out Connection

Most guitar amps have an XLR or ¼ inch Jack output connector at the back called a direct out. This outputs a line-level signal that can be used to connect the amp to the mixing console or recording device.

The direct output connection sends the signal from the amplifier’s circuitry before it goes to the speaker, meaning the signal fed into the recording device or PA system is the sound produced by the guitar amp itself.

In other words, any tone processed by the guitar amp and pedals is the same one being output at the line level. Any sound you’re making is going to the front-of-house mixing console or recorder.

This means that 100% of the audio signal is transferred when using the amp’s direct-out connection.

The amplifier direct-out connection works in the absence of a microphone.


What does an amplifier DI do?

An amplifier DI allows you to directly connect your instrument to a mixing console, audio interface, or professional recorder, thus bypassing the need for a microphone.

The primary function of the amplifier’s DI is to perform line balancing and impedance matching/bridging.

It converts the unbalanced line output of a guitar or keyboard into a low-level balanced signal to minimize unwanted sound degradation due to interference and hum.


How to Set Up and Use an Amplifier DI with a Mixing Console?

Step 1

To set up and use an amplifier DI to connect it to a mixer, you’ll need an ordinary microphone cable. Identify the XLR output on your amplifier.

Connect the female end of the microphone cable to the XLR output. It’s advisable to do this with the equipment powered down.

The gain on your mixing console should also be turned all the way down and the channel completely muted before you connect.

It’s also advisable to ensure that phantom power on your channel is off. Amplifier DIs don’t need phantom power. In fact, if you’re using an older design DI you could potentially harm the output.

 Step 2

The next step is to identify the XLR input on your mixer. Connect the male end of the mic cable to the XLR input. Keep in mind that you run the risk of overloading the preamp on some mixing consoles by running directly into XLR input.

That’s because some amplifier DIs have high output gain such that even with the gain on the mixer side all the way down, you still have too much signal coming in.

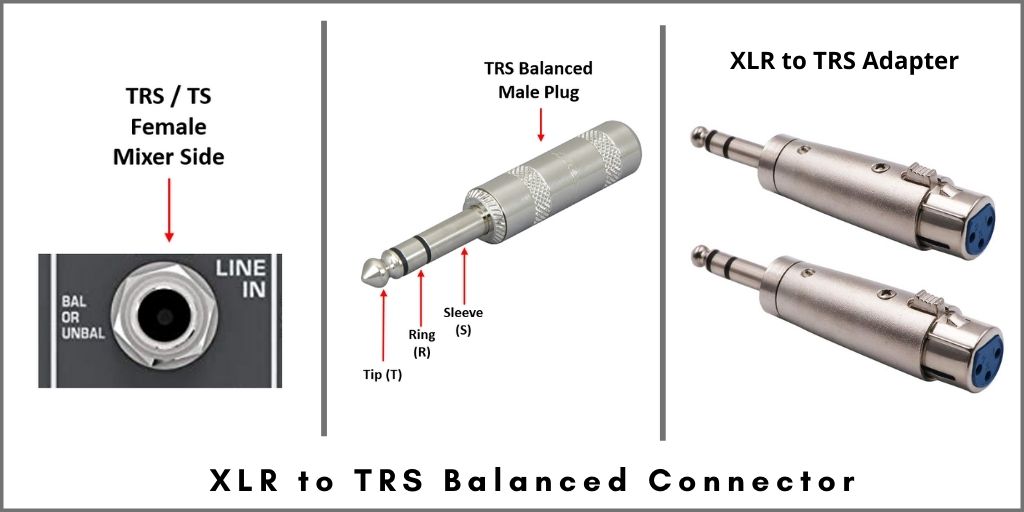
If this is the case with your console, it’s advisable to use a female XLR-TRS sleeve adapter like the one shown in the image below.

The adapter converts the XLR connector to a ¼ inch TRS (Tip, Ring, Sleeve) balanced connector to maintain the balanced line-level signal but with another type of connector with higher input impedance.

Using a TRS plug allows you to safely connect to the ¼ inch input on your mixing console. The result is balanced sound and better audio simply because you’ll be bypassing the microphone preamp, which in most cases can add unwanted sound coloration.

XLR to TRS Balanced Connector

Step 3

The final step is connecting your instrument to the amp. Again, be sure that the channel’s volume is turned all the way down to avoid sudden noise transients. 

Now, turn up the guitar’s amp volume and ensure that there’s sound coming from the amplifier.

If the amp has a master volume, in some cases, you have to turn it up as well so that a signal comes out of the DI. This is because some master volumes are positioned before the DIs. If no sound is coming from the amp, there will be no sound going to the DI.

Next, play your guitar and slowly turn up the master volume to confirm that all the connections are working well.

Check out the diagram below which shows the connections you need to do to connect a guitar amp to the mixing console using the direct output feature.

This image is a diagram that shows how to connect a guitar amp to a mixer using the amps direct out connection

Mixer Gain Setting Procedure

  1. Press the solo/PFL button. The solo light will blink to show you that you’re in mixer gain setting mode.
  2. Next, adjust the trim/gain level to around 9/10 o’clock, then play your guitar. If it’s too loud, keep changing the gain until you find the ideal sound level for your instrument. This will vary from one guitar to another.

You’ll find that running directly into the XLR or microphone output will need a relatively low gain setting; otherwise, you risk overloading the mixer’s input.

Advantages of Using Amplifier DIs

  1. It saves you money because you won’t need to buy a separate DI box
  2. Simple and quick setup. All you need is a single XLR or microphone cable. Plug it in, and you’re good to go. The more the wires, the more the connections you need to make, and the more things can go wrong.

Disadvantages of Amplifier DIs

  1. You risk overloading the input of some mixing consoles. This is often the case with cheaper entry model mixers. To fix this issue, you need to run an XLR-TRS adapter into your mixer’s line level.
  2. Because amplifier DIs are added as a secondary feature of the amp, they tend to be of lower-quality, unlike external, professional DI boxes.
  3. You won’t get the same tone as if you use a mic to pick up the amp’s sound.

The Best Way to Connect an Electric Guitar to a Mixer

Using an amplifier DI or an external DI box to connect your electric guitar to the mixer is quite frankly the easiest and cleanest way to get sound. Simply plug it in, and you’re set.

You don’t have to worry about signal bleed or degradation from poor miking techniques or someone walking by and knocking off the mic stand. You also don’t have to worry about the mic coloring and changing your sound.

Although a DI is the cleanest and most straightforward, it’s not necessarily the best for connecting electric guitars to an audio console. You’d honestly be giving up all the warm tones a guitar can produce.

Electric guitars tend to sound thin, plucky, and unnatural when connected directly to the mixer using an external DI box or the amp’s DI.

Just know that the guitar’s electronics, including its coil microphones, don’t capture the authentic sound we’re used to hearing from the instrument. This is because as the speaker inside the amp vibrates to generate the sound, the guitar’s tone is developed as it travels through the air.

If you are looking for a warm, natural tone, miking your amp is the way to go. This is not to say that going direct isn’t ideal in some cases, though. It all depends on your setup and what you are trying to accomplish.


Bottom Line

Above all else, the most important thing is to play and record your guitar in a way that doesn’t undermine your creative flow. There are no hard and fast rules when choosing to either go direct or with a microphone.

Every guitar player has different needs, so take your time to experiment with both and see what works for you.

How to Mic a Guitar Amp for Live Sound

If you’re a guitar player, ever since you held your first guitar, you’ve been on the seemingly never-ending search for the BEST possible tone.

Yet every time you think you’ve nailed the perfect tone on the guitar amp, it doesn’t sound as good when playing on a live stage, and the main reason is because the amp is not being miked and equalized correctly.

It’s no secret that having the best possible sound is the most critical part of the show, and one thing that can help you achieve that is knowing how to mic a guitar amp.

If you want the quick, short answer on how to mic a guitar amp, here it is… use a microphone such as the Shure SM57, place it on a short stand and make sure the mic’s head is one to three inches away from the grill and pointing directly to the speaker. If you want a mellow tone that emphasizes the mid and high frequencies, place the mic’s head at the center of the speaker. To minimize the higher frequencies and get a deeper, fatter, warmer tone, place the mic closer to the speaker’s edge.

For a more in-depth explanation, keep reading today’s article, as we’ll cover this topic in more detail. Let’s get started.


Why Do You Mic a Guitar Amp?

There are several reasons why you would want to mic your guitar amp. The biggest and most important reason is to achieve a mellow, balanced front house sound, capture the guitar’s full essence, and take advantage of the main PA system.

However, to dial in the best sound, it’s essential to use the right microphone, know how best to position it, and equalize it correctly.

Back in the day, guitar players and sound engineers would spend hours identifying the correct amp settings, getting the right microphones, and positioning them correctly. All this was done in a bid to produce good quality sound for that perfect performance.

Players should, however, understand that there’s no single surefire way to mic a guitar amp and that the sound output has to enhance the performance and not the other way round.

Today’s mics are designed in such a way that they can capture sound in every detail. The human ear can hear frequencies ranging from 20Hz to 20kHz. A good mic should capture the full spectrum of a guitar to produce the best desirable sound for the listeners.

Let’s look at the different factors you need to consider to achieve your guitar’s full potential.


What Type of Microphone Delivers the Best Sound When Miking a Guitar Amp

We could go on and on about choosing the right microphone, but before we talk about which type might be better than the other, we have to get familiar with them.

The key thing to understand is that not all microphones are created equal. Each one has its advantages and disadvantages depending on the transducer that’s inside of it. The way the transducer works will tell you more about the type of mic you’re using.

When a microphone’s transducer is designed, it has specific patterns that dictate from which direction it captures or rejects sound.

These pickup patterns are called polar patterns, and there are several of them, but the most commonly used are cardioid, supercardioid, and hypercardioid. To learn more about the different microphone polar patterns click the link.

Now let’s delve deeper into how the three most popular types of mics, namely dynamic, condenser, and ribbon, can be used to mic a guitar amp.

Dynamic Microphones

Dynamic microphones are very common, and most of them have a cardioid polar pattern, which means they are unidirectional. They only capture sound directly in front of them and reject noises from the sides and rear.

This characteristic makes them the most viable solution for live gigs where all sorts of unwanted noises can bleed into the main mix messing up the performance.

Out of the three types of mics, dynamic mics are the most recommended for use when miking guitar amps.

They are not particularly sensitive to loud sounds and can handle the sound coming out of a guitar or bass amp.

They’re also extremely durable and can handle drops and bumps, unlike condenser or ribbon mics.

The best part is that they are very affordable and sound really good, which is definitely a plus.

Condenser Microphones

Condenser microphones are very sensitive to sound and are characterized for picking up the most subtle nuances in sound.

They are available in more polar patterns and can pick up very high frequencies, producing crisp, clear sound. This is why they are generally used in recording studios or controlled environments.

The first thing to understand about condenser microphones is that they can be used to record guitar amps, but feedback is a big issue in live situations where the signal has to be monitored and played back.

They are also more sensitive to loud sounds, so you’ll need to be careful with your guitar amp volume.

Extremely loud situations can potentially cause damage to the membrane, and you don’t want that to happen.

Generally speaking, condenser mics are more sophisticated than dynamic mics, and for that reason, they tend to be more expensive.

Ribbon Microphones

Of the three mics, ribbon microphones can produce warm, organic, and vintage sound.

They are the most fragile mics around, so you’ll need to be extremely careful when handling them.

They have a figure-8 polar pattern, which means they are very sensitive to sound from the front and back but completely deaf to sound from the sides.

However, the biggest downside to ribbon mics is that they can’t easily isolate the source of your sound. This is not ideal in live sound situations or untreated rooms with all sorts of bouncing frequencies.

That said, pairing up a ribbon microphone with a dynamic microphone is the best way to capture the sound from your guitar amp, as they will deliver the classic, 60’s, and 70’s era vintage guitar sound.


When to Use Each Type of Microphone

Generally speaking, dynamic and some ribbon microphones are excellent for miking up guitar amps during live performance. At the same time, condenser mics tend to deliver better results in recording studios and controlled environments.

Keep in mind that condenser mics will also deliver a bright, crisp sound that is not typical in electric guitar. This is why they are often used for miking acoustic guitars with metal strings, as their sound is much brighter than the electric guitar.

Similarly, dynamic and ribbon microphones can be paired with loud instruments with mid to low frequencies, while condenser microphones work better with quieter instruments with higher frequencies.

This isn’t a static rule though, in the end, your personal taste will be the determining factor.

In some cases, you could mix and match microphones to get the perfect sound when miking guitar amps for live sound.


Best Position for Placing the Mic

Here comes the most critical part – how best to position a microphone in front of the amp.

This is very important because the sonic output directly relates to where you place the mic in relation to the amp’s speaker.

There are two things to consider in this scenario: distance and angle at which the mic will face the amp.

1.      Distance Between The Mic and Speaker’s Cone

This may come as a surprise, but even an inch difference in distance can significantly impact the tone produced.

The most recommended place to put the mic is directly in front of the speaker’s cone. That’s because this position gives you the most vivid representation of the guitar amp’s tone.

But the most confusing part is which part of the speaker’s cone the mic should face. The answer isn’t as straightforward, and here’s the reason.

The closer you move the center of the speaker’s cone, the more high ends and high mids you’ll get in the guitar’s tone.

The more you move away from the center of the speaker’s cone, the more bottom ends and lower mids you’ll get. And if you place the mic at either edge of the speaker cone, it will pick up a muffled and bassy tone.

If you have two mics, you can place them in two different positions to get a more rounded tone. This works perfectly well if there’s only one guitar player in the band.

If you have a dynamic mic, it’s recommended to position it one to three inches away from the speaker’s cone. If you place it too far, you may get a sound that’s “distant,” and the mic might even pick up other background noises that you don’t want.

If you have a condenser mic, you should put it further away from the grill, mostly because it is more sensitive and you want to avoid distortion. Ideally, you should place it about two to six inches away from the speaker’s cone for you to get the right tone.

I would recommend having both the condenser and dynamic microphones for that fuller, warmer sound, or a combination of a ribbon and a dynamic mic for a vintage mellow sound.

2.      Angle Between The Mic and Speaker’s Cone

Aside from distance, the angle at which the mic faces the speaker also has an effect on tone. If you position your mic directly in front of the amp’s speaker (perpendicular) and notice that the tone is a bit harsh, then the mic is picking up too many higher-ends and higher-mids.

Positioning the mic at an angle from the cone of the speaker can help correct that. All you have to do is move the mic closer to the edge of the speaker.

To do this, start by placing your mic directly in front of the speaker’s cone (at 90 degrees) then slowly angle it (towards 45 degrees) until you find that ‘’sweet spot’’ where the tone is smooth and even.

As you move outside the 90-degree angle, you’ll start to notice a slight drop in the high-ends. The bottom-ends are not affected by changing the angle of the mic.

As mentioned earlier, if you want that muddy tone, you’ll need to move the mic further away from the center of the speaker’s cone.


Best Microphones for Miking Guitar Amps for Live Sound

The are several microphones that are excellent for miking guitar amplifiers for live sound, but the top five are:

  1. Shure SM57 – Budget-friendly option delivering balanced tone accentuating high frequencies
  2. Sennheiser e609 Silver – Easy to install, balanced sound, budget-friendly
  3. Sennheiser e906 – Great overall tone offering a three-position switchable presence filter
  4. The Audix i5 – Designed for instruments delivering an accurate sound reproduction
  5. Beyerdynamic M160 – Overall winner. It delivers excellent bass response, warm mid-ranges, and silky-smooth highs combined to produce a unique vintage sound.

The Shure SM57

The industry standard and the most recommended mic to use is the Shure SM57. It’s the most popular choice by far for live sound, and there is a good reason for that.

It has an impressive frequency response of 40 Hz to 15,000 HZ and fully captures the essence of the guitar’s tones for the best possible sound.

From guitar, drums, and bass to vocals and even saxophones, this microphone can be used to mike practically everything.

With regards to durability, it is incredibly hardy and can take quite a beating. It is also resistant to weather conditions.

It has a cardioid polar pattern, which means it picks up sound that’s directly in front of it and rejects unwanted noises coming from the sides and rear.

Check Price on Amazon

Sennheiser e609 Silver

As one of the leading microphone manufacturers, Sennheiser offers a couple of excellent options that are tailored for miking guitar amps, with the e609 being an affordable option that delivers outstanding results.

The e609 Silver is a dynamic mic with a supercardioid polar pattern, which means that it has a tighter pickup angle than cardioids doing a better job at rejecting sound from the sides.

The frequency response goes from 40 Hz – 15,000 Hz, and it offers a relatively flat response curve between 100 Hz to 1500 Hz with a -10 dB boost between 1500 Hz to 4500 Hz.

In simpler terms, what this means is that it will pick up the sound as accurate as it sounds on the amp, with a slight boost on the lower-high frequencies. The sound captured by this mic is true to the original sound.

Other features worth mentioning are: it comes with a rugged metal body with an advanced shock-mount design for the transducer to minimize handling noise and a hum compensating coil to reduce noise in the audio signal.

Another cool design feature of this microphone is that you can hang it on the guitar amp for stand-free performance.

Check Price on Amazon

Sennheiser e906

The e906 is a step up from the e609 Silver. This dynamic, supercardioid mic was specially designed for miking guitar amplifiers.

It features a full sound response and swift attack with a flat-shaped head, making it ideal for miking amp faces with an extra-resistant reinforced metal body to ensure durability for years to come.

With its three-position switchable presence filter, you can quickly change the pickup characteristics between bright, moderate, or dark tone.

Just as with the e609, this mic can hang on the guitar amp, so you won’t need a stand to use it.

Its frequency response is between 40 Hz – 18,000 Hz. The response curve is relatively flat between 200 Hz and 2500 Hz. Depending on the presence filter selection, you can boost or decrease frequencies between 1500 Hz and 6000 Hz.

What I am trying to say is that with this mic, you’ll get a more natural, authentic sound when miking your guitar amp. But, if you feel that you need a small boost or decrease in the lower high frequencies, all you have to do is change the switch position, and there will be a small frequency correction to deliver a tone that suits your needs.

Check Price on Amazon

The Audix i5

The Audix i5 is a dynamic instrument microphone designed and built in the USA with the highest quality control standards. It is specifically tailored to be used for stage and studio applications.

Thanks to its cardioid pickup pattern, it helps reject feedback providing you with more isolation control.

When it comes to accurate sound reproduction, the i5 excels because it is equipped with a very low mass diaphragm, translating into a more natural sound reproduction.

Its comprehensive frequency response ranges from 50 Hz to 16,000 Hz, providing crisp, clear, natural tones that don’t require much equalization.

Positioning this microphone is very easy thanks to its small, compact size. Compared to the Sennheiser models, the only drawback is that it needs a small stand to place its head in front of the speaker cabinet.

Another great thing about the i5 is the durability. It is manufactured with a precision cast zinc alloy body, dent-resistant steel grill, durable black E-coat finish, and gold plated XLR connector

Check Price on Amazon

Beyerdynamic M160

The M160 from Beyerdynamic is an excellent ribbon microphone. It was designed considering all the drawbacks of a regular ribbon mic and improved every detail to deliver the best natural true-tone of what is placed in front of it.

It is a dynamic, hypercardioid microphone, and it comes with two pure aluminum ribbons diaphragms installed inside the capsule!

One of the drawbacks of ribbon mics is that they have a figure 8 pickup pattern, which tends to be a problem when miking instruments in live events, as they pickup sound from the front and back.

This is not the case with the M160. It offers a very tight hypercardioid pickup angle, which makes it a must-use microphone if you want to get classic vintage sound when miking guitar amps without the drawbacks of regular ribbon mics.

One of the best features of this mic is its characteristically warm and natural sound. It will be hard to find another mic in this price range that delivers such a warm and mellow sound. It provides an excellent bass response, warm mid-ranges, and silky-smooth highs combined to produce an exceptional vintage sound.

The frequency response is between 40 Hz – 18,000 Hz, and its response curve is as flat as it can get between 100 Hz and 2000 Hz. From 2000 Hz to 8000 Hz, there is only a boost of 2 dB, making this mic a perfect option to mic a guitar amp for live sound or in a recording studio.

Sound Sample

Check Price on Amazon

In Short

  • If you want a deeper, fatter sound, position the microphone towards the edge of the speaker. If the sound gets too bassy, slightly move it towards the center of the speaker cone.
  • Instead, if a warmer smoother sound is what you are looking for, position the microphone at the center of the cone to emphasize the mid and high frequencies.
  • Make sure the mic’s head is pointing straight to the speaker. In other words, it needs to be perpendicular to the protective grill. If you want to test different sound variations, Begin with the mic pointed at a 90-degree angle towards the speaker’s cone, and slowly  change the angle until you find that ‘’sweet spot.’’

I usually say there’s no right or wrong method, experiment until you find what works for you. Have fun while at it!

How to Livestream a Wedding

More than 2 million couples get married every year in the United States. These are joyous occasions and are the perfect time to celebrate with your nearest and dearest.

And boy, do they love to show their affection! In fact, on average, wedding guests spend over $800 per wedding on travel, accommodation, gifting, and clothes! 

In the past year, though, we have unfortunately seen fewer people traveling safely to celebrate weddings together due to the global COVID-19 pandemic.

Thankfully, it is still possible to share your special day with the ones you love and keep a recording for yourself! Want to know more?

Then you’re in the right place! Read on to find out everything you need to know about how to livestream a wedding.


What is Livestreaming and Why Use It? 

Livestreaming allows you to share videos in real-time. This is a bit like watching live TV programs. 

There are many benefits to watching a wedding on a livestream, especially when people’s travel options are limited. This means you can share your special day anywhere in the world, so you can even expand your guest list! 

It is also possible to record a livestream, meaning that you can record the wedding event to enjoy in the future, as well as sharing it on your big day.

With that in mind, let’s take a look at some of our top tips for livestreaming a wedding.


Three Methods You can Use to Livestream a Wedding

Depending on your budget and how professional you want the livestream to be, there are three options you can choose from.

  • Building a Pro live video streaming setup
  • Using your phone or table
  • Hiring a professional videographer

Suppose you are tech-savvy and can handle dealing with several audio and video equipment. In that case, you can opt for a pro setup that will provide the best DIY results, and it doesn’t have to cost thousands of dollars. Plus, you can also use the system for any future event you decide to livestream

Instead, if you choose a more straightforward method, you don’t need a lot of equipment to stream your wedding. In fact, you can do it directly from your smartphone. However, professional equipment will produce a better image and audio quality. 

Some people also choose to hire a professional videographer when filming a wedding live. This guarantees a good quality stream, and they may even be able to provide their recording equipment. It also means that your friends and family at the wedding will be free to enjoy the day without distractions. 

One thing to keep in mind is that this tutorial article assumes that you have a photographer in charge of taking pictures. This post only explains methods for livestreaming the event.


This is What You’ll Need Depending on the Method You Choose

DIY Professional Live Video Streaming Setup

With a professional DIY method, you will need several pieces of audio and video equipment. This setup will deliver the best quality and will be the most flexible.

One of the main objectives is to provide the best possible experience to the viewers that could not make it to the event.

The good thing about this setup is that you will have a wireless transmitter and receiver to connect the DSLR camera. That will give you the freedom to walk around the venue without having cables hanging around.

Cables are necessary, but they are annoying, plus they are tripping hazards that you don’t want to deal with.

To pull this off using this method, you need at least two people. One to be the cameraman to walk around and get all the video shots, and the other person to take care and monitor the livestream.

These are the equipment you’ll need for this setup. I provide links to Amazon if you want to check them out. I’ll also include a diagram to show you how to set them up.

This is the gear you’ll need: 

  • DSLR camera with HDMI output.
  • 512 Gb micro SD card for the camera to record a backup on the camera at 1080p. If you decide to shoot at 4k you would need one 512Gb memory card for every 1.5 hours of recorded video – The recommended one is the SanDisk 512GB Extreme micro SDXC as it writes data at speeds of up to 90MB/s. Make sure that the camera you are planning to use is capable of reaching such speeds.
  • 3-Axis Gimbal Stabilizer for Cameras – the recommended stabilizer is the  Zhiyun Weebill S.
  • A shotgun microphone for the camera that way it can pick up high definition sound.
  • Hollyland Mars 300 5G Wireless HDMI Video Transmission System. The transmitter connects to the camera, and the receiver connects to the video capture card or switcher.
  • To power the transmitter unit, you need the Sony NP-F style batteries – the recommended one is the NP-F550 RAVPower battery charger with the battery pack. The receiver unit can be powered by the included AC adapter or, if you prefer, by the same battery type.
  • A Replacement battery kit for the camera. RAVPower makes some of the best replacement battery packs for the different camera brands. Make sure to get one that is compatible with your camera.
  • Short 0.5 ft or 1ft HDMI cables for the connections, you’ll need at least two – The recommended one is the Monoprice HDMI cable. Choose from 0.5 or 1 ft cable.
  • Video capture card – The recommended one is ElGato Cam Link 4K. It can broadcast live via DSLR, camcorder, or Action Cam. The resolution is  1080p at 60 fps or 4k at 30 fps. It connects to the computer via USB 3.0 for a faster transfer rate. For compatibility issues with the specific camera you want to use, check here.
  • A portable computer with the following specs:
    • Processor – you’ll want the fastest processor you can have access to. The minimum I recommend is the Intel i5 processor.
    • RAM memory – no less than 8Gb. The more, the better.
    • Storage – a solid-state drive (SSD) with no less than 500Gb free if you plan to record the stream on the computer, which I highly recommend to have more redundancy.
    • Operating system – I recommend a 64-bit OS.
    • Ports – you’ll need to make sure that the computer you chose has enough ports as well as the type of ports you’ll need. It needs to have a minimum of two USB 3.0 ports. If it has more, it’s better because you’ll have more flexibility.
  • A strong internet connection and a backup if possible.

Steps to Follow for Setting Up a Professional DIY Livestream

Use the diagram below for your reference.

Camera Side Setup

  1. Make sure to charge all the batteries you need. This includes the replacement batteries for your camera and wireless devices. My recommendation is to always have as many batteries as possible because the last thing you want is to run out of power when you need it the most.
  2. Install the memory card of the DSLR camera. The micro SD card needs to be empty and formatted by the device. When dealing with memory cards, one crucial piece of advice is not to use cheap, after-market brands because it will be a disaster waiting to happen. Memory cards from known brands are expensive for a reason; they are reliable. Another piece of advice is to have backup memory cards just in case you run out of space.
  3. It’s time to install a shogun microphone to the camera. I recommend these types of mics because you want the audio quality to be as good as the video you’re shooting, as it is 50% of the experience. Selecting the right mic for your camera will depend on your budget and quality. Here a list of the top 5 mics for DSLR cameras; click the link to check it out.
  4. Install the camera in the gimbal stabilizer. If you don’t know how to use the Zhiyun Weebill S stabilizer, you can watch a tutorial on YouTube. A stabilizer is a must tool to get professional-looking video shots. There won’t be any bumps in the video with this tool, and your audience will thank you for that.
  5. Connect the Hollyland Mars 300 transmitter to the camera. Use a short HDMI flexible cable to connect the HDMI Out from the camera to the Transmitter’s HDMI Input. The unit is compact and lightweight, and it should be easy to clip it to the side of the camera or on the gimbal itself. It comes with a shoe mount adapter to secure it to the camera.

Now is time to set up the system on the computer side. This is where you’ll receive the camera’s signal and connect it to the computer to stream it.

Computer Side Setup

  1. Connect the Hollyland Mars 300 receiver to the AC power adapter.
  2. Use a short, flexible HDMI cable to connect the receiver unit to the ElGato video capture card.
  3. Connect the video capture card to an available USB port. I recommend using a USB 3.0 port for better transfer speeds. The ElGato Cam Link 4K is a plug-and-play device, so you don’t need to install any drivers for it to work.
  4. Download and install El Gato’s “4K CAPTURE UTILITY” For Windows or MAC, here is the link. In the “Select Your Product” drop-down menu, choose “CAM LINK 4K.” In the “Select Your System” drop-down menu, select your operating system.
  5. This program will record on your hard drive everything that is being streamed. My recommendation is not to skip this step because if the internet connection fails during the ceremony, you can still upload it later for people to watch. Plus, it will give you an extra layer of redundancy if the memory card on the DSLR camera fails.
  6. Open the streaming platform you want to use, whether Facebook Live, YouTube, Zoom, or any streaming platform. If you have a reliable internet connection with enough bandwidth, you can even livestream the wedding to multiple platforms.
  7. Go into the streaming platform settings and click on “Video” to select the ElGato capture card as your video source. Make sure also to select “HD” or the highest quality possible for your stream. Just make sure that your internet connection can handle it. Here is where testing everything to fine-tune the setup plays a critical role. 
  8. Run a test with all of the equipment to see how it performs and also to rule out any potential problems.
diagram for a diy pro set up to livestream an event

Expanding the Setup Using a Video Switcher

If you want to go a step further, you can add a couple of cameras to have different shot angles. Going this route will require you to have a team of people to pull it off. Besides, you’ll need a video transmission system per camera being used.

This will also require to use a video switcher so that you can change between video feeds. One of the best video switchers on the market today that doesn’t break the bank is the Blackmagic Design ATEM Mini HDMI Live Switcher.

Using the ATEM mini, you can connect up to four cameras or video feeds and use a USB cable to connect it to any computer.

The best part is that the PC will see it as a built-in webcam, so all streaming software for social media platforms will work without a problem!

Another remarkable feature of the Blackmagic ATEM mini is that you can have an audio line connected straight from the main audio mixer, so whatever comes out of the main PA system will be streamed as well. This provides a lot of flexibility when dealing with audio signals.

Using the ATEM Software Control provides you with the Fairlight audio mixer allowing you to change the EQ and dynamics before sending the signal to the streaming platform.

The ATEM Mini includes 4 standards converted HDMI inputs, USB webcam out, HDMI out, DVE for a picture in picture, transition effects, green screen chroma key, 20 stills media pool for titles, and free software control.

Here is a diagram for setting up a livestream using the Blackmagic ATEM Mini. Use it for your reference.

diagram for a diy multi-camera set up to livestream an event

Using Your Phone or Tablet For Livestreaming a Wedding – Simpler Method

Now that I have shown you the DIY professional method, it might seem intimidating to deal with all of the equipment.

You might want a simpler, more straightforward method that does require investing a couple of thousand dollars just to stream your cousin’s wedding.

So here we go… read on to learn how to stream a wedding using your iPhone, Android phone, or tablet. This method can also deliver excellent audio and video experience to the people who couldn’t make it to the event.

This is what you’ll need:

  • A smartphone – It could be an iPhone or Android with enough memory to store the entire ceremony. If your phone doesn’t have enough space, you’ll need to expand the storage using a Micro SD card – the recommended one is the SanDisk 512GB Extreme micro SDXC as it writes data at speeds of up to 90MB/s. Make sure your phone is compatible.
  • The DJI OM4 handheld 3-axis smartphone gimbal stabilizer – Highly recommended to avoid sudden bumps in the shot.
  • External microphone for better audio quality – Highly recommended. For iPhone or Android smartphones, the best option is the Shure MV88+.
  • Power bank to keep the phone charged. You don’t want to run out of power in the middle of the ceremony.
  • Any additional accessories for connecting everything. For a setup exactly as shown in the diagram below, you’ll need:  
    • 1 x Triple cold shoe gimbal microphone mount extension bar – Check Price on Amazon
    • 1 x Holder for the portable power bank – Check Price on Amazon
    • 1 x double lightning splitter, if using an iPhone – Check Price on Amazon
  • Lastly, a strong internet connection and a backup, if possible

Steps to Follow for Using Your iPhone or Android for Livestreaming a Wedding

  1. Verify that your phone and power bank are fully charged and ready to go.
  2. Your smartphone must have enough storage space to record what you are streaming. That way, you have redundancy in case you run into problems due to the internet connection while streaming.
  3. Install the external microphone pointing in the direction of the lens.
  4. Now it’s time to install the phone to the gimbal stabilizer. With the stabilizer, the livestream will be smooth and free of sudden bumps typically found in amateur videos.
  5. Connect the smartphone to the power bank to keep the phone fully charged during the livestream. When streaming, the battery charge decreases rapidly.
  6. At this point, connect to the streaming platform you want to use and test to make sure that it works well and that your internet connection is reliable.
  7. Don’t forget to allow HD quality video and audio on the platform so that your viewers watch the ceremony in high-quality video.
  8. Run the test several times to pinpoint and find any issues ahead of time.    
diagram for setting up your smartphone to livestream an event

Give Your Equipment a Test Run

Before your wedding livestream, it is a good idea to give everything a test run. You might want to do this at the wedding rehearsal or at another time.

When testing your equipment, you should: 

  • Practice setting up the camera where you want it and check if the position works throughout the wedding (you might want to record your rehearsal for this)
  • Practice walking the camera through the service
  • Ensure the internet connection is reliable
  • Check that all of your equipment is fully charged up and remains on charge before the wedding

Giving your equipment a test run will highlight any issues that need fixing. This will ensure that everything goes smoothly on the day of the event.


Pay Attention to the Sound 

Watching a wedding live is all well and good, but your remote guests won’t know what is going on if they can’t hear you. This is why it is worth thinking carefully about the audio equipment that you want to use. 

It’s straightforward to record high-quality audio on your iPhone. This does require careful positioning, though, so this is something you should test out in your practice run. 

Make sure to use a different device to monitor your livestream. That way, you can know if the audio is distorting or if the video feed is lagging.

This requires a little more setting up, but it will make all the difference to the people watching at home.


Send Out the Link in Advance

There are many great livestreaming platforms that you can use to bring people together on your big day. It is worth doing some research to find one that works for you. 

When choosing a platform, make sure you go for the one you have some experience using. This will ensure that things run smoothly on the day. A lot of high-quality streaming platforms also offer technical support, which can be helpful if it’s your first time streaming. 

In order to invite people to the stream of your wedding, you usually send out a link to the livestream. When you do this, make sure you provide details about the date and time that your livestream is due to start.

It’s a good idea to start the stream a little while before the ceremony begins. This gives people a chance to get set up at home, and it’ll make them feel like they’re arriving with the other guests, which is a nice touch! 

A Word of Caution Regarding Privacy

You should publicly avoid sharing the link to your livestream so that only people on your guest list can access it. Make sure that you share a ‘private’ link as well, rather than a public one. This means that your guests won’t be able to share it with anyone else. 

It is a good idea to do a practice run with your link sharing shortly before your wedding. This will allow you to troubleshoot any issues with the streaming platform or connectivity.


Get Ready to Share Your Special Day! 

Now you know exactly how to livestream a wedding (and do it well!), you’ll be able to share your special day with all of your loved ones – no matter where they are.

Don’t forget to ask your videographer to save a recording of the stream as well, so that you can cherish it forever. 

For more tips on capturing great live sound on your special day, check out these top tips.

6 Tips to Improve Your Livestream Audio Quality

With people staying inside and unable to go to weddings, parties, and other events, we rely on streaming to show live events and keep in touch with important family members, friends, and business partners.

When livestreaming your content, you want your audio to be at its best, so everyone can hear what’s going on.

It doesn’t matter if it’s your grandma in the nursing home, your boss across the country, or a live event you have tirelessly prepared to share with the world.

In this post, we provide six tips to help you improve your livestream audio for both, conversations and events.


Why Do You Need High-Quality Audio?

There are many reasons why people livestream. They could be creating a following for a social media channel, showing families and friends events they can’t visit, or having day-to-day conversations with the ones we love.

You may think that the most critical aspect of the broadcast is the video, so people see clearly, but don’t forget that audio is the other 50% of the experience.

In a conversation, whether for business or personal, it is essential to convey the information effectively and clearly. That could be the difference between someone understanding your intent or being annoyed by the quality.

Events can be a blur of visuals, and your commentary could be the only thing that lets them understand what’s going on. If you’re building an audience, no one stays connected if they can’t hear what you’re saying.

Audio is just as important as the video aspects of your stream.

If you are preparing to stream a music performance live but don’t know how; click here to read our article explaining the process in more detail.


Tip # 1 – Don’t Use The Internal Mic of Your Computer or Phone

The first tip to avoid using your device’s internal microphone.

Most people, when video conferencing or livestreaming, wonder why the sound quality is so low? One of the reasons is their device’s internal mic.

When livestreaming, you’ll want something that brings your voice to the forefront and cancels out the background noise as much as possible.

If it’s an event, do not rely on your phone’s microphone. It isn’t designed to pick up the nuances and details in sound.

For example, if you’re streaming a wedding reception, people watching may not hear clearly due to noise present in the area or because the sound source is too soft.

Live events need high-quality audio and video, so using professional video cameras and shotgun microphones to cover the broad spectrum of sounds if necessary.


Tip # 2 – Use the Right Type of Equipment

It is essential to understand that each livestreaming setup will be different depending on what you want to achieve. Here are some examples that can help you define your situation.

Solo Singer-Songwriter Livestreaming Setup

Suppose you are a solo singer-songwriter who wants to stream a live performance. In that case, all you would need is an HD Camera and a good microphone that can pick up the nuances in your voice and your instrument.

There are different options for capturing the video and audio of your concert for streaming it.

If you use a DSLR camera as your video capture device, you can use a stereo condenser shogun microphone to pick up the sound of your performance in high definition. Then the DSLR camera would connect to a computer and use it to stream your performance.

Solo Singer-Songwriter Livestreaming Setup using a DSLR camera with and a video capture card

Suppose you want to use your iPhone for streaming the performance. In that case, you can opt for connecting a stereo condenser microphone directly to the lightning port of your phone.

We have a complete post devoted to explaining how to capture high-quality audio using your iPhone. Click here for the full article.

If you decide to use your computer for streaming, you would need an HD webcam and an external microphone that is capable of picking up sound nuances in great detail.

Condenser microphones can deliver high definition audio. If the mic is stereo is much better, because it will deliver sound separation, thus delivering an excellent audio experience to your stream listeners.

Here are a couple of examples of stereo condenser mics that can pick up sound in high definition (links to Amazon):

  • AKG Lyra Ultra-HD
  • Blue Yeti
Solo Singer-Songwriter Livestreaming Setup using a webcam

Setup for Video Conferencing, or Video Calls

Whether you use Zoom, GoToMeeting, Google Meet, or any other video conferencing software, you’ll find that one of the most significant issues isn’t with the software itself but with the poor audio quality users experience.

This is a common issue and can be easily solved. Relying on your computer’s built-in microphone is part of the problem. The solution is to use an external microphone capable of delivering a clean, crisp audio experience.

There are several mics that plug directly into your computer or smartphone and can deliver excellent audio quality for your video conferencing. Here is the list of the best microphones for video conferencing.

Livestreaming a Podcast

When livestreaming a podcast-style show, depending on your setup, there are different options you can opt for.

You can use broadcasting style microphones like the Shure SM7B, which is a dynamic mic, or a USB capable mic like the Shure MV7.

Keep in mind that most broadcast-style mics need a stand to set them up correctly. Besides, as they are analog devices, you need an audio interface to connect them to a computer for streaming.

Suppose you have a podcast and plan to start streaming it live. In that case, I recommend reading this article. In it, we present some fantastic mixers specially designed for podcasting that include an option to connect it to a computer for livestreaming the audio straight from the mixer.

Another option is to use lavalier microphones to perfectly capture your voice. They’re not as expensive as other microphone options.

connection diagram for using a podcasting mixer in a live stream.

Tip # 3 – Grab the Audio Signal Straight From the Mixing Console

If there are multiple instruments and voices, the most likely option is that there will be a mixing console where all of these signals connect to.

In such a case, your best option for getting the best audio quality for your streaming is to feed an audio signal from the mixer straight to the computer. That way, everything that goes to the main PA system is also captured by the streaming platform.

This method is mostly used when livestreaming church events, live concerts, or band performances.

If connecting the computer straight to a mixer is not possible, your second best option is to use a stereo condenser microphone to pick up the event’s audio in detail.

As mentioned previously, if using a DSLR camera, you need to use a stereo shotgun microphone to get good results. If using your phone instead, make sure to grab a stereo condenser mic that connects straight to the phone’s port.


Tip # 4 – Check Your Audio Before Going Live

No matter what method you plan to use to livestream your content, check both, the video and the audio settings before going live.

You could have the best audio systems around, still, if the sound is not equalized correctly, you won’t have good audio quality.

Create a Balanced Sound with the Correct EQ

Spend time before the event or conference checking your audio settings. If you are streaming a large event such as a concert or church worship service, the most likely and best setup for this situation is to get the audio feed straight from the audio mixer.

If that is the case, make sure to perform a soundcheck prior to the event so that you can make the necessary EQ adjustments and ensure that the livestream sounds good.

We have prepared a full article providing excellent tips on how to eq different sound sources for live performance, click here to check it out.

Test Your Sound on Multiple Devices

People stream content on multiple platforms using different types of devices.

Testing how your stream sounds on multiple devices such as computers, smartphones, tablets, and smart TVs before going live can help you catch volume drops or if the sound is distorting.

Testing beforehand also lets you get your audio settings perfect.


Tip # 5 – Use a Wired Ethernet Connection or Reliable Wi-Fi

You only have so much bandwidth, and the quality of the cell network changes depending on the location.

If you’re livestreaming using a cell network, then the audio quality can downgrade if the cell reception is poor or hit a dead spot. It can also impact your video feed as well.

This is why I recommend using a wired ethernet connection whenever possible. That way, you avoid dead spots or sudden changes in internet speeds.

If using a wired connection is not possible, your second best option is to use Wi-Fi. If that’s the case, make sure that the router is reliable.

You should check the upload speeds way before the event starts to have enough time in case changes need to be made.

Another piece of advice is to close any unnecessary programs running in your computer or phone’s background because they can take up bandwidth or resources that can affect the system’s performance and decrease your overall livestreaming quality.


Tip # 6 – Hire Professionals to Take Care of the Livestream if You Are Not Sure You Can Handle It

Something like a wedding is a once of a lifetime event, so you want to make sure everyone that isn’t present can see and hear the event as if they were present.

You could have some friends do it all for you or let the venue handle it, but if they don’t have the expertise, you have to make sure to hire a professional so that your event is streamed without any problems.

A professional that handles the sound system or someone who carries a boom microphone and changes settings on the fly can make sure nothing goes wrong while streaming the event.

They hear everything as it happens, so if there is sudden background noise or interference, they can make the necessary changes on the fly.

You don’t want to hear after your wedding is finished that no one listened to the best man’s speech or the vows were garbled during the ceremony.

Handling the audio during a livestream event can be tricky. Professionals can keep these failures from happening and let you enjoy your special day or event.


Have the Best Audio Quality for your Event or Conversation

We hope these tips help make your stream sound perfect for everyone involved. These are guaranteed ways to improve the quality of your livestream, so follow them when you’re ready for your stream.

If you’re interested in learning more about this topic or about audio equipment, check our other articles.

How to Build a Pro Streaming Setup on a Budget

Are you looking to start streaming?

The modern age made it possible for people to engage in once unconventional careers. The online entertainment and media industry faced explosive growth in recent years. People now consider becoming a YouTuber an acceptable career path.

Aside from YouTube, people also opted to stream their content live. Twitch, the world’s first streaming platform, broke viewership records twice in 2020. Twitch also gained more streamers and is only expecting to welcome more users.

Are you on a tight budget but looking to start streaming?

Building a streaming setup on a budget is easy with the right information. This article covers some tips for building a streaming setup for beginners. Read on to find out more!


Select a Good Video Source

One of the first streaming tools you need is a video source. Giving your viewers a glimpse of your face mimics a face-to-face conversation. This can help build trust among your viewers and gain loyal followers.

If you’re planning on showing your face, you need a good webcam to connect with your viewers. The recommended minimum resolution for a webcam is 720p. Here are some webcam options that are not too expensive still deliver high definition video (Links to Amazon).

  • Logitech C922x Pro (1080p or 720p Video Resolution)
  • Logitech BRIO Ultra HD Webcam (4K resolution)

If you’re building a streaming setup on a budget, a webcam is your best option. This is the simplest and most affordable video source if you already have a desktop. Your computer or laptop may already have a built-in webcam and microphone.

Modern webcams in newer models offer a minimum of 720p video resolution. If you’re only a beginner, this is a great place to start. Many newer smartphone cameras also have better camera quality.

If you’re looking to save your money, opt to use your smartphone or built-in webcam. If you’re using your phone as a video source, you can download third-party apps for streaming.

For Android users, check out IP Webcam on Google Play. With your IP address, you can start streaming your face with your phone. For Apple users, you can achieve the same with DroidCam.

To set up your mobile phone, consider getting a mini-tripod. You can get one for cheap online or at the nearest electronics store.


Get a Quality Mic

Content streamers often engage with their watchers in real-time by speaking to them. You don’t need the best or most expensive mic on the market to be a good streamer. However, it would help if you had clear audio.

Aim for a mic that can cancel background noise. Ensure that audio input is clear whenever you speak into the mic. For this component, your built-in desktop or headset microphone may not be enough.

This is where we recommend investing in a good quality microphone. You don’t want your stream to pick up background noise like your keyboard clicking.

The following are a couple of recommendations if you’re considering buying an external mic that is great for a beginner live streaming setup, (links to Amazon):

  • Razer Seiren Mini
  • HyperX QuadCast USB Microphone

Consider Using a Headset for Better Audio and Hands-Free Operation

If your budget allows for it, you can also get a headset to deliver a better audio experience for your audience. Being that the microphone is directional, it also helps in rejecting ambient noises.

With a headset, your mouth will always be close to the microphone no matter where you are. If you move a lot this would be the best choice. For more freedom, you can also opt for a wireless headset unit, that way you don’t have to deal with those annoying cables.

Most wireless headsets will deliver more than 8 hours of continuous use, so battery charge life shouldn’t be a problem.

The following examples are excellent options for live streaming if you decide to use a headset, especially if you are a gamer or Twitch streamer (Links to Amazon):

  • HyperX Cloud II
  • Turtle Beach Stealth 700
  • SteelSeries Arctis 7

Other Accessories

To complete your budget pro live streaming setup, consider other accessories. If you’re looking to create pleasing visuals for your viewers, don’t neglect your setup. If you think your room isn’t fit for streaming, get a green screen.

This allows you to hide unnecessary things in the background so your viewers can focus on you. A $1 green cloth with some binders is a great alternative to getting an actual screen.

You may also want to consider getting the right lighting equipment for your video source. Natural light may be the most flattering light source. However, depending on the weather and time of day, it can be inconsistent.

We have a full article where we go in-depth on how to set up 3 point lighting to get the best results in your live streams or video recordings.

If you can’t afford studio lights, you may opt for ring lights. You can also use a tablet and a cereal box to create a DIY softbox. If you have a bright lamp, use parchment paper to soften and diffuse the light.

If you’re willing to invest in a different light source, check out the Viltrox L116T (Link to Amazon).

This is a portable panel light that’s easy on tight budgets. This gives you a steady light source and allows you to choose between color temperatures.


Streamer Software

Another essential tool that any streamer should consider is the encoder. This is the component that allows you to transfer data from your capture card. With this, you can upload your content to your chosen platform, like Twitch.

You may need to invest in a high-quality encoder if you want to ensure smooth streams. However, if you’re a beginner streamer, you can find some great budget options.

Some free software options include Open Broadcaster Software. OBS is available for Linux, macOS, and Windows. This is an open-source streaming software that offers flexibility and customization.

Depending on your needs, you may even get various features and plugins. However, if you’re still learning the ropes, try Streamlab OBS. This is a variant of OBS that is less-overwhelming for beginners.

SLOBS offers a more attractive and streamlined version of OBS. It features a cleaner UI and some special features like built-in chat. If you’re willing to give up some customization options, SLOBS is an excellent choice.


Good Internet Connection

Another element to consider is your streaming connection. Your internet connection must be able to provide enough bandwidth to deliver your content online. Your internet connection must be able to handle all the data your encoder is uploading.

If your computer is connected to the internet using Wi-Fi, make sure that your router is robust enough to handle a large amount of traffic.  

Start by testing your upload speed. The minimum recommended upload speed to stream video at 1080p is 5Mbps. If you plan to stream in UHD (4K), the recommended upload speed is 25Mbps.

If you think that your internet speed doesn’t meet your needs, try contacting your ISP. They may offer upgrades to your current plan to give you faster upload speeds.


Tips for Building a Streaming Setup on a Budget

Want to start live streaming? Whether your content is video games, makeup, or music, you need the right streaming setup. With this guide, you don’t have to worry about building a streaming setup on a budget.

In this blog, you’ll find several articles that can help you in your live-streaming or podcasting journey. Do you have any questions? Contact us today.

How to Connect a Soundbar to a TV

Let’s face it, the speakers that come with TVs sound anemic to say the least. It doesn’t matter if it’s a 32” LCD or the latest 77” OLED TV; the included speakers are not designed to deliver a cinematic, immersive sound experience.

Thanks to soundbars and home theater systems, you can significantly improve the sound experience with your TV. Speaker bars are more affordable than home theater systems, plus they are way easier to set up and deliver an immersive sound experience.

In today’s post, I will explain three simple ways of how to connect a soundbar to a TV, so let’s get started.


How to Connect a Soundbar to a TV – Three Easy Methods

Connecting a speaker bar to a TV is a straightforward process. The first thing you need to do is figure out which method you want to use. There are three easy ways to achieve this:

  1. Using an HDMI cable – Best Option
  2. Connecting it with an Optical cable – Second Best Option
  3. By using a red and white cable (RCA cable) – Use this method as a last resort

Let’s explore each one in more detail.


Connecting a Soundbar to a TV using an HDMI Cable

The easiest and best way of connecting a soundbar to a TV is by using an HDMI cable. HDMI stands for High-Definition Multimedia Interface, and it’s a type of audio/video connection that can transmit uncompressed and compressed video and audio data in digital form.

This type of connection is the current industry standard for connecting multimedia equipment digitally, delivering lossless video and audio quality.

These Are the Requirements When Using an HDMI Cable for the Connection

For connecting a speaker bar to your TV, you need to make sure that both your TV and soundbar have an HDMI port that is ARC capable (see picture below for your reference).

ARC stands for Audio Return Channel and is a special function of HDMI certified cables in which you can send and receive audio signals through the same cable reducing the number of connections between your TV and external speakers or home theater system.

One of the best features of HDMI ARC is that you can connect all your components like Roku, cable box, etc., to any ARC capable device, and then use only one cable to send the video and audio between devices. Most TVs and soundbars come with one HDMI ARC port for this purpose

Steps for Connecting a Speaker Bar to a TV Using an HDMI Cable

Before starting the setup, make sure to connect your other components like your Roku, cable box, Blu-Ray, or DVD player to the back of the TV or the soundbar. Doing this will help you test your setup with all of your equipment to make sure it works well.

  • The first thing is to make sure that the TV and speaker bar are both off.
  • At the back of the TV, locate the port labeled “HDMI ARC.”
  • Once you have located the port, connect one side of the HDMI certified cable to this port. There’s only one way that the cable fits correctly, so make sure you match up the plug in the correct way and push it until it goes all the way in.
  • At the back of the soundbar, locate the HDMI ARC port. Proceed to connect the other side of the HDMI cable coming from the TV to this port.
  • With everything connected, turn the devices on to continue with the configuration.
  • In most cases, with newer model TVs, as soon as it detects something connected to the HDMI ARC port, it automatically routes the audio signal to that port and disables the TV’s speakers. If it doesn’t happen automatically, you would have to do it manually.
  • If you have a Samsung TV, open the system’s menu, then go to “Sound.” Next, select “Speaker List,” then select “Receiver (HDMI)”

Depending on your TV’s brand, the menu will be slightly different, but the idea is the same. You need to locate the audio section, turn off the TV’s speakers and send the audio signal through the HDMI ARC port.

We are using a Samsung TV for this tutorial to walk you through, but the same principle applies to any other brand. If in doubt, consult your TV’s instruction manual for the step-by-step process of routing the audio signal to the HDMI ARC port with your particular TV.

  • Next, you want to make sure you select the correct input on your soundbar. Usually, it provides several inputs for connecting more than one device. There’s going to be a button on the soundbar’s remote or on the unit itself that says “Source” or “Input.” You’re going to press it until you select the correct input; in this case, select the one that corresponds to HDMI ARC.
  • With the input set to HDMI, play some video on the TV. If everything is correctly set, you should hear the sound coming out of the speaker bar. Try raising the volume if you don’t hear anything.
  • Select a different video source on your TV, let’s say your Apple TV, Amazon Fire, or cable box, and play something to make sure that it sounds good as well.
  • That’s it; you have successfully connected a soundbar to your TV using an HDMI cable.

How to connect a Soundbar to a TV using an Optical Cable

The optical cable is another way used to connect audio equipment digitally. It uses a fiber optic cable and a laser to transmit and receive audio signals. It was introduced back in 1983 by Toshiba to connect audio devices.

If you don’t have the option of using an HDMI ARC for connecting your TV to the speaker bar, use the optical cable method, but if you do have the option of using HDMI ARC, I highly recommended it because it is much better than using an optical cable.

First, you have to start by hooking up your other components like your Roku, Apple TV, Amazon Fire TV, cable box, Blu-Ray, or DVD player to the back of the TV. This will help you test your setup with all of your equipment and ensure that it works well.

If you are not familiar with optical cables, the picture below shows you what it looks like. One end will connect to the TV and the other to the soundbar. Some manufacturers include an optical cable as part of the cable bundle.

Steps for Connecting a Soundbar to a TV Using an Optical Cable

Now that you have connected all your components to the TV, the following steps will walk you through the rest of the process.

  • Make sure that everything is turned off before starting the setup.
  • The first thing you need to do is remove the small plastic covers on both ends of the cable. These little covers are used to protect the fiber optic connectors from dust. It is important to remove them because if you don’t, it won’t work. See the picture below for your reference.
  • Now you’re going to locate the optical output on the back of your TV. It is usually labeled “Optical Out” or “Audio Out.”
  • Plug one end of the optical cable to the back of the TV. There’s only one way that the cable fits correctly, so make sure you match up the plug in the correct way. Once the plug is in, you have to give it a little push to make sure it snaps into place. You’ll feel it lock into place once you push it in.
  • At this point, locate the optical connector labeled “Optical Input” or “Audio Input” on the soundbar.
  • With the optical cable connected, turn on the power on both units.
  • You have to go into your TV’s system menu and locate the “Audio” or “Sound Settings” submenu for this step. You’ll see an option to turn off the TV speakers and send the sound through the optical output.
  • If you have a Samsung TV, open the system’s menu, then go to “Sound.” Next, select “Speaker List,” then select “Audio Out/Optical.”
Image Credits: Cable Creation

Each TV has a different menu layout, but the idea is the same. You need to locate the audio section in the menu, turn off the TV’s speakers and send the audio signal through the optical output.

In our example, we are using a Samsung TV to walk you through the process. Still, the same principle applies to any other brand. If in doubt, consult your TV’s instruction manual.

  • Next, you want to make sure you select the correct input on the speaker bar. Usually, it provides several inputs for connecting more than one device. Find on the remote or the unit itself a button labeled “Source” or “Input” that you’re going to press until you see the correct input, in this case, Optical.
  • Play something on the TV and if everything is correctly set, you should hear the sound coming out of the soundbar. Try raising the volume if you don’t hear anything.
  • Select a different video source; let’s say your Roku device or Blu-ray player and test it to make sure that it works as well.

In some cases, you could use your TV’s remote to control de external speaker, especially if both devices are from the same brand. If not, you could check your TV’s manual to see if there is a way to program the remote to work with both of your devices.


Connection Method Using a Red and White Cable – RCA Cable

Another way to connect a speaker bar to a TV is with an RCA cable, sometimes referred to as the red and white cable. This works assuming that your television and external speaker supports RCA audio connections.

This method uses an analog audio signal between both units. Although it works for getting a better audio experience than with TV speakers, it cannot receive audio formats like Dolby or DTS.

RCA audio output is usually found in older generation equipment. The new generation TVs and streaming devices such as Roku, Amazon Fire, or Apple TV, are not compatible with analog audio connections like RCA anymore as they are being phased out and replaced by HDMI.

Use the RCA audio output connection as a last resort if HDMI ARC or Optical is not available.

Steps for Connecting a Soundbar to a TV Using a Red and White Cable – RCA Cable

Before we start, you need to have an RCA to RCA cable for making the connection.

  1. I always recommend having everything turned off before making any connection.
  2. In the back of the TV, locate the RCA “Audio Output” connector (red and white plugs).
  3. Take one side of the RCA cable and connect the red plug to the red connector and the white plug to the white connector to the back of the TV.
  4. On the speaker bar, locate the RCA “Audio Input” connectors in the back.
  5. Now, take the other side of the RCA cable and connect the red plug to the red connector and the white plug to the white connector.
  6. Turn both devices on to configure the TV so that the internal speakers are disabled and the audio signal is routed to the RCA output.
  7. If you have a Samsung TV, open the system’s menu, then go to “Sound.” Next, select “Speaker List,” then select “Audio Out.”
  8. Select the correct input in the soundbar and try playing something on the TV. Make sure to increase the volume in case you can’t hear anything playing.

Depending on your TV’s brand, the menu will be slightly different, but the idea is the same. You need to locate the audio section, turn off the TV’s internal speakers and route the audio signal through the “Audio Out” connector. If in doubt, make sure to consult your TV’s instruction manual.


Final Thoughts

Although TV’s speakers don’t deliver a good audio experience for watching movies, this can be easily fixed by installing a soundbar, and the best way to achieve it is by using an HDMI that is ARC capable.

If that’s not an option, the second-best option is to use an optical cable. Lastly, as a last resort, use the white and red cable (RCA) as long as is supported on your devices.

If in doubt, I recommend checking your TV’s manual for changing the sound setup on your TV. I hope this post was helpful to you.   

How to EQ Different Sound Sources for Live Performance

Do you ever feel like managing live sound is like trying to tame a wild beast? One minute, everything seems fine, then the click of a guitar pedal or change of a vocalist sends the whole thing crashing down. The key to dealing with these problems is EQ.

EQ is essential to any live performance, from large orchestras to solo singer-songwriters. Below, we discuss how to EQ live sound in our handy, must know guide.


What is EQ?

EQ is the short term for equalization. It is the process in which sound is mixed to provide an equal, balanced tone for the listener. This is done by manipulating the sound sources’ frequencies as they come through the microphones and sound equipment. 

To get a good, solid EQ, you must first have developed the ear to recognize what “good sound” is. Of course, some of this is down to personal preference, but there are some universally acknowledged truths that equate to bad sound. Essentially, you are trying to make the sound as clear as possible for the audience without any sudden jumps or peaks in the mix. 

It may be that the sound is too bassy or that the cymbals are cutting through too much. Perhaps the vocals are too quiet, or the treble on the guitars is overpowering. EQ will allow you to identify and correct these problems. 

EQ will also let you individualize each instrument or sound source. By pocketing each instrument in a frequency range, it’s possible to avoid unclear, muddy mixes and wailing feedback.

Imagine sound as paint on a canvas. Once it bleeds into other sources, it distorts the overall image and picture. 


What Factors Can Impact the Sound?

Literally, anything can impact the sound of a performance. The shape of a venue and the sound sources are the main factor, meaning EQ will be different every time you set up. 

In addition to this, the sound will change depending on the number of people that fill it. This can mean that your EQ in the soundcheck sounds very different from the actual performance. This is why it is essential to have a good ear and be able to identify what instruments and frequencies are working within your music in a live mix.


How to EQ Live Sound – Overview

The first step you must take when doing EQ is to identify any unwanted frequencies. Once you have them, try to cut them from the mix. This cleans up the overall sound, giving the frequencies you do want more clarity. 

First Cut then Boost the Needed Frequencies

Do not be tempted to boost the wanted frequencies and leave the unwanted in. This will just produce a confusing, muddy mix. You also want to avoid adding or boosting lots of elements unless really necessary, as it makes the whole mix harder to control.

When setting up a sound system and doing a soundcheck in a venue, the best practice is to start with all the EQ knobs in your mixer set to the middle or 0 dB. That way, you can clearly understand how the system sounds and reacts in that particular venue.

Furthermore, while doing the soundcheck, try to identify which frequencies are problematic and decrease them. Remember that to keep a mix clean is usually better to cut than to boost. In other words, first cut problematic frequencies and then boost what is needed to get the best mix possible.

Slow and Incremental Changes are Your Best Bet During the Live Performance

Make sure that any changes are extremely slow and incremental. This can be hard if you are under pressure during a gig, but a sudden spike or change in sound will be more noticeable than the current one. You can end up making it far worse, and you may end up with feedback or low end rumbling in the bass. 

Besides, working slowly is usually all you need to make a sound correction. Even a slight tweak when doing EQ can have huge differences. 

Additionally, keep it simple and focus on using one frequency range for the channel. It may be tempting to use complex EQ settings that are pre-installed in your mixer if using a digital mixer, but they can throw things off and take up a lot of time to fix.


Understanding The EQ Architecture of the Mixer

The frequency spectrum of any audio signal coming into your mixer will be made up of frequencies between 20 Hz to 20 kHz. This frequency range is subdivided into smaller ranges so that complex sounds made up of many frequencies can be equalized in the mixer.

Here is the breakdown of the audio frequency spectrum used to identify and equalize different sound sources:

Depending on the mixer you use, it will have from two to six knobs to boost or decrease various frequency envelopes, as shown in the table above.

Most analog mixers used for live setups have three to five knobs that sweep the audio spectrum. Digital mixers tend to have a wider frequency range and allows for more precise control when dealing with frequency envelopes.

When equalizing live sound, you should concentrate on the following EQ bands in your mixer:

Sub-Bass

Sub-bass frequencies go between 20 Hz to 60 Hz. These frequencies will only appear if you have high-end sound equipment with subwoofers or bass bins. Sub-bass frequencies fill the room, and depending on the type of music being played, they might be essential to get a full audio experience.

Unless your PA system has subwoofers capable of reproducing these frequencies, make sure to cut them out of your mix. If you don’t, it will not sound good, and you’ll get a lot of low-end rumble.

If it is not audible on your equipment, you should cut it out completely to avoid confusion and sound problems later on. 

Bass

Between 60Hz to 200Hz is the bass. This will mainly deal with bass guitars, low ends of pianos, synths, vocals, and any wood or brass instruments in that range. 

Bass can be tricky, as the human ear finds it hard to pinpoint the direction from which it has come. This means unlike your drum kit, guitars, and piano, it will not matter what side of the stage the source is set up. Bass will also sound very different close to the stage to how it does at the back of the crowd. 

Low-Mids

The low-mid frequencies run from 200 Hz to 600 Hz. It will require a lot of your attention, as it deals with many instrument ranges, including guitars, pianos, vocals, and the top end of the bass. This can result in a very muddy mix if not set right. 

One Tip when dealing with low mids is to deal with problems at the sound source. Tweak the instruments and amplifiers onstage, solving problems at the root rather than when they arrive at your mixing desk. 

Mids

The mid-range frequencies of the audio spectrum are found between 600 Hz to 3 kHz. These are essential in vocal ranges and acoustic instruments. You need to pay special attention to these frequencies as they help with the clarity of the sound.

Upper-Mids

Upper mids run from 3 kHz to 8 kHz. This is where you start to get harsh, sharp tones if not appropriately equalized depending on the sound source. They are essential because they can add more expression, punch, and aggression to your mix. Upper mid frequencies need to be balanced to avoid pops and hisses that may occur.

When you get feedback from vocals or other instruments, make sure to check the range of mid frequencies. It will probably be one of them that needs adjustments to solve the problem. 

Treble

Treble is anything above 8 kHz. This is usually the easiest area to EQ, as you will have a lot of space that is occupied mainly by guitars and cymbals. As long as they do not sound too harsh, you should not have a problem at this end. 


Tips on How to EQ Specific Live Sound Sources

EQ Vocals

The fundamental frequencies of vocals are between 100 Hz-300 Hz. Even adult males with deep voices don’t go below 85Hz. All this means is that any frequencies below 80 Hz should be cut out when equalizing vocals to avoid low-end rumbles.

Plosive sounds happen when a burst of air leaves the mouth at high speeds. It usually occurs when a word contains letters like “Ps,” “Ts,” etc. To avoid plosives, Try cutting around 200 Hz-250 Hz.

If in your mix vocals sound muddy or boomy, try adjusting the frequencies between 220 Hz-350 Hz. Don’t aggressively cut frequencies in this area because you could eliminate part of the warmth of the vocal’s sound.

Another critical area to EQ carefully is the frequencies between 350 Hz – 600 Hz. An emphasis around those frequencies will make the vocals sound “Boxy,” meaning that they will have resonances as if the vocals were enclosed in a box.

The upper mid-range or high-mid frequencies are the “Nasal Frequencies” and are located between 1 kHz – 3.5 kHz. They need to be carefully balanced because if there is an excessive buildup in this area, vocals will sound “harsh” or “grating.”

It is critical to bring out the vocals in a live mix because vocals are the most important part of the mix. This can be achieved by slightly increasing the “presence range of frequencies,” which are between 4 kHz – 6 kHz.

Frequencies between 6 kHz – 10 kHz need to be adjusted carefully to avoid a sibilant sound. Start with the EQ set in the middle and have vocalists sing. If you hear that the “s” sounds too exaggerated and bright, decrease the knob until the sibilant tone is gone from the vocal sound.

In any live sound setup, the vocals are the most important part of the mix but tend to be the hardest to get right. Click the link to read a more detailed explanation of how to EQ live vocals like a pro.

EQ Acoustic Guitars

When using an open to air microphone to mic an acoustic guitar, you have to consider how the microphone reacts to the venue’s acoustics. If using piezoelectric mics, like the ones in electro-acoustic guitars, the venue’s acoustics don’t affect the sound as much.

When equalizing acoustic guitars, any frequencies below 60 Hz is most likely to cause problems. These frequencies are boomy, which means that they are excessive on bass and have low-frequency resonances. This is why it is recommended to get rid of them by using the mixer’s high-pass filter, usually located below the gain knob.

Frequencies between 60 Hz and 125 Hz are responsible for the low-end response on the guitar. Here you have to be careful not to boost it excessively because you would end up with a muddy mix. However, if you cut too much, the guitar will sound thin in the mix.

Between 125 Hz and 500 Hz is where you get most of the acoustic tones of the guitar. This is also referred to as fullness of sound or body, with particular emphasis on the upper bass response. As always, be mindful when cutting or boosting in this range because it can negatively impact the sound within this envelope of frequencies.

Signature sounds unique to the different guitar brands will be emphasized between 500 Hz to 2 kHz. Here elements like the type of wood and building techniques used to construct the guitar will be audible within this frequency range. Make sure you sweep the full range of frequencies until you find the best response for the guitar being used.

The presence range responsible for the clarity, detail, closeness, and definition of the guitar is between 2kHz and 6kHz. Increasing this range can make the music seem closer to the listener. Reducing the 5kHz content makes the sound more distant and transparent.

Extra Tip: when equalizing electro-acoustic guitars that use piezoelectric pickup elements, avoid overemphasizing frequencies between 2 kHz and 7 kHz because it will sound harsh and abrasive.

Mic Placement is Critical

Another vital aspect you need to consider when dealing with acoustic guitars is mic placement, whether in a studio recording or live performance setup.

Even if you have a pickup, there will come a time to mike up because you can get a much fuller and more natural sound from a miked-up guitar, especially when compared to a piezo pickup.

When miking up your acoustic guitar, you need to know the best practices. Because there is not much you can fix with EQ if the mics are in the wrong place.

I won’t go into detail here explaining guitar miking techniques because I have prepared an entire article on how to mic acoustic guitars. Click the link to check it out.

EQ Electric Guitars

Cut The Sub-Bass Frequencies

Like acoustic guitars, when dealing with EQing an electric guitar, the first thing to do is get rid of anything below 80 Hz, because these frequencies are responsible for the low-end rumble that dirties up the guitar’s EQ. To do that, activate the high-pass filter in the mixer.

Boost The “Body” Frequencies to Add Weight to The Sound

In general, the equalization of an electric guitar is not that different from an acoustic one. The body of the instrument’s sound is found between 200Hz to 500Hz. In this range of frequencies, you don’t want to overdo it because it can overpower the rest of the mix.

You can start with a gain of “0 dB” at those frequencies and listen to how it sounds. If it sounds too fat and with too much emphasis on the upper bass, decrease it to “-2 dB” or until you hear a balanced tone.

Cut The Resonant Frequencies

An electric guitar has a complex tone because it has many harmonics. For the most part, these harmonics are present between 400 Hz to 1 kHz, and in some cases, it can go as high as 2 kHz.

These frequencies are the ones that give that unique tone to electric guitars. An excessive gain in this range can make the guitar sound honky and grating, especially in the 500 Hz to 700 Hz range. So to start on the right track, cut the resonant frequencies between 400Hz-1kHz, specifically at 600Hz.

Add Or Remove The “Presence” Frequencies to Get a Clear Tone

From 2 kHz to 10 kHz, you’ll get the clarity and definition of the electric guitar. An excessive gain here will make the sound too bright and can overpower the mix in a bad way.

My recommendation is to concentrate in the 1 kHz to 3 kHz range when adding “presence” or “brightness” to the sound. From there, you can decide if you want more “air” by boosting higher frequencies, but don’t overdo it, or it will sound harsh and piercing to the ear.

I have a complete article that includes a cheat sheet explaining how to EQ electric guitars in four easy steps using digital or analog audio mixers, click the link to check it out.

Equalizing Electric Bass

Cut The Ultra-Low-End Frequencies

Basses as electric guitars have many resonances that end up muddying the mix. In an electric bass, these resonances are present between 40 Hz to 80 Hz.

Make sure to use the high-pass filter in the mixer to cut everything below 40 Hz. That way, you get rid of problematic frequencies when equalizing bass guitars.

With a digital mixer, all you have to do is set a high-pass filter with a cut-off frequency set at 40 Hz.

If using an analog mixer, the included high-pass filter has a cut-off frequency set at 80 Hz or 100 Hz. So, engaging it will do nothing good for us because it will cut frequencies below 80 Hz, which is not ideal when EQing bass.

So, if your analog mixer doesn’t have a high-pass filter with a cut-off frequency below 80 Hz, leave it off (disengaged) to avoid cutting out some of the fundamental frequencies.

Enhance The Bass’s Fundamental Frequencies

The sound’s body of a bass guitar is found in frequencies between 40 Hz and 400 Hz. These fundamental frequencies are what shape the unique tone of an electric bass.

If you hear poorly damped harmonics that make the sound too boomy, try cutting around 125 Hz to fix the problem. Don’t over-cut because that will weaken the sound of the bass.

When the bass sounds boxy, most likely, the problem is between 250 Hz and 300 Hz. Try cutting it until you get a fuller, clearer sound.

As you may know, any note played on an instrument contains harmonics, but when the sound’s body is found in the lower frequencies, the harmonics can be challenging to control.

If you find yourself trying to figure out why the sound is congested when equalizing a bass, the problem may be fixed by dealing with frequencies from 500 Hz to 1 kHz. These are the upper harmonics of the electric bass, also called overtones,

Watch Out for The Harmonics

Lastly, from 2 kHz to 5 kHz, you’ll find what’s referred to in the industry as string noise. These include string slaps and more rhythmic percussive sounds. Here you can adjust it to your liking; just be careful not to make the sound excessively bright as it will lose the whole purpose of having a bass.

If you are interested in a more detailed explanation on equalizing bass guitars, click the link. In the article we go through an easy to follow 4-step process to eq an electric bass, plus a handy cheat sheet to help you visualize the process.

Equalizing Piano and Keyboards

Piano

When dealing with acoustic pianos, EQ should be applied carefully and mostly to correct issues, especially if the sound clashes with the rest of the mix. You want the piano to play a supportive role, mainly if vocals are present in the track or live performance.

One of the critical things to do when dealing with a piano is to have the correct mic placement, which will help you avoid feedback and get a better sound response. But when it comes to equalizing the sound, here are some tips.

Cut the Mid-Low Resonant Frequencies

A piano has resonant frequencies around 440-500Hz, which tend to dampen the sound. We need to remove these resonances before they happen to maintain a clean audio mix.

Try using a bell filter with a cut-off frequency set at 440Hz, reducing the gain at that frequency by -6dB.

Reduce Boxiness

The range of frequencies between 100 Hz and 250 Hz gives the piano its fullness and warmth. But at 220 Hz, you can get a resonant frequency that makes it sound boxy, meaning that it sounds like it was enclosed in a box. So, by reducing this frequency, we can get rid of the boxy sound.

When mixing, if you don’t remove this resonant frequency in the piano’s EQ, in addition to it sounding boxy, you’ll have a messy mix due to the buildup from all the other instruments in that frequency range.

Use a bell filter with a cut-off frequency set at 220Hz, reducing the gain at that frequency by -5 to -6dB.

Use a High-Pass Filter at 60-80 Hz

For the piano, anything below 64 Hz will only add unnecessary low-end rumble to the mix, and we want to leave this space open in the frequency spectrum for the bass.

So, to start with a clean piano sound right off the bat cut the frequencies below 64 Hz.

If using an analog mixer, activate the high pass filter (HPF) button. If you can select a frequency, set it at 60 Hz. With a digital mixer, all you have to do is to roll up the high pass filter with a cut-off frequency set at 64 Hz.

Extra Tips

Avoid boosting frequencies between 250 kHz to 3 kHz because this will add muddiness to the mix.

Frequencies from 3 kHz to 6 kHz add presence to the piano’s sound. They are responsible for the sound’s clarity and definition of the instrument.

From 8 kHz and above, you will get a lot of hiss, which brings out the noise of the dumpers, which is annoying if they are too loud. Carefully boosting this range of frequencies can add a bit of brightness to the sound, which is a good thing in some cases.

You can read this four-step piano Eq article, which walks you through this process in more detail. Plus, in the article, I have provided a cheat sheet in a graphical form so that you visualize the EQ process. Check it out by clicking the link.

Keyboards

Keyboards have several sounds, and each time the sound is changed, the EQ might need adjustment as well. Here are a few rules of thumb that you can follow to make it easier.

It’s always recommended to cut the sub-bass frequencies below 60 Hz with the high-pass filter. Most of the time, the lower frequencies add more problems to the mix as they have many harmonics that can create an uncontrollable low-end rumble.

With keyboards, frequencies between 400 Hz to 600 Hz can create a lot of muddiness in the sound, so be careful when dealing with this range.

If the sound is changed to a different one in the middle of the performance, and you hear muddiness, your problem will be solved by reducing the gain in this frequency range. 

If you want the keys to cut through the mix, like for a solo performance, boost frequencies between 1 kHz to 2 kHz.

To add presence to the sound, slightly boost between 3 kHz to 6 kHz. For a darker sound, decrease the gain within this range of frequencies.

EQ Drums

Equalizing drums is one of the most challenging tasks in live sound. It’s a way to measure an engineer’s ability to EQ and mix live sound. Drums set the rhythm, and their sound is very energetic; for that reason taming that wild beast is not an easy task. Here are a few tips to help you EQ drums.

Kick

When EQing kicks, you want to create a sound that’s big with a good transient response and a strong impact, but without overpowering the whole mix. If the kick’s sound is not deep enough with enough punchiness to cut through the mix, it will sound thin and anemic, lacking sturdiness. 

You have to consider two ranges of frequencies to get a big sound. These are from 40 Hz to 60 Hz and from 60 Hz to 100 Hz. But be careful because if they are boosted too much, the low-end rumble will be a nightmare, but if they are cut out or too low, there won’t be any punchiness in the sound.

The body of the kick’s sound or fundamental tone is from 100 Hz to 200 Hz. If you get a muddy sound, decrease frequencies between 200 Hz and 500 Hz, these are the muddy frequencies when dealing with kicks.

From 500 Hz to 2 kHz, you get the attack frequencies. Attack is the time it takes for a note to reach its maximum or peak amplitude. When the beater hits the drum head, the produced transients are difficult to EQ and can become a problem. If that’s the case, remember to control the attack frequencies mentioned.

Snare

The snare is the second on the drum list to EQ. For starters, you want to cut any sub-bass and bass frequencies. Anything below 80 Hz must go away because it will cause problems to the overall mix.

The snare’s fundamental tone is between 100 Hz and 400 Hz, but with particular emphasis between 150 Hz and 250 Hz.

When EQing snare drums, you have to know the problematic frequencies to deal with them before becoming a problem. These frequencies are between 400 Hz and 800 Hz. Don’t completely remove them but just be mindful to avoid a boxy sound.

If you want the snare to sound punchy with a good transient response and strong impact, you’ll need to take care of frequencies between 1kHz and 4 kHz. Boost them or decrease them depending on the result you want to achieve.   

Toms

When dealing with toms, you need to take care of two ranges mostly. The first range is the one that deals with the body or fundamental tone of the toms. The second range mainly deals with the attack and transients of the sound.

For creating a balanced tone, boost or decrease frequencies between 150 Hz to 400 Hz. Try moving the knobs within that range until you hear a full sound with the correct tone. But if this range is boosted too much, it will sound like a cardboard box.

The attack frequencies are found between 400 Hz to 4 kHz. This is the sound produced when the stick hits the drum head. You could decrease it entirely, but I don’t recommend it. This range of frequencies provides the characteristic sound and a more realistic sound.

Extra Tip: I recommend cutting anything below 80 Hz using a high-pass filter to avoid low-end rumble.

Cymbals

When dealing with bigger sound systems setups, and you need to mic cymbals, it becomes another critical element to deal with. If they are not equalized properly, you will get all kinds of problems such as harsh, overpowering, or inaudible cymbals.

The first thing you want to do is get rid of the unneeded frequencies that don’t help in the sound. In this case, this would be all frequencies below 200 Hz. If using a digital mixer is easier to achieve than when using an analog one because you can set the cut-off frequency to whatever you want.

But when dealing with analog mixers, you don’t have the flexibility to choose the high-pass filter’s cut-off frequency because it’s already set to 60 or 80 Hz. In that case, just activate the high-pass filter usually located under the gain knob, and try cutting anything below 200 Hz manually.

When EQing hi-hats, you want to have a modest gain between 200 Hz and 300 Hz as this range gives the particular sound clarity for this set of cymbals. The dominant frequencies in hi-hats are found between 300 Hz to 3 kHz.

To bring up the unique tones in crash and ride cymbals, you want to experiment with frequencies between 300 Hz to 700 Hz. I say “experiment” because depending on the cymbal’s size, the material alloy, and bell size, the sound will be unique.

Your cymbals’ attack frequencies are between 700 Hz to 7 kHz, with harmonics expanding all the way to 25 kHz. When equalizing, crash, rides, chinas, etc. Depending on the size, you want to sweep the attack range of frequencies until you tune the EQ to get a well-balanced tone that is not harsh overpowering.

Any frequencies beyond 8 kHz will add brightness or treble to the cymbal’s sound. Here it’s up to you what you want to achieve. Just remember that if you boost anything beyond 8 kHz too much, it will sound too bright, which tends to pierce through the ear, and that’s a negative effect.

To make your cymbals shine a little bit on the mix, you can subtly boost this range, and you will achieve a nice balanced cymbal’s mix.


Create Balance

Experience is also one of the key factors in how to EQ live sound. However, even with limited knowledge, you can do a decent job by cutting out unwanted noise and cleaning up the sound by dealing with the proper frequency ranges. 

If you are starting out on your first foray into live sound, then Virtuoso Central is here to help. Start by reading our handy guide on live sound tips for beginners by clicking here. 

How to Set Up 3 Point Lighting for YouTube Videos

You’ve got the camera, you’ve got the sound, and now you need the lighting. In the whirlwind of videography, you might be caught up with so many elements you ignore the lighting. This is not something you want to do.

Lighting is a crucial aspect of videography. Amateur filmmakers assume that because they have the right camera, they’re able to neglect lighting. Without proper lighting, the project will look unprofessional and unlit. 

You don’t want to distract people who view your work with poor lighting. The essential knowledge for lighting is learning the 3 point lighting setup. This is the first thing taught in any videography lesson. 

Whether it is for your YouTube channel, streaming, or video production, you must step up your lighting game. Let’s break it down.


What Is a 3 Point Lighting Setup?

3 point lighting is a traditional method of illuminating a subject. It’s used in video and photography productions. It also works perfectly well for YouTube content creators, to illuminate a subject on stage or for live streaming. All you need is three quality lights and an understanding of how to use them. 

Even if you only have one light or ring light, the principles still apply. Think of this as a guide to keep in mind during videography projects. Once you have enough practice, you’ll be able to experiment and expand on what you know.

In a 3 point lighting setup, you need three essential lights: the key light, the fill light, and the back light. By placing these three lights in the right positions and adjusting the lights’ brightness and color temperature, you can achieve perfect illumination that will make your videos stand out.

The first thing you want to think about before even lighting a scene is the light’s motivation. Think of the look you’re going for and how it serves the project’s tone. Once you can answer the initial questions, you’ll know how to get there with the lighting package you have.


How to Do a Proper 3 Point Lighting Setup for YouTube Videos

Key Light

The key light is the biggest and brightest source in your lighting set up. It’s where the prime exposure of your scene comes from. Typically, videographers place the key light slightly off to the side, at about a 45-degree angle, in front of the subject. However, don’t feel limited by this; try different angles to see what works best.

Since you already decided on the project’s look, you can shape the light to fit the aesthetic. If the project is dramatic and moody, then you’ll want low-key lighting. That means higher contrast and deep shadows. 

If the project calls for a lighthearted and joyful tone, then you can use high-key lighting. To ensure that the subject is evenly lit, you can use different diffusion methods.  

Once you set up the key light, you’ll be able to see where the shadows fall. If you only have one light, you can adjust this to create a more dramatic image. Even though you won’t fully create a high-key environment, you don’t have to settle for only one mood.

Once you have the key light set, then you see where your fill light comes in.

Fill Light

Even if you’re happy with the key lighting, bringing in a fill light can add a great dimension to your image. If you’re going for that high-key look, the fill light can “fill” the shadows caused by the key light. If you want to even it out altogether, make the fill light as bright as the key. 

This is where you can control the contrast and overall feeling with more flexibility. The fill ratio will decide the contrast of your video.

The fill light doesn’t always have to be a light aimed towards the subject. Sometimes, it’s aimed towards a surface, and the fill comes from the bouncing reflections. 

For example, if you’re using a key light and it’s bouncing off a white wall, that bounced light is helping fill in shadows. If you want to reduce that bounce, you can use light diffusers to control how the light enters your image.

You can also illuminate any significant shadows in the image to give it more detail.

You’ll want to position the fill light toward the shadows. This means placing it at a similar angle to the key light but on the opposite side, usually at around 45 degrees. 

Back Light

The third and final source of the 3 point setup lighting is the backlight. It is also called the “rim light” or “hair light.” This is usually placed behind the subject, and it creates a rim of light or outline around their head. 

The primary purpose of this light is to separate the subject from the background and give depth to the image. Place this light behind the subject and try to make it come from a higher angle. Then, you can adjust to see how intense you want it to be.

While people are happy with just using a key and fill, the backlight adds highlights that can elevate your image to another level.


Here are some examples of 3 point lighting kits that would deliver excellent results for your video recordings (Links to Amazon):

  • GVM LED 3 Point Video Lighting Kit
  • Neewer 3 Pack Dimmable LED Lighting Kit
  • Pixel RGB Full Color LED Video Lighting Kit

3 Point Lighting Diagram

3 point lighting diagram

Using a Ring Light as the Main Lighting Setup for YouTube Videos

An alternative video lighting setup for evenly lighting a subject that delivers excellent results for recording YouTube videos and streaming is by using a ring light.

Let’s say you don’t want to use a 3 point lighting setup because you don’t have space or because you don’t want to deal with the setup; in that case, a ring light is a good alternative.

With a ring light, all you have to do is place it in front of the subject and turn it on. The ring will disperse the light evenly. The only drawback is that it needs to be placed close to the subject. Some ring lights come with a stand and mount to install the camera.

Suppose you are a solo YouTube content creator and shoot video in a small area. In that case, a ring light works perfectly well and delivers excellent results. But if instead, you shoot your videos in a larger area, a ring light is not enough; for such a case, a 3 point lighting setup should be the choice.

Here are some examples of ring light setups with stands that fit different devices (Links to Amazon):

  • Pixel 19″ Ring Light Kit – Fits mobile phone, iPad, and DSLR cameras
  • Inkeltech 18″ Ring Light – Fits mobiles phone and DSLR cameras
  • Cshidworld 18″ Ring Light – Fits mobiles phone and DSLR cameras
  • Neewer 18″ Ring Light Kit – Fits mobiles phone and DSLR cameras

Brightness and Color Temperature are Key Elements in a Video Lighting Setup

Most LED lighting for videos come with controls either on the back of the unit or accessible through an app to adjust the brightness and color temperature to achieve the desired lighting effect.

By selecting a warmer color temperature (2700K to 3000K), the videos will project a more cozy and inviting ambiance that attracts the viewer. Using cool white (3000K to 4900K) creates a warm and welcoming feeling that can go well depending on the type of videos you create.

For a more invigorating and crisp scene, use daylight color temperature from 5000K to 7000K.

In case you didn’t know, the color temperature of light is a way to describe a light source’s appearance, and it’s measured in Kelvin (K). In photography and video, the commonly used color temperatures range from 2700K to 7000K.

The lower the number, the warmer the light is, and it tends to be more yellowish. The higher the number, the brighter it is, and the light tends to be whiter.


What’s Next?

A 3 point lighting setup is the first step to any good project. Once you get used to it, you’ll want to experiment with different creative versions of it. Lighting is something you learn and continue to experiment with. As a vlogger or a narrative storyteller, lighting for videos should be a fun and rewarding experience. 

Once you have the basics down, you’ll be able to push your project to the next level by improving the lighting. This means learning about all the different lights that are available and what they all do.


Take Your Video Projects to the Next Level

There are many elements that you need to consider when you are a videographer. It’s essential to learn the three-point lighting setup, no matter what type of footage you’re shooting. It’s not just lighting for vloggers and youtube creators; it’s the foundation for all the different video lighting setups.

Don’t make the mistake that other videographers make of placing all your emphasis on the camera’s quality without considering sound or lighting.

Having the right microphone to shoot your videos and the proper lighting setup will reflect on your videos’ quality and make them stand out from the rest. The first step is to learn the basics, and then you can build on that. 

If you’d like to know more about how to elevate your work, particularly with sound, feel free to contact us!

The Best Portable Tools for a Mobile Podcast Studio

Are you podcasting only in your studio, and wish you could go mobile?

Mobile podcasting from a live sports event as a commentator or after a live music event in a backstage interview can be a powerful ambient sensation for your viewers and listeners.

Since podcasting’s greatest moments are moments of genuine life, why not go out into it? It adds value to your podcasts — or could.

But to go out and record your podcast, you need to have a mobile podcast setup. Something that is portable, lightweight, battery-powered, and that has all the features to record a high-quality podcast just as if you were in the studio.

The best professional mobile podcasting setup is the Zoom PodTrak P4 portable podcast recorder with the Zoom ZDM-1 microphone and headphone pack.

Want to know about it in more detail? Read on, friend.


Best Portable Podcast Setup – A Complete Minimalist Podcast Setup

As far as professional mobile podcasting tools, it will be difficult to find something better or more practical than the Zoom PodTrak P4 portable podcast recorder.

With the P4, Zoom (not to be confused with the meeting platform) offers an excellent bundle for portability and effective recording. The bundle includes the PodTrak P4 and two ZDM-1 microphones with portable stands, cables, and two headphones.

Let’s explore its features in more detail.


The Zoom PodTrak P4 Portable Podcast Recorder

The P4 is so full of features that you are not going to miss the studio. What stands out the most is that it’s compact, affordable, flexible, and captures professional-quality audio wherever you’re recording your podcasts.

It Comes With All the Ins and Outs for up to 4 Guests

You can use one or up to four mics, depending on the number of guests you have on the podcast. The P4 provides four high-quality mic preamps with up to 70 dB of gain to deliver excellent sounding recordings.

Each channel comes equipped with phantom power to enable condenser microphones, and it can be turned on or off from a dedicated switch.

The Podtrak P4 also provides four dedicated headphone outputs, one per person. Each mic and headphone volume knob is numbered for easy visualization and access.

Features a Call-In Channel for Phones and Video Conferencing Platforms

A useful feature is to receive phone calls on the podcast by connecting a phone to the recorder. Everyone connected to the mixer will hear the caller, and the caller will listen to everyone. At the same time, the whole conversation is recorded for the podcast.

The call-in channel can be selected in channel 3 by the flip of a switch, and it has a dedicated volume knob to control the call-in volume.

The phone can be connected using a TRRS cable or wirelessly via Bluetooth. For Bluetooth connectivity, it requires the Zoom BTA-2 adapter, sold separately.

Do you need to add a second caller from Zoom Meetings, Skype, Google Meet, or Microsoft Teams? No problem, you can connect your computer via USB to channel 4 by switching it to USB mode and control the volume of the incoming call. This feature will enable you to record any guests straight from your computer.

To automatically prevent echo and feedback from the caller’s phone, the PodTrak P4 uses a Mix-Minus function. It means that the audio fed back to the phone includes the mix from all the channels minus the phone’s incoming audio. That way, the caller can listen to the conversation without echoing his voice, reducing the system’s feedback.

Check Price on Amazon

Produce Your Podcast Like a Pro With the Assignable Sound Pads

The P4 allows you to use 4 pads for assigning sound effects to add originality to your podcast.

Assign up to 4 sounds from the 11 preloaded sound effects that include applause, laughter, and more, or you can easily change them or add your own by transferring the files from your computer.

It Serves as a USB Audio Interface for iOS, Android, and Windows

Turn the Zoom PodTrak P4 into an audio interface. It provides a 2-input, 2-output configuration when functioning as an interface while connected to a computer.

You can use it for recording or live to stream, allowing you to use the mixer on platforms like Twitch, Youtube, Etc.

Portable – Battery Powered

It has almost all of what you’ll need in a small form factor. It works with a power adapter (not included) or 2 x AA batteries, making it extremely adaptable.

On 2 AA batteries, the P4 operates up to 4 hours. You can extend the recording time by using a USB battery pack.

Check Price on Amazon

The Zoom ZDM-1 Microphone and Headphone Pack.

The ZDM-1 microphone pack is ideal for podcasting delivering studio-like sound without breaking the bank. It comes with everything you need to build your mobile podcasting studio.

The box includes one ZDM-1 dynamic mic, one ZHP-1 closed-back headphones, a ZTPS-4 tabletop tripod mic stand, a windscreen, and a 10ft (3m) cable.

Excellent Quality Mic Designed for Podcasting in Mind

The large-diaphragm dynamic mic captures smooth vocals with balanced tones, perfect for podcasting. Dynamic microphones are used in podcasting studios worldwide.

The ZDM-1 was designed by Zoom to be used for podcast and broadcast applications. Dynamic mics are more forgiving than condensers because their membrane is less sensitive, picking up less ambient noise, especially if recording in the outdoors or noisy environments.

Check Price on Amazon

Accurate Monitoring Headphones

With the ZHP-1 closed-back headphones, you can monitor everything that’s being recorded in the podcast, and each guest can hear everything in detail.

Besides delivering excellent sound, these headphones can help isolate external noise because they fit over the ear.

Their 40mm neodymium drivers provide a wide frequency range and superior sound accuracy.

The padded earpads and headband are very comfortable to wear even during a prolonged time.

The Mic Pack Includes All the Accessories you Need for Mobile Podcasting

The last thing you want in a mobile podcasting setup is to carry heavy and oversized microphone stands. With the ZDM-1 pack, you are covered! It comes with one ZTPS-4 tabletop tripod mic stand that lets you turn any surface into a podcast studio.

They are durable, lightweight, and are so small that you can pack several of them in one compartment of your backpack.

The pack also includes a windscreen perfectly designed for the mic to help reduce plosive sounds and unwanted sibilance from vocals.

The included 10ft (3m) XLR cable can be connected to the PodTrak P4 or any other audio mixer, for that matter.

Check Price on Amazon

Features You Want For Your Mobile Podcasting Kit

What do you bring along when you’re on your way to podcast out-of-studio? There are a few things you’ll need to remember. What are those, you ask?

  • Keep it lightweight
  • Keep it consistent with your editing and publishing workflow
  • Think about power concerns
  • Make a checklist
  • Test your setup at home before you go out

Of course, being mobile, you’ll want to keep it lightweight. A backpack, duffle bag, or light hardshell case will be the best. Considering your gear can be quite expensive, you’ll want to keep it in a safe environment.

Using gear that is consistent with your sound quality, editing, and publishing workflow is absolutely necessary for you and your audience. It is something you want to keep in mind when choosing your mobile setup.

You should always try to deliver consistent audio quality. But being mobile once in a while, your audience will likely forgive any slight inconsistencies.

By the way, what gear do you have, and what do you need to bring? A checklist can help.


Make a Checklist and Check It Twice

It’s essential to make a list and write it down. That’s opposed to making a list and keeping it in your head. You want to be prepared every time you walk out the door with the purpose of portable recording.

There’s nothing as frustrating if you’re about to start your podcast or you’re setting up and notice a major component missing. You thought it was there, but lo and behold, it’s missing when you need it most.

A sample setup might look like this:

  • Bag, backpack, or case
  • Durable microphones (maybe even a backup)
  • Portable mic stands
  • Windscreen or wind foam
  • Interface, recorder, smartphone, or tablet
  • Earbuds or Headphones
  • cables
  • Batteries
  • Webcam (optional)
  • Adapters

This checklist is neither exhaustive nor universal. Every use case is different, so some things will need to come and go as needed. There are instances in which you might want to record your podcast using your phone.

By and large, you’ll need things that perform these functions at the very least.

No matter what your checklist looks like, you’ll want to test your gear. Do a “sample podcast,” and just don’t publish it.


Your Portable Podcast Setup

When setting up a mobile podcast studio, don’t forget about delivering consistent audio to your listener. You also want to make sure all your gear is easy to use and small enough to fit in a backpack. Remember to make a checklist and test everything ahead of time before you leave.

It’s a great idea to try out mobile podcast recording for authenticity and to engage more with your audience. These tips help you to do that with more confidence and assure you haven’t left anything behind.

If, after reading this post, you think that this setup for mobile podcasting has too much gear to carry around, read our article on how to record a podcast using your iPhone. There you’ll find a more straightforward podcast recording technique using your phone.

Are you ready to take your gear and your podcast to the next level? Virtuoso Central is here to help you out where you need it. Our articles are designed to inform you about podcasting and hardware.

How to Grow Your Podcast Audience

Recently, headlines of Joe Rogan landing a $100 million deal with Spotify may have made your eyes widen.

That’s $1 for every American who listens to podcasts during 2020. It also may have made you think about how to grow your podcast audience to achieve your personal goals.

It might seem daunting if you haven’t started a podcast yet, and you’re trying to figure out what you need to start. Surprisingly, you don’t need many things; you can start with your iPhone, iPad, or Android device, as long as their microphones are up to snuff.

Once you have your recording figured out, and maybe even the content idea, how do you get people to listen? It’s probably the number one question podcasters ever ask.

Keep reading to get some of the best tips we can offer.


Sincere Connections With Listeners

Podcasting is just like being a business owner, in a way. Your product is you, your opinion, your viewpoint, or those you interview in your podcast. It’s your voice, essentially.

Who does your voice resonate with? Do you know? It would be good to know before you even pick your niche.

Once you have, though, you have to realize that your voice resonates with those people because you’re being you. You must be genuine and sincere in everything you do to grow your podcast audience.

If you don’t succeed with your podcast, see where you’re not genuine, and you’ll probably solve the problem of growth.

Connect with your audience with this genuine voice off-mic as well, using social media tools that your audience is using.

Research Your Target Audience

This is where researching your audience demographic comes into play. It might be surprising to you who that might be. At least 48% of Americans aged 12-34 are the largest segment of listeners by far. Get to know what they like, along with the other current demographic traits.

Get comfortable speaking to a group of people as a fictitious character (avatar) that you’ve invented with those traits.

Welcome Newcomers to the Community

Wherever you engage with your community off-mic, welcome newcomers to the community if you can. Of course, you might get so many followers it’s impossible to welcome them all. But if some are engaging enthusiastically and you don’t recognize the name, welcome and thank them for their voice.

Cultivating your community means sprinkling the waters of attention, and meaning it.

Engage as Yourself

All of these points mention getting emotionally involved with your audience and giving of yourself. Not a fictitious person you act as in a podcast. Unless, of course, that’s your obvious shtick, in which case you’re still being genuinely you!

Invest Time Connecting Your Audience

Once you release an episode, make sure to set a time to answer comments, even if at the beginning you only get a few.

Being engaged with your audience says a lot about how invested you are in succeeding with your podcast. Answering questions and comments is a way your audience knows that you care about them. Doing this will help you grow your podcast audience.

By delivering value to your listeners and engaging with them, your audience will recommend your podcast to their friends and family, and little by little, you’ll see growth in a snowball-like effect.

Don’t expect growth to happen overnight, but if you set your mind and do the work, you’ll see a significant increase on your channel with time.


Content Creation

Content creation can be a complicated process since you need to generally keep it within your niche and always have something to say. What happens when there’s nothing new to say? Take a look at some of the older podcasts with the lens of today. That way, you keep the information current.

Another tip for content creation is to take time to read the comments. Sometimes you’ll find hidden gems that can become your next viral episode. Your audience can guide you in this process.

For instance, if you release an episode, but in the comments, a significant percentage of the audience is not clear with the information you tried to convey, you could do some more research and release another episode going more in-depth in the explanation.

But what to research, write, and talk about isn’t all.

You have to make some decisions about how to present it — and when. One of the most important things about your content niche, specifically that we’ll recommend is to use the “blue ocean” strategy.

Below are some ideas for having a fresh format with a variety that your listeners might enjoy.

Trailers

Trailers and teasers are excellent appetizers for your content. Do you need to do it every time? No, but if you make trailers for some regularly scheduled podcasts and sometimes don’t, it gets confusing for the audience.

If you don’t think you can keep up with making a trailer for regular programming, it’s best to leave it for special episodes or milestones.

Cornerstone Content

Creating cornerstone content is something like a special event. It’s a well-produced piece that flows through a topic in an easy-to-consume and logical pace and structure.

Cornerstone content is more of a blogging term for a comprehensive article, which lays the cornerstone for the category the blogger is targeting. It might even get periodically updated. It’s best to try and make this content “evergreen” or ageless.

Regular Programming

Regular programming is just that. Do you want a daily audience? Is it a weekly or monthly podcast? You choose, but make sure you select a frequency that you can manage. Just remember that the more content you produce, the faster you’ll grow. That’s the way it is, and there is no hack around it.

And most important of all, be consistent with your uploading schedule. Because consistency, along with excellent content, will ensure growth in the long run.

Consistent growth from an engaged, loyal audience is what you should aim for. This type of audience is the best-converting audience when the time comes.

Content is one part of podcasting. You also have to research new content, find new guests if that’s your thing, and plan other engagements. There’s a surprising amount of work that goes on off-mic.

Snippets and Highlights

Just as you have trailers, you can have highlight reels. This is something you’ll see quite often with longer shows like the Joe Rogan Experience. Casts can be 1-5 hours, or even more, in his case, but he and his team publish the highlights of the show in snippets.

These five-minute highlights can get the listener’s attention. Use a catchy name for each highlight you publish, and at the end, you can invite the listener to listen to or watch the whole episode by leaving the link.

Quarterlies and Special Events

After reaching a milestone, like a specific number of subscribers or a number of episodes, you could have a special show with a special guest. This is something that your audience can look forward to. Make sure to hype it up as far in advance as possible.


Analyze Your Statistics

Statistics analysis is probably not your favorite part, but it’s necessary. Just as you have to analyze your audience initially, those audience members grow and age—the world changes with time.

Analytics help you visualize the growth of your channel. There you can see how each episode is performing. With all this data, you can see a trend and create content accordingly.

For instance, if you see a spike in the number of downloads for a specific episode, use that information to create more podcasts around the same theme but exploring different topics.

If you see that the trend continues, it means that your audience is more interested in that specific subject.

Keeping track of your statistics is different from platform to platform, so make sure you invest time in getting to know the tools given to you; they are worth it.


Grow Your Podcast With Peace of Mind

If you want to grow your podcast, it requires more than being good on the mic — but we could argue it’s 99% of what makes a podcast work.

It’s the all-important research before and after finding your audience and having something genuine to say that will stick with your audience. If you have that, the world is your oyster. Want to know more about audience generating tools, like live-streaming performances? The more you see from us, we guarantee the more you’ll want to keep reading.

  • « Go to Previous Page
  • Page 1
  • Interim pages omitted …
  • Page 4
  • Page 5
  • Page 6
  • Page 7
  • Page 8
  • Interim pages omitted …
  • Page 12
  • Go to Next Page »

Primary Sidebar

Search

Guides & Tutorials

  • Choosing a Portable PA System
  • How to Be a Better Singer
  • Build a Budget Live Streaming System Using PTZ Cameras
  • How to Get the Best Audio Quality on YouYube
  • Setting Up Stage Monitors
  • Mixing Console Basics
  • How to Position PA Speakers
  • Stage Sound System Set-Up
  • How to EQ Live Vocals
  • How to EQ Live Sound
  • Daisy Chain Active Speakers
  • Zoom Audio Settings for Music
  • How to Livestream a Wedding
  • Improve Your Livestream Audio Quality
  • Microphone Preamp Buying Guide

Featured Posts

Treblab X9 Pro: Tough Earbuds, Big Performance

Escape the Noise: Best Affordable Noise-Canceling Headphones

How to Combine Passive and Powered Mixers

What is a Ground Loop? – 5 Simple Ways to Fix the Buzz and Hum

Disclaimer

VirtuosoCentral.com is a participant in the Amazon Services LLC Associates Program, an affiliate advertising program designed to provide a means for sites to earn advertising fees by advertising and linking to Amazon.com.

Home  About  Contact  Disclaimer  Privacy

Copyright © 2019-2025 Virtuoso Central. All Rights Reserved.