This website uses cookies to improve and personalize your visit. Learn more about cookies. Got It

  • Skip to primary navigation
  • Skip to main content
  • Skip to primary sidebar

Virtuoso Central

  • About Us
  • Contact
  • Privacy

Informational

Open-back vs. Closed-back Headphones – Which One Is the Best for You

If you are reading this article is because you might be in the process of buying a pair of headphones and are confused about whether you should get an open-back vs. closed-back headphones. 

Each type has advantages and disadvantages depending on what you are going to use it for. Before handing out a load of cash, you need to know which type is best for your needs.

Before we continue, let me plant a few questions in your head to start thinking about how you will use your headphones. Are you a recording artist? Do you plan to start producing music in your home studio? Do you listen to music often and are constantly wearing headphones? Do you like natural or bass-boosted sound? Are you going to use your headphones for podcasting or in the recording studio?

Answering these questions will help you figure out which type you’ll need, and after reading this article and knowing all the pros and cons of each class, you can make an educated decision based on your needs.

Whether you’re making music or listening to it, you need the highest-quality sound. And having the correct type of headphones for your situation can make all the difference.

What you learn in this article also applies to other areas of audio as well, including podcasting, live broadcast, music production, etc.

To figure out which one is the best investment for you, keep reading.

Open-Back vs. Closed-Back Headphones: What’s the Difference?

The main difference between open-back and closed-back headphones comes down to the design and construction.

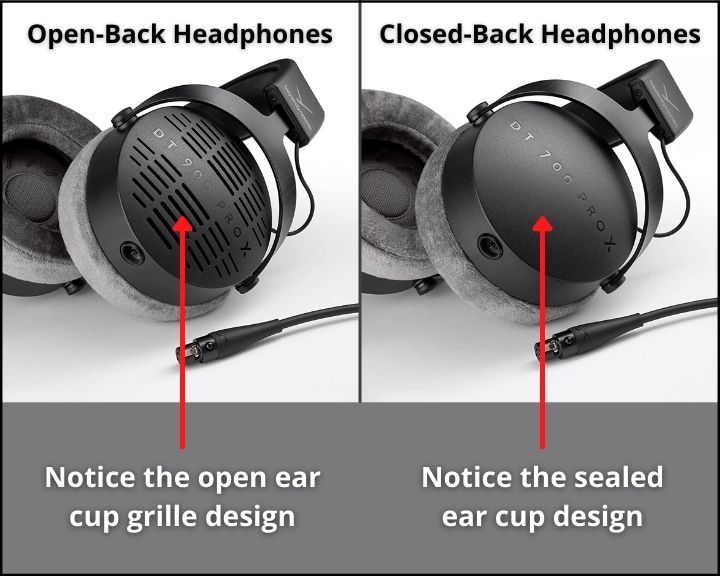
Open-back headphones are exactly what they sound like: open. They have a more open design that allows sounds to come in and out of the ear cups. Meaning that you may hear sounds around you while those around you may hear what you’re listening to.

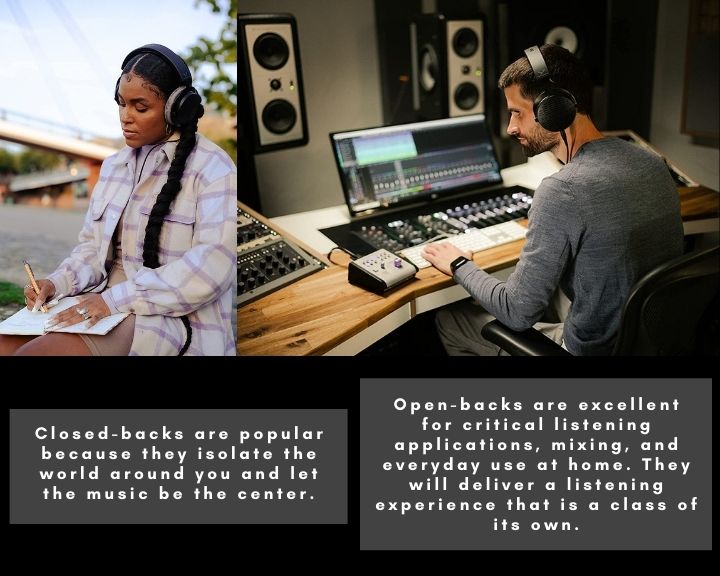
On the other hand, closed-back headphones are closed. They have a more isolated design that concentrates the audio into the ear cups on the headphones. So, you’ll be able to avoid hearing noises around you.

What Are Open-Back Headphones?

Open-back headphones have an opening for air to pass from the rear of the speaker diver to the ear cups. Because of this air travel, you won’t have to worry about any resonance or low-frequency build-up. 

Open-back headphones tend to be more expensive because they offer a more natural and clear sound. However, this is only true when you’re isolated without excess noise in your surroundings.

Because open-back headphones allow for air travel, they also have trouble blocking out surrounding noise. So, you’ll hear everything that’s going on around you.

In addition, people will be able to hear what you’re listening to. So, you may be disturbing those around you if you’re working in a crowded setting.

It’s also important to note that open-back headphones are relatively fragile. They are more susceptible to moisture because of their openness. If you invest in these headphones, you need to take good care of them.

With that said, open-back headphones are the best options when mixing or editing in the studio. In contrast, they won’t be a good option for recording in the studio because the reference music will bleed into the recording mic and compromise the take.

Here are some of the best open-back headphones available in the market [links to Amazon]:

  • Audio-Technica ATH-AD700X
  • Beyerdynamic DT 990 PRO
  • Sennheiser HD 660 S
  • AKG Pro Audio K712 PRO

What Are Closed-Back Headphones?

Closed-back headphones are completely sealed around the back. This design only allows the sound to go into your ear.

While this makes it easier to block out noises around you, it means that the sounds you’re hearing aren’t as natural or precise as you may want them to be. More technically speaking, the sealed rear chamber causes lower frequencies to be more amplified. Thus, it causes more unnatural-sounding music.

The sealed design also makes it more likely that your ears may become overheated. During the winter, this may be nice. However, during warmer months or in warmer settings, you may end up sweating inside of the headphones.

With all of these considerations in mind, closed-back headphones are best to use while recording in the studio because the reference music won’t bleed out, delivering a better take. They’re also helpful for artists who are trying to listen to themselves while recording their voices. The sealed design makes it less likely that the microphone will pick up the voice doubling.

They are also the best option to use while you’re commuting. You can also use them to listen to audio in a public place, like your office or a coffee shop.

If you’re someone who travels every day or works outside of the home, closed-back headphones are a must.

Check out this list of the best closed-back headphones [links to Amazon]:

  • Sennheiser HD 569
  • Audio-Technica ATH-M50X
  • AKG Pro Audio K371
  • Beyerdynamic DT 770 Pro
  • Shure SRH1540

This is What Each Design Offers

As we said, the design is the most significant difference that divides open headphones and closed headphones. Because of each headphone’s structure, each one has pros and cons.

The kind of headphones that you should use will depend on what kind of activities you’ll be doing with the headphones. Each type of headphone thrives in different environments with different uses.

Open-Back Headphones – Pros

  • They offer a clear, crisp, warm sound.
  • They’re perfect for at-home listening or in situations where others won’t be around while you’re using them.
  • If you’re trying to listen to something critically, open-back headphones are the way to go.
  • These headphones are also perfect for people who are mixing and mastering music or messing with high-quality audio files of any kind.
  • Music producers enjoy working with open backs because of the accuracy they provide.

Open-Back Headphones – Cons

  • This type of headphones isn’t great if you need something that can work in a crowded room.
  • You shouldn’t use them while you’re in the office, the gym, or any other crowded place as they can bother people around you, especially if listening at high volumes.
  • They also aren’t great at blocking outside noise, so you shouldn’t count on them to eliminate the noise around you.
  • If you’re commuting on a bus and trying to listen to music, these aren’t the headphones you want to be using.

Closed-Back Headphones – Pros

  • They are best for people who are looking for casual, everyday headphones.
  • They allow you to listen to audio without hearing all of the sounds around you. So, you should use these headphones while you’re traveling or working.
  • These headphones are also great for recording live in the studio because the noise won’t escape out the back of the ear cups. Whatever you’re listening to won’t feedback into the microphone. You can even listen to yourself while you’re recording without worrying about the microphone picking up the extra noise.

Closed-Back Headphones – Cons

  • There is a lack of ventilation. You shouldn’t use these headphones when you’re exercising or working out in any capacity.
  • While you can use them in the warmer months, you should be careful not to gather too much moisture in the ear cups.
  • The sound you’re hearing isn’t as natural.
  • The sealed rear chamber boosts lower frequencies causing a more unnatural and uneven sound.

Do Open-Back Headphones Sound Better Than Closed-Back Headphones?

Closed headphones may be able to keep excess noise from polluting your audio. However, open-back headphones offer the best sound overall.

Open-back headphones don’t have any audio build-up since the sound can travel out of the ear cup. This means that any resonant noises or low-frequency harmonics aren’t going to get stuck inside the ear cups and alter the original sound that you’re listening to.

Overall, you’re going to get a more transparent, more natural sound from open-back headphones, while you’ll get a more bass-boosted sound from closed-back headphones.

Because of this sound enhancement, open-back headphones tend to be more expensive.

Are Open-Back Headphones More Accurate?

Yes, open-back headphones are more accurate. They’re better for critical listening. The sound that you’ll hear through open ear cups will be more accurate than the one you’ll listen to through closed ear cups.

However, it’s also important to note that you may be able to hear more with closed-back headphones. Even if the sound isn’t more accurate, it is fuller since you won’t have to worry about outside noises infiltrating your sound.

Which Type of Headphone Is Better for Mixing: Open-Back or Closed-Back?

Since mixing requires sensitive and critical listening, it’s better to use open-back headphones. Ideally, you should mix in a private setting like in the recording studio so that there aren’t too many noises while you’re trying to listen.

Open headphones are the best choice for professional mixers who are hoping to make high-quality productions. Otherwise, you may find yourself creating sounds that you didn’t mean to create.

The inconsistency with frequencies on closed headphones will make your music sound different. So, you may end up producing music that isn’t exactly consistent with what you’re hearing.

Which Type of Headphone Is Better for Recording: Open-Back or Closed Back?

If you’re planning on using headphones for recording, you should invest in closed-back headphones. Because of their design, closed-back headphones keep the sounds from inside and outside divided. So, you’re only going to be able to hear what’s coming through the headphones.

This is perfect for recording. You can listen to yourself through the ear cups without your microphone picking up on the sound a second time. So, you won’t have to deal with any reverb coming through the ear cups and the microphone simultaneously.

Plus, you won’t be distracted by any outside noises. With closed headphones, you’ll be able to focus on the sound coming through the ear cups. There won’t be any excess noise coming through. 

Although, we do recommend that you record in a quiet place so that your microphone doesn’t pick up on outside noises.

Open-Back vs. Closed-Back Headphones: Which Should You Choose?

The battle of open-back vs. closed-back headphones comes down to what your preferences are. If you’re going to be using the headphones in a crowded place or the studio for recording or podcasting, you should invest in closed headphones.

If you’re going to be using the headphones in a private place or for music production, you should invest in open headphones.

In the end, if it is within your budget, you should get both types, that way, you have the right one depending on the situation.

To learn more about headphones and other audio devices, feel free to contact us. I’d be happy to answer any questions or concerns that you have.

6 Mic Techniques Every Singer Should Know About

As a vocalist, you might feel like your instrument is your voice. While this is true, you need to realize that having a beautiful, well-trained voice will not be enough to have a successful performance. The reason is that even the best of singers can instantly ruin a performance by using the wrong mic techniques.

Even the best sound engineer won’t make you sound good in the mix if you don’t use the mic correctly. Not only does this reflect poorly on him, but it also makes you look bad as well.

So, what can you do to make sure you always sound great when using a microphone to sing or speak?

Here are the 6 best mic techniques for vocals that you should know about:

  1. Hold the Microphone Correctly Because Your Grip Colors Your Sound
  2. Good Sound Starts at the Source – Mic Proximity is Very Important
  3. Use the Proximity Effect to Your Advantage
  4. Turn Your Head Slightly Away from the mic When you need to Hit High, Loud Notes
  5. Have a Clear Vision to Communicate With Your Sound Team
  6. Listen to the People Who are Mixing Your Live Performance – Stay Teachable

In this article, we go over each of these techniques and tips in more detail so that you know the best practices when handling microphones, let’s get started. 

1. Hold the Microphone Correctly Because Your Grip Colors Your Sound

One of the most crucial mic techniques for singers is to make sure to hold the microphone correctly. If you hold the microphone in the wrong way, you can make your vocals sound so terrible that the sound technician can’t do anything about it from their mixing console. 

Basically, you always need to make sure you hold the mic in the handle. You should never cover the metal grille with your hand while holding the mic because it will change the mic’s frequency response if you do. This means that the mic will overemphasize certain parts of your voice while removing other elements. 

Covering the metal grille while holding the microphone will generally remove some of the high-frequency content from your voice and concentrate the mid-frequencies. This will make your voice sound incredibly nasal and, in some cases, muddy, and there is not much that can be changed on the EQ to make it sound better. 

This happens because when you sing or speak through a microphone, some of the sound pressure escapes through the back of the grille, where standing waves tend to add up around the capsule.

Covering the grille capsule will add significant resonances that affect the microphone’s frequency response, negatively coloring the sound.

This phenomenon happens due to the sound waves bouncing back and forth between the inside surfaces of the grille without having a quick way to escape. Therefore, emphasizing some frequencies while rejecting others. This frequency unbalance creates resonances that change your voice’s tone, and the worst part is that the sound engineer can’t do much to improve the sound.

This is one of the vital microphone tips I can give you because not only will holding the mic incorrectly impact your sound, but your sound technician also won’t be too pleased with you as you’re making their life especially hard. 

If you’re in doubt about how you’re supposed to hold a particular mic, you can always ask the engineer. 

2. Good Sound Starts at the Source – Mic Proximity is Very Important

Another critical mic technique for singers or speakers is ensuring you don’t hold the mic too far away from your mouth. Some people tend to hold the mic very far down, and this is a huge mistake because the microphone will pick up your voice via reflections in the room rather than from your mouth, and it also picks ambient noise.

This means that the gain on your mic will need to be turned up a lot to be heard, making it prone to feedback.

When there’s deafening feedback coming out of the PA system, all eyes will be on the sound engineers, and this will reflect poorly on them, although the person with the mic is primarily responsible for the feedback in the first place.

When singing live on stage, the ideal distance to hold the mic is between 4 to 6 inches from your mouth.

Be mindful that your voice will sound overly bassy if you get too close to the mic’s head. Using the correct distance from your mouth will improve the sound of your voice while providing more gain headroom to the person working at the mixing console.

Help your sound engineer out by using the right microphone techniques when singing or speaking.  

3. Use the Proximity Effect to Your Advantage

Another thing you should do as a vocalist is to use the proximity effect to your advantage. Microphones tend to boost the low frequencies when the sound source is close to them. 

While the proximity effect in isolation could make your voice sound boomy and muddy, it is of great value to the sound engineer when used correctly.

The issue with using vocal microphones is that they also pick up the ambient sound from the loudspeakers inside the venue. This would end up making your voice sound cluttered and less natural, but if you’re getting the added bass from the proximity effect, it can be fixed by using the EQ to compensate and bring your voice back into the natural range.

Since it’s undesirable to have any sound except the voice coming through the mic, sound engineers want to eliminate the ambient sound from the mics as much as possible. And a way to achieve this is by using the proximity effect to our advantage.

The person working on the mixing console can use equalization to reduce the low end coming from the mic by decreasing the gain on the low-frequencies and compensating on the mid and high frequencies to get a natural sounding voice.

The great thing about leveraging the proximity effect is that most of the ambient noise present on the stage and in the venue will be significantly decreased. 

This is an example of something that might seem unintuitive from your perspective but makes perfect sense. 

Sound reinforcement is a complicated field, and sound engineers have complex knowledge about how acoustics works. It pays off to listen to their knowledge. 

4. Turn Your Head Slightly Away from the mic When you need to Hit High, Loud Notes

You generally want to have around 6 to 10 inches of distance between your mouth and the microphone when you’re hitting those high, loud notes as a singer. If the sound going into the microphone is too loud, it can cause the sound to clip. This is when the audio waveform starts to “square off” at the peak. 

When the sound goes into the microphone too loudly, there’s not much anyone can do to fix it. Even if you’re in a recording studio where you can do post-processing, there’s not much you can do if your vocal is clipping the mic.

The only solution is to use the correct mic techniques for vocals. Holding the mic at the proper distance is one solution, but it can be challenging to accomplish this consistently, especially when you’re trying to focus on delivering a great vocal. 

Another solution is to put the mic slightly to the side of your mouth when you hit those notes. Tilting the mic 45 degrees to either side when singing will help decrease the signal’s loudness when hitting high notes.

This is a much easier technique to get down, and it will ensure you’re not clipping the signal coming from the mic. 

5. Have a Clear Vision to Communicate With Your Sound Team

There are many situations on stage where you need to communicate something with the engineer. Most of the time, you’ll either want some element in the mix turned up or down in your monitors. 

As previously mentioned, sound engineers like to keep it low-key. This means you shouldn’t draw attention to them during your performance. You should avoid specifically asking them for things through the PA.

Generally, performers will use hand gestures and signals to communicate with the soundman what they want. With that said, they probably won’t appreciate it if you use overly dramatic and exaggerated motions. A good engineer will be able to recognize more subtle gestures. 

When sound engineers and performers are on the same wavelength regarding this, they can often communicate without the audience even realizing it. 

It may make sense to talk with your sound technician beforehand to figure out how they prefer you to communicate with them from the stage. If you’re unsure what they like, it’s usually best to keep it low-key. 

6. Listen to the People Who are Mixing Your Live Performance – Stay Teachable

One of the most critical tips that you’ll ever learn is to listen to your sound technician as they often have decades of experience, and they’re likely to have worked with their equipment for a large part of that time. 

This means that the sound engineer almost certainly knows more about their setup than you do. In most cases, it pays off to listen to them. If they tell you to adjust your microphone technique in some way, it’s because they’re trying to help you sound better. 

Another reason that you should listen closely to your soundman is because when the band and vocalist are easy to work with, it enables them to focus on getting a better mix. 

Sound engineers want to focus their energy on getting the sound levels right, not spending half the night fighting with the vocalist on the correct mic technique. If you treat your sound technicians well and listen to their advice, you’ll sound great. 

The Right Mic Techniques for Vocals Will Make You Sound Loud and Clear

If you want to be a singer or public speaker, you’re going to use microphones. While these devices are not quite as complicated as a guitar or drumkit, you’ll still need to master specific mic techniques for vocals if you want to sound your best. 

If you remember only one tip from this article, it should be that you need to listen closely to your sound engineer because they know the equipment best, and they will be more than happy to help you if you have any doubts about the technique. 

So many people hold the microphone wrong and use various other bad techniques that a sound technician will significantly appreciate you asking for their advice. 

If you read more articles like this one, visit our site as we always publish new articles. Do you have questions or comments about our dedicated site, please don’t hesitate to reach out.

8 Helpful Vocal Mixing Tips

Did you know that Michael Jackson’s Thriller is considered to be one of the best albums of all time? In fact, the album has sold over 30 million copies worldwide.

If you want to have a live production sound like Michael Jackson or another legend of music, you will need to master your mixing and other related skills.

If you are reading this article is because you are wondering which vocal mixing techniques you can use to get better-sounding vocals in live performance or the studio.

To get the best results when mixing vocals, you should:

  1. Coach the Vocalist to Use Proper Mic Techniques
  2. Set the Gain Stage to Minimize Noise and Distortion
  3. Use a High-Pass Filter to Clean Up the Vocal’s Sound
  4. Primarily Use Subtracting Rather than Additive EQ On Vocals
  5. Dial-In Compression Settings to Smooth the Sound
  6. Use Tools Such as Deezer or Multiband Compression Only If Necessary
  7. Use Effects to Enhance the Vocal’s Sound
  8. Make Sure to Provide a Good Monitor Mix for the Vocalist

This post will expand on these eight tips that will make a big difference when mixing vocals in the studio or at a live event. Hopefully, these tips will help you bring your sound to a higher standard and help you get better results. Let’s take a look.

1. Coach the Vocalist to Use Proper Mic Techniques

If you want to know how to mix vocals for a live performance, I’ll let you in on a little secret that is very simple but makes a lot of difference and will make your life easier when mixing vocals; good sound quality starts at the source.

This means that if you have the best mic and the vocalist has the most beautiful voice, but the microphone is not positioned or held using the proper techniques, it will sound awful no matter how good of a sound engineer you are.

So, using the correct mic techniques by the vocalist is the first and foremost important tip to get the best results when mixing vocals in a live environment. Because if your sound source doesn’t sound good before you capture the signal by the mic, no matter what you do on the mixer, it won’t sound good.

We have an entire article that explains the mic techniques every singer should know about when performing live. Click the link to check it out.

Choose the Right Type of Microphone

It is also vital that you and your vocalist are on the same page on which microphone will suit your needs best, whether it is a condenser or dynamic mic.

After all, a condenser mic isn’t going to sound the same as a dynamic one. Depending on what kind of result you want, either one could come in handy.

For instance, intimate concerts in tamer venues often require a condenser mic, while a dynamic mic is suited to stadiums and other noisy locations.

One would hope that your vocalist already has the necessary know-how and experience when dealing with microphones, but that’s not always the case.

It’s important for them to realize that the closer they get to their mic, the clearer the sound will be and the less noise it will pick up.

correct vs. incorrect way of holding a microphone

2. Set the Gain Stage to Minimize Noise and Distortion

Gain staging is a crucial step for getting beautiful sounding vocals. If you didn’t know what gain staging is, here is a simple explanation. It is the process of setting the correct volume at the input of each amplification stage without distorting or clipping the signal.

The goal is to bring up the gain of the audio signal (in this case, the vocals) to the point that even if the signal goes down the audio chain to different pieces of equipment, it doesn’t distort or clip when it comes to the output.

For example, suppose you have a mic signal that goes through a preamp, EQ, effects, etc. You want to get the audio at the output with no distortion or clipping, even though the signal is going through several amplification stages.

To achieve this, you need to set the gain staging correctly so that you don’t end up with a distorted signal after manipulating it.

Performing a mic test will help you determine if you’ve increased the gain by too much or if the gain is not set high enough. Getting it at the perfect setting will allow you to cut out as much noise pollution and distortion as possible.

When setting the gain stage, be sure to keep the EQ in mind but don’t mess around with that until later. At this point, you should only use the EQ to eliminate any feedback that occurs during the mic test.

In this critical step, just make sure your signal goes through your audio chain and comes out strong, clean, and without clipping, distortion, or noise.

setting gain staging

3. Use a High-Pass (Low-Cut) Filter to Clean Up the Vocal’s Sound

Another tip that will help you when mixing vocals is to use a high-pass, also known as a low-cut filter to eliminate any muddiness present in the audio signal.

When a signal sounds muddy, your audience can’t hear things clearly, and this is due to weak harmonics and a smeared time response.

So to clean up the vocals, use the handy high-pass filter that comes with your mixer; it will help a lot. The sweet spot zone for high-passing or low-cutting vocal sounds is at 100 Hertz and below.

When you use a low-cut filter on an audio signal, you get rid of frequencies below 100 Hz. Frequencies in this range don’t help at all when mixing vocals; all they do is create a low-end rumble that messes up your mix. So by activating the filter, you eliminate these problematic frequencies, and you end up cleaning the vocal’s sound.

After passing the signal through the filter, you’ll be glad to hear that any residual muddiness will be gone. This will go a long way toward making the vocals sound as clean and crisp as possible.

High-pass (low-cut) filter helps eliminate any muddiness present in the audio

4. Mostly Use Subtracting Rather than Additive EQ On Vocals

Another aspect that will help when mixing live vocals involves using a subtracting EQ approach instead of additive EQ. Simply put, it can be tempting to use EQ to add and subtract many frequency elements. However, the old saying “less is more” definitely applies to vocal mixing when equalizing.

Rather than focusing on the additive side of things, you should spend a lot more time subtracting. This strategy can give you much more control over the sound of the vocals while also avoiding any unwanted compression.

As you boost specific frequencies, you end up coloring the sound, which could negatively impact it. With that in mind, you should listen closely to all the frequencies and bring down the ones that don’t belong or that add sound pollution to the singer’s voice.

Don’t forget to consider any outlying frequencies in the vocalist’s voice too. Addressing those will result in a voice that is crystal clear rather than muddy, for instance.

Remember that your job as a sound engineer is to create a mix that sounds as natural as possible. Being mindful when applying EQ will determine the sound quality you will deliver to the audience.

This principle also applies if you are mixing vocals in the studio. Your job is to capture the singer’s performance in the most natural way possible. Adding too much EQ will rob the natural characteristics of the performance, which is not acceptable.

Another vital aspect to keep in mind is that the vocals are the most important part of the mix in any live sound setup but tend to be the hardest to get right. In our article how to EQ live vocals, I explain in detail what you need to do to correctly EQ vocals. Click to link to check it out.

5. Dial-In Compression Settings to Smooth Vocals

As with EQ, a small amount of compression can work wonders on your live or studio vocal mixing. The last thing you want to do is go overboard with it. There are several ratios that are considered sweet spots for your dial-in compression settings, including 3:1, 4:1, and 6:1.

Be sure to go through your various attack and release settings so that you can find one that matches your vocalist’s singing style the best. From falsetto belting to death metal growls, not every style will be suited to a single compression setting.

For instance, a slow-release setting may end up compressing vocals for too long. Similarly, a too-fast attack setting will strip the power from even the most passionate voices out there.

In your effort to smooth out the vocals in a way that sounds pleasing and does justice to the singer’s voice, you may find yourself setting the compression between 3 and 60, but there are always exceptions.

6. Use Tools Such as De-Esser or Multiband Compression Only If Necessary

While audio tools can come in handy to help even out your sound mixing, you should do your best only to use them if it’s absolutely necessary.

Usually, if you add too much to your sound, it will end up sounding unnatural. This is why you should not go overboard when using different tools or filters, as this could be tempting when exploring different possibilities. Just use them only when strictly necessary and if they are going to enhance the performance.

For example, you can use de-essers to eliminate plosives and sibilance (intrusive “s” sounds), especially if they are more prominent in the singer’s voice in question. However, if this isn’t a noticeable aspect in your mix, then using a de-esser could end up muddying the sound.

A multiband compressor is often used to finetune and edit frequency layers within a given vocal track. Whether it’s low frequency, mid-frequency, or even high frequency, this tool gives you the option of toying with each.

You can even apply different compression settings for each frequency down to the specific attack and release settings. Typical multiband compressors have 3 to 5 bands of compression.

Remember to be mindful when using these types of audio tools and ask yourself if using them enhances the sound.

7. Use Effects to Enhance the Vocal Sound

Effects are like the icing on the cake, but they shouldn’t be added until your mix is as perfect as you can get it. From there, the effects you add will depend on the music genre and the specific tastes of the singer. For instance, you won’t want to give them autotune unless they request it.

Delay, reverb, and pitch shift are several types of effects that can enhance the voice of a general singer without being over the top. Since these effects are often quite subtle, the audience won’t notice them on a conscious level unless they’re sound-mix pros. Instead, all they’ll know is that what they’re hearing sounds amazing.

Hall or plate settings are often great starting points for figuring out how much reverb is needed. From there, you can tinker with the decay and pre-delay time of the reverb to find out what sounds best for the type of music involved.

In general, sound mixers like to use a ping-pong delay for a nice stereo movement, a short slap delay for a bit of depth, or a pitch shift to give the impression of a chorus sound without overdoing it.

8. Make Sure to Provide a Good Monitor Mix for the Vocalist

Your chores don’t stop there, though, because it’s essential to make sure that your vocalist’s stage monitor is also set correctly. You may even need to go up on the stage to have a better idea of what the surrounding area sounds like.

This info can help you adjust the mixing as needed, avoid feedback on stage, and boost the volume as much as possible so that everyone in the crowd will enjoy the show.

Once the show starts, you may be tempted to fiddle with the settings. However, it’s important to let the mix live its life. You should only make changes that are necessary or requested by one of the musicians. After all, each band has its own dynamics, and you could end up sabotaging that by constantly changing things as they play.

While there’s a science to mixing, you can’t forget to listen to music with the ears of an artist too. Not everything is going to fit into an exact mold. If it did, then music would have no personality or soul behind it.

Even if you’re not a huge fan of the vocalist who is singing, you should put yourself in the shoes of one and imagine what you would want to hear as you’re out there in the audience. That way, you can end up producing a concert that the crowd will remember for many years to come.

Ready to Use These Vocal Mixing Tips?

Now that you’ve learned all about the 8 tips for mixing live vocals, you can ensure that your performance has a pristine production that does the music justice.

When it comes to live sound and recording, you can always rely on us to provide you with helpful tips and hacks. We post high-quality content that covers a range of essential equipment and procedures, including PA systems, microphones, active and passive speakers and subwoofers, miniature PA systems, setting up various sound systems, and so much more.

If you have questions or comments about our dedicated site, please don’t hesitate to reach out.

How to Convert VHS to Digital

Your precious memories stored in VHS tapes are at risk. Research has shown that VHS tapes can deteriorate in as little as 10 years due to magnetic decay. That’s considering it’s stored in an ideal environment with a humidity between 40-50% and temperatures between 64-70°F (18-21°C).

If you haven’t converted your family’s early memories to digital files, you should do it as soon as possible. And if you are reading this post, you are considering the importance of doing so before it’s too late.

This post will show you a couple of methods you can use to convert your VHS tapes to digital and store them permanently in a format that won’t lose quality over the years and can be easily shared with friends and family with the push of a button.

Additionally, I will show you the devices you need to turn your old tapes into digital videos by yourself at home, saving you hundreds, even thousands of dollars if your collection is quite large. Let’s get started.

Two Simple Ways to Convert Your Old VHS Tapes to Digital

Turning your old tapes into digital videos is an easy task if you have the correct tools. The two best methods are:

  • Using a video/audio capture device – Needs a computer
  • Using a standalone digital video capture/recorder – No computer needed

Please note that you need to have a VCR to play the tapes and convert them to digital. The information presented in this post also applies if you want to convert your old camcorder tapes, Video8, Hi8, or any other analog or digital video recordings. Still, you need to play these tapes to convert them using the capture device or recorder.

Basically, the way we will do this is to take the analog video/audio signal coming from the VHS player, digitize it, and store it in either the universal H.264 digital video format or MP4 video format. Choosing a video format to store your VHS videos will depend on the type of converter you select.

These formats are ready for Windows and Mac computers. They are also supported by Android smartphones, iPhones, iPads, smart TVs, and any video editing software of your choice.

Want to upload the converted videos to social media or the cloud? No problem, the converted digital files can be used in any social media platform, including YouTube.

1. Using a Video Capture Device to Convert VHS Tapes to Digital Format

In this case, the purpose of using a video capture device is to take the video and audio feed from the VRC player, digitalize it, encode it to H.264 or MP4 digital video format and transmit it to a computer through the USB cable.

Most video capture cards used for converting VHS to digital come with bundled software offering simple tools that allow you to trim the beginning and end of the captured video. Some also include enhancement tools to bring back to life old videos.

Here is a list of the best VHS to digital video/audio capture devices available in the market today (links to Amazon):

  • Elgato Video Capture
  • Roxio Easy VHS to Digital Converter
  • VIDBOX Video Conversion Suite

To connect the video capture with your VCR, follow these steps:

  1. Using the included RCA cable, plug the yellow, red, and white cables into the corresponding connector on the VCR player.
  2. The other side of the RCA cable, connect it to the video capture card as shown in the diagram below.
  3. On your computer, install the included software.
  4. Connect the USB cable from the capture device to the computer. After a few seconds, you should see a pop-up message on your computer saying that the connected device is installed and ready to use.
  5. Open the application software you installed, and follow the on-screen instructions to select the screen resolution and video format of your choice. The most common is MP4.
    • If there are no on-screen instructions, go to settings and select the correct on-screen resolution and video format.
  6. Turn the VCR on and insert a VHS tape to start playing.
  7. Click the record button to convert the video/audio feed from the VCR into digital format.
  8. Run a short test to make sure everything works as intended.
  9. At this point, you can start playing each tape through the converter to change it to digital format.
  10. Once the VHS tape has been converted, save the video file with the name of your choice.
  11. Repeat steps 6-10 for each VHS tape that you wish to convert into digital format.

Connection Diagram to Convert VHS Tapes to Digital Format Using a Capture Device

Connection Diagram to Convert VHS Tapes to Digital Format Using a Capture Device

2. Using a Standalone Digital Video Capture/Recorder to Convert VHS Tapes to Digital

Another way to turn your old VHS tapes into digital videos without the need for a computer is by using a standalone digital video capture and recorder.

Basically, this device comes with everything you need inside a small form factor. It accepts any input source with RCA Composite or S-Video and offers HDMI output with a 1280x720p60 resolution if you want to connect it to a TV.  

Standalone converters feature a 3.5” LCD display for preview and playback. You can record directly to an SD card or USB Flash Drive plus it comes with built-in speakers to monitor the audio as it is recorded.

If you are looking for an easy way to convert your old VHS tapes to digital without the need for a computer and dealing with software installations, using a standalone digital video converter is your best choice. Here are the best ones available in the market today (links to Amazon):

  • ClearClick Video to Digital Converter
  • Diamond Multimedia Video to Digital Converter

If you decide to go this route, here are the steps to connect the video capture/recorder with your VCR:

  1. Using the included RCA cable, plug the yellow, red, and white cables into the corresponding connector on the VCR player.
  2. The other side of the RCA cable, connect it to the video capture/recorder device as shown in the diagram below.
  3. Connect the included power supply to the wall and use the USB cable to feed power to the unit.
  4. Turn on the video capture device.
  5. Go to the menu and scroll down until you find Video Source and select AV if you want to use RCA cable or S-Video to use the S-Video connection. You can also use the menu to change the language, time, and other settings such as aspect ratio and video format.
  6. You can use either an SD card or a USB flash drive to record the signal feed. It is also possible to use an external hard drive as long as it has its own power supply.
  7. To select the type of memory you are going to use, go to the menu and scroll down until you find Default Storage Device. Choose between SD or USB.
  8. Insert an SD card or flash drive into the corresponding slot.
    • Please note: the device might ask you to format the memory card or flash drive. Doing so will erase anything stored on the card or flash drive. Please make sure you don’t have any critical information on them before accepting to format.
  9. Turn the VCR on and insert a VHS tape to start playing.
  10. Click the record button to convert the video/audio feed from the VCR into digital format.
  11. Run a short test to make sure everything works as intended.
  12. At this point, you can start playing each tape through the converter to change it to digital format.
  13. Once the VHS tape has been converted, save the video file with the name of your choice.
  14. Repeat steps 9-13 for each VHS tape you wish to convert to digital format.

Note: This procedure can be used to convert to digital format any video source from devices such as camcorders, Video8, Hi8, even old video game consoles can be connected to this device, and because it outputs HDMI, you can see the video feed in bigger TV screens. Just know that when the HDMI cable is connected, the 3.5” screen turns off.

Connection Diagram to Use a Standalone Video Converter

Connection Diagram to Convert VHS Tapes to Digital Format Using a Standalone Video Converter/recorder

Standalone Video Converter Review

Video Credits: JetskiPilot Gaming

Tips to Get Better Results When Converting your VHS Tapes to Digital Format

To get the best possible video quality, your VHS player needs to be in good condition. This means that its magnetic heads need to be clean and calibrated.

To clean the heads is pretty simple. All you have to do is use a VHS head cleaner, insert it into the VHS player and let it run for a few minutes. Then you would remove it and play your tapes.

You’ll know if the heads need alignment if the video that is being played flickers and you see lines on the screen. In some cases, flickering video with lines is also due to the tapes being damaged. But most of the time, flickering lines on the screen are a tell-tale sign that the tape path needs calibration.

Calibrating or aligning the heads is a more complicated process than cleaning the heads. To do this, you would need to find a technician who has the tools and knowledge to do it.

If you are up to calibrating it yourself, you can find some video tutorials on YouTube that walk you through the process of aligning the tape’s path using a TV and a screwdriver. But please keep in mind that if the process is not done correctly, the problem could worsen or even damage the heads.

Aligning the Tape Path on a VHS Player – D.I.Y

Here is a video I found on YouTube in12voltvids channel showing the process on how to align the tape path.

Video Credits: 12voltvids

If your old VCR has mechanical issues such as tapes that won’t play, rewind, fast forward, or eject, it might need repair or replacement.

Nowadays, due to VCRs not being popular because they are old technology, it might be hard to find a place to fix it, and it might not be worth it. If that’s your case, then buying a new one would be the most cost-effective way.

If you are in the market for buying a new VCR, here are the links to the most popular brands available on Amazon:

  • JVC 4-Head Hi-Fi VCR
  • Toshiba VCR/DVD Player Combo
  • Magnavox VCR/DVD Combination Player

How to Store Your Digital Video Library

Once you are done converting your VHS tapes to digital, it is vital to have at least three different backups. Digital data can be lost easily if not stored properly. Viruses, hard drive failures, ransomware attacks, accidental computer damage, etc., can destroy your important data. And if you don’t have a backup in place, you lose it all.

Let’s say you store all of your VHS collection on a hard drive. Then one day, you decide you want to watch your videos, and when it is connected to your computer or TV, it gives you an error. Or the drive gets damaged by accidentally dropping it. What to do now? If you don’t have a backup, your data is lost.

This is why it is recommended to have at least three separate backups, and one of those backups should be in a different location, ideally in the cloud. You can have your data stored on a computer. Then as a second layer of backup protection, you can have an external hard drive as cold storage.

In case you don’t know, cold storage refers to the storage of inactive data that is rarely used or accessed. In other words, your cold storage hard drive should be offline, not connected to any computer, and only accessed every few months to ensure the drive’s health.

The last recommended layer of data protection to store your newly converted VHS tapes to digital is to use cloud storage.

Services such as Google Drive, Microsoft’s One Drive, Apple’s iCloud, pCloud, etc., can be used to store your important data in the cloud. This will protect you against losing important files in case of computer viruses, ransomware attacks, accidental computer or hard drive damage, etc.

If the free options don’t provide you with enough space, you can easily upgrade for a few dollars a month, and believe me, when the time comes, you will be glad you did.

Taking these precautions with your digital data will ensure that you always have a backup if the worst happens.

Final Thoughts

When it comes to converting your precious memories stored on decaying VHS tapes, you are racing against time. The longer you wait, the worst it will get.

If your VHS collection is older than 10 years old, then you should consider converting your VHS to digital as soon as possible,

If you already have a VCR player, all you have to do is follow any of the two options presented in this article and do it as a weekend project. You will be glad you did once you know that your memories are safe on two, even three, different digital storage devices.

How to Connect an XLR Mic to a Computer

So, you have a microphone with an XLR connector and want to connect it to the computer, but you are not sure how to do so?  In this post, I will present three methods that explain step by step how to connect an XLR microphone to a computer.

Whether it is a dynamic or condenser mic, you will be able to use it with your computer to record, stream, or simply get better audio with your Zoom or Skype calls.


A Couple of Things to Consider Before We Start

Connecting an XLR microphone to a computer is not as simple as attaching a cable from the mic to the PC’s 3.5mm mic/headset input.

First, you will need to figure out if the mic is a condenser or dynamic. Condenser microphones are commonly used in professional and home recording studios. They have a wide frequency range and are known for being very sensitive in picking even the most subtle nuances in sound. This means they will pick up clearer, more precise audio with greater volume depths.

Dynamic mics are the ones you have most likely seen used with PA systems or in karaoke bars. This, however, does not mean it is a cheap or low-quality choice. Dynamic microphones are highly versatile and can deliver excellent results.

It is essential to know that condenser microphones need a +48V DC voltage called phantom power to work. Your PC by itself doesn’t provide this voltage, but in this post, I will show you what you need to make it work with your computer.

Instead, if it is a dynamic mic, in most cases, the audio signal level coming out of it is very low, and it needs to be boosted before the computer can appropriately use it.

Taking these details into consideration, the three methods for connecting an XLR mic to a computer, whether it is a condenser or dynamic, are:

  1. Using an XLR-to-USB Signal Adapter
  2. With the use of an audio interface
  3. Using a USB to XLR microphone cable converter – This method works only with dynamic microphones

1. Using an XLR-to-USB Signal Adapter

Using an XLR to USB signal adapter to connect a microphone to a computer is one of the easiest ways to do so. These devices are plug-and-play, so they don’t require drivers to work. All you have to do is connect the mic to the adapter, then connect the adapter to the computer.

An excellent feature of these types of adapters is that they have phantom power, which means that you can use them to connect condenser microphones as well. They also come with an integrated preamp with gain controls to adjust the signal strength. This feature comes in handy when connecting dynamic microphones such as the Shure SM58 or the SM7B, as they need a preamp to increase the signal strength to line level.

The monitor mix controls the blending of the mic’s signal and playback audio, which comes in handy when recording with backing tracks.

Basically, the XLR to USB signal adapter works as a simple one-channel audio interface with basic controls. But don’t get fooled by its simplicity, it gets the job done, and it does it well.

Here are the best two XLR to USB signal adapters (links to Amazon):

  • Shure X2U XLR-to-USB Signal Adapter
  • Pyle Microphone XLR-to-USB Signal Adapter

These are the steps you need to follow to connect an XLR mic to a PC using a USB signal adapter:

  1. Connect one side of the included USB cable to the signal adapter and the other side to the computer’s USB port.
  2. After a few seconds, you should see a pop-up message on your computer saying the connected device is installed and ready to use.
  3. Using an XLR microphone cable, connect the female connector to the microphone, and the male connector to the adapter. I recommend using a long enough cable so that the USB signal adapter stays close to the computer in a safe area. Don’t place it on the floor to not step onto it. Here are a few suggestions for 6ft, 10ft, and 15ft XLR cables.
  4. If your mic is a condenser, turn on the +48V phantom power switch to provide power to the microphone.
  5. At this point, right-click the speaker icon on the lower right corner of your Windows PC, and click on “Open Sound Settings.”
  6. On the new window that opens, under “Input – Choose your input Device,” click on the drop-down menu to select the signal adapter as your input device.
  7. Next, open the software or application where you want to use the XLR microphone to run a test. If you speak or sing onto the mic and don’t see the signal level on the screen, you might have to go into the software settings and select the USB adapter as your input device.

The following diagram provides visual representations of the connections you need to make for connecting either a dynamic or condenser microphone with an XLR connector to your computer using a USB signal adapter.

diagram showing how to connect an XLR dynamic or condenser mic to a pc using a USB signal adapter.

If you only need to connect an XLR mic to a computer for recording vocals or use it for streaming, this works perfectly well. The only downside is that you can only connect one channel to the computer, and with a few more bucks, you could get an audio interface with at least two channels with gives you more flexibility.


2. Connect an XLR Mic to a PC Using an Audio Interface

The best way to connect an XLR microphone to a Windows or Mac PC is to use an audio interface. This device takes the analog XLR signal from the microphone and converts it to a stream of digital bits to be used by the computer to stream it, record it, or use it in a video conference.

Using an audio interface will give some advantages over other methods because it comes bundled with software you can install and use to do many things, including edit and add sound effects to your voice and instruments.

Plus, most of them come with at least two input channels which you can use to connect another microphone or a musical instrument if you choose to do so.

An audio interface can be used to connect condenser and dynamic microphones. Thanks to its phantom power, preamp, gain controls, and monitoring capabilities, you can set up a simple yet powerful home recording studio with the bundled software.

Click the link for a list of the best audio interfaces available in the market today that will have you recording or streaming using your XLR microphone in no time. The list provides different price ranges you can choose from depending on your budget.

The following steps show you how to connect an XLR mic to a PC using an audio interface:

  1. The first thing to do is connect the power supply to the audio interface. Keep in mind that newer model interfaces don’t use a power adapter because they are powered from the USB-C or Thunderbolt port.
  2. Connect the USB cable to the computer. If your interface gets its power from the USB port, it also uses the same port for sending and receiving data.
  3. After a few seconds, you should see a pop-up message on your computer saying that the connected device is installed and ready to use. If you get an error message, don’t worry. All you have to do is go to the manufacturer’s website to download and install the necessary drivers for your specific model.
  4. Using an XLR microphone cable, connect the female connector to the mic and the male connector to one of the audio interface inputs.
  5. If you are using a condenser mic, turn on the +48V phantom power switch to power up the mic.
  6. Next, right-click the speaker icon on the lower right corner of your Windows PC, and click on “Open Sound Settings.”
  7. On the new window that opens, under “Output – Choose your output Device,” click on the drop-down menu and select the audio interface as your output device. This will enable you to monitor your recording using a pair of headphones.
  8. Now look for “Input – Choose your input Device,” click on the drop-down menu, and select the audio interface as your input device.
  9. Increase the gain until you see a healthy signal level under the “Test your microphone.” Make sure it doesn’t go beyond 75%. That way, your audio signal will sound clean and distortion-free.
  10. Next, open the software or application where you want to use the XLR microphone to run a test. If you speak or sing onto the mic and don’t see the signal level on the screen, you might have to go into the software settings and select the USB adapter as your input device.

The diagram below provides visual representations of the connections you need to make to connect an XLR mic to a pc using an audio interface.

This setup works for dynamic mics such as the world-famous Shure SM58 or any XLR condenser microphone as well. Plus, you could connect another mic or an instrument with the extra available channel if you prefer.

diagram showing how to connect an XLR mic to a pc using an audio interface.

3. Connect a Dynamic Mic to PC Using a USB to XLR Microphone Cable Converter

By far, the easiest and most cost-effective way of connecting a dynamic mic to a PC is by using a USB microphone cable link. This is basically a cable with a female XLR connector on one side, and on the other side, it has a USB port.

The USB is not just a regular port. Inside it has a small analog to digital converter that acts as a sound card when connected to the computer. The small circuit is powered from the USB port, takes the analog signal from the mic, boosts it, converts it to digital, and feeds it to the USB data bus. 

The USB mic cable is plug-and-play and supports USB 2.0/1.1; no driver or software installation is required. It is as simple as connecting the XLR connector to the dynamic mic and the USB port to the computer.

Here are a couple of suggestions if you would like to go this route (links to Amazon):

  • USB Microphone Link Converter
  • XLR to USB Cable Converter

Please Note: USB microphone cables don’t work with condenser microphones because they don’t provide phantom power to energize the mic. If you have an XLR condenser mic and want to connect it to a computer, please use any of the two aforementioned methods.

Here are the steps to connect a dynamic mic to a pc using a USB microphone cable link:

  1. Connect the female XLR connector to the dynamic microphone.
  2. Next, connect the USB port to the computer.
  3. As this is a plug-and-play device, you should see a pop-up message on your computer after a few seconds saying the device is installed and ready to use.
  4. Right-click the speaker icon on the lower right corner of your Windows PC, and click on “Open Sound Settings.”
  5. On the new window that opens, under “Input – Choose your input Device,” click on the drop-down menu and select the USB mic cable as your input device.
  6. Next, run a test on the software or app where you want to use your mic.
diagram showing how to connect an XLR mic to a pc using an XLR mic cable converter link.

Final Thoughts

Connecting an XLR mic to a pc, whether it is a dynamic or condenser microphone, is a simple process if you have the right tools. In this post, I have presented three easy ways to do so.

Choose the one that is more practical to you. With that said, my recommendation is to use an audio interface because it is more flexible. Plus, you get added benefits with the included software.

If you need to connect another mic or instrument later on, you can because it has two input channels. Additionally, you can use a pair of headphones to monitor your voice.

Explore our site for more articles like this one. Thank you for reading this blog.

How to Connect a USB Mic to a SmartPhone

Did you know that it is possible to connect most USB microphones to your iPhone or Android smartphone?

Using a USB condenser mic connected to your phone will enable you to broadcast studio-quality streams, have better audio for Zoom meetings, and even record professional-sounding podcasts or Vlogs directly to your cell phone.

This post will show you how to connect a USB mic to a phone in a few easy-to-follow steps. What’s more, you might already have a USB condenser microphone that you use with your computer. All you’ll need is a few accessories and cables to get things connected and ready to go. Let’s dive into the article.


Three Ways For Connecting an External Mic to a Smartphone

In most cases, connecting a USB mic straight to your smartphone wouldn’t work because these types of microphones need more current than what a phone can supply. To work around this issue, the mic needs to get the power from another source and only use the phone’s port to receive the data.

There are three ways of supplying power to a USB mic to connect it to a smartphone:

  • By using a PowerBank
  • By using a charger that delivers enough current
  • By leveraging a powered USB hub that uses an external power adapter.

In this post, I am assuming that you already have a USB microphone. If you don’t have one and are thinking about buying one to get the best sound possible for your Zoom meetings, streaming, or vocal/instrument recordings, here are some excellent options you can choose from [links to Amazon]:

  • AKG Pro Audio Lyra Ultra-HD Mic
  • Blue Snowball
  • Audio-Technica AT2020USB+
  • Mackie EleMent USB Condenser Mic
  • Blue Yeti
  • Samson G-Track Pro
  • HyperX QuadCast

Connect a USB Mic to a Phone Using a PowerBank

This approach is the best option if you want a mobile way of supplying power to the USB mic but still gives you the flexibility of moving around. The good thing is that by using this method, you can also provide power to the phone. That way, you don’t run out of battery while using it.

Make sure to get a power bank/portable charger with enough capacity to last the time you need it for.

Here is What You’ll Need for the Setup

  • A PowerBank with Enough Capacity
  • For Apple devices, you need a Lightning to USB-A 3.0 Adapter – Please note that the adapter needs to have both the USB-A and Lightning charging port to connect to the PowerBank and microphone at the same time.
  • For Android devices, you need a USB-C to USB-A 3.0 Adapter – The adapter needs to have both the USB-A and USB-C charging port to connect to the PowerBank and microphone simultaneously.

Connecting Everything Together

  1. Connect the adapter to your phone. If it is an iPhone, use the lightning to USB-A 3.0 Adapter. But if instead, you have an Android smartphone, use a USB-C to USB-A 3.0 Adapter.
  2. Use your phone’s charging cable to connect from the power bank to the charging port on the adapter.
  3. Next, connect the USB cable from the microphone to the USB-A port of the adapter.
  4. Unlock the phone and follow the on-screen instructions to finish the setup.
  5. Open any of the applications in which you wish to use the mic and run a test to make sure it works well.

The following diagram shows the different connections you have to make to connect a condenser mic to a phone using a power bank. Use it for your reference.

Diagram to Connect a USB Mic to a Phone Using a PowerBank

Connect an External USB Mic to a Smartphone Using a Charger and Adapter

If you need to connect the microphone to your phone to use it as a recording device to record podcasts or yourself singing with background music, you don’t need the setup to be mobile.

In such a case, all you need is to use a charger that delivers enough current to run the microphone while charging the phone. Most fast phone chargers should work well for most USB condenser microphones.

Accessories You’ll Need for the Setup

  • A Phone charger with enough output power to charge the phone and run the mic
  • For Apple devices, you need a Lightning to USB-A 3.0 Adapter – Make sure that the adapter you choose comes with a USB-A port and Apple’s Lightning port for charging. The reason is so that you can charge the phone and run the mic simultaneously.
  • For Android devices, you need a USB-C to USB-A 3.0 Adapter – Please note that the adapter needs to have both the USB-A and USB-C charging port to connect to the PowerBank and microphone at the same time.
  • Miscellaneous cables for the connection.

Making the Connection

  1. Use a USB adapter that fits your phone’s charger port. For iPhones, use the lightning to USB-A 3.0 Adapter, and for Androids, use a USB-C to USB-A 3.0 Adapter.
  2. Connect the charger to the wall and use your phone’s charging cable to go from the charger to the corresponding port on the adapter.
  3. Attach the USB cable from the microphone to the USB-A port of the adapter.
  4. Unlock the phone and follow the on-screen instructions to finish the setup.
  5. Open any of the applications in which you wish to use the mic and run a test to make sure it works well.

Use the image below for your reference to make the connections.

Diagram Connect an External USB Mic to a Smartphone Using a Charger and Adapter
Video Credits: Lloyd Sim

Connect a USB Condenser Mic Using a Powered USB Hub

The third way of connecting a USB mic to a phone is by leveraging a powered USB hub that uses an external power adapter. The approach in this method is to use the hub to supply the necessary current that the microphone needs and use the phone’s port to receive the digital audio signal sent from the mic.

This is What You Need for this Setup.

  • A USB 3.0 Hub with Power Adapter to provide power to the phone and mic
  • As with the previous two methods, you’ll need a Lightning to USB-A 3.0 Adapter for Apple devices.
  • You need a USB-C to USB-A 3.0 adapter if you plan to use an Android device.
  • Miscellaneous cables for the connection.

Connecting All the Components to the SmartPhone

  1. Use the correct USB adapter that fits your phone’s charger port from the ones suggested here.
  2. Connect the USB hub’s power adapter to the wall and power it on.
  3. The hub comes with a male USB type A that is used to connect it to a computer. In our case, we will attach it to the female USB-A port of the adapter.
  4. Attach the USB cable from the microphone to one of the ports in the hub.
  5. If prompted to finish the setup on your phone, unlock it and follow the on-screen instructions.
  6. Run a test on any application where you want to use the mic to make sure it works.

I have prepared a diagram that can serve as a reference showing the connections you need to make if you decide to use this method of connecting a USB mic to a smartphone.

Diagram to Connect a USB Condenser Mic Using a Powered USB Hub with external power supply
Video Credits: MackieTV

Final Thoughts

Connecting a USB microphone to a smartphone is possible, and it delivers excellent results. You can use it to record vocals, instruments, podcasts, and Vlog. Plus, you can use it to improve your sound quality at Zoom meetings.

In this post, I presented three different approaches you can use to perform the connection. Assuming that you already have a USB mic, all you’ll need is a few accessories and cables to get things connected and ready to go.

How to Build a budget Live Streaming System Using PTZ Cameras

In the wake of the COVID-19 pandemic, our lives changed, and our daily routines got interrupted.

Everything from church services to live events got canceled, and the only way to continue was by doing live streaming.

Depending on what you want to achieve, setting up a live streaming system could cost thousands of dollars buying all those fancy cameras and video equipment gear.

If you have the budget, great, go right ahead! But what if you are a small congregation, a singer/songwriter, or a small band who has a small following but still wants to put on a show to live stream it but doesn’t have a budget to get a professional system?

Plus, don’t forget that using several DSLR cameras means that you need to have more people involved to get the right video shots.

Wouldn’t it be nice to have a live streaming system that one person controls and be able to get high-quality video and achieve all this by using a handful of equipment?

In today’s article, I present a complete solution to build a budget live streaming system using a couple of affordable PTZ cameras and joystick controllers.

Want to know more about this streaming system? Read on as we go into more detail on how to build it.


Low Budget Live Streaming System Set Up Overview

We want good quality but affordable PTZ cameras that deliver a good quality HD image, and plenty of zoom for setting up the live streaming system.

The way the system works is as follows. Two network PTZ cameras connect to a network switch. At the same time, one or two PTZ camera joystick controllers are also connected to the same network switch.

To get an extra video shot, you can use an HD Webcam to get a wide-angle view from the main stage or pulpit.

OBS Studio is used as the video switcher to prepare the video shot before it is sent to the live stream.

Keep in mind that OBS should be installed on a computer with a potent video card to simultaneously handle the transcoding of the video streams from two or three cameras.

Your stream destination can be Zoom, Microsoft Teams, YouTube, Facebook, Twitch, or any other streaming platform.


Equipment and Software You’ll Need for the Setup.

  • OBS Studio – Free open source software for video recording and live streaming.
  • VB-CABLE Virtual Audio Device – The virtual audio device forwards the audio signal to Zoom because OBS doesn’t have a way to do so as of May 2021.
  • PTZ Cameras – 2 x SUNBA PTZ 25X 601-D25X (Link to Amazon)
  • Wide-angle camera [optional] – Logitech HD Pro Webcam C920 (Link to Amazon)
  • PTZ Camera Controller – 1 x LEFTEK Video Conference PTZ Controller (Link to Amazon). Adding a  second controller is recommended for having an independent live feed and control of each camera.
  • Network Switch – TP-Link TL-SG108 (Link to Amazon). Any gigabit switch with enough ports would work. The one suggested here is in case you don’t have one and need to buy it.
  • Router with internet connectivity and a backup if possible.
  • HDMI video capture card [optional] – Elgato Cam Link 4K (Link to Amazon). The capture card is suggested if you need to feed a video signal to OBS. For example, if you need to connect a laptop for a presentation from the pulpit or main stage and want to have it available as a video source in OBS for streaming.
  • Miscellaneous Accessories – Network cables, audio cables, HDMI cable, and connector, etc.
  • Fast internet connection for streaming the video feed.

Setting Up the Live Streaming System

The following sections explain the setup process, but before permanently installing the cameras and PTZ controllers, I recommend running a bench test to ensure everything is working correctly.

Installing The PTZ Cameras

The cameras need to be installed in a place where there is a good view of the main stage. In our setup, we are using two cameras for better flexibility. One needs to be installed in the back of the sanctuary/venue and make sure it is centered. The other camera should be placed in the front and slightly to the side.

The camera in the back will be used to focus on the main stage or pulpit area. The one installed in the front would provide a different angle shot of the main stage area as well as the audience.

Having two cameras gives you more flexibility because you can prepare the shot before sending it to the live stream, and by having one in the front and another in the back, you can have a 360-degree view of the venue.

In our case, we are using the SUNBA PTZ 25X 601-D25X. This camera is one of the best budget PTZ cameras for live streaming. It offers a high-speed pan, tilt, and zoom with 360 degrees endless horizontal rotation, 15 degrees upward tilt, and 90 degrees downward movement, making it ideal for getting high-quality professional-looking video shots.

The Sumba camera delivers excellent results, and it’s capable of delivering 1080p HD video. But it is a budget-friendly camera, and it lacks some features, especially in low-light environments.

If your budget allows for it, I recommend the PTZOptics 30X-SDI. This is a professional-grade PTZ camera that offers 30X optical zoom, pan movement of ±340°, a field of view 60.7°(Wide) 2.28°(Tele) with a resolution of 1920 x 1080. Plus, it has simultaneous video outputs on 3G-SDI, HDMI, & IP Streaming.

Recommended Height and Installation Tips

Install each camera at the height of no more than 20 feet so that if you need to focus on a person’s face, it doesn’t seem like you are looking from the top.

Also, it would be best if you install them at the height of no less than 10 feet so that if people are walking around, it doesn’t affect the video shot.

Another critical factor you need to consider before deciding where to install the camera is that an RJ45 ethernet cable needs to go from the network switch through the PoE (Power over Ethernet) and connect to the camera’s back.

In other words, consider the place you are permanently installing the camera and how easy or difficult it will be to send the ethernet cable to reach the camera.

Below is a graphical representation of the PTZ camera installation you can use for your reference.

Using a Webcam for a Wide Angle Shot – Optional

Using a webcam is not necessary but can be helpful if you want to have an extra wide-angle shot. You could install a webcam such as the Logitech HD Pro Webcam C920 close to the computer you are using for streaming.

This wide-angle shot could be helpful in case you run into a problem with one of the PTZ cameras in the middle of a live streaming session.

Usually, in churches and live event venues, the PA system and all the equipment are located in the back. In that case, all you have to do is find a suitable position for the webcam so that you get the right shot.

With this camera, try to get a position you like and live it to be used when needed.


Provide Electric Power to The Cameras Via the PoE Injector

A good feature of the Sumba PTZ and the PTZOptics 30X-SDI cameras is that both accept PoE connections, meaning that you can send the power and data through the same ethernet cable.

This makes installation much easier because you don’t need to provide an electrical outlet where you decide to mount the camera.

Each Sumba camera comes with a regular power adapter that needs to connect to an outlet. You can use it this way, but I recommend using a PoE injector to make the installation process much more straightforward and cleaner.

PoE stands for Power Over Ethernet, and what it does is that it supplies the necessary voltage to the camera through the same ethernet cable coming from the network switch.

The way you need to connect the PoE injector is as follows:

  1. First, plug in the PoE injector’s to an electrical outlet. 
  2. Use a short ethernet cable to go from the network switch to the PoE’s input.
  3. From the PoE’s output, use another Ethernet cable to continue to the camera. This cable will now be providing the data stream and necessary power for the camera to work.

Please note that the Sumba PTZ 25X 601-D25X doesn’t come with a PoE unit. It only brings a regular power supply.

If you decide to use PoE instead of the regular power supply included with the camera, ensure that it can deliver at least 25W and 802.3at Standard.

Here are a few options that will work, links to Amazon:

  • StarTech.com 4 Port Gigabit PoE+ Injector 802.3at – For up to 4 devices
  • SUNBA High Power 802at/af Compliant PoE+ Injector – For only one camera
  • TRENDnet Gigabit Ultra PoE+ Injector – For only one camera

If needed, here is the diagram for your reference on connecting the PoE unit.


Connecting the Cameras, Computer and Controller to the Network Switch

The connections are easy. All you have to do is use RJ45 CAT5 or CAT6 network cable to connect everything together.

  1. Start by connecting the router to the network switch
  2. Next, connect the computer, the controllers, and the PTZ cameras to the switch.
  3. If you decide to use the PoE adapter to provide power to the cameras, make sure to connect it correctly, and don’t forget to plug the PoE into the electrical outlet. If needed, check the diagram in the previous section.

Access Cameras Using Sumba’s Device Manager Software

All Sumba cameras have a factory default IP address which is 192.168.1.10. If you connect two or more cameras on the same network, you need to change the IP address because each device connected to the network requires a unique IP, or conflicts between devices will occur.

The easiest way to access the cameras to manage it or change the network settings is by using Sumba’s IP config tool called Device Manager.

The software comes in the CD-ROM bundled in the box, or it can be downloaded from the manufacturer’s website; here is the link.

Download and install Sumba’s device manager on the computer. The next step is to change the IP and make it static.

It’s worth mentioning that you don’t have to assign static IPs to each device in the small network we are building for the live streaming system as long as you use a DHCP router that assigns IPs automatically.

Still, I believe it is a much better practice to assign static IPs because that way, you will know the IP address of each device, which makes it much easier when trying to troubleshoot a problem. I highly recommend labeling each device with its static IP for faster access.


Assign Static IPs to the Cameras

The following steps explain how to change the IP and Gateway configuration of the cameras so that they work within the network.

  1. The first thing you need to do is to make sure that only one camera is connected. The reason for this is because if both cameras have the same IP, you will end up with an IP conflict, and you need to avoid that.
  2. Open the Device Manager software that you just installed and click on the “IP Search” tab located in the lower-left area of the window.
  3. After a few seconds, the camera should appear in the list of devices; click on it. If you don’t see it on the devices list, restart the camera by disconnecting the power adapter and reconnecting again after a few seconds.
  4.  On the upper-right area of the window, you have the IP Address, Subnet Mask, and Gateway. These are the numbers we need to change. Below is a screenshot for your reference.
  5. Next, you need to modify the Gateway on the configuration so that the camera is part of the same local network family.
  6. To find out what your Gateway IP is on Windows 10, right-click on the network icon found on the lower right corner of your screen and click on “Open Network & Internet Settings.”
  7. Under “Advanced Network Settings,” click on “Change Adapter Options.”
  8. In the new window that opens, double-click on the Ethernet adapter. On the new window that opens, click on “Details…” On the new window that opens, look for “IPv4 Default Gateway” and take note of it.
  9. Now that you know the Default Gateway go back to the device manager tool and change the Gateway of the camera to the corresponding value of the local network that we just looked up.
  10. Next, change the IP Address of the Camera. Make sure that the IP Address number you choose is part of the Gateway. For example, if the default Gateway is 192.168.1.1, the IP address must be 192.168.1.xx, where xx is any number between 2 to 255. I recommend choosing numbers that follow each other closely. For example, one camera can be 192.168.1.20, and the other camera 192.168.1.21, etc.
  11. After making the changes, make sure to click on “Modify” to save the changes on the camera.
  12. At this point, you can connect the second camera and repeat the procedure to assign the correct Gateway and IP Address to it.

Setting up the PTZ Controllers and Assigning Static IPs

To control the cameras, we will be using a joystick PTZ controller. The one we are choosing for this budget live streaming application is the LEFTEK Video Conference PTZ Controller.

It’s worth mentioning that the LEFTEK controller can be connected using PoE. So, if you get a powerful enough PoE injector, you can use it as a central power supply unit for the cameras and video controllers. 

This controller plays the role of monitoring the video feed from the camera thanks to its 5-inch, 800 x 480 TFT LCD display while controlling the Pan, Tilt, and Zoom positions of the camera by using the joystick.

To navigate the menu options on the Leftek controller, use the joystick to go up, down, left, or right. The “ENTER” or select button is in the center of the joystick; all you have to do is press it.

Follow these steps to set up the controller and assign static IPs to the controllers:

  1. On the keyboard, press the “Menu” button to enter the main menu.
  2. Use the joystick to navigate the menu and select “Network Set.”
  3. In the options that open, navigate to “Type,” press “ENTER,” and select “STATIC.” That way, each device in your system has static IPs.
  4. Next, enter the IP for the video controller. In the previous example, we used IP 192.168.1.20 and 192.168.1.21 for the cameras. For the PTZ controller, we can use 192.168.1.22 and so on.
  5. In the “Mask” section (subnet mask), enter 255.255.255.0
  6. Following, enter the “Gateway” IP address. This is the same IP we used in the previous section. (Refer to step 6 in the last section –  Assign Static IPs to the Cameras)
  7. In the “DNS” section, enter 8.8.8.8
  8. Next, navigate to “Save” and press “Enter” to save the settings.

If you decide to use two controllers, one for each camera, repeat these procedures for each controller, and don’t forget to use a different IP.

Adding the Cameras to the Leftek PTZ Controller

After the cameras and controller are on the same LAN network, you can add the cameras to control them using the joystick.

These are the steps to follow when adding the cameras to the controller:

  1. Press the “SEARCH” button to find the IP cameras that are in the LAN network.
  2. Use the joystick to go up, down, left, or right. The “ENTER” or select button is in the center of the joystick.
  3. Using the joystick, choose “SEARCH DEVICE” to find the IP cameras connected to your network.
  4. Once you see the IP cameras, navigate and choose “SELECT ALL,” then select “ADD” to add them to the device list.
  5.  At this point, you can test each camera by using the joystick to pan, tilt, and zoom to see its video feed on the LCD screen.
  6. The controller assigns an ID number to each camera that you need to use when switching between them. To call a camera, push the “CAM” button and then enter the number of the camera you want to access. For example, we are using two cameras, one for the front, ID number 1, and one for the back, with ID number 2. To call camera one (front), push CAM, then number one on the keypad.

You can use two separate video controllers, one for each camera. The advantage of doing this is that you can have an independent video feed of each camera, and you can prepare the next video shot before sending it live.

If you decide to go this route, on step 4, instead of choosing “SELECT ALL,” only select one camera to add. Then repeat the same procedure on the other controller to add the second camera. 

Using the Preset Feature on the Leftek Controller

After you have added the cameras to the controller and can operate them, you’ll quickly realize that there are video shots that you will use constantly. The Leftek controller allows you to store up to 99 preset positions that save time when getting a video shot ready. Here is how to store preset positions.

  1. Use the joystick to pan, tilt, and zoom until you get the desired video shot.
  2. On the IP PTZ controller keyboard, locate and press “SET PRESET” > “The preset number of your choice” > “ENTER.” For example, for preset 1, you would press the following buttons in this order: SET PRESET > 1 > ENTER. For preset 2: SET PRESET > 2 > ENTER, and so on up to 99.
  3. To recall a preset, press “CALL PRESET” > “The preset number of you want to call” > “ENTER.” For example, to recall preset 1, you would press the CALL PRESET > 1 > ENTER buttons. For preset 2: CALL PRESET > 2 > ENTER, and so on up to 99.

Extra Tip: It would be a good idea to create a spreadsheet or use a notepad to write down a short description of each preset for easy access during a livestream.


Installing and Setting up OBS and Needed Plugins

OBS Studio will be used as the video switcher to prepare the video shot, add effects, and mix multiple video sources.

Installing OBS Studio

Here are the steps to install and configure OBS Studio for our live streaming system:

  1. Go to OBS Studio’s official website and download it. Choose your operating system and go through the basic installation process.
  2. After it’s done installing, before clicking “Finish,” disable “Launch OBS Studio 26.1.1.” Now you can click “Finish” to complete the installation.
  3. Before launching OBS, search for it in the start menu, right-click on it, and select “Pin to Task Bar.”
  4. Once pinned to the taskbar, right-click the OBS icon, go to Properties >> Advanced, then enable “Run as Administrator,” then click Ok. Doing these steps will ensure that OBS always runs as administrator, which prevents some performance issues.
    • Note: If you don’t have administrator privileges on the computer you are installing OBS, then ignore steps 2 through 4 and perform a regular install following the installation wizard.
  5. Next, launch OBS, and you will get a pop-up window, which is the auto-configuration wizard. Use the configuration wizard if you will use Facebook Live, YouTube, Twitch, or Twitter/Periscope for your stream, as it will prompt you to log into the platform of your choice and choose the best settings. Doing this will save you time because it will log in as soon as you open OBS.
    • Note: If you are planning to use Zoom, Microsoft Teams, or any other streaming platform, jump to the next section.
  6. Select “Optimize for streaming, recording is secondary,” and click Next.
  7. On the “Base (Canvas) Resolution,” choose 1920 x 1080. On the FPS option, select “Either 60 or 30, but prefer 60 when possible,” click Next.
  8. In this step, you can choose the streaming service that you’ll be using. Click on the dropdown menu to select it and enter the required information to log into the platform. Make sure to enable “Prefer hardware acceleration” and “Estimate bitrate with bandwidth test.” This process can take some time, so be patient.

Make sure to set OBS to Studio Mode. With this mode, you will see a preview screen and a program screen. To enable studio mode, find the “Controls” section and click on “Studio Mode.”

Next, we need to install and set up a plugin on OBS to forward the audio signal coming from the audio mixer to the streaming platform.

Installing VB-CABLE Virtual Audio Device

By default, OBS Studio doesn’t have a way of routing the audio signal internally to Zoom. To do this, we need a plugin called VB-Cable virtual audio device.

Follow these steps to set up the VB-Virtual audio device:

  1. Download VB-Virtual Audio Device and follow the installation wizard to install the plugin. Make sure that OBS is not running. After the plugin installs, you need to restart the computer for the changes to take effect.
  2. Open OBS studio and look for the “Sources” section, which is in the lower-left area of the window.
  3. Click the “+” and select “Audio Input Capture.” On the new window that opens, select “Create New” and name the new capture you are creating. Be sure to enable “Make Source Visible,” then click “Ok.”

Adding the PTZ Cameras as Video Sources in OBS

To use OBS Studio as the video switcher between the PTZ cameras and webcam, they need to be added as video sources. Additionally, you need to add the video sources as scenes to use them between video shots. Here is how to do this

  1. Open OBS Studio and find the “Scenes” section located in the lower-left area of the window. You need to have at least one scene for the setup to work.
  2. Click the “+” button, and a new window called “Add Scene” opens. Name the new scene you are creating, and be sure to use a name that makes it easy to identify when doing the live stream.
  3. The newly created scene doesn’t have a source assigned to it. To assign a video source, select the scene we just created, and in the “Sources” area, click the “+” button and select “Media Source.”
  4. On the new window that opens, select “Create New” and give it a name. Be sure to enable “Make Source Visible,” then click “Ok.” Note: I recommend using a name that makes it easy to identify, for example, front camera, back camera, Cam1, Cam2, etc.
  5. Select the newly created video capture device and click on “Properties,” which is the gear icon located next to the minus sign.
  6. In the new window that opens, deselect “Local File” and make sure that “Restart playback when source becomes active” is selected.
  7. Lower the “Network Buffering” to 1MB by moving the slider to the left.
  8. Next, we need to tell OBS the RTSP address for the camera we want to link as a device.
  9. On the “Input” section, type the RTSP IP address in the following format rtsp://xxx.xxx.x.xx/1 where xxx.xxx.x.xx is the static IP address we assigned to the camera previously.
    • In our example, we assigned 192.168.1.20 to the front camera, so in this case, the RTSP address would be rtsp://192.168.1.20/1
  10. Leave the “Input Format” section blank
  11. Further, in the “Reconnect Delay” section, use the slider to bring it down to 1S (1 second)
  12. Select “Use hardware decoding when available.” By selecting this feature, you will be telling your video card to perform some of the decoding tasks, which will make the system run smoother.
  13. Ensure to select “Show nothing when playback ends,” then click “Ok” to exit the setup.

If you are using more than one IP camera, you need to add another scene and repeat these steps for each camera until all of them have been added to OBS as media sources.

For USB cameras, you don’t add them as RSTP devices. In that case, you would add them as video capture devices.


Connecting the Live Audio Feed from the Mixing Console to OBS Studio

This setup is intended to be used for live church streaming or live events such as concerts, conferences, etc.

In this case, we are dealing with several microphones and even musical instrument signals mixed using the audio mixer.

After all the audio signals go through the mixing board, we need to connect a line from the soundboard to the computer’s audio input so that OBS can use it for streaming.

There are two approaches to do this. One is by connecting a stereo cable from the mixer to the PC’S audio input located in the sound card. This approach is intended for desktop PCs with a dedicated audio card that offers inputs and output connectors.

This approach doesn’t work well on laptops because a laptop uses the same 3.5mm jack for input/outputs; it doesn’t accept both simultaneously. Check out the diagram for your reference.

The second method is by using a USB audio interface. This method would work better for laptops and desktop computers because it uses an external device to convert external analog audio signals into digital.

For a more detailed explanation of connecting a mixer to an audio interface, click the link.

Here is the diagram of the connections you need to make.

Testing the Audio Feed from the Mixing Console

With everything connected and with OBS Studio running, play any audio from the mixer. If your connections are good and volumes set correctly, you should see in the “Audio Mixer” section in OBS signal coming through.

The meter should be showing the audio feed coming from the mixer. Make sure that the volume is between the green and yellow colors of the meter. Avoid going into the red because that means that the signal is too hot, and it will sound distorted.

Use a pair of headphones to listen to the incoming signal to assess if it is distorting or not.

In the OBS audio mixer, you will see a volume slider that you can use to lower or increase the signal level.

If it sounds distorted, try decreasing the volume on the mixer side until you see the signal bouncing between the green and yellow (on the OBS studio audio mixer)


Configuring Zoom to Work with OBS for Live Streaming Using PTZ Cameras

Now that we have configured OBS, it’s time to configure Zoom to accept the audio and video sources from OBS. Here is how to do it.

  1. The first thing to do is find the “Controls” section located in the lower-right corner of the window.
  2. Click on  “Start Virtual Camera” to enable it. The virtual camera is the way OBS will send the video stream to Zoom. 
  3. Next, open Zoom and log into the platform. Click on “Settings” >> “Video.” From the dropdown menu, select “OBS Virtual Camera.”
  4. We have already installed VB-CABLE Virtual Audio Device, so the next step is to assign it as the microphone. To do this, look for the “Audio” tab, and under the “Microphone” section, click on the dropdown menu and select CABLE Output (VB-Audio virtual cable).
  5. At this point, you should be able to see the video and audio feed coming from OBS.

Note: If you see that the audio and video are out of sync, or there is a delay in the video when compared to the audio, go to the next section to see how to fix it.


Fixing the Audio/Video Latency

In most cases, when the video feed comes from an IP camera and the audio is taken from the main audio mixer, you will see that the audio and video will be out of sync.

This happens because video takes longer to process and encode in OBS than audio does. Audio comes out faster than video, therefore the reason for them being out of sync.

The difference between the audio and video is usually a few milliseconds, but you can see and hear the delay.

There are three different ways to solve this issue:

  1. Feeding the audio signal from the mixing console straight to cameras [Best Option]
  2. Use the advanced audio properties in OBS to delay the audio signal coming from the mixing console
  3. Using the GStreamer plugin for RTSP sources – This plugin helps reduce latency differences between the audio and video feeds.

Feeding the Audio Signal to the Camera to fix Latency Issues

Feeding the audio signal to each PTZ camera is the best option for fixing latency issues. The reason is that the video and audio will be encoded together and sent through the IP protocol and decoded back once they reach the destination.

Although this is the best option, it is not the most practical. The reason is because you would need to send a physical cable from the mixing console to wherever each one of the cameras is installed. If the church or venue is large, sending a cable could be a real challenge.

Still, if this is feasible in your case, it will ensure that no latency is present between the audio and video feed.

The SUNBA PTZ 25X 601-D25X doesn’t have the feature to embed the audio feed, but the PTZOptics 30X-SDI does. This is where the features offered by the PTZOptics camera surpass the Sumba camera in every way.

Using the Advanced Audio Properties in OBS Studio

OBS has advanced audio features that you can set to fix the delay or latency issue between the video and audio. Here is how to fix the latency problem in OBS:

  1. Have someone talk through a microphone connected to the audio mixer from the front of the venue. Make sure that the mic is on a stand so that the person can clap. The clapping sound will be used as a physical indication when syncing the audio with the video.
  2. Use the PTZ camera to zoom into the person that is in the front.
  3. In OBS, under the “Controls” section, click on “Start Recording” and have the person in the front say a few words, then clap a few times, allowing a few seconds in between claps.
  4. Next, watch the video to see if the audio is leading or lagging.
  5. Go to View > Advanced Audio Options.
  6. In the new window that opens, you will see all the audio sources you have available. Locate the one that you are using to receive the audio feed from the mixing console.
  7. Then, find the “Sync Offset” section and increase the number to 200 ms. Repeat the recording to see if you need to increase or decrease the delay.

Remember that doing it this way is by trial and error, so it might take some time until you get it just right. Be patient, as it might take a few tries until the audio and video are synced.

Video Credits: Awall Digital

Run a Streaming Test to Make sure It Works

Finally, the last step is to run a live stream to test if everything works well. Use a device such as a smartphone or a laptop to connect to Zoom, YouTube, Facebook Live, or any other platform you are using to test the streaming video and sound quality.

This is the workflow you can follow to test the whole streaming system:

  1. Open OBS
    • Start virtual camera
    • Make sure studio mode is selected
    • Check the incoming audio and adjust the levels if needed. Avoid distortion or saturation from the mixer side
      • Right-click the audio area in OBS, click the advanced audio properties, and on the new window that opens under “Volume,” you can boost or decrease the audio levels as needed.
      • The audio input level can also be adjusted from sound control panel settings in Windows. Right-click the volume icon > open sound settings > input > device properties).  The selected input device should be the Line In. If using a USB audio interface, make sure to select it for adjusting the volume.
  2. Verify that the PTZ controllers are turned on
  3. Confirm controls are working for the front and back cameras
  4. To see all the scenes in one window, open the multiview window feature in OBS (View > Multiview (windowed))
  5. If you have set camera presets on a spreadsheet, open it and have it handy
  6. Open and log into the streaming platform of your choice. It can be Zoom, Facebook Live, YouTube, etc.
    • For the Mic/Line, it should be CABLE Output (VB-Audio virtual cable)
    • To receive audio from Zoom, the speaker should be your computer’s audio card
    • In the video or camera section, select the OBS Virtual Camera
    • Unmute mic if a Zoom participant needs to be routed to the mixer
  7. Verify the audio feed from the computer to the soundboard
  8. Use OBS to switch shots and add graphics as needed
  9. Use the PTZ controllers to move cameras and call presets as needed
    • Call Preset > number > enter
    • You can also adjust the focus manually if needed (focus+ and focus-)
  10. You can use OBS to record the event; then, the video can be uploaded to YouTube or any other platform.

How To Connect Multiple Microphones to a Computer

Most people are familiar with how to connect a single microphone to a computer. But what if you need to connect multiple microphones instead?

That can be a little trickier, but with the right instructions, you’ll easily be on your way. There are three basic methods that most people rely on.

We’ll look at the different ways to do this, which will allow you to find the system that works best for your circumstance.


Three Methods to Connect Multiple Microphones to a Computer

  • Using a USB capable audio mixer
  • With a multiple channel audio interface
  • By connecting two USB microphones

Connecting Multiple Microphones to a Computer with a USB Capable Audio Mixer

By using this method, you will have a few advantages. For example, you can equalize each channel separately before sending the signal to the main audio bus.

It also provides you with options such as a low-pass filter – to cut the low-end rumble, audio compression – which helps keep a more constant audio level, phantom power – for connecting condenser microphones, aux send/returns – for connecting external effect boards, etc.

Most USB-capable mixers only allow you to record a stereo track which can be a limiting factor if you plan to record each channel separately.

If you are considering this option for recording a podcast with multiple guests, you might want to consider a mixer specially designed for this type of application. Here a list of the best audio mixers for podcasting.

Instead, if you plan to use multiple microphones for music applications such as a band, check out this post on the different types of audio mixers.

Things You Need to Consider

When using a USB-capable audio mixer, there are a few things you’ll need to know.

  • First, you’ll want to decide on how many channels you’ll need for your situation. Based on that information, you’ll be able to select a mixer accordingly.
  • As you’re setting your audio mixer up, it’s essential that you equalize each channel correctly. By taking the time to do this right, you’ll get the best results.
  • You’re going to want to make sure that your levels are consistent. You’ll do this before recording. Why? You don’t want to end up with distortion. It may seem like a hassle to do the prep work, but it will save you trouble later.
  • Now, you’ll use the included DAW software or another one to record from your microphones. By the way, DAW stands for Digital Audio Workstation.

This is What You Need to Do

  1. First, use the corresponding cable, either XLR or 1/4” plug, to connect each microphone to the mixing console.
  2. Turn the gain knob to the middle and make sure also to increase the master volume and volume slider or knob for each channel you are using.
  3. Test each microphone to see if you have a signal. You should see the strength of the audio signal on the VU meter. Try to keep the VU meter at or below 0 dB to avoid saturation and distortion on the audio signal. In other words, stay within the green LED’s avoid going into the yellow or red. If you are not familiar with mixing consoles, click the following link to read an article about mixing consoles basics.
  4. Equalize each channel to your likings. Make sure there is a balanced sound between all the mics. Avoid having one being louder than the other. This is where an audio compressor comes in handy.  
  5. Monitor the sound by plugging in a pair of headphones. You might want to check out the post on how to EQ vocals or the one on how to equalize different sound sources to get a well-balanced sound in your recording or live stream.
  6. Connect the USB cable from the mixer to the computer and let it install the driver. Most USB audio mixers are plug-and-play (PnP). If the driver doesn’t install automatically, download it from the mixer manufacturer’s website.
  7. Install the included DAW (Digital Audio Workstation) or your favorite one. Follow the on-screen setup wizard to finish setting up the DAW software.
  8. Run a sound recording test to make sure you are happy with the sound before recording. If it doesn’t sound good, try tweaking the EQ or volume levels until you are satisfied with the result. Verify that the audio doesn’t distort; there is nothing more annoying to your listeners than saturated sound.

Here is a diagram you can use for your reference that shows you the different connections you need to make.

Let’s move on to the next method, which uses a multiple-channel audio interface.


Connect Several Mics to a Computer Using a Multiple Channel Audio Interface

Another way to connect several microphones to a computer is by using a multiple-channel audio interface.

This is the most straightforward way of connecting multiple microphones to a computer but has some limitations.

For example, it doesn’t allow you to equalize the sound source before converting the analog signal into digital. This is not necessarily a bad thing, but it poses some limitations if you like to EQ sound before recording it.

The good thing is that with the DAW software, you can EQ the recorded sound or even add sound effects later on when mixing the recorded material.

In some cases, it is better to record a raw take on the audio source without any EQ or added sound effects. That way, when it is time to finish the mix, you can add whatever you want to the sound. Just make sure that the recorded take is clean and unsaturated.

You can add EQ, compression, effects such as reverb, echo, chorus, etc. And if you don’t like how it sounds, you can always revert it with the click of a mouse. This is something you can’t do if your raw recorded audio it’s been equalized and effects have been added to it before it was recorded.

To achieve good quality recordings, live streams, and podcasts, you need to have a good mic to make sure that the source signal is picked up clearly.

Here are a few suggestions of some of the best mics for recording vocals and some of the best microphones for podcasting, hand-picked for their quality and sonic characteristics. Click the links to check them out.

Details To Consider

Let’s take a closer look at some important details you need to consider when using an audio interface for connecting multiple microphones to a computer.

  • Your interface is going to convert your audio signal into digital. Before you get started, you need to consider what you’re using this for. Each setup is different, so having a clear idea of how you want to use the audio interface will help you select the right unit.
  • The next step is understanding how many inputs and outputs you need. Consider a two-person podcast vs. a band that has multiple instruments, as well as vocals. These are completely different uses but are both viable with the right interface. Do you need headphones? How many pairs? These are the types of things you should consider before selecting a multiple-channel audio interface.
  • You also need to consider the kind of computer/device connectivity you’ll use. These are the most common connection types: USB, FireWire, Thunderbolt, or PCIe (PCI Express). USB is the most popular, but if using a multiple channel interface, if possible, a faster connection such as Thunderbolt is recommended.
  • There are different price ranges and extras you can get, but by making a list of your needs, you’ll be able to sort through the multiple interfaces available to find the one that will work for your needs and budget.

You can check our suggestions for audio interfaces by clicking the link. That article provides you with some of the best affordable options available in the market today. We always keep our articles up to date to provide you with an updated list of the best audio gear available.

How to Set it Up

  1. Start by installing the drivers of the interface. They can be downloaded from the manufacturer’s website.
  2. Next, install the DAW you are planning to use. If you don’t have one, most audio interfaces come bundled with one which can download it from the manufacturer’s website.
  3. Connect the microphones to the interface using balanced XLR cables.
  4. Set the gain of each channel until you get a balanced tone.
  5. Make sure to check the audio level on the DAW side so that the signal sent to the computer is not saturated.
  6. After the audio has been recorded, you can use the DAW software to edit the recorded it sound.
  7. If using the audio interface to live stream the audio, you can monitor the sound level from the platform you are using to stream to make sure it sounds good.
  8. When live streaming, it is recommended to also use a different device to connect to the stream and monitor the quality of the audio signal.

If you need, use the diagram below as a reference for making your connections.


Connect Multiple USB Microphones To a Computer Using a Third-Party Software – For Windows PC

We’re going to look at two different processes for this setup. One will be for Mac users using Garageband to create two separate tracks for recording both microphones simultaneously.

The second method is for Windows users. We will be using Audacity as the DAW and Voicemeeter as a virtual mixer to combine the two microphones into one track.

2 Microphones/2 Tracks Method – For MAC Computers Using GarageBand

When you’re looking to use two microphones and want two tracks, you’re going to use the Audio Midi set up and choose something called Aggregate Device. In case you didn’t know, an aggregate device is simply the wording for multiple input/output devices that work together as “one” device.

These are the steps to follow:

  1. Connect each microphone to an available USB port. If your computer doesn’t have enough ports, you’ll need a USB hub.
  2. Next, go to the “Applications” folder and scroll down until you find the “Utilities” option and click on it.
  3. Select the “Audio MIDI Setup” option. In the new window that opens, look for the plus sign “+” in the lower-left corner and click on it to create an aggregate device.
  4. On the right side, look for the two USB microphones you have connected to the computer under “Audio Device,” and select them.
  5. I recommend changing the name of the new aggregate device to something like 2 USB Microphones to make it easier to visualize. This becomes handy if you have several aggregate devices.
  6. Open GarageBand and click on “Create.” Next, click on GarageBand on the upper left corner of the window, and from the drop-down menu, click on “Preferences.”
  7. In the new window that opens, click on “Audio/MIDI” and click on “Input Device.” From the drop-down menu, select the aggregate device you created earlier. This is why renaming it makes things easier.
  8. At this point is time to add tracks, one per USB microphone. Click the “+” to add a new track. In the new window that opens, click on “Input” to select the USB mic. Repeat the same procedure to add the second device, and that’s it. You can start recording on two separate tracks using two USB microphones.

If you don’t see an audio signal on the VU meter, double-check those inputs so you know you’ve got the right ones.

With this method, each microphone will record its own track. This is the 2 microphone/2 track method

Video Credits: Pat Flynn

2 Microphones/1 Track Method – For Windows PC Using Audacity and Voicemeeter

To connect two USB microphones to a Windows PC, you need to use a program called Voicemeeter.

As explained on their website, Voicemeeter is an audio mixer application endowed with a Virtual audio device used as Virtual I/O to mix and manage any audio sources from or to any audio devices or applications.

This particular program allows you to put a different microphone on each panel. You’re going to sync this with your Audacity program in a short bit. Let’s look at getting started.

These are the steps to follow:

  1. Download and install Voicemeeter from their website.
  2. Connect both USB microphones to available USB ports. If you don’t have enough ports, use a USB hub.
  3. Open the Voicemeeter application, and click on “Hardware Input 1.” From the drop-down menu, select the first USB microphone to assign it to Hardware Input 1.
  4. Click on “Hardware Input 2” to select the second USB mic from the drop-down list to assign it to Hardware Input 2.
  5. Once both mics have been assigned, test them to see if they are configured correctly. You should see the VU meter moving, meaning that they have been configured correctly.
  6. At this point, you can use any DAW software to start recording, but instead of selecting only one USB mic as the input device, you’ll choose Voicemeeter, which in turn is mixing the signal of both mics. In our case, we’ll be using Audacity because it’s a free, open-source DAW.
  7. Open Audacity and look for the small microphone icon to select which input Audacity is going to use. From the drop-down menu, choose Voicemeeter.
  8. Click the “Record” button to run a test. Speak through each mic, and you should see a signal being recorded. If the volume of the microphone is too low, open the Voicemeeter app and increase the volume. If it’s too high, make sure to decrease it to avoid clipping and distortion in the signal.

When you push the record button on Audacity, you’ll see that the two microphones now come through on a single track instead of the two tracks like in the method mentioned above. This is due to limitations in the Voicemeeter software.

Use this method to connect multiple microphones to a Windows computer. This becomes handy if you need to record a podcast with a guest and don’t have an audio interface or mixing console available to accommodate more than one mic.

Video Credits: Pat Flynn

Takeaways:

There are three basic methods of connecting multiple microphones to a computer.

  1. Using a USB capable audio mixer
  2. Using a multiple channel audio interface
  3. Connecting two USB microphones to the computer and using third-party software

Knowing how you’re using these methods can significantly help you choose, based on your needs, your budget, and software. Are you recording multiple instruments and vocals? Is it a two-person podcast?

Regardless of what you choose, remember to adjust your levels and settings – because clean sound that’s well balanced or not can make or break your recording.

Have you connected multiple microphones to a computer? Which method did you prefer? Did you find that you tried one and weren’t happy with the results? Be sure to let me know if this was helpful and if there are other topics that you’d like me to cover.

When it comes to audio, quality matters —every time.

Easy to Build DIY Acoustic Panels with Step-by-Step Instructions

When it comes to absorbing sound, there are popular choices that are commonly used to do the job.

One option is professional-grade acoustic panels, but what do you do if money is tight? Is there a way to dampen the echoes and noise in the room you’re working in?

Fortunately, if you’re on a budget or just starting out, there are other means of creating sound-absorbing panels. This way, you don’t need to overinvest and can still accomplish the task at hand.

With DIY acoustic panels, you can avoid emptying your wallet just to buy traditional acoustic foam panels. Instead, you’ll learn a simple method that can work just as well, even if you have a large area to cover.

Let’s face it, if you’ve been pricing professional-grade acoustic absorbing material, you’re probably still in sticker shock. Take a moment to catch your breath and sigh with relief because we’ve got you covered.


What Are The Best Materials For Sound Absorption?

Acoustic foam is the obvious choice, but people have used towels, pillows, moving blankets, cork, and other options such as carpet padding and egg crate.

When it comes to absorbing sound, the process is the same. You’re dealing with sound waves that are bouncing off surrounding surfaces. You need something that captures and stops the vibrations from bouncing about like a rubber ball on steroids.

One of the best choices is to use multiple towels or heavy moving blankets. When the sound passes through, it muffles it and stops the noise from traveling the way it would without the barrier.

In an article by Tom Scalisi, housing and building expert, Bob Vila’s site mentions that while sound panels are a choice to buffer noise, another you might not have thought of is mineral wool. And who hasn’t dealt with a loud snorer in their life?

An interesting source that speaks of different types of absorbing materials is SnoringSource.com. They mention ideas like using pillows, wall hangings, acoustic curtains, and more.


What Fabric Should You Use?

When it comes to affordability and easy-to-work options, we think towels are a great first choice. Another excellent option is a coarse woven fabric, but it will cost more than towels.

Moving blankets are another and can be found without paying a bundle. Hit up your local home improvement store, thrift store, or big box store for cheap towels, and get plenty so you can layer them. The thicker the layer, the better the sound-absorbing qualities.

Now that we’ve gotten the basics out of the way let’s get to building your budget-friendly DIY acoustic panels.


DIY Acoustic Panels – Step-by-Step Instructions

First, you’ll want to gather some supplies, so without further ado, here’s a list of what we suggest.

Materials and Tools Needed

  • Wood (1×2’s, 1×3’s, or 2×4’s) You can use any of the three options mentioned, but I recommend using 1×2’s or 1×3’s so that the frame doesn’t end up being too heavy.
  • Wood glue
  • Screws
  • Drill
  • Drilling bits sized for the crews you are going to use
  • Either a staple gun or small nails
  • Sound absorbing material – towels, foam, moving blankets, or fiberglass insulation
  • Tools that will be helpful: saw if you don’t have properly sized wood, screwdriver for screws, and hammer if using nails in place of a staple gun. A clamp can also be handy if you’re only relying on glue without screws – We highly recommend adding the screws for more reliable strength.

Design and Sizes

When building your DIY acoustic panels, consider the space of the room you’re working with. If you’re in a tight area, it might be easier to work with 1×3 lumber, whereas if you have a bigger space and decide to make bigger panels, we’d suggest 2×4 lumber.

You can make frames of different sizes. Standard sizes are 24×48”, 12×48”, 24×36”, 24×24”, or 12×12”. You could choose one size or mix and match different sizes to create a unique design.

Remember that you will need several frames attached to the wall to reduce echo and bouncing sounds effectively. The image below shows various examples of what you can make.

Image Credits: Acoustimac, and Acoustic Design Works

Step-by-Step Instructions

1. The wood’s purpose is to create a box frame, so make sure you have smooth edges and avoid warped boards if possible. It should be cut to size. If you get it from a home goods store, like Home Depot or Lowes, they may be able to cut it to size for you if you don’t have a saw handy.

2. Create a frame from the wood into a rectangle or square shape depending on what design you choose to do.

3. Use screws to attach the corners to create a stronger hold. The glue alone won’t be as strong, and we recommend you add screws at this point. You want to attach the pieces of wood in a manner that will keep them together for a long time to come! Repeat this on each corner until you’ve completed the entire frame, making sure it’s secure. The image below shows you how to insert the screws on each corner.

TIP: I recommend pre-drilling holes before inserting the screws. Use a drill bit sized for the screw you are going to use. That way, the wood won’t split due to internal stresses when joining the corners.

4. Add a support piece to hold the filling material. If you’re creating a larger panel, you may want to put a support piece in place, which would simply go across the center within the frame. I recommend adding at least two support pieces if the frame is larger than 36 inches. The last thing you want is the material falling out when moving or installing the fame to the wall.

TIP: Make sure to cut the support beams to a smaller width than the rest of the frame. The reason is so that there is enough space for the material you are adding between the supporting beam and the front cover. When installing the support beams to the frame, pre-drill holes for the screws, glue the edges together, and join the support beam to the frame using screws.

5. Fill the empty box portion of the frame with the absorbing material of your choice. You’ll now use filling materials such as folded towels, foam, or fiberglass insulation. We recommend towels since they are affordable and easy to come by. In the space gap that’s left on the inside of the frame, layer more towels for better sound absorption. You can nail or staple the top backside towel to the frame.

WARNING: If you decide to use fiberglass insulation as the filler material, make sure to use eye protection, dust mask, gloves and handle it with care because this stuff is dangerous.

6. Take a towel, blanket, or any coarse woven fabric of the color you like and wrap it around your frame. Stretch it so that it lays smoothly. Using a staple gun or small nails, secure the edges into place on the wooden frame. Cut off excess material for a clean look.

7. One of the great things about these frames is that they can be added to your walls, which won’t take up floor space, or if you don’t want them out all the time, simply pull them out and lean them against your walls when you need them for recording.

The DIY acoustic panels lend themselves well to being temporary if you need to store them away between recordings. Slide them under your bed to take up less space, or stack them in the closet.

Another option is to use a towel the color of your walls, so they blend seamlessly and will hardly be noticed. Want to display them like artwork? Choose decorative prints for your outside framed towel.

If you have a little extra budget, get a couple of different coarse woven fabric colors to create a design that flows with your home studio.


Final Thoughts

There you have it, easy to make acoustic panels that won’t break the bank. Whether you’re just starting out or are limited on space or money due to your budget, these DIY acoustic panels are the answer you’ve been looking for.

Buffering sound doesn’t have to be a nightmare. A simple solution is to work with what you have. Not everybody has the budget to get professional-grade acoustic foam, but now you have an easy workaround.

Get back to what you love doing, and stop worrying about the chaotic sound of noise bouncing off the walls. Good quality sound comes down to understanding how things work. Sound waves, vibration, and energy. Once you know the basics, there are always workarounds!

How to Build a Home Studio for Less than $400

Setting up a home recording studio used to be an EXPENSIVE affair. It takes a huge amount of planning, research, and budgeting…doesn’t it?

Well, many people think that building a studio at home would cost as much as buying a house.

The reality is…getting started is way CHEAPER than you imagined. Because let’s face it, all you need is a few pieces of gear and software.

If you want a quick answer, here it is… To build a home recording studio, all you need is an audio interface, software (DAW), a microphone, a pair of headphones, XLR cable, a mic stand, pop filter, and acoustic treatment.

And the good news is that the prices are a fraction of what they once were.

In today’s article, we’ll tell you exactly what you need. So, let’s get started, shall we?


Why You Need to Keep it Simple and Basic

For beginners on a budget, deciding on the ideal home recording studio essentials for one’s needs can be challenging and time-consuming.

For most, it usually means experimenting by trial and error, and the “error” part often inflates the final cost.

The truth is, it’s possible to start with a basic home studio. In fact, it’s advisable to start small.

Because, just like all other hobbies, starting too big too soon could:

  • make you overwhelmed
  • make you discouraged, and
  • make you quit

And all the time and money you’ve invested goes to waste

So to avoid all this, it’s better to keep things basic and simple when starting off.

One question that’s in everyone’s mind now is…


Exactly How Much Will a Basic Home Studio Cost?

It won’t cost thousands of dollars of investment in gear to create exciting music and soundtracks.

High-quality music production is now possible with as little as $400.

Students and beginners with low income often express their desire to create a working studio but are hindered by startup costs.

This post is for beginners who want a simple home studio setup to slowly upgrade their equipment and capabilities to a professional level.

We will share a few suggestions for cheap recording studio essentials as well as brand solutions that won’t break your bank and still deliver excellent results.

We will confine our post to ‘in the box’ sound production, but most of what we recommend can also work for live performances as well.

This article is mainly for bedroom producers who would like to set up a working studio at home for less than $400. Still, the principles also apply to amateur and professional sound engineers and artists alike.

Here’s our full recommendation:


The Complete $400 Home Studio

With the following 8 items, you have a complete home recording studio, perfect for anyone just starting out:

  1. Audio Interface
  2. Software (DAW)
  3. Microphone 
  4. Headphones
  5. XLR Cable
  6. Mic Stand
  7. Pop Filter
  8. Acoustic Treatment

We are assuming you already own a computer.

Your computer shouldn’t be the latest MacBook Pro with every fancy specification you can think of.

An average laptop will do, but, of course, it shouldn’t be a secondhand machine that’s 10 years old.

If you are an Apple user, we usually recommend a recent iMac, Mac Book Pro, or a Mac Mini. Instead, if you use Windows, make sure that your PC is not more than 5 years old. Keep in mind that most creatives in the sound industry prefer Mac Computers.

It’s essential to ensure your computer will run your plugin instruments, DAW, effects, and any other relative software without any problems. Also, make sure your DAW is compatible with the computer’s OS.

Your computer will be the centerpiece of every operation. For this reason, it is a very important part of creating a working home studio.

Now, let’s go ahead and talk about each piece of gear on our list, along with how much you’ll need to acquire them.


1.      Audio Interface

The first thing you will need for your home studio is an audio interface.

An audio interface is essentially a tiny box that allows you to connect microphones, instruments, and any other sound output to it. Then it converts the analog signals to digital and relays that information to your PC via the USB cable.

Unless you want to solely use virtual instruments in all your productions, you’ll have to buy an audio interface.

A poor quality audio interface will hurt your sound output, so shy away from really low-end models.

The good news is that you can get an excellent audio interface for as cheap as $120.We recommend on the lower end the Focusrite Scarlett Solo.

It comes with one mic preamp at the front and a second channel for connecting a bass, guitar, keyboard, or any other instrument that can send a signal.

With two inputs, you can record two instruments simultaneously. It also offers a latency-free headphone jack connection that you’ll use to monitor your recording.

The audio interface connects to your computer via a USB cable. Then, any software you decide to use to record will detect the interface, and you’ll start recording your tracks in no time.

The Focusrite Scarlett Solo is hands down the best audio interface in the $100 range. It is easy to use, it can record audio at very high sample rates and lets you get high-quality audio from professional microphones, either dynamic or condensers, into your PC.

Money spent – $120

Check Price on Amazon

2.      Software (DAW)

The second thing you’ll need is a music production software, also called Digital Audio Workstation or DAW for short. With this software where you’ll produce, record, mix and master your tracks.

A good audio production software should be able to record and have other audio manipulation effects such as equalization and compression.

With a good DAW, you’ll turn your ideas into sounds and tracks. Then adjust and edit your sound with the required effects. And lastly, mix and master your tracks into a song.

Buying a DAW software can be expensive, but I’ve got good news. When you purchase the Focusrite Scarlett Solo, you get two pieces of FREE high-end software: Ableton Live Lite and Pro Tools.

Ableton Live Lite and Pro Tools are super powerful software that can record, edit and export audio. They help complete your mixing and editing tasks from the first idea to the final mastering of the track.

It’s no wonder the most prominent names in the industry, including Avicii and David Guetta, use these software to produce their hits. And you can also use them for free when you purchase the Focusrite Scarlett Solo because they come bundled with it.

Money spent -$0


3.      Microphone

As your home studio grows, you’ll eventually need a variety of different microphones, each for a specific purpose. But for now, all you need is 1 or 2 mics to get started.

The mic you choose will mostly depend on the instruments you have.

Since most of us start out recording vocals, your home studio will need a large-diaphragm condenser vocal microphone.

A condenser microphone is a type of microphone that can pick up sounds with great detail and accuracy. It captures an extensive frequency range and has an excellent transient response.

We recommend the Samson CO1 microphone ($79). It’s one of the best investments you’ll make when starting. It is perfect for vocals, pianos, and stringed instruments.

It has a balanced bass response and high-end clarity. It also has a low-frequency roll-off to get rid of unwanted background noises.

It provides you with a lot of value at its price point. It works beautifully and has an excellent quality build. It will plug right into your Scarlett interface mic preamp.

Because condenser microphones need phantom power to work, don’t forget to activate it on your Focusrite Scarlet.

The good thing is that the Focusrite audio interface got you covered. It provides the necessary voltage for your mic just by switching a button.

Money Spent – $79

Check Price on Amazon

4.      XLR Cable

Someday soon, your home studio will have a variety of different cables. But for now, you’ll only need one XLR cable for your microphone.

An XLR cable is the one whose connectors are round and have three pins at the end.

For a simple home studio set up in a small room, we recommend getting a standard 10-20 foot cable for around $30.

I like the Hosa brand of cables. This company makes excellent products, and the prices are really good.

Of course, you can get any brand you prefer, but Hosa has proven to deliver excellent quality at the right price.

If you plan to use a different audio interface than the one recommended in this post, before you buy the mic cable, double-check that your audio interface’s input has XLR connectors.

That’s because sometimes, they have TRS connectors, in which case you’ll need TRS cables.

You’ll notice that a good XLR cable won’t cost you an arm and a leg. With just under $30, you’re good to go.

Money Spent – $28

Check Price on Amazon

5.      Headphones

When starting, you’ll spend most of your time recording by yourself. This is why you’ll only need one pair of good headphones in the beginning.

There are two types of headphone designs used in recording studios: closed-back headphones (primarily for tracking) and open-back headphones (mostly for mixing).

As the name suggests, closed-back headphones offer maximum isolation. They don’t allow any outside noise to mix with headphone’s output. Open-back headphones allow outside noise to mix with the headphone’s output.

Generally speaking, open-back headphones offer optimal sound quality, while closed-back have lesser sound quality. While open-back is considered a luxury when starting (as they are more expensive), closed-back headphones are necessary.

My recommendation is the Audio-Technica ATH-M20X headphones ($50). This is an excellent pair of closed-back over-ear professional mixing headphones for live monitoring and mixing.

They offer a superior standard of comfort, even over long periods of use. They are designed to avoid any discomfort after extended use.

The special foam conforms to the shape of your ear to ensure a perfect fit. You’ll appreciate the highly accurate, comprehensive, and natural frequency response it delivers. Best of all, you’ll get a lot of value for your money.

Money Spent – $50

Check Price on Amazon

6.      Mic Stand

Most beginners assume that all mic stands are equal, and therefore buying just any mic stand will do.

This couldn’t be further from the truth.

Not all mic stands are created equal. And a quality mic stand will play a vital role in any new home studio.

That said, mic stands don’t come cheap. But because we are working with a tight budget, you’ll need an affordable but reliable mic stand.

I usually recommend that you buy a tripod mic stand over a round-base. The reason is that tripods are more stable and have a boom arm, so you can place them in any position you want.

If you are recording drums, the boom arm gives you a lot of flexibility. Instead, if you are recording vocals or acoustic guitars, the tripod stand with a boom arm will make positioning the microphone very easy.

A decent tripod stand will cost you about $30.

Money Spent- $30

Check Price on Amazon

7.      Pop Filter

A pop filter is a circular nylon mesh that’s positioned in front of a microphone.

It serves one primary purpose: to eliminate plosives when you speak or sing into a microphone.

Plosives are blasts of air that come out of your mouth whenever you use such letters as B’s, T’s, P’s, and so on.

Just imagine saying a word like “Peter” into a mic. Your mouth will blast a lot of air directly into the mic’s capsule, causing it to produce an unpleasant sound. This causes the mic to pop.

As the name suggests, a pop filter works to filter those popping sounds by dispersing the air blasting out of your mouth in different directions.

This is so that air doesn’t hit the mic in a blast. The result? Plosives don’t sound harsh in your recording.

Plosives are usually louder when using a large-diaphragm condenser mic. While you don’t need to have a pop filter every time you want to sing, when recording is extremely important.

That said, you can buy a good pop filter for just $10.

Money Spent- $10

Check Price on Amazon

8.      Acoustic Treatment

Finally, consider investing in room acoustic treatment, which you’ll come to notice how greatly improves the quality of the recording.

The truth is that professional-grade acoustic treatment is expensive. The good news is that you can make your own acoustic panels that can also serve as decorative objects.

You’ll only need a few materials like towels or foam and a couple 1 x 3 lumber to build it yourself.

You can get the towels from thrift stores which will cost you only a few dollars.

We have a full article that explains how to build your own acoustic panels with step-by-step instructions. Click the link to check it out.

Instead, if you don’t want to build acoustic panels, you can opt for buying a microphone isolation shield. It will reduce echo and sound reflection during vocal recordings.

As your studio grows, you can purchase professional-grade room acoustic treatments later on. It will be one of the most durable investments you’ll ever make in your home studio.

Money Spent -$36

Check Price on Amazon

$400 Home Studio Budget Breakdown

  1.  Audio Interface – $120
  2. Software (DAW) – $0
  3. Microphone – $79
  4. Headphones – $50
  5. XLR Cable – $28
  6. Mic Stand – $30
  7. Pop Filter – $10
  8. Acoustic Treatment – $36

Total – $353

That’s it- all the essentials you need to build a cheap recording studio for under $400, perfect for beginners just starting out on their recording journey.

  • « Go to Previous Page
  • Page 1
  • Interim pages omitted …
  • Page 3
  • Page 4
  • Page 5
  • Page 6
  • Page 7
  • Interim pages omitted …
  • Page 12
  • Go to Next Page »

Primary Sidebar

Search

Guides & Tutorials

  • Choosing a Portable PA System
  • How to Be a Better Singer
  • Build a Budget Live Streaming System Using PTZ Cameras
  • How to Get the Best Audio Quality on YouYube
  • Setting Up Stage Monitors
  • Mixing Console Basics
  • How to Position PA Speakers
  • Stage Sound System Set-Up
  • How to EQ Live Vocals
  • How to EQ Live Sound
  • Daisy Chain Active Speakers
  • Zoom Audio Settings for Music
  • How to Livestream a Wedding
  • Improve Your Livestream Audio Quality
  • Microphone Preamp Buying Guide

Featured Posts

Treblab X9 Pro: Tough Earbuds, Big Performance

Escape the Noise: Best Affordable Noise-Canceling Headphones

How to Combine Passive and Powered Mixers

What is a Ground Loop? – 5 Simple Ways to Fix the Buzz and Hum

Disclaimer

VirtuosoCentral.com is a participant in the Amazon Services LLC Associates Program, an affiliate advertising program designed to provide a means for sites to earn advertising fees by advertising and linking to Amazon.com.

Home  About  Contact  Disclaimer  Privacy

Copyright © 2019-2025 Virtuoso Central. All Rights Reserved.