This website uses cookies to improve and personalize your visit. Learn more about cookies. Got It

  • Skip to primary navigation
  • Skip to main content
  • Skip to primary sidebar

Virtuoso Central

  • About Us
  • Contact
  • Privacy

Informational

What Is an Aux Send and How to Use It on a Mixer?

Aux Sends on a mixing board are very useful for many purposes. They have the advantage of having level controls over each channel individually, which is entirely separate from the main mix.

One of the primary purposes of aux send is to set up a monitor mix and to route signals to record live music. Being able to record straight from the mixing desk is amazing for taking an accurate snapshot of live performances. But that’s not all they’re useful for.

Read on to learn how to use aux send on mixer driven sound systems.

What Is an “Aux Send” or “Auxiliary Send” on a Mixing Console?

Before you learn how to use the aux send feature on a mixer, you must understand how it works. You also need to know what a mixer is.

What Is a Sound Mixer?

A mixer is an electronic device that changes audio signals’ quality and quantities. It is also referred to as the mixing console, soundboard, or audio mixer. 

You may use a mixer to conveniently route or combine various audio signals and change the tone and volume of the sound.

While a mixer’s main outputs generally route to the front-of-house speakers and foldback. They often also include auxiliary sends.

What Is an Aux Send?

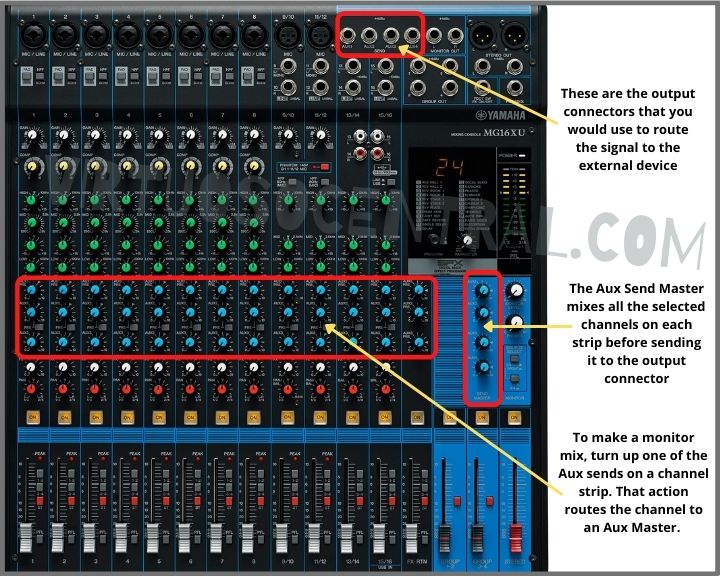
“Aux Send” is short for Auxiliary Send. It can be defined as a circuit pathway in a mixing console that routes an independent mix to an external device.  

Most newer model consoles have more than a few aux sends on each channel allowing various devices to process the input to a singular channel or groups of channels.

Some mixers have aux sends, which are “internal” such that they send a signal to an onboard effects processor. On the other hand, some aux sends are “external” because they route the signal out of the mixer to another device altogether.

It’s quite common for the final mix to be available as an aux send channel too.

Aux Sends and Returns

The aux send is an auxiliary channel in a mixing console that is sent to an external device such as an effects processor. Whereas an aux return connects the external device output (effects processor) output back into the signal path. 

How to Use Aux Send on Mixer – Typical Uses 

Auxiliary Sends have many uses. Below is a rundown of some of its uses.

Monitor mix – You can use an auxiliary send to create several monitors or headphone mixes. Usually, the mixes are different from the main mix the audience hears; it is just for performers to hear themselves.

Private Communication – Aux sends allow a musician to communicate privately with the sound desk and the people on stage. This function is best achieved with in-ear monitors.

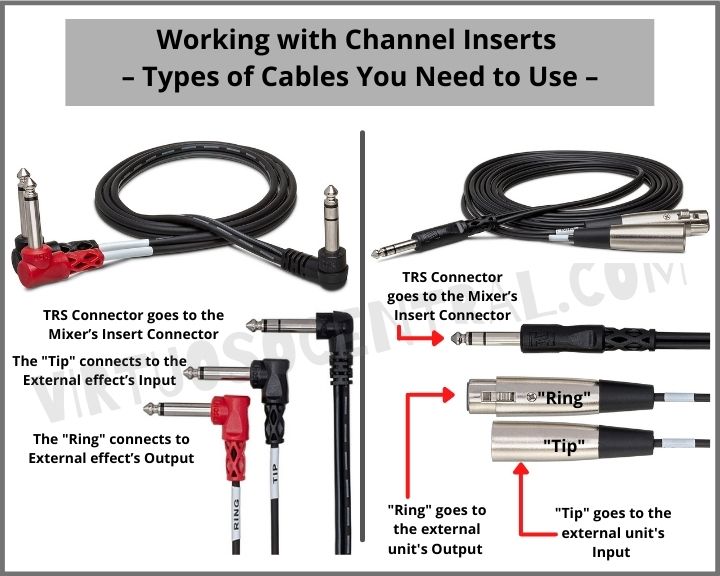
External Effects Processor – This allows you to send an early signal to external effects units such as reverb, delay, compressor, limiter, and many more.

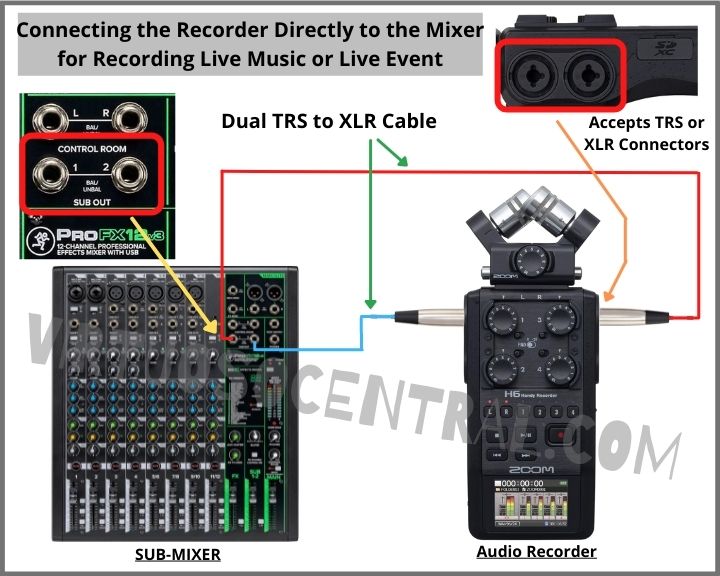
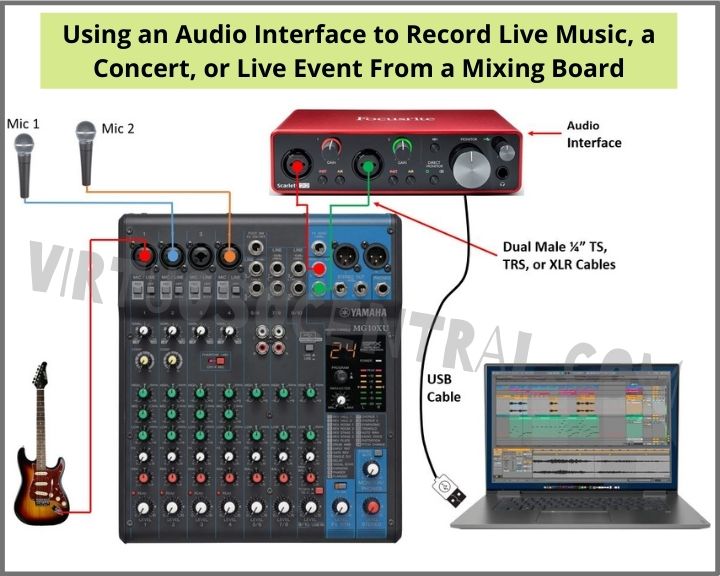
Recording the Main Mix or Different Mixes – You can use the aux send to relay only the channels you want to record. Additionally, you can also simultaneously record different mixes.

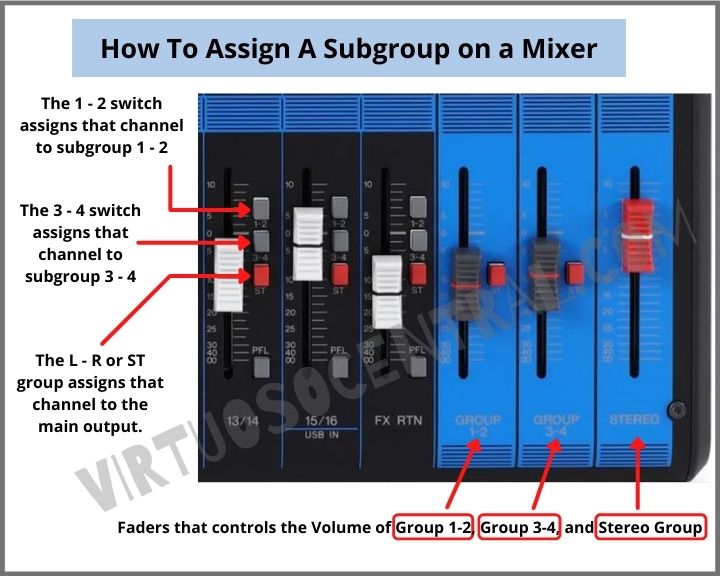
Creating Your Main Mix and a Sub-mix – You can create the main mix and a sub-mix using an aux send.  This is usually used for drums, whereby you can send all drum components to one channel fader only.

Overdubbing – You can use the aux send to route only specific channels into a recording interface. This can be useful when overdubbing.

Other Uses

  • In-Ear Monitors
  • Interruptible Fold Back sends (IFB) – for broadcast use
  • Zone sends
  • Record Feeds
  • Press Feeds
  • Delay Zone/Ring Sends
  • Mix-minus – for teleconferencing

Difference Between Pre- and Post-fader Aux Sends 

Aux may be used in two ways: to supply signals to an external processor or to supply signals to a diverse monitor mix for a musician onstage. These two options are critical when learning how to use aux sends in a mixer.

Pre-Fader Aux Sends 

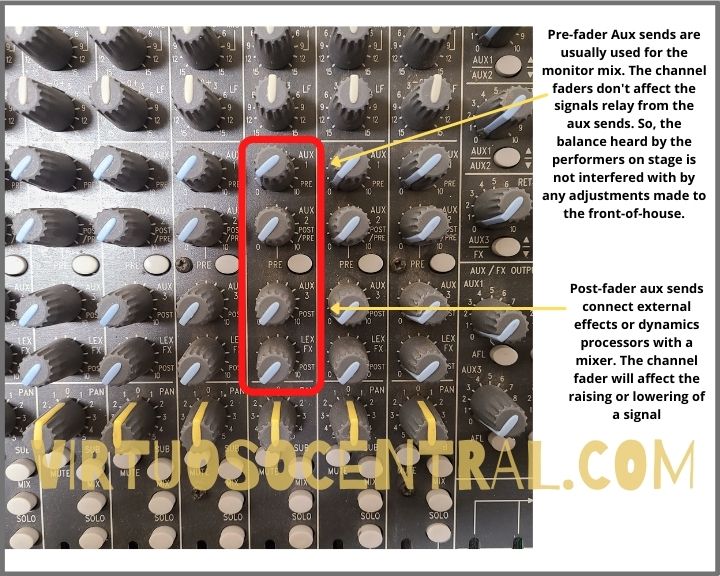
These are usually used for the monitor mix. The channel faders don’t affect the signals relay from the aux sends. So, the balance heard by the performers on stage is not interfered with by any adjustments made to the main output going to the front-of-house speakers.

Additionally, when using the Pre-fader mode, only the Aux Send knob will affect a channel’s aux level but not the channel’s fader. Whereas when you use the post-fader mode, the adjustments you will make on that channel fader will change the signal going to your Aux Send.

Post-Fader Aux Sends 

Post-fader aux sends, connect external effects or dynamics processors with a mixer. Sound engineers achieve this by sending the signal to the processor using an aux send; then, after the signal is processed, it reenters the mixer through an aux return. 

A different aux send control for each channel allows you to adjust the processing amount. The channel fader will affect the raising or lowering of a signal.

Most mixers have at least one post-fader and one pre-fader aux send, while some mixers have switchable aux sends – meaning that you can switch between pre- and post-fader with these mixers.

When to Use Pre- or Post-Fader Aux Sends

There are a few reasons why you may prefer to use pre-fader sends, while in other situations, a post-fader send is much more useful. Check out the scenarios below to figure out which is best for you.

Scenarios of When to Use Pre-Fader Aux Sends

Pre-fader aux sends are independent of channel faders. Therefore, you can use them as a musician monitor wedge or in-ears. In this instance, you want to achieve consistency in the monitor mix on stage regardless of how much or little of each source you may need in the main PA mix. 

Another reason why pre-fader sends are advantageous is because you can use them solely as an effect track (such as reverb or delay). In this instance, you can route multiple channels into one effect.

Additionally, a good way of enhancing your workflow is to put up a template for your mixes if using a digital mixer. Generally, with about three to four auxiliary tracks – two long and short delays and two long and short reverbs onto your aux sends and manipulate from there.

You may also use pre-fader aux sends for parallel compression. Parallel compression blends the original signal/track with a heavily compressed track. 

Say you want to parallel compress your drums tracks. This means you would like to hear all your drum microphones but send each track to a different compression track to be heavily compressed, perfect for certain genres like metal.

You can make sure you hear both dry and wet tracks of the parallel compression by sending the signal pre-fader. All you need is simple tweaks to create two stellar drum mixes.

Scenarios of When to Use Post-fader Aux Sends

Meanwhile, using post-fader aux sends could be doing a monitor mix for a theatrical play. Usually, the actors’ microphones are only live on the monitor mix when they enter the stage and bring up their corresponding channel fader into the main mix.

Bussing is another way of using post-fader aux sends. For instance, if you record a guitar-heavy track on a mixer, you can control all the guitar levels using a post-fader send as an overall fader.

With simple automation on the auxiliary track, you can lower the levels of the guitar in parts of the song, such as the chorus, using one fader.

Aux Send vs. FX Send – What is the Difference? 

FX is an abbreviation for effects. Effects refer to the processing of sound either using analog (hardware-based effects) or digital (software-based effects) such as reverb, delay, phaser, etc.

The FX Sends functions by relaying signals from any individual channel to an external effects unit – mostly a reverb unit. Using a single unit for every instrument gives the illusion that all instruments are together in one space, thus giving a feeling of cohesiveness to the sound.

Typically, “FX send” refers to the “Post-Fader Auxiliary Send,” which is a type of aux send. As earlier mentioned, when you use the post-fader aux send, the signal relayed to the aux send master is proportional to the level of the input fader. This is how you can send a signal to an external processor, such as reverb.

As aforementioned, the aux-send function relays output on multi-channel sound mixers (unlike FX send), which only sends to an external effects unit. An aux send can be sent to different locations, such as another mixer or a signal processor. In short, it allows the signal to be split and sent independently to other locations.

The Difference Between FX Send and Return? 

FX ‘send’ is the aux bus from the mixer that sends to the effects processor. The ‘return’ is the mixer channel that receives output from the effect processor.

Using Aux Sends for Monitors – Setting It Up 

Now that you know the different modes of aux send and the various uses, you are ready to learn how to use an aux send on a mixer for one of its most common purposes.

To make a monitor mix, turn up one of the Aux sends on a channel strip. That action routes the channel to an Aux Master. The signal then relays to a stage monitor set-up and an output of the mixer, each connected with their respective Aux output jack.

To complement the performer, you need to balance the aux send levels. Keep in mind what is relevant for each performer. You need to understand what they need to hear depending on their position and how they optimize their performance. They’ll tell you during the soundcheck.

After everything is set up, it is crucial to perform a sound check with the performers to finalize the monitor mix. Doing this step will ensure that the sound engineer is familiarized with performers and musicians, knowing how it will sound

The following steps will help you finalize the monitor mix:

  1. Set the mixer’s Aux output (Aux Master Knob) level to unison. In most cases, depending on your mixer, it means turning the knob to the middle.
  2. While sending signals from microphones, instruments, or phone/computer playback to play a sound through your mixer, turn that channel’s Aux send level to unison as well.
  3. Next, turn up the stage monitor’s level to a convenient volume. Once through, change each channel’s Aux level to customize the monitor mix as needed by the performers.

When using aux sends for monitors, the aux send knob controls the signal level that travels to the aux master and then out to the stage monitors. Thus, you will need to turn up the channel fader to hear more of one channel in the mains. 

Separately, turn up the Aux Send knob if you want to hear more through the stage monitors. 

Otherwise, if you’re going to hear more of everything, you should turn up the Aux Master to listen to it on the monitors and the Master Fader to listen to it in the mains.

Where to From Here?

Now that you have learned how to use an aux send on a mixer, there is still much to know about a mixing console. Check out our blog for plenty more useful guides to mixing and mastering recorded or live music.

How to Record the Live Event Sound from a Mixing Board – 4 Methods

One way to immortalize a live concert or event is by making an audio recording of it. And to get the best results on your recording, you need to get the audio feed straight from the mixer.

There are several ways you can use to record live music from an audio mixer, but the four best, proven methods are:

  1. Using a portable audio recorder
  2. With your smartphone or tablet and an app
  3. Connecting a computer to the mixing console
  4. Leveraging the multitrack recording capabilities of a digital audio mixer

Whether you are looking to record the audio at a live concert, an important event, or get high-quality demos for your band, in this post, we go into more detail to show you the best four methods you can use. Keep reading to learn more!

1. Using a Portable Audio Recorder

A portable audio recorder is a practical option to record audio at a live event. You only need the recorder and a handful of cables and connectors to make the connection. Plus, it is very easy to set it up, and the recorded audio quality is excellent.

With an audio recorder, you have two options when it comes to recording at a live event:

  • Using the built-in or external microphones
  • Connecting the recorder directly to the mixer.

Using the Built-In or External Microphones

You can get good live audio recordings without connecting the recorder to a mixing board, using either the built-in or attachable external microphone.

The resulting sound would be ok because the built-in microphones are usually very sensitive condenser mics, thus delivering excellent sound.

The only problem with using open to air microphones is that they also pick up all the ambient noise, and the recorded sound won’t be as detailed as if the signal was coming straight from the audio mixer. This is especially true if you are farther away from the sound source.

You also lose the ability to control your mix at this point, unfortunately, so you’re missing out on an opportunity if you’re not using the mixer’s outputs.

If you choose to go with this method, you have to point the microphones towards the main stage and get as close as possible to get the best chance of picking up the performance in more detail.

Most professional audio recorders allow you to install different interchangeable microphone capsules with different configurations that snap into place.

You can also use any external mic you’d like because professional recorders also have input channels with phantom power to connect the microphone of your choice.

Connecting the Recorder Directly to the Mixer

To get the best audio quality when using a portable recorder to record a live concert or event, you need to connect it straight to the mixer to get a clean audio signal.

To achieve this, you need to get a mono or stereo signal from the main mixing console.

When deciding which output to use on the mixer, I would highly recommend talking to the sound technician so that he can tell you what is available.

It is also important to ensure that the audio recorder you use accepts 1/4″ TRS or XLR inputs. Most professional recorders accept both.

Choosing The Mixer’s Output

There are several ways you can get an audio feed from the main mixing board, but it will all depend on availability and whether you want a mono or stereo signal.

Using Aux Sends as Outputs

If you want a mono signal, meaning a single channel, you can use the output labeled “AUX SENDS,” “MON,” “CTRL ROOM,” or “CR OUT.” Depending on the brand you use, they could be labeled differently, but they do exactly the same.  

After locating the output you want to use, you have to run a cable from the output you chose to the recorder. Usually, it will be a TRS or XLR connector.

Then you need to increase the volume on the mixer until you see a level on the recorder’s screen.

If you choose to use the aux send as your mono output channel, don’t forget that you need to increase the volume on each channel you wish to record. In other words, each channel will have an “AUX” knob that you have to increase to include it in the recording.

This is not the best way to get audio from a mixer to record it, but sometimes it’s the only available option depending on the mixer and size of the event.

Using Subgroups for the Output Signal

The way I recommend to get audio from the mixer to record it is to use a stereo “SUBGROUP,” also labeled “SUB,” or “STE” depending on the brand. Here’s how:

  • To use this method, locate the SUBGROUP output labeled 1, 2, 3, 4, etc., and run a balanced TRS cable from the mixer to the recorder. Most recorders will accept balanced TRS or XLR connectors.
  • Then, on the board, above each fader, locate the subgroup buttons and activate all the switches on the channels being used on the mix to send it to the subgroup’s main faders.
  • Next, increase the volume of the subgroup’s main faders until you see the signal coming into the recorder and adjust it to avoid clipping and saturation.

To learn all about Subgroups, click the link.

You could also use the “MAIN OUTPUT” or “STEREO OUT” from a line-level mixer to connect it to the audio recorder. But this only works if you don’t intend to connect powered speakers or amplifiers to the mixer.

If the mixer is being used for the event, chances are you won’t be able to use the line-level main output for recording.

Note: If you are using a powered mixer, NEVER connect the recorder or any other device to the main output. This output is not line-level; it is used to connect Loudspeakers. If you connect your recorder to this output, it will be damaged.

Using The Rec Out Connector to Get the Signal Feed

Another way to get an audio feed from a mixer for recording is using a pair of RCA connectors labeled “REC OUT,” “TAPE OUT,” or just “OUT.” This output was initially intended to record to tape cassettes or tape reel recorders.

Although this connection is intended for recording, I don’t recommend it that much because this output is not balanced, meaning that the connectors and cables are not shielded. A balanced connection uses shielded twisted-pair cable and three-conductor connectors specially designed to be immune to line noise.

If you decide to use the “REC OUT” connector anyways, you’ll still get a decent quality audio signal, but you might find some noise in the line if you run it over long distances.

These concepts might be difficult to understand if you are new to sound engineering. If this is the case, don’t worry, I have written an article explaining all of these concepts in an easy-to-understand way. If interested, click the link to learn about mixing console basics.

You no longer have to be a professional artist or field recordist to have a powerful, detailed portable audio recorder. There’s a ton of excellent field recorders available at consumer prices. Here are a few suggestions of some of the best portable audio recorders available in the market.

2. Using Your Smartphone or Tablet and An App

Considering how powerful and portable today’s electronics are, you don’t even need a laptop to record live audio from a mixer. You can even make a good recording using just a smartphone and a few accessories. You’ll need to prepare accordingly, however. 

Most of the considerations for recording from a mixer to a smartphone are similar to what you’ll encounter when recording to a laptop. You’ll need a way to get audio into your phone. You’ll also need some app to record the audio.

As far as getting a signal into your phone, there are several ways to do so. Here are the best six methods:

  • By Connecting a USB Capable Audio Mixer to Your Smartphone (Best Option)
  • Using a multi-channel audio interface
  • Leveraging the Interface Capabilities of the iRig Stream
  • Using an XLR to USB Signal Adapter or Line-In to USB Interface Cable
  • With an External USB Sound Card
  • Using a Line-Level Audio Adapter with Built-In Attenuation

 I won’t go into detail on how to use these six methods because I have already written an article explaining this process with step-by-step instructions and connection diagrams. To check the article, click here.

The only caveat is that the article was intended for iPhone users, but the same procedure also applies to Android users. The only difference is that instead of using Apple’s camera adapter to make the connection (Lighting to USB-A adapter), you need to get the correct adapter to go from USB-A to USB-C or micro USB, depending on the Android phone you have.

If you’re going to be recording on an Android, you’ll need to install some third-party app for recording. Bandlab is both a multitrack recorder for Android devices and social media network for musicians. If you’re doing live audio recording to help build a band or musician’s reputation, Bandlab is a useful tool to have in your pocket. 

If you’re recording with an iPhone, it should come with a copy of GarageBand included. No additional apps will be necessary. 

Recording apps are often set up similarly to GarageBand, so if you’re familiar with that software, you should be good to go. You’ll open the software and create a new track. You’ll be given the option for what kind of signal you’re working with.

It won’t make much of a difference which option you choose, though, as you’re consolidating everything down to a mono or stereo input. The Guitar or Instrument option should suffice. 

Once everything is set up, check and make sure there’s a signal via the meter. If you’ve got a signal, you just need to press the big red record button, and you’re ready to go!

3. Using A Computer to Record Live Music from Mixer

One of the best ways to record live music from a mixer is by using a computer. As nearly everybody’s got a laptop at their disposal, this could be the most practical method.

Most of us have powerful, high-quality recording software at our disposal as well. This means you’ll get clear, detailed recordings using this method. You’ll also have far more control over those recordings once they’re in the software. 

This raises the question about live audio recording – how will you get the audio from the mixer into your laptop?

Here are the best three methods to record a live event using a laptop:

  • By connecting the mixer directly to the computer through a sound card or line-in to USB interface cable
  • Using an audio interface
  • Using a USB-Capable Audio Mixing Console or Multitrack Recorder

I will not explain each method in detail because I have already covered how to record audio from a mixer to a computer step by step in another article. Click the link to check it out.

A Few Things to Consider if Choosing this Method

If Using an Audio Interface

A USB audio interface is recommended if you’re recording live concert audio.

Luckily, there’s some powerful audio software out there for next to nothing. And usually, when you buy an interface, it comes bundled with a DAW (Digital Audio Workstation) software that you can use for recording.

If you’re recording on a budget, there are even excellent free options like Audacity. It’s a bit rough, but it will get the job done. 

When picking out a USB audio interface, you should think about how many simultaneous channels you want to record to get the correct one.

You would also need to know what sort of conditions you’ll be in. Will you be looking to record a live band from a professional venue’s mixing desk? Or will you be in more makeshift environments like coffee shops, basements, garages, and living rooms?

This answer will determine what kind of power source you should get for your audio interface. You can get audio interfaces that are powered solely by USB. They tend to have fewer inputs and cost more than the alternative. 

If finding an outlet isn’t going to be a problem, you can get all sorts of excellent audio interfaces for not a lot of money. Here are a few suggestions you can take into consideration.

Pre- or Post-Fader

This might seem like a subtle decision, but it’s one that will have an enormous impact on your recording. This approach will mostly factor in if you’re recording from your mixer’s AUX outs, where this will be an option. 

A post-fader mix means you’re recording everything exactly as it’s coming out of the board. If you have to turn down a guitarist’s cab mic during a particularly intense section, for instance, that will be reflected in the final recording. 

On the other hand, a pre-fader mix records audio before it reaches the main mixer outs. This approach also gives you some excellent additional options for even more detailed recordings. 

A pre-fader mix lets you record audio from a dedicated pair of room mics from the mixer board, without running the risk of a feedback loop, for instance. You could set up ambient mics on-stage, as well, if there’s room from the monitoring board.

This also solves one of the dilemmas you may encounter if you’re going to record audio at a live event. Not everything gets a microphone. If it’s not going through a microphone, it’s not going to get picked up by the board.

This means it wouldn’t show up in a live recording straight from the AUX out. 

Multitrack Recordings

Modern recording equipment and software offer some truly unprecedented options. Given how powerful and versatile modern recording tools are, your imagination’s the limit.

If you’re using a multi-channel audio interface, you could record direct-outs of individual channels as well using channel inserts. This means you can create a track for as many signals as you want, which you can then mix and master like you would a studio recording. 

If your mixer comes with “Inserts” for each channel, you could use a multi-channel interface to connect each separate channel from the mixer to the respective channel on the interface.

Then you would create a recording where each track is separate. That way, you could edit each track independently then mix it on the DAW of your choice.

One of our most crucial recording audio tips is to play through the gig in your mind beforehand. This will help you decide the most important details, like which instruments you’re hoping to record and at what volume.

You could even create a template before you get there, so you’ll be prepared and ready to go!

If you’re working with a digital mixer, you’ll want to look at its instruction manual if that’s available to you. Different mixers route audio differently, and you’ll need to know those specifics if you’re looking to make a multitrack recording.

4. Leveraging the Multitrack Recording Capabilities of a Digital Audio Mixer

Many modern digital mixing boards have native recording capabilities. It’s also common to record straight to a USB drive. Some can even record multitrack files, which can be mixed, mastered, and polished after the fact.

If a digital mixer is going to be used for the event, you could just connect a large enough USB drive and set things up so that the mixer records each channel separately to give the option of mixing and mastering the raw recording on a DAW later on.

It’s unbelievably easy, efficient, lightweight, and portable. Such powerful technology is readily available these days. Make the most of it!

Recording Live Music From a Mixer – Final Thoughts

When recording audio at a live event, you need to be ready for anything. So while you may plan on preferring one approach mentioned above over another, you should really have options for all of them in case something goes wrong. 

You can always get another take in a studio setting if something goes wrong. With live audio, you got only one shot; once the moment’s gone, it’s gone forever. 

This means if you have the option, you should bring along a laptop and all of the cables you’d need to record live audio. You should also make sure to have whatever adapters you might need, as things tend to go wrong when the moment strikes. 

You may even want to bring along a field recorder if that’s available to you at all. While it’s no alternative to getting a clean signal straight from the board, it’s better than nothing. It can serve as a backup if every other failsafe fails. 

Whatever you’re planning on doing with sound engineering, you should know how to record live audio from a mixer. Everyone from established bands to emerging artists to public speakers may need your services, and it pays to be ready!

Ready to Master How to Record Audio at a Live Event?

I’ve gathered a ton of knowledge in my years working with audio equipment that I like to share on my blog, from recording live music to getting the perfect mix. Check out my blog to learn more about these subjects.

If you have questions, get in touch and let me know!

How to Connect the Focusrite Scarlett 2i2 to an iPhone or iPad

These days, it is easier than ever before to record music from the comfort of your home. As equipment and software become better, you need less to make great stuff! 

That being said, it is still worthwhile to invest in an audio interface such as the Focusrite Scarlett 2i2. This interface won’t break the bank, but it will make your recordings higher quality. 

If you’re making music with your laptop, all you need is your interface, laptop, a DAW (Digital Audio Workstation), a microphone, and maybe a USB adapter, depending on what kind of laptop you have. 

However, if you don’t have a laptop or desktop computer or would rather use your iPhone or iPad, don’t worry because you can easily connect the Scarlett 2i2 interface to your iPhone or iPad Pro.

Keep reading to learn how to connect your Focusrite Scarlett 2i2 to an iPhone or iPad Pro. It’s easier than you might think!

Why Connect Your iOS Device to Your Scarlett 2i2?

There are a few reasons why you might choose to record with an iPad Pro or iPhone instead of a personal computer.

If you don’t have a personal computer, you might not want to make the investment right away. And even if you do have one, you might find it easier to work with the touch screen user interface of iOS DAWs.

Some people swear by the specific recording setup they like to use, but at the end of the day, you can make great music with any DAW, even something basic like Garageband. 

In fact, Garageband for the iPad and iPhone is a highly versatile app with an easy-to-learn user interface and more features than the desktop version you may have used before. 

Don’t let the fear of having the wrong setup get you down. Simply connect your Scarlett 2i2 to an iPhone or iPad and start creating!

You Might Also Like: How to Connect a USB Mic to an iPhone or Any Other SmartPhone

Two Ways for Connecting the Focusrite Scarlett 2i2 to an iPhone or iPad

Connecting the Scarlett 2i2 straight to your iPhone or iPad wouldn’t work in most cases because the interface needs more current than what your device can supply.

If you have a 3rd Gen Focusrite Scarlett 2i2, you can connect it directly to an iPad Pro using the included USB-C cable, and the device will be able to power it because the new generation interfaces consume little power, and the iPad Pro can handle it.

Instead, if you have a 2nd Gen 2i2 interface, not even the iPad Pro will be able to power your interface by itself. Unless the interface uses an external power adapter, you will need to provide power for the interface to turn on

When it comes to the iPhone, it can’t power either the 2nd or 3rd Gen Scarlett 2i2 because its battery cannot deliver enough power for the interface to work.

To solve this issue, the interface needs to get the power from another source and only use the phone’s port to send and receive the data.

There are two ways of supplying power to the Focusrite Scarlett 2i2 to connect it to an iPhone or iPad:

  1. Using a PowerBank – Perfect for a Mobile Setup
  2. With a charger that delivers enough current to power the interface while charging the phone.

I assume that you already have an iPhone or iPad and the interface in this post.

If you don’t have an audio interface, I recommend the Focusrite Scarlett 2i2 3rd Gen interface, but the 2nd generation will also work if you already have one. The difference is that the third generation comes with USB-C, and it consumes less power than the previous generation interface [Link to Amazon].

You don’t even need to install any drivers because the interface is plug-and-play.

The Scarlett is an affordable, tried-and-true interface and has long been a go-to for musicians everywhere.

1. Connecting the Scarlett 2i2 to an iPhone Using a PowerBank

This method works best if you want the flexibility of a mobile setup to record on the go.

Another advantage of using this method is that you provide power to the phone or tablet. That way, you don’t run out of battery in the middle of the recording session.

One thing you need to take into consideration is to get a power bank or portable charger with enough capacity to last the time you need.

This is What You’ll Need for the Setup

  • A PowerBank with Enough Capacity
  • To connect your Focusrite Scarlett 2i2 to an iPhone or iPad, you’ll need a Lightning to USB 3 camera adapter – Please note that the adapter needs to have both the USB-A and Lightning charging port to connect to the PowerBank and interface at the same time.
  • Lastly, you will also need your phone or tablet’s charging cable.

Please Note: The adapter mentioned above is made for cameras, but it is a must-have for any musician working with an iPad or iPhone. Not only can you use it to connect your interface to your iOS device, but also to hook up your MIDI keyboard as well!

A new adapter retails at around $39. If you have an older Apple USB adapter, you can make that work too. However, you will need a USB splitter and a Y cable to get power to your interface.

Making the Connection and Setting Things Up

  1. Connect the Lightning to USB 3 camera adapter to your iPhone.
  2. Use your phone’s charging cable to connect from the power bank to the charging port on the adapter.
  3. Next, connect the USB cable from the interface to the USB-A port of the adapter.
  4. Unlock the phone and follow the on-screen instructions to finish the setup.
  5. Open GarageBand or any other application you wish to use the interface and run a test to ensure it works well.
  6. Setting the input audio levels on the interface is essential to avoid distortion or clipping of the incoming signal.

The following diagram shows the connections you have to make to connect your interface to an iPhone using a power bank to power both devices. Use it for your reference.

diagram to know how to connect the scarlett 2i2 interface to iPhone using a power bank

2. Connect the Focusrite Scarlett 2i2 to an iPhone Using a Charger and an Adapter

Another way of using the Scarlett 2i2 with an iPhone is by using the Lightning to USB 3 camera adapter and a power brick that delivers enough current to use the interface and phone simultaneously. Most fast phone chargers should work well with the interface.

This approach is not as mobile as the previous method but works perfectly well.

Adapters and Accessories You’ll Need for the Setup

  • A Phone charger with enough output power to charge the phone and run the interface simultaneously.
  • As with the previous method, you’ll need a Lightning to USB 3 Camera Adapter – The adapter must have the USB-A port and Apple’s Lightning port or USB-C for charging, depending on the device you have. Please check your device’s port before purchasing.
  • You’ll also need your iPhone or iPad’s charging cable.

Making the Connection

  1. Connect the adapter to your iPhone or iPad’s charging port.
  2. Connect the charger to the wall and use your phone’s charging cable to go from the charger to the corresponding port on the adapter.
  3. Attach the USB cable from the Scarlett 2i2 interface to the USB-A port of the adapter.
  4. Unlock the phone and follow the on-screen instructions to finish the setup.
  5. Open your favorite application or DAW to run a test. GarageBand should work great for any recording.
  6. It is important to check the input audio levels on the interface to avoid distortion or clipping on the incoming signal.

The diagram below can help you visualize the connection you need to make. Use it for your reference.

Diagram for connecting the Scarlett 2i2 to an iPhone Using a Charger and an Adapter

Bonus Tip – Connect an Audio Interface to an iPad Pro with USB-C

There is a simple method for connecting an audio interface, whether it is the Scarlett 2i2 or any other USB-C interface, to an iPad Pro that I will discuss in this article. And it is by leveraging a powered USB-C hub with pass-through charging.

The idea behind using this method is to use the hub to supply the necessary current that the interface needs and use the iPad’s USB-C port to send and receive the digital audio signal sent from the interface while charging it simultaneously.

This is What You Need for this Setup.

  • A USB-C Hub with pass-through charging to provide power to the iPad Pro and interface.
  • You will also need the iPad’s USB-C charger that will help power the audio interface and charge simultaneously.
  • USB-C to USB-A cable, usually supplied with your interface.

Connecting All the Components to Your iPad Pro

  1. First, connect the USB-C hub to your iPad Pro
  2. Connect your iPad’s USB-C charger to the Type-C charging port on the USB-C hub.
  1. Next, connect the iPad’s USB-C charger to the electrical outlet.
  2. At this point, you should see a notification letting you know that the device it’s charging. As mentioned earlier, the benefit of charging the iPad while recording is so that it doesn’t run out of power in the middle of a recording session.
  3. Take the corresponding USB cable and plug one side to the back of the interface and the other end to the appropriate port of the USB-C hub.
  4. If prompted to finish the setup on your phone, unlock it and follow the on-screen instructions.
  5. Run a test on any application where you want to use the interface to make sure it works.

Here is a diagram I have prepared that can serve as a reference showing the connections you need to make if you decide to use this method for connecting an audio interface like the Scarlett 2i2 to an iPad Pro.

Diagram to Connect an Audio Interface to an iPad Pro with USB-C

Connect Your Focusrite Scarlett 2i2 to an iPhone or iPad Pro 

By plugging your iOS device into your interface, you’re almost all the way to owning a cheap and totally functional home studio.

We hope you’ve enjoyed this guide on how to connect your Focusrite Scarlett 2i2 to an iPhone or iPad Pro. As you can see, the process is quite simple and rewarding. 

Once you’ve got your interface connected to your iOS device, you can start making music to your heart’s content. 

For more informational posts like this one, make sure to check out the rest of the articles in our blog by clicking here.  

How to Use Inserts on a Mixer

We’ve all seen those connectors in a mixing board labeled “Insert.” Have you wondered what they are used for? Do you know how to configure and use inserts on a mixer?

In simple terms, inserts on a mixer are points of access on the signal path that can be used to take the signal out to an external device such as effects, compressor, limiter, etc. Then bring it back into the mixer so that it continues its path.

When you’re mixing audio, using audio effects is often the rule rather than the exception. It’s very uncommon to use raw, unprocessed audio, even in recording sessions when so much happens in post-production.

External effects are even more prevalent in live sound, though, where noise gates, reverb, compression, and limiters are so common. 

Does that mean you need to use up all of your channels for routing audio from your mixer? Not at all. For this, you use inserts.

We’ve put together a guide on how to use inserts on a mixer to help you get started and, once and for all, understand how you can use them properly.

Keep reading to learn how to use channel inserts on a mixer and how it can elevate your mixes!

What Are Channel Inserts?

Picture your mixer, or if you’re still new to sound engineering, stand in front of it or pull up a picture.

Nearly every mixer on Earth will have a gain knob and three additional knobs for EQ. These are generally immediately above a pair of Aux Send knobs, and then there’s the Pan knob below that.

There may be an Effects send, as well. Then there’s the fader at the very bottom. 

At the top of the channel strip, there’s usually an XLR and 1/4″ input. Finally, there’s a 1/4″ input immediately beneath the main inputs. This is a Channel Insert.

What it does, however, is a different story. It’s one of the more mysterious elements of a mixer. Although it resembles numerous other features, it’s also one of the more useful, especially if you have a limited number of channels.

Also, keep in mind that an insert works simultaneously as an input and output.

To put it simply, a channel insert hijacks the signal of a particular channel or group of channels and routes it to an external source (Out).

Then the signal from the external source is returned (In) to the mixer using the same connector to continue its path through the rest of the channel and ultimately end up at the main output or subgroup output.

To better understand the concept, here is a picture of a TRS to dual TS cable used for routing signals in and out of the mixer inserts.

“Isn’t this just a direct output or aux send, then,” you might be asking? No, not exactly, although it can function like either. More on this later. 

Common Uses For Channel Inserts

Channel inserts are similar to other functions like aux sends. However, there are some reasons why you’d want to use channel inserts over other routing options. Here are a few.

Applying Effects

The most common reason, by far, for using channel inserts is as effects send/return. There are a few advantages of using inserts over other routing options when it comes to effects.

When you use the “Insert” feature on a channel, your signal is passed automatically through whatever effects it’s plugged into before moving down the signal chain.

It’s an easy way to ensure that all of your reverb, compression, EQ, or whatever other external effects modules you are using get into the mix. 

For example, let’s say that the main vocalist has a high sibilance voice, meaning that there are excessive high-frequency bursts when using “S,” “CH,” and “T” sounds. Instead of a plosive that bursts out into the mic, sibilance is more of a high hiss.  

Sometimes just lowering the high-frequencies in the EQ is not enough to take care of this issue. For this, you need a de-esser, but you only want it on the vocalist’s channel that has the problem. The easiest way to achieve this is to route that channel to an external de-esser using the channel insert. That way, this effect doesn’t affect the rest of the channels.

Another practical, real-life example of using channel inserts on a mixer would be to run a mic through a noise gate in a live setting. This way, the mic is guaranteed to be off when it’s not in use.

Using Channel Inserts as Direct Out

You can also route signals as direct-outs without interrupting their path using channel insert—this means that inserts don’t always return a signal depending on how you connect the cables.

For example, you can use channel inserts to handle sub-mixes. For instance, you might run the necessary channels into a secondary mixing board if you need to do a separate mix, whether it is for recording a raw take of each channel or as a broadcast feedline.

Another example of using channel inserts as a direct out is connecting a cable from the send side of the insert connector and running the signal into a recording device, such as a multitrack recorder or DAW (Digital Audio Workstation). 

Signal Routing

When using channel inserts, you can route signals and apply effects simultaneously.

You can use a Y-splitter after the channel insert to run that channel through whatever effects you want, then connect the signal to a different device such as a multitrack recorder.

In other words, you can use channel inserts for applying effects and as direct out simultaneously.

Let’s go back to the previous example of using a de-esser to eliminate sibilance on a vocalist.

In this case, you would connect the external de-esser to the mixer using the channel insert. Then use a Y-splitter at the effect’s output to send the modified signal back to the mixer and use the other side of the Y-splitter to send the signal to a different device, such as a recorder or DAW.

Working with Channel Inserts – Types of Cables You Need to Use

As we’ve said, channel inserts are similar to other features you’ll find on a mixing board.

They’re also unique in many specific ways, though. This means you’ll often need a specific kind of cable for optimal use of your inserts.

This mostly pertains to TRS cables. TRS cables stand for ‘tip,’ ‘ring,’ and ‘sleeve.’ They look very similar to regular 1/4″ cables, but they’re somewhat different. 

TRS cables act like three cables in one. You can plug in the cable up to the first ring, which is the Tip, to solely send a mono signal. The ring and sleeve can be used to receive a mono signal after it has gone through a signal processor. 

If you’re going to use TRS cables to split the signal from your channel insert, you will need a TRS to Dual TS Y-splitter for unbalanced signals or a TRS to Dual XLR Y-Splitter for balanced signal. The one you would need depends on the type of connector your external device uses. You can check your device’s specifications to know which cable to get.

How To Use Inserts On A Mixer – Making The Connection 

We’ll round things out with a couple of real-world examples so you can see channel inserts in action. This will give you some concrete illustrations you can rely on in your own mixes. 

The first scenario is hooking up your mixer to a compressor. To do this, you’re going to use a TRS Y-splitter. This will let you split the signal coming out of your channel insert. 

Next, take the tip-side cable and plug it into the compressor’s input. Take the other (ring-side) and run it into the output. Now you’ve got a compressor patched in, using only one input. 

If you want to use the channel insert as a direct output, simply plug the TRS cable in halfway. This way, a signal is sent out but not returned. 

Channel inserts are so useful once you get used to using them. They come in handy in everything from live sound to studio sessions, letting you use all your effects without having to use up all your return channels.

They also ensure that your effects are in-line and in the mix, so you’re guaranteed that your compressors, EQs, and reverbs show up the way you intend them to.

What Comes After Learning How To Use Inserts On A Mixer?

There’s so much to know when it comes to mastering audio! Every area is its own unique discipline, with its own rules and laws. 

For more audio engineering tips and tricks, make sure to check out the rest of our informative blog articles here. 

How to Use Subgroups on a Mixer

Nothing exists in a vacuum. This is particularly true when dealing with sound, where every decision you make affects every other element of your mix. 

When running sound, whether it is in the studio or at a live event, there are situations when you need to group tracks or channels together. Maybe you’re trying to get a consistent drum sound. Perhaps you need to turn up all the vocals at once.

Either way, the subgroups on a mixer are one of the most useful tools for grouping channels together. 

Keep reading if you’re ready to learn how to use subgroups on a mixer to master your mix and bring unprecedented polish to your recordings and live audio. 

What Is a Subgroup?

If you want a single, easy-to-remember definition of subgroups, here it is:

“A subgroup in a mixer is a selection of channels or tracks that you can route to different outputs other than the main output.”

To begin our journey in learning how to use a subgroup, let’s start with an example. Think about the main outputs on your mixer. This is a subgroup.

A subgroup makes it so that selected signals included in the group are controlled with a single fader (or a pair of faders, in the case of stereo busses.)

The grouped signals can then be processed with the same EQ and effects like compression or reverb.

Even this simple example should be getting your wheels turning with ideas about mixing with subgroups. 

Subgroups are also sometimes called “Aux Groups,” “Aux Tracks,” “Sub Bus,” or “Group Channel.” These alternate descriptions are an easy shorthand for understanding subgroups on a mixer. 

How To Assign A Subgroup

There will be some variation from mixer to mixer, but generally, subgroups on a mixer are fairly common. There will be a group of buttons next to each fader on most mixers, which you can use to select that specific channel to be part of a group.

Using these buttons is how you’ll assign that channel to a subgroup. 

The top button reads “L – R.” This assigns that channel to the main output, as we discussed in our “what is a subgroup on a mixer” example. 

The next button is “1 – 2”. This assigns that channel to subgroup 1 – 2. 

The final button is “3 – 4”. Where do you think that channel is routed?

If you guessed subgroup 3 – 4, you’re right. You are already on your way to understanding what subgroups are on a mixer.

Here is an image showing the button that assigns a specific channel to a group.

Let’s take a moment to consider virtual mixers and assigning subgroups. Virtually every audio program is based upon traditional hardware and recording techniques. Even the most advanced DAW is organized like an enormous mixing board.

For DAWs, you could theoretically have unlimited subgroup channels. There are also countless ways for you to group channels together, where you can apply the same principles as you would using a subgroup bus. 

The main thing to think about using virtual mixers is not to get too complicated. The subgroup’s main job is to make your job easier and to provide a cleaner, more polished mix. 

Examples Of Using Subgroups On A Mixer 

Now let’s look at some examples of common scenarios where you might use a subgroup. These examples of using subgroups on a mixer will make these concepts less abstract and more practical.

Once you understand subgroups in a more concrete way, you’ll have an easier time knowing how to apply these concepts in your own mixes.

Drums

The first – and, arguably, best – reason to use a subgroup is for mixing drums. If you’ve ever had your hand on a fader, you’ll know that getting a good drum mix is a delicate balancing act that is much harder than it looks. Drum sounds are powerful, and it doesn’t take much to drive your signal into the red. 

Drum sounds can sometimes take up so much of a mix that some engineers and producers will take them out entirely when mixing the other elements. The problem with this approach is it leaves little room for the drums, as you’ll likely have cranked up the guitars, vocals, bass, and whatever other elements you’ve got going on. 

Now there’s no room left. You’ll be forced to try and cram them in, being left with a weak and ineffectual drum sound. 

Instead, you can route all of your drum channels to a single subgroup. This way, you can pull back on the entire grouping when other lead elements come in. Then you can nudge them forward when there’s more room in the mix.

This is an easy way to add excitement, energy, and drama to your mix without adding additional effects.

Vocals

One of the other most common applications of using subgroups is for mixing vocals. This is particularly true in live sound or any scenario where several people are singing together. 

In the case of routing vocals to a subgroup, it’s more about universal EQing and effects than volume. Grouping similar vocals together can result in some sublime mixes with a minimum of processing. 

Say you’re mixing a small choir. You’ve got four mics on the soprano section. You can route them all to a single subgroup.

Now you can bump up the Highs and slightly trim the Mids and Lows, as those frequencies are less critical for this vocal range. You’re left with a clear, intelligible vocal sound over the other elements in the mix. 

Add in some subtle reverb, and you’ve got a heavenly blend, with only having to push a couple of buttons and add one single effect.

Subgroups are one of the best examples of how you don’t need a ton of flashy bells and whistles to get great-sounding audio. Assigning subgroups is one of the simplest techniques you can use, but it’s also one of the most useful. 

If you’re serious about mastering your mixes, you need to learn how to use subgroups effectively. You won’t believe what a difference it will make!

Live Broadcast or Line-Level Audio Distribution

Another excellent use of subgroups is to assign specific channels when patching the live mix for broadcast, whether streaming online or providing a line-level signal to a TV or radio station.

Here is a practical example of using subgroups for line-level audio distribution. Let’s say that you are the sound technician at a church. You have your mix sounding perfectly well on the main PA system.

At the same time, you need to stream the program online, plus send another live-level signal to the fellowship hall or mother’s room.

Each of these signals needs to be at different levels for each specific use, and in some cases, you might not want to assign a particular channel of the mix to one of the subgroups.

In such a case, you can use subgroups to send the main mix at a different volume as needed without affecting the main mix on the PA system.

Let’s say that the mixer you are using has the main L – R group, groups 1 – 2, and 3 – 4. In this case, you can assign the main L – R group to be your output to the PA system. Group 1 – 2 can be assigned to the online streaming platform via an audio interface, and lastly, group 3 – 4 can be assigned to send the signal to the fellowship hall or mother’s room.

Here you can see the utility of using subgroups if you need to send your mix at different audio levels. In the end, subgroups on a mixer are an excellent tool you can use for many other purposes depending on your needs.

What’s Next After You Know How To Use Subgroups On A Mixer?

Understanding audio is the pursuit of a lifetime. It’s both an art and a science. Once you know how to use subgroups on a mixer, you’ll need to understand compression, how to mix drums, and on and on.

The only way to learn is by doing. Start by setting up a subgroup on your mixer to learn the ins and out until you understand the concept.

Let us know if you have any questions or ideas for future blog posts!

How to Connect Two Mixers Together – 4 Simple Methods

If you are in the recording or live performance business, chances are you’ve worked with a mixer. But sometimes mixers don’t have enough inputs, leaving you in a bind.

Often, doubling up on microphones and inputs does not work when you have, for example, multiple vocalists who cannot share a microphone. So, you need a way to expand your current mixer’s capabilities.

Luckily, there are several ways to connect two mixers together to give you all the inputs you need to finish the show or recording session.

Here are the top 4 methods you can use to connect two mixers together:

  1. Using a Stereo Pair Input on the Main Mixer
  2. Connecting to Line-Level Inputs
  3. Using the Effects Return
  4. Using the Tape-In or 2-Track Input on the Main Mixer

Keep reading if you want to learn more about each of these four methods in this complete guide we’ve put together. Let’s get started!

Main Reasons to Connect Two Mixers Together

There are several reasons why you would consider connecting two mixers together, whether it is a live set up or in the recording studio.

This article will focus on the two main reasons: running out of input channels on the main mixer and sending an audio signal from one location to another.

1. Running Out of Input Channels on the Main Mixer

Let’s say, for example, your mixer has eight channels. But the band has a full drum kit, two guitars, a bass, a keyboardist, and two vocalists.

You can guess that those inputs will get used up really quickly, probably before you can even plug in the keys or the guitar amps. Being able to connect to another mixer gives you more channels to work with. 

2. Sending an Audio Signal from One Location to Another

An example of this is if a band brings their own mixer. This happens a lot if a band is mixing their own in-ear or wedge monitors. Their instruments and microphones will all be hooked up to their own on-stage mixer.

In order to run the band’s sound through the main PA system, you will need to be able to connect their mixer to yours. 

Regardless of the reason, the mechanics to connect two mixers together are the same. The route you take just depends on your specific scenario.

The Basics of How to Connect Two Mixers Together

Before we get into the weeds of connecting two mixers, we should lay out the intention behind it.

This article will refer to the second mixer as the “sub-mixer.” Meaning that it is sending all its signals to one or two channels on your main mixer.

The sub-mixer could be used, for example, to mic up a complete drum kit if it has eight inputs, which gives you plenty of microphones to use on a full kit. 

You will then be mixing the kit on the sub-mixer to control the EQ and levels. After the sub-mixer mix sounds good, you will be sending that to one or two channels on the main mixer.

That way, your main mixer inputs are not getting eaten up by eight drum microphones. If it also has eight inputs, that leaves you six or seven for your other instruments and vocalists.

This also gives you an advantage of controlling the drums (or whatever is on the sub-mixer) as its own separate group in the mix, with one fader. Very convenient for recording or live shows!

A Few Things to Consider 

Before you start plugging in cables, there are a few things that you need to take into consideration when you connect two mixers together.

Is There a Snake in The Signal Chain?

Not the reptile kind of snake, but a stage snake. An audio snake is an input box on the stage that allows you to run a single cable from the stage to the main mixer instead of a spaghetti bowl of XLR and 1/4″ cables.

If there is a snake in your PA set up, you will have to route it to one of the mixers. It does not change the number of inputs, but it does make connecting to the stage much simpler.

For example, let’s say you have a 16-channel snake. You can use the first eight channels for mics, guitars, keyboards, and the other eight channels for miking the drum set.

In a case like this, you would connect channels 1-8 to the main mixer and 9-16 to the sub-mixer. Then you would connect the sub-mixer to the main mixer, and you would have your full set up ready to go.

Types of Cables You Need to Make the Connection 

There are two primary types of cables in the audio world that we use to connect two mixers together.

The first is balanced cables. The most recognizable is the XLR or microphone cable. 

There are also 1/4″ TRS (tip-ring-sleeve) cables that can be used for the same purpose, for jacks that are not XLR connectors.

Balanced cables have three wires inside: a tip, a sleeve, and a ring. This “grounds” the signal, ensuring it stays pristine and clear over long distances.

On the other hand, unbalanced cables only carry two wires: the tip and the sleeve. This leaves the signal ungrounded (hence, unbalanced).

These are not ideal for sending audio over long distances, as the signal will degrade and be subject to interference from radio frequencies and dirty power.

If you plan to connect two mixers together, make sure that you are using balanced cables whenever possible. Unbalanced will work in a quick pinch, but they are intended more for instruments such as guitars into amplifiers. 

To sum it up: if your mixer outputs have 1/4″ jacks, use TRS 1/4″ cables. If they have XLR jacks, use XLR cables.

Line-Level Vs. Mic-Level Input – Which One Should You Use?

Many mixers will have the option of a line-level or microphone-level input on their channels via a switch or toggle.

A line-level input is a hot signal that is sent from a mixer or instruments such as synthesizers. 

A microphone-level or instrument-level input is a lower-level signal. These generally have less volume or gain to not feedback on the PA system.

When you connect your sub-mixer, you will want to use the line-level input on your main mixer. This gives you a hot signal that will be easier to work within your main mix.

If you use an instrument/mic-level input, you will need to be careful not to clip the signal due to higher gains present on these input channels. In such a case, you need to bring the gain down and make sure you leave enough headroom for the loudest parts of the presentation.

Figure Out If You Need a Mono or Stereo Signal

A mono signal will be more than sufficient in most live sound circumstances. This only uses up one input on your main mixer.

However, if you are using effects or want a stereo mix for recording, you will have to send two outputs from your sub-mixer into two inputs on your main mixer.

If you want to get really fancy with it, you can do a full stereo mix with your sub-mixer, panning instruments, or microphones however you want. This will be preserved if you hard-pan your main outputs on the sub-mixer.

Let’s use the drums as an example again. Say you want your kick and snare in the center, your toms panning towards the right, and your overhead cymbal mics hard-panned left and right.

You will need to mix the drum kit like this on your sub-mixer, panning the microphones appropriately.

As you send your stereo outputs, make sure to hard-pan the left and right 100% clockwise and counterclockwise, respectively. 

When you plug those sub-mixer outputs into your main mixer, you will then need to hard-pan the left and right channels again on the input channels.

This also applies to the final output stage of your main mixer. Hard panning left, and right makes sure that the signals go in the direction they need to go. Leaving the knobs at the center creates a mono audio image.

Choose Which Output You Will Use on the Sub-Mixer

Some mixers can send outputs from each channel directly. This is not ideal for these situations, as it will still take up the same number of channels on your main mixer.

Most mixers can also send a sub-mix out. If you are using the sub-mixer on stage for a band’s monitors, you will need to decide whether to use the sub-mix or the main outputs.

The main outputs will generally be the ideal ones to use on the sub-mixer. They have balanced outputs and will “sum up” the rest of the inputs and send them out as a group to the main mixer.

Choose Which Input Channels You Will Use on the Main Mixer

This comes down to personal preference and workflow. Generally, it’s easier to just use the first or last input channels on the main mixer. 

That way, the sub-mixer channel is not stuck in the middle of your other channels, leading to confusion. 

Keep the input channels together if you are running stereo inputs from a sub-mixer. It will save you a lot of headaches down the road and make getting the volumes and EQ to match much easier. 

Four Simple Methods to Connect Two Mixers Together 

Now that you’ve learned the ins and outs of using a sub-mixer and the main mixer together let’s talk about connecting them. 

We touched on this briefly in the previous section, but let’s look at the four easiest ways to connect two mixers together.

1. Using a Stereo Pair Input on the Main Mixer

This is the most straightforward method to connect two mixers if you are using stereo mode.

In this case, you will be using the unbalanced main stereo output on the sub-mixer and a stereo pair input on the main mixer.

As stated before, most mixers will use XLR outbound connectors for their main stereo outputs. These would typically run out to the PA speakers, but in this case, we are going to use the main output TS/TRS female connectors.

Use this method if both mixers are close to each other. For long runs, please refer to the last section of this article that explains how to connect two mixing consoles together if they are far from each other using a long cable.

You’ll need two Male to Male TS cables for this connection. These cables are also known as instrument cables.  

You’ll connect two male TS cables to the stereo out on the sub-mixer. Then, connect the other end of the wires to a stereo pair input on the main mixer.

Stereo pair input channels are usually the last two or four channels in a mixer. They are typically labeled 9/10, 11/12, etc., meaning that they are stereo pair inputs that are controlled by a single fader.

Then all you need to do is adjust the levels and EQs. The advantage of using this method is that you can control the stereo signal coming from the sub-mixer with one fader, making it much easier to have control over your mix.

2. Connecting to Line-Level Inputs on the Main Mixer

This method works for mono or stereo signals. It is the same, in principle, as the method above, except you are connecting the output of the sub-mixer to one (for mono) or two (for stereo) line-level inputs on the main mixer.

If choosing this method, you need to decide if you need a mono or stereo signal. If you choose mono, all you need to do is bring one output from the sub-mixer and connect it to a line-level input making sure that the PAN is set to the center. That way, the audio signal is mirrored on both channels simultaneously.

If you decide to go with a stereo signal, you need to connect the left output from the sub-mixer to one channel, then pan it left. Next, take the right output from the sub-mixer, connect it to the following input channel, and pan it to the right.

Then all you have to do is adjust the levels and EQs of both channels to match each other. Make sure that one is not louder than the other, or your stereo image will be off.

This way, you can control the stereo signal coming from the sub-mixer using two faders.

Remember to use either an XLR or a TRS balanced cable to connect the mixers together. If one or both of your mixers only has a 1/4″ jack out, make sure you are still using a balanced cable.

3. Using the Effects Return on the Main Mixer

This is a bit more “advanced” of a trick and is best if your main mixer does not have a lot of inputs to work with. Also, not all mixers have an effects return. But if they do, it can free up even more channels for your main mixer. 

In this case, you will be using the main stereo output on the sub-mixer and the effects return on the main mixer.

The principle of the “Effects Return” on a mixer is to send a signal from the mixing console to outboard effects, such as a reverb or delay unit. This is useful for live vocals and instruments to give it space.

The signal is returned from those outboard effects, back into the board, and given its own “channel.”

If you connect the outputs of your sub-mixer to the effects return inputs on your main mixer, you can effectively use the effects return “channel” as another input.

If your main mixer has an effects return, it should also have a separate fader or knob to control the levels of the mix.

This can be done in mono or stereo, as a mixer with an effects return will have stereo ins and outs. 

The only real downside to this method is that you cannot use outboard effects on your main mixer, and you won’t have EQ on that channel.

So plan carefully if you need to connect two mixers together using this method. Only use this technique if you can’t use methods 1 and 2.

4. Using the Tape-In or 2-Track Connector on the Main Mixer

The last method you can use to connect two mixers is using the tape-in connector.

The tape-in connection, also known as the 2-Track input, is usually found in older mixing boards, and it is intended for connecting devices with RCA outputs such as tape players, CD players, MP3 players, etc.

Please keep in mind that this is not the best option because you will have limited control over the signal that is coming from the sub-mixer. Basically, the only control you’ll have is volume.

I decided to include this method in this article so that you have all the options available. That way, you can choose the one that is right for you.

Another thing you need to know is that the tape-in connection is not a balanced signal, so you will need to use an unbalanced output in the sub-mixer.

To make this connection, you need a dual TS to RCA cable. Then you need to locate a TS output connector on the sub-mixer. The best one to use is the unbalanced main output, usually located next to or below the main XLR connectors.

Plug the TS cable to the left and right channels, respectively, and connect the other side of the cable to the RCA Tape-In input on the main mixer.

Set the volume and signal levels in the sub-mixer, then use the tape-in volume knob to control the gain of the signal.

The tape-in signal goes straight to the main bus in the mixer, meaning that you can’t EQ it, use compression, effects, or any other tool with it. This is why I don’t recommend using this method to connect two mixer boards together.

Use this method only if there are no other channels available on the main mixer or you are in a real pinch.

How to Connect Two Mixers Together If They Are Far From Each Other – Pro Tip

If your mixers are going to be a long way away from each other, for example, from the main stage or pulpit to the sound booth all the way in the back, you will need a way to connect them.

With balanced XLR cables, this is not a problem at all. You can chain XLR cables together and go up to 200 feet with no signal loss or degradation.

You can use TRS or unbalanced cables if you don’t have XLR output available; however, this becomes a bit trickier, as they cannot simply snap together. And unbalanced cables introduce more noise the longer they get.

If you find yourself in this situation, invest in a stereo DI box. There is a wide range of DI box prices and features, but even a basic passive DI box will help solve your long cable run issues.  

Something like the Radial ProD2 will work perfectly well, and it has two channels you can use to send a stereo signal.

In case you don’t know, DI stands for direct injection and is meant to take an unbalanced 1/4″ input and convert it to a balanced XLR output.

It will work fine with balanced cables as well. That way, you can send the signal through long runs without worrying about noise and signal degradation. To learn more about DI boxes, click this link.

Mixer Connection Methods, Demystified

Regardless of the method you choose to connect two mixers together, make sure that your audio gear is high-quality. This includes the mixers, cables, DI boxes, and whatever else you are using in your signal chain.

For more audio engineering tips and tricks, make sure to check out the rest of our informative blog articles. 

How to Record Audio From Mixer to Computer – Top 3 Methods

With the availability of cheap personal computers and recording gear, it is more accessible than ever to mix and record your own music. 

But one of the most confusing parts of home or live recording is figuring out how to get the audio from an analog mixer into your computer. If you are reading this article, most likely, you are trying to figure out the best ways to do so.

Here are the top 3 proven methods you can use to record audio from a mixer to a computer:

  1. By connecting the mixer directly to the computer through a sound card or line-in to USB interface cable
  2. Connecting the computer to a USB mixing console
  3. Using an audio interface

Read on to learn more about each of these three methods in this complete guide we’ve put together. Let’s get started. 

Requirements for Recording Audio from a Mixer to a Computer

The Computer

The first piece of equipment you will need is a decent computer. Both Mac and Windows work fine.

You will need a computer that has enough RAM and processing power. These are the biggest bottlenecks in terms of recording audio.

It doesn’t have to be the latest, top-of-the-line system on the market, but it needs adequate resources to work. I would stay away from Chromebooks or outdated equipment as they are very limited and can’t be upgraded most of the time.

These are the computer specs I recommend for recording audio from a mixer:

  • PROCESSOR: you’ll want the fastest processor you can afford. The minimum I recommend is the Intel i5 processor.
  • RAM MEMORY: no less than 8GB. The more, the better.
  • STORAGE: a solid-state drive (SSD) no less than 250GB. If you can afford to buy or upgrade to NVME M.2 SSD, I highly recommend it because it will run smooth and lightning fast, which will be handy, especially when editing. 
  • OPERATING SYSTEM: I highly recommend 64-bit OS. Most digital audio workstation software runs on 64-bit operating systems.
  • PORTS: you’ll need at least two USB ports. If it has more, it’s better because you’ll have more flexibility. If possible, a Thunderbolt connector is an excellent idea, especially if you decide to upgrade later.

The DAW

The second thing that you will need to record audio is a DAW. This stands for “Digital Audio Workstation.”

DAWs allow you to record multiple tracks simultaneously. This is useful when mixing, as it gives you control over the sound and levels of each track.

You can also apply effects such as equalization, reverb, and compression. DAWs also let you quickly edit tracks. So if you have an extra hit on the snare drum, you can just splice it out easily.

Digital Audio Workstations come in many different flavors and price ranges. For example, Audacity is completely free and open source. It is a popular choice for people just getting into recording. 

GarageBand can also work if you are a Mac user, but keep in mind that it is somewhat limited. For beginners, it is an excellent choice.

For a step up in terms of functionality and ease of use, look into Reaper. You can use it as a free and fully functional demo for as long as you wish. And a full license only costs $60. 

Other DAWs such as ProTools, Logic, Cubase, StudioOne, and FruityLoops are popular choices, as well. 

The 3 Proven Methods for Recording Audio From a Mixer to a Computer

After you have your computer and DAW set up and ready to rumble, it’s time to connect the mixing console to your computer. 

There are three options for achieving this, each increasing in quality and price. 

1. Connecting the Mixer Directly to the Computer’s Sound Card

This is the simplest and cheapest option, assuming that you already have some kind of mixing board.

If it is an older board or lacks USB connectivity, this is the route you will have to take. 

This method assumes that your computer has an onboard sound card with a microphone input connector. On most computers, this is a 3.5mm input jack.

Keep in mind that most newer model laptops don’t come with a microphone input anymore, so if you decide to use this method, you’ll need to get a USB sound card like the Sabrent AU-MMSA.

Another thing to remember is that these affordable USB sound cards only provide a mono line-in input, which means that they can only record a mono signal coming from the mixer.

Here is a diagram to help you figure out the connection.

If you want a stereo line input for recording, you will need an external sound card with a stereo line-in connector. 

Something like the Creative Sound Blaster X4 will work for connecting stereo line-in signals from the mixer to the computer for recording. The only downside is its price. For about the same amount, you can get an audio interface that does a better job at recording and offers more features.

Cables For Making the Connection

Depending on the output connections on your mixer, you will have to use different cables. 

  • If your mixer has RCA outputs, you will need a 3.5mm TRS Stereo Audio Jack to Two RCA
  • You can also use two 1/4″ TS (mono) outputs. For this, you will need a dual 1/4″ TS to a single 3.5mm adapter cable. 
  • Lastly, if your mixer has XLR outputs, get a 2x female XLR to 3.5mm adapter cable. 

Keep in mind that you should not skimp on cable quality. Cheap cables introduce noise and interference into your recordings. 

A Cheaper and Effective Method Using a Line-In to USB Interface Cable. 

An alternative to external sound cards is to use something like the Behringer Line2USB cable interface. This adapter would work perfectly well because it accepts a stereo signal and connects it to the computer via a USB.

Inside the USB-A case, an analog to digital converter takes the line level signal from the mixer and converts it to digital so the DAW can record it in stereo mode. 

The 6.6 foot (2 meters) cable comes with two mono 1/4″ jack connectors that you can easily plug into your mixer to bring the stereo signal to your computer.

This device is Plug-and-Play which means that you don’t need to download any drivers for it to work with your favorite DAW on Mac and Windows computers.

The digital audio output operates at 44.1 kHz and 48 kHz sample rates. And for your convenience, the Line2USB cable is also compatible with most 32-bit drivers and software.

Follow the connection diagram shown below to hook things together

Setting Up for Recording

To set this up for recording, create a track in your DAW and route the input to your soundcard. Use your mixer to adjust your levels until everything sounds good, and start recording.

The major downside of this method is that it does not allow you to multitrack. This means that whatever comes through the mixer will get recorded all on one track. 

This can be mitigated by using a USB sound card that can accept a stereo line input. If using the Behringer Line2USB, it would send a stereo signal by default.

If you use this method, it will split your signal into left and right channels.

You can then pan your mixer tracks all the way to the left or right. Tracks on the left will be recorded into one stereo track and the same for the right side. 

In your DAW, you can separate the stereo track into the left and right tracks and mix them separately. 

Please keep in mind that this is not the best method for recording audio from a mixer to a computer, but it can work in a pinch or on a tight budget. 

2. Using a USB-Capable Audio Mixing Console or Multitrack Recorder

If the sound card method is not working for you and you want better quality and control over your tracks, consider springing for a USB-capable mixing console.

These come in many input numbers and price ranges. Generally, they start at two simultaneous tracks and can go all the way up to forty-eight. 

Mixing consoles are appealing for live sound recording, as they allow you to record audio from a PA system to a laptop. 

When shopping for a USB-capable mixer, make sure to keep the number of simultaneous tracks in mind.

Not all USB mixers can multitrack with all of the inputs. Don’t make the mistake of buying a 16-channel USB mixer that can only record one stereo track.

Generally, the more you spend, the more tracks it will be able to record simultaneously. 

Besides being able to multitrack, these mixers also allow you to route computer audio playback to the mixer. 

If good sound quality matters to you, don’t skimp on the mixer either. Cheap mixers do not have high-quality microphone preamps and will sound noisy and dull. Go for trusted professional audio brands. 

There are several excellent options on the market for USB-capable mixers. Yamaha, Allen & Heath, Tascam, and Mackie make several great options with differing numbers of inputs and outputs.

Some higher-end USB mixers can even act as DAW controllers, allowing you to record, pause, and play with the faders on a physical console. An example of this is the Tascam Model 12  and the Zoom LiveTrak L-12 for mixers that can really do it all affordably. 

To record using a multitrack USB mixer, you will have to ensure that your DAW recognizes it as an input device.

  1. Connect all your instruments and microphones to the mixer
  2. Use the USB or Thunderbolt connector to connect the mixer to the computer
  3. Create a track for each input that you are recording.
  4. Make sure to assign each track to the proper input from the mixer. 
  5. Then it’s as simple as pressing the record button and making the music happen! 

3. Using a USB Audio Interface

Audio interfaces used to only be available in high-end recording studios. But in the past decade, manufacturers have put out affordable offerings for “prosumers” at home.

Audio interfaces are the preferred method for connecting a mixer to a laptop or pc for recording audio. 

The easiest way is by getting the stereo output from the mixing console and connecting it to the audio interface. Here is how to do it:

  1. Find an available line-level output in the audio mixer
  2. Setup the audio interface to receive the signal from the mixer
  3. Use the proper cables (TS, TRS, XLR) to make the connection between the two devices
  4. Set the gains and levels correctly to get a clean signal for recording to avoid clipping and distortion

I am only presenting an overview because I have covered these steps in detail in another article. To check it out, click this link. The explanation includes pictures and a connection diagram.

Things to Consider When Choosing an Audio Interface

Audio Interfaces have much better microphone preamps than most standalone mixers and better analog-to-digital conversion rates. 

While they don’t have all of the knobs and faders of a mixing console, the other advantages make them the go-to in the recording world. 

Audio interfaces are also designed to be easy to route and connect to a DAW. They are usually USB powered, although some also have Thunderbolt connections.

They also come in a wide range of input numbers and prices. There are cheap 8-input interfaces and four-figure two inputs, so make sure to balance performance and features accordingly. 

Audio interfaces also allow you to route playback audio through monitors or headphones. Some also have MIDI input/output connections that enable you to control virtual or hardware synths from your DAW. 

Higher-end interfaces, such as the MOTU 8pre-es or Universal Audio’s offerings, allow you to run plugins from your daw within the interface, taking the strain off your computer’s processor. 

Companies such as Focusrite, Audient, PreSonus, MOTU, and Behringer offer multiple sizes of interfaces. Features also vary, so shop carefully. 

If your budget is limited now, but you plan to expand in the future, there are two things to consider when future-proofing your interface purchase.

The first is ADAT and/or SPDIF connections. These allow you to “chain” multiple interfaces or microphone preamps together. This basically expands your interface’s inputs. 

You can start with a cheaper interface with fewer inputs, such as the Audient iD14. This is an example of a two-input interface with ADAT, allowing you to expand to ten inputs in the future with a separate preamp or interface.

Since audio interfaces usually interface with DAWs automatically, all you need to do to record multiple tracks is create the number of tracks you need. Then assign them to the inputs on the interface. 

If you can only afford an interface with a limited number of inputs, be aware that you can still use a traditional mixer.

This is especially useful for recording things like drums, where you can put all of the drum mics into the mixer and then have it go to one input on your interface. 

Recording For Everyone

Whichever method you choose, you now know the three best methods to record audio from a mixer to a computer. Remember, what’s most important is making the music happen.

Starting small and simple with restrictions can force you to become a better mix engineer. Going straight to a four-figure setup when you don’t even know how to create a track in your DAW will not make you better.

For more audio tips and in-depth how-to’s, make sure to check out the other articles on our blog.

How to Record Audio from a Mixer to iPhone or iPad – 6 Best Methods

In this era of intelligent technology, we have most of our digital tools in our pockets. The iPhone, and smartphones in general, can be used to make good quality audio recordings, whether you are using the onboard microphones or connecting the phone to a mixer.

These phones have good microphones that would work well for most people’s needs and can even pick up and record sound with a wide range of frequencies. But that doesn’t mean it would sound anywhere near as good as if you were getting the signal straight from the audio mixer. 

There are several reasons why you would want to record the audio signal coming from external devices such as a mixer to your phone. One example would be to capture a clean audio signal from a live event such as a concert or seminar.

Another case would be if you are recording a podcast with several guests or if you are creating content for social media and are using several lapel microphones connected to a mixing board.

You would benefit from getting a straight feed from the mixing console in any of these cases. That way, you end up with a much better and cleaner sound.

There are several ways you can use to record audio from a mixer to an iPhone, but the six best methods are:

  1. By Connecting a USB Capable Audio Mixer to Your iPhone (Best Option)
  2. Using a multichannel audio interface
  3. Leveraging the Interface Capabilities of the iRig Stream
  4. Using an XLR to USB Signal Adapter
  5. With an External USB Sound Card
  6. Using a Line-Level Audio Adapter with Built-In Attenuation

Read on as we go into more detail on each one of these methods so that you figure out which one will work best for you.

Recording Audio from a Mixer to an iPhone – Step By Step Instructions

If you want to capture and record external audio sources, such as from a mixer to your iPhone, you will need some extra equipment and a few connectors to achieve this.

The iPhone and iPad don’t support inputs from most mixers natively, so you have to look for other ways to make the connection.

Here are several ways to get the best-sounding audio from your mixer into the iPhone. Some of these methods are reasonably inexpensive and easy to perform, while some solutions may require a bit of effort, knowledge, and investment on your end.

1. By Connecting a USB Capable Audio Mixer to Your iPhone

If you have a USB-capable audio mixer, this method is very inexpensive and easy to follow. A USB-capable audio mixer has everything it needs inside to output a digital stream of the audio signal through a USB cable. It basically works as a built-in audio interface between the analog signals and your iPhone.

This is what you will need to make the connection if you choose this method [Links to Amazon]:

  • USB-A to Lightning Adapter or a USB-A to USB-C Adapter (MFI Certified)*
  • USB Cable to connect to the mixer
  • An Audio Recorder App or DAW installed on your device (GarageBand Works)

*Please Note: You need to figure out the type of connector your device uses so that you get the correct adapter. For example, the iPad Pro now comes with USB-C instead of the usual Lightning connector. This also applies to some iPhone versions. Some newer models use USB-C, while others still use the Lighting port. I have included links for both types. Choose the right one for you.

Steps for Making the Connection

Follow these steps to send audio from a mixer to iPhone or iPad. You can also use the diagram below as a reference.

  1. With the audio mixer turned off, Plug the mixer’s USB cable at the back.
  2. Connect the other side of the USB-A coming from the mixer to the Lightning-to-Camera adapter. You can either choose the Lightning-to-Camera adapter or the USB-C multi-adapter, depending on the model of your iPad. The adapter also allows you to charge your device while the other device is connected, making it more feasible to use for more extended events.
  3. At this point, you can connect the adapter to your phone
  4. Turn on the mixer and wait for the device to show the pop-up message saying “Audio Device Connected.”
  5. On the pop-up message, you can either select “Turn on Monitoring” to connect a pair of headphones to the mixer and monitor what is being recorded on GarageBand or select “Cancel” if you don’t want to monitor the audio on the mixer side but on the iPad itself connecting headphones to it.
  6. You don’t need to download any drivers. Your iPhone or iPad should establish the connection immediately. If it doesn’t automatically connect, you might need to go to the mixer’s manufacturer site to download the drivers. This can happen if the mixer you are using is slightly old.

To configure GarageBand with your audio mixer, go to the last section of this article, where I explain how to configure it correctly to capture and record a stereo audio signal.

Connection Diagram

Diagram for Connecting a USB Capable Audio Mixer to Your iPhone

2. Using a Multichannel Audio Interface

The second method to record audio from a mixer to an iPhone is to use a USB audio interface. This is a bit more complicated in terms of getting power as these devices rely on the bus power from your computer, and your iPad or iPhone isn’t powerful enough to do that efficiently.

To solve this issue, you will need to use a powered USB hub that gets power through a wall adapter rather than relying on power from the USB bus.

When using this method, you need a few accessories and cables to make the connection. This is what you will need [Links to Amazon]:

  • A USB audio interface
  • A USB hub with an external power supply
  • Depending on your device, a USB-A to Lightning Adapter or USB-A to USB-C Adapter – Needs to be MFI Certified.
  • USB Cable to connect to the audio interface – Usually supplied with the audio interface
  • TRS balanced audio cable or XLR balanced audio cable – To bring the audio signal from the mixer to the audio interface.
  • An Audio Recorder App or DAW installed on your device (GarageBand Works)

Please Note: The latest generation audio interfaces like the Focusrite Scarlett are USB-C native, which means that if you are using an iPad or iPhone that has a USB-C charging port, and your USB hub data cable is also USB-C, you wouldn’t need to get the USB to Lightning adapter. In that case, you would go straight from the hub to the phone.

You can even use the phone or iPad’s charger to charge the device while recording. That way, you don’t run out of battery while recording.

Step-by-Step Process for Making the Connection

  1. First, connect the USB Hub’s external power supply to an electrical outlet.
  2. Now, connect USB to Lightning adapter to your iPhone or iPad.
  3. At this point, attach the hub’s data cable to the USB to Lightning adapter.
  4. Connect the audio interface’s USB cable to the hub. You should see the interface turn on.
  5. A few seconds later, you should see a pop-up appear on the device saying “Audio Device Connected.”
  6. The audio interface then needs to be connected to the audio mixer. We can do this using XLR cables, or you can use quarter-inch TSR or TS audio cables, depending on what kind of throughputs your mixer uses. I will not go into detail on how to connect the mixer to the audio interface because I have already covered this topic in another article. Click the link to check it out if you need to.
  7. At this point, you can configure GarageBand on your device to start recording. Once you do that, you will see the input signal level on your phone’s display, and after that, you just need to adjust the volumes, and you’re good to go. To configure GarageBand, you can see the procedure in the last section of this article.

Diagram for Making the Connection

Connection diagram for Using an Audio Interface to Record Audio From a Mixer to Your iPhone

3. Leveraging the Interface Capabilities of the iRig Stream

The iRig Stream is a 2-channel audio interface designed for mobile devices like iPhone, iPad, or Android. It also works with Mac and Windows computers. This device consumes so little power that your phone or tablet can power it on the go, with no need for external power adapters.

It connects the analog signal coming from any audio mixer using RCA connectors, making it a versatile tool for capturing a stereo or mono signal and recording it to your iPhone or iPad with the included app or GarageBand if you prefer.

Here is what you will need if you decide to use this method [Links to Amazon]:

  • iRig Stream Interface
  • Download and install the iRig Recorder 3 LE. You can also use GarageBand or any other DAW of your choice.
  • Audio Cables – Male TS to Male RCA or Female XLR to Male RCA. The audio cable you choose will depend on which output is used from your mixer.

This is an excellent option if you efficiently want to connect a mixer to an iPhone. It’s a simple setup process:

  1. Take the included Lightning or USB-C cable and connect one side to the iRig stream and the other side to your iPhone or iPad. This also works with Android devices.
  2. Locate an available line-level output in the audio mixer. You can use the output labeled “CTRL ROOM,” “CR OUT,” “STEREO OUT,” “AUX SEND,” or “REC OUT” if you have an older mixer.
  3. Run a cable with the correct connector to the iRig Stream from the mixer. Depending on the line-level output you chose, you would need to use an XRL to RCA or TS to RCA cable.
  4. You should start to see an input on your iPhone which means you’re good to go. However, before you hit the record button, you need to perform an audio check to ensure good sound levels.
  5. If you use multiple microphones in a podcast setting, ensure all microphones are at the proper sound level. 
  6. Adjust the signal on your mixer first, as it’s the primary device in the audio chain.
  7. Now, move on to the iRig interface, adjust the primary signal using the knob on the device to make sure that the recorded audio isn’t too high or too low.

If you’re in doubt, consider having the signal a bit lower as you can increase the volume post-production without any distortion. But please, keep in mind that having it too low may cause you to need to remove some hiss when boosting volume, too, so make sure the audio signal is at least audible before you start recording.

You can perform a few tests before recording to ensure a correct volume.

Follow This Diagram for Your Reference

Connection diagram for Using the iRig Stream to Record Audio From a Mixer to Your iPhone

4. Using an XLR to USB Signal Adapter

This method is somewhat limited because you can only record a single channel or mono signal. These types of adapters can only handle one channel.

The reason is because they are originally designed to connect XLR microphones to a computer. But if you have one of them lying around, it can be used to send an audio signal from a mixer to the iPhone or iPad.

The setup procedure will be very similar to the second method, but in this case, we are only dealing with a single channel.

Please Note: This method is not as good or practical as the first three methods presented in this article. Buying one of these adapters will cost you almost the same as purchasing an audio interface. But I decided to include it so that you have all the options available to determine which works best for you.

Here is what you need to follow these steps easily:

  • XLR to USB Signal Adapter – The best two adapters are the Shure X2U and the Pyle PDUSBPP10
  • XLR Cable
  • USB to Lightning Adapter
  • USB Cable
  • Broadcaster app, DAW, or recording app

Making the Connection

  1. Start by connecting an XLR cable from one of the mixer’s XLR outputs into the input of the XLR signal adapter
  2. Connect one end of the USB cable into the XLR signal adapter and the other to the USB to Lightning Adapter.
  3. At this point, you can connect the USB to Lightning dongle to your iPhone or iPad the same way we did in the first method.

The good thing is that your phone or tablet can power the signal adapter without needing an external power supply. However, it’s recommended to get the USB to Lightning dongle with the charging port so that your phone stays charged while recording.

This XLR signal adapter is also helpful in some other cases. For example, you can connect a condenser studio microphone or regular dynamic mic on the go to your computer without an interface.

Diagram for Making the Connection

Diagram for Using an XLR to USB Signal Adapter to Record Audio From a Mixer to Your iPhone

5. Record Audio From Mixer to iPhone With an External USB Sound Card

Using an external USB sound card isn’t the best method to connect the mixer to iPhone because you don’t have much control over the audio signal. Still, it’s one of the most convenient ones if you already have one lying around, making it a more viable option for many people. These sound cards are relatively inexpensive online too.

If you decide to use this method, here are the components and cables you’ll need to make the connection:

  • A USB sound card
  • USB to Lightning Adapter
  • Depending on the output you choose in your mixer, you need one of these cables:
    • 3.5mm Stereo Audio Jack to Two RCA
    • 3.5mm Stereo Audio Jack to Two ¼” Jack
    • 3.5mm Stereo Audio Jack to Two XLR  

Connecting Everything Together

  1. Plug the USB sound card into the USB to lightning adapter.
  2. Connect the adapter to your iPhone or iPad. You will see a message pop up that tells you that your audio device has changed.
  3. You can use two options here to connect your mixer to your iPhone.
    • If your mixer has RCA output, you can use a stereo RCA to 3.5mm audio jack. Connect the 3.5 mm jack to the red microphone port on the soundcard. Plug the RCA wires in the “Record Out” port of the mixer, and it should start giving you a signal on your iPhone or iPad.
    • If you decide to use the main XLR output or the “Stereo Out” or any other Aux or SUB outputs in the audio mixer, you need a 3.5 mm to XLR cable or the 3.5 mm to ¼” Jack. Please note that the cable you use here will depend on the output capabilities of your mixer. Connect the 3.5mm jack into the red microphone jack of the USB sound card, and the XLR or ¼” Jack plugs in the corresponding output in your mixer. At this point, you should start getting an audio signal on your iPhone or iPad.

Connection Diagram

Here is a diagram that you can use for your reference that shows the connections

Connection Diagram Using a USB Sound Card to Record Audio From a Mixer to Your iPhone

6. Using a Line-Level Audio Adapter With Built-In Attenuation

The last method you can use to send audio from a mixer to an iPhone or iPad is by using an adapter that takes the line-level signal coming from the mixer, then attenuates it so that it can be used adequately.

Using this method is very simple but is somewhat limited because you don’t have much control over the signal coming into your device. 

The reason why the audio signal coming from the mixer needs to be attenuated is because if you connect it straight to the iPhone, it will overload the device, and the resulting sound will be distorted and impossible to comprehend.  

To avoid this, you can use a line-level audio adaptor to solve the issue. These adapters work by knocking down the signal to a point where the iPhone can take the signal without distortion. Technically speaking, it attenuates the signal by -20 dBV.

If you feel that this method works best for you, here are a few things you will need to make it work [Links to Amazon]:

  • Headset Buddy
  • TRRS to Lightning Connector Dongle
  • Depending on the output you choose in your mixer, you need one of these cables:
    • 3.5mm Stereo Audio Jack to Two RCA
    • 3.5mm Stereo Audio Jack to Two ¼” Jack
    • 3.5mm Stereo Audio Jack to Two XLR  
  • Download and install an input level recording application such as bossjock jr on your iPhone. This will allow you to set the input level. It shows you the input level on the screen, and you can adjust it easily.
  • A DAW program such as GarageBand or the one of your choice.

Hooking Up Everything Together

  1. Start by connecting the TRRS to Lightning dongle to your iPhone or iPad
  2. Next, connect the Headset Buddy to the TRRS to Lightning dongle
  3. At this point, you need to bring the audio feed from the mixer to connect it to the Headset Buddy. As mentioned previously, you need to choose an output from the mixer. It can be the one labeled “CTRL ROOM,” “CR OUT,” “STEREO OUT,” “AUX SEND,” or “REC OUT” if you have an older mixer.
  4. The input level on your mixer can change depending on how loud the mix is. Keep in mind that eventhough the audio mixer may show that the audio levels are fine, this can be different at the input of the iPad or iPhone.
  5. The key to setting the audio level is knowing where it should be without peaking. This is where the bossjock jr app comes in to keep in check the input audio level so that it never is too low or to high. A good rule of thumb is to keep the audio level in the green area of the meter. Never allow the audio level to go beyond the yellow level.
  6. Do a test recording to make sure the level are good before recording the event’s audio.
  7. Open the DAW app such as GarageBand, and start recording the audio coming into your phone from the audio mixer.

Diagram for Making the Connection

Here is the diagram you can use as a reference to make the connection

Diagram for Using a Line-Level Audio Adapter with Built-In Attenuation to Record Audio From a Mixer to Your iPhone

Setting Up an Audio Capturing Device With GarageBand

As mentioned earlier in the article, you can record the audio coming into any audio capturing device such as a mixer, audio interface, iRig interface, XLR to USB converter, or USB audio card to your iPhone or iPad using Apple’s GarageBand app.

But before you start recording, it needs to be configured to record the audio in stereo mode. Follow these steps to configure it:

  1. Press the plus button “+” in the top right-hand corner of GarageBand’s main window.
  2. Scroll until you see the “Audio Recorder” option, select “Voice,” and wait until the track settings window opens.
  3. On the lower left side of the window, select the “Channel” option.  
  4. A small window opens where you can select how many channels you want to use in your recording. Since you are taking the audio signal from a mixing console, select the “Stereo” option.
  5. If you want to monitor the recording through the mixer, on the lower-right side of the window, under Monitor, select “On.”

You may need to use a decent set of headphones coming from your iPhone, iPad and not just from the monitor out of the mixer, as the signal may be different once the phone has processed it.

Looking for More Help?

Most people have access to their phones 24/7, so doing your recording on your iPhone may seem like the best option. You can record audio from mixer to iPhone with any of the above options we mentioned, but we recommend using a dedicated device like the iRig for the best results.

We hope that these methods help you out in your audio recording journey. You can also check out our article on mixing and mastering tips if you can’t get the audio sounding just right.

9 Tips That Will Make Your Microphone Sound Better

Are you looking for ways to improve your microphone’s sound quality? Are you struggling to make your mic sound better?

Whether you are on stage at a live event, in the recording studio, podcasting, or creating audiovisual content for social media, you need to get the best possible sound when using your mic.

For that reason, we have created a guide on how to improve microphone sound quality for getting the best sound possible. Without knowing about each of these nine tips, you might be missing out on some of your mic’s potential. 

Here are 9 tips that will make your microphone sound better:

  1. Use Quality Cables
  2. Use a Quality Low Distortion Preamp
  3. Listen to the Sound Source Before You Mic
  4. Get the Cleanest Sound Possible Before Mixing
  5. Learn Your Mic’s Features and Capabilities
  6. Learn What Your Mic Sounds Like
  7. Understand Your Mic’s Polar Patterns
  8. Find The Best Mic Placements on the Stage
  9. Use the Proximity Effect to Your Advantage

Keep reading as we go into more detail on each one of these nine tips that will make a mic sound better and improve your overall sound quality. Let’s get started.

How to Improve Microphone Sound Quality – Tips to Improve Your Sound

When miking vocals, instruments, or any other sound source, you can do a few things to take full advantage of the mic’s features. Overlooking these simple things can make all the difference between getting excellent or mediocre sound. Here is what you need to do:

1. Use Quality Cables

If you hear unexpected crackles, pops, or static noise while performing live or in your recordings, you might have a cable problem. If you’re using a cable that is old or bent out of shape, it may adversely affect your sound. 

Always test your cables before each performance or before recording at the studio. You don’t want to see a great take get ruined by cable issues!

Look for a mic cable with a flexible polymer strain relief. The strain relief is a thick piece of rubber that protects the wiring in your cables from getting bent out of shape. 

You should also look for a cable with excellent shielding. Shielding refers to the layer of braided strands of copper, a spiral winding of copper tape, or a conducting polymer layer.

Shielding reduces the electrical noise and crosstalk between cables, and the most important thing is that they reduce RF interference while protecting the copper inside your cables. 

The perfect mic cable should have enough shielding to block interference and deliver an excellent electrical connection between the microphone and the equipment to which you are connecting it to.

Another thing to keep in mind is that properly storing your cables can help them last longer. Always keep your cables neatly wrapped and resist the urge to throw broken cables back in with the good ones. 

One last tip when it comes to cables is to use a right-angle cable connector if you need to place a microphone in tight placement situations. Some examples are when miking a guitar amp, a drum set, or where you want the cable to be less visually obstructive when you’re shooting video, taking photos, or when miking instrument on stage.

That way, you don’t have to bend the cable, which ends up damaging it, thus creating a signal problem in the form of noise and unstable signal flow.

2. Use a Quality Low Distortion Preamp

This is one of the most critical steps you can take to make your microphone sound better. Here is why.

“Mic level” refers to how loud sound is when it comes out of the microphone alone. Mic level is generally a very quiet signal, which is why you need a preamp to give it a volume boost. 

A preamp will bring your audio up to “line level,” which is the signal level at which most audio equipment operates. 

You need a low distortion preamp to make sure that your signal stays clean while it’s amplified. Low-quality preamps tend to cause too much distortion, which makes everything sound messy. 

Modern audio compressors, interfaces, mixing boards, and other pieces of recording equipment are equipped with internal preamps. Although these preamps generally deliver a good signal quality with low distortion that is good enough for most users, it doesn’t compare to what quality external preamps can deliver. 

The best preamps are external preamps. These will provide you with the best sound quality. For more information about preamps, check out our article on finding the best preamp for vocals and instruments.

3. Listen to the Sound Source Before You Mic

It is vital to listen to your sound source before you mic it. You need to know how much raw signal is coming out of your sound source so that you can appropriately amplify it, and depending on what you want to mic, the mic placement and EQ will be different. 

When miking vocals, you should always listen to the vocalists before deciding how to set up their mics. Different singers can have vastly different vocal power depending on their tessitura, vocal style, and singing register. 

If you are trying to mic wind instruments, you also need to know where the instrument is giving off the most sound.

For example, you should mic trumpet and saxophone near the instrument’s bell. Flutes, however, should be miked close to the mouthpiece or the center of the instrument’s body. 

After listening to the sound source, you will know how to set the correct gain at each stage. Doing so will minimize noise and distortion, resulting in a clean and clear sound performance.

When you’re setting up your volume levels, make sure to “start out low and turn up slow.” Make gain adjustments in small increments to avoid damaging any part of your audio system. 

In other words, you need to set the correct gain at the input of each amplification stage without distorting or clipping the signal.

4. Get the Cleanest Sound Possible Before Mixing

You should always try to get your levels right before you mix. When you mic in a live setting, your goal should always be to adjust as little as possible during the performance.

This ties in with mic placement, which we’ll talk about in a moment. It also ties in with your choice of microphone. 

Different instruments sound better with different kinds of mics. For example, dynamic mics often work best when miking guitar amps, bass amps, kick drums, and sometimes snare drums. Dynamic mics can handle loud bass frequencies without causing distortion.

However, for vocals, acoustic guitars, and wind instruments, you will probably get the cleanest sound with a condenser mic.

Instead, if you are going for a more natural, vintage, and warm sound with a smooth mid-range response, miking vocals and instruments with ribbon microphones will give you the best results.

In short, the sound you end up with will be closely related to your choice of microphone in the first place.

5. Learn Your Mic’s Features and Capabilities

Every mic is designed with different features and specifications. As a result, you must treat each mic differently.

For instance, some mics are more sensitive than others. Some provide a better response on high and mid frequencies, while others are better for miking sound sources with lower frequency response.

Knowing the frequency response and response curve of the microphones you are using will help you get better sound because you will know which mic will work better for the sound source you are trying to mic. 

Most dynamic mics offer a relatively flat frequency response in the mid frequencies and lack to provide high-frequency gain.

Another feature of dynamic mics is that they are not as fragile as other types of microphones. They can handle getting banged up a bit. Dynamic mics are also not as sensitive as condenser or ribbon mics, which is why they’re the best choice for powerful sounds like kick drums, snares, guitar and bass amps, and vocalists with strong voices.

On the other hand, condenser mics offer a smooth low and mid-frequency response combined with a crisp and clear high-end that sounds good on vocals or instruments.

They are more fragile and more sensitive than dynamic mics. They can pick up sound from farther away while keeping your sound clean. This is why they shouldn’t be used with loud sound sources to avoid distortion and clipping.

Ribbon mics are expensive and fragile, and they need to be stored and handled with extreme care. But they can also deliver a pristine sound if you are looking for a more vintage sound. They can also work great when used as overhead mics. 

Ribbon mics, for that reason, are the best choice for recording live drums. If you don’t want to set up several mics on your drum kit, you can get a great sound with just ribbon overheads and maybe one dynamic mic on your kick.

Knowing your microphone’s features and capabilities will ensure that you get excellent sound because you will know the mic’s limits, and you’ll be able to use it accordingly.

6. Learn What Your Mic Sounds Like

Dynamic, condenser and ribbon mics all sound different. However, no two mics of the same variety are going to sound the same. 

The four ways that different mic tones can be described are: bright, dark, warm, and cool. These words are just metaphorical, but they aptly describe how certain mics affect an instrument’s or vocal’s natural tone. 

These differences in tone come from the unique way each microphone is manufactured, and the best way to find your favorite mic for certain instruments is to experiment. 

Try setting up the same instrument (or vocalist) with multiple mics and see how the tone changes. 

Condenser and ribbon mics tend to have more variation in tone since they are more sensitive in general. Dynamic mics are more predictable, but they do vary as well. 

7. Understand Your Mic’s Polar Patterns

One of the major keys (no pun intended) to unlocking a microphone’s potential is understanding polar patterns. Polar patterns were first discovered by abstract mathematicians, but they apply to how mics pick up sound.

The three most common polar patterns are omnidirectional, bi-directional, and cardioid. 

Omnidirectional mics pick up sound equally from every direction. No matter which way your mic is facing, everything should sound the same. 

Bi-directional mics pick up sound equally from the front and the back, but they do not pick up as much sound from the sides of the mic. 

Cardioid mics pick up the most sound in the front, slightly less sound on the sides, and virtually no sound in the back. 

There are two less common polar patterns that you might encounter: supercardioid and hypercardioid. Both patterns are variations of the cardioid pattern. 

These days, many mics are multidirectional, which means that they have the potential to be both cardioid and omnidirectional, or omnidirectional and bi-directional, etc. 

You can change the polar pattern of your multidirectional mic by flipping a switch. A great multidirectional mic can be invaluable to your recording setup. 

By knowing your microphone’s polar pattern, you can place it in the stage or studio to get the best results and avoid feedback.

Video Credits: Shure

8. Find the Best Mic Placements on the Stage

Few things affect your live signal more than mic placement. Back in the days before post-production effects, mic placement was all that engineers had to ensure that they got a clean recording.

When you’re placing your mics on stage, always be conscious of “bleed.” 

Let’s say you have a saxophone player standing next to a guitar amp. You need to mic them both without getting too much guitar sound “bleeding” into your sax channel, and vice versa. 

In this situation, you could keep your channels clean by using a bi-directional mic on your saxophone and a cardioid mic (with it rear-facing the sax) on your guitar amp. 

When you get your mic placements just right, it will be much easier to mix your live performance. 

9. Use the Proximity Effect to Your Advantage

The proximity effect is one of the most troublesome issues that audio engineers run into. However, the proximity effect does not have to be your enemy. 

The proximity effect is the phenomenon where the closer someone is to their mic, the more the bass frequencies you hear. 

When you don’t want your bass frequencies boosted, this can be a huge problem. You can try to cut out those bass frequencies using EQ, but that can lead to a hollow sound. 

The best way to combat the proximity effect is to use it to your advantage. If you want a beefy sound from your kick drum, snare, bass guitar, or rhythm guitar, go ahead and close-mic it. 

If you know that you don’t want a lot of bass frequencies from an instrument, use a more sensitive mic that you can place farther away from it. 

Also, knowing how to correctly EQ sound sources can play an essential role in the overall sound you’ll get. I have prepared a full article with a more detailed explanation on how to EQ different sound sources; click the link to check it out.

How to Make Your Mic Sound Better with These Tips

Hopefully, these tips have helped you understand how to improve microphone sound quality. If any of these tips especially piqued your interest, check out the rest of our blog! We have plenty of posts that go in-depth on some of these concepts.

How to Set Up a Simple PA System for a Small Band or Solo Artist

The worst thing that could happen during your performance, other than misspelling the name of the city you’re in, is a gear failure. Popping speakers, audience members yelling they can’t hear you; cords being tripped over and broken, there’s a lot that can go wrong! 

While there’s certainly quite a lot of work involved with setting up a band pa system, there has to be a simple PA system setup that works! 

While there’s no “guaranteed perfect setup” that will work in every venue for every band, there is plenty you can do to make the process easier. The best part is that you don’t even need any experience with PA equipment.

Here are the 10 steps you need to follow to set up a simple PA system for a solo artist or small band:

  1. Choose the Right Portable PA System
  2. Check the Room Layout & Get Organized
  3. Position and Set Up the Speaker System
  4. Position the Microphones and Stands on stage
  5. Set Up Your Mixer to Be Within Your Reach
  6. Connect the Speaker, Mic, and Instruments with the Correct Type of Cables
  7. Run Power Drops to the Equipment
  8. Organize Your Cables to Prevent Mid-Show Tripping
  9. Power On Your Gear Carefully
  10. Perform a Sound Test

Read on as we go in more detail in this how-to guide on the ten steps you can take to set up a simple PA system for a solo artist or small band. 

1. Choose the Right Portable PA System – A Good Simple PA System Setup Begins with the Right Gear

Your setup will only be as good as the gear you buy. That’s not to say that you need to blow your entire budget to sound good. There’s plenty of great equipment available at affordable prices. The onus lies in knowing what to look for. 

First, consider your needs. As you’re a solo artist or a small band, it’ll likely be you, your bandmates if you have any, and whatever venue staff offer to help. Until you get a dedicated road crew, go with portable equipment. Don’t let the size of some portable PA systems fool you; a good portable set can pack a heck of a punch!

When considering how powerful you want your speakers to be, keep in mind the Sound Pressure Level (SPL), not the system’s wattage. The SPL, which is measured in decibels, indicates how loud your speakers will be. The decibel level you aim for should depend on the types of venues you’ll be performing in; small venues range from 80-100+ dB, give or take. 

In terms of sound quality, you’re going to need to look at the frequency range of your setup. In all, your setup should be capable of reproducing all frequencies between 20Hz-20kHz.

If you’re looking for a few recommendations, the Bose L1 Compact, Bose L1 Pro8, JBL EON One, Yamaha StagePas 600BT, Yamaha STAGEPAS 1K, and Electro-Voice Evolve 50, are excellent starter setups that I’ve reviewed before, click the links if you’d like to read the reviews.

These setups possess many features you should look for when shopping for your PA setup: easy to store/carry, compact size that won’t dominate the stage, and solid sound quality. 

I also have a complete guide on how to shop for gear properly!

2. Check the Room Layout & Get Organized – Get the Lay of the Land Before You Start Setting Up

It’s always a good practice to get some idea of the venue before you start setting up. Not only do you need to consider acoustics and equipment placement, but you’ll also need to ensure that everything can be powered or that you don’t end up putting yourself in the wrong place!

Start by meeting with the venue staff. Talk with management to get an overview of the performance ahead of you. The venue may have restrictions in place on where things can be placed (and a lot of the time, this is for safety reasons), so make sure you listen carefully.

It also helps to get an idea of where the audience will be, especially in a restaurant or cafe setting where they may be seated and spread out more. 

Next, you’ll want to locate electrical outlets. Before entering the venue, get a running total in your head of how many plugs you’ll need. Find outlets for each close to where you will need them. Additionally, try to determine how many power drops (extension cables) you’ll need.

A good tip is to make sure that the outlets work before you unpack and set up everything. To do this, you can use a simple outlet tester such as the Sperry Instruments GFI6302. With this tester, you can ensure that the wiring is correct and that the outlet has power before you start.

If you can, try to mark general locations for where you’d like everything to go. Use something that can be moved around just in case you start setting up and reconsider the layout.

3. Position and Set Up the Speaker System – Consider Your Speaker Setup Very Carefully!

As someone that’s set up many a band PA system, let me tell you: good speaker placement is vital. Always remember that speakers don’t just “blast sound”; they disperse it across an area. Each speaker has its own dispersion pattern and can project sound efficiently throughout that space.

For a live performance, especially as a solo artist or small band providing its own sound system, you’ll want speakers with a broad dispersion pattern to cover a larger area with the minimum number of speakers.

Broad dispersion speakers also sound better, providing a more enveloping sound for your audience. While narrow-dispersion speakers project further, their sound quality is lessened, and their projection area isn’t as wide.

This is where portable PA systems like the Bose L1 Compact, Electro-Voice Evolve 30M, or the Bose L1 Pro8 outperform regular PA speakers. This is because the array enclosure is designed to deliver 180 degrees of usable horizontal coverage, ensuring that your audience hears the sound super clearly no matter where they are in the room.

Thanks to this capability, the speakers generate high-quality, crystal clear, and even sound throughout the room.

Most people find it hard to believe that clear and loud sound emanates from such small systems. If you use a pair of any of the speakers mentioned previously in a room packed with about 300-400 people, everyone would hear the sound clearly.

I have personally used a pair of the Bose L1 Compacts for setting up the PA system for an acoustic band, and the sound is not only clear but also of superior quality. Pretty much everyone who buys any of these PA systems greatly enjoys pushing it to its limits at gigs.

When placing your speakers, make sure they face the crowd and space them out just enough to cover the main audience area. When in doubt, aim both speakers towards the rear-middle of the room. Ensure that any speakers are in front of you and a safe distance from where you and any other band members will stand.

Basic PA System Setup Diagram

Basic PA System Setup Diagram For Solo Artist
Basic PA System Setup Diagram for a Small Band

4. Position Your Microphones and Stands to Avoid Feedback

In placing your microphone stands, consider feedback. The closer a microphone is to a speaker, the higher the chance of ear-piercing feedback! This is why, when you placed your speakers, you put them to the front and to the side of where you and your bandmates would be.

When placing the stands, try to find a balance between the space everyone will need to move around while performing and the safe space needed to prevent feedback. 

When considering these “bubbles” of space around your mic stands, make sure you consider how much movement each band member will be capable of during a show. You won’t need to worry about a drummer wandering in front of a monitor, but make sure any singers have enough room to move around without hitting a feedback minefield. 

If you have wired mics, make sure you place stands and designate “bubbles” concerning the lengths of the cables you have. While cables aren’t as much of a problem with wireless mikes, take care to advise anyone using them to watch where they wander.

5. Set Up Your Mixer to Be Within Your Reach

If you’re a small band or a solo performer, chances are you don’t have a dedicated sound technician. Handling the sound mixing during a live performance is possible on your own, thankfully. Of course, you’ll need to make sure the mixer is close enough for you to use. 

Considering the bubbles I discussed above, place your mixer somewhere you and other band members can easily reach. If you have a band member that tends to stay in one place, like a drummer or pianist, try tasking them with sound mixing, and set up the mixer near them. This will ensure that someone will always be close if you need to tweak your audio mid-performance. 

If you’re not that versed on how to properly configure and use a mixing board, I’ve got you covered! 

6. Connect Your Equipment, but Consider Your Audio Cables Carefully

Your gear is placed; now it’s time to hook it all together. Connecting audio cables might sound straightforward, but there’s quite a bit that goes into connecting cables to get the best audio quality. 

For starters, is your cable balanced or unbalanced? An unbalanced cable has a positive connection, as well as a grounded connection for shielding. A balanced cable, however, has an additional negative connection.

In layman’s terms, balanced cables are more stable and produce better sound quality over long distances. 

Using XLR cables, connect your microphones to your mixer, and your mixer to the speakers. If you have musical instruments like guitars, you’ll want to use unbalanced TR cables or balanced TRS cables. 

7. Run Power Drops to Your Equipment

Now that your audio equipment is connected, you can work on running power to your gear. A key thing to remember during the PA system setup is not to turn anything on before everything is connected. We’ll get to the reasons why later. 

In the meantime, start running drops between your setup components. As you connect power cables, try to lay them neatly with audio cables. We’ll be returning to them in the next step. 

8. Organize Your Cables to Prevent Mid-Show Tripping!

Time for some cable management. Your band sound system likely has a tangle of cables heading in every direction. Leaving it in this state as you perform is asking for trouble! As you connected power cables, you hopefully did so in a way that kept them consolidated with your audio cables. 

Survey these cable bundles and consider the walkways that you, your bandmates, and venue staff will be using. Using gaffer’s tape, you can safely create “walkways” over cables spanning busy areas.

At the same time, try to mark out where cables are in spaces that might not be traveled as much. If someone tries to take a shortcut, don’t let them trip!

Don’t just leave cables in disorganized lumps, even if they’re out of the way. This will make packing up much harder. As best you can, try to organize grouped sections of cable neatly. 

If it is within your budget, try getting wireless systems so you don’t use too many cables to set up the PA system. You can even connect the speakers to the mixer wirelessly. If you want to know how to do this, here is an article that explains the process in detail, and believe me, it is very simple.

9. Power On Your Gear Carefully

The order in which you power up the components of your setup greatly matters. If you turn something on out of order, you might be greeted with a loud POP! To avoid damaging your equipment, you’ll need to follow a specific order.

This process typically begins with any outboard effects; equipment that alters your sound from outside the mixer. Effects units, equalizers, preamplifiers, and other equipment like this should be powered on first. Anything else going into your mixer, like your mics, need to be switched on too. 

Next, fire up the mixer itself. After this, you’re free to power on your speakers or amplifiers. 

If using a simple PA system setup consisting of one Bose L1 Compact powered speaker, one microphone, and one instrument, don’t turn on the speaker until everything is connected to the speaker’s back.

You also want to make sure that the volume knobs are turned all the way down to avoid unexpected noise before turning on the speaker system.

Powering down your equipment requires the same care but effectively in reverse. When your show ends, shut down your amplifiers and speakers and wait for a minute or two.

Amplifiers need to store power to operate, and it’ll take a brief moment for them to discharge. Once you’ve waited for the discharge, continue the process in reverse—power down your mixer, followed by any outboard equipment. 

Remember: last on is first off.

10. Perform a Sound Test

Now that you know how to set up a PA system for a solo artist or small band, all that remains is tweaking and testing your setup before your big show. This stage of the process is extremely vital, so make sure that you take your time!

This final stage should begin with some additional feedback prevention. To start, only keep microphones powered on when they’re going to be used. Additionally, keep little space between your mouth or instrument and the microphone. Too much space lets in errant sound waves. Here is a complete guide for correct microphone handling.

Now we can begin equalizing your band PA system. If you’re a solo act, position yourself in place near your mic and mixer. If this is a band act, have everyone take their places but don’t let anyone start playing yet. 

With your mixer, cut any unwanted frequencies from the feed. Just powering above these by turning the wanted frequencies up will sound cacophonous and mess up your performance.

Next, have each member of the band individually play so that you can hear them through the sound system. Adjust the frequency bands as needed to balance each instrument and vocalist.

If you’re having issues finding a balance, have each member play the loudest part of the set first, followed by the softest. This method should help you get a good idea of the range you’ll need for the venue to make everyone heard.

Use the same method when testing together as a band, alternating between quiet and loud segments. Take your time to get the sound right.

While you’ll have chances to fix it later, doing so mid-performance can be jarring; picture it from your audience’s perspective; what if you suddenly got louder just as your loudest song was coming up? Make any adjustments during your show gradually to avoid this.

Looking for More Help for Your Big Show?

Your band’s PA system is vital, but it doesn’t need to be overly complicated to blow the roof off the venue! With careful consideration to your gear and the proper setup, any simple PA system setup can be fine-tuned to almost any small to medium venue.

Your audio equipment might be ready for the performance, but do you feel ready? If you’re feeling a little jittery or just looking for some advice, check out my guide on how to be a better singer!

  • « Go to Previous Page
  • Page 1
  • Page 2
  • Page 3
  • Page 4
  • Page 5
  • Page 6
  • Interim pages omitted …
  • Page 12
  • Go to Next Page »

Primary Sidebar

Search

Guides & Tutorials

  • Choosing a Portable PA System
  • How to Be a Better Singer
  • Build a Budget Live Streaming System Using PTZ Cameras
  • How to Get the Best Audio Quality on YouYube
  • Setting Up Stage Monitors
  • Mixing Console Basics
  • How to Position PA Speakers
  • Stage Sound System Set-Up
  • How to EQ Live Vocals
  • How to EQ Live Sound
  • Daisy Chain Active Speakers
  • Zoom Audio Settings for Music
  • How to Livestream a Wedding
  • Improve Your Livestream Audio Quality
  • Microphone Preamp Buying Guide

Featured Posts

Treblab X9 Pro: Tough Earbuds, Big Performance

Escape the Noise: Best Affordable Noise-Canceling Headphones

How to Combine Passive and Powered Mixers

What is a Ground Loop? – 5 Simple Ways to Fix the Buzz and Hum

Disclaimer

VirtuosoCentral.com is a participant in the Amazon Services LLC Associates Program, an affiliate advertising program designed to provide a means for sites to earn advertising fees by advertising and linking to Amazon.com.

Home  About  Contact  Disclaimer  Privacy

Copyright © 2019-2025 Virtuoso Central. All Rights Reserved.