This website uses cookies to improve and personalize your visit. Learn more about cookies. Got It

  • Skip to primary navigation
  • Skip to main content
  • Skip to primary sidebar

Virtuoso Central

  • About Us
  • Contact
  • Privacy

Informational

How to Connect a Phone to Powered Speakers – No Mixer Necessary

In this post, I will show the two most straightforward ways to connect a phone to powered speakers for playing music, and the best part is that you don’t need to go through a mixer to do this.

There are a few things you need to know before making the connection the correct way, but if you want a quick answer, here it is: To connect a phone to powered speakers to play music, you can use two approaches. The first is by using a 3.5mm to dual 1/4″ Jack breakout cable, and the second is to use a Bluetooth receiver connected to the speaker to pair the phone wirelessly.

If you need to connect the phone through a mixer to play sound because you are dealing with a PA system, check out this post. Let’s dive into the article.

Connecting The Phone to a Powered Speaker Using a Cable

As mentioned previously, the first method is to use a cable to physically connect the phone to the powered speaker to play music. The downside to this method is that the phone is basically tied down to the speaker; to use it, you would need to sit next to it.

Although this is not as convenient, it has the advantage that you would not lose signal strength due to accidentally moving away from the receiver. It also uses less battery as you won’t be broadcasting the music using the Bluetooth protocol.

Choosing the Input Channel in The Powered Speaker System

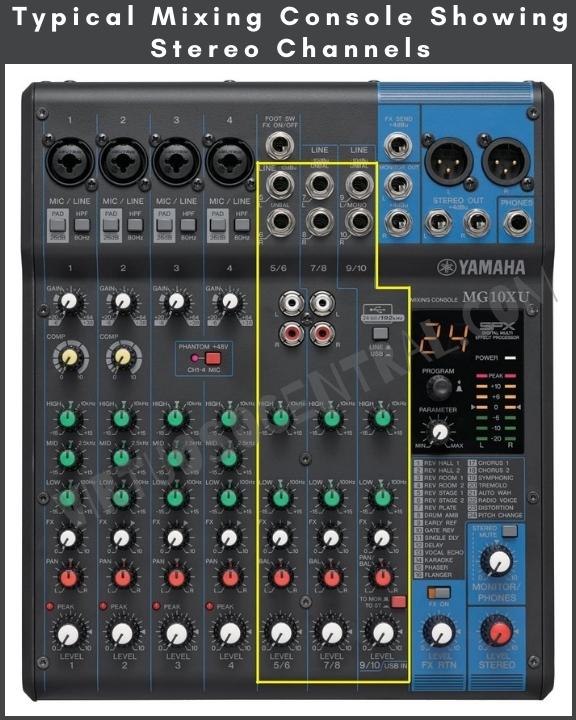
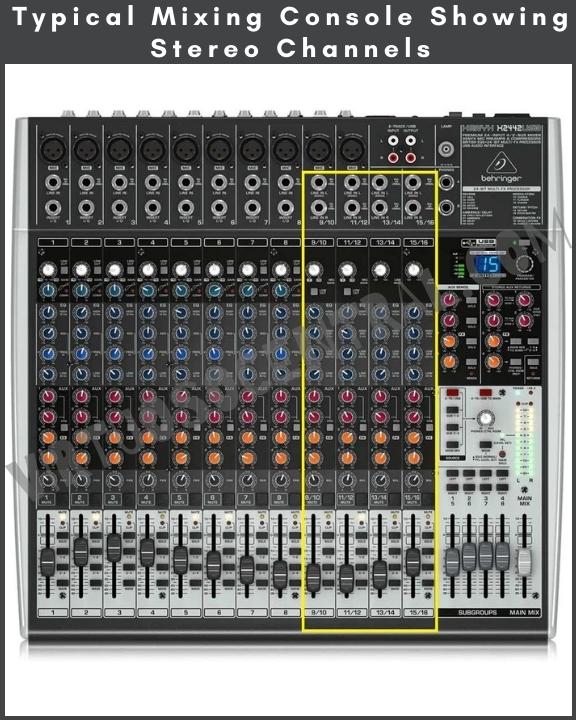
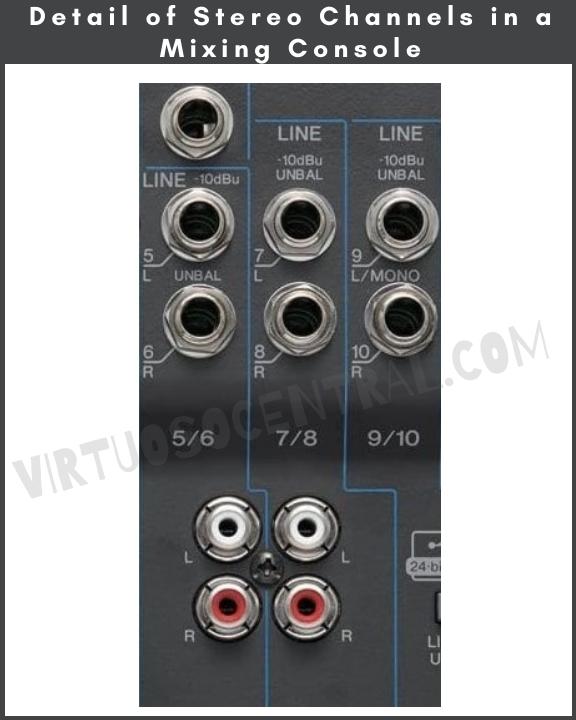
Most powered speakers have two input channels, and some offer a wide range of input connectors you can choose to connect your equipment.

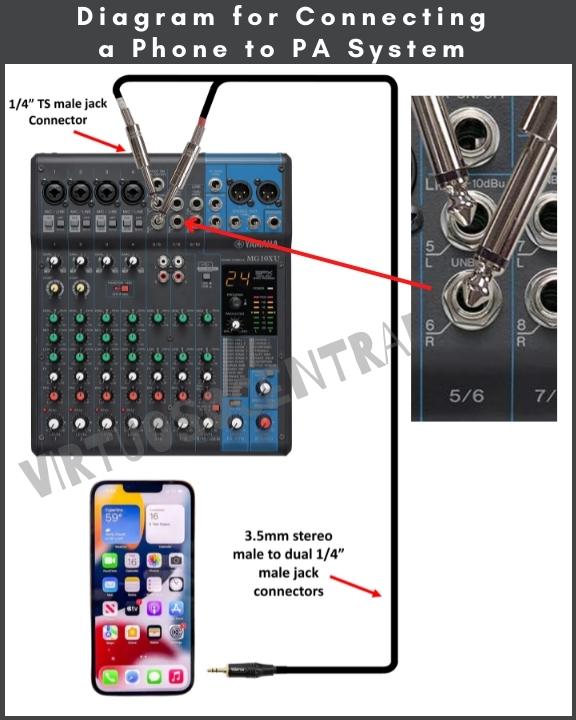
In most cases, they only come with a Combo XLR/TRS input connector (See the image below for reference). The combo XLR/TRS connector is the one we will use to connect the cable from the phone to the speaker.

This image shows a cCombo XLR / TRS Input Connector On a Powered Speaker

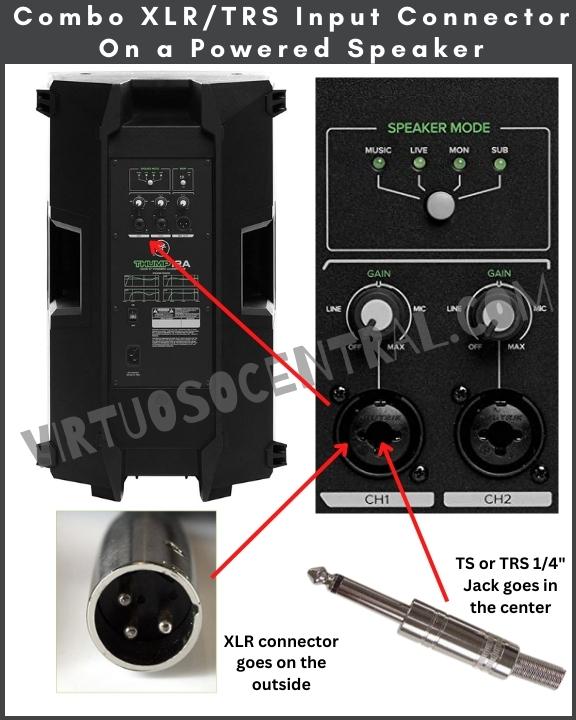
One thing to keep in mind is that the audio from your phone is a stereo signal, meaning it has a left and right channel. Ideally, you would have two speakers so that the sound is stereo. That way, you connect the left channel to the left speaker and the right channel to the right speaker.

But if you only have one speaker, don’t worry; all we must do is use both channels to convert the audio signal from stereo to mono using the speaker’s internal circuitry. That way, you don’t lose sound quality.

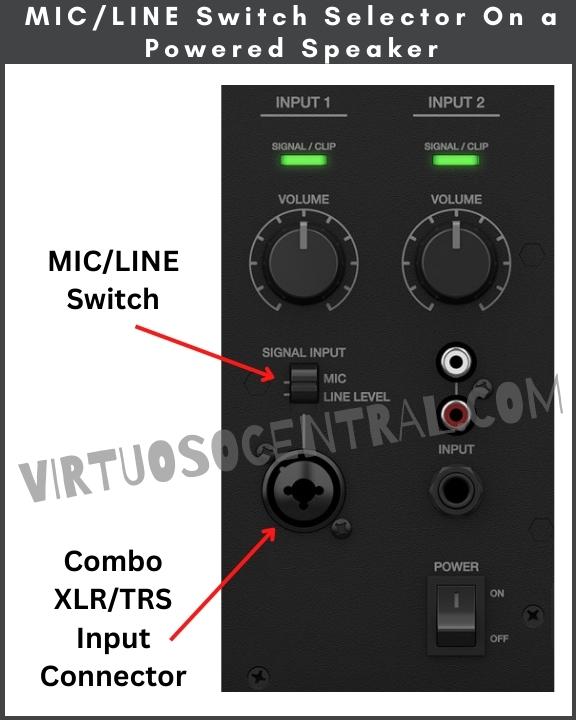
Your speaker may have a MIC/LINE switch on top or under the GAIN/VOLUME Knob. If it does, make sure to switch it to Line. See the image below for your reference.

This is because the speaker has a gain structure that makes it more sensitive for mics as they need more gain to work correctly. But because we are connecting a phone, it already has a line level signal which needs less boost.

You’ll find that if not switched to line level when connecting the phone, it will sound distorted, and the volume sweep will be much more sensitive, which in some rare cases could damage your speaker. So, make sure to switch it to Line.

If the speaker doesn’t have a switch to select between MI/LINE, don’t worry, it means that the manufacturer has already added attenuation at the TRS side of the connector, so it would automatically become a line-level input.

This image shows a MIC / LINE Switch Selector On a Powered Speaker

This is What You’ll Need to Make the Connection Using a Cable

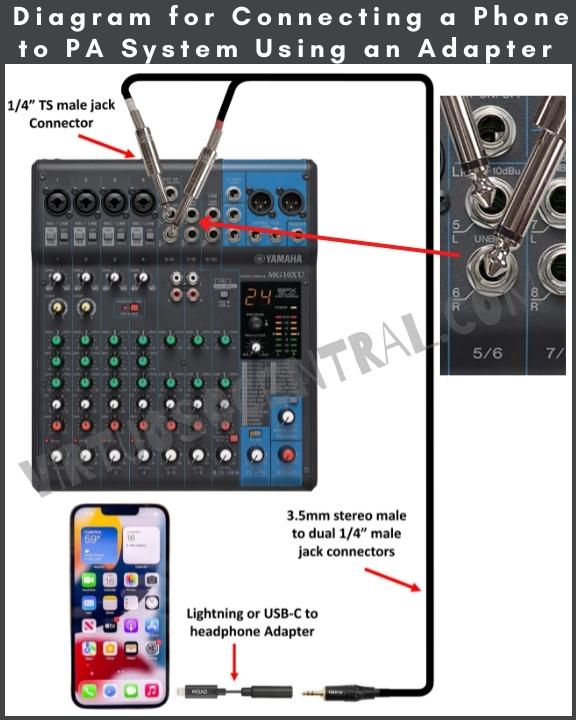
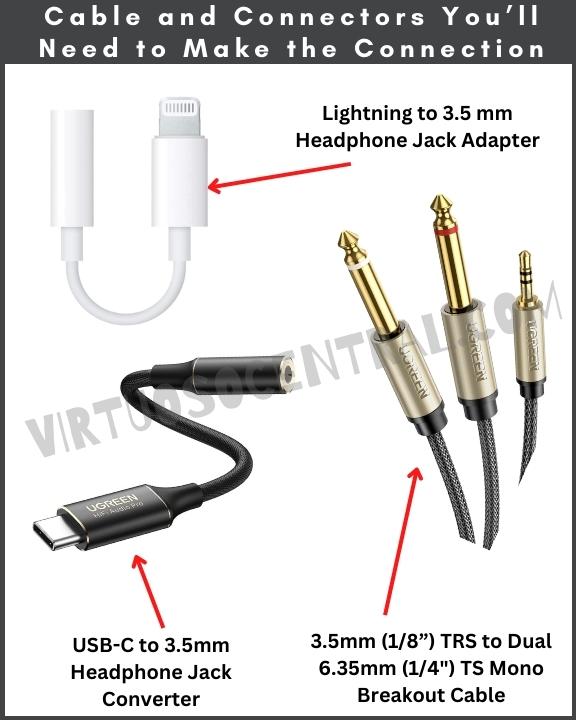
If you have a three-year-old or less phone, it most likely doesn’t have the 3.5mm headphone output anymore, so in that case, you’ll need an adapter.

If you have an iPhone, you’ll need a Lightning to 3.5 mm Headphone Jack Adapter, and if you have an Android device, you’ll need a USB-C to Headphone Jack Converter(links to Amazon)

Just for your reference, inside the adapter, there is a small digital-to-analog converter circuit that takes the digital audio signal from your phone and converts it into analog so it can be connected to the powered speaker.

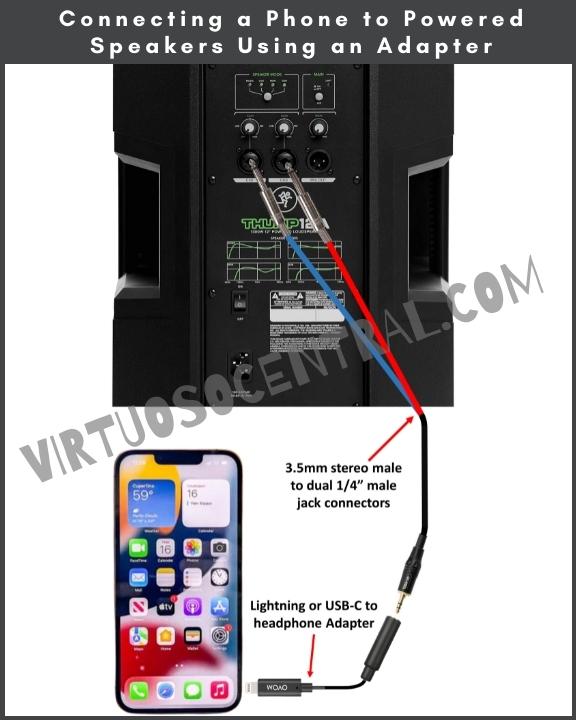
Regardless of the phone you have, to connect it to the powered speaker, you will need a 3.5mm (1/8”) TRS to Dual 6.35mm (1/4″) TS Mono Breakout Cableto go from the output of the adapter to the speaker’s input.

This image shows the cables and adapters Needed to connect a phone to a powered speaker

Steps to Connect a Phone to Powered Speakers to Play Music – Wired

  1. Before starting, ensure that the speaker is powered off and that the volume knobs for both channels are all the way down.
  2. If the LINE/MIC switch selector is present, make sure to switch it to LINE.
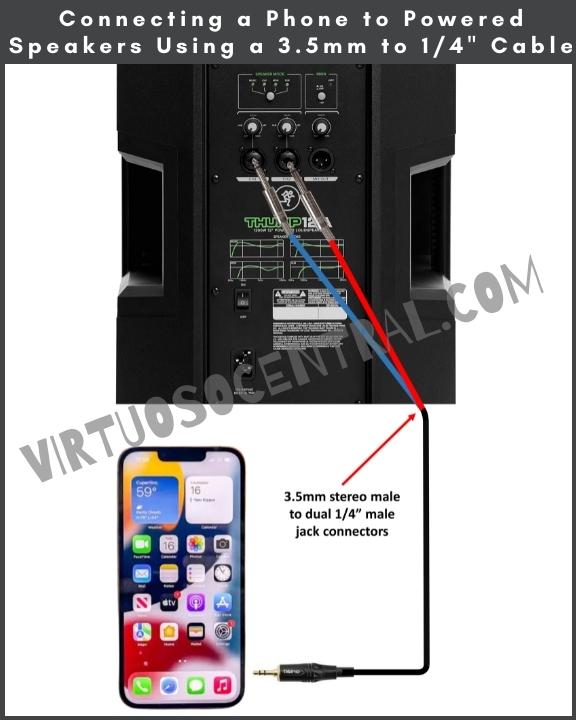
  3. Connect the Left (White) 1/4″ jack to Channel 1.
  4. Connect the Right (Red) 1/4” jack to Channel 2.
  5. Before connecting the 3.5mm stereo jack to the phone, make sure there is no audio playing and bring your phone’s volume down.
  6. Connect the 3.5mm stereo jack to the headphone output on the phone or if your phone doesn’t have a 3.5mm headphones jack, first connect the USB-C (Android) or Lightning (iPhone) connector to the phone, then connect the 3.5mm stereo jack to the adapter’s output. Check the diagram below.
  7. Turn on the speaker.
  8. Set both volume knobs to less than halfway
  9. Play some music on your phone and slowly increase the volume until you hear sound coming from the speakers.
  10. At this point, you need to adjust the volume knobs on the speaker so that your phone’s volume is about halfway and the sound coming from the speakers is loud enough for you. I recommend keeping both volume knobs at the same level to amplify the left and right channels equally.
  11. If the speaker comes with EQ knobs, adjust the highs and lows until it sounds like you want.

I have included the following diagrams for your reference. Use the first diagram if your phone has a 3.5mm headphone port. Use the second diagram if your phone doesn’t have a headphone output.

Diagram to Connect a Phone to Powered Speakers Using a 3.5mm to 1/4" dual TS breakout Cable
Diagram to Connect a Phone to Powered Speakers Using a lightning or USB-C adapter and a 3.5mm to 1/4" dual TS breakout Cable

Connecting The Phone to a Powered Speaker Using a Bluetooth Receiver

The second and most convenient method to connect a phone to powered speakers is to use a Bluetooth receiver. That way, you can wirelessly pair your phone to the speaker and be free to move around.

Before going any further, check if the speaker already has Bluetooth capabilities.

Most consumer-grade speakers offer Bluetooth connectivity. If this is the case, then you must pair your phone to the speaker, and that’s it.

If you have checked and the speaker lacks Bluetooth connectivity, you need to get a Bluetooth receiver to pair your phone.

This is What You’ll Need to Make the Connection Using a Bluetooth Adapter

The easiest way to add Bluetooth capabilities to any powered speaker is by using Alto’s Bluetooth Total Audio Adapter(link to Amazon).

This device is an XLR-equipped, rechargeable Bluetooth receiver that streams audio wirelessly to any powered loudspeaker or audio mixer.

With Bluetooth Total, you can quickly and easily add Bluetooth to any live sound setup providing you with a range of up to 100+ft. Its rechargeable battery lasts 6+hours. And the best part is that no wires are needed for the connection as it plugs in directly to the back of the speaker.

Steps to Connect a Phone to Powered Speakers Wirelessly – Using the Alto Bluetooth Total

  1. Before getting started, ensure that the speaker and Bluetooth receiver are powered off and that the volume knob for the channel you’ll use is all the way down. Also, don’t forget to bring your phone’s volume down. This is to avoid sudden loud pop sounds that could damage your speaker.
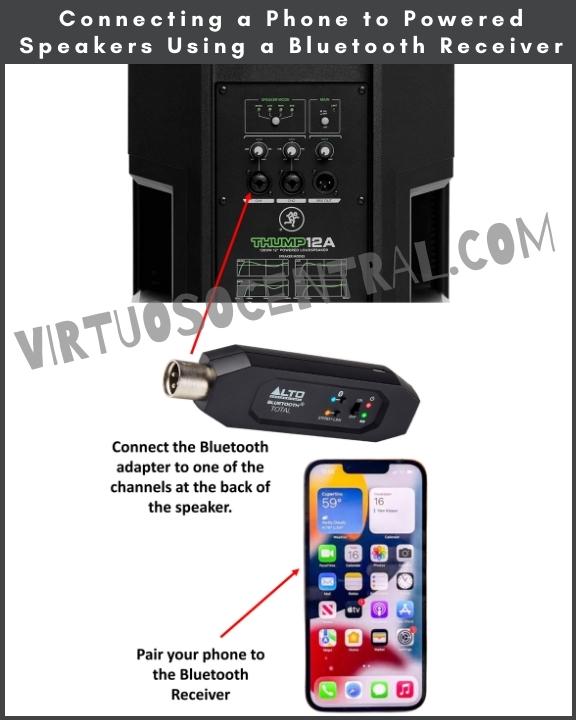
  2. Connect the Bluetooth adapter to one of the channels at the back of the speaker. Let’s say to Channel 1.
  3. Turn on the Bluetooth adapter and the speaker.
  4. Set the speaker’s volume knob to less than halfway.
  5. Press the pair button on the receiver for 3 seconds until the blue LED starts flashing. When “Bluetooth Total” is in pairing mode, a pairing tone will sound on the speaker.
  6. On your phone, under the list of Bluetooth devices, look for the one named “Alto BT2” and tap to connect it. After the connection between the phone and receiver has been established, a confirmation tone will sound, and the Bluetooth LED should stay on. Please note: If your Bluetooth device prompts for a pairing code, enter “0000.”
  7. Play some music on your phone and slowly increase the volume until you hear sound coming from the speakers.
  8. At this point, you need to adjust the volume knob on the speaker so that your phone’s volume is about halfway and the sound coming from the speakers is loud enough for you.
  9. If the speaker has EQ knobs, adjust the highs and lows until it sounds like you want.

Use the diagram below for your reference on how to make the connection.

Diagram for connecting a Phone to Powered Speakers Using a Bluetooth Receiver

One More Thing to Consider

The steps discussed previously are for connecting a phone to a single speaker, but what if you have two speakers placed at different locations within 100ft? Or What if you want to connect it in stereo mode? In that case, you can use two Alto Bluetooth Total Audio Adapters and link them together.

If you notice, on the adapter, there is a third button labeled Stereo-Link. This button is used to link two Bluetooth Total units for stereo sound.

To connect your phone to two powered speakers for stereo sound, follow these steps:

  1. First, you need to pair your phone to one of the receivers. To do this, follow the steps in the previous section. After your phone is paired to one of the receivers, this will become your master receiver.
  2. On the master receiver, press and hold the Stereo-Link button for 3 seconds. Do the same on the secondary receiver.
  3. Both Stereo-Link LEDs will blink, and a linking tone will sound while each Bluetooth Total “searches” for the other.
  4. When they are successfully linked, each Bluetooth Total will produce a confirmation tone, and the Stereo-Link LEDs on both units will stay on.
  5. At this point, you need to adjust the volume knob on both speakers so that your phone’s volume is about halfway and the sound coming from the speakers is loud enough for you. I recommend keeping the volume knobs at the same level on both speakers, that way, the left and right channels are amplified equally.
  6. If the speaker has EQ knobs, adjust the highs and lows until it sounds like you want.

Please Note: To erase linking settings on both units and go to factory default (Mono or single channel), press and hold the Stereo-Link button on the master unit for 10 seconds. A confirmation tone will sound, indicating that linking settings have been erased. This will also unpair your phone from the device.

To erase linking settings on the secondary receiver, hold the Stereo-Link button for 10 seconds. A confirmation tone will sound, indicating that linking settings have been erased.

Final Thoughts

In this post, I have shown a couple of straightforward ways to connect a phone to powered speakers for playing sound or music. These methods also apply if you want to connect any other audio device such as a tablet or iPod to a set of powered speaker system. I hope this information is helpful to you. If you liked this article and was helpful to you, please share it with others. Thank you for reading my blog.

How to Connect a Phone to Audio Mixer to Play Sound

In this post, I will show you two easy, straightforward ways of connecting a phone to an audio mixer for playing Music.

Before we continue, if you want a quick answer, here it is. To connect a phone to a Mixer to play sound you need to use a 3.5mm (1/8”) TRS to Dual 6.35mm (1/4″) TS Mono Breakout Cable to go from the phone to the PA system’s input.

If your phone doesn’t have the 3.5mm headphone jack output, you’ll need an adapter. Although I just gave you the quick answer, there is more to it than this.

Keep reading for a more detailed explanation of connecting a phone to a mixing console or PA system to play sound. This principle applies to iPhone, Android, or any other phone brand you have. Let’s get started.

Choosing the Input Channel in The Audio Mixer

You need a stereo channel when you want to connect a phone to a mixer. The reason is that the audio from your phone is a stereo signal, meaning it has a left and right channel.

For this reason, there are a couple of approaches you can use when selecting the input channel. You can use a single stereo line level channel or two separate channels.

Using a Single Stereo Channel

Most mixers used in PA systems have stereo inputs with EQ knobs to equalize the sound as necessary.

Stereo channels are usually labeled with two numbers, letting you know it is a stereo channel. For example, you’ll see a single channel marked 5/6, 7/8, and so on. The two numbers mean that one volume slider internally controls two channels (stereo).

The images below show a couple of typical mixing consoles used in PA systems. I have highlighted the available stereo input channels you need to look for when connecting your phone to a mixer to play music.

Typical Mixing Console Showing Stereo Channels - Yamaha
Typical Mixing Console Showing Stereo Channels - Behringer

If you pay attention to the following image, you’ll see that the channels labeled with two numbers have Left (L) and Right (R) input connections with 1/4″ phone jack. These connectors can be used for connecting your phone or any mobile device to the PA system.

Close up Detail of Stereo Channels in a Mixing Console

You’ll also notice that there are RCA-type connectors, which could also be used when making the connection if you have that cable. But the most used nowadays is the 1/4″ phone jacks.

Using Two Separate Mono Channels

Another way to connect your phone to a mixer is by using two separate mono channels. In this case, one channel will be panned to the left and the other panned to the right.

Some older analog mixing consoles don’t have a single stereo channel for connecting a stereo signal. If that is the case, then you need to use two separate mono channels.

The downside of using this method is that if the mixer is limited in the number of input channels it has, you will be running out of channels faster as you will use two channels to connect the phone.

Here is an example of how you’d proceed if you used two separate channels to connect a phone to the mixing console.

Let’s say that we are going to use channels 1 and 2. The first thing is to locate the “PAN” knob; it is usually located above the volume slider.

After locating it, turn the channel 1 “PAN” knob to the left and the channel 2 PAN knob to the right. This way, you set each mono channel to one side of the stereo bus.

Then, you’d proceed to connect the left (white) jack to the input labeled “LINE” on channel 1 and the right (Red) jack to the input labeled “LINE” on channel 2.

I recommend setting the EQ and volume sliders to the same level so that both channels sound at the same volume.  

This is What You Need to Make the Connection

Most likely, your phone doesn’t have the 3.5mm headphone output anymore, so in that case, you’ll need an adapter. If you have an iPhone, you’ll need a Lightning to 3.5 mm Headphone Jack Adapter, and if you have an Android device, you’ll need a USB-C to Headphone Jack Converter (links to Amazon).

Just for your reference, inside the adapter, there is a small digital-to-analog converter circuit that takes the digital audio signal from your phone and converts it into analog so it can be connected to the mixing console.

Regardless of the phone you have, to connect it to the PA system’s mixing board, you will need a 3.5mm (1/8”) TRS to Dual 6.35mm (1/4″) TS Mono Breakout Cable to go from the output of the adapter to the mixer’s input.

Steps to Connect a Phone to a Mixer for Playing Sound

  1. Before starting, make sure that the volume slider for the channel(s) you will use in the mixer is all the way down.
  2. Connect the Left (White) 1/4″ jack to the mixer.
  3. Connect the Right (Red) 1/4” jack to the mixer.
  4. Before connecting the 3.5mm stereo jack to the phone, make sure there is no audio playing.
  5. Connect the 3.5mm stereo jack to the headphone output on the phone. Please Note: if your phone doesn’t have a 3.5mm headphones jack, first connect the USB-C (Android) or Lightning (iPhone) connector to the phone, then connect the 3.5mm stereo jack to the adapter’s output. Check the diagram below.
  6. Play some music on your phone and slowly increase the volume slider on the mixer until you hear sound coming from the speakers.
  7. Use the EQ knobs to adjust the highs and lows until it sounds like you want.

I have included the following diagrams for your reference. Use the first diagram if your phone has a 3.5mm headphone port. Use the second diagram if your phone doesn’t have a headphone output.

This is a diagram for connecting a phone to a mixer or PA system using a 3.5mm to dual 1/4" jacks.
This is a diagram for connecting a phone to an audio mixer or PA system using a lightning or USB-C headphone adapter and  a 3.5mm to dual 1/4" jacks.

A Few Things to Consider

Up to this point, I assume you will use a cable that is not longer than 10ft. If you plan to use this configuration in runs longer than 10ft, I recommend using balanced cables and a DI Box (Direct Insertion Box).

The reason for this is because when using unbalanced cables in long runs, the audio signal degrades and is vulnerable to picking up noise from nearby RF signals or ground loops.

To avoid noise in the signal path, use only balanced cables for the long run and a DI Box to convert the signal from unbalanced to balanced.

If you are unfamiliar with this terminology, I have a post explaining everything you need to know about balanced cables and another post explaining the DI Box in detail. Click the links to check them out.

Using a Longer Run to Connect a Phone to a Mixer or PA System

In case you must connect the phone to the PA system from distances longer than 10ft, you would need two balanced cables, one for the right channel and another for the left channel, and a two-channel DI Box.

Here is the link for a good quality balanced XLR cable, you can choose the length you need (links to Amazon). Also, if you don’t have a stereo DI Box, I recommend the Radial ProD2 Passive 2 Channel Direct Box which is one of the best in the market. This is my go-to DI Box for converting stereo unbalanced signals to balanced.

If the Radial ProD2 is outside your price range, then something like the dbx DJDI, or the ART DualZDirect are more affordable and would work.

Using a direct box for connecting a phone to a PA system is straightforward. Here are the steps:

  1. Connect the 3.5mm stereo jack to the headphone output on the phone or to the USB-C or Lighting adapter as discussed previously.
  2. Connect the Left (White) and Right (Red) 1/4″ jacks to the corresponding Left and Right unbalanced inputs of the DI Box.
  3. Using two balanced cables, connect one to the Left and the other to the Right balanced output connector of the DI Box.
  4. Connect the other side of the balanced cables to two separate mono balanced channels on the mixer, PAN one channel to the right and the other to the left.
  5. Play music on your phone and slowly increase the volume sliders on the mixer for both channels until you hear sound coming from the PA speakers.
  6. Use the EQ knobs to adjust the highs and lows until you like the sound.

The diagram below can be used as a reference for the setup.

This is a diagram for connecting a phone to a mixer or PA system using a DI Box. This method is used for cable runs longer than 10ft.

Final Thoughts

In this post, I have shown a couple of easy ways to connect a phone to a mixer for playing sound or music. These methods also apply if you want to connect any other audio device to a mixer. I hope this information is helpful to you. If you liked the article, drop us a comment in the comments section below. Thank you for reading my blog.

Sound Like a Pro with These Guitar Amp Settings For Clean Sound

I once heard a lead guitarist say, “turn everything to 12 o’clock and if you don’t like how it sounds, get a different amp.” While he may have been exaggerating, his statement has some truth.

When trying to get the best clean tone out of your amp, you have to use your ear. The best way to make adjustments to your tone is to start everything as neutral as possible. In other words, set everything to the middle, or 5 on each knob (12 o’clock).  

But there is a lot more to it than that.

Lucky for you, this article will provide you with a comprehensive guide to creating the best amp settings for clean sound. Read on to nail down the perfect tone for your amp.

This image shows the settings as they need to be set on a guitar amplifier to get a clean tone

Picking the Right Amp

One thing you will definitely need to create a decent clean tone is an amp with plenty of headroom, meaning that you can get enough volume out of it before getting a distorted sound.

Hopefully, you can have the gain set to next to nothing, and you get little to no crackle even when you turn it up.

This shouldn’t be an issue for solid-state amplifiers. But let’s face it, if you’re looking to get the best tone from your amp, you need a tube amp.

Old school Fender amps are known for their ample headroom. Yet, plenty of high-quality British amps can compete with them. The Marshall JVM series is a prime example.

There’s No Right Answer

Unlike with rock, metal, and blues, it’s hard to give template amp settings for a clean tone. It truly is all about experimentation and working it out for yourself.

Start with everything in the neutral position, turn off any effects, then start playing.

Listen. Then make adjustments and repeat.

But, there is an exception to this.

Fender Amps and The Magic 6 Number

Fender amps (and guitars) are synonymous with classic American tones. They’re also known for their ample headroom, so they’re perfect for use on their clean channels. This also makes them the ideal base to build upon with a pedalboard.

You’ll hear plenty of Fender amps on your favorite artists’ recordings. For example, the Fender Princeton and its subsequent reissues have been around since the ‘70s and still see plenty of use in modern recording studios. The same goes for the Fender Reverb and the Fender Twin Reverb.

Pretty much any vintage Fender amp or their reissues can create the typical sparkly, bright, and percussive tone we’ve all come to know and love.

So, with the similarities between these amps, and their age, we can draw some conclusions about ideal EQ settings for them.

Here’s how it works:

  • Volume: 6
  • Treble: 6
  • Mids: 3
  • Bass: 2

Sound guys and guitarists have been using this setting for Fender amps for years. So, this is just the ticket when you say you’re looking for the best amp settings for clean tone and you own a classic Fender.

You could also use these settings with cheaper Fender solid-state amps. It just won’t be so sure-fire, and you may have to make some adjustments.

This image shows the settings as they need to be set on a guitar amplifier to get a clean tone using a fender amp.

Altering Your Tone to Get The Best Clean Guitar Sound

One important thing to keep in mind when you’re building your sound is to make sure that the volume on your guitaris turned all the way up. Unfortunately, having the volume turned down alters the tone too.

The same goes for the pickup switch. Make sure it’s set to the pickup that you plan to play with the most. If your amp has two clean channels (fancy), you can even use a footswitch to change pickup positions and have two separate settings.

For ease of writing, let’s say you don’t own a Fender amp. This means you’ll start with the dials all set to 5 (right in the middle).

Drive/Volume

Ideally, these will be separate knobs, and you can have the drive set as low as possible. But many tube amps need to use the drive knob to also control the volume. In which case, you should be wary that pushing the volume too high will introduce fuzz or distortion into your tone.

If your amp isn’t loud enough to get over a drummer without becoming overdriven, you should consider micing up your amp with the main PA system when you play instead of cranking the gain.

You need to remember that too much volume generally equals distortion.

Bass, Mids, and Treble

We’d recommend messing with each of these knobs one at a time. It will make it easier to identify when each becomes too much. Once your ear becomes familiar with the changes, it will be easier to create complete tonal profile changes for different guitars and amps on the fly.

We have an article on how to EQ acoustic guitar for live sound with a helpful flowchart. The same principles apply to clean tone on an amp, so you could use that to make some informed alterations to your settings.

Reverb

The amount of reverb you want depends on your taste.

For example, a jazz musician will probably use minimal reverb, a blues player on the clean channel will use a little, and a reggae musician would likely have it cranked past ten if they could. That doesn’t mean you have to fit inside a specific genre box, especially if you’re writing music.

You may also need to adjust the reverb settings when you play in different rooms, studios, and venues. Most rooms have a certain degree of natural reverb in them, and the artificial or spring reverb in your amp may clash with it.

For example, a hall generally has a lot of reverb. But an outdoor venue will have almost none.

Pedals to Improve Your Guitar Amp Setting for Clean Sound

Reverb

If your amp does not have built-in reverb, you should think about getting one ASAP. It doesn’t have to be expensive, and reverb will definitely improve your sound.

Here are some of the best reverb pedals in the market, to name a few:

  • Electro Harmonix Oceans 11 Reverb
  • MXR M300 Reverb
  • Boss RV-500

Delay

Delay is another pedal that sounds amazing with clean amps. You don’t need to saturate the sound by turning the delay pedal’s settings to maximum.

While this could be a cool effect for lead lines and certain parts of songs, it’s something to use to break up your song structure.

You can leave the delay pedal on constantly with lower settings, so it’s hardly noticeable. Combine that with a decent reverb, and you’ll have a rich-sounding full clean tone.

Pedal EQ

Sometimes the onboard three-band EQ on an amp just doesn’t cut it when it comes to building the best amp settings for clean tone. Using a pedal EQ lets you boost or cut much smaller frequency ranges to fine-tune your sound.

If you haven’t mastered the amp EQ yet, hold off on getting a pedal. Think of it as more of an upgrade.

If the pedal EQ is also a stompbox, you can turn it on and off when you switch pickups to maintain a fantastic tone throughout a varied performance.

Chorus

Chorus is another one of those effects that people can use too much of. Doing this can often make your chords sound dissonant, which is fine if that’s what you’re trying to do artistically but be careful.

On the other hand, a chorus pedal on low settings is perfect for creating ambiance with your playing.

Master EQ Effectively

Ask any sound guy, and they’ll tell you they are always learning more about perfecting soundscapes. You should make this a goal too. Learning music should be a lifelong journey because there’s always more to learn.

We have plenty of articles about making perfect sound for recordings and live performances to help you on this journey. Some of our best are:

  • How to Record Live Sound Through a Mixing Board
  • Vocal Mixing Tips
  • How to EQ Acoustic Guitar for Recording

Guitar Amp Settings for Blues to Get the Best Tone with Any Amp

Blues is the perfect style of music to learn once you have the basics of playing guitar under your belt. The rhythms are straightforward and translate well into other genres. And the blues scale is the second easiest to learn after the pentatonic scale.

But how do you get the best tone while you’re playing blues?

The tone is sometimes just as important as what you play in recreating the vibe of a genre.

While some amps outshine the competition in terms of the perfect blues sound, using the right EQ settings on your amp will help you get the best out of what you already have.

This article will dive into the best amp settings for blues to create a crunchy and clear blues tone on just about any amp. So, read on to master your amp for this popular genre of guitar intensive music.

A Basic Outline of Guitar Amp Settings for Blues

A good starting point for setting up your amp for blues would be to try out these settings:

  • Gain or Drive: 3 or less
  • Bass: 3
  • Mids: 7
  • Treble: 6

Generally speaking, blues has a little fuzz on it. Try not to push too hard on the gain so that you don’t end up in full-on distortion.

This image shows the settings as they need to be set on a guitar amplifier to get the real tone of the blues genre.

Tweaking Your EQ Amp Settings for Blues

Although we’ve given you a starting place to find the best tone for blues, each amp is different. You’ll need to adjust the settings to get the most appropriate tone from your particular amplifier.

Also, keep in mind that artists use many EQ settings themselves. You may have to make further adjustments if you want to play along to a particular song and sound as close as possible to the original.

To achieve this, you need to know how to adjust the EQ correctly and know what each knob does to the sound. So, let’s take a look at how you can tweak each setting on your amp.

Gain/Drive

This controls how much crunch you get through your amp. Turn it up, and you’ll get more distortion. Simple as that.

However, many of us get carried away with the gain, especially when we need more volume in a band setting. Try to use the volume controls instead. We’re not playing metal, after all.

You likely have too much distortion if you’re playing blues and your gain is set higher than five. Dial it back a little.

Bass

Start low. But there’s no reason you couldn’t crank the bass a little. Generally speaking, you’ll want to leave a little space in the lower frequencies. Yet, if you’re playing in a band with no bass player, sometimes it’s good to fill that space with some guitar.

Be wary that you don’t end up with a muddy mess from too much bass. Listen as you play and adjust accordingly.

Mids

Having a present mid-range allows the guitar in blues bands to cut through the mix. You’ll want to start with these anywhere above five but may wish to increase up to eight.

Another thing to keep in mind is the other instruments in your band. If you’re playing with a keys player or brass instruments, you may want to dial your mids back a little so that the tone from the guitar doesn’t collide with the rest of the band.

Remember that you want to deliver a balanced, mellow sound to your listeners.

Treble

As you’re probably working on your lead guitar skills when you play blues, feel free to crank the treble a little. Just be wary that too much treble can cause a shrill sound. Again, listen as you play and make adjustments as you go.

Practice Makes Perfect

The key to dialing in the “right” guitar amp settings for blues depends on your taste or the artist you’re trying to emulate.

It’s unlikely you’re going to get it exactly right the first time you try to make adjustments, but your ear will get better over time, and you’ll be able to recognize what you need more of and what is overbearing.

Some simple indications to change the variables could be:

It sounds too “rocky” — In this case, you almost definitely have the gain set too high. Dial it back down to around two and work your way up slowly again.

It sounds dull — Pump up the mids a little and maybe add a little more reverb into the mix. If your amp doesn’t have reverb and you don’t have a pedal, you could try adding a little more gain. But, again, don’t go overboard with the gain settings.

It sounds harsh — In this case, you likely have the treble turned up too high. Come back to 12 o’clock (middle of the dial) and raise it slowly.

It sounds flat or muddy — You likely have the bass set too high. Create more separation by turning the bass down a little and raising the mids. Doing so should help create a more precise tone.

Guitar Amp Settings for Blues Flowchart Diagram Cheatsheet

Guitar Amp Settings for Blues Flowchart Diagram Cheatsheet

What Makes a Good Blues Amp?

Most amp manufacturers make amps that are perfect for blues. A good example is the Fender Blues Deluxe. I mean, it’s in the name, right?

Just because there are many dedicated blues amps on the market doesn’t mean you have to spend a fortune on the perfect amp. In fact, blues is one of the most forgiving genres in terms of the type of amp you use.

As long as you can get a touch of overdrive through your amp without making the signal too wet, you’ll be fine.

A two-channel amp is ideal for blues. You’ll pretty much always want a little bit of crunch. But, plenty of famous blues artists use a clean tone too. John Mayer is a prime example of this.

Using Pedals to Supplement Your Amp Setting for Blues

You could use a few different types of pedals to get a better tone from your amp. We’d recommend the following:

Fuzz/Overdrive

If your amp does not have a decent overdrive channel built-in, you’ll need a fuzz pedal to give you that little bit of bluesy crunch.

Don’t go for a distortion pedal. You won’t need anywhere near that kind of rough signal.

A couple of classic fuzz pedals that deliver excellent overdrive are the Electro-Harmonix Op-amp Big Muff Pi and the Dunlop FFM3 Jimi Hendrix™ Fuzz Face®. Any of these effects will create overdriven melodic overtones perfect for blues.

Reverb

Pretty much every blues song ever written has a little reverb. This can be true for the entire track, but the guitars significantly benefit from reverb.

If you’re switching between a clean and dirty tone throughout your set, make sure you have adjustable reverb too. This will allow you to keep a consistently excellent sound.

You obviously won’t need a pedal if your amp has a built-in reverb effect.

Start with the reverb sitting at around two and bring it up as you go. Many blues artists use extremely saturated reverb on their clean channels for certain songs. Don’t be afraid to crank it for some songs, but don’t play a whole set like that. It gets a bit much.

Here are some of the best reverb pedals in the market to name a few:

  • Electro Harmonix Oceans 11 Reverb
  • MXR M300 Reverb
  • Boss RV-500

Bonus: Loop Pedal

As we mentioned earlier, playing blues is a fantastic way to up your guitar game. This is especially true when working on your lead guitar chops.

Although it won’t really impact your tone, using a loop pedal will allow you to practice your timing (making the loops) and your solos and leadlines. You can just constantly practice some licks over the top of your recorded chords.

Rinse and repeat for different keys. You’ll be a master of the fretboard in no time.

Learn More About EQ

Keep at it, and eventually, you’ll be a master at getting your amp to sound like a blues powerhouse. Hopefully, by then, you’ll be playing in a band. Be prepared by checking out our other EQ articles to learn as much as you can about creating the perfect band-wide tone.

You may find these articles helpful:

  • Vocal Mixing Tips
  • How to Use Subgroups on a Mixer
  • How to EQ Acoustic Guitar for Live Sound

Guitar Amp Settings for Rock – A Comprehensive Guide

Emulating your favorite rock artists with your existing gear can be a challenge. Getting your EQ settings on your amp right can help significantly with this.

Rock music is probably the broadest reaching genre of music with the most sub-genres. Many modern styles of music, such as indie, pop, and even metal, have their roots in rock music.

That makes it difficult to put a lid on exactly what the best amp settings for rock are. As such, we will discuss what you can change to suit your style.

This article will cover all the best guitar amp settings for rock to get you off to a rolling start. Read on to master rock tone on any amp.

A General Starting Point

For the sake of an easy starting point, we want to create a light overdrive with decent sustain and a present, crunchy tone. The following settings will be an excellent place to start for most amplifiers to make such a sound.

  • Gain or Drive: +7
  • Bass: +5-6
  • Mids: +7
  • Treble: +5

All amps differ slightly, so you may have to experiment a little. Play a few chords and listen as you play, then adjust one knob at a time. This will allow you to hear how the adjustment impacts your sound.

This image shows the settings as they need to be set on a guitar amplifier to get an authentic rock tone.

The Right Amp

Since rock music is so varied, the range of appropriate amps is also huge. If you don’t use pedal or rack effects, it’s a good idea to use an amp with two or more channels so you can switch between tones during your performances.

You could use the separate channels to run one clean and one dirty. You’ll find that many popular rock songs switch to an overdriven channel for choruses. It’s important you’re able to do the same.

You could go for a Vox AC30 or a Marshall Plexi for quality British tone. Fender Hot Rods are the perfect American tone amps for rock. As we mentioned, there’s plenty of variety available. Even if your amp is only good for clean tones, you can use pedals to create an incredible rock sound.

Using Effects

Some amplifiers come with onboard effects that will allow you to build the perfect rock tone. Other times, you’ll have to use stompboxes or rack effects. In any case, here are a few of the essential effects you should consider.

Overdrive

Overdrive is arguably the most critical effect for classic and hard rock. It allows you to create crunchy rhythm lines and push lead lines to soaring new heights. Even if your amp has a decent overdrive channel, you can use an overdrive pedal too. This allows you to introduce different levels of overdrive mid-song.

A classic example of a high-quality overdrive pedal is an Ibanez Tube Screamer.

Distortion

Distortion pedals are often confused with overdrive. Yet, to put it in simple terms, distortion pedals give a hotter output and create a much more saturated and heavy tone. Steer clear of distortion for rock unless you want to play one of its heavier sub-genres.

Fuzz

Fuzz also works similarly to overdrive. Picture fuzz as overdrives little brother. It creates overdriven effects by concentrating on melodic overtones. Generally, it’s less heavy and more bright.

A couple of classic fuzz pedals that deliver excellent overdrive are the Electro-Harmonix Op-amp Big Muff Pi and the Dunlop FFM3 Jimi Hendrix™ Fuzz Face®. Any of these effects will create overdriven melodic overtones.

Reverb

Many high-end vintage amps have reverb built into their clean channels. While it’s okay to use a bit of reverb with overdrive, it can often cause feedback issues.

However, using reverb is necessary to get those clean tones you’re familiar with from plenty of your favorite rock artists like the Rolling Stones.

Delay

Delay comes in several different forms. Tape delay is one of the more favorable types used in rock music. These pedals recreate vintage tape echo machines, so they excel at building a classic rock soundscape.

A digital delay is a more modern approach to the delay effect, which records a sound and replays it at specific intervals that you can adjust. Many guitarists use this type of delay for their lead lines.

Editing Your Guitar Amp Settings for Rock

If you’ve got your amp and effects all sorted, it’s time to start messing with your EQ to get the exact tone you’re after. Let’s take a quick look at what each setting does.

Drive/Gain

This is how hard your tubes get pushed. Solid-state amps recreate the same effect by using discrete components. Therefore, the gain will increase your volume and the saturation of distorted overtones. In short, if the drive is cranked, the amp is overdriven.

To adjust your sound with the drive or gain knob, turn it up to increase the overdrive and down to decrease it.

When using a two-channel amp, you’ll need the gain pulled back on one of the channels to achieve a clean tone. In this case, you should turn the volume knob up on the clean channel to counteract the loss of volume from the drive being set lower. This is especially true for tube amps.

Bass

We suggested setting the bass at around 12 o’clock as a neutral setting in the low end is a good starting point. You don’t want your notes to clash with your bass player, nor do you want the very bottom end of your notes to be the most present part of your playing. This can sound very muddy.

However, you may want to boost the bass a little if you play hard rock to get a better chug from palm-muted strums.

Mids

The middle frequencies are arguably the electric guitar’s best. They don’t have much to contend with within a typical band setting and fill out the overall sound. This is why rock guitarists tend to have the mids boosted a little in the EQ.

Again, if you play a heavier sub-genre of rock, you could choose to scoop them instead to allow for a crisper chug and give room for the treble and bass to shine.

Treble

It’s rarely a good idea to crank the treble settings on your amp to 11. It creates an uncomfortable harshness. Yet, if you feel like the high end lacks a little, or want a little more crispness for your solos, feel free to boost the treble a little.

Be Aware of Your Pickups

Single-coil, rail, and humbucking pickups all work great for rock music. But, you should be aware that each will impact the overall tone of your setup. Ideally, we’d recommend single-coil pickups for classic rock and humbuckers for hard rock.

You should also take note of which pickup position you use most. You might find the perfect amp settings for your bridge pickup, but they won’t work for your neck pickup. It may be a good idea to take note of the settings for each.

The same applies if you use several different guitars. Don’t assume your Les Paul will sound the same as your Stratocaster with the same EQ settings on your amp. Experimentation is key. Just make sure you have done all the experimenting before taking your gear on stage.

Learn More

Although the guitar is often the centerpiece of performance, getting the electric guitar amp settings for rock right doesn’t complete the picture.

Your whole band has to sound on point to get noticed. Luckily, we have plenty of articles dedicated to getting the perfect PA settings. Check out these related articles to help you out.

  • How to EQ Acoustic Guitar for Live Sound
  • How to Use an AUX Send on a Mixer
  • Mixing Console Basics

Guitar Amp Settings for Metal – A Complete Guide

Chances are, if you’ve landed on this page, you’ve tried cranking up your amp to 11 and have not been able to recreate the tone of your favorite metal guitarists. Don’t worry. It happens to the best of us, and learning your way around amp EQ can be more complicated than it seems at first.

Before you even get to the amp, there are many other things to consider. Yet, even with a less-than-ideal setup, you can still optimize your tone with the onboard EQ of your amplifier. So, without further ado, let’s dive into the best guitar amp settings for metal and everything else you need to get the perfect tone from your amp.

Amp Settings for Metal – General Settings

Crank the gain, scoop the mids. That’s all. Every amp is slightly different, but you could start with these settings and experiment from there:

  • Gain or Drive: 8+
  • Bass: 7+
  • Mids: 2-6
  • Treble: 5+

The more distortion you want, the higher you should pump the gain. If your amp has presence or resonance settings, you can experiment with cranking these too to see if you like their impact. They alter the very top and lowest possible frequencies, respectively.

It’s best to listen with them cranked and the gain pulled back a little first to make it easier to hear how they impact the tone. Then, you can pull them back to a more respectable level as you boost the gain.

Before we get too carried away with how each setting impacts your tone, let’s take a quick look at what else can help you improve your sound.

This image shows the settings as they need to be set on an amplifier to get a metal tone.

Optimizing Your Gear

Yes, EQ can help you get a better metal tone. But, it’s not the only thing you’ll need. Ideally, you should have an amp designed for high-gain applications. If the amp is not ideal, you could get a quality overdrive and/or distortion pedal.

The Right Guitar

Typical metal guitars include classics like the ESP Eclipse and B.C Rich guitars, but a Gibson Les Paul can be just as good at creating a soaring metal tone. What do these guitars all have in common? Humbucking pickups.

Humbuckers allow for a much thicker tone and are less susceptible to unwanted noise, which is especially important when using distortion. And, you can’t have a metal tone without distortion.

Many people argue that active pickups (humbuckers) are much better for metal too. They’re often referred to as “hot pickups,” which means they provide a stronger electrical signal to the amp and react better to high gain EQ settings.

Choosing an Appropriate Amplifier

We could argue for days about whether tube amps or solid-state amps are better. But, the consensus is that tube amps provide a richer and more natural tone. They also offer a more natural overdrive if the preamp tube can be powered appropriately. Some of the most influential metal amps on the market are:

  • Peavey 6505
  • Mesa Boogie Triple Rectifier
  • ENGL Powerball II

However, plenty of solid-state amps on the market do a great job of pumping out metal. A good example is the Randall RG series.

You could also opt for modeling amps like a Boss Katana or Positive Grid Spark. They’re perfect genre-spanning amps as they copy the tone of different types of amps. The latter is only good as a practice amp, so be wary of that if you intend to play gigs.

Generally speaking, a two-channel amp with a dedicated overdrive channel is the best option when you’re looking to play metal. They also have the apparent advantage of switching to a clean channel for certain sections of music. This is prevalent in many types of metal, such as thrash metal like Metallica through to melodic djent.

Yet, even if you have a $30 practice amp, you can still optimize it for metal tone. Follow the quick settings under the first subheading and read on below to improve your sound.

If Your Amp Doesn’t Cut It

We can’t always afford the best gear and have to work with what we have. Unfortunately, The distortion channel on most budget amplifiers is absolute garbage. Adding a cheap distortion pedal can be a good band-aid for this situation.

Some of the cheapest options on the market replicate the industry standards. An Ibanez Tube Screamer is an obvious choice if you can afford it. Yet, something like a Behringer UM300 Ultra Metal can be the perfect interim while you save for a more appropriate amp.

Altering the Guitar Amp Settings for Metal

The recommended settings we gave you earlier should get you into the right ballpark. But, sometimes something isn’t quite right, so now we’re going to look at how each setting impacts the tone of your amp so you can dial in the perfect tone on your amp.

Gain Amp Settings for Metal

The gain knob controls how “hot” the signal is through the rest of the amp. The higher its set, the more natural distortion you’ll achieve. So, if your amp sounds too muddy, dial it back a bit. Feel free to pump it up if you’re after a bit more sustain and volume.

Some amps also have a “drive” knob alongside the gain. This is generally only for tube amps, as one controls the signal running through the preamp tube while the other interacts with the amp tube.

Bass

You need to inflate the bass frequencies to create a good metal tone, as it allows for the solid wall of chug when you palm mute. As you can imagine, this is especially important for the rhythm guitarists in a metal band.

A common mistake is to boost the bass a little too much. This leaves you with a muddy mess of almost unidentifiable notes. This is especially true if you’re down-tuned and not using a baritone guitar.

Floppy strings + too much bass = bad tone

Mids

Most metal artists scoop the mids on their amps (some passionately disagree). But why? Well, the answer lies in the palm mutes again. Scooped mids allow those chugs to come through clean and clear. It gives your tone the perfect crunch.

If you’re the lead guitarist in your band, you may want to consider boosting the mids instead. This is because the sonic range is more available if your other guitarist has their mids turned down. Thus, your guitar cuts through without having to introduce overbearing volume.

If you sound a little thin with your mids set below 5, raise them slowly until you’re happy with how it sounds.

Some amps make it easy to scoop the mids without touching the bass, mids, and treble. These amps have a knob marked contour. Dialing it back will automatically lower the mids while also raising the treble and bass. Make sure the other knobs are set to 12 O’clock if you want to use the contour control as a shortcut.

Treble

Generally speaking, the lead guitarist should have their treble a little higher than the rhythm guitarist, so their solos and lead lines cut through. The treble often gives amps with heavy gain a little clarity. Although with a slightly raised risk of feedback, especially if your gain is cranked too high.

On The Mixing Desk

You should consider a few things if you’re micing up metal guitarists to a mixer:

Boost the mids: Though scooped mids are ideal for metal, they can often sound thin when paired with PA speakers. You may have to counteract their default amp settings a little.

Cut Some Bass: The same applies for the low end. The down-tuned guitars used in metal can work their way into the subs and drown out the bass guitar with a muddy mess of chugged notes.

More To Learn

If you found this article useful, check out our other guitar EQ guides

  • How to EQ Acoustic Guitar for Live Sound
  • How to EQ Acoustic Guitar for Recording

How to EQ Acoustic Guitar For Live Sound

Equalization of acoustic guitars for live music can be a daunting task, but it doesn’t have to be. It can become second nature as soon as you wrap your head around the basic fundamentals.

This article is geared more toward singer-songwriters, solo cover musicians, duos, or small bands. If you’d like to learn more about EQing guitar for bigger band setups or in a recorded mix, check out our other acoustic guitar EQ article here.

EQ Acoustic Guitar Using Your Onboard Preamp and a Mixing Console

Onboard EQ vs. Mixer EQ

When mixing your acoustic guitar for live sound, you have to consider exactly how you’re going to EQ. The most professional and best-sounding way is to use the mixer and focus on problem frequencies.

However, not everyone is a pro sound guy with a trained ear to pick out these exact frequencies. Sometimes it’s challenging to alter the EQ on your mixer while in the middle of a solo set, depending on the type of PA you use.

You can also use the onboard EQ that comes installed in acoustic guitars to wrangle the sound for a live gig. Even budget electric acoustic guitars often come with a 3-band EQ built into them, so you can at least do a basic mix with just your pickup. And, let’s face it, a basic mix is all many small-time working musicians need to produce an excellent sound to get people dancing and singing along.

In truth, once you know your way around your onboard EQ and your mixer, you should use both for every gig. You can find the ideal settings for the room at the start of your gig with the mixer, then make minor adjustments as changes in the room are made throughout your set like

  • More or fewer people
  • Furniture being removed
  • A change in your playstyle for different times
  • Adding or removing other performers, you can make space in the sound spectrum for voices and instruments.

Acoustic Guitar EQ Cheat Sheet – Using the Onboard EQ

Let’s assume your acoustic guitar has a basic 3-band onboard EQ like the ones shown in the image below.

That means it has a dial or slider for Bass, Treble, and Mids. Great! Hopefully, you can use these to create a decent sound for your front-of-house speakers. Here is a detailed acoustic guitar EQ cheat sheet in the form of a flow chart to help you do so:

Acoustic Guitar EQ Cheat Sheet Using the Onboard EQ

As you can see, basic onboard EQ is a little trial and error. You have to listen, play, and make adjustments until you get the sound you want.

The 12 O’Clock Principle

To start using your onboard EQ, it’s a good idea to have the dials set to 12 o’clock or if you have faders, set them to the middle. This should give the most neutral tone possible for your acoustic guitar. Then, you can use the above cheat sheet flow chart to improve the sound.

Of course, this is just a rule of thumb. Each guitar and pickup is a little different. So, once you learn a little about how your guitar sounds plugged into your PA system, you can take note of the settings you like and use that as a starting point.

A protip is not to assume that the same EQ will sound similar everywhere because acoustics change between venues, but you can take note of the EQ that works best for you and make the necessary adjustments as needed.

I could say the same thing about the EQ on the mixer. You could take notes of the settings but don’t assume that the next time you play will sound the same if you are in a different place. Just use those EQ settings as a base from which you can build.

Contour, Notch, Blend, Presence, and Resonance

If you’re lucky enough to have a better onboard EQ for your acoustic guitar, you may have some extra EQ settings you can work with to perfect your sound. These usually exist to make EQing your guitar easier. You can use one knob to do several things at once.

Contour – This is a knob that controls how scooped the middle frequencies of the guitar will be. It may also simultaneously boost the treble and bass a little. This helps achieve the “smile EQ,” a commonly used starting point for guitar EQ. The higher the contour is set, the more scooped the mids will be.

Notch – This is one of the more complicated EQ knobs for onboard acoustic preamps. It allows you to pull out specific frequencies that are causing feedback. Most acoustic guitars have at least one frequency range that can cause this issue. If you notice feedback:

  1. Sweep for the problem frequency using the notch knob
  2. If you think you’ve found the problem, pull the fader up a little to hear more closely
  3. If you were right, pull the fader down to dampen that frequency in the mix.

Blend – Some acoustic guitars use both a mic pickup and an under-saddle pickup. The blend control indicates how much of each you would like to use in the mix. For example, with the knob set to 12 o’clock, you will get 50% of the sound coming from each pickup.

Presence – Presence adjusts the higher end of the treble spectrum frequencies. You can crank this a little for songs where the guitar is the main focus, but be careful not to overuse it. Too much presence can be tough on the ears of your audience.

Resonance – The resonance works like the presence but for lower frequencies. Not many acoustic guitars have a resonance control as the lower frequencies are not usually something you want to accentuate.

Fixing EQ on the Fly

Sometimes, you’ll spend an hour before your gig making sure the sound is perfect. Only to find three songs in, that something is way off. Don’t panic because this happens to everyone sometimes. That’s why the sound guy doesn’t just leave the mixing desk at big concerts.

When it comes to altering EQ during a set, the onboard system on your guitar can be a godsend. This is especially true if you have a notch knob, as you can find and pull out any overly resonated frequency that is causing feedback. This takes some practice, of course, and ideally, you’d like to isolate the sound into your foldback speaker while making any adjustments.

It’s not just feedback you may have to account for during a set, though. Let’s pretend you’re playing a gig in a beachside restaurant that has glass walls so people can enjoy the views. When you set up your EQ at the start, you likely pulled down both the highs and lows more than you usually would to avoid bouncing soundwaves when hitting the glass, as it is a very reflective surface.

Yet, when the restaurant is full, the frequencies you’ve pulled down are dampened naturally by the bodies in the room (or even curtains that move during the evening), so the sound will be completely different. You’ll definitely need to make changes to keep your guitar sounding full and not a muddy mess.

You don’t have to wait till you have a break. Strum a few chords and adjust the EQ on your pickup slightly between songs to get an idea of what is missing or boosted to high. You can still use the flowchart above to help.

Then, when you’re between sets, you can make more sweeping changes on the mixer.

Using Pedals for EQ

Pedals can be an excellent substitute for an onboard preamp EQ. Actually, pedal preamps are usually much more powerful and detailed than those built-in to acoustic guitars.

They can be a great buy if you have a cheaper mixer and want more control over your sound.

They’re also perfect for getting a more consistent sound if you often play gigs with different PAs. You can save presets for each PA and use them when you need them.

Pedal preamps are all-but-necessary for mic-only pickup guitars too. They allow you the stage control we’ve discussed earlier, which would not be possible without the pedal or having your mixer next to you on stage while you play.

Why Using a Mixer Is Better (But Also More Difficult)

So far, what we’ve discussed should help you EQ your guitar with your onboard preamp, but it’s no substitute for a full mixer EQ, depending on your mixer, of course.

Some low-end mixers only use 2-band or 3-band EQ on each channel, so there’s not much of a difference there other than visualizing the overall EQ when working with different instruments and voices.

Professional mixers with four, five, or six knob EQ allow you to identify and work with more narrow frequency ranges. And if using a digital mixer, you have an even broader EQ where you have more control over the frequency spectrum, which helps you with:

  • Preventing feedback
  • Building a more cohesive sound
  • Boosting and dropping problem frequencies

To boil it down, a mixer is just a much more in-depth tool for you to use than an onboard EQ. So try not to overlook it. As we mentioned earlier, using both at the same time is usually the best option.

EQ Settings for Acoustic Guitar Using a Mixing Console

As mentioned in the previous section, it is much easier and more precise to implement EQ using a digital audio mixer because you have a more accurate parametric EQ for each channel. And the advantage you have is that you can pinpoint individual frequencies and either increase or decrease them very accurately as necessary.

Instead, using an analog mixing console will make EQing individual frequencies more difficult because one knob is usually responsible for a broader range of frequencies.

In this case, you would have to use your ears to identify the frequency you are trying to increase or decrease, which means that your ears need to be trained. Don’t worry, though, because, with a few pointers and some practice, you can learn how to EQ acoustic guitar for live performance.

Here are a few mixer EQ settings for acoustic guitars that can help you get started depending on the number of EQ knobs available.

EQ Acoustic Guitars Using a Three-Knob EQ Analog Mixer

Please know that if your analog mixer has three knobs for the EQ, you are limited to what you can do but can still get excellent results if the tones are balanced using the three EQ knobs.

The first thing you need to do before setting up the EQ is to activate the high pass filter (HPF), also known as low cut. This is to eliminate unwanted low frequencies that produce an annoying low-end rumble. The HPF switch is usually located above the Gain knob, and it is labeled HPF or low cut. The image below shows you where to find the HPF switch on a mixing console.

The next step is to set the EQ to neutral. Basically, you need to set the High-frequency knob to the middle and do the same for the mid and low-frequency knobs. Doing this will help you get a neutral sound from which you can boost or decrease the EQ at specific frequencies, depending on what is needed.

If the guitar sounds muddy, meaning that its lower frequencies are unintelligible, try reducing the low-frequency knob a bit to get rid of the smeared sound by turning the knob counterclockwise by 1/4 turn from the center.

If, instead, it sounds muffled, meaning that it sounds like a thick blanket is covering the speakers, the most likely problem is that the highs and upper mids need to be boosted a bit. To fix this problem, all you have to do is increase the High-frequency knob clockwise, less than 1/4 turn from the center. Then, increase the Mid-frequency knob clockwise about 1/8 of a turn from the center.

Listen to the guitar as it comes out of the loudspeaker and make minor adjustments according to what is needed to make it sound as balanced and transparent as possible.

If the guitar sounds dull or dark, the EQ is weak at high frequencies. Try increasing the highs a bit more.

If your guitar’s sound is not cutting through the mix, meaning that it’s not punchy, increase the mid-frequency knob until the guitar is easy to hear with detail in the music. You might also have to increase the volume or gain a bit if the guitar still doesn’t cut through the mix.

How to EQ Acoustic Guitars Live Using a Four-Knob EQ Analog Mixer

Most professional analog mixing consoles have four or more EQ knobs to give you more control over the equalization.

If your analog mixer has four knobs for the EQ, the second one under the high-frequency knob is a frequency selector. With that knob, you can select the frequency you want to adjust, then use the third knob down to increase or decrease the gain on that frequency. That way, you have more control over selecting which frequencies to EQ.

When EQing acoustic guitars, the first thing to do, as mentioned previously, is to activate the high pass filter to avoid problematic low frequencies and their harmonics.

Then, start by setting the HF (high-frequency) knob to the middle “0.” Make sure that the second knob down is also set to the center. Increase the third knob to about 50%. Set the fourth knob to 1/4  turn counterclockwise from the center.

At this point, you have a somewhat balanced EQ, but it might need some adjustment to make it sound better.

Ask the guitarist to start playing, and as you hear the sound coming out of the loudspeaker, slowly sweep the frequency selector knob (second knob from top to bottom) between the 250Hz and 2000Hz range. You want to pay special attention to this range because the warmness and fullness of the guitar’s sound is this range. The sound you are looking for is vibrant and full.

A good way to describe the sound you want to hear is that it has a sense of warmth and fullness and the notes sound authoritative with a sense of life about them. You want to achieve a well-balanced tone that blends with the rest of the instruments.

Take into consideration all of the tips mentioned previously and adjust the knobs until you have found a sweet spot that you like.

EQ Settings for Acoustic Guitars Using a Six Knob Analog Mixer Equalizer

The ideal analog mixer would have at least six knobs for the EQ. That way, you have more precise control over the frequencies you want to equalize.

With a six-knob EQ, the first one from top to bottom is for the high frequencies. The second one is the high-mids frequency selector. The third knob controls the high-mid frequency gain.

The fourth knob from top to bottom is the low-mids frequency selector, with the fifth knob being the gain control for the low-mids. The sixth knob is responsible for controlling the gain for the low frequencies.

As mentioned previously, the first step in your EQ setup is to activate the high pass filter to avoid unnecessary low frequencies that can dirty up the sound of your acoustic guitar.

Next, start by setting the HF knob to the middle; that way, you keep the brightness neutral so that the guitar doesn’t sound harsh. If later, after setting up the rest of the EQ, it sounds dull or dark, come back to the high-frequency knob and increase it 1/4 turn clockwise from the center to add more “air” or brightness to the sound

Next, set the second knob (high-mids frequency selector) to the center. Then, set the third knob (high-mids gain) to about 40%. You can increase the second and third knobs (from top to bottom) if you want to add more transparency to the sound. But don’t go overboard because it can end up sounding hard, making your audience feel uncomfortable due to the aggressiveness of the frequencies in this range.

The fourth EQ knob (low and upper-mids frequency selector) is responsible for the warmness and fullness of the guitar’s sound. Here we are dealing with the frequencies between 200Hz and 3000kHz.

Set the fifth knob to the center and slowly sweep the fourth knob (low and upper-mids frequency selector). Listen to how the guitar’s sound changes and stop sweeping the frequency selector when it sounds pleasantly spacious, with adequate reverberation at the upper mid frequencies.

Set the low-frequency knob to the middle “0” (twelve o’clock position).

I recommend keeping the EQ as flat as possible as long as it sounds good. If the acoustic guitar sounds tinny, boomy, or thin, try sweeping the upper-mids frequency selector until you find the offending frequency and use the boost/cut knob (fifth knob from top to bottom) to increase to boost or cut accordingly.

Get Gigging

To wrap it up, onboard EQ can be perfect for on-the-fly adjustments and getting a steady sound from your acoustic guitar. But they’re no substitute for a full mix on your PA.

Use both mixing methods together to get the best sound possible. Practice makes perfect, and you’ll find your mixes will get better at every gig, so keep up the hard work and keep on gigging.

How to EQ an Acoustic Guitar for Recording

Equalizing acoustic guitars is not very difficult, but it requires trained ears and knowing a few concepts that will get you the best results.

The problem when setting up the EQ for acoustic guitars is that small changes can make a big difference in the overall sound. And if the changes you make are the wrong ones, you can end up with a thin, weak, lifeless sound that just doesn’t cut it.

Here are a few rules for acoustic guitar EQ settings that will help you get the best sound possible:

  1. Get Rid of Unnecessary Low-End by Using a High a Pass Filter
  2. Cut Out Any Frequencies That Accentuates Excessive Down Strum Thumps
  3. Take Care of the Mid Range EQ – To Get a Full Sound vs. Thin Sound
  4. Add Sparkle and Shine in the High Range – “Boost the Air”

In this article, I will show you how to EQ acoustic guitar for recording. Read on to get the most out of your recordings at home.

Dealing With EQ – The Difference in the Studio Vs. Live Performance

If you’re used to playing live gigs with an acoustic guitar, you’ve probably dabbled with the EQ already. Most pickups in acoustic guitar come with basic three-band EQ controls that allow you to modify the highs, mids, and lows. But, when we’re working in a studio setting, you have to go deeper than that.

You’ll need to figure out which specific frequencies are causing issues with your sound and pull them down. On the other hand, you may need to boost different frequencies to get more body or sparkle.

When working on EQ in a studio, you need to either boost or cut frequencies depending on the tone you want to achieve. And in most cases, you don’t need to deal with specific frequencies but rather a range of frequencies that are an integral part of the Highs, Mids, and Lows.

On the other hand, when equalizing an acoustic guitar for live performance, your priority is to make the sound balanced and natural while avoiding feedback.

Remember that when dealing with live sound, in many cases, you need to ring out specific frequencies that can cause feedback, so your job is to avoid losing the fullness of the guitar’s sound while avoiding feedback.

If that sounds a little terrifying, don’t worry. We’ll make what you have to do clear in the following sections of this article.

A Few Things to Consider Before Setting Up Your EQ

Yes, this article is about the best EQ settings for acoustic guitar, but there’s no point trying to get a lousy take to sound good. It just won’t work no matter how many filters, effects, and EQ settings you change. So, you need to set up everything right in the first place.

Here are a few tips you can follow for getting the best raw, natural sound from your acoustic guitar before setting up the EQ for recording:

  • Make sure you use the correct microphone placement
  • Try different miking techniques using mono or stereo XY configuration until you figure out which works best for you and your guitar.
  • If you’re using the built-in pickup, try one take with the onboard EQ set to neutral and one set to how you usually play in a live setting. You can use both to play around when editing in the post-mix to see what sounds better.
  • Use open to air mics and a piezo pickup at the same time. Record each on a separate track on your DAW because having the best of both worlds never hurt anybody. You can blend the two or just pick your favorite to work with afterward.
  • Practice Until you get it right. EQ can’t be a solution for bad playing. Many professional studios get session musicians to replay parts after the artist leaves. This may not be a luxury you have in your home studio.

Now that we know the basics of getting the best sound from the source let’s dive into how to EQ acoustic guitars when recording in the studio.

1. Get Rid of Unnecessary Low-End by Using a High Pass Filter

Most mixers, even budget-friendly ones, come with a high pass filter. If recording straight to your DAW without going through a mixing console, a high pass filter plugin is usually included in most DAWs. If yours doesn’t have one, there are plenty of free options available for download that do a fine job filtering out unwanted low frequencies.

The purpose of a high pass filter is to cut out any frequencies below a certain point in a recording. The lowest frequency an acoustic guitar in standard tuning creates is around 80Hz. So, anything below 80Hz when setting up your guitar’s EQ should be cut out because it is likely to develop a low-end rumble.

All kinds of things can create sounds below 80Hz when you’re recording. Some examples are air conditioner hum, booming from an unreliable mic or pickup, or rumble inside the guitar itself, which you will want to cut out.

Also, if your acoustic guitar recording exists inside of a band mix, feel free to roll the high pass filter up higher than 80Hz. Other instruments create a more pleasing ambiance with their overtones in that range than acoustic guitars do. You’ll want to give them space in that frequency range so they shine in the mix.

At the very least, you should set the filter to cut out from around 50hz and below. You may not notice much of a difference while listening back on your headphones, but this is a sure-fire way to avoid any issues when listening back to the track later on a system with subwoofers.

2. Cut Out Any Frequencies That Accentuates Excessive Down Strum Thumps

When guitarists are strumming, there is often a push in specific frequencies around 150Hz. That’s not necessarily a bad thing for live performances, nor do you want to remove it from the mix entirely because by doing so, you could get rid of the warmness of the guitar sound.

But, it’s a fantastic idea to soften the impact of the affected frequencies.

You’ll probably notice a spike on the overall track that will make it easy to identify exactly where this is happening. Once you find the spot, listen to it and the surrounding few seconds with the fader of your EQ plugin up and active.

You should see which frequencies spike for that small part of the track. All you have to do is pull each of those frequencies down a little until you get a desirable even tone.

Most likely, this thumping sound will be visible in the EQ plugin between 125Hz and 175Hz, being 150Hz the most likely target.

If you’re having trouble hearing the frequency while looking at the frequency spectrum analyzer, give those frequencies a boost first. This will allow your ear to hone in on the frequency before lowering them to a more neutral position.

You usually only have to do this once and then apply that EQ to the whole track, but sometimes the thumping can be in a slightly different range if the guitarist moves their strumming hand positioning during the recording. So keep that in mind while you analyze the track.

Now, if the guitar is going through a mixer before going through the DAW, you might want to sweep the frequencies between 125Hz and 175Hz until you find the problematic one and slightly lower the level to avoid spikes on the track in the first place.

3. Take Care of the Mid Range EQ To Get a Full Sound Instead of a Thin Sound

If you have a recording that already sounds good right off the bat, you may still have to do a bit of EQ in the lower mid-range frequencies between 250Hz and 2000Hz. You want to pay special attention to this range because the warmness and fullness of the guitar’s sound is here.

Also, by correctly equalizing the mid frequencies on the acoustic guitar will help to clean up the mix, leaving some space for other instruments or vocals as well.

A good rule of thumb is to carefully reduce the 320Hz, 640Hz, and 1.2kHz ranges, as these are positions in which many acoustic guitars give excessive resonance from their fundamental frequencies.

These are also octaves of each other, so if you cut down one, you generally won’t have much to worry about by bringing them all down.

We should mention that this is just an overarching rule that doesn’t apply to every guitar. You may have to play around to figure out the best mid-range acoustic guitar eq settings for your particular instrument.

If your acoustic guitar sounds thin or tinny when EQing, you’ll have to approach the EQ differently. In this case, you’ll want to cut down on the Upper Mids between 3kHz-8kHz, while boosting the lower mids between 250Hz-2000Hz and the bass frequencies around 80Hz-200Hz.

Making those changes will give you more warmth and help avoid disruptive overtones shining through the overall mix from the guitar.

In general, the mid frequencies are often overemphasized in acoustic guitar recordings, so it’s imperative to give them at least a small cut to allow space for the highs and lows to come through more in your track.

4. Add Sparkle and Shine in the High Range – “Boost the Air”

Your basic acoustic guitar EQ settings are all but complete by this time. The track should sound pretty decent. Yet, if you want to add more presence to emphasize the guitar’s clarity and give it a sense of openness, airy and spacious, there’s a simple solution for this.

You just have to boost the frequencies that interact with the strumming noise. For acoustic guitars, this is usually around the 5kHz to 8kHz range. Again, this won’t be the same for every recording or every type of guitar, so you’ll have to take it as it comes and figure out exactly where it is for yourself.

To help you figure out what would work for your specific guitar, try making some changes in the 5kHz to 8kHz range until you hear that it sounds more spacious and open.

Rinse and Repeat

Just like any other part of sound design, you’ll have to practice over and over again to get it right. That includes each individual track.

I’d recommend you save your first EQ edit in a separate folder, take and break, then start from scratch a second time.

Once you’ve finished the second attempt, compare and contrast what you’ve done. Which sounds better? What did you do differently? Could you take ideas from both and make a third mix even better? Remember that practice makes perfect.

Moving Forward with Your Learning

Now that you know the basics of how to eq acoustic guitar for recording, you’ll need to learn more about EQ as a whole, how instruments interact with each other, and tackling live sound. Lucky for you, we have plenty of articles covering these topics, such as:

  • How to EQ Live Sound
  • Sound Gear and Setup for a Live Band
  • Live Sound Tips for Beginners
  • Recording Live Sound at a Concert

How to Mic an Acoustic Guitar – Acoustic Guitar Mic Placement

Even the most outstanding performers attest that acoustic guitar mic placement can be pretty tricky. As an acoustic guitarist, you will eventually encounter the challenge of miking up your guitar.

Whether in a studio recording or live performance, there will come a time to mike up, even if you have a pickup. You can get a much fuller and more natural sound from a miked-up guitar, especially when compared to a piezo pickup.

Read on to learn how to mic an acoustic guitar in a studio setting or live performance.

Acoustic Guitar Miking Techniques for Studio Recording

Although miking in both studio and live performances use similar techniques, studio recordings are easier. The acoustic guitar mic placement is primarily constant, and the room is much smaller and quieter.

Here are a few essential factors you need to consider when miking an acoustic guitar in a recording studio:

The Guitar

First and foremost, you will need a quality acoustic guitar that will guarantee a fantastic sound.

This is not to say that you must have the best guitar at hand, but you genuinely have to manage your expectations. When content with the sound your guitar gives, you can set up your mic.

Also, ensure that the guitar is well-tuned. If you use one that has not been tuned well, it is pointless to record. New strings will always help you get a better sound, but break them in first.

The Room

This may come as a surprise to many, but the sound and shape of the room affect your recording.

Rooms in which most surfaces are hard, like a bathroom, reflect most of the sound, thus producing a sound that has quite a bit of character but is harder to control.

On the other hand, rooms with furniture will have much of the sound absorbed by the fabric and give a much tighter sounding recording.

Ensure that the studio has had effective acoustic treatment before recording. That doesn’t mean that you need to go out and spend a lot of money to treat the room. You can even make your own acoustic panels for very cheap.

The Microphone

You need to get the right tools if you want a job done well. This is no different when it comes to demystifying guitar miking techniques.

When you shop around for studio microphones, you’ll find that there are mics that cost $100 while there are other professional-grade mics that cost thousands of dollars. And the sound each type captures will be different.

However, if you’re a beginner starting your recording journey, something like the AKG C214  or the Audio-Technica AT4041 would deliver excellent results without breaking the bank.

You would want to get a cardioid mic that picks up sound from the front while rejecting it from the back. In so doing, you will decrease noise and limit the impact of lousy room acoustics.

Keep in mind that if you choose condenser microphones, they will require phantom power, which is usually provided by the mixer, preamp, or audio interface. So make sure that the mic you plan to use is compatible with the rest of your equipment.

When it comes to choosing the correct mics for acoustic guitars, it is crucial to find the right balance of microphones for capturing the sound.

Combining a large and small diaphragm microphone is a good practice to ensure that you capture the full body sound.

With the large-diaphragm mic, you’ll pick up low and mid-frequency ranges while picking up the sound’s detail and brightness with the small diaphragm mic.

Remember that your job when miking acoustic sounds is to capture the original sound without any coloration. Doing this will ensure that you get a more balanced and accurate recording, keeping the original sound intact.

Microphone Placement

The debate as to whether to use one microphone (mono miking) or more (stereo); and where and how exactly they should be placed in a recording room has been on for ages.

You may wonder if you should put the microphone on your shoulder, on the floor, or even at a higher level to achieve the best results.

There is also the issue of how the mic placement may affect the recording of the different types of acoustic guitars. We will touch on this issue later in the article.

Mono Miking an Acoustic Guitar

Depending on the Type of Acoustic Guitar

The general rule of thumb for acoustic guitar mic placement is that each acoustic guitar type sounds different with different mic placements.

For instance, a dreadnought guitar throws more sound than a classical 00 size guitar, so the mic usually needs to be placed a little further away or higher for the latter.

To make this easier for you, keep the microphone at a constant spot, test it, then keep moving until you get the desired recording for that particular guitar.

Depending on the Type of Microphone

One vital thing to note when learning acoustic guitar mic placement is that some microphones are directional, focusing all the energy from the soundwaves through a mic diaphragm.

These mics pick up sound from only one direction. Therefore, depending on its position relative to the player, some sound characteristics may be inhibited or change the tone.

When using directional microphones such as the AKG C451B and the Neumann KM184, getting the guitar closer to the mic will produce a more bassy sound characterized by its fullness. On the other hand, moving the guitar further away from the mic would capture a thinner sound emphasizing the mid and high frequencies.

Listen through a pair of professional headphones as you play to monitor the sound, and moving around until you get the right spot will come in handy to help you get the tone you want.

Mic Placement Best Practices

Regardless of the mic or guitar type you use, one crucial thing to ensure is that you do not, under any circumstance, position the mic directly in front of the soundhole.

Doing this will make the guitar sound boomy, meaning that it will have an excessive bass sound around 125 HZ. In some cases, it could also sound bloated at 250 Hz, increasing the low-frequency resonances.

Therefore, keep the microphone at a reasonable distance from the guitar soundhole to avoid these issues.

A good rule of thumb when miking an acoustic guitar used by most sound engineers is to place the mic between 12 to 16 inches and away from the 12th fret. The resulting sound will be balanced at the mid and low-frequency ranges with enough clarity at the high-end, capturing the instrument’s true tone.

The section between the soundhole and the neck is where the sound waves are more balanced, providing a more intelligible sound when picked up by a mic.

If you’d prefer a slightly heavier sound on the low frequencies but still sounds balanced, you can place the microphone above the soundhole (12″ to 16″) or slightly behind and below the bridge.

With this mic placement position, the captured sound will have strong fundamental frequencies relative to its harmonics, providing a fuller sound without being boomy.

To obtain a crisp midrange with lower bass response, place the microphone behind and below the bridge, aimed towards your hand. But keep in mind that miking an acoustic guitar using this mic position will also capture more finger and pick sounds, which could be the style you are going for. Think old Cat Steven recordings for this position.

Stereo Guitar Miking Techniques

Most mics for acoustic guitars are condenser mics because of their superior sensitivity. Condensers work great in the studio, but when miking an acoustic guitar for live performance, dynamic mics like the Shure SM57 deliver excellent sound while reducing the chance of feedback.

To find your preferred acoustic guitar mic placement, you can experiment with several condenser mic sizes and dynamic mics.

When recording at the studio, you can try using small and large-diaphragm condenser mics because each type will produce a different sound texture. To get the sound you want, you might want to mix and match different kinds of mics and try different positions until you find the tone you want.

For instance, you can try using a large-diaphragm condenser mic with a dynamic one or use two small-diaphragm condensers. At the end of the day, nothing beats experimentation.

If you want a stereo sound when miking acoustic guitars, one of the best methods you can leverage is using the XY approach and panning each mic to the left and right according to the amount of stereo separation you want.

Another advantage of the XY mic placement approach is that you can EQ the signal from each microphone differently. That way, you have more alternatives for mixing your track in the DAW.

To make it easier to line up your mics in the XY method, use a stereo array spacing bar like the Rode S20 or the Gator Frameworks. You could also use two separate mic stands to have a wider stereo separation between the two mics.

If you feel extra adventurous, add a third (Z) microphone to the mix. Just be careful to line them up appropriately.

Guitar Miking Techniques for Live Performances

You cannot claim to know how to mic an acoustic guitar if you don’t learn guitar miking techniques for a live performance. Yet, the basic principles are much the same as for studio performances.

The type of guitar and microphones are all considered as in the studio. However, the difference now is that the room in live performances is much bigger, noisy, and may even be outside! So, in this case, how do you deal with the unpredictability of your sound?

You would be forced to consider a shock mount, different microphone combinations, and of course, mic placement.

Shock Mounts

A shock mount is a device that secures a microphone while isolating it from the stand or boom to which it is attached. This isolator shields the microphone from shock (mechanically transmitted noise) and secures it to its frame or boom arm.

You may need to consider getting one to achieve a much cleaner sound. Many studio setups use these too, but they become crucial for live performances with certain mics to stop huge pops in the PA if someone knocks the stand by accident. This can easily damage the speakers.

The Type of Microphone

Consider a small-condenser microphone with a hyper-cardioid pattern or a cardioid one, as it would likely reject most sounds from the sides and the back of the mic. It would also be more sensitive and would respond better to frequency.

This is the opposite of what you want in a studio setup. There’s usually too much noise in a live setup to use a large-diaphragm mic.

However, if there’s more external noise from the audience or other musicians on stage, consider using a dynamic mic like the Shure SM57 or a ribbon mic such as the Beyerdynamic M 160 which will deliver a warm, balanced classic sound.

Although the SM57 is considered a classic vocal mic, it shares many audio characteristics with some of the best dynamic guitar mics, and you’re likely to have one lying around.

The Mic Placement

A 98% effective way to make the guitar sound better is to have the mic pointing midway between the soundhole and the neck.

This was for the same reason mentioned earlier. Miking the guitar’s soundhole would most likely add a lot of unwanted low end, which is difficult to remove with EQ.

However, when miking acoustic guitars in live environments, it is a good miking technique to place it as close to the guitar as possible to avoid ambient noise (e.g., other instruments or audience noise) but never precisely in front of the soundhole. Just move the mic’s position slightly to the left or right to avoid excessive low ends.

If you need to move around the stage, try your best to keep a constant distance between the guitar and the mic to get a consistent sound for your audience.

Start Miking

All-in-all, for you to confidently know how to mic an acoustic guitar, you will need to practice acoustic guitar mic placement both in a studio and live performance setting. In both cases, remember that the type of mic and guitar can also contribute to the quality of sound you get.

How to Connect Speakers to an Amplifier – Everything you Need To know

Setting up amplifiers and speakers for a PA or entertainment system can be tricky. And if done incorrectly, it can damage the speakers, amplifier, or both.

If you are new to setting up sound systems, you can easily get lost trying to navigate through the different cables, connectors, and concepts you need to know when researching how to connect speakers to an amplifier. 

Of course, you can consult a professional if you get completely stuck. But before you get there, read on to learn everything you need to know about how to connect speakers to an amplifier efficiently and effectively.

Concepts You Need to Know Before Connecting Speakers to an Amplifier

Setting up speakers and amplifiers in more than just physically connecting cables between them. There is preparation that goes before making the connection.

For instance, you need to choose a suitable amplifier for your speakers by matching the amp’s and speaker’s wattage and impedance.

If these concepts are new to you, don’t worry; here, we explain what you need to know in an easy-to-understand way so that it makes sense. You need to learn a few details to help you understand the hows and whys for connecting up your amp to speakers.

Determining the Power Handling Capability of the Loudspeakers

When dealing with speakers there are several specifications you need to take into consideration and power rating or wattage is one of them. The power rating spec is measured in watts and you’ll find it on a label attached to the magnet. Some examples are 1000W, 800W Peak, 350 RMS, etc.

The speaker’s power rating or wattage is the total continuous power that can be dissipated by the coil inside the magnet in the form of heat without burning out.

You need to be careful because some manufacturers use the peak power that the speaker can handle for only a few seconds as an advertisement hook to mislead the buyer into thinking that the number written in the label refers to the continuous power the speaker can handle. You need to look for the continuous, or root mean square (RMS) value which is the real amount of power the speaker can handle continuously without being damaged.

Power ratings generally relate to voltage, current, and resistance or impedance. If you want to learn more about speaker wattage and power handling, I have written an article that explains it in more detail. Click the link to check it out.

Determining the Impedance of the Loudspeakers

Before we continue, let’s clarify what is impedance when dealing with speakers and amplifiers. To put it in the simplest terms possible, impedance is the resistance that the speaker presents to the amplifier. Impedance is denoted by Ohms and the Ω sign.

When connecting a loudspeaker to an amplifier you need to make sure that the impedances match or you can run into problems such as the amplifier overheating or speakers coils being damaged.

A lower speaker impedance means that there will be more power flowing from the amplifier. In contrast, a higher impedance speaker will have less power flowing from the amplifier.

To give you an example with numbers consider two speakers, one is 4Ω the other is 8Ω. The 4Ω speaker will draw more current than the 8Ω speaker when using the same amplifier. Meaning that the 4Ω will consume more power than the 8Ω will.

This is why when you check an amplifier’s specs you will see information such as Watts @ 8 ohms: 450W, Watts @ 4 ohms: 650W, Watts @ 2 ohms: 1200W. As you can see as the impedance of the speaker decreases, the power draw increases.

Matching the Speaker’s Input and Amplifier’s Output Power

A common mistake people make when matching the speaker’s power handling and the amplifier’s power output is to assume that the loudspeaker’s wattage needs to be greater than the amp’s power output. This cannot be further from the truth.

For an audio amplifier to work correctly, it needs to have enough headroom. When I say headroom I mean that it needs to run at no more than 80% of its maximum power delivery capabilities.

The reason is that when an amp is overdriven beyond its maximum capabilities, it will clip, when it clips parts of the waveform act like it they were a DC power source which can easily damage the coils of a loudspeaker.

A good rule of thumb is to choose an amplifier that delivers at least the same amount of power as the RMS or continuous (program) power that the speaker can handle. A better practice is to choose an amplifier that is twice the RMS or continuous power because that way, you will have more headroom to avoid clipping territory.

TIP: Please keep in mind you can also connect a speaker with low power handling to an amplifier that delivers a higher output as long as you keep the output power from the amp controlled to a point where it delivers a maximum of twice the RMS or continuous power of what the speaker can handle.

I have written an article explaining in more detail everything you need to know about matching the right amplifier to the speaker’s wattage and impedance. Click the link to check it out.

Handy Chart for Recommended Amplifier Power for Speakers

Speaker RMS Power RatingMinimum Recommended Amplifier Power (RMS) Ideal Recommended Amplifier Power (RMS)
50 Watts50 Watts100 Watts
100 Watts100 Watts200 Watts
200 Watts200 Watts400 Watts
300 Watts300 Watts600 Watts
500 Watts500 Watts1000 Watts
1000 Watts1000 Watts2000 Watts

Power the Amplifier Will Deliver into the Loudspeaker – Based on the Speaker’s Impedance

As mentioned previously, matching impedances between the speakers and amplifiers is crucial for the correct operation of the audio system.

Depending on the speakers’ impedance, the amplifier will deliver more or less power to achieve the same sound pressure level (SPL).

In case you didn’t know, Sound Pressure Level (SPL) is the measure used to determine the loudness of a speaker.

This is why the loudness of a sound system should never be deduced from the amount of power a speaker can handle or the power an amp can deliver. Loudness is an entirely different story.

To put it in simple terms, an amplifier connected to a low impedance speaker (4 Ohms or 2 Ohms) needs to put out a higher current, that’s why lower impedance speakers are harder to drive and consume more power.

The same amplifier connected to a higher impedance speaker (8 Ohms or 16 Ohms) puts out less current to drive the speaker.

So, when passing a signal from the amp to the speaker, you want your impedance numbers to match as closely as possible.

For optimum power transfer when you connect speakers to an amplifier, the amplifier’s impedance should be equivalent to the total impedance of the speaker elements.

This is why it is always a good idea to check the manufacturer specifications for both the speaker and the amp to know exactly what your system’s limitations are.

Steps For Connecting Speakers to an Amplifier

  1. Before making any connection, turn off your amplifier. This will prevent loud clicks, pops, thumps, etc., that might cause damage to your speakers as you make the connection or produce unpleasant noise.
  2. Make sure you have the right cables and cable connectors.
  3. For the best operation and protection of your gear, ensure you match the impedance of your speakers in your amplifier.
  4. Consider the mode of the amplifier and connect appropriately as per the equipment’s user manual.
  5. Connect the cables to the amplifier and speaker; make sure you connect the correct polarity from the speaker to the amp when using the various connectors.
  6. Lastly, the final step is to turn on the power amp and slowly raise the gain.

How to Set Up Amplifier and Speakers’ Cables for Home Systems 

Most home audio systems come with everything you need to make the installation. In case they don’t you would have to get the speaker wires to make the connection between the speaker and the amplifier.

Most brands use standard plugs or connectors to make a connection between the amp and the speaker. In some cases, high-end brands such as Bose, use proprietary connectors on the amp and speakers side.

For easy and quick setup, most speaker wires are color-coded. Red is positive and black in the negative. Sometimes, the positive wire has a single stripe, dashed lines marker, or a printed label. 

Before inserting the wires into your speaker, strip them first to expose the copper strands. Next, twist the strands tightly so that no strand is left by itself. You have to make sure all strands become one single wire before inserting it into the speaker or amp.

The last thing you want is a strand shorting between the positive and negative because it can damage your amp.

The cables do not need any special shield, as the signal from the amplifier to the speaker is still low and cannot be tapped. However, you can consider different gauges of wire cable.

The higher the power the cable will carry and the longer the cable will run, you need to consider a heavier gauge. Typically, this is between 10 and 14 gauge.

For easy connection to your speakers, some speaker wires have special connectors. The following are the types of connectors available:

  1. Spade connectors (Mostly used insede the speaker cabinet)
  2. Pin connector
  3. Banana plugs
  4. Push Connectors

When it comes to speaker terminals, spade connectors and banana plugs are used for binding post terminals, while pin connectors are used for spring clip terminals. You can separately buy these connectors and install them on bare speaker wires.

Speaker Wires/Cables for Live Music, Live Sound, and Audio Recording

Usually, PA systems will use Speakon connectors or ¼” Jacks to connect amps to speakers. This is due to the movable nature of PA systems. It doesn’t make sense to connect with stripped wires. 

This often makes connections as simple as plugging the L channel into the left front-of-house speaker, R Aux into the right foldback, etc.

Before you buy an amplifier, check the connection type of your speakers. You can always purchase adapters or mixed connection cables, but it’s more convenient to have matching inputs and outputs.

If you are lucky, your home system will also use these types of connections or RCA leads to make life easier.

Connecting Multiple Speakers to an Amplifier

You can’t just plug in as many speakers as you’d like your amp. There are a few considerations to make first.

Calculate the Combined Impedance of the Loudspeakers You Want to Connect.

Remember, amplifier channel combinations vary. They can have:

  • A single mono channel
  • Two channels, known as stereo 
  • Even more channels (the output of each of the extra channels could also be mono or stereo themselves)

When calculating speaker impedance, you need to consider each channel. In the end, the left and right channels on a stereo amp become independent.

Calculating total speaker impedance is similar to calculating total resistance in an electrical circuit, as you will learn below.

Series Connection

If you connect your speakers in series, you need to add each speaker’s impedance. The total is the overall impedance. 

For example, if you have two speakers with an impedance of 4Ω each, the total is 8Ω. The speakers would work well if you have an amp with an 8Ω output impedance.

Parallel Connection

In parallel, the impedance calculation is different. The total impedance reduces as you continue adding more speakers to the circuit. 

If we used the speakers in the previous example and reconnected them in parallel, the total impedance would be 2Ω instead of 8Ω. In such a case, you need to be extra careful when connecting speakers in parallel because the impedance can be too low for the amp.

All in all, ensure that when connecting speakers to an amplifier, the total speaker impedance is not be lower than the amp’s output impedance. It can be slightly higher, but you will struggle to get your ideal volume then.

Reference Chart for Parallel Speaker Impedance Matching

Number of Speakers Connected in ParallelRated Impedance of Each SpeakerTotal Impedance as Seen by the Amplifier
24 Ohms2 Ohms
28 Ohms4 Ohms
216 Ohms8 Ohms
34 Ohms1.33 Ohms
38 Ohms2.67 Ohms
316 Ohms5.33 Ohms
44 Ohms1 Ohm
48 Ohms2 Ohms
416 Ohms4 Ohms

Operating Modes of Power Amplifiers – Stereo, Parallel, Bridge Mono

There are three main ways power amps connect to speakers. These are stereo, parallel, and bridged modes. Let’s take a closer look at them.

Stereo Operation

Most modern amplifiers are Stereo meaning that they have left and right channels powered independently. You can consider each amp channel to be a separate amp, combined into a single package to make one amp. 

Being that both channels are independent of each other, in some cases and depending on the amp, you could run different loudspeaker configurations with different impedances and power outputs simultaneously. 

When working with a stereo amplifier, you will have two inputs at the back where you can connect the signal coming from the mixer or speaker management system. They are usually labeled “Channel 1, ” “Channel 2,” or “Left” and “Right.”

Then, each output from the amplifier connects into two speakers (left and right) facing the audience, or to monitors on stage, if it’s through the AUX channel. 

Often the mixer will allow separate mixes for the L and R channels, allowing the sound engineer to create a unique stereo sound.

Parallel Operation

In parallel operation, the same signal is fed through both the L and R channels. When using an amp in parallel mode, you are basically feeding a mono signal two both channels.

An example of using an amp in parallel mode is when you have a mixer that has only one output (mono signal mixer) and you want to connect it to a stereo amplifier.

In such a case, you would use a “Y” splitter cable to receive the mono signal from the mixer and split it into two to send the same signal to both channels on the amp.

Bridged Mono Operation

The idea behind the bridged mono mode in amplifiers is to make a more powerful amp by combining a two-channel amp into one. This configuration is usually used for powering subwoofers as they require lots of power to work, especially when using large 18″ subs. 

The way bridged amps work is by taking the input signal and splitting it into two identical signals. Then internal circuitry takes one of the split signals and reverses its polarity. Next, the original signal is fed to one channel amp, and the inverted signal is fed to the other channel amp.

When connecting a speaker to a bridged amp, the cables are connected across the two positive leads. This is why you have to make sure to enable bridged mode on the amp before attempting to connect anything by activating the dip switches located on the back of the amplifier. 

Amps vary, so you might need to look up your manual for exact details of your amp’s requirements.

Daisy-Chaining Power Amplifiers

Let’s say that you want to connect a mixing console to four separate amplifiers. In other words, you want to daisy chain several amplifiers together using the same audio signal coming from the mixer. How would you do that?

There are two approaches you can use to achieve this. The first method uses different outputs from your mixer to connect to each amplifier. The second method is to daisy chain the amps themselves using their buffered unused input connectors.

Some mixers have two main outputs, one using XLR and one using TRS connectors. You could use the XLR outputs to connect to one amp and the TRS to connect to the other amplifier.

This method is somewhat limited, and it depends on the type of amplifier you have. If your amp only has one input per channel and doesn’t offer buffered extra inputs, this is the only method you have to use.

The second approach is to daisy chain the amps themselves. If you look at the input for each channel in the back, you’ll notice that most modern amplifiers have XLR inputs as well as TRS and, in some cases, even RCA inputs.

These are all connected internally using a buffer circuit. The unused inputs can also be used as outputs to the next amplifier. You will need an XLR to TRS adapter cable to make the connection.

Next, connect the TRS to any unused input on the first amp channel and then use the XLR male to connect to the following amplifier and so on until you have daisy-chained all the amplifiers you need.

You don’t have to worry about impedance mismatches because these inputs are buffered.

You can also read more on daisy-chaining active speakers here.

Setting the Correct Gain Control or Input Sensitivity on Amplifiers

If you correctly set the gain on your amplifier, you are assured of quality sound from your speakers. The gain control adjusts how much you have to increase the volume on the source to reach the amplifier’s full power.

The key is finding the right balance for your speaker. If you set the gain too high, you will introduce distortion into the sound. Whereas if you put it too low, then you’re defeating the amp’s purpose in the first place.

Even though manufacturers make amps with different designs and have specific instructions for using them, a general technique works well with any amplifier.

Here is what you need to do to set the correct gain control or input sensitivity on an amplifier:

  1. The first step is to turn the amp’s gain entirely down.
  2. Input some audio signal and play the loudest part of the track or performance.
  3. Then increase the gain (volume) until you see that the amplifier will start clipping or distort the signal.
  4. Next, reduce the volume until the distortion disappears, and make sure to allow enough room for the loudest part of the performance or track you want. 

Every audio signal should now be clear. The system should be more forgiving of some extra hard hits from a drummer or an inexperienced singer not backing off the mic enough for big notes.

What Next?

Now that you have learned how to connect speakers to an amplifier, can you set up a connection by yourself? We hope you can, but if not, feel free to ask through our contact page.

You could also check out some of our other articles dedicated to setting up music gear, by visiting the home page.

  • « Go to Previous Page
  • Page 1
  • Page 2
  • Page 3
  • Page 4
  • Page 5
  • Interim pages omitted …
  • Page 12
  • Go to Next Page »

Primary Sidebar

Search

Guides & Tutorials

  • Choosing a Portable PA System
  • How to Be a Better Singer
  • Build a Budget Live Streaming System Using PTZ Cameras
  • How to Get the Best Audio Quality on YouYube
  • Setting Up Stage Monitors
  • Mixing Console Basics
  • How to Position PA Speakers
  • Stage Sound System Set-Up
  • How to EQ Live Vocals
  • How to EQ Live Sound
  • Daisy Chain Active Speakers
  • Zoom Audio Settings for Music
  • How to Livestream a Wedding
  • Improve Your Livestream Audio Quality
  • Microphone Preamp Buying Guide

Featured Posts

Treblab X9 Pro: Tough Earbuds, Big Performance

Escape the Noise: Best Affordable Noise-Canceling Headphones

How to Combine Passive and Powered Mixers

What is a Ground Loop? – 5 Simple Ways to Fix the Buzz and Hum

Disclaimer

VirtuosoCentral.com is a participant in the Amazon Services LLC Associates Program, an affiliate advertising program designed to provide a means for sites to earn advertising fees by advertising and linking to Amazon.com.

Home  About  Contact  Disclaimer  Privacy

Copyright © 2019-2025 Virtuoso Central. All Rights Reserved.