This website uses cookies to improve and personalize your visit. Learn more about cookies. Got It

  • Skip to primary navigation
  • Skip to main content
  • Skip to primary sidebar

Virtuoso Central

  • About Us
  • Contact
  • Privacy

Informational

How to EQ Bass Guitar – In 4 Easy Steps, Plus Cheat Sheets

It is a fact that no live band or music record sounds good without bass. So, getting the bass guitar to sound right first will help the other instruments in the band to sit nicely in the mix.

Bass is considered the foundation of any mix, whether it is live or in the studio. But knowing how to EQ bass guitar takes some practice.

The good thing is that once you know which frequencies to cut and which to boost, the process will be straightforward, and your mixes will sound great.

If you want the summarized, quick answer on how to eq a bass guitar, here it is. You have to:

  1. Cut the ultra-low-end frequencies below 40 Hz that muddy up your bass sound using a high pass filter.
  2. Enhance the bass’s fundamental frequencies from 40-400 Hz.
  3. Adjust the Mid-range frequencies between 500-1kHz to add or remove punchiness and growl.
  4. Watch out for the harmonics between 2-4 kHz, as they are necessary to add excitement to the sound.

In this article, I will go through these four steps to get your bass to sound great, which will make your whole mix sound better because the bass is essential in any mix.

Plus, I have included an alternative EQ setup, suggested starting EQ points for analog mixers, and a cheat sheet to get you started in no time. Let’s get started.

Your EQ’s Accuracy Depends on the Mixing Console You Use

Before we continue, it is necessary to understand a few things about audio mixers and how each mixer will affect the accuracy of your equalization (EQ).

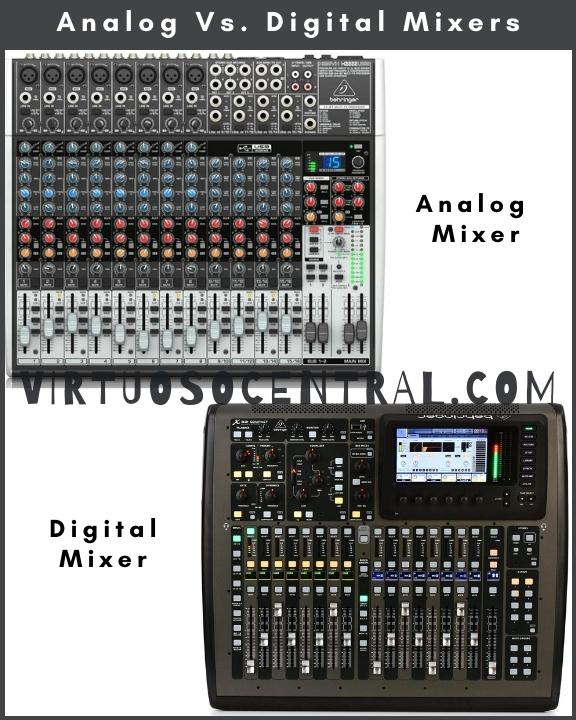
All audio mixers are not created equal. You have analog and digital mixers, and even though they do the same thing, they are entirely different.

Analog Mixers

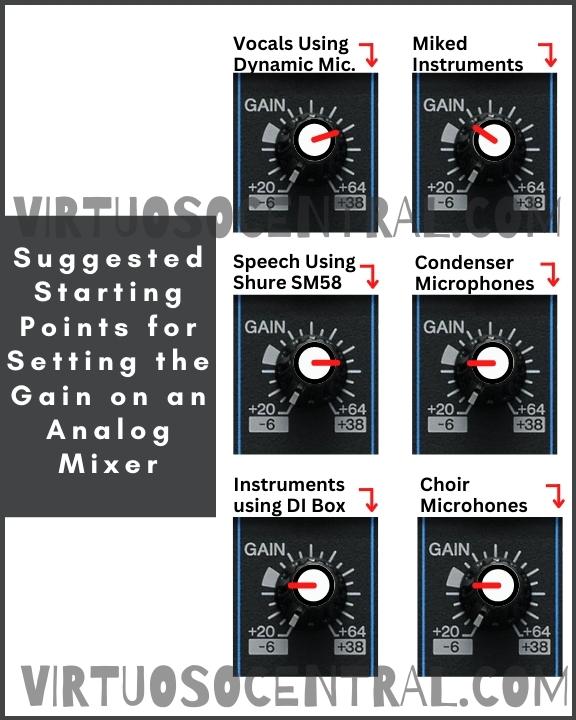
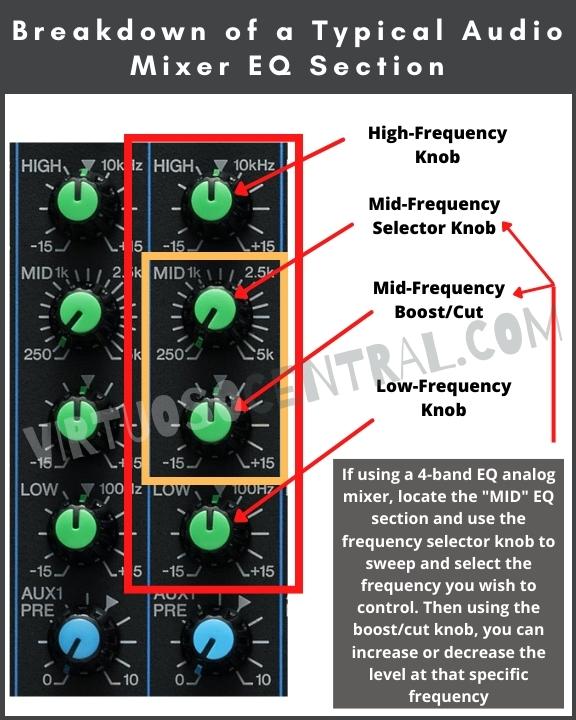
Analog mixers, for example, come with preset cutoff frequencies for the EQ section of each channel strip. This means that you are limited in what you can do when equalizing different sound sources.

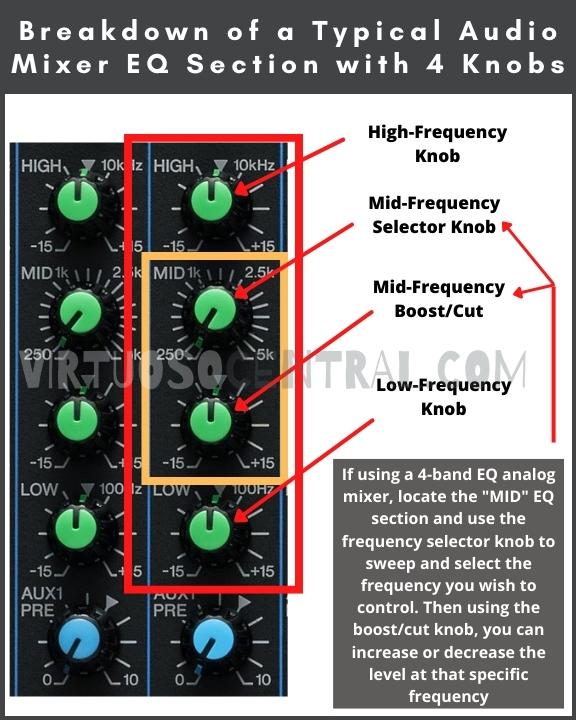
Most commercial analog mixers come with 4-knob EQ sections per channel strip, giving you only one frequency selector to choose a specific Mid frequency to boost or cut. This limits you a lot in what you can do.

To get low-mid and high-mid frequency selectors, you will need a 6-knob EQ mixer. These types of mixers are usually found in recording studios and tend to be older generation and very big and bulky.

Preset Filters Found in Analog Mixers

Analog mixers use shelving filters for the High-end and Low-end EQ knobs and a peak filter, also known as a bell curve filter, for the Mid frequencies.

Each filter comes with preset cut-off frequencies. The only one that can be changed is the bell curve filter for the mid frequencies because it comes with a frequency selector for choosing the center frequency.

A shelving filter is linear, which boosts or cuts all frequencies above or below a preset cut-off frequency. The preset center frequency can’t be changed because it is set by choosing specific electronic component values when the audio mixer is designed. These components are soldered to the circuit board inside the mixer.

A peaking filter attenuates or boosts frequencies around a specified center frequency point. This filter on an analog mixer also comes with preset cut-off frequencies, but in this case, you have more options to choose from, as the manufacturer included a frequency selector knob you can use to set your cut-off frequency.

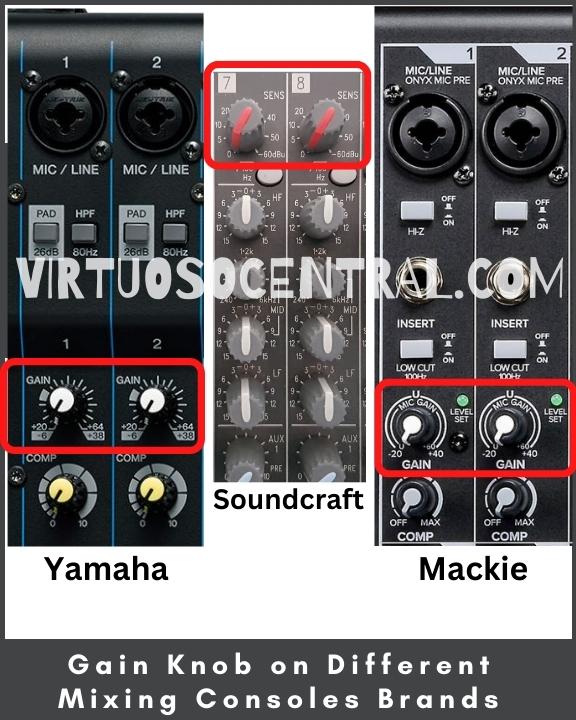
In this article, I will use the popular Yamaha MG16XU mixer as an example for this explanation and, later in the article, to provide you with the suggested EQ starting points.

For most popular commercial audio mixers, including the Yamaha MG16XU, the cut-off frequency for each frequency range is as follows:

  • HIGH: Cut-Off frequency: 10 kHz shelving
  • MID: Cut-Off frequency: 250 Hz to 5 kHz peaking
  • LOW: Cut-Off frequency: 100 Hz shelving
This image shows the cutoff frequencies of a typical audio mixer eq section with 4 knobs

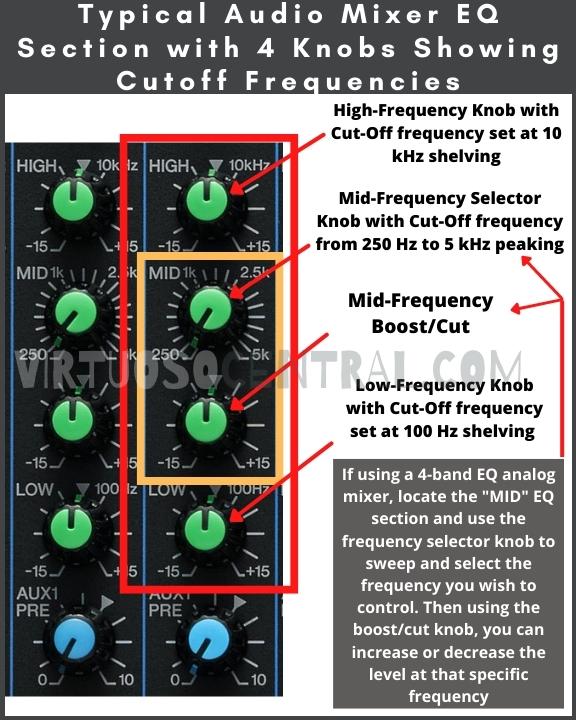
For example, the low-frequency knob has a 100Hz shelving frequency. This means that if you increase the low-frequency knob, you will increase the gain at frequencies above 100Hz but below 250Hz, which is the starting frequency for the Mid-Frequency selector.

So, by increasing the low-frequency knob slightly, you’ll also increase the frequencies between 100-250Hz. So, if you wanted to cut 200Hz, you couldn’t do it accurately.

I know this sounds confusing and could be hard to understand, but with analog mixers, there is no way around this. That’s why digital mixers are more accurate when dealing with EQs.

Digital Mixers

Digital mixers, on the other hand, are more convenient and precise. They usually offer a wide EQ section in the form of menus and submenus that allow you to pinpoint specific frequencies and provide a wide range of filtering options you can use to boost or cut specific frequencies, giving you more control over the EQ process.

A typical digital mixer will offer the following EQ filters: low cut, low shelf, high cut, high shelf, bell curve, band pass, and notch filters.

You can use any combination of these filters to equalize the sound in any of the channels, giving you a great deal of control over the equalization process.

A good starter digital mixer is the Behringer X32, as it’s loaded with all kinds of features to help you get the best mix possible, whether it is for live sound or in the studio (link to Amazon).

To learn more about analog and digital audio mixers, click the link, as I have a dedicated article explaining both types of mixing consoles in more detail.

If you are new to the world of PA systems and audio mixers, here is an article explaining the basics of mixing consoles to get you started.

Now that I have explained a bit about the way analog and digital mixers deal with EQ let’s see how to EQ bass guitar in four easy steps.

This image shows the image of an analog and digital audio mixer for comparison purposes

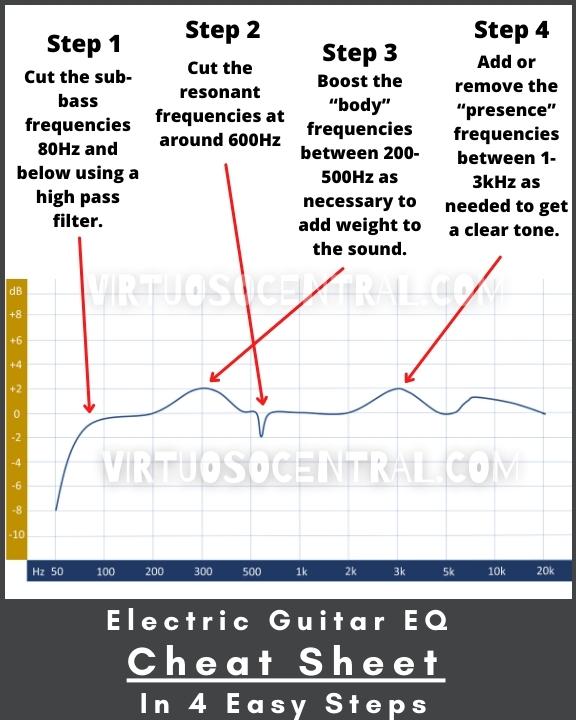
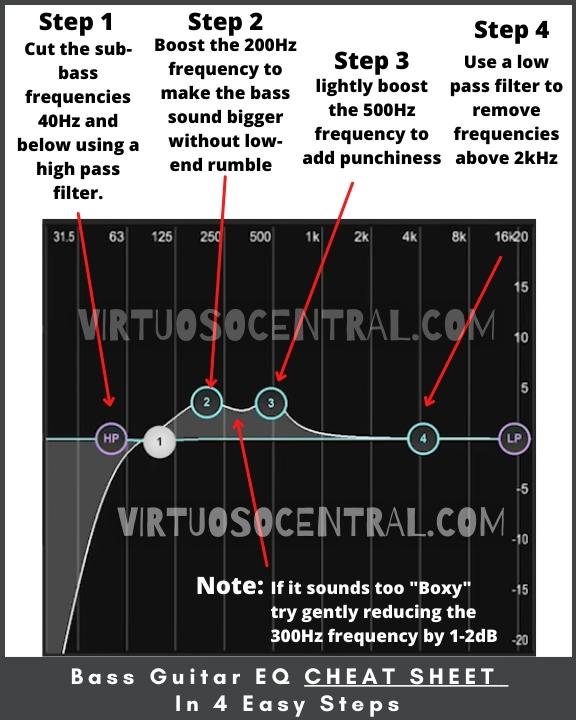
1. Cut the Ultra-Low-End Frequencies below 40 Hz Using a High pass Filter

The fundamental frequencies of a 4-string bass guitar tuned to E standard using A=440 Hz as a reference are from E1=41.20 Hz to E4=329.63 Hz.

For a 5-string bass guitar tuned to E standard, the fundamental frequencies are from B0=30.87 Hz to E4=329.63 Hz. And for a 6-string bass guitar, the fundamental frequencies are from B0=30.87 Hz to A4=440 Hz.

As you can see, the lowest frequency a bass guitar can generate is 31 Hz, and the Highest is 440 Hz. But its harmonics can go all the way up to 4kHz.

Anything below 40 Hz is considered ultra-low-end frequency that muddy up your bass sound, meaning that the sound is not clear, has weak harmonics, and has a smeared time response, which is a perfect recipe for a horrible sound if not dealt with.

So, to start with a clean sound, the first step is to cut the frequencies below 40 Hz.

With a digital mixer, all you have to do is set a high-pass filter, also known as a low-cut, with a cut-off frequency set at 40 Hz. This will allow everything above 40 Hz to go through while attenuating everything below the cut-off frequency.

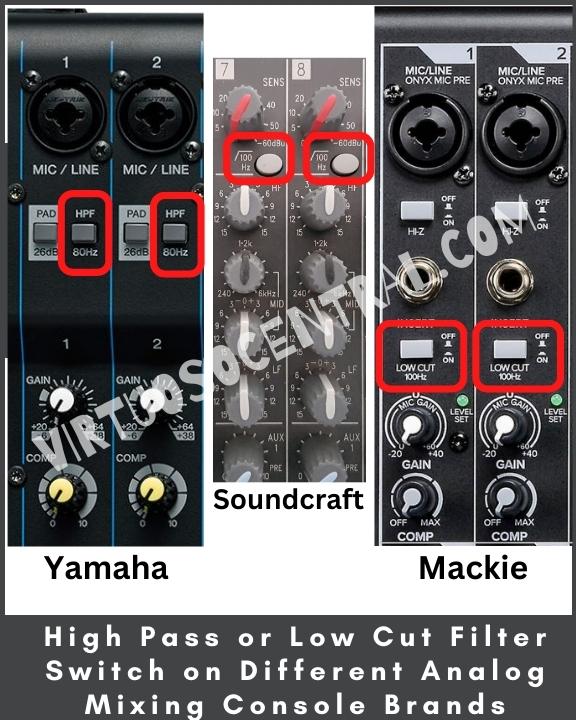
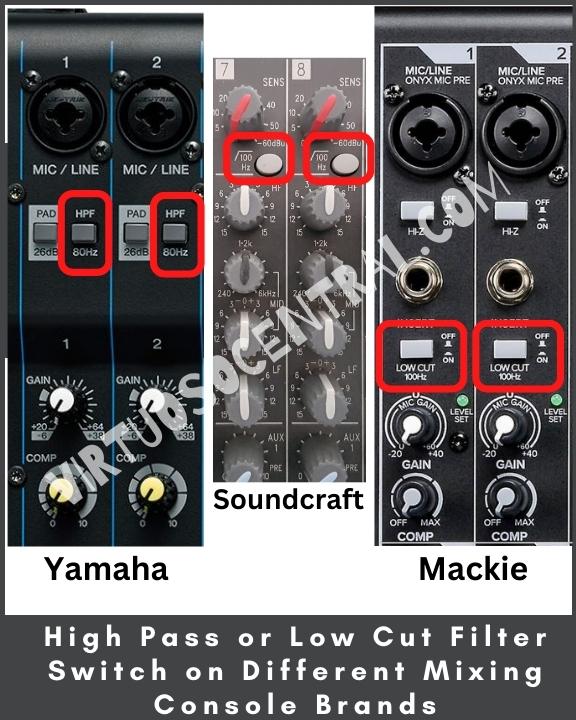
On most analog mixers, the included high-pass filter has a cut-off frequency set at 80 Hz or 100 Hz. So, engaging it will do nothing good for us because it will cut frequencies below 80 Hz, which is not ideal when EQing bass.

In this case, leave the high pass filter off (disengaged) to avoid cutting out some of the fundamental frequencies.

2. Enhance the Bass’s Fundamental Frequencies from 40-400 Hz

The frequencies between 40-400 Hz are the “body” of the bass guitar’s sound. These frequencies add weight and character to the sound.

The bottom end of the instrument lies between 100-200 Hz, which is also part of the fundamental frequencies for other instruments, such as the kick drum. Therefore, we need to be careful only to boost what is necessary to avoid instruments fighting each other in the mix.

My advice is always to avoid boosting frequencies if not necessary to enhance the sound. In this case, if the bass sounds with enough weight and character, don’t boost anything.

If it sounds a bit thin and you want to add more body, boosting the 200Hz frequency will help you get a bigger bass sound without adding low-end rumble.

If it sounds boxy or chunky, your problematic frequency will likely be 300Hz.

Adding More Body and Removing Boxiness Using a Digital Mixer

To add more body, use a bell curve EQ filter with a center frequency set at 200Hz. Boost it by +3 to +5dB. This should be enough to produce a well-rounded sound without low-end rumble.

To remove boxiness, gently reduce the 300Hz frequency by 1 to 2dB or until the boxiness goes away. Don’t overdo it because you will be carving away essential bass frequencies.

Setting bell curve filters at specific center frequencies can only be done with a digital mixer or in the DAW (Digital Audio Workstation) using a plugin when mixing and mastering a record.

Add Weight and Get Rid of Boxiness with an Analog Mixer

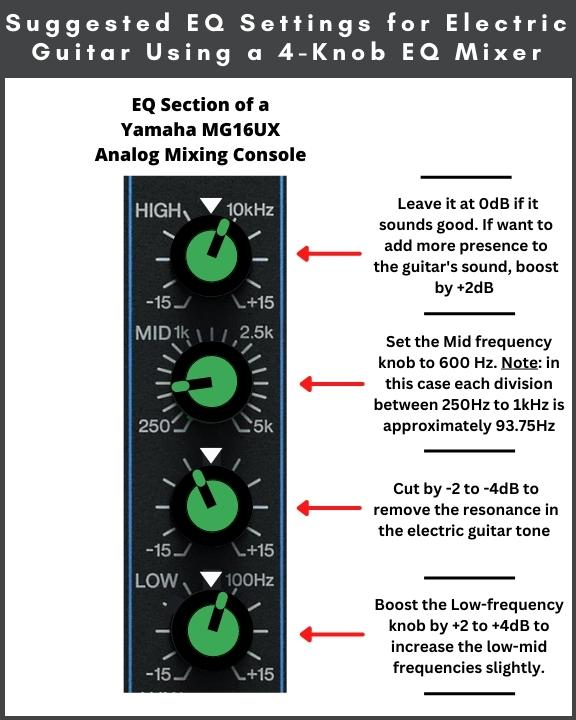
To add weight and body to the bass sound with an analog mixer, increase the LOW EQ knob to +3 to +4dB. Doing this will give you a well-rounded bass tone.

At this point, you are faced with a decision when working with an analog mixer. You either remove boxiness by setting your mid-frequency selector to 300Hz and cutting it by -3 to -5dB, or you add more attack by putting the mid-frequency selector to 2.5kHz and boosting it by +3dB.

If it doesn’t sound “boxy” or “nasal,” you could also boost the 500Hz frequency to add more punchiness to the sound. This is explained in more detail in the next step.

Unfortunately, you can’t do both due to the limitations of an analog mixer’s ability to set different cut-off frequencies.

In this case, you need to try both options and see what sounds better. If you hear that the bass interferes with the kick drum, cut the 300Hz frequency by -3 to -5dB. If the kick drum and the bass don’t fight each other, then you could add more attack to the bass to make it more intelligible in the overall mix.

The image below shows the setting to remove boxiness or add attack using the EQ section of the popular Yamaha MG16XU mixer.

This image shows suggested EQ settings for bass guitar using a 4-knob EQ analog mixer

3. Adjust the Mid-Range Frequencies Between 500-1kHz to Add or Remove Punchiness

The term punchiness is used in audio to describe that a sound has a good reproduction of dynamics (variation of loudness), good transient response (no overhang or extended notes), and a strong impact in the mix.

To add some punchiness or growl and get the notes more defined, increase the 500Hz frequency by +2 to +4dB

To do this, use a bell curve filter with a center frequency set at 500Hz. As you increase it to +4dB, you will notice that the frequencies from 500Hz to 1kHz are also slightly increased, providing a more defined tone that cuts through the mix.

4. Watch out for the Harmonics Between 2-4 kHz.

When equalizing an electric bass, you want to avoid some of the harmonics that appear between 2-4kHz. Everything above 5kHz is unnecessary, as it would not affect the bass’s sound much, so cutting it off is a good idea.

By using a low pass filter with a cutoff frequency of around 2kHz, you would make some space for other instruments in that zone while reducing the harmonics the bass guitar produces.

Removing Harmonics and Adding Snap with a Digital Mixer

At this stage in the EQ process, we need to get rid of the harmonics that appear above 2kHz. To do this, use a low pass filter with a cutoff frequency set a 2kHz, and attenuate it by -6dB. This will help reduce the harmonics making more room for the other instruments with fundamental frequencies above 2kHz, such as pianos and keyboards.

At this point, you will notice that the sound is a bit dull in the upper frequencies. If you want to add “snap” to the sound, you need to use a bell eq filter for the high mid band with a cutoff frequency set at 2kHz and boost it by +2 to +3dB.

Basically, what you are doing by using the low pass and bell curve is to slightly boost the frequencies around 2kHz, while sharply rolling off anything above 3kHz.

Dealing with High Frequencies with an Analog Mixers

With analog mixers, there is little you can do in the high band at specific frequencies. My advice is to set the HIGH knob to 0dB. This should give you a balanced high-frequency response with a snappy sound.

To reduce the “sheen” sound, reduce the HIGH knob by -2 to -4dB until you are happy with the results.

This image shows an easy to follow cheat sheet to EQ bass guitar in 4 easy steps

Alternative EQ Setting for a Bass Guitar

If the EQ setup explained above doesn’t suit your sound taste, I have included an alternative EQ setting focusing on keeping the bass’s low end and high definition while removing the growly mid-tones in the 500-1kHz range.

For this approach, we don’t use a high-pass filter to remove the low frequencies below 40Hz. Here we will keep all the low frequencies and concentrate on the mids and high-mid frequencies.

Using a digital mixer, start by applying a high-shelf filter with a cutoff frequency set at 2kHz and attenuate it by -6 to -8dB. This will remove the harmonics and unnecessary sheen from the bass’s sound.

Next, locate the mid-band frequencies and apply a bell curve filter with a cutoff frequency set at 750Hz. Reduce it by -6dB. This will carve out some space in the frequency range for the guitar and piano while keeping the bass’s bottom end and high definition.

Notice that previously in step 3, the approach was to add some punchlines or growl at 500Hz by boosting that frequency by +2 to +4dB. In this case, the approach is different. We want to keep the bass’s depth and remove the growliness.

This image shows an alternative easy to follow cheat sheet to EQ bass guitar to emphasize the bass's depth

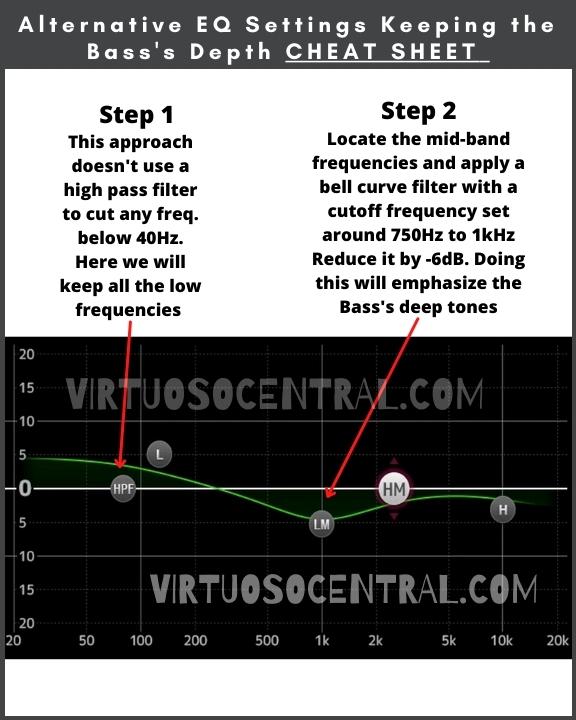
If the sound is too dark and deep, we can add some sheen by setting a bell curve filter with a cutoff at 2kHz and boosting it by +2 to +3dB. The result will be a bass that sounds deep while keeping the high definition in the upper mid frequencies.

This image shows another alternative cheat sheet to EQ bass guitar but this time it emphasizes in keeping the bass's depth while adding more definition to the sound

Conclusion

Learning how to eq bass guitar for live performance or for the recording studio is a must for any sound engineer.

As I have shown in this article, it is a simple process once you know what to cut and what to boost, but it takes some practice to master it.

In summary, to EQ a bass guitar, you have to:

  1. Get rid of the ultra-low-end frequencies below 40 Hz that muddy up your bass sound using a high pass filter.
  2. Enhance the bass’s fundamental frequencies from 40-400 Hz.
  3. Add or remove growl/punchiness by adjusting the mid-range frequencies between 500-1kHz.
  4. Cut out the harmonics between 2-4 kHz and add some “snap” to the sound.

I hope this article was helpful to you. Visit the site to explore more articles like this one by clicking here. Thank you for reading my blog.

4 Easy Steps to EQ Electric Guitar – Includes Cheat Sheet

Getting a great electric guitar sound starts with dialing the correct EQ at specific frequencies. That’s why knowing how to EQ is an art, as it is a science, and it all starts with applying basic EQ techniques.

It doesn’t matter if you have the best guitar and sound gear; if the EQ is not set correctly, your sound will be off, and if you are a guitarist or sound engineer, you need to know how to eq electric guitar.

If you are wondering what you need to do to EQ an electric guitar, here are the steps:

  1. Cut the sub-bass frequencies 80Hz and below using a high pass filter.
  2. Cut the resonant frequencies between 400Hz-1kHz.
  3. Boost the “body” frequencies between 200-500Hz as necessary to add weight to the sound.
  4. Add or remove the “presence” frequencies between 1-3kHz as needed to get a clear tone.

Of course, this is easier said than done, and although several more factors can play a crucial role in getting a good electric guitar sound, these four are the main ones when dealing with EQ. Mess any of them up, and your guitar will sound terrible.

In this post, I will go through each of these four steps to help you EQ an electric guitar to get the best sound possible.

Plus, I have included suggested EQ settings to get you started and a cheat sheet for your reference. Without further ado, let’s get started.

1. Cut Out the Sub-Bass Frequencies with a High-Pass Filter

The first thing that you must do is get rid of unwanted frequencies below 80Hz. The reason for getting rid of these frequencies is because, in most cases, and depending on the instrument, they can cause more problems than good, as they are responsible for the low-end rumble that dirties up the EQ.

This is due to low-end harmonics generated when the lower notes are played on the guitar.

To cut out the sub-bass frequencies, if you use a digital mixer, you can set a high-pass filter (also known as a low-cut) with a cut-off frequency set at 80Hz.

If you have an analog mixer, there is a small switch above the gain knob labeled HPF or LOW CUT. When engaged, it activates a low-pass filter, cutting everything below 80Hz.

Another reason for getting rid of the low-end frequencies is that an electric guitar’s fundamental frequencies are between 82.4Hz for E2 and 1318.51Hz for E6. This is calculated by setting A=440Hz as the reference.

These numbers are without taking into consideration all the harmonics. So, cutting out anything below 80-100Hz makes sense to help you get a clean start when setting EQ for an electric guitar.

After passing the signal through the filter, you will be glad to hear that any residual low-end harmonics are gone. This will go a long way toward making the electric guitar sound as clean and crisp as possible.

This image shows where the high pass or low cut filter switch is located on different analog mixing console brands

Related: 6 Ways to Mic a Guitar Amp That Will Give You the Best Tone

2. Cut the Resonant Frequencies Between 400Hz-1kHz.

Electric guitars resonate at around 600Hz, so cutting out this frequency using a bandpass filter is necessary.

Using a bandpass filter with a center frequency set at 600Hz will smoothly decrease and cut out that chosen part of the frequency spectrum.

If using a digital mixer, decreasing this range of frequencies is relatively easy because you can use a bell or peaking equalization filter, also known as a bandpass filter, set within this range of frequencies.

To start, locate the 600Hz frequency and decrease it slowly. You’ll notice on the mixer’s screen that the adjacent frequencies are also slightly reduced below and above 600Hz.

This is because as you lower the 600Hz frequency, the digital mixer uses it as the center frequency. So, by decreasing that center frequency a bit, it will also slightly lower the range of frequencies around the center frequency, rounding off the sound, which is excellent for the end result.

If using an analog mixer, you’ll need one with a four-knob EQ section to achieve the same results. This is so that we can choose the center frequency.

The image below shows the EQ section of a typical analog audio mixer with a four-knob EQ.

This image shows the breakdown of a typical audio mixer EQ section with 4 knobs

The analog audio mixer I use for this example is the popular Yamaha MG16XU. Notice that the second knob down is set at 600Hz.

Also, note that the MG16XU has a bandpass filter with center frequencies selector between 250Hz to 5kHz, which means you can also test different cut-off frequencies.

Depending on your mixing console, the frequency range available on the mixer would be different but end up giving you the same result. All you have to do is use the frequency selector to set it at 600Hz.

Then, use the third knob to either boost or reduce the level of the frequencies at and around the selected center frequency. For this example, I have cut it by -2dB.

In the image below, I have set the EQ with starting points so you can use it to set the EQ for the electric guitar on your analog mixer.

You can use the suggested starting points provided here, but at the end, you need to use your ears to make adjustments as necessary to make sure it sounds good with your setup. These are just starting points to get you started on equalizing the electric guitar.

This image shows suggested EQ settings for electric guitar using a 4-knob EQ mixer.

Related: Guitar Amp Settings for Rock 

3. Boost the “Body” Frequencies Between 200-500Hz Only if Necessary

Remember that when equalizing any sound source is always better to reduce the gains at specific frequencies rather than to boost. But in some cases, when cutting some frequencies as we did in the previous step, some wanted frequencies are also removed.

When setting the EQ for an electric guitar, if the guitar sounds thin and needs more body, you can slightly increase the range of frequencies between 200-500Hz, as they add weight to the guitar’s sound if it is too thin.

With a digital mixer, use a bandpass filter and slightly increase the 300Hz frequency. You’ll notice on the mixer’s screen that the adjacent frequencies are also slightly increased below and above 300Hz.

In essence, our center frequency is 300Hz, so by increasing that center frequency a bit, it will also slightly raise the range of frequencies around the center frequency, rounding off the sound, and making it sound fuller.

Doing this with an analog audio mixer is more complex. The reason is that unless you have a 6-knob mixer like the ones used in recording studios, in which you have a low-mids center frequency selector, you most likely won’t be able to pinpoint a specific frequency.

In this case, the best you can do is boost the Low-frequency knob by +2 to +4dB to increase the low-mid frequencies slightly.

Most analog mixers use a shelving filter for the Low and High EQ knobs. A shelving filter is a linear filter that boosts or cuts all frequencies above or below a set cut-off frequency.

In the case of the Yamaha MG16XU, the cut-off frequency for the low-frequency knob is 100Hz. This means that if you increase the low-frequency knob, you’ll increase the gain at frequencies above 100Hz but below 250Hz, which is the starting frequency for the Mid-Frequency selector.

So, by increasing the low-frequency knob slightly, you’ll also increase the frequencies between 100-250Hz.

I know this sounds confusing and could be hard to understand, but with analog mixers, there is no way around this. That’s why digital mixers are more accurate when dealing with EQs.

In summary, for this step, all I am trying to say is that you can turn the low-frequency knob clockwise a bit to gain some of the fundamental frequencies in the guitar by adding some “body” and “weight” to the guitar’s tone.

Related: Guitar Amp Settings for Blues 

4. Boost or Cut the “Presence” Frequencies Between 1-3kHz to Get a Clear Tone.

In most cases, the frequencies between 1-3kHz can stay at 0dB, meaning that they are not boosted or cut, and you should get a nice tone.

But if the guitar is piercing through the mix, making an annoying ringing noise, your problematic frequency will likely be 3kHz. If this is the case, cut the 3kHz frequency until the piercing tone disappears.

With a digital mixer, use a bandpass filter with a center frequency set at 3kHz, then decrease that frequency by -2 to -4dB as necessary.

If you lose some brightness, add a high shelf with its starting frequency set at 4kHz. Remember that a shelf filter will linearly increase or decrease all frequencies simultaneously. Increase the high shelf EQ filter by +2dB and adjust it as necessary to add some air and brightness to the guitar’s tone.

If using an analog mixer, as with the previous steps, is less precise than with a digital mixer. Although the High-frequency knob uses a shelf filter, the cut-off is usually set between 8-10kHz. So, if you get a piercing guitar sound, you can lower (counterclockwise) the High-frequency knob by -2dB.

I would start setting the high-frequency knob at 0dB, then adjust it only as necessary. If you need more brightness, increase it by +2dB. Going beyond this point will make the guitar sound harsh.

The Cheat sheet below shows these four steps is summary, with a graphical representation of how these settings would look in a digital audio mixer. Use it for your reference, and please remember that this is not an exact science.

When dealing with EQ, you have to make your own adjustments to make things sound good, as many other factors can affect the tone of your guitar.

This image is a cheat sheet that can be used as a reference for setting the EQ of an electric guitar, in four easy steps.

Related: Guitar Amp Settings for Metal

Conclusion

As a sound engineer or guitarist, knowing how to EQ electric guitar is crucial, whether you are EQing live sound or in the studio. I have shown you four easy steps to equalize the electric guitar and sound good.

These steps work whether you are miking the guitar amp or going straight to the mixer through a DI box.

In summary, to EQ an electric guitar, you must:

  1. Get rid of the sub-bass frequencies below 80-100Hz using the high-pass filter included with your mixer.
  2. Cut the resonant frequencies between 400Hz-1kHz, specifically at 600Hz.
  3. Boost the “body” frequencies between 200-500Hz only if the guitar sounds thin and you want to add more weight to the sound.
  4. Boost or cut the “presence” or “brightness” frequencies between 1-3khz to get a clear tone. 

I hope this article was helpful to you. Visit the site to explore more articles like this one by clicking here. Thank you for reading my blog.

6 Ways to Mic a Guitar Amp That Will Give You the Best Tone

There are several ways to mic a guitar amp. You can do it with one, two, or more microphones, each technique delivering a different tone.

While using a single microphone does a great job, miking a guitar amp with 2 mics allows you to capture the guitar’s full tone in more detail.

In this article, I will show you six techniques on how to mic a guitar amp that will help you get the best tone, whether you are playing live or in the recording studio.

Some techniques are as simple as using a single SM57, while others use the combination of two mics to capture the entire character of the guitar’s sound. Without further ado, let’s get started.

A Few Things to Consider Before Miking Up the Amp

Before we dive into the six techniques, there are a few important things that you should consider to get the best tone possible. Overlooking these simple tips can significantly impact the sound.

Set the EQ on the Amp to Get the Tone You Want First

The first thing you should do before placing any mic in front of the cabinet is to dial in the EQ on the guitar amp until you get the tone you want.

Remember that when miking anything, you want the source to sound as intended before placing the mic. That way, you avoid many problems when equalizing the mic placed in front of the guitar amp on the mixer side.

If you are the sound engineer, you want to have the guitarist set his preferred EQ so that the sound coming from the amp’s speaker is exactly what he wants to hear.

The reason is that trying to fix the sound later, on the mixer side, will be a headache, no matter how well you equalize it.

Watch out for Phase Cancellation When Using Multiple Mics.

Some of the techniques explained in this article use two microphones to mic the guitar amp. When using two or more mics, you need to set them so that they don’t cancel each other out.

This phenomenon is called phase cancellation, and it happens when sound waves of the same frequency don’t reach the microphone at the same time, resulting in a reduction of the signal’s amplitude.

When your phase is not lined up properly due to the mic’s positions, you’ll hear strange tonalities, and the guitar will sound null.

So, if you get a null sound, try changing the position on one of the microphones until your phase lines up and the phase cancellation goes away.

Use Your Ears to Decide the Mic’s Placement

In this article, I will be giving you techniques that you can use to mic the guitar amp but providing you with specific distances and angles between the cabinet and the mics is something you need to figure out using your ears.

The reason is that each amp is different, and the acoustics of the venue or room is also different, so giving you specific numbers is not going to work out.

Take the information provided here, use the starting points I give you, then experiment with the mic placement until you hear a tone you like.

You could also record samples from the mixer, then hear them back to figure out what sounds best.

Remember that when running a mic through a guitar amp, experimentation is key to finding a sound that you like and works for the project you are working on.

Related Article: How to Connect a Guitar Amp to a Mixer

The Mic Choice is Half of the Puzzle

When miking a guitar amp, the most important thing to consider is the type of microphone you’re using.

Experimenting with different types of microphones is recommended to find what sounds best. You can choose dynamic, condenser, or ribbon mics or combine them to get a composite sound.

Dynamic Mics are The Industry Standard

Dynamic mics are the standard for miking guitar cabinets because they are durable, directional, and deliver a warm tone characteristic of the guitar sound.

When choosing which dynamic mic to use, the Shure SM57 is practically the go-to choice for most sound engineers. Another great option is the Sennheiser MD 421-II, whose sonic characteristics deliver a precise sound reproduction of the source.

Condensers Sound Crisp and Bright

Condenser microphones are very sensitive to sound and are characterized for picking up the most subtle nuances in sound. They are usually used in recording studios or acoustically controlled environments to avoid feedback.

This doesn’t mean that you can’t use them in a live setup but be aware that feedback could be a big issue if not handled properly in live situations where the signal must be monitored and played back.

Some standard condenser mics chosen to mic a guitar amp are the AKG C414 or the Neumann U87 Ai.

Ribbon Mic Deliver Organic, Vintage Sound

Of the three types of mics, ribbons can produce warm, organic, and vintage sound. They are the most fragile, so you’ll need to be careful when handling them.

They have a figure-8 polar pattern, which means they are very sensitive to sound from the front and back but completely deaf to sound from the sides.

One of the downsides to ribbon mics is that they can’t easily isolate the source of your sound. This is not ideal in live sound situations or untreated rooms with all sorts of sound reflections.

That said, pairing up a ribbon microphone with a dynamic microphone is the best way to capture the sound from your guitar amp, as they will deliver the classic ’60s and ’70s era vintage guitar sound.

Some of the best ribbon mics to mic guitar amps are the Beyerdynamic M160 or the Royer R-121.

Related Article: 3 Ways to Connect a Bass Guitar to a Mixer or PA System

How to Mic a Guitar Amp – 6 Easy Techniques

1. Placing a Single Mic on the Speaker Cabinet

This method is the easiest, and it delivers excellent results. All you have to do is mount the mic on a stand and place it in front of the speaker cone, ensuring that the mic’s head is 1 to 3 inches away from the grill and directly facing the speaker’s cone.

This single-mic guitar amp miking technique delivers a bright and present tone rich in mid and mid-high frequencies, delivering the characteristic electric guitar tone.

With this technique, where you place the microphone across the speaker will dramatically affect the tone you get, which is great because you can use this to your advantage.

For example, if you want to minimize the higher frequencies and get a fatter, warmer tone, place the mic closer to the speaker’s edge just by moving the mic stand a few inches to the left or right, always keeping the mic’s head parallel to the cone.

Another thing to consider is the angle between the mic and the speaker’s cone. Changing the mic’s position off-axis will also provide a different tone.

To angle the mic off-axis, start by placing it in front of the speaker at 90 degrees (perpendicular), then slowly angle it towards 45 degrees to locate the sweet spot where the sound is even and smooth.

You can also move the angled mic a few inches to the left or right, keeping it perpendicular to the speaker’s cone. Doing this will change the top-end response by decreasing the higher frequencies and thickening up the bottom end, providing a fuller, warmer sound.

As you can see, a single microphone gives you many options to mic your guitar amp or cabinet. I recommend that you experiment with different positions and angles until you get the tone you want.

So, in summary, if you are wondering how to mic a guitar amp with an SM57 or use a single mic method, this is the technique you need to use. Place the mic on a stand right at the center of the speaker cone with the mic’s head 1 to 3 inches away from the grille.

This image shows a diagram on how to place a single microphone to mic a guitar amp.

2. Using 2 Mics, One at 90 and the Other at 45 Degrees

Miking a guitar amp with 2 mics is another way of getting a killer tone. For this technique, you need to use two mics, one straight onto the speaker cone at 90 degrees (perpendicular) and another off-axis at 30-45 degrees to the cone.

In this case, you will blend these two mics on the audio mixer, resulting in a bigger, fatter composite tonal characteristic that gives you much more control.

Now that you have the two mics picking up the sound with different tonal characteristics, you can blend them at specific levels on the mixer, depending on the sound you want to achieve.

One mic will pick the mid and mid-high frequencies, while the other will pick the low-mid frequencies helping you get a more rounded tone.

This image shows a diagram of Miking a guitar amp with 2 mics one at 90 degrees and the other at 45 degrees.

3. Miking the Amp with Front and Back Mics

If you have an open-back combo guitar cabinet, you will notice that the sound coming from the front is different than the one coming from the back.

This is because the back of the speaker is inside a resonant box and miking the back of the cabinet provides you with lower frequencies that you never get in front of the amp.

We can use this to our advantage when miking a guitar amp with 2 mics because you end up with a more rounded-off sound with a good mix of high, mid, and low frequencies.

This technique only works if you have an open-back combo guitar cabinet. In this case, place one mic in front of the speaker’s cone slightly to the right but not at the center 1-3 inches away from the grille. Then, place the second mic at the back of the amp slightly to the left (looking from the front), also 1-3 inches away from the opening.

Notice that the front and back microphones are opposite to each other. This is to avoid phase cancellation.

With this technique, you can run into microphones canceling each other out. That’s why you need to be aware of this and place the mics accordingly to avoid it.

If you run into phase cancellation problems, move the mics slightly to the left or right, or you can also angle them to hear how it affects the sound. In this case, you also need to experiment to find your tone.

This image shows a diagram of Miking a guitar amp with 2 mics, one at the front of the speaker and the other behind the cabinet.

4. Using Two Front Mics, One Close, the Other Farther Away

This guitar amp miking technique aims to capture the sound at different distances.

As the speaker’s cone vibrates, it changes the air pressure around it, generating the sound we hear. As the sound waves expand and move away from the cone, their sonic characteristics change. So, a mic close to the cone will sound different from one placed some distance away.

With this miking technique, we capture both sonic characteristics and blend them in the mixing console at different levels to generate a more rounded-off sound.

This technique could be problematic on stage because having an open-to-air microphone sitting a few feet away from the sound source will capture surrounding noise and be prone to feedback.

This technique is more suited when working at a recording studio where the environment is more controlled.

But you could try this guitar amp miking technique on stage to see how your PA system reacts. You could end up with a beautiful guitar tone without getting feedback.

To use this method, you need two microphones and two stands. You have to place one microphone in front of the speaker cone with its head 1 to 3 inches away from the grill and directly facing the speaker. Then put the second mic 1-2ft away, pointing straight at the speaker’s cone.

Some adjustment you can make is to move one of the mics off-axis and see how it sounds. Also, you could move the mic closest to the speaker a bit to the sides to avoid too much brightness and capture a sound with more bottom end.

Image shows miking a guitar amp with 2 mics one close to the speaker, the other farther away.

5. Using a Distance Microphone

As with the previous miking technique, this one tries to catch the sound after the sound waves have expanded in the room, letting the amp “breathe” a little before capturing the sound.

The idea behind this method is to simulate what a person would hear if they were sitting in the room while the guitarist was playing.

As the mic picks up the ambiance and the soundwave reflections from the room, you capture more depth from the performance.

To use this technique, you need one microphone and a stand. Place the mic aimed at the speaker cone and move it 1-4ft away from the grill, but always facing directly at the speaker.

If you run into problems such as sound reflections from setting the mic at the speaker level too close to the floor, you can raise the mic to capture the sound as if you were standing in the room.

Beware that this technique is for recording purposes. In live sound, this method wouldn’t work too well, and yes, you guessed it, feedback and ambient noise will be the problem.

Image shows how to mic a guitar amp using a distance microphone.

6. The Four Mics Technique

This guitar amp miking method is intended for recording and needs to be used in an acoustically controlled room such as a recording studio.

For this method, we will use four microphones. Place the first one right at the center of the speaker cone, the second a few inches to the right, the third midway between the center of the cone and the edge of the speaker, and the fourth mic at the edge of the speaker. All the mics should be 1-3 inches away from the grille.

We are doing this because we want to capture the tone at the different sections of the cone. Then all the mics can be mixed in the audio console at different levels depending on your goal.

The advantage here is that you can produce several different tonalities just by changing the level in the mixer of each microphone, giving you a lot of control over the miking process.

Image shows miking a guitar amp using four microphones

Related Article: How to Connect an Acoustic Guitar to an Amplifier or PA System

Conclusion

In this article, I have shown you how to mic a guitar amp using six easy techniques that will give you the best tone.

So, in summary, to mic a guitar amp using a single microphone, you can:

  • Place a single mic in front of the speaker cabinet, ensuring that the mic’s head is 1 to 3 inches away from the grill and directly facing the speaker’s cone.
  • Use a distance microphone aiming it at the speaker cone 1-4ft away from the grill, but always facing directly at the speaker.

For miking a guitar amp with 2 mics, you can:

  • Place one mic straight onto the speaker cone at 90 degrees (perpendicular) and another off-axis at 30-45 degrees to the cone.
  • Mic the amp with front and back mics, placing one mic in front of the speaker’s cone slightly to the right but not at the center, 1-3 inches away from the grille. Then, place the second mic at the back of the amp slightly to the left (looking from the front), also 1-3 inches away from the opening.
  • Use two front mics, one close, the other farther away, placing one microphone in front of the speaker cone with its head 1 to 3 inches away from the grill and directly facing the speaker. Then put the second mic 1-2ft away, pointing straight at the speaker’s cone.

Lastly, to mic a guitar amp with four mics, you can:

  • Place four mics starting at the center of the speaker’s cone and placing the last mic right at the edge of the cone, leaving 2-3 inches between each other, making sure all mics are 1-3 inches away from the grille.

I hope this article was helpful to you. Visit the site to explore more articles like this one by clicking here. Thank you for reading my blog.

How to Connect an Acoustic Guitar to an Amplifier or PA System

There are two types of acoustic guitars, the ones that have an installed pickup system, also known as acoustic-electric guitars, and those that don’t. Depending on which one you got, the process of connecting it to an amplifier or PA system would be different.

To connect an acoustic guitar to an amplifier or PA system that has a pickup system already installed, all you need to do is use a DI-Box to go from the output of the guitar to the input of a DI-Box, then go from the output of the DI-Box to an input of the mixer or PA system. If the acoustic guitar has no internal microphone, you need to use a vibration pickup mic system or a regular open-to-air microphone.

In this article, I will explain how to connect an acoustic guitar to an amplifier, mixer, or PA system using both methods. I will also provide connection diagrams for your reference. Let’s get started.

Connecting an Acoustic Guitar to an Amp. or PA System Using the DI-Box Method

To use this method, I am assuming that your acoustic guitar already has a microphone system installed.

If this is the case, using a Direct Insertion box (DI-Box) is the easiest way to connect the acoustic guitar to the PA system because you only need a couple of cables, and the procedure is simple.

The reason you want to use a DI-Box instead of going straight into the mixer or PA system is that, most likely, your cable run will be more than 6ft long, which means that your unbalanced guitar cable will act as an antenna degrading the sound quality and inserting unwanted noise in the signal.

Using the DI-Box will transform your guitar’s signal from high to low impedance without degrading the quality of the signal itself while gaining signal strength at the input of the mixing console.

It also converts the unbalanced line to a balanced one, meaning that it takes the two-conductor unbalanced guitar cable to convert it to a three-conductor balanced line like the XLR cable, so you don’t have to worry about external noise getting into the line. This is a must when you have long cable runs.

Here are a few examples of some of the best passive DI boxes available today (links to Amazon).

  • Radial Pro DI
  • Whirlwind IMP 2
  • Behringer Ultra-DI DI400P
  • Samson MD1

There is a lot more to learn about the DI-Box. If interested, click the link, as I have an entire article explaining everything you need to know about this fantastic piece of equipment.

Steps to Connect an Electric-Acoustic Guitar to a Mixer or PA System Using a DI-Box

Connecting an acoustic-electric guitar to a mixer using a DI-Box is simple. Here are the steps:

  1. Before we start, ensure the mixer’s main fader is down while connecting everything. That way, you avoid sudden pops or high volumes on your system in case the input level of the source signal is higher than expected.
  2. Use a 1/4″ TS to 1/4” TS cable (regular guitar cable) and connect one end to the output of the acoustic-electric guitar.
  3. Connect the other side to the high-impedance input of the DI-Box.
  4. Locate the Balanced output on the DI-Box, usually located on the opposite side of the input, and connect an XLR cable.
  5. Take the other side of the XLR cable and connect it to one of the inputs of the mixing console or PA system.
  6. It is essential to set the gain on the mixer correctly to avoid saturation in the signal later on. In the last section of this article, I explain step by step how to set the gain.
  7. Adjust the EQ until you get a balanced tone for the acoustic-electric guitar.

If you don’t know how to adjust the EQ for the acoustic-electric guitar, click the link as I provide some tips on how to do so.

If you are unfamiliar with how to equalize sound on an audio mixer, I recommend you read the whole article, as I explain some of the theory behind the equalization process for different sound sources.

Here is the diagram to connect an acoustic-electric guitar to a mixer or PA system using a DI-Box. Use it for your reference.

This image shows a Diagram to Connect an Acoustic-electric Guitar to a Mixer or PA System Using a DI-Box

Connecting an Acoustic Guitar to an Amp. or PA System Using the Mic. Method

If you want to connect an acoustic guitar that doesn’t have an installed pickup system, then this is the method you need to use.

There are two options for this method. The first involves using a vibration pickup, and the second involves using open-to-air microphones.

Both options have pros and cons, but ultimately both methods can be used to mic and connect an acoustic guitar to an amplifier, mixer, or PA system, delivering excellent results.

Using a Condenser Vibration Pickup Microphone

If you decide to go this route, I recommend using the AKG C411 condenser vibration pickup microphone. This mic works for guitars with steel strings as well as nylon strings.

This mic is designed especially for string instruments, and if you have an acoustic guitar that doesn’t have an internal mic system, this is the less intrusive way you can use to mic the instrument while delivering the best results.

When I say intrusive, what I mean is that, in some cases, to install a piezo mic system, you need to take the guitar to a luthier to perform the job because a piece of the guitar’s body needs to be cut out to insert the volume controller and drilled to install the cable connector.

To avoid all this, you can use a vibration mic like the AKG C411 and get a beautiful sound on the amplifier and PA system without drilling any holes in the guitar.

Another advantage of using the AKG C411/L is that you could pair it with an Instrument Wireless system that accepts the Mini XLR connector to go wireless, thus making your setup more organized and professional.

Be aware that this mic comes in two configurations that you can choose from. The C411PP comes with a standard XLR connector, meaning that you can use any microphone cable to connect it to the mixing board of the PA system, and the C411L, which comes with a miniature XLR connector designed to work with any wireless instrument bodypack that accepts mini XLR connector.

Here is the diagram for connecting the guitar to a PA system using the C411 wired and wireless versions.

The image shows a diagram to Connect an Acoustic Guitar to a Mixer, Amp., or PA System Using a wired Vibration Pickup  Mic
The image shows a diagram to Connect an Acoustic Guitar to a Mixer, Amp., or PA System Using a Vibration Pickup  Mic wirelessly

Using a Contact Piezo Transducer Microphone

Another more affordable option is to use a piezo transducer contact microphone. This type of mic works for guitars with steel strings or nylon strings.

Contact mics are made using piezo transducer elements that pick up the string’s vibrations and convert them into electrical signals that can be amplified.

They are affordable, but their sound is natively heavy on the mid-frequencies, making the guitar sound boxy. To clean up the sound, you need to work on the EQ to make the guitar sound more natural.

The Korg CM200BK or the Luvay clip-on piezo contact mics are examples of what you can use if you decide to go this route (links to Amazon).

Although these mics are affordable, very easy to install, and can help connect an acoustic guitar to an amplifier or PA system, keep in mind that the sound quality is not as good as the AKG C411 or installing an under-the-bridge piezoelectric mic system.

Using a Soundhole Pickup for Steel String Acoustic Guitars

A soundhole pickup system delivers excellent results for guitars with steel strings. It uses a microphone with a magnet and a coil similar to the ones used in electric guitars. But be aware that this type of mic doesn’t work for classical guitars with nylon strings.

When the steel string vibrates, it induces an electric current in the magnetic pickup, which in turn, is amplified on the PA system. If the strings are nylon, no current will be induced because nylon is not a conductive material. This is why this type of mic wouldn’t work for classical guitars.

The installation is as simple as placing the pickup in the soundhole and connecting it to the amp. If the cable run is more than 10ft long, I recommend using a DI-Box, as mentioned earlier to avoid noise in the line.

Some of the best-sounding soundhole pickups are the AMUMU SP30, the Dean Markley Pro Mag Grand, the Fishman Neo-D, and the Seymour Duncan Woody (links to Amazon).  

This image shows a diagram to Connect an Acoustic Guitar to a Mixer, Amp., or PA System Using a Soundhole Microphone system

Using a Bridge Mic for a Nylon String Acoustic Guitars

If you got a classical guitar with nylon strings and don’t like the sound of piezo contact mics but want the same sound quality as the soundhole pickup but for nylon strings, then I recommend the KNA NG-1 pickup for classical guitars.

This mic delivers the natural sound of your nylon-string guitar with no modifications to your guitar whatsoever. It’s built inside a wooden sensor casing, making it lightweight and unobtrusive. It is detachable and can remain installed when not in use.

To install it, all you have to do is loosen the strings and slide the mic under the string knots on the bridge. Then tighten the strings and connect the mic to the amp or PA system using the included cable.

This image shows an under the Bridge Mic option to Connect an Acoustic Guitar to a Mixer, Amp., or PA System

Using Open-to-Air Microphones

Miking the guitar using this technique would deliver the best results acoustically speaking. Because as the sound waves vibrate inside the guitar’s body and leave through the soundhole, the sound is amplified and developed as waves travel through the air, so you pick up the guitar’s sound in its natural form when using open-to-air mics.

This is why this method is preferred in recording studios when recording acoustic guitars and acoustic instruments in general.

If you need to mic a guitar on stage with more instruments around it, it could pick up a lot of noise and be prone to feedback. But, if you mic the guitar using the correct procedure and the right type of mic, it could deliver excellent results while reducing the chances of feedback.

I have a complete article explaining how to mic an acoustic guitar using open-to-air microphones. This theory applies to live sound as well as in the studio. If you are interested in going this route to mic your guitar, thus connecting it to an amp or PA system, I highly recommend you to read this article, as it will help you understand the process.

This image shows the XY mic configuration and the mono mic placement approach as possible Configurations to mic an Acoustic Guitar to connect it to a Mixer, Amp., or PA System Using an Open-to-Air Microphones

For live performances where there’s more external noise from the audience or other musicians on stage, consider using a dynamic mic like the Shure SM57 or a ribbon mic such as the Beyerdynamic M 160, which will deliver a warm, balanced classic sound.

Although the SM57 is considered a classic vocal mic, it shares many audio characteristics with some of the best dynamic guitar mics, and you’re likely to have one lying around.

Another option you can use is condenser microphones. While they are more sensitive and have more gain than their dynamic counterparts, they deliver a bright, full sound.

If you decide to use condenser mics for miking the guitar, remember that setting the correct gain and EQ levels is a must to avoid feedback.

Some of the most popular condenser mics for their quality, reliability, and crystal clear sound are the AKG Perception 170 and the Shure SM81-LC, among others.

This image shows a diagram to Connect an Acoustic Guitar to a Mixer, Amp., or PA System Using the popular Shure SM57 Open-to-Air Microphone

Gain Setup on The Mixer or PA system for the Acoustic Guitar

To get a well-balanced mix, it all starts by setting the correct gain for each channel. Also, setting up the gain at this stage will leave enough headroom for all the other instruments in the mix so that you don’t end up with a saturated mix.

Now that you have connected the acoustic guitar to the mixer, I will show you the procedure you need to follow to set the correct gain and avoid distortion. Here are the steps to set the gain:

  1. Start by muting all other channels in the mixing console so that the readings on the VU meter are accurate. Also, to avoid sudden high volumes on your system in case the input level of the source signal is higher than expected.
  2. Set the Master Faders to 0dB / U / Unity, depending on what’s labeled on your mixer.
  3. Find and press the PFL button to activate it. The PFL button is usually located at the bottom of each channel strip next to the fader. In some mixers, a small LED lights up when pressed.
    • Note: PFL stands for “Pre-Fader-Listen,” and it routes the audio signal from that channel to the VU Metter so that you can visually see and measure the strength of the audio signal on that specific channel.
  4. Next, have the guitar player start playing and watch what is happening at the VU Meter. If you don’t see any movement in the VU Meter, slowly increase the gain until the loudest sections of the audio source are shown in the green area of the meter. Ideally, you want to be as close as possible to 0dB or Unity (usually the last green LED).
  5. Never allow a signal to go beyond the yellow and into the red because it means that the signal is too loud and will distort. If the gain knob is all the way to the left (no gain) and your VU meter is in the yellow or red section, your source signal is too high, and you need to lower it at the source. This usually happens with acoustic-electric guitars or any other active instruments.
  6. Once you have set the gain correctly, your signal should always be in with the green LEDs on the VU meter.

Conclusion

If you were wondering how to connect an acoustic guitar to an amplifier, mixer, or PA system in this article, I have shown two methods to do so:

  1. You can use a DI Box to go straight from the acoustic guitar to the amp or mixer if the guitar has a microphone system already installed in it.
  2. If the guitar doesn’t have a mic system installed, you could use a vibration mic, a piezo contact microphone, a soundhole microphone system, or open-to-air microphones.

Any of these methods will also work in the studio for recording, delivering excellent results. But remember that using an open-to-air mic will provide you with the most natural sound that comes from the acoustic guitar.

One thing you need to remember is that setting the gain is a must to get a good sound.

I hope this article was helpful to you. Visit the site to explore more articles like this one by clicking here. Thank you for reading my blog.

4 Ways to Connect a Bass Guitar to a Mixer or PA System

Connecting a bass guitar to a mixing console or PA system is a bit tricky because you are dealing with an instrument that produces a sound mainly in the lower frequency spectrum, which means that if you don’t do it correctly, you could end up with a saturated mix.

There are 4 easy ways to connect a bass guitar to a mixer:

  1. Using a DI-Box to go from the bass guitar to the mixer.
  2. Miking the Amplifier with a Mic connected to the mixing console.
  3. Leveraging the Amp’s direct connection or line out if available.
  4. Using a wireless system for bass guitars.

All these methods work and will deliver excellent results whether you are performing live or in the studio, but in some cases, one method will work better than the other, depending on the situation.

In this article, I will explain each one of these methods in detail so that you can decide which will work better for you. Plus, I will provide connection diagrams and some pro tips that, if implemented, you will end up with a beautiful mix with no saturation.

So, without further ado, let’s start explaining how to connect a bass guitar to a mixer or PA system.

1. Using a DI-Box to Go from the Bass Guitar to the Mixer

Using a Direct Insertion box (DI-Box) is the easiest way to connect a bass guitar to a mixing console because you only need a couple of cables, and the procedure is simple.

Before we continue, let me explain some basic information about the DI-Box. You can skip to the next section if you already know this information.

The DI-Box is Like the Swiss Army Knife of Live Sound

A Direct Insertion Box, or DI-Box for short, is a versatile piece of equipment that solves two key issues that are problematic in live sound or in the studio: impedance mismatch and external noise.

A DI-Box transforms a signal from high to low impedance without degrading the signal itself while gaining signal strength at the input of the mixing console.

It also changes an unbalanced to a balanced signal, meaning that it takes a two-conductor unbalanced line like the guitar cable to convert it to a three-conductor balanced line like the XLR cable, so you don’t have to worry about external noise getting into the line. This is a must when you have long cable runs.

I say external noise because an unbalanced cable acts like an antenna, and it could pick up RF noise. But if the noise comes from the signal itself due to a ground loop, then, in some cases, the DI-Box can also help you fix the issue.

For instance, if you have a ground loop noise coming from your bass guitar or amplifier signal, this noise will also be noticeable on the output of the direct box. To get rid of a ground loop hum or buzz from a signal, you need to break the ground loop.

Most direct boxes come with a “ground lift” switch intended to break the ground loop noise in your signal. In most cases, the hum goes away by just flipping the ground loop switch. Still, there are instances where it is more complicated to eliminate the ground loop buzz.

In such a case, the best and easiest solution is to use an inline ground loop isolator such as the IceCube IC-1 Line Hum Eliminator (link to Amazon), as it will filter the 50-60Hz buzz from the sound signal.

To learn more about the DI-Box, click the link, as I have an entire article explaining everything you need to know about this fantastic piece of equipment.

This image shows active, passive, and stereo direct insertion boxes DI-Box.

The Easiest Option Doesn’t Always Mean Better Sound

Now, getting back to the subject, I need to point out that although a DI is the cleanest and most straightforward way to connect a bass guitar to an audio mixer or PA system, it’s not necessarily the best way, acoustically speaking.

The reason is that you’d give up all the warm tones a bass guitar can produce. Bass guitars tend to sound thin and unnatural when connected directly to the mixer using an external DI box or the amp’s DI because the bass’s electronics, including its coil microphones, don’t capture the authentic sound we’re used to hearing from the instrument.

This is because when the bass guitar is connected to an amp, as the speaker inside the amp vibrates to generate the sound, the bass’s tone is developed as it travels through the air.

If you are looking for a warm, natural tone, miking your amp is the way to go, this method will be explained in the next section.

This is not to say that going direct isn’t ideal in some cases. It all depends on your setup and what you are trying to accomplish.

Steps to Connect a Bass Guitar to a Mixer Using a DI-Box

Connecting a bass guitar to a mixer using a DI-Box is a simple process. Here are the steps:

  1. Before we start, always ensure the mixer’s main fader is down while making any connection. That way, you avoid sudden pops or high volumes on your system in case the input level of the source signal is higher than expected.
  2. Use a 1/4″ TS to 1/4” TS cable (regular guitar cable) and connect one end to the bass guitar.
  3. Connect the other side to the high-impedance input of the DI-Box.
  4. Locate the Balanced output on the DI-Box, usually located on the opposite side of the input, and connect an XLR cable.
  5. Take the other side of the XLR cable and connect it to one of the inputs of the mixing console or PA system.
  6.  It is essential at this point to set the gain on the mixer correctly to avoid saturation in the signal later on. In the last section of this article, I explain step by step how to set the gain.
  7. Adjust the EQ until you get a balanced tone for the bass guitar.

If you don’t know how to adjust the EQ for the bass guitar, click the link as I provide some tips on how to do so. If you are unfamiliar with how to equalize sound on an audio mixer, I recommend you read the whole article, as I explain a bit of the theory behind the equalization process for different sound sources.

Here is the diagram to make the connection. Use it for your reference.

This image shows a diagram to connect a bass guitar to a mixer or pa system using a di-box

Here is another diagram showing the connection of a bass guitar to a mixer or PA system using a DI-Box but using the Thru feature to connect the amp before the signal goes to the mixer. Use it for your reference.

This image shows a diagram to Connect a Bass Guitar to a Mixer or PA System Using a DI-Box but Going Through an Amp using it a personal monitor when on stage.

2. Miking the Amplifier with a Mic connected to the mixer

Although miking a bass amp sounds weird, this is the best option to connect a bass guitar to a mixer or PA system in live sound, but with some caveats.

Your setup and the venue where you are setting your PA system are the factors that will determine if this option is viable or not.

If the space on stage is limited, or the venue is prone to feedback, then the first option with the DI-box might work better. But if you want to capture the natural sound that we have come to like from a bass guitar, then miking the amp is the way to go.

Another advantage of using this method is that the bass player can use the amp as a personal monitor to hear himself while on stage. Plus, the bass player can set the EQ as he always does, making it more familiar to him.

How to Position the Mic in Front of the Bass Amp

Mic placement is the most critical part when miking a bass amplifier. This is very important because the sound characteristics will be directly related to where you place the mic in relation to the amp’s speaker.

There are two things to consider in this case, the distance from the mic’s head to the amp and the angle at which the mic faces the amp’s speaker.

Distance Between the Mic’s head and Speaker’s Cone

Even an inch difference in distance can significantly impact the tone produced.

This is because the closer you move the center of the speaker’s cone, the more highs and mid-highs you’ll get in the Bass’s tone, and the more you move away from the center of the speaker’s cone, the more bottom ends and lower mids you’ll get.

Placing the mic at either edge of the speaker cone will pick up a muffled and bassy tone.

When miking a bass amp, the recommended mic position is directly in front of the speaker’s cone, four to ten inches away from the amp’s grille. That’s because this position will produce the most vivid representation of the bass amp’s tone while avoiding picking up other instruments on stage, as well as the proximity effect.

Don’t place the mic too far because you may get a “distant sound,” and the mic might even pick up other background noises you don’t want.

If you have a condenser mic, make sure to lower your gain at the mixing board as they are more sensitive than dynamics, and you could end up with distortion.

I would recommend having both the condenser and dynamic microphones next to each other in front of the speaker’s cone for that fuller, warmer sound or a combination of a ribbon and a dynamic mic for a vintage mellow sound.

This image shows the distance Between the Mic’s head and Speaker’s Cone

Angle Between The Mic and Speaker’s Cone

Aside from distance, the angle at which the mic faces the speaker also influences the tone.

If you position your mic directly in front of the amp’s speaker (perpendicular) and notice that the tone is emphasized in the high and mid tones, placing the mic at an angle from the speaker’s cone can help correct that. All you have to do is move the mic closer to the edge of the speaker.

To do this, start by placing your mic directly in front of the speaker’s cone (at 90 degrees), then slowly angle it (towards 45 degrees) until you find that ‘’sweet spot’’ where the tone is smooth and even.

As you move outside the 90-degree angle, you’ll notice a drop in the high and mid frequencies while the low frequencies will be accentuated.

As mentioned earlier, if you want that muddy, bassy tone, you’ll need to move the mic away from the center of the speaker’s cone and to the side.

Recommended Mics for This Setup

For this setup, you will need a microphone connected to the mixer and a small mic stand (links to Amazon). The microphones I recommend for miking a bass amp are:

  1. Shure SM57 – Budget-friendly option delivering balanced tone accentuating high frequencies
  2. Sennheiser e609 Silver – Easy to install, balanced sound, budget-friendly
  3. Sennheiser e906 – Great overall tone offering a three-position switchable presence filter
  4. The Audix i5 – Designed for instruments delivering an accurate sound reproduction
  5. Beyerdynamic M160 – Overall winner. It delivers excellent bass response, warm mid-ranges, and silky-smooth highs combined to produce a unique vintage sound.

Steps to Connect a Bass Guitar to a Mixer Miking the Amp.

  1. Place the bass amp on stage as needed
  2. Connect the microphone you’ll use to mic the amp to the mixing board. Make sure to lower the volume fader on that channel and mute it to avoid popping noise while installing it.
  3. Install the mic on the stand, and place the mic stand in front of the speaker’s cone four to ten inches away from the grille.
  4. Let the bass player connect his bass to the amp and set his EQ as he needs.
  5. Ask the bass player to start playing, unmute the channel where the mic is connected, and slowly increase the volume on the channel.
  6. You might need to adjust the mic’s position until you find a tone that works for you.
  7. Set the gain for that channel as described in the last section of this article.

Here is the diagram showing the connections you need to make.

3. Leveraging the Amp’s Direct Connection, if Available

This method is very similar to the first one explained in this article. The only difference is that you will use the bass amp’s internal DI instead of an external one.

Most bass amps come with a balanced “Line Out,” usually located at the back of the amp. You can use this connector to run a cable to the mixer, thus connecting the bass guitar’s signal to the mixer.

The procedure is straightforward, and you will only need an XLR-to-XLR or TRS-to-TRS cable, depending on the type of connector your amp offers. Check your amp to see which kind of connector it uses.

Steps for Connecting a Bass Guitar to a Mixer Using the Amp’s Internal DI

  1. Make sure the fader for the channel you are going to use on the mixer is all the way down while making any connection.
  2. Check your amp to know what cable you need to use. In most cases is going to be an XLR-to-XLR cable.
  3. Connect one end to the “Line Out” of the amp and the other to the input of the mixer.
  4. Turn on the amp and tell the bass player to start playing, then slowly increase the volume fader until you hear the signal from the PA speakers.
  5. As with all the methods explained in this article, it is essential at this point to set the gain and EQ on the mixer correctly to avoid saturation in the signal later. In the following section, I explain how to set the gain step by step.
  6. Adjust the EQ until you get a balanced tone for the bass guitar.

Below is the diagram to help you make the connections.

This image shows a diagram to Connect a Bass Guitar to a Mixer or PA System Using the Amp's Internal DI Connection or line out.

4. Using a Wireless System for Bass Guitars

Another option you can use for connecting your bass guitar to a mixer is to use a wireless system. Nowadays, there are several systems that you can use, but be aware that not all are of good quality.

The last thing you want is to have an unstable signal when on stage. That is why I like to stick to the well-known brands that have a good reputation and that you know for a fact that their systems work as advertised.

Something like the Sennheiser XSW-D, or the Line 6 Relay G50 would work perfectly well, providing you with the advantage of being wire-free and delivering excellent sound with no interference or drops within its specified range.

Steps for Connecting a Bass Guitar to a Mixer Using a Wireless System

  1. Before connecting anything to the mixer, first check that the fader for the channel you will use on the mixer is down.
  2. Connect the receiver unit to the power source.
  3. Use a 1/4” TS to TS cable or an XLR-to-XLR cable, depending on what the receiver uses, to go from the receiver’s output to the input channel on the mixer side.
  4. Turn on the receiver.
  5. Connect the transmitter to the bass guitar with the provided cable or connect the transmitter straight to the bass, depending on your model.
  6. Turn the transmitter on.
  7. Make sure the transmitter and receiver are on the same channel.
  8. Turn the volume on the channel you are using up slowly and start playing
  9. Adjust the gain, volume, and EQ to get a nice tone.

Pro Tips to get the Best Sound on the Mixer

Setting Up the Gain on The Mixer for the Bass Guitar

As mentioned previously, setting the correct gain for the bass guitar on the mixer is a must, or you could end up with a saturated mix because the bass guitar has its fundamental frequencies in the low-frequency band. For that reason, here are the steps to set the gain:

  1. Before setting up the gain, make sure to mute all other channels in the mixing console so that the readings you get on the VU meter are accurate. Also, to avoid sudden high volumes on your system in case the input level of the source signal is higher than expected.
  2. Set the Master Faders to 0dB / U / Unity, depending on what’s labeled on your mixer.
  3. Find and press the PFL button to activate it. The PFL button is usually located at the bottom of each channel strip next to the fader. In some mixers, a small LED lights up when pressed.
    • Note: PFL stands for “Pre-Fader-Listen,” and it routes the audio signal from that channel to the VU Metter so that you can visually see and measure the strength of the audio signal on that specific channel.
  4. Next, have the bass player start playing and watch what is happening at the VU Meter. If you don’t see any movement in the VU Meter, slowly increase the gain until the loudest sections of the audio source are shown in the green area of the meter. Ideally, you want to be as close as possible to 0dB or Unity (usually the last green LED).
    • Note: When setting the gain, never allow a signal to go beyond the yellow and into the red because it means that the signal is too loud and will distort. If the gain knob is all the way to the left (no gain) and your VU meter is in the yellow or red section, your source signal is too high, and you need to lower it at the source. This usually happens with bass guitars or any other bass-heavy instrument.
  5. Once you have set the gain correctly for the bass guitar, your signal should always be in with the green LEDs on the VU meter.

Avoid Excessive Dynamic Range

The dynamic range of a bass guitar could be all over the place – dynamic range means the ratio between the softest and the loudest sound.

To avoid this, and to have a more stable signal, use an audio compressor to even out the differences between the softest and loudest sounds.

Most mixers include a one-knob audio compressor, and digital mixers have a full-blown compressor with all the settings you need to get a stable sound.

If an audio compressor is available with your mixer, I strongly recommend using it to minimize the difference between the softest and loudest sounds.

Although a one-knob audio compressor like the ones found in analog mixers can help to even out the sound a bit, the truth is that they are very limited in what they can do because they don’t have the controls a standalone compressor has. For that reason, if available, use an external compressor to get better results.

A workaround for this issue is to use a pedal compressor on the bass guitar. Something like the MXR Bass Compressor, the Ampeg Opto Comp Optical Compressor Pedal, or the Seymour Duncan Studio Bass Compressor Pedal would deliver outstanding results.

Conclusion

If you were wondering how to connect a bass guitar to a mixer or PA system, in this article, I have shown four methods to do so:

  1. You can use a DI Box to go straight from the bass guitar to the mixer
  2. Use a mic to pick up the sound from the bass’s amp and send the signal to the mixing console, which delivers the most natural sound
  3. Leverage the amp’s internal DI box to send the signal from the “Line Out” to the mixer.
  4. Lastly, you can use a wireless system to connect the bass guitar to the mixer or PA system

Any of these methods will also work in the studio for recording, delivering excellent results.

One thing you need to remember is that setting the gain is a must to get a good sound, and if possible, consider using an audio compressor to minimize the excessive dynamic range of the signal.

I hope this article was helpful to you. Visit the site to explore more articles like this one by clicking here. Thank you for reading my blog.

2 Easy Ways to Connect an Effects Processor to a Mixer

If you have tried connecting an effects processor to a mixer for the first time, you most likely felt confused about the procedure.

You might have asked which send and return to use, pre-fader or post-fader? Should I use the external effect send or Aux Send?

When connecting an effects processor to a mixer, the best way is to route the signal to the processor using a post-fader send, then bring the processed or “wet” signal back to the mixer using a stereo channel.

Connecting the external effects unit to the mixer this way will provide you with many advantages, such as being able to EQ the effect, route it to the monitor mix as necessary, and give you more control over the effect’s signal path in your mixer, to name a few.

In this post, I will show you how to connect an effects processor to a mixer using two different methods, plus provide you with connection diagrams for your reference, let’s get started.

Getting to Know Your Mixer’s Send/Return Section

Before we continue, let me clarify what pre-fader and post-fader terms stand for.

Pre-fader means that an Aux Send taps into the channel’s incoming signal at a point before the channel fader. Meaning that if the channel fader is up or down is not going to affect the level of the signal going out on the “Send” connection.

On the other hand, post-fader means that the signal going out on the “Send” connection follows the channel fader, meaning that if the fader is down, there will be no signal at the “Send” connection, and if it’s up, there will be a signal at the level set by the fader.

The image below shows you the Aux Send configuration on different mixing console brands.

The image shows the Aux Send configuration on different mixing console brands.

Most analog mixers with 12 channels or more will provide you with at least one pre-fader and one post-fader Aux Sends. In most cases, they can have more. Sometimes Aux Sends come with a switch to either use them as pre- or post-fader Aux Sends.

For setting up an effect processor, the best practice is to use a post-fader Aux Send to have the most control over the effect and how it’s routed through the mixer.

This is because when you fade out the channel, you want the effect to fade out along with it; you don’t want the channel signal to go away but the effect to stay on. It doesn’t sound natural in live sound. It sounds weird because you’ll only hear the wet signal.

Locating the Pre- and Post-Fader Send/Return on a Mixer

The image below is of a Yamaha MG16XU, a very popular and excellent analog mixer in the market. There you can see the typical Aux Send configuration used by most mixing console brands nowadays.

The image shows the Pre- and Post-Fader Send/Return sections on a typical mixing console

You’ll get two or four Aux Sends in a typical analog mixer. In the image below, we have Aux 1, and 2, which are “switchable” pre- or post-faders Aux Sends, meaning that by default, they are post-fader, but you can activate the switch and make them pre-fader if you want, and Aux 3 and 4 which are post-fader by default.

Also, notice that Aux 4 is also labeled FX. This is because this particular mixer comes with internal effects, but keep in mind that if you connect a cable to Aux 4 Send, the internal effects will be disabled, and you will be able to use Aux 4 as a regular post-fader Aux Send.

Connecting anything to the Aux Send labeled FX in any analog mixer will automatically disable the mixer’s internal effects.

Notice that each channel has a knob labeled Aux used to control the amount of signal from that specific channel to be sent to the effects unit. Also, notice that on the right side of the mixer, in the master section, there are other Aux knobs Labeled “Aux Send Master.”

For the signal to go out from the mixer to the effects unit, you need to have the Aux knob on the specific channel turned up, and the Aux Send Master knob also turned up.

To recap, when connecting an external effects unit, first locate a post-fader Aux Send on your mixer, then route the signal from the mixer into the effects unit.

Cables You Need to Make the Connection

To connect the mixer to the effects unit and back to the mixer, you need three 1/4″ TS Male to 1/4″ TS Male cables (link to Amazon). This type of cable is also known as a regular guitar cable.

The reason we are going to use regular guitar cables is that the cable runs are short, basically a few feet long. If the cable runs are longer than 10ft, use TRS or balanced cables.

We are using three cables because we need one line to carry a mono signal from the Aux Send on the mixer side to the Input of the effects unit (dry signal) and two cables to bring the signal from the effect units in stereo to the input of a stereo channel on the mixer (wet signal).

Steps to Connect an Effects Processor to a Mixer Using a Stereo Channel – Best Option

For this example, I will use a Yamaha MG16UX mixer to explain the procedure. The steps described here apply to any other mixer brand. The only difference could be minor differences in how other mixer knobs are labeled.

  1. After locating the Post-Fader “Aux Send” you want to use, connect one side of the 1/4” TS male jack to the corresponding Aux Send connector.
    • In this case, I am using Aux 3. Aux 1 and 2 can also be used, but you must ensure that the pre-fader switch is not activated. Also, I am not using Aux 1 and 2 because they are usually used to set a monitor mix for musicians and singers.
  2. Take the other side of the 1/4″ cable and connect it to the input of the effects unit. If your effects unit comes with a stereo input (left, right), connect the cable to the left side, this tells the device that the incoming signal is mono.
  3. Connect one side of the other two 1/4″ TS cables to the stereo output of the effects unit, one to the left and one to the right.
  4. Take the other side of the cables and connect them to the left and right connectors on one of the stereo channels on your mixer.
    • I like to use the last stereo channel closest to the master section. In the case of this example, it would be channel 15/16.
  5. Turn on the effects processor and choose an effect such as reverb or hall to run a test.
  6. Increase the Aux knob on the channels you want to have an effect to about halfway and turn the Aux Send Master to about halfway. For this example, I have plugged a microphone for testing and setting gains on channel 1. So, I need to turn up the Aux 3 knob on channel 1.
  7. Usually, effects units have a knob labeled “Input Trim,” “Trim,” or “Sensitive” that controls the amount of signal coming into it. If that’s the case, you want to make sure that you set it to a point where the input signal doesn’t exceed 0dB or Unity gain to avoid distortion in the signal.
    • It is a good practice to have the audio level coming into the effects unit lower than 0dB to have better headroom.
  8. Set the correct gain on the stereo channel where the signal from the effects unit is connected. In my case, I need to set the correct gain on channel 15/16. To do this, you need to:
    • Set the Master Faders to 0dB / U / Unity, depending on what’s labeled on your mixer.
    • Set the volume fader on the stereo channel where the signal coming from the effects unit is connected to 0dB / U / Unity.
    • Increase the fader volume on the channel where the mic you are using is connected.
    • Locate and press the PFL button to activate it. It is located at the bottom of the channel strip next to the fader in every channel. In some mixers, a small LED lights up when pressed.
      • Note: PFL stands for “Pre-Fader-Listen,” and it routes the audio signal from that channel to the VU Metter so that you can visually see and measure the strength of the audio signal on that specific channel.
    •  At this point, start talking into the mic and watch what is happening at the VU Meter. If you don’t see any movement in the VU Meter, slowly increase the gain on the stereo channel where the signal coming from the effects unit is connected until the loudest sections of the audio source are shown in the green area of the meter.
      • Ideally, when setting the gain for effects, you want to be below 0dB or Unity (green LED). As long as you see a signal coming in and is below 0dB, that would be perfect.
  9. Once you have set the gain for the stereo channel where the signal from the effects unit is connected, depress the PFL button and increase the Aux knob for each channel you want with the audio effect.
  10. Run a sound test with all those channels to make the necessary adjustments so that it sounds balanced.

Remember, you can increase or decrease the amount of effect coming into the mixer by increasing or decreasing the fader, or if you want to increase or decrease the effect for a specific channel, you can do so with the Aux knob. In this example, it would be Aux 3.

A good practice is not to overdo an effect, meaning you don’t need to add a crazy amount of effect to your mics and instruments. Add a bit to make it sound better because, as the saying goes, if you can hear the effect, you added too much.

Adding too much reverb or any effect, in general, will make your signal sound too damp or too wet, as referred to in the sound industry.

Check out this article to learn how to set up your mixer to get the best sound possible.

Here is the diagram to connect an effects processor to a mixer leveraging a stereo channel on the mixer. Use it for your reference.

The image shows a diagram to connect an effects processor to a mixer using a stereo channel.

Connect an Effects Processor to a Mixer Using “Stereo Aux Returns”

The second option to connect an external effects unit to a mixing console is by using the “Stereo Aux Returns.” Although this is another option you can use, it’s not as practical as the previous one because you don’t have much control over the effect signal other than increasing or decreasing the amount of effect you add to a specific channel.

By connecting the effect to the stereo aux return, you can’t EQ the effect, mute it, route it, or control the gain. But sometimes, you don’t have enough stereo channels to use, so in such a case, you can opt for using this method.

Steps for Connect an Effects Processor to a Mixer Using Stereo Aux Returns

For this example, I will use the Behringer Xenyx X1832USB mixer to explain the procedure. The steps described here apply to any other mixer brand. The only difference could be minor differences in how other mixer knobs are labeled.

To make this connection, we’ll also need to use three 1/4″ TS Male to 1/4″ TS Male cables (also known as regular guitar cables) link to Amazon.

  1. Locate the “Aux Send” you want to use and connect one side of the 1/4” TS male jack to the corresponding Aux Send connector. In this case, I am using Aux 1.
  2. Connect the other side of the 1/4″ cable to the input of the effects unit. Connect the cable to the left side if your effects unit has a stereo input (left, right). Doing so makes the effects unit default to a mono signal.
  3. At this point, connect one side of the other two 1/4″ TS cables to the stereo output of the effects unit, one to the left and one to the right.
  4. Bring the other side of the cables and connect them to the left and right connectors of the “Stereo Aux Return 1.”
  5. Turn on the effects processor and choose an effect such as reverb or hall to run a test.
  6. Increase the Aux knob on the channels you want to have an effect to about halfway and turn the Aux Send Master to about halfway.
    • In this case, Aux 1 knob for each channel and Aux 1 Send and Aux 1 Return.
    • In the case of the Behringer Xenyx X1832USB and most mixers in this price range, you have two master knobs, the Aux Send and Aux Return (Masters). “Aux Send” controls the signal level going out to the effects unit, and the “Aux Return” controls the amount of Wet signal you input into the main mix from the effects unit.
  7. Run a sound test with all channels to make the necessary adjustments so that it sounds balanced.

Here is the diagram to connect an effects processor to a mixer using the stereo aux return connectors. Use it for your reference.

The image shows a diagram to connect an effects processor to a mixer using the Stereo Aux Returns.

Final Thoughts

If you were wondering how to connect an effects processor to a mixer, I have shown you the two methods you need to know in this post.

I recommend using the first method because it leverages the flexibility of a stereo channel. Doing so will make your life easier when dealing with effects in live sound, as it will allow you to EQ the effect, mute it, route it, or control the gain.

But if you don’t have enough stereo channels and are in a pinch, you can opt for using the stereo aux returns method.

If you liked this article and want to know more about setting up PA systems, browse this site by clicking here, as I have several articles on this subject. Plus, you’ll find connection diagrams to help you understand things better. Thank you for reading my blog.

How to Set Up a Wireless PA System for Live Sound

Wouldn’t it be nice to set up a wireless PA system for live sound without having a whole bunch of messy cables everywhere? Imagine how convenient that would be and how clean and professional your setup would look. Plus, you would minimize tripping hazards significantly.

Setting up a wireless PA system is as simple as substituting your cable runs from the mixer to the speakers, microphones, and instruments with pro-level wireless systems and adapters, transforming your loudspeakers into a high-performance wireless playback system.

Doing this can be pretty expensive if you have a large system, but think of it as an investment that’s well worth it, especially if you work with sound systems.

In This post, I will show you how to set up a wireless PA system, what you need, and how to connect everything using available devices in the market today.

1. Substituting Cable Runs from the Mixer to the Speakers with a Wireless System

The first thing you need to do when setting up a wireless PA system is to substitute the cable runs going from the mixer, speaker management system, or crossover network to the powered speakers or amplifier/speaker combination with a pro-level wireless speaker system.

I recommend the Alto Professional Stealth MKII-UHF system(link to Amazon), which stands out in the market today, delivering excellent results.

The advantage of this system is that you can replace hundreds of feet of console-to-speaker cabling without compromising audio quality. Additionally, you can quickly and easily expand to more speakers by getting extra receivers.

So, if you have a pa system for live sound with multiple speakers, this system will be a perfect fit for you.

This is a game changer when connecting a mixer to active speakers or an amplifier/speaker combination because it cleans up messy cables and makes your setup more professional.

This is especially true for people who DJ at parties bringing their own equipment, or for people who rent out audio systems for parties and events.

One thing that stands out from the Alto Stealth wireless speaker system is its rock-solid UHF wireless connection, thanks to its true diversity reception feature, meaning that it delivers a more reliable performance making it appropriate for mission-critical applications such as a live sound setup.

Additionally, the system includes numerous pro-level features like auto frequency scan and synchronization, switchable stereo/dual mono operation, and built-in delay line functionality.

Steps For Substituting Cable Runs from the Mixer to the Speakers

  1. The first thing to do is turn off the mixer and the speakers before making any connections. That way, you avoid sudden pops that could potentially damage your equipment.
  2. Set the mixer’s master volume faders and speaker’s volume all the way down.
  3. Locate the “Main Out” or “Stereo Out” connectors in the mixing console.
  4. Choose between balanced XLR, 1/4” TRS, or unbalanced 1/4” TS jack plugs to connect the output of the mixer to the input of the transmitter of the Alto Stealth system. I recommend using balanced cables.
  5. Use the included XLR to TRS cable to connect the output from the receiver unit to the input of each powered speaker or to the input of the amplifier if using an amp/speaker combination.
  6. Now, you can turn on the mixer and the transmitter unit.
  7. Also, turn on each receiver unit and the powered speakers or amplifiers. Turn up the volume on the speaker halfway. You can adjust as necessary during the sound check.
  8. On the transmitter, set the mode to Mono or Stereo. If your mixer is stereo, choose the stereo mode.
  9. Press the “VOL” button on the transmitter unit to set the left and right channels’ volume at which it will broadcast.
  10. Press the “CH” button to select a broadcast channel on the transmitter for the left and right audio channels. The transmitter and receivers should synchronize but double-check to ensure the same channel number on the receiver units.
  11. Play some music on the mixer and slowly increase the main volume until you hear sound from the speakers.
  12. Adjust the volume of the speakers or transmitter unit until you are satisfied with it, and perform a sound check. Always leave enough headroom when setting up the volume structure between devices.
  13. Use the EQ knobs to adjust the highs and lows until it sounds like you want.

If you don’t have XLR, TRS, or TS patch cables on hand to make the connection and need to buy them, here are a couple of links to Amazon; you can choose the length according to your needs:

  • Balanced XLR Patch Cable
  • Balanced TRS Patch Cable
  • Unbalanced TS Patch Cable

Here is a diagram for your reference on how to make the connection.

This image is a diagram to connect powered speakers to a mixer wirelessly

2. Set Up Wireless Microphones – Two Options

Getting rid of microphone cables is a step up when it comes to setting up a live sound system. They provide the freedom of moving around without wires being in the way while delivering excellent results without compromising sound quality.      

When it comes to wireless microphones, you have two options to choose from. You can opt for using professional-grade wireless microphone systems, or if on a budget, use a Transmitter/Receiver Combo to convert your wired mics to wireless. Let’s explore each option.

Using Professional Grade Wireless Microphone Systems

These mic systems are very convenient as they come as one package you can install on a rack.

They are easy to set up, and if using a professional brand, such as Shure, Sennheiser, Audio-Technica, or AKG, you can be assured that the sound quality and reliability of the wireless connection will be top-notch when used within its specs.

If you don’t have wireless mics and need to buy them, stay away from cheap, unknown brands, as they will surely be a big headache down the road.

When dealing with wireless microphone systems, always choose known brands as they have years of experience designing and manufacturing wireless systems and don’t cut costs on crucial components.

The downside of professional-grade wireless microphone systems is that they cost several hundred dollars each. But what is guaranteed is the excellent results they deliver. Some examples are:

  • Shure PGXD24/SM58-X8
  • Sennheiser Pro Audio XSW 1-825

If you can make the investment, that’s great. That way, you set everything up on a rack and be ready to offer your clients the freedom of wireless mics. If this is outside your budget, use a transmitter/receiver combo, as presented in the next section.

Steps to Connect Professional-Grade Wireless Mics to Your Sound System

  1. Set the volume fader of the channel you will use on the mixer all the way down.
  2. Use a balanced XLR or TRS cable and connect one side to the channel input of the mixing console and the other side to the wireless mic’s output.
  3. Turn on the receiver unit as well as the microphone. Don’t forget to install the battery on the mic.
  4. Most likely, the mic and receiver will be synced. If not, press the Sync button and give it a few seconds for the devices to sync. Depending on the model you buy, some receivers don’t have a sync button. In that case, you would have to manually set the channel on the microphone (transmitter) and the receiver unit. Make sure you put both on the same channel.
  5. Increase the volume fader on the channel you are using on the mixer and start talking on the mic.
  6. Set the gain correctly for that channel and tune the EQ until it sounds like you want.

If you don’t know how to set the gain on a microphone, click the link as I explain the step-by-step process.

Also, if you want to learn how to EQ vocals, click the link, as I have devoted a whole article explaining the process in detail.

Here is the diagram for connecting a wireless microphone system to a mixer. Use it for your reference.  

This image is a diagram for connecting a wireless microphone system to a mixer

Using a Transmitter/Receiver Combo to Covert Wired Mics into Wireless

What if you don’t have the budget to buy professional wireless mics but want to have the freedom of being cable free on stage? Is there a way to convert your wired mics into wireless without spending a lot of money? Luckily, there are several options to do this.

You only need a Transmitter/Receiver Combo to convert your wired dynamic mics, such as the popular Shure SM58, into wireless.

If you do a quick search on Google or Amazon, many options will pop up. Just be aware that not all of them are reliable options. You need something that will deliver a stable wireless connection.

In my opinion, the best options that stand out are:

  1. Sennheiser XSW-D XLR Base Set
    • It Provides up to 250ft range (75m) of rock-solid wireless connection with up to 5 hours of battery life on a single charge.
    • You can switch between multiple transmitters linked to one receiver or configure any combination of transmitters and receivers depending on your need.
    • The one-touch ease-of-use button simplifies the setup and can be used as a mute button from either transmitter or receiver.
  2. Alto Professional Stealth 1
    • Provides 16 switchable UHF channels, which means you can simultaneously use up to 16 sets (transmitter/receiver) to convert up to 16 wired mics into wireless.
    • It uses one AA battery and delivers up to 4 hours of continuous use. If you want to use it continuously without worrying about changing the battery, it can be plugged in using the included micro-USB cable.
    • The USB power adapter is not included, but a phone charger can work. The Alto Stealth 1 is slim so that you can plug them next to each other on a mixing console or DJ mixer.
  3. Joyo MW-1
    • Uses the 5.8Ghz band known to have strong anti-interference ability, longer transmission distance, and high stability within 100 feet range.
    • It provides 4 switchable channels to use up to 4 sets at the same time. This is a rechargeable device, and it can deliver between 3 to 4.5 hours of use per charge.
    • A downside of the Joyo MW-1 is that you cannot plug more than one receiver next to each other on a mixer due to its large diameter. You would have to leave a channel space between them if using more than one or use cable patches to go from the mixer to the receiver unit.  

These three units can convert any wired dynamic mic into wireless for a fraction of the cost. Remember that you will need one set (transmitter/receiver) for each wired microphone you want to convert to wireless.

Steps to Convert Wired Mics into Wireless Using a Transmitter/Receiver Combo

  1. Always remember to set the volume fader of the channel you will use on a mixer all the way down when making a connection. This is to avoid sudden loud pops that could damage your equipment.
  2. Connect the receiver unit to the input channel on the mixer side.
  3. Take the transmitter unit and connect it to the microphone. It will go in the place you would plug the cable in.
  4. Turn on the receiver and transmitter units.
  5. If using the Sennheiser XSW-D, you don’t need to do any setup as it comes pre-programmed from the factory. Go to step 7.
  6.  If using any other device, most likely, the units will be synced. If not, long press the channel selector button on both devices to pair them. Once paired, you can select between the available channels.
  7. Increase the volume fader on the channel you are using on the mixer and start talking on the mic.
  8. Set the gain correctly for that channel and tune the EQ until it sounds like you want.

Here is the diagram for converting a wired microphone into a wireless one and connecting it to a mixer. Use it for your reference. 

This image is a diagram for converting a wired microphone into a wireless one and connecting it to a mixer

3. Use a Wireless Instrument System to Substitute Instrument Cables

You can substitute the on-stage cable with a wireless system for the guitars, bass, and any other pluggable instrument. This will allow the musician to move around on stage as part of the show.

Using a wireless instrument system is as easy as plugging it in, turning up the volume, and starting playing.

There are several options you can choose from. You can opt for rack-mounted professional systems from well-known brands such as the Shure BLX4R and Shure SLX14 or use the more practical plug-and-play rechargeable options such as the Sennheiser XSW-D or the Boss WL-20 Digital Wireless Guitar System.

The budget-friendly selections similar to the systems mentioned above are Westshell Wireless Instrument System, Lekato WS-50, and Joyo JW-03.

Steps to Convert Any Pluggable Instrument into Wireless to Substitute Instrument Cables

  1. Set the volume fader of the channel you will use on the mixer all the way down.
  2. If you connect your guitar to an amp before sending the signal to the mixing console, connect the receiver unit to the input of the guitar\bass amplifier, then route the signal to the mixer as you usually do.
    • If, instead, you go straight to the mixer, then connect the receiver to the input channel of your choice in the mixer. If using a rack-mounted system, you will need to run a patch cable from the mixer to the receiver unit. If using a plug-and-play option, connect the receiver to the channel.
  3. Take the transmitter unit and connect it to the instrument. It will go in the place where you plug the cable in.
  4. Turn on the receiver and transmitter units.
  5. Most likely, the units will be synced. If not, long press the sync button to sync the transmitter and receiver. If using a budget plug-and-play option, select the same channel on both devices to pair them.
  6. Increase the volume fader on the channel you are using on the mixer and let the guitar play to run a sound check.
  7. Set the gain correctly for that channel and tune the EQ until it sounds like you want.

As with microphones, you need to set the gain correctly for each instrument you connect to the mixer. It’s the same procedure. If you want to learn how to do this, click the link.

Also, if you want to expand your knowledge about how to set the EQ for instruments such as electric and acoustic guitars, bass guitars, etc., click the link to read the guide.

Here is the diagram for connecting a wireless instrument system to a mixer. Use it for your reference. 

This image is a diagram for converting a pluggable instruments into wireless and connecting it to a mixer

Final Thoughts

Now you have a clearer idea of how to set up a wireless PA system using devices available today. Wireless PA systems have a cleaner and more professional look. No messy cables to deal with, and the performance and audio quality are as good as using cables but without the hassle. 

There is more that goes into setting up PA systems that I cover on this website. If you would like, browse the site to learn more by clicking here. 

How to Set a Mixer to Produce Good Sound

You are done setting the PA system, and when you run a sound check, it doesn’t sound very good. You don’t know why so you start moving knobs and faders up and down to realize that you are making it worse.

If you are wondering what you need to do to set up a mixer to produce a good sound, here are the steps:

  • First, you must set the correct gain for each channel.
  • Second, you must set the proper EQ depending on the sound source
  • Third, you should set the volume faders correctly to deliver a balanced mix.   

Of course, this is easier said than done, and although several more factors play a crucial role in getting a good sound when setting up a mixer, these three are the main ones. Mess any of them up, and it will sound terrible.

In this post, I will cover these three aspects you need to master to produce a good sound when setting up a mixer. Let’s get started.

Setting Up the Gain for Each Channel

The gain is the single most important knob on the entire channel strip. If it’s set wrong, it will compromise the sound from the beginning, and you will not be able to fix it later in the signal chain, so this knob must be set correctly from the get-go.

But before I show you the steps to set the gain correctly, there are a few things you need to know.

Gain is Not the Same as Volume

Sometimes gain and volume are mistakenly confused and interchanged, but you need to know that gain is not the same as volume.

With volume, you can both increase and decrease the output level from a channel strip. In other words, you can control the loudness of that channel without affecting its tone.  

When dealing with gain, you are only increasing the level of the incoming signal until the internal circuits of the mixer that make up the signal path, such as EQ, effects, etc., can work with it. In other words, gain conditions an input signal to an ideal electrical level so the mixer can use it. This also means that the gain can control the signal’s tone but not its loudness.

Here is a simple example to understand this concept. Audio mixers operate at what is called line level, which is electrically around one volt. A microphone, such as the popular Shure SM58, outputs a signal close to 1000 times lower than the line level.

So, for the mixer to use the signal coming from an SM58, it needs to increase it significantly to a point where the circuitry in the mixer can deal with it; otherwise, you’re just trying to process a whole bunch of noise and that’s where your gain control comes in.

Getting to Know Your Mixer’s Gain Knob

Depending on your mixer’s manufacturer, the gain knob could have various names. Gain can also be referred to as “Trim,” “Input Trim,” “Input Sensitivity,” “Sensitivity,” or “Gain Sensitivity.”

The gain Knob is usually the first knob on a channel strip (from top to bottom) located under the PAD switch.

Although they are labeled differently, they do precisely the same thing: to set the amount by which the channel’s preamp will amplify the incoming analog signal.

The image below shows a typical audio mixer channel strip highlighting the gain knob for your reference.

the image shows the Gain Knob on Different Mixing Consoles Brands

Gain Setting Procedure on an Audio Mixer – Steps to Follow

You must set the gain for every input channel you use to avoid distortion if the gain is too high or noise and insufficient audio level if set too low. These two scenarios will compromise your audio quality when setting up a mixer to produce good sound.

Follow these steps to correctly set the gain of each channel on your mixing console:

  1. Make sure the channel fader is all the way down while setting gain. This is to avoid sudden high volumes on your system in case the input level of the source signal is higher than expected.
  2. Set the Master Faders to 0dB / U / Unity, depending on what’s labeled on your mixer.
  3. Locate and press the PFL button to activate it. It is located at the bottom of the channel strip next to the fader in every channel. In some mixers, a small LED lights up when pressed.
    • Note: PFL stands for “Pre-Fader-Listen,” and it routes the audio signal from that channel to the VU Metter so that you can visually see and measure the strength of the audio signal on that specific channel.
  4. At this point, for example, if you are setting the gain to a mic, start talking into the mic and watch what is happening at the VU Meter. If you don’t see any movement in the VU Meter, slowly increase the gain until the loudest sections of the audio source are shown in the yellow area of the meter. Ideally, you want to be as close as possible to 0dB or Unity (green or first yellow LED).
    • Note: When setting the gain, never allow a signal to go into the red because it means that the signal is too loud and will distort. If the gain knob is all the way to the left (no gain) and your VU meter is in the yellow or red section, your source signal is too high, and you need to lower it at the source. This sometimes happens with active bass guitars and electric guitars using pedals or keyboards.
  5. Repeat the same procedure for each channel until all your input signals are as close to 0dB or unity as possible, never letting the loudest sections go beyond the yellow LEDs.

Here are some suggested starting points for setting the gain on an analog mixer. Remember, these are just starting points, which could vary from mixer to mixer and from different sound sources. Use them to start off but always use the gain setting procedure explained above to set the gain for each channel.

The image below also shows the gain knob position for each of the suggested gain settings.

  • Vocals Using Dynamic Microphones: 2 o’clock
  • Speech Using Shure SM58: 3 o’clock
  • Instruments using DI Box: 9 o’clock
  • Miked Instruments: 10 o’clock
  • Condenser Mics: 9 o’clock
  • Choir Mics: 9 o’clock
the image shows Suggested Starting Points for Setting the Gain knob on an Analog Mixer

Set the Proper EQ Depending on the Sound Source

The second most important thing you need to do to get a good sound when setting up a mixer is to EQ each channel properly.

EQ is the short term for equalization. It is the process in which sound is mixed to provide an equal, balanced tone for the listener. This is done by manipulating the sound sources’ frequencies to either boost or decrease specific frequency envelopes so that it sounds clear.

The difficulty when equalizing different sound sources is that there is no such thing as one fits all EQ setting. To EQ, you need to develop your ear to recognize what “good sound” is.

Of course, some of this is down to personal preference, but there are some universally acknowledged truths that equate to bad sound. Essentially, you are trying to make the sound as clear as possible for the audience without sudden jumps or peaks in the mix.

Getting into the nitty-gritty details about equalizing specific sound sources goes beyond the scope of this article, but don’t worry, I have a 4000+ word article showing the procedure you need to follow and providing specific tips on how to EQ sound sources such as vocals, acoustic guitars, electric guitars, bass guitar, piano and keyboards, drums, etc. Plus, I explain in detail the EQ architecture of a mixing console so that you understand what each knob in the EQ does and how to use it properly. Click Here to check it out.

But here are a few quick, summarized tips to help set the proper EQ.

EQ Each Channel Individually

The best way to EQ a sound source is to hear it by itself. Some amateur sound engineers like to EQ while all channels are playing. This is the wrong approach because you first need to EQ each channel separately to make sure it sounds as clear as possible before doing it with all the channels simultaneously.

After each channel has been equalized individually, run a sound check with all the inputs playing to make minor adjustments as necessary to complement the mix.

First Cut, then Boost

The secret behind good equalization is to cut out problematic frequencies before boosting anything. The first step you must take when doing EQ is identifying unwanted frequencies.

Once you have identified problematic frequencies, try to cut them from the mix by lowering the EQ knobs. This cleans up the overall sound, giving the frequencies you want more clarity.

When doing a soundcheck in a venue, the best practice is to start with all the EQ knobs in your mixer set to 12 o’clock or 0 dB. That way, you can hear the incoming signal with a neutral EQ to identify which are the problematic frequencies to cut them out or what is lacking to boost it.

Use a High-Pass (Low-Cut) Filter

When mixing vocals, string instruments, acoustic guitars, and in some cases, electric guitars, always use a high-pass, also known as a low-cut filter, to eliminate any muddiness present in the audio signal.

When a signal sounds muddy, your audience can’t hear things clearly, and this is due to weak harmonics and a smeared time response in the lower frequencies.

So, to clean up your mix, use the handy high-pass filter that comes with your mixer; it will help a lot. The sweet spot zone for high-passing or low-cutting sounds is 100 Hertz and below.

The high-pass filter switch is usually located above the gain knob or next to the PAD switch. I have highlighted it in the image below for your reference.

The image shows a High Pass or Low Cut Filter Switch on Different Mixing Console Brands

Make Small Incremental Changes as Necessary

After you have equalized each channel separately and run a sound check, things can change after the venue is filled with the audience. This is due to changes in the acoustic characteristics of the room, which are very dynamic and can change suddenly.

This means that adjustments are sometimes necessary throughout the show or event. If you must change the EQ or gain, always make small changes at a time.

Make sure that any changes are extremely slow and incremental. This can be hard if you are under pressure during a gig, but a sudden spike or change in sound will be more noticeable than the current one. You can make it far worse and may end up with feedback or low-end rumbling in the bass.

Besides, working slowly is usually all you need to make a sound correction. Even a slight tweak when doing EQ can have huge differences.

Additionally, keep it simple and focus on using one frequency range for the channel.

The image below shows a breakdown of a typical analog audio mixer EQ section. 

the image shows the Breakdown of a Typical Audio Mixer EQ Section

Set The Volume Faders Correctly to Deliver a Balanced Mix.   

After you have set the gain and equalized each sound source separately, it is time to have all the channels play so that you can adjust their volume to create a balanced mix.

A good practice is to sit back and hear how everything sounds together. That way, you can identify what channels need adjustment and make minor adjustments at a time until you find a well-balanced sound.

When listening to all the channels playing simultaneously, try to concentrate on listening to one sound source at a time to hear how it blends with others.

At this point, you might have to make slight EQ and volume adjustments to get a clear-sounding mix. Remember that the main goal is to deliver a well-balanced sound to your audience.

Here are a few more tips to look out for to get a balanced mix:

Pay Special Attention to the Vocals

The vocals are the most important part of the mix in a live sound or recording setup. Therefore, you must pay special attention to the main vocalist and backup singers. The instruments are also important, but as they are accompaniment, they can never overpower the vocals.

When setting up a mixer to produce a good sound, you’ll soon find that vocals are the hardest to get right because each vocalist has a unique tone. So, you might have to spend extra time making sure the vocals sound right. This goes from setting the EQ to finding their place in the mix.

Since vocals are the most important part of the mix, I devoted an entire article providing the best tips and mixer settings for vocals that you can check out by clicking here.

Dial-In Compression Settings, if Necessary

You might find that some instruments or vocals have a dynamic range that’s all over the place (dynamic range means the ratio between the softest sound to the loudest sound).

When listening to your mix, if you notice that a signal or sound is all over the place, you can use an audio compressor to lower its dynamics. Just remember, too much compression will cause a sound to seem dead and takes the character out of it.

Most mixers have a one-knob compressor that you can use to help you even out the sound on a specific channel. To use it, have the offending channel play and increase the knob slowly until you don’t notice the changes between the soft and loud sounds as much. The image below shows you a typical one-knob compressor on a mixer.

To get better results, you need to use an external compressor as they have more settings, such as ratios and attack and release times, that gives you more control over the sound source.

There are several ratios that are considered sweet spots for your dial-in compression settings, including 3:1, 4:1, and 6:1. Be sure to go through your various attack and release settings so that you can find one that matches your need to get even, balanced sound from your mix.

the image One Knob Compressor on  Different Mixing Console Brands

Final Thoughts

If you were wondering how to set a mixer to produce good sound, in this post, I have shown you the three most important aspects you must do to get the best results. Always remember that the end goal is to produce the most natural, clear sound possible for the audience to enjoy. There is more that goes into setting up PA systems that I cover on this website. If you would like, browse the site to learn more by clicking here.  

How to Connect a Powered Subwoofer to Passive Speakers

Adding powered subwoofers to an existing PA sound system with passive speakers is easier than you might think.

The are several ways to achieve this, but the easiest and more straightforward method of connecting a powered subwoofer to passive speakers is to take the audio signal from the main outs of the mixer, feed it into the powered subwoofer first, then use the internal crossover of the sub to feed the amplifier that powers the passive speakers.

So basically, the subwoofer sits between the mixer and the amplifier that feeds the passive speakers.

The advantage of using this method is that you can integrate a subwoofer into an existing system without needing to use Aux Sends, Subgroups, or external frequency crossover. And it only takes a couple of extra XLR or TRS cables.

In this post, I will show you a couple of ways you can use to connect a powered subwoofer to passive speakers. Best of all, you can do it in just a few minutes using a couple of cables. If you have powered speakers instead and want to add subwoofers, check out this article as I explain that process in detail. Let’s get started.

Two Simple Methods to Connect Powered Subwoofers to Passive Speakers

The first method is by having the powered subwoofer sit before the amplifier that powers the passive speakers. Basically, the signal from the mixer goes first to the sub, then continues its path to the amp.

The second method is by connecting the mixer to the amplifier first, then using the line-out of the amplifier to send the audio signal to the powered sub. Please note that this method only works if the amplifier that powers the passive speakers has a line out for each channel. If it doesn’t, you must use the first method.

Before we continue with the step-by-step process to make the connection using any of the two methods, there are a few things we need to know, which I explain in the following sections.

Getting to Know Your Subwoofer’s Input/Output Structure

If you look at the back of your active subwoofer, you will notice several XLR or XLR/TRS Combo connectors used to receive and send signals to and from the sub (Check the image below for your reference).

Active subwoofers have a built-in feature called a “Frequency Crossover.” A crossover, also labeled X-Over for short, is an electronic frequency-dividing network that splits a full-range audio signal into several bands, namely Highs, Mids, and Lows. 

The subwoofer takes on the low frequencies and sends out the Mid/High frequencies to be amplified by the full-range tops or passive speakers, as is the case in this article.

In other words, to add a subwoofer to an existing PA system that uses passive speakers and an amplifier, we need to take the signal coming straight from the mixer, split it up into lows, mids, and highs using the sub’s crossover network to feed the correct frequency to each component.

To simplify things and connect a powered subwoofer to passive speakers, we take advantage of the built-in crossover feature that the powered sub already has, minimizing complexity while getting excellent results.

Powered Subwoofer’s Input-Output Structure

Getting to Know Your Passive Speakers Amplifier’s Input/Output Structure

As mentioned previously, leveraging the amplifier’s line-outs is the second method we can also use to connect powered subs to an amplifier that powers passive speakers.

Basically, with this method, you would leave the connection the way it is. All you would have to do is to locate the line-outs on the amplifier, then run cables from there to the powered sub’s input.

This method is perfect if you have a sound system already installed in a fixed location, such as a church or an event hall.

To locate the line-out on the amplifier, look in the back, as they are usually found next to the input channel. They are labeled “Line Out,” “Link/Out,” or “Thru/Out,” depending on the manufacturer. See the image below for your reference.

Amplifier’s Input-Output Structure

Cables You Need to Make the Connection

To connect the mixer to the powered subwoofer, you need to use balanced TRS or XLR cables, depending on the type of connector your subwoofer uses.

Most subwoofers come with balanced XLR/TRS Combo connectors for the input and XLR for the output (output meaning going to the Tops or, in our case, going to the amplifier that powers the passive speakers).

Some brands only use XLR for the input and output. So before picking up cables to make your connection, always check your powered subwoofer to know what cables to use.

Always use a balanced XLR or TRS connection when going from your mixer to the subwoofer, as it helps to avoid noise in lines, thus delivering better audio quality.

If you don’t have these cables on hand and need to buy them, here are a couple of links to Amazon. You can choose the length according to your needs, but please check what type of connectors your subwoofer uses before buying:

  • Balanced XLR Cable
  • Balanced TRS Cable

Steps for Connecting a Powered Subwoofer to Passive Speakers

Now that you know the input/output structure of your powered subwoofer and amplifier and have the correct cables on hand, it is time to proceed with the connection. Here are the steps for both methods.

Method 1 – Subwoofer Before the Amplifier

  1. Before starting, confirm that all your equipment is turned off and that all the volume knobs and faders are down. This is to avoid sudden loud pops that could potentially damage your equipment.
  2. Set the subwoofers on stage or where you need them at the venue and plug them into the closest power source.
  3. Locate the “Main Outs” or “Main Outputs” on your mixing console and plug the XLR or TRS cables, one to the left channel and one to the right channel. Note: the type of connector you use will depend on your subwoofer’s input connector type. 
  4. Take the other side of the left channel cable and plug it into the left subwoofer’s input. Do the same for the right channel subwoofer.
  5. Take another XLR-to-XLR cable and plug one side into the left subwoofer’s “High Pass Output.” Take the other side of the cable and plug it into the “amplifier input” that feeds the passive speakers. Repeat the same process to connect the right channel sub.
  6. Connect the passive speakers to the amplifier.
  7. At this point, turn all the equipment on and set the volumes and gains to a proper level to run a test.

Here is a diagram depicting the connections you need to make using method 1. Use it for your reference.

Diagram for Connecting a Powered Subwoofer to Passive Speakers where the subwoofer sits before the amplifier leveraging the sub's crossover - Method 1

If you don’t like having a bunch of cables all over the place messing up your setup, did you know you could connect most of your PA system wirelessly? If it sounds interesting, check out this article as I explain the process of connecting your PA system Wirelessly in detail.

Method 2 – Using the Amplifier’s Line Outs

  1. As always, I recommend turning off all the equipment before making any connections. Also, don’t forget to turn down all the volume knobs and faders. That way, you avoid sudden loud pops that could damage your equipment.
  2. Connect your passive speakers to the amplifier. Then connect the mixer’s main outs to the amplifier’s input. Basically, you want to connect your passive speakers as you always do.
  3. Set the subwoofers on stage or where you need them at the venue and plug them into the closest power source.
  4. Locate the “Line Out” or “Link/Out” on the amplifier and plug an XLR or TRS cable into each channel. One to the left channel and one to the right channel. Note: The connector you use will depend on your amplifier line outs and the subwoofer input. 
  5. Take the other side of the cable coming from the Line Out of the amplifier and plug it into the subwoofer’s input. Repeat the same process to connect the other sub if you have one.
  6. At this point, turn all the equipment on and set the volumes and gains to a proper level to run a test.

PLEASE NOTE: Never connect the output of the amplifier (the side that connects to the speakers) to the sub’s input, as this will immediately damage both of your equipment. Make sure you are taking the line going to the subwoofer from the connector labeled “Line Out,” “Link/Out,” or “Thru/Out.” If you don’t see this on the back of your amplifier, next to or below the input connector, your amp doesn’t have this feature, and you can’t connect the powered subwoofer using this method. In that case, as mentioned previously, you need to use method 1.

Here is a diagram showing the connections you need to make when using method 2. Use it for your reference.

Diagram for Connecting a Powered Subwoofer to Passive Speakers where the amplifier sits before the subwoofer - Method 2

Final Thoughts

Now you know if you were wondering how to connect a powered subwoofer to passive speakers. And as you can see, it is an easy task. I hope this post was helpful to you.

There’s so much to know when it comes to mastering audio! For more audio engineering tips and tricks, check out the rest of our informative blog articles here. 

2 Easy Ways to Connect Powered Speakers to a Mixer

Connecting powered speakers to a mixer is a straightforward process you can easily do. In this post, I will show you two easy ways you can use to achieve this.

The first method uses cables, and the second uses a wireless system to avoid having cables all over the place.

Before we get into the nitty-gritty details of how to connect powered speakers to a mixer, if you want the quick answer, here it is: All you need to do is run a couple of XLR or TRS balanced cables from the mixer’s main output to the inputs of each one of the speakers, one to the left and one to the right channels.

If you are not familiar with an audio mixer and audio equipment in general, the answer I just gave you could be hard to understand. That’s why I will go into more detail to show you the proper procedure to achieve this in no time. Plus, I will provide you with easy-to-follow connection diagrams to make it as easy as possible. Let’s get started.

Choosing The Correct Type of Connection

Before we go any further and start connecting things, we need to know what type of connection we want to use to get the correct cables.

There are different types of connectors used in audio equipment, but the most widely used are XLR and 1/4” Jack plugs for Balanced or Unbalanced connections.

If you already know the difference between balanced and unbalanced signals and the types of connectors used for each, you can skip to the next section. If not, read this section, as this is important to know when connecting a powered speaker to a mixer or any other audio equipment.

XLR Connector

The XLR is a style of audio connector that is used primarily for professional audio connections. It has three pins for carrying the signal, positive (red), negative (black), and Ground (cable shield).

XLRs are balanced connections meaning that they cancel out noise. The advantage of balanced signals is that they reject noise from RF or ground loop interference.

This is a must if your cable runs going from the mixer to the speaker are more than 10ft long. The image below shows an XLR connector, both male and female.

1/4″ Jack Connector

This style of connector is also known as a phone jack plug. It was used initially for telephone switchboards and today is still widely used to carry analog audio signals. There are two versions of it, the 1/4″ balanced TRS connector (Tip, Ring, Sleeve), and the 1/4″ unbalanced TS connector (Tip, Sleeve)

The image below shows both versions of a 1/4” jack plug for your reference.

Image showing Balanced XLR/TRS and  Unbalanced TS Connectors

Now that you know the two types of connectors there are for connecting a mixer to powered speakers, you can choose the one that is more convenient for you.

I recommend you use balanced TRS or XLR as this will always be better to avoid noise in lines, thus delivering better audio quality.

If you don’t have these cables on hand and need to buy them, here are a couple of links to Amazon; you can choose the length according to your needs:

  • Balanced XLR Cable
  • Balanced TRS Cable

Getting To Know Your Mixer’s Output Channel Section

Mixing consoles have lots of knobs and several input and output connectors. If you don’t know the basics of a mixing board, looking at one can be pretty intimidating because each knob and connector has its function, and you wouldn’t know where to start.

But don’t feel intimidated because audio mixers are actually straightforward to follow. A mixing console is divided into two main sections: the input and output sections.

The input section is composed of each channel strip, and the output section is composed of the “Main Outputs,” “Subgroup Outputs,” and “Auxiliary Outputs.” In the image below, I have divided the input and output sections of a mixer, the one in green is the input section, and the red is the output section.

Image showing the Input and Output sections on an audio mixing board

Of course, there is more going on with each channel strip which is beyond the scope of this article, but if you are interested in learning more about the basics of mixing consoles, click the link as I have a dedicated, easy-to-follow article that explains this in more detail. 

For the scope of this article and to correctly connect the mixer to powered speakers, we will concentrate on the mixer’s “Main Output.”

Before going any further, you need to locate the Main Output XLR or TRS connector on the mixer’s output section, which we will use to run the signal to the powered speaker.

The image below shows the Main Output connector you need to find on your mixer. This is where you will connect the two cables going to the speakers.

Image showing a Few Examples of Main Outs on Different Audio Mixer Brands

Getting To Know Your Powered Speaker’s Input Section

Now that you know where to get the output signal from the mixer, it is time to locate the input channel on your powered speaker to which you will connect the signal coming from the mixer.

Most powered speakers have two input channels and offer a wide range of input connectors you can choose from to connect your equipment.

We will use either the XLR or TRS connector to make our connection. In most cases, powered speakers come with a Combo XLR/TRS input connector (See the image below for reference).

The combo XLR/TRS connector is the one we will use to connect the cable from the mixer to the speaker.

If you decide to use an unbalanced TS connector because that’s the cable you have and your run is short, connect it to the same plug where you connect the TRS, as shown in the image below.

Please Note: Your speaker may have a MIC/LINE switch on top or under the GAIN/VOLUME Knob. If it does, make sure to switch it to Line. This is because the speaker has a gain structure that makes it more sensitive for mics, as they need more gain to work correctly. But because we are connecting the speaker to a mixer with a line-level signal, it requires less boost.

Image showing a combo XLR/TRS Input Connector On a Powered Speaker

Steps to Connect Powered Speakers to a Mixer – Using Cables

  1. Before we start connecting cables, I recommend turning off the mixer and the speakers. That way, you avoid sudden pops that could potentially damage your equipment.
  2. Bring the master volume faders in the mixer down. Turn the volume down on the speakers as well.
  3. Next, connect the cables to the Main Output of the mixing console—one to the left and one to the right channel.
  4. Take the other side of the left cable and connect it to the left speaker. Do the same for the right-side speaker.  
  5. Now that everything is connected, turn on the speakers and the mixer.
  6. Set the volume on each speaker to the middle.
  7. If your mixer uses faders, bring the left and right channel faders to “0” (0 dB) or “U” (Unity Gain). If the mixer has a knob for the master volume, turn it halfway.
  8. Play some music or use a microphone connected to the mixer to check the volume structure of the setup by slowly increasing the volume slider until you hear sound coming from the speakers adjusting it to suit your needs.
  9. Use the EQ knobs to adjust the highs and lows until it sounds like you want.

The image below shows the connections you need to make to connect two powered speakers to a mixer. If you need to expand your setup to connect four powered speakers to a mixer, I have an article explaining the procedure in detail. Click the link to check it out.

Image showing a diagram to Connect Powered Speakers to a Mixer Using Cables

Connect Powered Speakers to a Mixer Wirelessly

Up to this point, I have covered connecting the speakers using cables. But what if you want to have a setup with no cables to avoid tripping hazards or to have the freedom to place the speakers anywhere you desire in a venue? To do this, you need a wireless audio system for active speakers, such as the Alto Professional Stealth MKII-UHF system (link to Amazon).

The advantage of this system is that you can replace up to 200 feet of console-to-speaker cabling without compromising audio quality. Moreover, you can quickly and easily expand to more speakers by getting extra receivers.

This is a game changer when it comes to connecting a mixer to active speakers because it cleans up messy cables and makes your setup more professional.

This is especially true for people who DJ at parties bringing their own equipment, or for people who rent out audio systems for parties or events.

Steps to Connect Powered Speakers to a Mixer Wirelessly

  1. As mentioned previously, I recommend turning off the mixer and the speakers before starting to make any connections. That way, you avoid sudden pops that could potentially damage your equipment.
  2. Make sure that the master volume faders in the mixer and the speakers’ volume are all the way down.
  3. Locate the “Main Out” or “Stereo Out” connectors in the mixing console.
  4. Choose between XLR or 1/4” TRS jack plugs to connect the output of the mixer to the input of the transmitter of the Alto Stealth system.
  5. Use the included XLR to TRS cable to connect the output from the receiver unit to the input of each powered speaker.
  6. After connecting the XLR cable to the speaker, turn the volume on the speaker halfway and turn it on. Also, turn on each receiver unit.
  7. Now you can turn on the transmitter unit and the mixer.
  8. On the transmitter, set the mode to Mono or Stereo. If your mixer is stereo, choose the stereo mode.
  9. Press the “VOL” button on the transmitter unit to set the left and right channels’ volume at which it will broadcast.
  10. Press the “CH” button to select a broadcast channel on the transmitter for the left and right channels. Make sure to choose the same channel number on the receiver units.
  11. Play some music on the mixer and slowly increase the main volume until you hear sound from the speakers.
  12. Adjust the volume of the speakers or transmitter unit until you are satisfied with it and perform a sound check.
  13. Use the EQ knobs to adjust the highs and lows until it sounds like you want.

Here is a diagram for your reference on how to make the connection.

Image showing a diagram to Connect Powered Speakers to a Mixer Wirelessly

Final Thoughts

Now you know how to connect powered speakers to a mixer, and as you can see, it is a straightforward process as long as you know where to connect it to. I hope this post was helpful to you.

There’s so much to know when it comes to mastering audio! For more audio engineering tips and tricks, make sure to check out the rest of our informative blog articles here. 

  • « Go to Previous Page
  • Page 1
  • Page 2
  • Page 3
  • Page 4
  • Interim pages omitted …
  • Page 12
  • Go to Next Page »

Primary Sidebar

Search

Guides & Tutorials

  • Choosing a Portable PA System
  • How to Be a Better Singer
  • Build a Budget Live Streaming System Using PTZ Cameras
  • How to Get the Best Audio Quality on YouYube
  • Setting Up Stage Monitors
  • Mixing Console Basics
  • How to Position PA Speakers
  • Stage Sound System Set-Up
  • How to EQ Live Vocals
  • How to EQ Live Sound
  • Daisy Chain Active Speakers
  • Zoom Audio Settings for Music
  • How to Livestream a Wedding
  • Improve Your Livestream Audio Quality
  • Microphone Preamp Buying Guide

Featured Posts

Treblab X9 Pro: Tough Earbuds, Big Performance

Escape the Noise: Best Affordable Noise-Canceling Headphones

How to Combine Passive and Powered Mixers

What is a Ground Loop? – 5 Simple Ways to Fix the Buzz and Hum

Disclaimer

VirtuosoCentral.com is a participant in the Amazon Services LLC Associates Program, an affiliate advertising program designed to provide a means for sites to earn advertising fees by advertising and linking to Amazon.com.

Home  About  Contact  Disclaimer  Privacy

Copyright © 2019-2025 Virtuoso Central. All Rights Reserved.