This website uses cookies to improve and personalize your visit. Learn more about cookies. Got It

  • Skip to primary navigation
  • Skip to main content
  • Skip to primary sidebar

Virtuoso Central

  • About Us
  • Contact
  • Privacy

Informational

How to Make Powered PA Speakers Wireless

When setting up a PA system for a party or live event, you’ll see lots of wires going everywhere. Thanks to wireless microphones, fewer cables are used nowadays in setups. Still, speakers always need a signal cable to run from the main audio mixer to them.

These cables are usually long, and they create a lot of inconveniences, including tripping hazards for the people walking around the venue. Wouldn’t it be awesome to have a wireless PA speaker system so that no cable runs are needed anymore?

In today’s post, I will present a couple of ways of how to make powered speakers wireless. I will also discuss if it’s possible to use a Bluetooth transmitter on a mixing console to send the signal wirelessly to Bluetooth-capable PA speakers.


Exploring What Options Are Available On the Market

The truth is that there aren’t many options for converting powered PA speakers into wireless. For some reason, manufacturers have lots of options for wireless microphones but none for speakers.

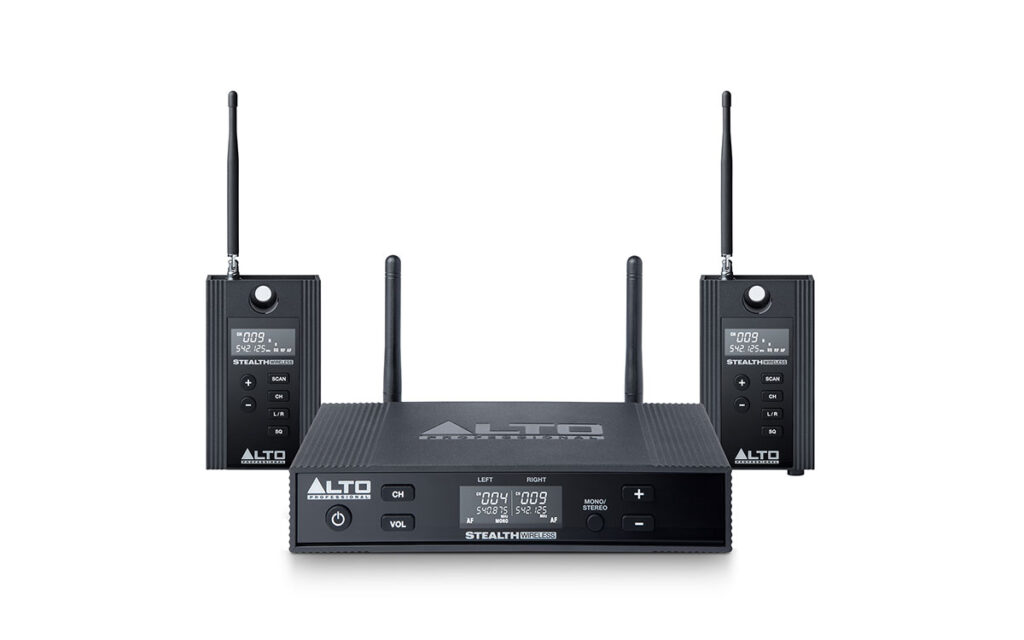
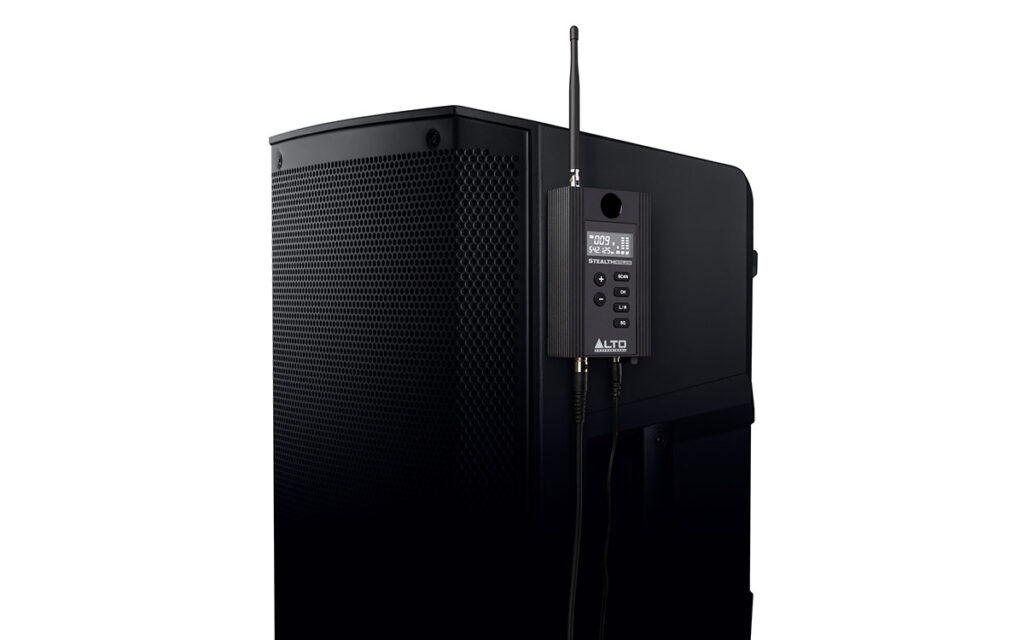
There is a company called Alto that makes a wireless stereo system for active speakers, the Alto Stealth Pro Wireless System for Loudspeakers. This system comes with one stereo RF transmitter and two receivers, one for each speaker.

They give you the option of buying extra receivers called Stealth Expanders to use them in bigger setups. If you were asking yourself how to make your pa speakers wireless, this is the best option.

Image Credits: Alto Professional 

Pro-Level Wireless Speaker System

The Alto Stealth Pro wireless system is excellent because it comes with everything you need to make any powered or passive speaker wireless, and once and for all, get rid of all those audio cables and step into the world of wireless sound. The only problem is that it is a bit pricey.

The Alto Stealth Pro is designed for active speakers. Still, it can accommodate passive speakers as well, depending on your setup. Plus, it is compatible with devices such as mixers, DJ controllers, karaoke devices, or any other audio source.

Features

The transmitter offers two combo XLR-1/4” inputs to accommodate different types of devices. With the available 16 UHF channels, you can be assured that interference will be at a minimum, plus it comes with three controlled squelch settings.

The system’s frequency range is between 540-570 MHz, which falls within the legal wireless frequency range. The operating range is 330 ft (100 m) line of sight, and its frequency response goes between 50Hz-17kHz.

With the dual-channel UHF transmission and True Diversity reception, you can be sure that you will get the best coverage within its operating range for all of your events.

Both the transmitter and receiver units have an intuitive front-panel LCD screen that provides instant confirmation of the configuration. It displays the RF frequency and channel as well as the AF signal level for each channel.

Image Credits: Alto Professional 

Content of the Box

The Alto Stealth Pro wireless speaker system comes with everything you need to setup right away. In the box you will get:

  • Stealth Pro Transmitter (x1)
  • Stealth Pro Receiver (x2)
  • Power Adapters (x3)
  • Mini-XLR to XLR Cables (x2)
  • Removable Antennas (x6)
  • M10 Rigging Bolts (x2)
  • Short Rack Ear (x2)
  • Long Rack Ear (x1)
  • M4 Rack Ear Coupling Bolts (x5)
  • Center Coupling Bracket (x1)
  • User Guide
  • Safety & Warranty Manual
Check Price on Amazon

Steps for Making Active Speakers Wireless

To install and use the Alto Stealth Pro wireless system for powered speakers, follow these steps:

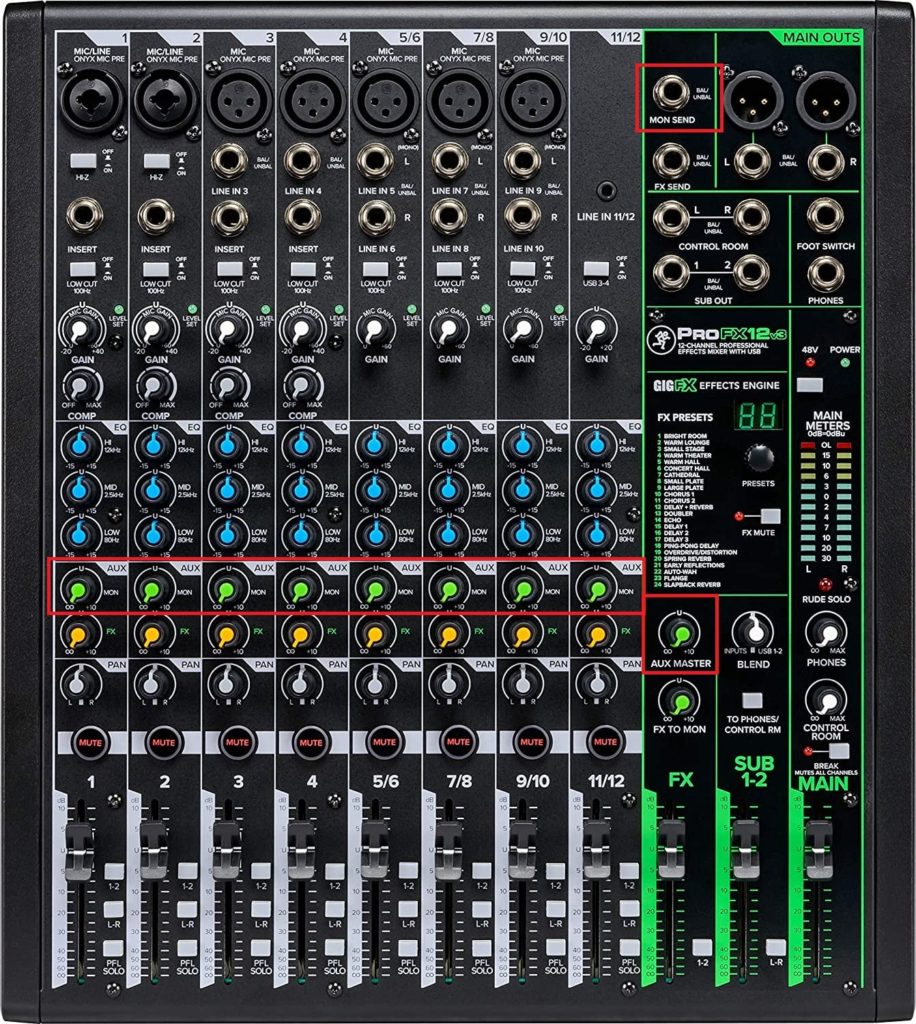
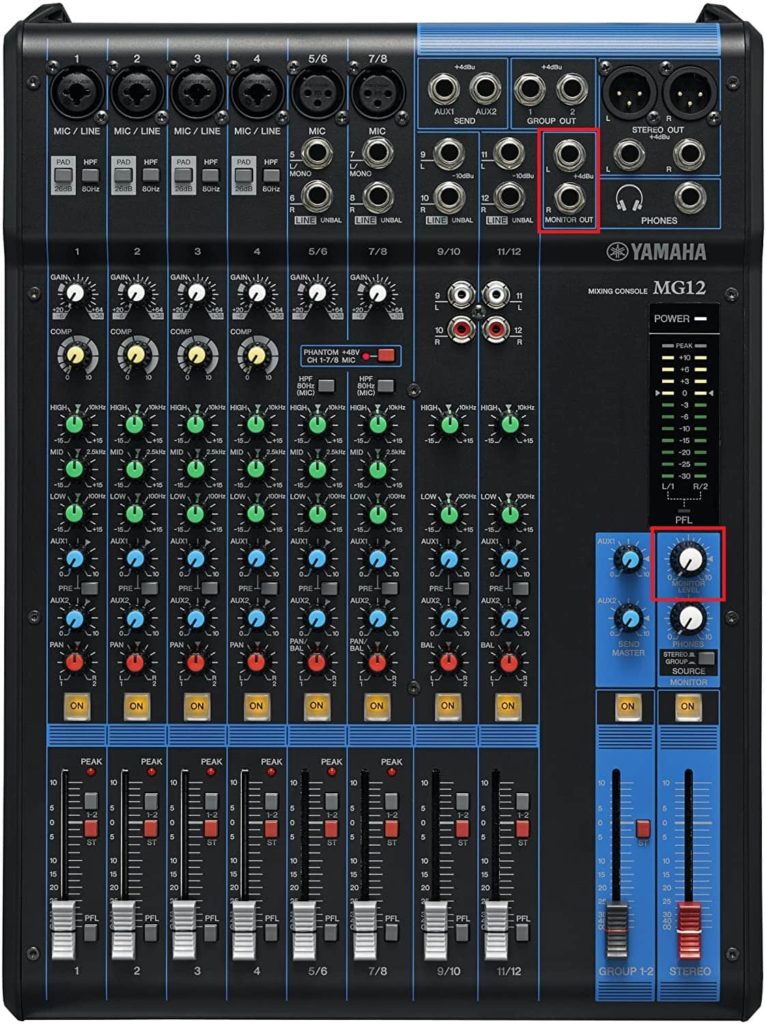
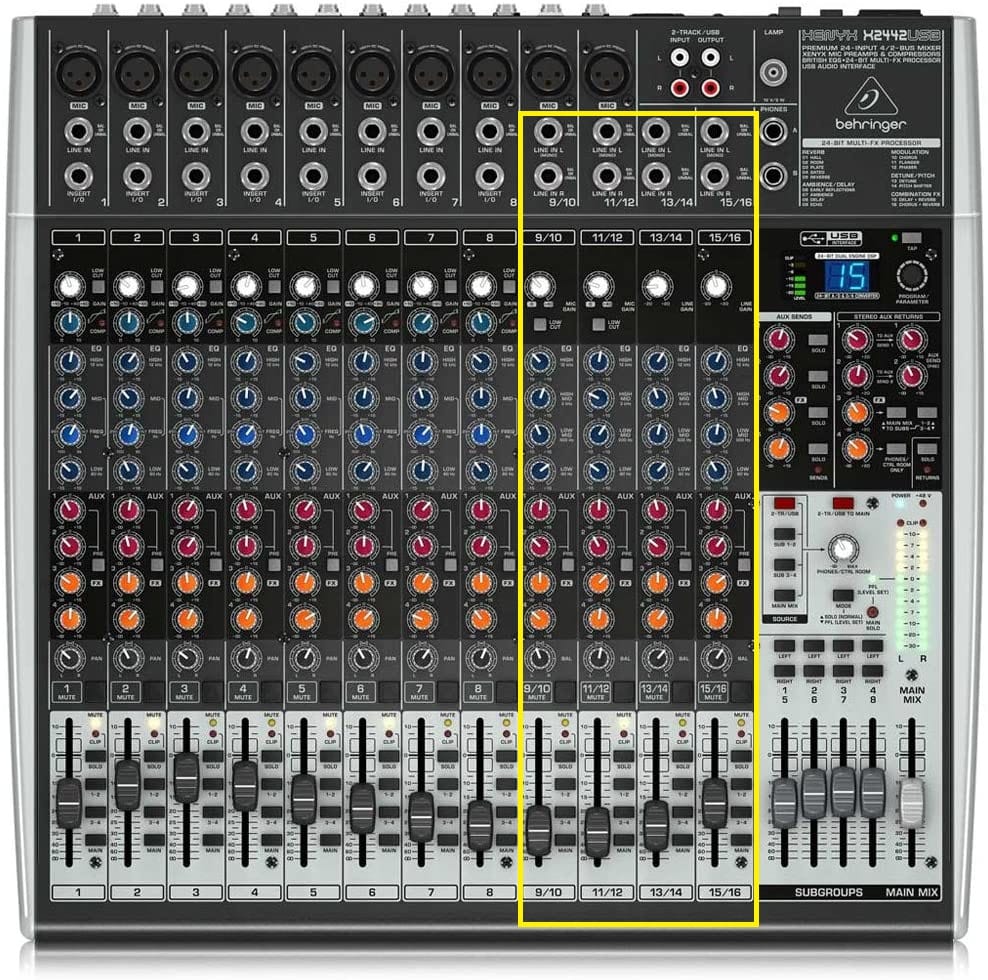
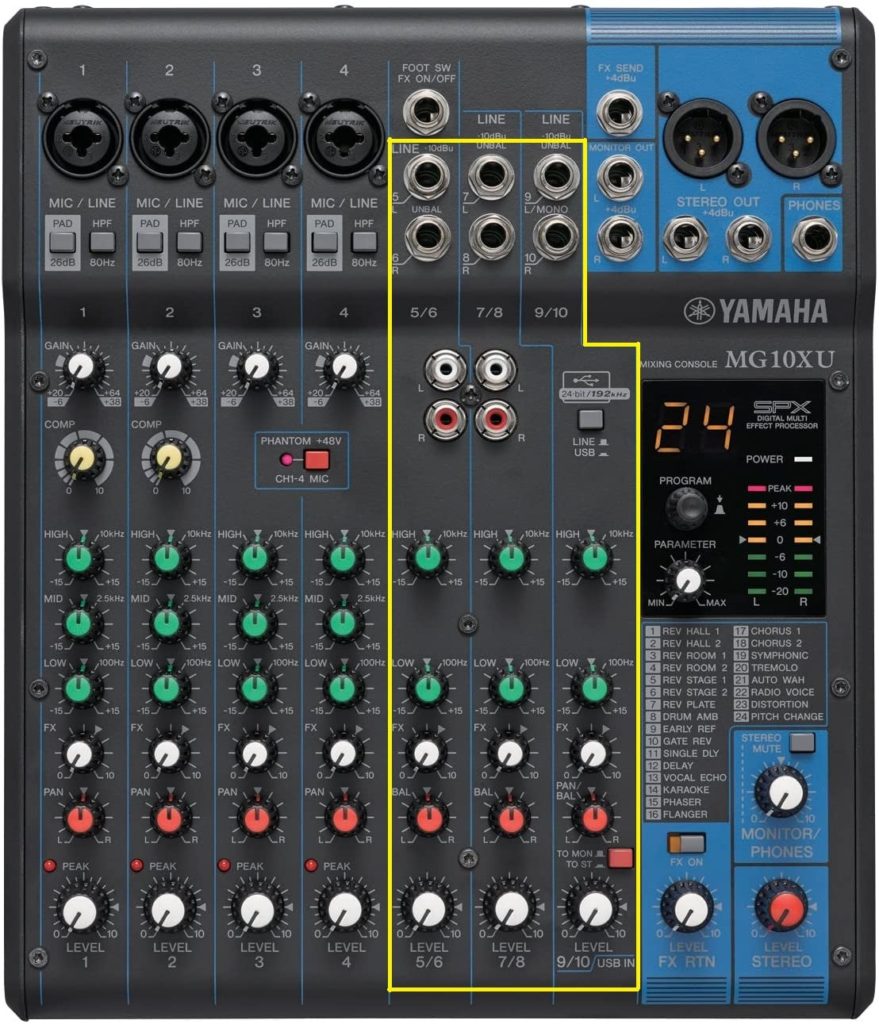
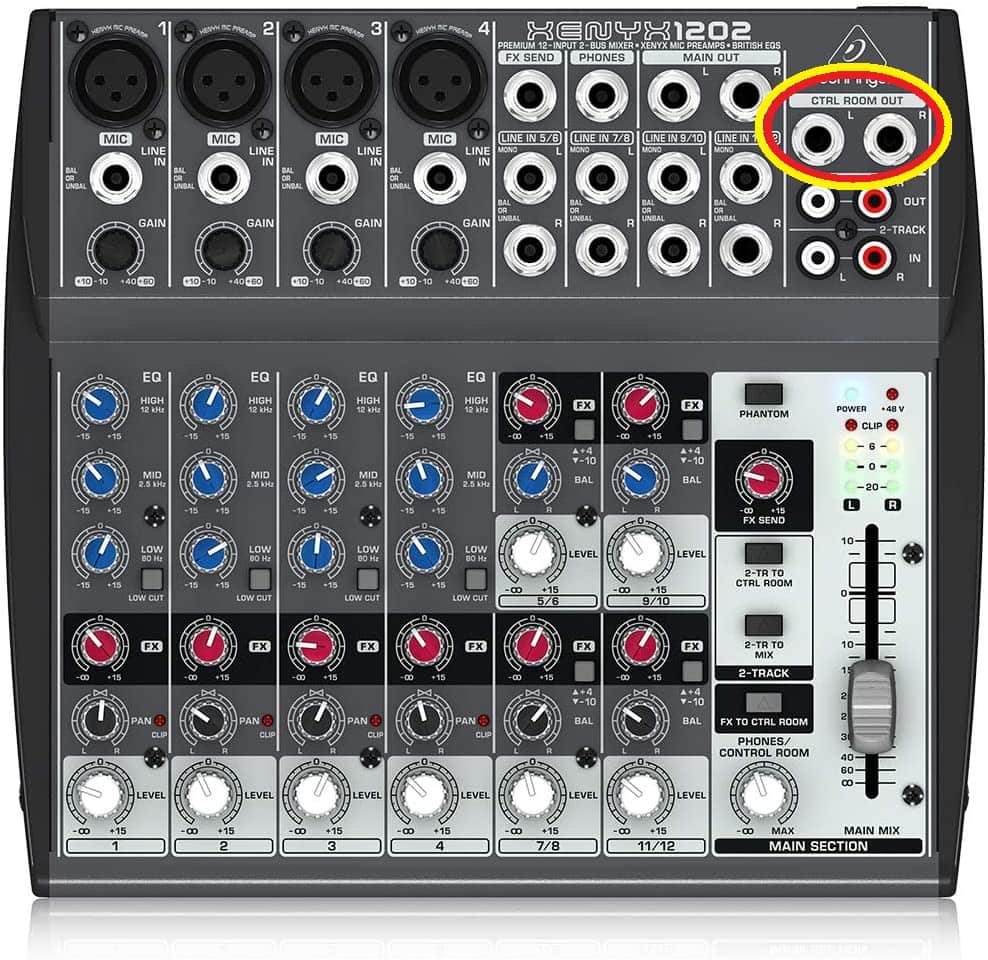
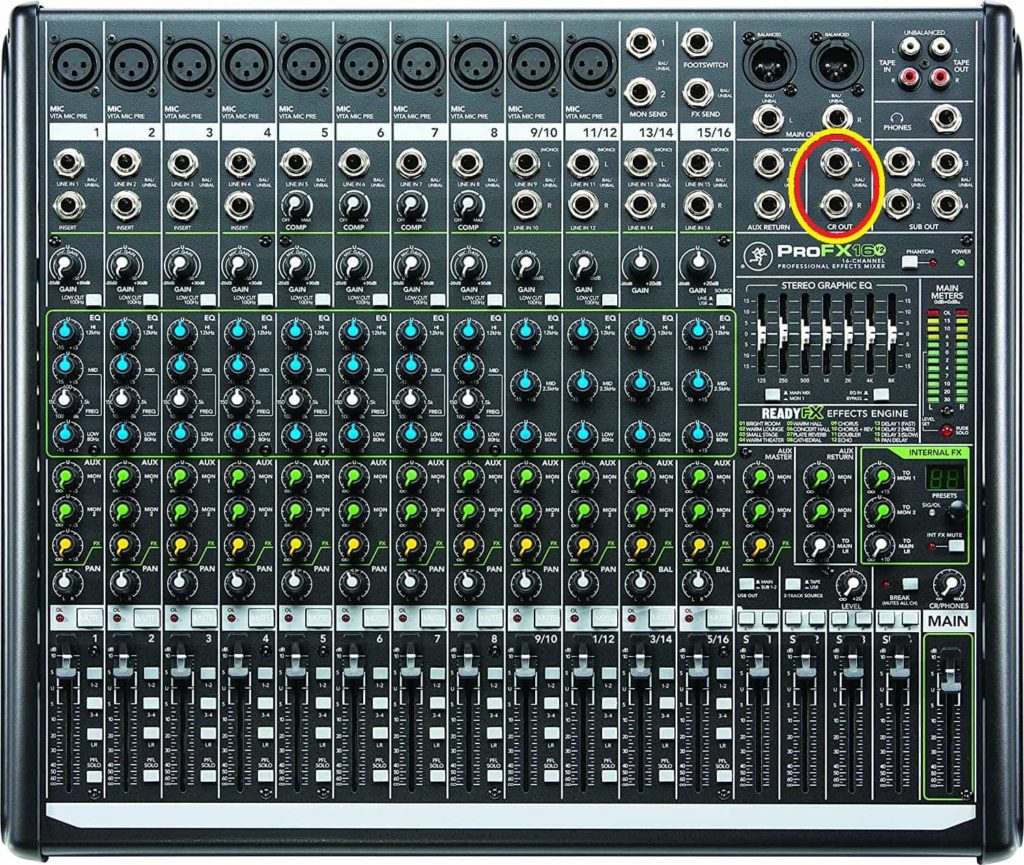
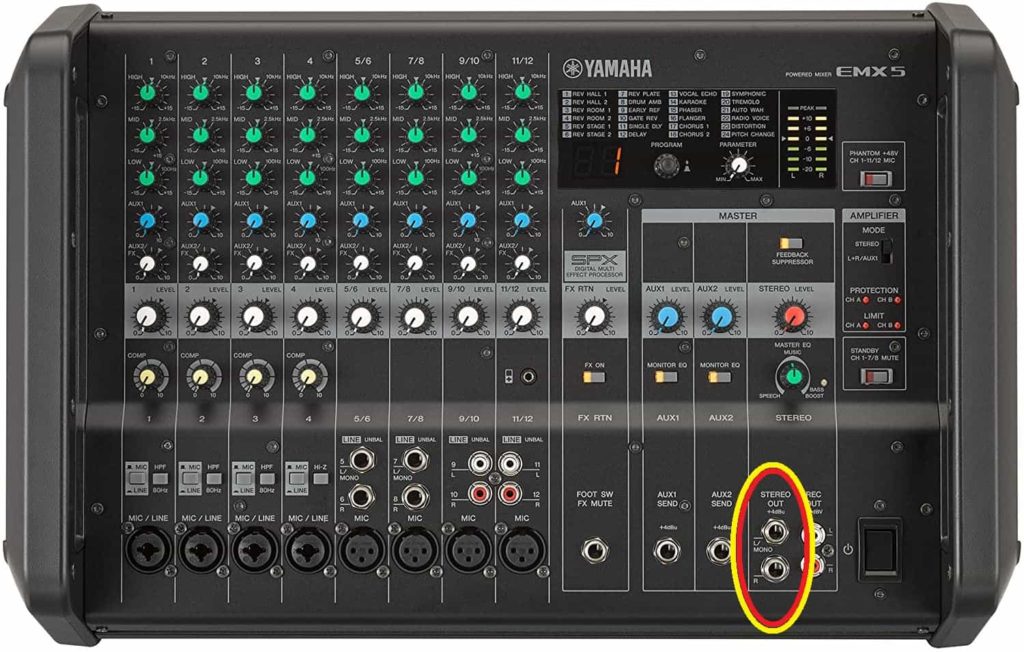
  1. With the mixer, transmitter, receivers, and speakers turned Off, locate the “Main Out” or “Stereo Out” connectors in the mixing console.
  2. Choose between XLR or 1/4” jack to connect between the output of the mixer and the input of the transmitter.
  3. Use the included mini-XLR cable to connect from the output of the receiver unit to the input of the powered speaker.
  4. After connecting the XLR cable to the speaker, turn the volume on the speaker halfway and turn it on. Also, turn on each receiver unit.
  5. Now you can turn on the transmitter unit and the mixer.
  6. On the transmitter, set the mode to Mono or Stereo. If your mixer is stereo, choose the stereo mode.
  7. Turn the volume of the left and right channels halfway on the transmitter unit using the buttons on the front panel.
  8. Select a broadcast channel on the transmitter and make sure to select the same channel number on the receiver units.
  9. Play some music on the mixer, and slowly increase the main volume until you hear a sound coming out of the speakers.
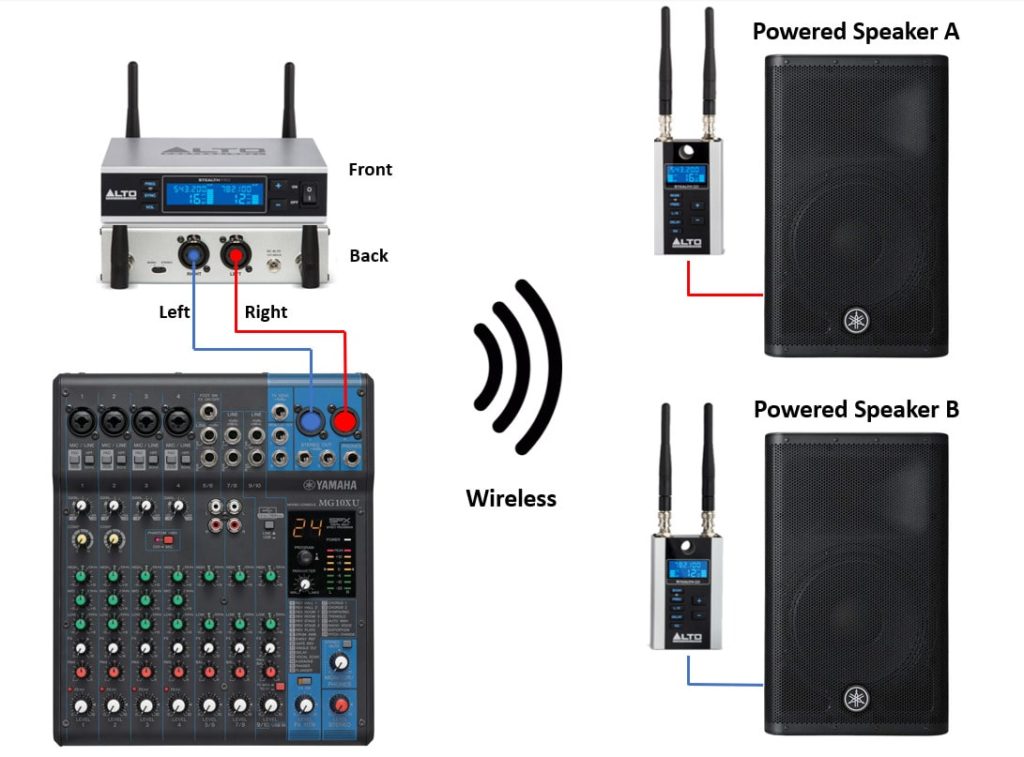
  10. Adjust the volume of the speakers or transmitter unit until you are satisfied with it and perform a soundcheck.

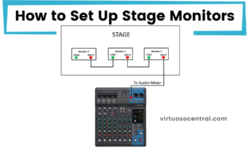
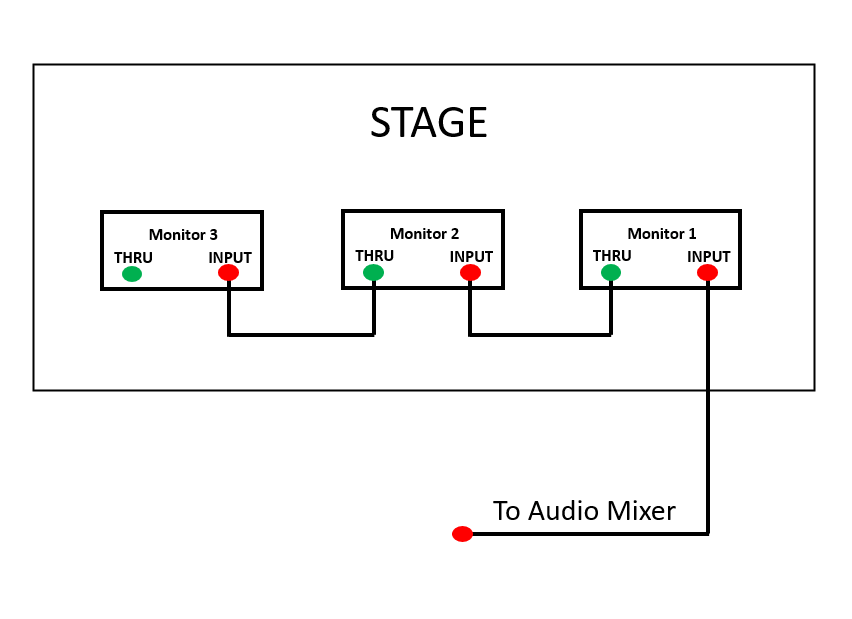
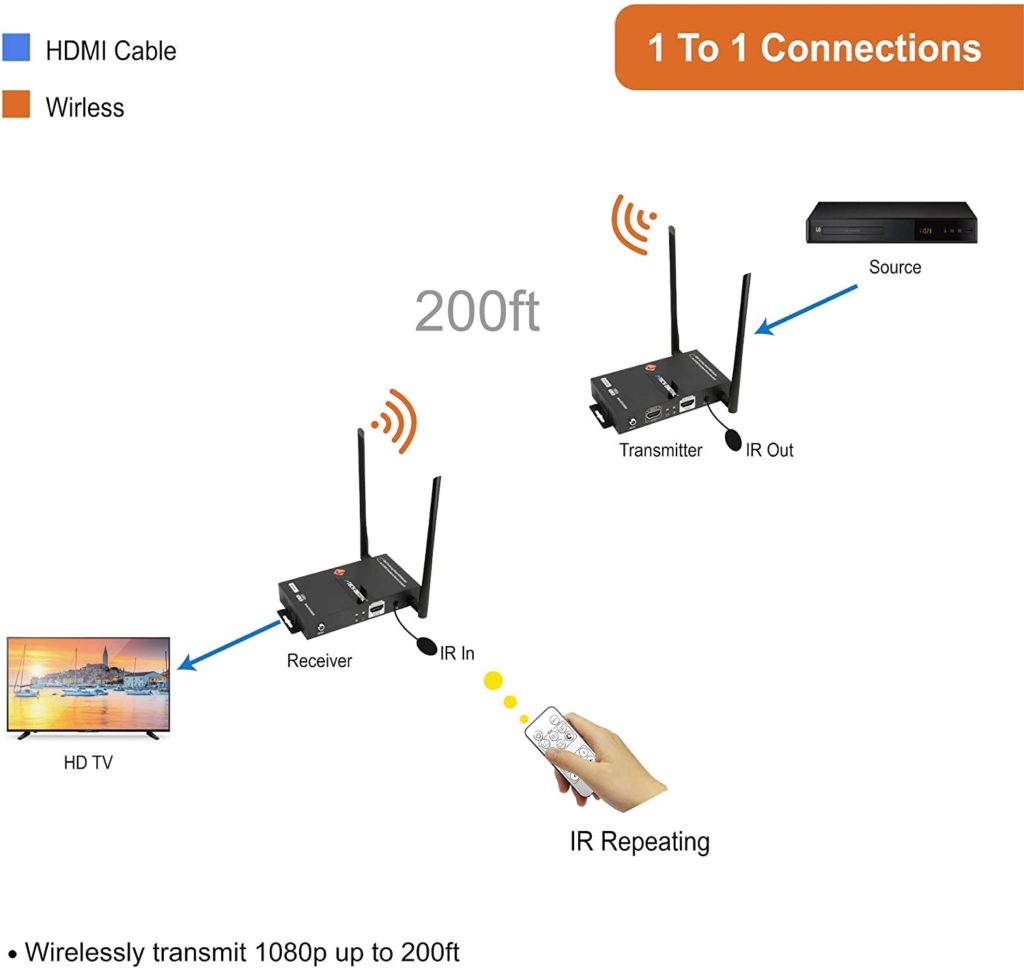
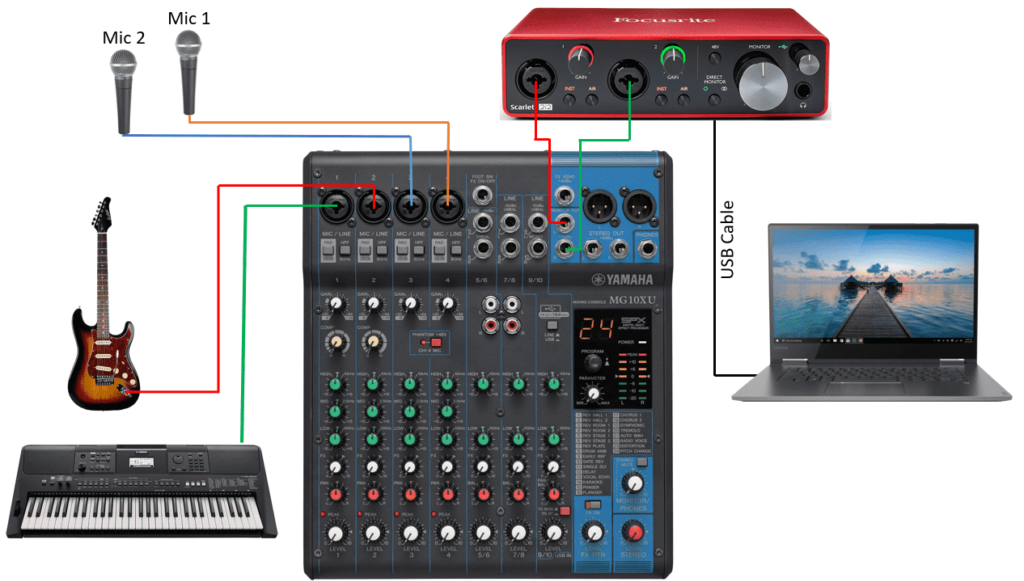
Here is a diagram for your reference on how to make active pa speakers wireless.

diagram for making active pa speakers wireless.

Steps for Making Passive Speakers Wireless

As mentioned previously, the Alto Stealth Pro wireless system can also be used for turning passive PA speakers wireless. To do that, follow these steps.

  1. Make sure all of the equipment are turned off before starting to connect things up.
  2. Locate the “Main Out” or “Stereo Out” in the mixing console.
  3. Use an XLR or 1/4” jack cable for connecting between the output of the mixer and the input of the transmitter.
  4. Use the included mini-XLR cables to connect the output from the receiver units to the input of the power amplifier.
  5. After connecting the XLR cable to the amplifier, turn the volume on the amp to halfway.
  6. Connect the passive speakers to the amp and turn it on. Don’t forget to also turn on the receiver units.
  7. Now you can turn on the transmitter unit and the mixer.
  8. On the transmitter, set the mode to Mono or Stereo, if your mixer is stereo, choose the stereo mode.
  9. Turn the volume for the left and right channels halfway on the transmitter unit using the buttons in the front panel.
  10. Select a channel on the transmitter and make sure to select the same channel number on the receiver units.
  11. Play some music on the mixer, and slowly increase the main volume until you hear a sound coming out of the speakers.
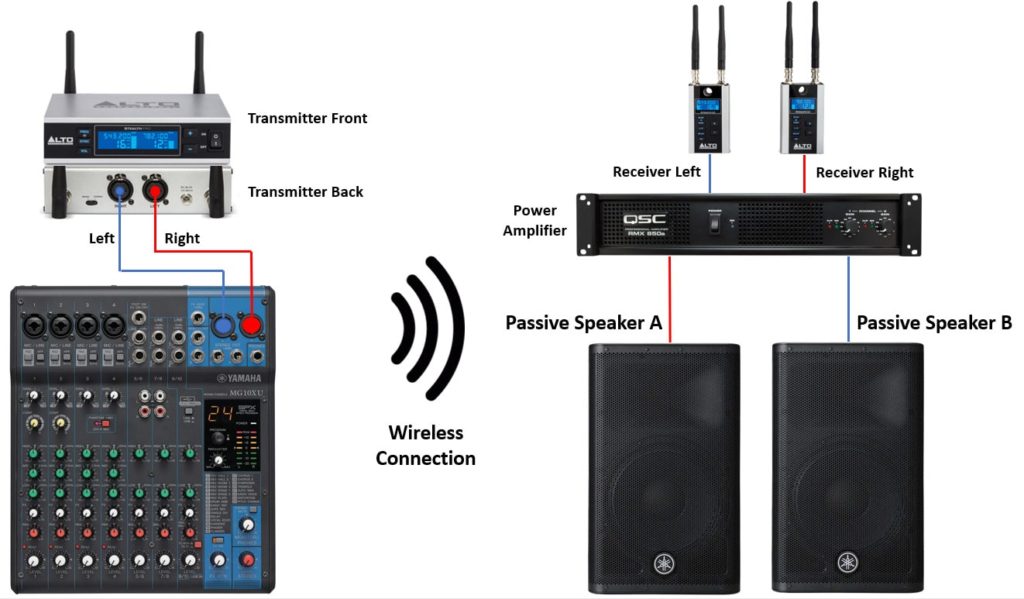
  12. Adjust the volume of the power amplifier or transmitter unit until you are satisfied with it and perform a soundcheck.

Here is a diagram for connecting passive speakers to a mixer wirelessly, use it for your reference.

diagram for connecting passive speakers to a mixer wirelessly

Another Wireless Solution from Alto Professional

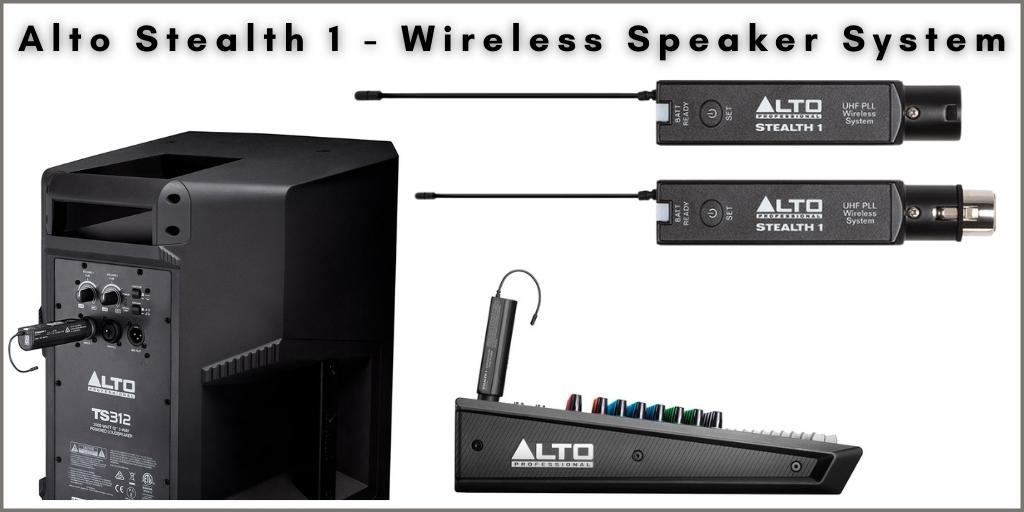
Alto Professional provides another wireless solution for converting any active speaker to wireless, the Alto Stealth 1 Wireless system. This is a more affordable option, but it also delivers excellent results.

Just like the Pro system, it’s easy to set up. The Stealth 1 is a mono UHF wireless system offering balanced XLR connectors for the transmitter an receiver.

Each set comes with one transmitter and one receiver, which means that if you have a stereo setup, you would need to buy two sets. Buying two set will cost you about half of what the Stealth Pro costs.

The audio quality is as good as if the system was connected using wires but without the hassle. This wireless system uses one AA battery for the the transmitter and another AA for the receiver which gives you 4+ hours of operation.

The system uses the reliable UHF band between 542-566 MHz, which falls within the legal wireless frequency range in the US and Canada. The operating range is 100ft (30 m) line of sight, and its audio frequency response is between 50Hz-17kHz.

If you decide to go with this unit, the setup would be very simple. Connect the transmitter on the “Main Outs” of the mixing console and the receiver on the input channel of the powered speaker. Set the same channel on the transmitter and receiver and you are done.

Check Price on Amazon

Another Option for Making Any Powered PA Speakers Wireless

To make any powered speaker wireless, you need to transmit the signal from the mixer or DJ controller to the speaker wirelessly. To achieve this, you can use a wireless instrument set.

I have personally used this option as a more affordable way of making my powered speakers wireless. Although it is more affordable, it’s not going to be as good as the Alto Stealth Pro system.

Using a Wireless Instrument System for Making an Active Speaker Wireless

Wireless instrument systems are designed to make any pluggable instrument such as guitar, bass, or electric violin, etc. wireless. They have an input level control knob to adjust the audio level that comes in.

You can use any wireless instrument system from any brand to try this, but I am going to describe the process using the AKG Perception Wireless Instrument Set because I have used it in my setup and it delivers a good result.

Image Credits: AKG

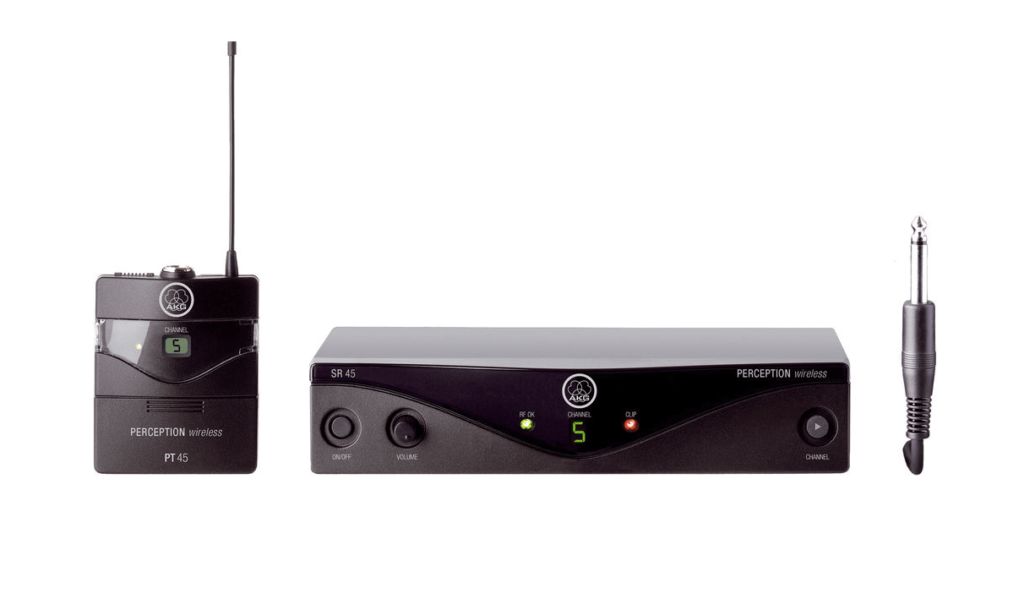
The AKG Perception is a wireless system designed to be used as a wireless instrument system. But thanks to its high-quality audio broadcast and wide frequency range, it can be used for our purpose.

For converting your PA speakers to wireless, you would need two units, one to send the signal to the left speaker and one for the right speaker.

This unit ships with one transmitter, one receiver, and a 1/4” jack to mini XLR cable.

It provides 8 Selectable Frequencies that range between 530 – 560 MHz and an audio bandwidth of 40 Hz to 20 kHz. This system also falls within the legal wireless frequency range and it offers an operating range of 100ft (30.5 m) line of sight.

The transmitter pack uses 1×1.5V AA Battery for up to 10 hours of operation, making it very efficient for any live setup.

By setting up the system correctly, you can use it to broadcast the mixing console’s audio signal to a speaker as long as it is within the system’s range.

Check Price on Amazon

Steps for Making Active Speakers Wireless Using a Wireless Instrument Set

The following steps explain how to use the AKG Perception wireless instrument set to make PA speakers wireless:

  1. I always recommend having all the equipment turned off before starting any setup.
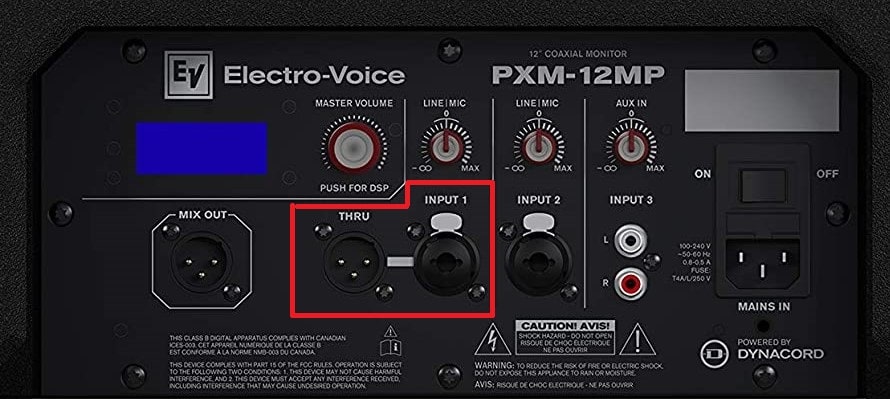
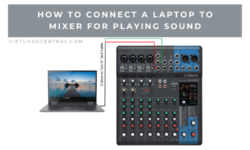
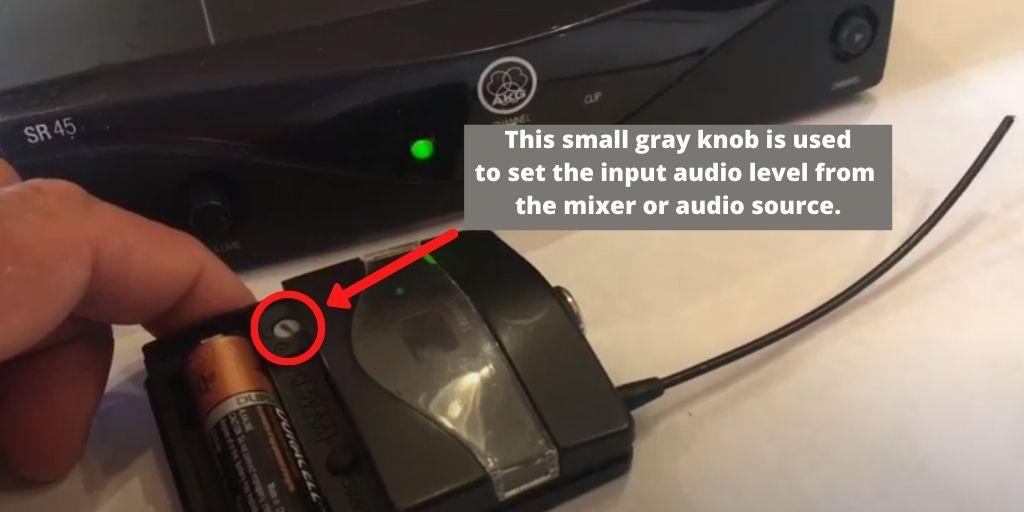
  2. Before connecting the transmitters’ bodypack to the mixer, make sure to adjust the input level. Turn the knob down to about 25% of the volume. Make sure that both transmitters are set to the exact same level. To do that, open the battery cover and look for a small gray knob that is located in the upper left corner above the battery. See the image below for your reference.
  3. Connect the transmitters’ bodypack to the mixer’s outputs using the provided 1/4” Jack cable that comes with the unit.
  4. Take the receiver and place it next to the active speaker. Use the corresponding cable to make the connection between the receiver and the speaker.
  5. Make sure to set one channel for the left and a different channel for the right speaker. For example, if you set channel 5 on the transmitter and receiver for the “Left” speaker, use channel 7 on the transmitter and receiver for the “Right” speaker. The good thing is that you get eight channels to choose from.  
  6. Set the volume of the speaker to about halfway. If, after testing, you feel that the volume is too low, increase it to your likings.
  7. Turn on the mixer, transmitters, receivers, and speakers to do a soundcheck.
  8. Slowly increase the volume on the mixer. If you get to the point that the sound is too low, then try increasing the volume on both transmitters to see if it sounds better. Make sure not to saturate the input of the transmitters, because it will sound distorted. For better results, if you start hearing distortion, put the volume on the transmitters back to the way it was, and try increasing the volume of each speaker instead.
  9. Perform soundchecks using microphones and music to see how the system reacts, if you are not happy with it, try adjusting until you find the sweet spot. It might take a few sound tests before you get the ideal setting.

Adjusting the Input Audio Level on the AKG Perception Transmitter

Knob for adjusting the Input Audio Level on the Perception Wireless 45 Instrumental Set

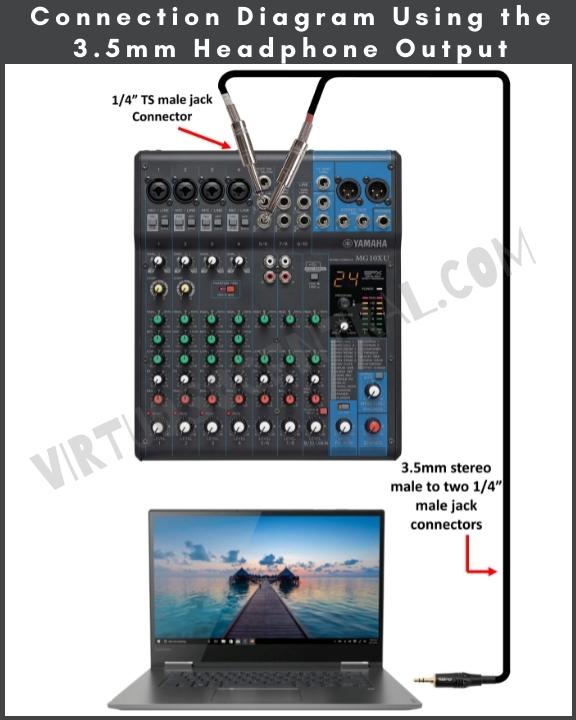
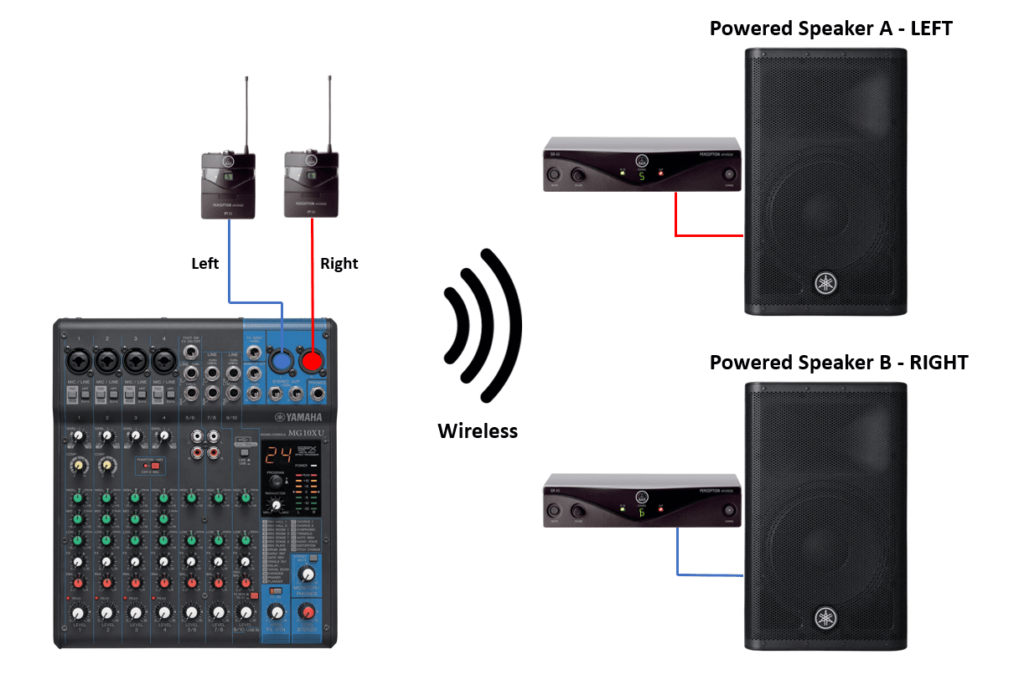
Connection Diagram Using the AKG Perception Instrument Set

Below is the diagram for making powered PA speakers wireless using the AKG Perception wireless instrument set.


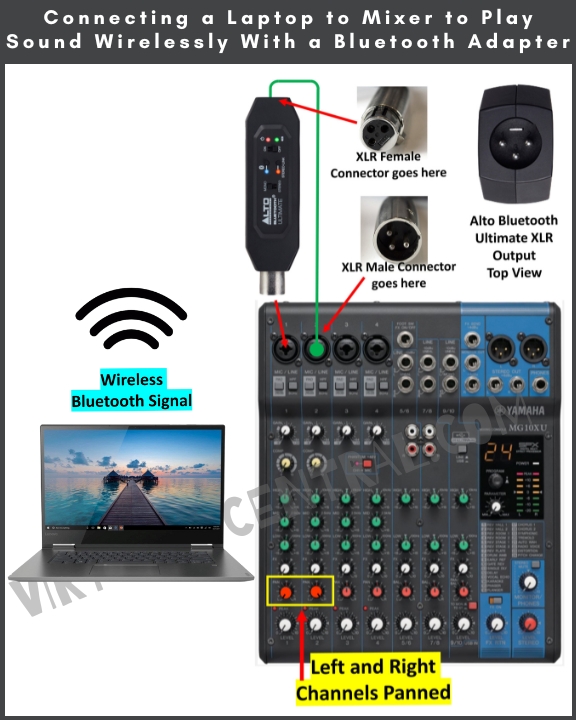
Using a Bluetooth Transmitter and Bluetooth capable PA speakers

You might ask the question if it’s possible to use a Bluetooth transmitter on a mixing console to send the signal wirelessly to Bluetooth-capable PA speakers.

In theory, it’s possible to use a stereo Bluetooth transmitter to connect the output of your mixer to it, then pair the Bluetooth-capable PA speakers, but I don’t recommend it.

The problem is something called latency, which is a delay between the time the signal is generated in the mixer and how long it takes for it to sound on the speaker. Let me explain what goes behind the scenes.

Let’s say that a person is talking through a microphone, the signal goes from the mic to the mixer, then out to the Bluetooth transmitter. The signal is then digitized (converted from analog to digital), encoded, and broadcasted.

The Bluetooth receiver inside the PA speaker receives the signal, and has to decode it, then transform it back to an analog signal so that the amplifier can use it.

All this process takes only a few milliseconds, but it creates a delay that’s long enough for you to hear it on the speakers. That’s where RF-based systems are much more efficient. They take the analog signal and transmit it immediately without digitizing or encoding it; hence there is no latency.


Final Thoughts

Any of the options explained in this post will help make powered pa speakers wireless. Having a wireless setup is very convenient for many reasons. I hope this post is helpful to you; thank you for reading my blog.

How to Connect a DVD Player to a Smart TV

Remember the days when to watch a movie you had to go to a video rental place to get the film you wanted to watch, or buying those movies on sale for $4.99? Well, those days are over. Nowadays, to watch a video, all you have to do is log into your Netflix, Hulu, or Amazon Prime account to pick the movies or TV shows and start watching immediately without leaving your house.

But during those years, you ended up accumulating a big collection of DVDs and Blu-Rays with your favorite movies and TV shows that now are part of your storage. All of a sudden, nostalgia kicks in, and you remember all of your limited collector’s edition DVD sets that you have. You want to watch them, but you are not sure if your Smart TV is compatible with your old DVD player.

This post will show you how to connect a DVD player to a smart TV so that you can watch your DVD collection. Let’s get started.


Check Your DVD Player to See What Video Connections it Has.

Before doing anything, make sure to check your DVD player so that you know what types of video connections it comes with. If you bought the DVD player not too long ago, it likely comes with an HDMI output. If this is the case, follow these steps to connect it to your TV.

  1. Connect one side of an HDMI cable to the back of the DVD player.
  2. The other side of the HDMI cable connect it to an available input on your TV.
  3. Turn on the DVD player, and using the TV’s remote, select the corresponding input.
  4. At this point, you should see the DVD Player logo on your TV screen.

If you don’t have a DVD player and need to get one, make sure to buy one that comes with an HDMI video output, that way you can connect it straight to your smart TV.

Image Credits: LG

In case you still have an old DVD player, but it doesn’t have an HDMI video output connection, check the back of it to see what type of connection it has available.

Most older DVD players have Composite Video Out and Component Video Out. Use the image below to help you figure out the type of connection it has. After figuring out the kind of connection, continue reading to learn how to connect your DVD player to a Smart TV. 

You Could Be Interested in: How to Convert VHS Tapes to Digital Format


Check if Your Smart TV Has a Composite or Component Video Input

Most smart TVs up to 65” still include one composite video input. If that’s the case, in the back of the TV, you should see a yellow RCA connector, which is an analog video signal. It also includes a stereo input signal for the audio, which has white and red RCA connectors. Sometimes instead of RCA connectors for the audio connection, it uses a stereo 3.5mm audio jack connector. The image below is for your reference.

If your TV comes with composite video, follow these steps to connect the DVD player to the TV:

  1. Connect the composite video cable (Yellow RCA) to the DVD player.
  2. Next, connect the White and RED audio RCA cables to the corresponding connectors on the back of the DVD player.
  3. Take the other side of the composite cable and audio cables and connect them to your TV.
  4. Turn on the DVD player and select the input channel on the TV.
  5. You should see the DVD player’s logo on the TV screen.

In some cases, the TV comes with Component video input, which is also an analog video signal divided into three separate signals. Each signal is sent by a different RCA cable, one green, one blue, and one red.

This type of video connection delivers a better signal quality than composite video. The audio comes in as a separate signal. It is usually a white and red RCA or a small 3.5mm audio jack connector. Check the image below for your reference.

If your TV comes with component video, follow these steps to connect the DVD player to the TV:

  1. Connect the component video cable (Green, Blue, Red RCA) to the DVD player.
  2. Next, connect the White and RED audio RCA cables to the corresponding connectors on the back of the DVD player.
  3. Take the other side of the component video cable and audio cables and connect them to your TV.
  4. Turn on the DVD player and select the input channel on the TV.
  5. At this point, you should see the DVD player’s logo on the TV screen.

Note: if you need to buy a component video cable, make sure to also pick up an RCA to RCA audio cable because you’ll need it to send the audio signal to the TV.


What if my Smart TV Doesn’t Have Composite or Component Video Input

As time goes by, TV manufacturers are eliminating analog video connections, because as video resolution increases to 4k and 8k, there is no point in downgrading the video quality experience by using analog signals such as composite and component that can only deliver low-quality video. Still, if you have a DVD collection and want to watch it on your big screen, smart TV, you should be able to do so.

What you would need to convert the analog video signal to digital is a Composite to HDMI Converter or Component to HDMI Converter (links to Amazon). If your DVD player comes with both types of connections, I recommend going with the component to HDMI converter because it can output a 1080p HD video signal.

Composite video can deliver a resolution of up to 704×480 (480i). You need a 1920×1080 resolution (1080p) to get a decent video experience on your Smart TV. What the converter does is upscale the resolution to 1080p so that the video quality looks better.

Component video connections deliver resolutions of 480p, 576p,720p, and 1080p. That’s why it is recommended to use component over composite because that way, the converter does a better job when upscaling the video image. The result is better video quality.

Please keep in mind that even if you get an upscaled 1080p video signal from the converter, the video quality might not be the best, and should never be compared to current video HD formats. The reason is because the standard resolution of DVDs is 720×480 pixels for NTSC and 720×576 pixels for PAL in 4:3 or 16:9 aspect ratio.

Another thing to keep in mind is that these converters are only one-way converters, meaning that they can go from analog to digital but not the other way around.

Follow these steps to connect a DVD player to a Smart TV using a component to HDMI converter. Use the image below for your reference.

  1. Connect the component or composite video cables and audio cables (white and red RCA) to the back of your DVD.
  2. Take the other side of the cables, a total of 5, and connect them in the corresponding place on the video converter.
  3. Use an HDMI cable to connect the converter box to the TV.
  4. Make sure to plug in the converter to the power outlet and turn it on. In some cases, the converter like the one we recommend in this post doesn’t bring a power adapter; but it comes with a USB cable to power it. If your TV has a USB port that delivers power, you can connect it there, if not, just use a recycled 5VDC power adapter from an old cell phone.
  5. Turn on the DVD player and use your TV’s remote to select the correct input channel.
  6. At this point, you should see the DVD’s logo on the screen of the TV.
Image Credits: EasyCel

Final Thoughts

Following the easy steps shown in this article is going to help connect your DVD, Xbox 360, PS2, or any other older device that you have to your Smart TV.

Make sure to have all the cables you need on hand and if you don’t have them, you can use the provided links to buy them on Amazon.

How to Set Up Stage Monitors

Stage monitors are critical components in a live sound system setup. The reason is because that’s how singers and musicians can hear the mix to have a reference. Nowadays, in-ear monitors are gaining popularity, but they are expensive. Still, standard stage monitors play an important role, and they are much cheaper than in-ear monitors.

In this post, I’ll explain how to set up stage monitors so that you can correctly place them in the stage and know how to set up the mix that’s going to it. Let’s get started.


Placement, the Most Important Aspect

When setting up monitors around the stage, the first thing you need to address is where to place them. If placed in the wrong position or at an angle diagonal to the microphones, you will get a lot of feedback, and it will be a nightmare to control the audio.

To choose the monitor’s right position on the stage, you need to know the polar pattern of the microphones that are going to be used, and you’ll choose placement accordingly.

For example, the most common stage microphone in the world is the Shure SM58. It is a dynamic microphone with a cardioid polar pattern. A cardioid polar pattern is most sensitive in the front and less sensitive in the back.

This reason makes it ideal for live stages where there is some noise in the background. It has a 131-degree coverage angle and 33% ambient sound sensitivity. The SM58 and most dynamic cardioid mics are less prone to feedback due to these characteristics.

Knowing this information about the mic allows you to make the right decision about where to place it on the stage. Being that a cardioid mic is less sensitive in the back, place the monitor right behind the microphone. Leave a distance between 3 to 5 feet between the monitor and the microphone’s stand.

If instead of a cardioid polar pattern, you use a super-cardioid or hyper-cardioid polar pattern, the placement of the monitor will be different. Take a look at the polar pattern of both mics in the picture below and you will see that they can pick up sound from the back.

These types of microphones have a deaf spot at 120 and 240 degrees. By placing the monitor in any of these positions would work perfectly fine and greatly reduce feedback. To learn all about polar patterns make sure to read this post.

Another essential thing to keep in mind is to place the monitor as close as possible to each performer or group of performers. That way, you don’t have to increase the volume as much for the performers to hear the mix, which will help reduce and control feedback.

Video Credits: voicecouncil

What to Choose, Active or Passive Monitors

When shopping around for stage monitors, you have two options, active or passive. As you may know, an active monitor comes with its amplifier and volume controls. It needs to be plugged into a power outlet to feed the amplifier inside. It requires a cable from the mixer with the signal to be connected to it. 

On the other hand, a passive monitor doesn’t have an amplifier inside, meaning it would need to be connected to an amplifier for it to sound. This type of setup requires a connection from the mixer to the amplifier and then to the speaker. It’s not as convenient as active monitors.

If possible, stick to active monitors; they are easier to set up and deliver excellent results.

Video Credits: Seismic Audio

Setting Up the Monitors

Now that you know how to place the monitors on the stage correctly, it’s time to connect everything and feed a signal to them from the mixing console. I am assuming that you are using active monitors.

To set up the stage, monitors follow these steps:

1. After surveying the stage and deciding where to place the monitors, connect them in daisy chain form so that the same signal coming from the audio mixer is fed to each one. To daisy chain monitors, locate the “Input” and “Thru” connectors. Use the image below for your reference.

Image Credits: Electro-Voice

2. Before you continue, make sure that the active monitors are off, and the volume knob is all the way down. Locate the monitor closer to the audio mixer, take a cable, and connect one side of it to the connector labeled “THRU.” The other side of the cable plug it in the next speaker in the connector labeled “INPUT.” Use the diagram below for your reference.

3. In the audio mixer, locate the “Monitor Out” or “Monitor Send” connector and plug the cable that is going to be sending the signal to the monitors. These could be different depending on the mixer you are using. Here is a couple of images that should help you locate the monitor out connector.

Image Credits: Mackie
Image Credits: Yamaha
Image Credits: Behringer

4. After everything is connected, make sure there is no audio playing through the mixer, and turn on all the monitors connected in the daisy chain. Increase their volume halfway, and if they have equalization knobs, set the EQ to a neutral position.

5. Go back to the mixer and play audio through the system and increase the corresponding volume knobs until you start hearing sound coming out of the monitors in the stage. In the image above, I have circled in red the corresponding volume knobs that need to be used.


Creating the Monitor Mix

Up to this point, we have discussed how to correctly place the monitors, connect them to the mixer, and test them to make sure that there is audio playing through them. It is time to create the monitor mix explicitly adjusted to the singers and performers on stage so that they get the best audio reference for the performance. My recommendation is to have all the singers and musicians go on stage and start performing for the soundcheck.

To create the monitor mix, follow these steps:

  1. To start, disable the main PA speakers so that audio only comes out from the monitors. That way, the sound technician doesn’t get confused from the reflected sound coming out of the main speakers.
  2. Each channel has its monitor volume knob so that you can adjust it to the needed level (Monitor knob is highlighted in red in the image above). Use a pair of headphones connected to the mixer so that you can listen to the mix and adjust accordingly until you get a balanced sound from all the input sources. Some mixers allow you to route the monitor sound feed to the headphones. If that option is not available in your console, listen to the sound coming from the main mix, but using headphones to adjust more accurately.
  3. Once you are satisfied with the sound that you hear through the headphones, enable the main speakers again and set the volume to where you want it to be. This step is essential so that you rule out any feedback loop.
  4. After the main speakers and monitors are sounding, walk on stage and hear the level coming from the monitors and judge if the volume is too low or too high and adjust accordingly.
  5. If you like the sounds as the sound technician, ask the performers and musicians what they think, and make sure to ask them if they can hear themselves. You will get feedback from them and make minor adjustments to the EQ or volume level. Have them perform again and let them critic your setup, especially the volume and EQ of the monitors.
Video Credits: Soundcraft Mixers

Using Aux Sends for Monitors

There are audio mixers that don’t have an independent monitor output. Such an example is the mixer in the image below. Instead of having a dedicated monitor control per channel strip, it has several AUX sends that can be used for creating different monitor mixes.

The image below is of a Yamaha MG166XU. As you can see in the highlighted yellow area, there are three AUX sends. If needed, you could create up to three independent monitor mixes. One can be only for the vocalists; the other can be only for the guitars, and so on.

If you look closely, you will see that AUX 1 is also labeled “Pre” and AUX 2 has a switch to activate the “Pre” function.

In case you didn’t know, “Pre” means pre-fader, which means that the audio signal from the channel strip is taken before the channel fader. So, there will still be a signal sent to the aux bus when the channel fader is down. That way, the audio signal is completely independent of the main fader.

You need to be careful because if you turn the fader all the way down thinking that no audio is going out of the mixer, but the AUX Send Master Volume is up, there will be a signal going to whatever is connected to the Aux Sends.

yamaha mg16xu with highlighted aux sends for connecting monitors
Image Credits: Yamaha

Setting Up and Creating a Monitor Mix Using Aux Sends

To create the monitor mix using Aux Sends, follow these steps:

  1. Firstly, make sure that all the equipment is turned off before connecting anything.
  2. In the audio mixer, locate the SEND OUTPUT connectors. They are usually found in the upper right corner or at the back of the mixing console.
  3. Connect the corresponding cable from the SEND OUTPUT to the INPUT of the first monitor. Then daisy chain the rest of the monitors that are part of this monitor mix.
  4. Turn on all the equipment but make sure to disable the main PA speakers so that audio only comes out from the monitors. You don’t want to have sound coming out of the front-of-house speakers confusing you while you set up monitors on stage.
  5. Each channel strip has its AUX volume knob so that you can adjust it to the needed level. There is also an AUX SEND MASTER VOLUME for each aux bus. They can be located somewhere in the lower right area of the console. Check the image above to use it as a reference to find it.
  6. Have the musicians play while you set up the mix. Adjust each level to get a well-balanced sound coming out of the monitors.
  7. Once you and the musicians are satisfied with the sound coming out of the monitors, enable the main speakers again and set the volume to where you want it to be. This step is essential so that you rule out any feedback loop.
  8. After the main speakers and monitors are sounding, walk on stage and hear the level coming from the monitors and judge if the volume is too low or too high and adjust accordingly. Make sure to ask the musicians on stage if the monitor setup works for them and adjust accordingly.

Remember, it is vital to have all the performers pleased with the sound coming from the monitors because this is the only way for them to get a reference for the music during the performance.

There will be cases in which you would have to relocate the monitor or increase the volume of one channel strip more than others. Fortunately, the signal sent to the monitors is a separate signal from the one going to the main speakers. That way, you have complete control of the volume level going to each one.

That’s it you have successfully set up stage monitors, make sure to adjust the volume to a comfortable level, and ask the singers and performers if they like the sound coming out of the monitors.

How to Connect a Laptop to a TV

Connecting a laptop to a TV is a simple process, especially if you have a newer model laptop and TV. In this post, I’ll explain step-by-step how to connect a laptop to a TV providing you with different options depending on the laptop you have, so that you can stream videos, look at pictures, or give a presentation straight from your TV.

There are two ways of connecting a laptop to a regular or smart TV. The most common is by using cables such as HDMI or VGA, and the second is wirelessly, no cables running from your laptop to the TV. It all depends on the laptop you have and the ports it has available for video output connection. Let’s get started.


Connecting a Laptop to TV using a HDMI Cable or Adapter

The easiest, but sometimes the least convenient way is by running a physical cable between your laptop and the TV. First you need to check what video output port you have available in your laptop. Some laptops have a full size HDMI connector, while others use a Mini-HDMI. Newer laptops come with a USB-C connector with Thunderbolt 3 connectivity, and older laptops have VGA video out.

Check the image below to have a reference on all the different video out connectors available in laptops so that you can locate the type of port you have.

Keep in mind that in some cases you would need an adapter to go from your laptop’s video out connection to a TV’s HDMI. Here I explain each case for your reference.


Using a Full-Size HDMI to HDMI Cable

Image Credits: Amazon

This is the easiest way for connecting your laptop to a TV if your laptop comes with this port. If your laptop has this port, all you need is a regular HDMI to HDMI (Male) cable for the connection. Follow these steps to connect your laptop computer to a TV using a regular HDMI to HDMI cable.

  1. With your TV on, use the remote to select one of the available HDMI input channels.
  2. Connect one side of the HDMI cable to the corresponding port in your laptop.
  3. The other side of the HDMI cable connect it to the TV, and after a few seconds you should see the computer desktop on the TV screen.
  4. The TV and laptop should automatically adjust for the best resolution, but If this is not the case, and the resolution is all messed up, try adjusting it manually, here are the steps to follow.

Manually Adjusting the Screen Resolution for Windows 10

1. Right-click on the desktop and click “Display Settings”

2. Under “System,” click “Display.”

3. Locate “Display Resolution,” and try experimenting with different resolutions until you get one that you like and looks good on the screen. To keep the setting click on “Keep Resolution” if you don’t like it and want to try another, click on “Revert.”


Connecting a Laptop to TV Using a Mini-HDMI to HDMI Cable

Image Credits: Amazon

There are some laptop computers that have a Mini-HDMI connector for video out. If that is the case, to connect it to a TV all you need a Mini-HDMI to HDMI cable. To connect your laptop to a TV using a Mini-HDMI to HDMI  cable, follow these steps.

  1. First select the HDMI input channel on your TV.
  2. Connect the Mini-HDMI side to the laptop, and the regular HDMI to the TV set.
  3. At this point your TV screen should show the desktop. If it doesn’t or it looks like the resolution is not the correct one, try adjusting the resolution manually. Follow the steps in the previous section for manually adjusting the screen resolution.

Connecting a Laptop to TV Using a Mini Display Port to HDMI Cable

Image Credits: Amazon

Some computers manufactured after 2008 include a port that has the symbol “P.” This port is not the same as a Mini-HDMI port, it is different. The Mini Display Port was introduced by Apple and it’s a miniaturized version of the DisplayPort audio-visual digital interface.

The Mini Display Port is common in laptops but not on TVs. If you want to connect your laptop a TV using this port, you need to get a Mini Display Port to HDMI Adapter. To connect it follow these steps:

  1. Connect the Mini Display Port to your laptop.
  2. With the TV on, select an available HDMI input on your TV.
  3. Connect the HDMI side to the correct port.
  4. Wait for the computer and TV to sync. After a few seconds you should see the desktop on your TV’s screen.

Connecting a Laptop to TV with a USB-C (Thunderbolt 3) to HDMI adapter

Image Credits: Anker

Newer model laptops such as the MacBook Pro, Windows Surface, Dell XPS, HP Envy, etc. Have few ports available for connections. Most new model laptops have Thunderbolt 3 connectivity for interfacing with other devices. It can be used as a DisplayPort for connecting the laptop to a TV. Remember that Thunderbolt 3 uses the USB-C connector form factor for interfacing.

If you have a laptop with Thunderbolt 3 connectivity (USB-C connector), you need an adapter that can convert from USB-C to HDMI (link to Amazon). This connection is plug-and-play, meaning that all you have to do is connect them and they should work, without needing to install any drivers or change settings. To connect your laptop to a TV using a USB-C to regular HDMI follow these steps.

  1. Connect the USB-C side of the adapter to the correct port on the laptop.
  2. Select the HDMI input that you want to use.
  3. Connect the HDMI side of the adapter to the TV.
  4. You should see your computer’s desktop on the screen.

Connecting an Old Laptop to TV Using a VGA to HDMI Adapter

When you want to connect an older laptop that uses a VGA port to a TV, you need to have an adapter box. The reason is that VGA is an analog signal, unlike HDMI which is digital. A VGA to HDMI Adapter Box (link to Amazon), is going to convert the analog signal to digital with a resolution that can go as high as 1080p.

Please be advised that these types of adapters can only convert a video signal one way, meaning that it can convert from VGA to HDMI but not from HDMI to VGA.

These are the steps you need to follow to connect your laptop to a TV using a VGA to HDMI adapter:

  1. First, you need to hook up the power source to the converter box. Usually, it uses a USB cable that connects to a phone charger or to a 5V source.
  2. Connect the VGA cable from the laptop to the converter box.
  3. Connect the audio cable from your laptop’s headphone jack to the converter box. This step assumes that you want the audio coming from the computer to be sent to the TV through the HDMI cable. Remember that HDMI cables can send video and audio signals through the same cable.
  4. Take the HDMI cable and connect one side to the TV and the other to the converter box.
  5. Select the correct input channel on your TV, and you should see the laptop screen on the  TV.

Here is a diagram for connecting your laptop to a TV using a VGA to HDMI adapter box.

Image Credits: Gana

If you need to connect your old laptop to a projector that only has HDMI input, the process is exactly the same, but instead of connecting one side of the HDMI cable to the TV, connect it to the projector instead.

Another case that you might run into is if your laptop has an HDMI video out port and you are trying to connect it to an old TV, monitor, or projector that only offers VGA input. If that is the case, you would have to get an HDMI to VGA Adapter (link to Amazon) to convert the HDMI (digital) signal, to VGA (analog) signal.

This type of adapters are inexpensive and is always good to have one in case you want to use an old monitor as a secondary screen for better productivity. 


Connecting a Laptop to a TV or Projector Wirelessly

Connecting your laptop wirelessly to a TV or projector is very convenient because you won’t have cables cluttering the place. If the distances are too long, then using cables is not convenient and ends up being expensive. With a wireless adapter all you do is connect the transmitter to your computer’s video out port, and the receiver to the TV or projector.

To achieve HDMI wirelessly connectivity, you need to get a transmitter and receiver system such as the J-Tech Digital HDbitT (link to Amazon) that can transmit an HDMI signal up to 200ft (60m). It also provides the flexibility to get a second receiver, allowing you to wirelessly connect to two TVs or projectors at the same time using only one transmitter and one video source.

Another option is the Ansten HDMI Wireless Extender (link to Amazon), with this device you can get up to 300ft (100m) line of sight. It’s perfect for using it in a conference room, church, or at home for sending an HDMI signal wirelessly around the house.

The most popular and least expensive way of connecting a laptop or any other portable device to a TV wirelessly at home is by using a Goggle Chromecast device (link to Amazon). With it you can stream video, photos, or anything from any smartphone, or laptop. It delivers HD quality with resolutions that go up to 1080p @60fps.

Image Credits: Amazon

To stream videos, pictures, or presentations from your phone or laptop to your TV; all you have to do is plug Chromecast into an available HDMI port on your TV, download the Google Home app, set up the Chromecast device with some basic information, and start casting content straight to your TV wirelessly.

You can cast music, TV shows, and just about anything you want, and best part is that it is very affordable, so much that you can add one Chromecast to any TV around the house.

How to Connect a Laptop to a Mixer for Playing Sound

There are some occasions when you need to connect a laptop or any other media device like a smartphone, iPad, or mp3 player to your mixer to play music. This type of setup is prevalent in karaoke settings and for DJs to connect their laptop with their playlist and DJ software to the mixing board for a live show.

In this post, I explain a couple of easy, straight forward ways of how to connect a laptop to a mixer for playing sound.

But if you want the quick answer here it is:  Use a 3.5mm (1/8”) stereo male to two 1/4” male jack connectors to go from the laptop to the mixer’s input.

If you need to connect your computer to a mixer for recording, read this post on How to Connect Mixer to Computer For Recording.


Getting to know your Mixer’s Input Channels

As you may know, mixing consoles have lots of knobs and several input channels. If you don’t know the basics of a mixing board, looking at one can be quite intimidating because each knob has its function, and you wouldn’t know where to start.

When you want to connect a laptop to a mixer, you need a stereo channel. The reason is because the audio coming from your computer is a stereo signal, meaning with a left and a right channel. Most mixers have stereo input channels with their EQ knobs to equalize the sound to your likings.

They are usually labeled with two numbers. For example, you’ll see a single channel marked 9/10, 11/12, and so on. The two numbers mean two channels or a stereo channel.

In the image below, I have highlighted the available stereo input channels that you need to look for when connecting your laptop to a mixer to play sound. I have included a couple of different brands of audio mixers so that you have a better reference.

Image Credits: Behringer
Image Credits: Yamaha

If you pay attention to the image below, you’ll see that the channels that are labeled with two numbers have Left (L) and Right (R) input connections with 1/4″ phone jack. These connectors can be used for connecting your laptop or mobile device to your mixer. Some mixers still use RCA type connectors, but the most common nowadays is the 1/4″ phone jacks.


Connecting the Laptop to The Mixer Using a Cable – Two Options

Using the 3.5mm Headphone Output

To connect the laptop, iPad, smartphone, or mp3 device to the mixing board, we will use the headphone output, which is a 3.5mm female jack connector. All you’ll need is a 3.5mm stereo male to two 1/4” male jack connectors (link to Amazon).

Using a USB-C Port as The Headphone Output

Most Windows laptops still come with the 3.5mm stereo headphone output. Still, some of the newer models, especially the slim 2-in-1 Laptops (convertible laptops & tablets), don’t come with a 3.5mm headphone output.

It’s worth mentioning that some Apple laptops and new generation iPhone and Android phones don’t have the headphones output jack.

To work around this issue when trying to connect them to a mixer, you’ll need an adapter to go from the USB-C port to a headphone jack.

Here is the link if you have an Apple device and want the original Apple USB-C to headphones jack converter.

Inside the converter is a small digital-to-analog converter that takes the digital audio signal and converts it into analog so it can be connected to the mixing console.

Follow these steps to connect your laptop to a mixer for playing music:

  1. Make sure that the volume slider for the channel you will use in the mixer is all the way down.
  2. Connect the Left (White) 1/4″ jack to the mixer.
  3. Connect the Right (Red) 1/4” jack to the mixer.
  4. Before connecting the 3.5mm stereo jack to the laptop, make sure there is no audio playing.
  5. Connect the 3.5mm stereo jack to the headphone output on the laptop. Note: if your laptop doesn’t have a 3.5mm headphones jack, first connect the USB-C to headphone jack converter, then connect the 3.5mm stereo jack to the output of the converter. Check the diagram below.
  6. Play some music on your laptop and slowly increase the volume slider on the mixer until you hear sound coming from the speakers.
  7. Use the EQ knobs to adjust the highs and lows to your liking.

I have included the following diagrams for your reference. Use the first diagram if your laptop has a 3.5mm headphone port. If your laptop doesn’t have a headphone output, use the second diagram.

Diagram for connecting a laptop to mixer for playing sound using the 3.5mm headphone Output
Diagram for connecting a laptop to mixer for playing sound using a USB-C port

Another Way of Connecting a Laptop to Your Mixer

Another way to connect your laptop to a mixer is by using two mono channels, with one channel panned to the left and the other panned to the right.

Some older analog mixing consoles don’t have a single stereo channel for connecting a stereo signal. If that is the case, then you need to use two separate mono channels.

Let’s say that we are going to use channels 1 and 2. The first thing is to locate the “PAN” knob; it is usually located above the volume slider.

After locating it, turn channel 1 “PAN” knob all the way to the left and channel 2 PAN knob all the way to the right. This way, you are setting each mono channel to one side of the stereo bus.

Connect the left (white) jack to the input labeled “LINE” on channel 1, and the right (Red) jack to the input labeled “LINE” on channel 2.

I recommend setting the EQ, and volume sliders to the same level so that both channels are at the same volume.   

Here is the connection diagram for your reference.


Connecting a Laptop to a Mixer Wirelessly Using a Bluetooth Receiver

The second and most convenient method to connect a laptop to a mixer for playing sound is to use a Bluetooth receiver. That way, you can wirelessly connect your laptop to the mixer without cables hanging around.

The easiest way to add Bluetooth capabilities to any audio mixer is by using Alto’s Bluetooth Ultimate Audio Adapter (link to Amazon).

This device is an XLR-equipped, rechargeable Bluetooth receiver that streams audio wirelessly to any audio mixer or powered loudspeaker.

With Bluetooth Ultimate, you can quickly and easily add Bluetooth to any live sound setup providing you with a range of up to 100+ft. Its rechargeable battery lasts 6+ hours, and the best part is that no wires are needed for the connection as it plugs in directly into the mixer.

Another great feature is that the receiver comes with dual XLR connectors to add Stereo Bluetooth Streaming capability to any mixer for playback from all your devices, including smartphones & tablets.

Steps to Connect a Laptop to a Mixer Wirelessly – Using the Alto Bluetooth Ultimate

  1. Decide if you want a Stereo or Mono stream. If you decide to go with Stereo, which I recommend for a better hearing experience, you will need two separate input channels in the audio mixer and a short XLR to XLR cable to leverage the stereo feature. You’ll only need one input channel if you decide to go with a Mono connection.
  2. For stereo mode, use two mono channels, with one channel panned to the left and the other panned to the right. For mono, use one channel and leave the pan knob in the center.
  3. Before making any connections, ensure that the channel/s you will use in the mixer are muted and that the volume faders are down. Also, don’t forget to bring your laptop’s volume down. This is to avoid sudden loud pop sounds that could damage your speaker.
  4. For stereo mode, connect the Bluetooth adapter to the input channel panned to the left. Let’s say to Channel 1 and use the XLR-to-XLR connector to connect one side of the cable to the adapter, and the other side to the input channel panned to the right. Just as shown in the diagram below.
  5. Turn on the Bluetooth adapter and set the stereo/mono switch to your desired mode.
  6. Turn the volume faders on the mixer up to less than halfway.
  7. Press the pair button on the receiver for 3 seconds until the blue LED starts flashing. When “Bluetooth Ultimate” is in pairing mode, a pairing tone will sound on the speakers.
  8. On your laptop, under the list of Bluetooth devices, look for the one named “Alto BTU” and tap to connect it.
  9. After the connection between the laptop and receiver has been established, a confirmation tone will sound, and the Bluetooth LED should stay on. Please note: If your Bluetooth device prompts for a pairing code, enter “0000.”
  10. Play some music on your laptop and slowly increase its volume until you hear sound on the main PA speakers.
  11. At this point, adjust your volumes on the mixer and the laptop until it is loud enough for you.
  12. Set the EQ on the mixer to adjust the highs and lows until it sounds like you want. I recommend setting the same EQ and volume faders on both channels to the same level to sound balanced.  
This image shows a diagram for connecting a laptop to a mixer to play sound wirelessly with a Bluetooth adapter.

Final Thoughts

In this post, I have shown a couple of easy ways of how to connect a laptop for playing sound or music. These methods also apply if you want to connect a laptop to a mixer for karaoke purposes. I hope this information is helpful to you. Thank you for reading my blog.

How to Test a Speaker

When a speaker stops producing sound, there could be several reasons why. In this post, I will explain a couple of methods of how to test a speaker to know if it’s working or not. The procedures shown in this article also apply for testing a car speaker as well.


How to Test a Speaker

There are a couple of methods used for testing a loudspeaker. The first method involves using a multimeter, and the second using a 9 Volt battery. Both ways can let you know if the coil that is inside of the magnet still works or not. Let’s take a look at the first method.

How to Test a Speaker With a Multimeter

The first thing you need to do is to try to get the speaker out of the cabinet. The reason is that most speakers have a frequency crossover inside to separate the signal going to the tweeter and the one going to the speaker.

If you measure straight from the connection terminals, the reading from the multimeter is not going to be accurate because there are several electronic components in between.

After getting the speaker out, put it upside down to have easy access to the terminals where the coil is connected, and follow these steps:

  1. Check the label in the back of the magnet to see what is the impedance of the speaker. The most common are: 4Ω, 8Ω, 16Ω, and in some weird case, you could get a speaker with an impedance of 2Ω. The symbol “Ω” means Ohms, and it’s the unit used for measuring electrical resistance.
  2. Set the multimeter to read Ohms (resistance), and place one lead in the negative terminal and one in the positive terminal of the speaker. If everything is ok, you should have a resistance reading.
Speaker With a Good Coil

If your speaker has in the label 4 Ohms, your multimeter should read anywhere between 2 and 3.6 Ohms. The measured resistance of an 8 Ohms speaker can be between 4.8 and 8 Ohms. A 16 Ohms could have a resistance between 10 and 16 Ohms. In some cases, it can go as low as 8 Ohms and be considered good. The reason for such wide tolerances is due to something called “Direct Current Resistance or DCR” – and it’s defined as the measured resistance of an inductor. This resistance is dependent on the material used to make the wire used in the windings of the coil.

If your reading is a little resistance close to zero, it means that the coil is shorted internally. If the reading is a high value or “OL” as shown in some digital multimeters, then the coil is open circuit.

Speaker With a Shorted Coil

For example, if an 8Ω speaker reads 1.8Ω, it means that the coil was pushed outside its designed working parameters, heated up, and partially shorted inside. In a case like this, the speaker is damaged.

On the contrary, if an 8Ω speaker reads something like 50Ω, it means that the coil is also damaged due to excessive power applied to it. In a case like this, the loudspeaker is also damaged.

How to Test a Speaker With a Battery

In case you don’t have a multimeter and need to test a speaker to know if it works or not, you can use a 9 Volt battery to do so.

In this case, I also recommend taking the speaker out of the enclosure to make sure that you don’t apply voltage to the crossover circuitry that is inside the cabinet.

After getting the speaker out, hold it in one hand, and with the other hand, touch the terminals with the battery. Just make sure that the positive terminal of the speaker is connected to the positive side of the battery and the negative terminal to the negative side of the battery.

Testing a Speaker With a 9V Battery

Another precaution is to touch the terminals of the loudspeaker with the battery for a short time, no more than 2 seconds or less, to avoid damaging the coil inside, especially if the speaker is of low wattage. 

If the speaker is good, as soon as you touch the battery to the terminals, you should hear a sound, and the cone should move. If the coil is shorted or open, the cone will not move or generate any sound.

The method of testing a speaker with a battery is not as accurate as using a multimeter because sometimes the speaker could be partially damaged, and it would seem to be working but, in reality, is not good.

Another thing you can do is verify if there is a burnt smell when you get close to the cone. If you notice a smell like something is burned, then it’s likely that the coil overheated due to excessive power applied to the speaker.  


How to Test a Tweeter

Tweeters come in different shapes and sizes, but most of them use a coil placed inside a magnet to generate the sound. Other types of tweeters, such as piezo, use piezoelectric crystal coupled to a mechanical diaphragm for sound to be produced.

To test a tweeter that uses a coil, follow the same steps as for testing a speaker. Don’t use the battery method to test a tweeter because it can damage the coil as it’s not as robust as a speaker’s coil.

To correctly test if a tweeter is good, follow these steps:

  1. Check the label in the back of the magnet to see what is the correct value.
  2. Set the meter to read Ohms and connect one lead to the negative terminal, and one lead to the positive terminal.
  3. Use the tolerances mentioned above to compare the measured values with the label value.

A shorted tweeter coil is going to read zero Ohms or any value close to zero. An open tweeter coil is going to read a high resistance or “OL (Out of Limit).”

Testing a Piezo Tweeter

When testing a piezo tweeter, we have to take a different approach. A multimeter is not recommended for testing it because the result might not be valid. To correctly test it, disconnect it from the crossover, and if possible, remove it from the cabinet.

Use a small amplifier to connect it. Play some music and slowly increase the volume until you hear a sound coming out of it. If you have increased the volume to a point where you should hear something, but there is no sound, then the piezoelectric crystal is damaged. If there is sound coming out of it, but it doesn’t sound good, then it’s partially damaged, and it needs to be changed.


Final Thoughts

In this post, I have explained how to test a speaker using a couple of ways. The first way is by using a multimeter, and the second is by using a battery. Both procedures should help you pinpoint if you have a problem with your loudspeakers.

If you are wondering how to test a car speaker, you can also use both methods to do that. In the article, I have also addressed the procedures for testing tweeters.

How to Remove Vocals From a Song – The Easy Way

Sometimes the song that you want to sing doesn’t have a karaoke track, and you end up wondering how can I remove the vocals from a song? After doing some research, you end up downloading an app that wants to charge you to remove the vocal from your favorite song.

I have put this post together to help you with this matter by explaining how to remove vocals from a song using Audacity; an open-source, completely free program that delivers excellent results. Let’s dive in.


Background Information on Removing Vocals

There is advanced software that can remove vocals from songs using complicated algorithms to do so. In our case, we are not using such professional software because they cost thousands of dollars.

If all you want to do is remove the vocals from a song to sing along with a karaoke song, you don’t want to spend that much money and devote months just learning how to use the software. The tutorial in this post is based on phase cancellation to remove vocals.

Every sound is made by vibrations of molecules and can be represented by frequencies. Sound Frequency is a measure of the number of wave cycles that occur in a second. The phase of a frequency is measured in degrees, and it defines a particular point in time of a given cycle.

Two waveforms are considered to be in phase if they start and end at the same time. They are out of phase if they start and end at different times. If two frequencies are 180 degrees out of phase, they cancel each other out, resulting in a loss of signal.

When using phase cancellation to remove vocals, the signal that contains the vocals needs to be 180° degrees out of phase or have the polarity inverted so that it’s canceled out.

This is the principle behind removing vocals from a signal, of course, there is a lot more going on behind the scenes, but this is just a simple explanation of the theory behind the process.

If you take a song recorded in stereo, split the signal into two mono paths, then invert the polarity of one of the mono tracks and remix it, you’ll remove the vocals from that song.

A disadvantage of removing vocals by using the phase cancellation method is that anything in the track that is panned center will be lost because it will be canceled out. One way of mitigating this issue is to add a lowpass filter for the low and mid-low frequencies, between 70Hz to 250Hz.

All of the process explained above is done automatically by audacity by the touch of a button. Still, please keep in mind that the vocals are never going to be removed entirely from the track. Still, they will be almost inaudible, allowing you to use the song as a backing track for singing. Let’s follow the tutorial on how to remove vocals from a song.


Removing Vocals From a Song Using Audacity – Step by Step Tutorial With Pictures

1. The first thing you need to do is download and install Audacity in your computer, click the link, and it will take you to Audacity’s website.

2. After installing it, open the program, and you should see the following on your screen.

3. Click the “File” tab in the upper left corner. From the dropdown menu, select “Import,” then select Audio. A new window will open for you to choose the song that you want to remove the vocals. Browse your files until the song you want is selected and click “Open.” The audio file you want to work with must be on your computer.

4. After the file is open in Audacity, you should see something similar to what is shown in the image below.

5. The next step is to select the file for processing. To do so, click the tab labeled “Select,” and from the dropdown menu, select “All.” Now the Audacity knows that you want to process the whole file with the vocal remover effect.

6. In this step, you select the vocal remover effect. To do this, click from the menu the tab labeled “Effect.” From the dropdown menu, go all the way down until you find the one named “Vocal Reduction and Isolation…” and click on it.

7. After you like the settings, click “OK” for the program to start processing the file and removing the vocals.

8. In case you don’t like the results, click the “Undo” button or click “Edit,” and from the dropdown menu, click Undo. Repeat the procedure by following steps 5 and 6.

9. After the software is finished processing the finished file should look something like the image below. If you like the result, it’s time to export the file as an Mp3 file so that you can play it on your devices.

10. To export the project as an Mp3 file, click “File,” “Export,” “Export as MP3”. In the new window that opens, select the bitrate, write a title for the song, and select the folder where you want to save the file, and within a few minutes, it will be done.


Vocal Reduction and Isolation settings for Different Genres

These are some settings I have tried with different genres of music and gotten decent results.

For Pop, Ballad, Soft Rock, Music:

Action: Remove Vocals

Strength: 1.25

Low Cut for Vocals (Hz): Try values between 150 – 250

Hi Cut for Vocals (Hz): Try values between 14500 – 16632


For Hip-Hop, R&B, Electro, Techno, Rap  Music:

Action: Remove Vocals

Strength: 1.50

Low Cut for Vocals (Hz): Try values between 120 – 200

Hi Cut for Vocals (Hz): Try values between 13500 – 15500


For Country, Indie, Gospel, Music:

Action: Remove Vocals

Strength: 1.25

Low Cut for Vocals (Hz): Try values between 180 – 250

Hi Cut for Vocals (Hz): Try values between 14500 – 16500


This is what each option means, the information was taken from the Audacity manual here is the link:

Strength: The Strength slider modifies the shape of the center. Higher values increase the degree of reduction or isolation. Zero is off (no reduction or isolation).

Low Cut for Vocals (Hz): The frequencies below will either not be removed or not be included in the isolated audio. It is useful to exclude bass and kick drum. The default value of 120 Hz is good for most lead vocals, or even low male voices. You can enter a higher value around 170 Hz for female voices and about 230 Hz for those of children

Hi-Cut for Vocals (Hz): The frequencies above will either not be removed or not be included in the isolated audio. It is useful to exclude high sounds like bells, cymbals, or Hi-hat. Note that human sounds like S or Z can also be very high in frequency – 5000 to 8000 Hz, so listen carefully to the preview.


Final Thoughts

In this post, I have shown a simple, easy way of removing vocals from a song step by step with pictures for your reference. As mentioned earlier, the quality of the generated file will never be perfect. Still, it is usable, especially for karaoke or backing tracks.

The result will also be different from song to song. You might get better results in one song but not with others. Just try changing the Vocal Reduction and Isolation settings until you get something you like. Also, try experimenting with the settings I have suggested in this post and adjust it to your likings.

I hope this post was helpful to you. If you have any questions or comments, please leave them in the comments section. Thank you for reading my blog. 

How to Connect an Analog Mixer to an Audio Interface

There are situations in which an audio interface doesn’t have enough channels for everything you want to mix and record. An example is a band that wants to record the live performance of what’s coming out of the PA system by taking a line out from the mixer to the audio interface and then recording it into a laptop.

Another example could be a DJ that wants to connect the DJ mixer to the audio interface to record the music mix. There are many other cases in which you would want to use an analog audio mixer to record the audio to your computer digitally; and an easy and effective way is by using an audio interface.

In this post, I explain how to connect an analog mixer to an audio interface for recording, let’s dive in.


Step by Step Guide to Setup an Audio Mixer to the Interface

This is What You Will Need

  • An audio mixer with available line-level output.
  • Two TRS to TRS cables (Balanced Cables).
  • An audio interface with two inputs.
  • Laptop for recording the audio coming from the interface.

1. Locate an Available Line-Level Output in the Audio Mixer.

Most mixers provide line-level outputs for connecting monitors or for taking a line for recording purposes. You can use the output labeled “CTRL ROOM,” “CR OUT,” or “STEREO OUT.” Depending on the brand you use, the name could be different, but they do exactly the same. Below I have included some pictures as reference of different brands of audio mixers showing the output connectors you need to locate.

Image Credits: Behringer
Image Credits: Mackie
Image Credits: Yamaha

Keep in mind that in most analog mixers, there is a pair of RCA connectors labeled “REC OUT,” “TAPE OUT,” or just “OUT,” which are intended to be used for recording to tape cassettes or tape reel recorders.

Although this connection is intended for recording, I don’t recommend using it to connect the mixer to your interface because this output is not balanced, meaning that the connectors and cables are not shielded. A balanced connection uses shielded twisted-pair cable and three-conductor connectors specially designed to be immune to line noise.

If you decide to use the “REC OUT” anyways, you’ll still get a decent quality audio signal, but you might find some noise in the line.

You could also use the “MAIN OUTPUT” from a line-level mixer to connect it to the audio interface if you don’t intend to connect powered speakers or amplifiers to the mixer.

Note: Never use the main output from a powered mixer. This output is not line-level; it is used to connect Loudspeakers. If you connect your interface to this output, it will be damaged.


2. Setup the Audio Interface to Receive the Signal From the Mixer.

All audio interfaces provide you with the option of connecting a microphone or line-level input/instrument. In our case, we need to select the option that is labeled “Line” or, in some cases, is labeled “Inst.” The reason is that by switching it to “Line,” it decreases the gain internally so that the audio doesn’t distort when recording.

Check your interface and locate the selector and make sure to switch it to LINE/INSTRUMENT.

Here are some pictures for your reference on where the selector for Line/Mic is located on different brands of the most popular audio interfaces. Check out our post of the Best Audio Interface on a Budget.

Image Credits: Focusrite
Image Credits: Behringer
Image Credits: Tascam

3. Connect The Two TRS Phone Connectors From the Mixer to the Audio Interface.

After you’ve located the line-level output that’s available in the mixer, use the two TRS balanced cables to connect the “L” (left) from the mixer to “Input 1” and “R” (right) to “Input 2” of your audio interface.

Make sure the audio interface is turned off while making the connections. Also, turn the “GAIN” knob all the way down so that there is no signal passing through when you turn the interface back on.

Here is the diagram of the connections you need to do.


4. Set Gains and Levels Correctly to Get a Clean Signal for Recording.   

At this point you have everything connected, it’s time to set the gains to the correct levels to get a clean audio signal for recording.

With the interface off, use a microphone connected to the mixer to set the levels.

Start by bringing the gain knob of the mic all the way down; the gain must be set to zero at this point.

Bring the volume slider for that channel to the middle position. Do the same to the “CONTROL ROOM” output knob or if using the “MAIN OUTPUT,” bring the main slider to the middle position.

Start speaking into the mic and slowly increase the gain knob for the mic until the “MAIN METERS” or “VU METERS” start lighting. Check the audiometer while you are speaking and keep increasing the gain until the 0dB LED stays on.

Connect the interface to your computer and turn it on. Slowly increase the gain on both channels at the same time until you see the volume level meters on the recording software at -20dB. This ensures that the signal is clean and not distorted.

You’ll never want to have a volume that turns the clipping Red LED on. I would always keep it in the green area, maybe the first yellow, but never allow the volume to go more than the second yellow LED because the audio will distort.

If you have a band or musical group, my recommendation is to play a song and check the levels in the mixer and audio interface and adjust accordingly, always making sure that the signal is not too loud so that the recording is not distorting.

When ready to record, press the record button in the software and start recording.


Conclusion

In this post, I have explained the correct way of connecting and setting up and analog mixer to an audio interface, I hope it is helpful for you. If you have any questions or comments, please leave them in the comments section below. Thank you for reading my blog.

How to Get Better Audio in Your YouTube Videos

It doesn’t matter how hard you’ve worked on your video for your YouTube channel; if the audio quality is not good, the experience will be compromised. The reason is that the audio in a video is half the experience; it’s not a good idea to neglect it.

In this post, we have put together a few tips that will help you get better audio in your YouTube videos so that your audience and subscribers have a great experience when watching.


6 Tips to Getting Better Audio in Your YouTube Videos

  • Shoot the Video In a Quiet, Echo Free Place.
  • Work On Developing a Better Vocal Projection
  • Use an On-Camera or USB Mic
  • Do a Sync Clap Before each Take for easy synchronization
  • When Filming Outdoors Use a Windscreen or Deadcat Cover on Your Mics
  • Use a Multitrack Recorder to have a Second Audio File of your Shot.

Shoot the Video In a Quiet, Echo Free Place

The first tip on getting great audio in your YouTube videos is to find a room with good acoustics. What I mean is that when possible, avoid shooting your videos in echoey places. It is most likely to get echo in a large room because sound can travel and hit the walls, bouncing back and forth, producing echo.

My recommendation is to find a smaller room and use some type of acoustic treatment, such as sound absorption panels or noise-dampening foam. These types of acoustic treatments deliver exceptional results, but depending on the size of your room and budget, it could get a bit pricey.

An alternative solution to acoustic treatment panels is to use curtains, carpet, or any other material that can absorb the sound from bouncing around.

An easy, cheap way of dampening the sound for your video shoot is to use some stands and put blankets over them. Then get the sheets as close as possible to the subject being filmed, just make sure that the blankets don’t appear in the shot.

The blankets will absorb some of the sound not letting it bounce back and forth, significantly reducing the sound echo when shooting a video.


Work On Developing a Better Vocal Projection

You could use the best camera microphone, or lavalier mic while shooting your video, but if you don’t speak loud enough, your voice is not going to project well.

To have better vocal projection practice boosting your voice volume by speaking from your diaphragm. To be able to boost your voice, you must breathe correctly. Try doing some breath control exercises to help increase your voice’s volume.

When you speak, be sure your shoulders are not rising. If they are, your breathing is too shallow. Shallow breathing means you get an initial burst of volume, but you’ll run out of breath too fast. To correct that, practice breathing through your nose and exhaling through your mouth.

Your breathing should begin down in your stomach, with your diaphragm muscles expanding. By using the correct breathing technique, your voice will drastically improve, and you will have a better vocal projection, which in turn will make every microphone, even the cheap onboard mics of a camera sound better.


Use an On-Camera or USB Mic to Get Better Audio

Often, the mics that come onboard a digital camera or smartphone don’t deliver good audio quality. This is why it is frequently recommended to use a better quality microphone.

Adding an External Mic to Your Digital Camera

If you use a digital camera for recording your videos and it has an input to connect an external mic, get a good quality camera-mountable microphone if your budget allows for it. I recommend getting an on-camera mic such as the Rode VideoMicPro, Rode Compact On-Camera Microphone, or the Tascam DR-10SG.

For example, the DR-10SG from TASCAM is a super-cardioid shotgun mic that has a very narrow pickup pattern, which means that it will pick less ambient noise delivering a cleaner, better audio. Plus, it features a professional quality digital recorder in a single unit. It records to microSD or microSDHC cards. It comes with TASCAM’s unique Dual Recording mode, which automatically records a second “safety take” at a lower level (1).

Using a Condenser Bluetooth Mic with your Smart Phone

Many beginner and intermediate YouTubers use their phones to record their videos. If this is your case and you would like to get better sound using a wireless, Bluetooth lavalier mic, check the SmartMike+ by SabineTek. This microphone gives you excellent value for the price.

It’s small and provides surprisingly good quality audio, plus it’s designed for Bluetooth pairing with your iPhone or Android device, making it perfect for content creators. Together with the free app, you can record audio suitable for podcasts, vlogging, teaching, interviews, and more. Read our full review of the SmartMike+.

Recording The Audio with a USB Condenser Mic

If the format of your YouTube channel is like a podcast where you talk most of the time, it would be a good idea to invest in a USB-Mic so that you get professional sounding videos. An example of a good budget USB mic is the Blue Snowball iCE, Blue Yeti, or HyperX QuadCast. If you want to learn more about which microphone to choose, read our Best Microphones for Podcasting article, there you’ll get more mic options that are excellent for videos that have a podcast format.

Record Voice Over and Synchronize It With Your Video

Let’s say you are recording a Vlog of your trip, and for some reason, the audio is not clear. If you don’t have a USB mic, one thing you can do to resolve the issue is to use the onboard mic from your camera or smartphone to record better audio by speaking close to the mic. Then transfer the audio file to your video editing software and synchronize it with the video.

In case you have a USB mic like the ones mentioned above, you can use free software like Audacity or Garage Band to record a secondary audio track, then synchronize it when editing. This takes us to the fourth tip, do a sync clap before each take for easy synchronization.


Do a Sync Clap Before each Take for easy synchronization

A common practice used by video creators when using external microphones such as USB or camera-mounted ones is to do a sync clap before each take. This practice makes everything much easier when syncing different audio files.

Let’s say you are using your phone’s camera to record your videos, but you don’t like the sound quality of the onboard mic. All you have to do is connect a USB-mic to your computer, open a recording software like Audacity or Garage Band, and hit the record button.

Press record on your phone and get ready for your take. Then clap at the beginning of your video, wait one second and start talking or doing whatever you need for your video.

Next, take the audio file from your USB mic and find the clap audio peak and use it as a reference to sync it you’re your phone’s recorded audio.

After checking that the audio is synchronized to the video, delete the audio file that sounds worse, usually the one from the onboard camera, and edit your video to your likings.


When Filming Outdoors Use a Windscreen or Deadcats on Your Mics

Image Credits: Rode Microphones

Many perfect shots have been ruined because the wind noise renders useless the audio track. Maybe the video shot can be used, but the audio is not clear because of wind noise. To solve this issue, use a windscreen or dead cover to filter the noise anytime you are recording at the outdoors.

Depending on the microphone you are using, there is likely a windscreen or deadcat filter for it. If you use a lavalier mic, get a deadcat cover for it because it will ensure good audio results under windy situations.


Use a Multitrack Recorder To have a Second Audio File of your Shot

Image Credits: Zoom

In some cases, it is crucial to use a backup recording device to ensure that you get a secondary audio file of your shot.

Let’s say, for example, you are interviewing someone for your YouTube channel, and you need to do everything in one shot because the interviewed subject is on a tight schedule.

When you are ready to edit the video, it turns out that the audio file is incomplete because the lavalier mic you were using stopped working in the middle of the interview, or it was continually cutting off. 

There is nothing to do, the interview is over, and you can’t arrange for a new one. This is why it’s essential to have at least two cameras and two different audio recording devices. For cases like this, I highly recommend using a multitrack audio recorder like the Zoom H4n Pro, Zoom H6, or the Tascam DR-05X.

All of the mentioned multitrack recorders come with stereo condenser mics that will pick up the audio in great detail. Plus, they come with many features, and one that I like the most is the dual recording mode, which automatically records a second audio take at a lower level, in case the main audio take is distorted.

With all of these precautions, you will be sure to have the perfect audio take for editing your videos. That way, your sound will be excellent, and your audience will appreciate it.


Conclusion

In this article, we have presented practical tips to get better audio in your YouTube videos. Also, we have given a couple of techniques so that you have a backup in case your main audio take is lost or is of low quality.

How to Make Money From Podcasting

Today, podcasts are more popular than ever. Considering how visual our society is now, it’s a bit of a wonder that audio-only podcasts are so in demand. Podcasts are wildly popular, and the trend has grown steadily over the past several years.

Podcasts are perfect for morning and evening commutes, long trips, or when working out. Some have become fans of a particular podcast series and eagerly await the next episode.

It’s relatively easy to record podcasts with quality audio. Podcasting can be a profitable venture if you take the time to record a quality podcast and build your audience. Why should you create podcasts? They are an inexpensive, professional way to position yourself or your company as an industry leader.

Podcasts create and build audiences, help you connect with other influencers, and build your personal brand by boosting exposure for your business.

In addition, many have found success in turning their podcasts into additional revenue streams for their businesses, whether the business is a large company or an individual. If you are a beginning podcaster, there are several aspects to consider, especially if your goal is to make money.

Read on to find out how to make money from podcasting.


How to Make Money from Podcasting

If you are thinking of starting your own podcast to share your interests with others, you may want to take it a step further and see if you can make a little extra money in the process. Some folks make this their full-time gig. Next are a few necessary steps you need to take.

Photo by Seej Nguyen from Pexels

1. Why Do You Want to Podcast?

The best, simplest place to start is to ask yourself why you want to create a podcast? Your purpose is your center. It becomes the purpose of your podcast as well as the focus of your goals for the podcast.

Think of it as your personal or business’ call to action. Notice we aren’t discussing the topic of your podcast just yet. That’s coming. For now, focus on what effect you want your podcast in the first place. Your action statement should contain a goal.

For example, if you want to promote your business, you’ll know the podcast is working if you increase your product sales by 15% as a result. In other words, your goal should be measurable in some way. As you develop your podcast plan, you can add ideas to make your podcast profitable as well.

2. To Teach or Entertain?

Podcasts focus on providing listeners information or entertaining listeners. A superior podcast does a bit of both. However, it will focus on one or the other. When thinking about the type of podcast you want to create, think about whether you want to educate and inform listeners. Or, do you want to entertain your listeners and speak to their interests?

Whichever you choose, the content of your podcast should also be relevant and meaningful to your listeners. Chances are it will be if you’ve already discovered how and why it’s relevant to you. Also, it should be relevant to whatever it is you want to promote. Many podcasters have the practical goal of promoting their own business and services.

3. Select A Topic You’re Passionate About

Now we’re getting to the topic of your podcast. According to award-winning podcaster and podcasting consultant, Daniel J. Lewis, your topic should be one you are passionate about. Lewis’s podcast is called The Audacity to Podcast. In it, he stresses the importance of keeping the topic relevant to you as well as your target audience.

Lewis defines one’s passion as the topic that you talk about, learn about, or spend your off time doing. For some, that’s a hobby. For others, it’s family or business. Whatever it is for you, that’s your area of expertise.

4. Find Your Niche Market

Podcasts either target a mass-market audience or a specific, narrower niche audience. For individuals and smaller companies, the niche market is the right one for podcasts. It’s easy to define your audience as well as identifying the types of advertisers and sponsors you need.

A niche market by design is focused, specific, and unique. Thus, there’s less competition in that space. All the better for you to claim your place within that place in the market.

If you aren’t sure what your niche is, then take a moment to think about what sets you apart from others in your industry? What is it that you or your company can offer that no one else does? If you have an established business, look at your mission statement. You may find the answer there.

Identifying your niche doesn’t mean you’re stuck talking about the same thing all the time. Rather, it means identifying your angle. You’ll find your point of view for each podcast, your inspiration for podcasting, and the reason your listeners will care about your topic.

Even if you start with a niche market-based podcast, you can expand the scope of your podcast to reach a wider audience later on.

5. Invest in Quality Podcast Recording Applications

Since your goal is to generate revenue through your podcast, you must create a professional quality product. No matter how small you start, take the time to produce quality, relevant content, along with consistency and quality in every production. Your goals are to gain a following and attract sponsors and advertisers. You’ll need a quality product to reach those goals.

There are many tools and applications available to assist you. Next are three that are affordable and assist you with the various aspects of podcast recording.

Audacity

Audacity is an open-source audio recorder and editor. It’s a free program that delivers good, basic recording. Over the years, the company has added features that make it stand up well again even the more expensive paid applications. It’s simple to use, making it perfect for a beginner.

Audition

Audition is part of the Adobe line and is a paid application. It’s an audio mixer and editor that also restores audio content. This one is for more experienced users, as it is a bit more complex than basic programs like Audacity.

GarageBand

If you own a Mac, you probably already have GarageBand. GarageBand is a music creation studio with a vast sound library. You can choose from an array of presets for voice as well as instruments. The best part, it has a recording program designed just for podcasting.


Ways to Generate Revenue Through Your Podcast

Photo by CoWomen on Unsplash

If you sell your own products and services, then mention those on your podcast. If you don’t, then you can promote someone else’s products and services as an affiliate. Affiliates earn a commission for promoting products.

Once you’ve grown your podcast audience, you can receive income through sponsorships and product mentions. There are other ways to make money through your podcast, as well.

1. Podcast Sponsorships

The more popular podcasts generate thousands of dollars per month through sponsorships. Sponsorships work through a cost per impression (CPM) model, which means you receive a commission for 1,000 or more downloads.

Sponsorships help cover your podcasting costs, even if your audience is small. If you have a small, niche audience, you can reach out to your target companies directly.

2. Ad Agencies and Marketplaces

If you have an established audience of 5K-10K listeners, there are various podcast ad networks out there that connect podcasts with advertisers. They handle the search for advertisers, negotiating, and acquiring the script for you. Two successful ad networks are Midroll and Authentic.

There are also podcast marketplaces like Advertisecast. They allow you to list your show and inventory. Brands can browse and select from Advertisecast’s listings.

3. Relationship Building

In business, building relationships with partners and customers is essential for growth. The same applies to podcasting. Networking within your niche interest or industry is often the inspiration for starting a podcast. Think about who you may want to interview for podcast episodes.

Interviewing someone is often the beginning of a collaborative relationship. That individual may be a prospect or representative of your demographic for prospects. In this way, you build a one-on-one relationship as well as strengthening your relationship with your audience.

4. Increase Product and Services Sales

Before you set your sites on sponsors, review the products and services that your business sells. Is your offering relevant to your listeners? If so, think of ways to increase sales through your podcast. For example, offer your listeners a special discount as a thank you for tuning in.

Whether you intended it or not, your podcase is a marketing tool for your company. So, why not turn your listeners into subscribers, and then turn those prospects into customers? As you build your community, it makes sense to offer your subscribers exclusive deals and even early access to your company’s offering.

5. Consulting and Coaching

If you offer consulting or coaching services of any kind, why not center a podcast around that topic? Remember, loyal listeners, become loyal customers. You could build in an offer for a free 30-minute session (or another type of discount) for listeners and subscribers.

Get creative with your offers, such as a discount for repeat customers, or even a contest based on a listeners’ interaction with your podcasts, such as liking and sharing. This kind of marketing works toward all your goals, from growing your audience to growing your brand and increasing sales revenue for your products or other services.

6. Affiliate Marketing

Affiliate marketing is also called performance marketing. You receive a commission when you refer people to other companies, and someone makes a purchase from that referral.

If you are familiar with the products or services you are promoting, then your promotion is authentic and likely to generate commission. In your podcast, you’d create an ad of sorts to promote an affiliate product or offer.

7. Programmatic Advertising

Programmatic advertising is gaining popularity among podcasters. Rather than promoting another company’s product or service yourself, this form of advertising involves a non-host who reads ads that appear in your podcasts.

Brands purchase programmatic space according to their audience demographics, not according to specific shows and topics. So, you may be able to get paid to run ads from some seemingly unlikely sources.

8. Repurpose Your Podcast Content

Most podcasts include a written transcript, even if it’s only in the form of notes. On the development end, you have a script of some sort as a base. Both the audio and written content is valuable. Why not repurpose it into a form that generates revenue? Two ways to do that are books and online courses.

Audiobooks and Books

As you continue to create podcasts, you’re creating valuable content that you essentially give away for free or as part of a paid subscription. This easy access is one of the best parts of podcasting. But, it’s also an opportunity for you to leverage your knowledge and hard work by repurposing your content into a platform that generates revenue.

You can review your podcasts, organize and transcribe them into a book. You may create a collection or combine your podcast content with new material. Either way, you’ll have a marketable product that showcases your business as well as your podcast.

Books are a separate format altogether, so you’ll spend some time reorganizing and working with an editor. In the end, though, you’ll have a published piece of literature to add to your professional resume.

Online Courses

Many podcasters use their expertise as well as repurpose some of the podcast content to create paid online courses. Online courses are an excellent way to teach something. The format differs from a podcast in that you are organizing it in a way that’s easy to follow.

People who pay for courses hope to be able to apply what they’ve learned once they complete your course. It takes a little time to reorganize your podcast topics into logical lesson modules. Though, the result can be an ideal representation of your expertise. Your fans and followers are likely to purchase from you because they already enjoy your podcasts.

9. Donations and Crowdfunding

Depending on your niche, you may want to consider asking your community of listeners for donations. Crowdfunding platforms make it easy for your patrons to make donations as pledges. One popular crowdfunding platform is Patreon.

You can create offers with additional content or bonus gifts for higher contributions. In the next section, we will talk about how you can also use platforms like Patreon to organize and collect revenue for events.

10. Virtual Summits and Other Events

We have discussed the importance of building relationships through your podcast. If you have done that, then you can turn that connection into a profitable business opportunity in the form of a virtual summit. Virtual summits enable you to get more out of your podcasts and build more relationships by bringing people together.

You will expand existing relationships. Some companies have organized world-leading, global digital conferences this way. Though, you can still do this on a smaller scale if you are a small corporation or a business army of one.

Explore your connections and gather other experts who are willing to be expert speakers at your event. A successful event will result in increased sales and increased subscribers. In this way, a podcast is so much more than a casual conversation with an influencer or expert in your studio.

If you’re not in the position for a large event, there are smaller events you can organize and host. Doing so brings your fans together with other experts and influencers within your niche. Events can be small cons or professional conferences that allow people to come together virtually.

Some folks combine crowdfunding platforms like Patreon with their live events. Patrons receive early access to tickets to your event.

11. Premium Content Offers

Premium content covers just about anything. Subscribers can listen to your podcast for free. If they choose, they can purchase additional premium content. Examples of premium content that pertains to podcasts are additional interviews, an ad-free RSS feed, and Q&A sessions with the hosts.

Other options are an early-access RSS feed and behind-the-scenes content. Usually, premium content costs subscribers only a few dollars a month. Though, that amount adds up month after month.

12. Swag and Other Physical Products

As your podcast gains a loyal following, you can offer swag products, which are physical products like mugs, mousepads, t-shirts, keychains, and other items. Sites such as Cafe Press and Teespring allows you to sell swag that’s made to order, rather than you having to purchase products upfront and in bulk.


Conclusion

Making money from podcasting is not automatic. It takes time to build an audience and you must have the talent and drive to continue. Though all the topics in this article represent the many aspects behind creating a successful podcast.

Even experienced marketers need a year or two to learn best practices for creating podcasts. Even so, building and launching a podcast is an ideal way to reach your target audience while providing relevant, valuable content.

As you have learned, podcasting is not just a way to market your company or brand. It can be another source of revenue for your company. Depending on your goals, that revenue can simply pay for the cost of producing the podcast. Or, it can generate substantial income as well as networking opportunities.

Once you become a master, you may even consider being a podcasting coach or consultant. You can help other companies and provide them with your own tips on how to make money from podcasting.

  • « Go to Previous Page
  • Page 1
  • Interim pages omitted …
  • Page 9
  • Page 10
  • Page 11
  • Page 12
  • Go to Next Page »

Primary Sidebar

Search

Guides & Tutorials

  • Choosing a Portable PA System
  • How to Be a Better Singer
  • Build a Budget Live Streaming System Using PTZ Cameras
  • How to Get the Best Audio Quality on YouYube
  • Setting Up Stage Monitors
  • Mixing Console Basics
  • How to Position PA Speakers
  • Stage Sound System Set-Up
  • How to EQ Live Vocals
  • How to EQ Live Sound
  • Daisy Chain Active Speakers
  • Zoom Audio Settings for Music
  • How to Livestream a Wedding
  • Improve Your Livestream Audio Quality
  • Microphone Preamp Buying Guide

Featured Posts

Treblab X9 Pro: Tough Earbuds, Big Performance

Escape the Noise: Best Affordable Noise-Canceling Headphones

How to Combine Passive and Powered Mixers

What is a Ground Loop? – 5 Simple Ways to Fix the Buzz and Hum

Disclaimer

VirtuosoCentral.com is a participant in the Amazon Services LLC Associates Program, an affiliate advertising program designed to provide a means for sites to earn advertising fees by advertising and linking to Amazon.com.

Home  About  Contact  Disclaimer  Privacy

Copyright © 2019-2025 Virtuoso Central. All Rights Reserved.