This website uses cookies to improve and personalize your visit. Learn more about cookies. Got It

  • Skip to primary navigation
  • Skip to main content
  • Skip to primary sidebar

Virtuoso Central

  • About Us
  • Contact
  • Privacy

Informational

Differences Between Active and Passive Speakers

If you’re new to the audio world and trying to figure out which PA sound system would work best for you, you’ve come to the right place. When it comes to active and passive PA speakers, people often question which would be the better choice for their situation.

In this article, we’re going to help you narrow that down. We’ll be presenting the differences between active and passive speakers, the pros and cons of each one, plus we discuss which one is better, so you’ll be able to get the right PA sound system for your needs.


Active vs. Passive speakers: What’s the Difference?

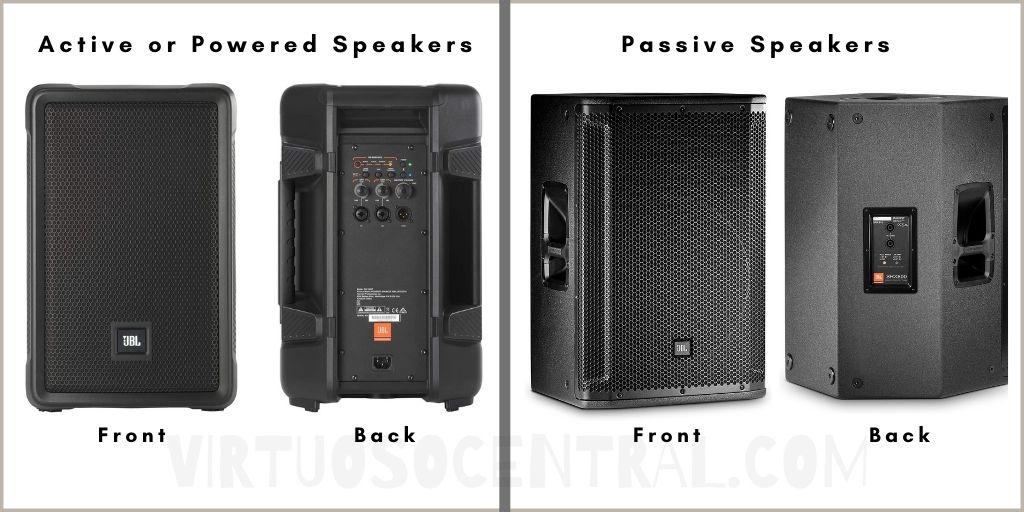
The main difference between active and passive speakers is that active speakers have a built-in power amplifier. Passive speakers don’t; they rely on external amplifiers to produce sound.

Now, there’s more to it than that, so stick with me. With active PA speakers, you’ll need a power source for the unit. You’ll either plug into a wall outlet or choose a battery-operated system. With a passive PA speaker system, you need your own amplifier to operate.

There are a couple of things you’ll want to know before jumping in, so let’s look at things to consider if you’re thinking about active PA speakers. But before we continue, we need to understand some basic terminology.


Basic Terminology Before We Continue

If you’re new to this, some of the different terminologies can be confusing, so I’m going to quickly cover a couple of basics that you’ll see a lot. Feel free to pop to the next section if you’re up on these terms.

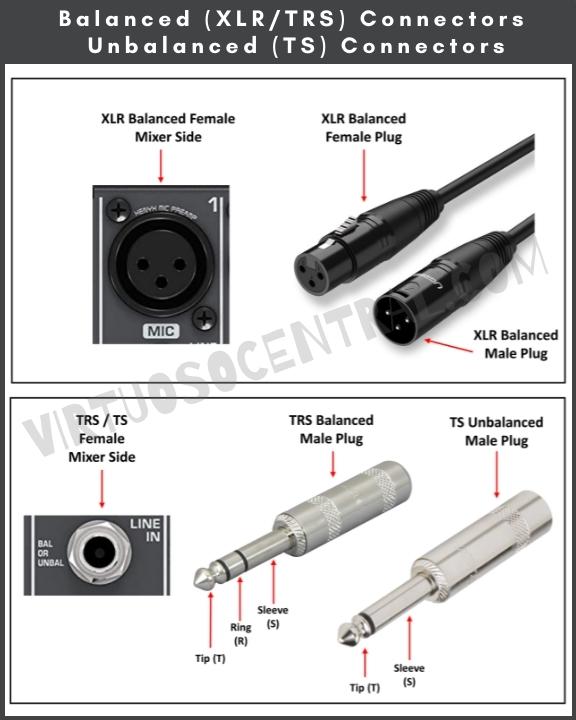
Line-level: this comes down to the strength of the signal and moves between the different pieces of equipment you have. Now, line-level and mic-level are different, but we care about line-level right now, which is just about 1 volt.

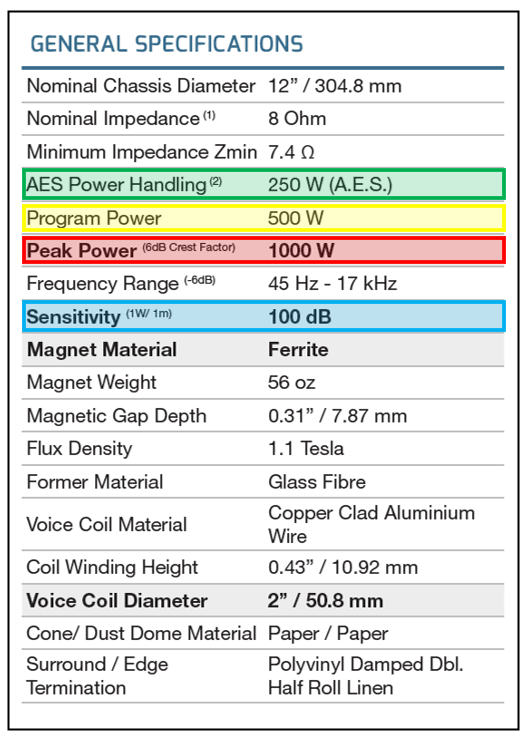
Drivers: these are the speakers in your sound system. In PA systems, there are two main categories woofers and tweeters. Woofers handle low and mid frequencies while tweeters take care of high frequencies. Both basically take the signal and turns it into sound waves.

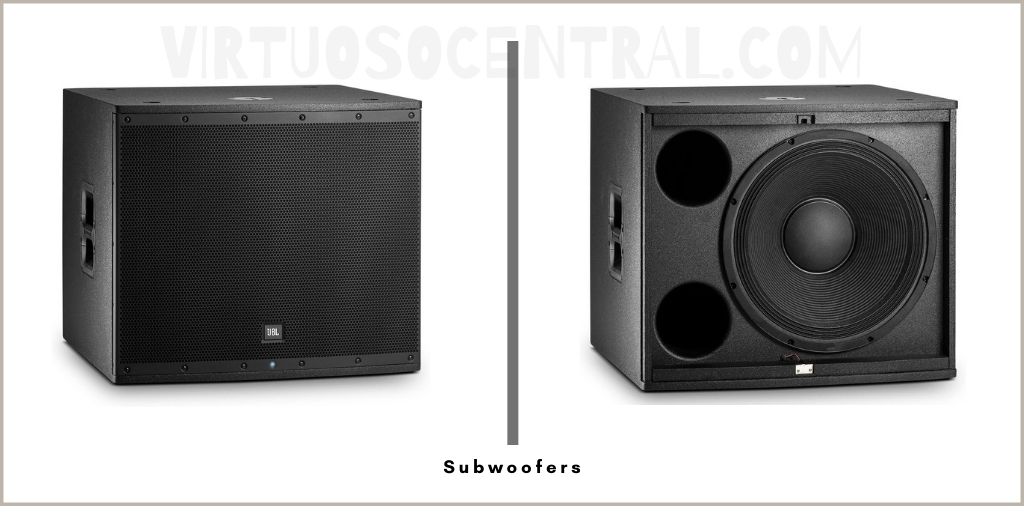
Crossover component: when you put one input signal into a piece of equipment, it goes in, and the crossover network splits it in two or more frequency ranges. Namely Highs (Tweeters), Mids (Mid-range woofers), and Lows (Low-range woofers or subwoofers)


Pros and Cons of Active PA speakers

Okay, now that we got the basics out of the way, let’s look at what you need to know when it comes to PA speakers. You’ll generally hear of two types, active and passive speakers. What’s the difference?

Let’s take a balanced look at active PA speakers to see if these are the right choice for your audio needs.

When you’re weighing pros and cons, it’s easy to get pulled into one piece of information, but think about what situation you’ll be using the speaker system in, and will it change? Do you move around a lot? Do you need ease of use? How much will it set you back? Only you know what your circumstances are.

Pros

  • Active speakers are quick and easy setup. Think plug and play. They offer an easy, out of the box answer.
  • Simple to adjust. You don’t need to be a master sound engineer. Great if you don’t need all the bells and whistles.
  • With active speakers, you get lots of options. You can find portable designs that offer different power options, such as plug-in or battery-powered units.
  • All-in-one-system. Your amp needs are there, simply plug in your line-level signal, and away you go.
  • Simple solution. One piece of equipment with no need to match up your speakers to your amps or need to worry about getting the right amp.
  • It gets the job done.

Sounds great, right? Slow down, my friend. There are some things you’ll want to think about. Let’s look at a couple of reasons this might not be the right choice for you.

Cons

  • Let’s face it, they’re heavier since the amp is built into the unit. What that means is if you’re moving around a lot, it could be inconvenient.
  • Reality check. If one of the parts breaks, you can’t simply swap out that one piece, and it can be costly. If it goes, your entire system just went.
  • If the system is not battery operated, you need to be near a wall adapter, which can limit your setup.
  • If you play in large venues, passive PA speakers might be better.

In general, an active PA speaker system is the right choice when you’re looking at smaller venues. It will also be the right choice if you move around a lot like a traveling DJ or if you’re a speaker.

Active speakers are great for in-house systems that aren’t too big. Churches and cafés are great examples of places where they work well, or maybe you’re somebody who plays acoustically at local events. In this case, active PA speakers are a great, easy choice.

With those things in mind, let’s check out passive PA speakers.


Pros and Cons of Passive PA Speakers

Pros

  • They tend to be lighter in weight than powered PA speakers because there isn’t an amp built-in
  • You have a central control where you have more customization
  • Since the speakers and amps are separate units, when you want to scale up later, you don’t have to replace the entire system
  • You can see what’s going on easier, as an active PA speaker encloses the amp, and you can’t fully see what’s there, so you aren’t always sure of the quality of the equipment

Cons

  • Sometimes it’s hard to know how to match the speakers and amplifiers if you don’t have the knowledge.
  • If you have too much distance between everything, you might get some signal loss
  • More equipment to pack up/set up
  • If you get amps which aren’t compatible, it can cause problems

Connection Diagram for Active Speakers

Active speakers are easy to setup. Plug the power cord to an outlet, then connect them to the mixing board’s main output with a cable, and you are set. You could also connect powered speakers wirelessly for having a more convenient setup free of wires.

The following diagram illustrates how to connect active speakers to an audio mixer, use it for your reference.

READ: How to Connect 4 Powered Speakers to a Mixer


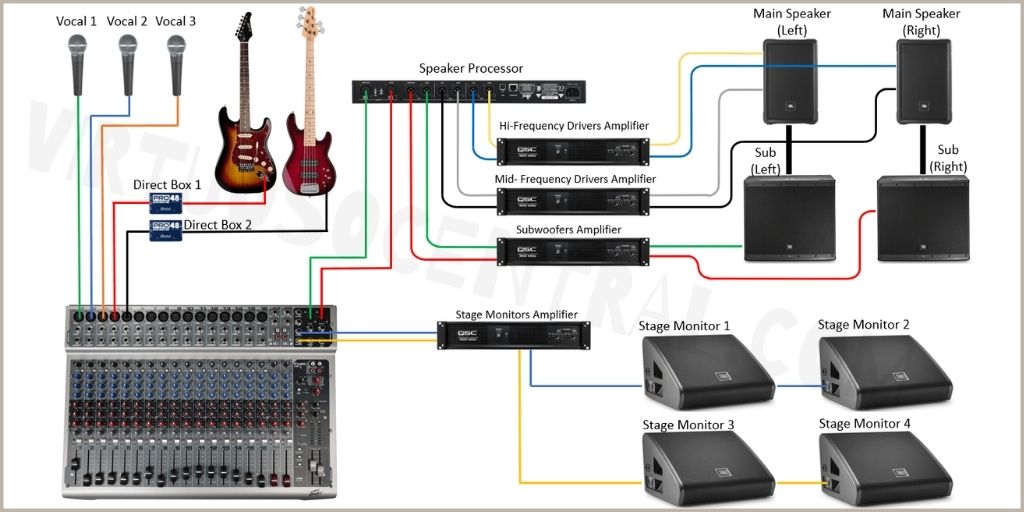
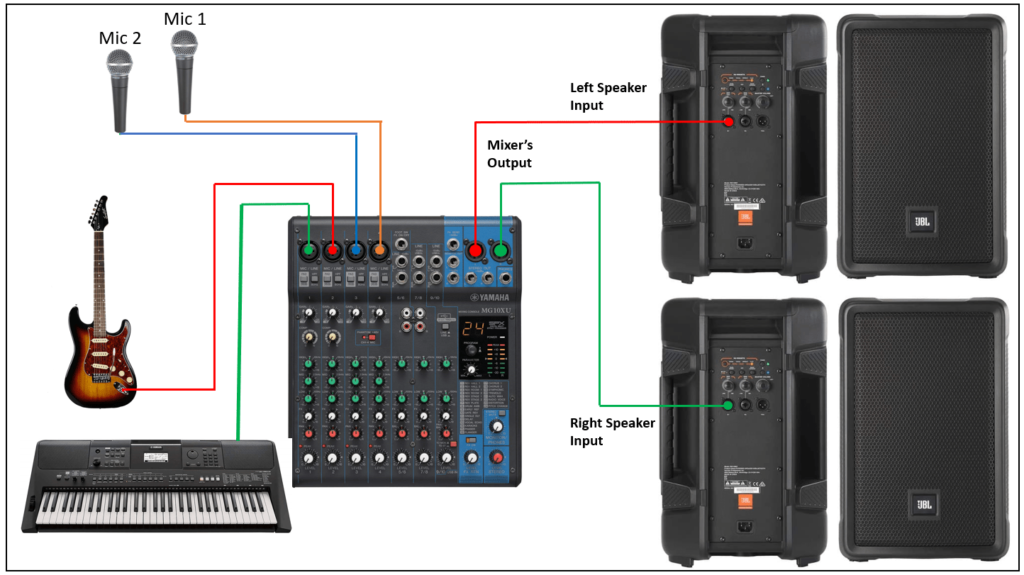
Connection Diagram for Passive Speakers

Passive speakers take more work to set them up. First, you need to place your speakers in the venue. Then you need to set up the amplifier and connect it to the mixer. Once that’s done, lay down the cables from the amp to the speakers.

When using passive speakers, you need to carry more things with you and make sure that the speakers are correctly matched with the amplifiers you are using.

The following diagram illustrates how to connect a passive PA system.

READ: How to Set Up a Stage Sound System


Which is better? Active or Passive Speakers?

It’s not a matter of right or wrong, but more of looking at how you’ll be using the speakers. Each type of PA speaker offers different things worth considering.

Active PA speakers can be a simple, all-in-one unit that offer an easy, plug-in answer. But, there are limitations.

Passive speakers need something else to send the signal through them. You need an amp, mixer, or cables to get going. First, the signal comes from your mixing console; it goes through the amp, then the amp pushes the signal and sounds out through the speakers.

That original signal gets broken down into smaller bits before going to where it needs to be. With a passive PA speaker, your line-level signal needs to first go through an amplifier. Why? It increases the signal before it goes to your speaker. In this case, the amp powers the speakers. Without the amp, there is no power to passive speakers.

Okay, so those are the basics. Your first instinct may be to grab an active PA speaker, but there are things you’ll want to consider. There are benefits to choosing a passive PA speaker you might want to explore.

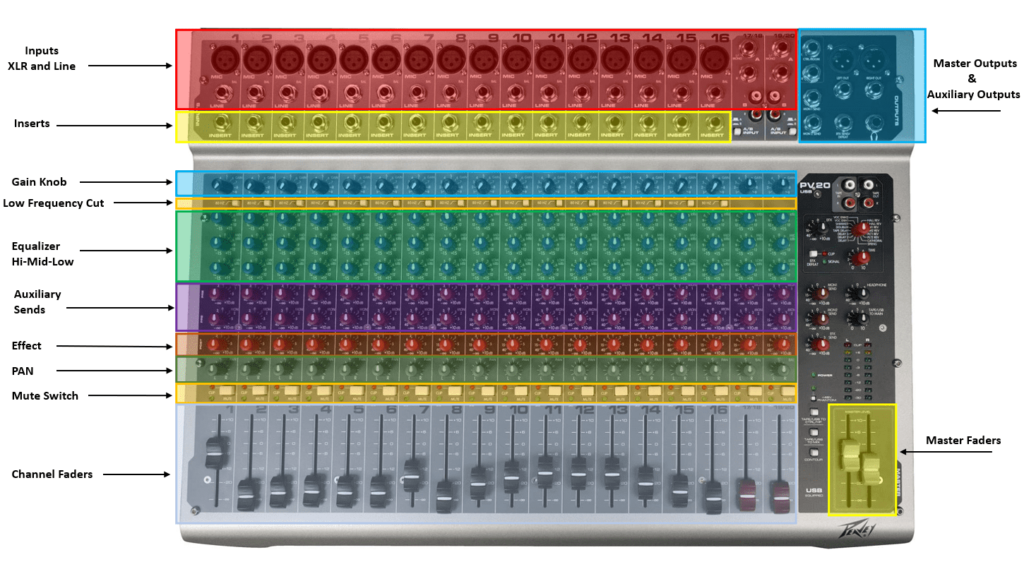
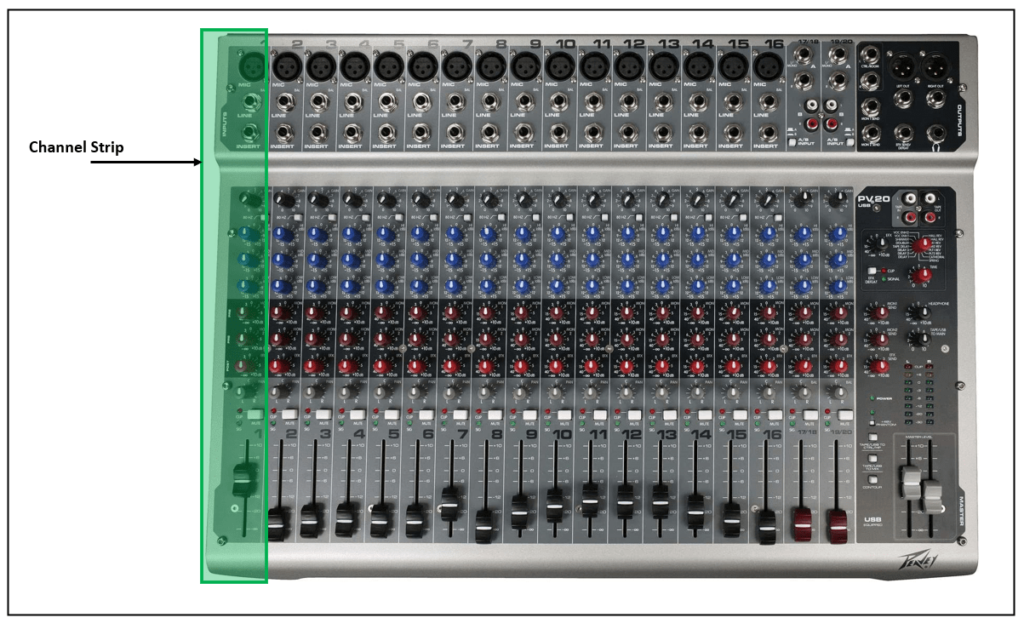
READ: Mixing Consoles Basics


When to Choose Passive PA Speakers

One of the big things to keep in mind when choosing speakers is knowing how you’ll be using the system. So, knowing when to choose passive PA speakers and when to choose active comes down to some basics.

Passive PA speakers are popular with people who play live music. They’ve been doing it that way for a while, and they work really well in medium to large venues. If it’s a place that gets used a lot, it’s nice to have a good system set up and in place. Now, if you need to move things a lot, it may not be the best choice.

On the other hand, consider the scalability factor. Are you going to outgrow your active PA speaker too quickly? When it comes time to upgrade, when you chose passive PA speakers, you only have to upgrade one piece, not the entire system, which saves you money. Also, if you want to add things later, like sub-woofers, it’s easy with passive.

READ: Speaker Wattage Explained


Final Thought

So, there you have it. Both will get the job done, but how you do it, the cost and other factors like portability and the size of the venue all come into play when you’re considering a PA sound system. 

Tips to Stop Mic Feedback in a Small Room

When it comes to reducing feedback in a small room, there are a couple of things to keep in mind. Maybe you’re used to practicing in a larger space, but when you show up for a gig, you find the room is half the size.

Understanding what’s going on is half the battle. With that in mind, let’s look at how to stop mic feedback in a small room.

Photo Credits: Aleksandr Neplokhov from Pexels

Pinpoint Problematic Frequencies

Well, that’s strange. Last time you played a gig, it was a high pitch squeal that was the problem. This time it’s a hoot or howl. What’s going on?

Any time you get that high squeal or a hoot or howl, knowing which is the problem frequency can help you pinpoint your issue. Different feedback sounds are based on different problematic frequencies. Detecting those frequency ranges can help you tackle the problem.

So, if you’ve got a weird howl going on, it can usually be found in the 250 to 500 Hz range. Make sure to cut down on those frequencies a bit to see what happens. If the vocalist gets feedback, usually, the problem is around 1kHz. Got a screech that’s blowing out your ears? It’s probably frequencies between 2kHz-4kHz.

Just try experimenting by cutting down on those frequencies to see if you get better results. If you’ve looked at your levels, and tried pinpointing problematic frequencies and it’s not correcting the problem, there are a few other things to check for.


Let’s Talk Mics for Reducing Feedback in a Small Room

The next thing you can do to reduce feedback in a small room is to check the position and location of the mic. Where is it located? Did you check the angle of your mic? How far away is it from the sound source? Make sure your mics are behind and away from the main speakers.

Are you using a directional mic or an omnidirectional mic? What type of polar pattern does it have? Is it cardioid, super-cardioid, or hyper-cardioid? Depending on the type of pickup pattern of the mics, their location on the stage can vary, also, the positioning of the monitors. Make sure to read our post of the best microphones for live performance by clicking the link.

Do you have more mics in the room that aren’t in use? Turn those bad boys off. How’s your channel gain? Is it too high? Try adjusting the gain to get enough volume without feedback.

These are all basic things you can check when you’re trying to reduce feedback. But, the microphone isn’t the only issue you need to watch for. In this case, it’s a good place to start.

Sometimes, it’s as simple as the volume being too loud. Turn it down and see if it helps the problem.

Another helpful way for stopping feedback in a small room is by using a microphone isolation shield. Although they are primarily designed to be used in home studios, they can also be repurposed for isolating sensitive microphones in small areas.

READ: What Causes Microphone Feedback and How to Stop It


Check the Acoustics of The room

Are you still having an issue with too much feedback? Here’s another place to look, when you’re dealing with feedback in a small room. Glance around. What surfaces could the sound be bouncing off?

If you have flat and hard surfaces without any dampening material such as carpet, sound vibrations can hit the surface and bounce back, producing an echoey sound that increases the risk of feedback to happen. If possible, try dampening the walls with curtains and the floors with carpet.

Another way of dealing with a room with bad acoustics is to use acoustic absorbing materials on the walls. These materials will absorb sound, significantly reducing feedback. Acoustic materials tend to be expensive.

I have found a video online that will help you make your own acoustic pads to help reduce echo in a small room, and the bast thing it’s very cheap to make. You only have to spend a few dollars.

Video Credits: DIY Perks

Other Ways to Deal with Mic Feedback in a Small Room

One way to get a hold of the heavy squeal is to equalize the channel signals. Look for lower frequencies. When it comes to the heavy whistle that we all hate, the mic is picking up sounds from the monitors or speakers and sending it back. It becomes a nasty loop that sets your ears on fire.

Here are a couple of ways to avoid this. First, make sure your mic and speakers aren’t too close. Oh, on a side note, if you have the money, be sure to invest in a higher-quality monitor, because good quality monitors have a flat response. That helps a lot in reducing feedback. It’s one investment you won’t regret.

Make sure your speakers are placed behind your mic—in the opposite direction. Another tip worth trying is to put your monitors on the floor instead of elevating them. Or better yet, try in-ear monitoring if you can.

Have regular speakers? Try monitors, as they offer a flat frequency response you can get better results.


A Few Final Tips on Dealing with Mic Feedback in a Small Room

Learn to work with your equalizer. Make sure your set up is good. Get quality equipment, and oh yeah…consider getting a feedback eliminator. You can add it to the source, and let it help you work things out. What it does is basically use filter bands that measure what’s happening. It helps suppress the audio feedback for you. It just may be the easier option if all else fails.

How to Set Up a Stage Sound System

Live performance is the most authentic way of bringing your music to your audience. The live experience is directly dependent on your stage sound system set up as well on the quality of your audio equipment.

Setting up a stage sound system correctly will go a long way towards providing great entertainment for your audience. This article will give you some pointers to help do that, as well as some explanations of how sound systems work.


How a PA System Works

A PA (or public address) system is used to increase sound for your audience. This generally includes a microphone, mixer, and loudspeakers, all of which perform a specific function.  The microphone converts sound pressure to voltage. Its magnetic force emits a small amount of voltage when someone produces vocal sounds into it.

This voltage is then modified and equalized on the mixing console, then is amplified by a powered loudspeaker or amplifier. The higher voltage is dispersed by the speakers, which increases the volume of the sound for the audience.  

Sound Pressure Level (SPL) of speakers determines the volume of sound at given distances from the speaker. Speakers usually work together to amplify sound in a trapezoidal configuration, which allows for easier placement than a square or rectangle arrangement.


Before Setting Up a Stage Sound System

If you’re new to setting up a sound system, you may arrive at your first venue and think, “How do I set up a PA system for my band?” It’s OK to feel uncertain about this your first few times. Each venue is different, and with time you will learn tricks to adapt to each one.

You will also develop a system that works for you, that can easily be modified to fit each new setting. A basic rule of thumb to remember is to keep the speakers in front of the microphones (rather than behind) to prevent feedback.

Feedback is what happens when a microphone picks up too much of its signal. The amplifier then outputs a louder version of the signal, creating a feedback loop that can only be interrupted by muting the speaker or microphone. Similarly, you will want to do your best to keep the main amplification away from the microphones.


Equipment Needed for Setting Up a Stage Sound System

Let’s start with some brief descriptions of some of the equipment you’ll be using to set up the stage sound system for your band or live event.

The Mixing Console

Mixers are used to combine multiple audio sources such as microphones and instruments to then manipulate the volume, frequency, and dynamics of the sound source. In a PA system, audio signals are increased to line level in the mixer.

Audio mixers come in different sizes. Larger audio mixers have several input channels that will accommodate more microphones and connections. They can be analog or digital. Analog mixers balance the tonal sound and carve out space in the sound profile for each instrument in the band. Most have a three to four parametric EQ (equalization), which changes the balance of different frequency components in an audio signal.

Digital mixers tend to be best for touring bands, since most require less gear to operate, and can be controlled wirelessly through dedicated apps. A sound engineer using this setup can move around a room or venue to make adjustments tailored to the audience’s perspective. It can also adjust monitors from the stage while listening to the musicians play.

To correctly use a sound mixer, you need to know the basics of mixing consoles, click the link to read an entire article that explains the ins and outs of audio mixers.

Microphones

Microphones capture the sounds produced by vocals, guitar amplifiers, drums, and any other sound source. Mics come in different shapes and forms. Some are designed for studio recording, while others are tuned explicitly for live performances.

For live performing vocals, there are two main types of mics from which to choose: dynamic and condenser. Dynamic microphones are usually best for live performances because they are less sensitive than condenser mics. Having low sensitivity means the mic is less prone to bleed and feedback during a stage performance.

Even so, many vocalists and sound engineers prefer customized condenser microphones because they deliver superior sound quality and clarity when compared to dynamic mics. Condenser mics pick up more details, including inflection and other nuances of the speaking or singing voice.

Additionally, you can use a microphone to get the guitar, bass, or keyboard amplifier’s sound in the PA system, rather than turning the guitar’s amps all the way up.

The Amplifiers

Once audio signals coming from microphones or instruments are mixed, equalized, and amplified to line level, they leave the mixer and continue their path to the amplifier. Audio amplifiers increase the signal further to the speaker level.

Increasing the volume to the next level is called gain staging. At this point, it has attained speaker level and is controlled with the amplifier’s level control. The amplifier’s high voltage causes the speaker to reproduce the original sound at a much higher level for the audience to hear.

The Main Speakers

There are two different kinds of speakers, passive and active. Passive speakers have an amplifier as a separate device in a rack, usually located away from the speakers. In contrast, powered (or active) speakers have the amp in the cabinet with the speaker.

Active speakers are easier to use as they have built-in amplifiers matched to the speaker components (subwoofers, mid-range, and tweeters). They require only line-level input and no separate amplifiers to provide power.

Passive speakers, meanwhile, require amplification, speaker cables, and may require an external crossover and other signal processing. Bi-amped or tri-amped passive speaker will give you greater control over the speaker components, but they need a separate amplifier for each speaker part.

The Subwoofer

Whether you need a subwoofer when setting up a PA system for your band depends on the kind of instruments and music being played. Country and folk music generally do not require subwoofers, as the bass and kick drum for these types of bands don’t need additional amplification.

Rock, metal, pop, and hip-hop tend to sound better with subwoofers, however.  A subwoofer extends frequency response and output for full-range speakers. These are speakers that amplify low frequencies. It’s often best to put subwoofers close together, as putting two together increases sound pressure level by 3 decibels (dB) and will not produce interference. Placing them near walls or corners also increases the perceived bass output.

Stage Monitors

Wedge or stage monitors allow instrument players in the band to hear themselves as they play, by sitting on the floor and angling up toward the performers. Correctly placing monitors on a stage plays a vital role in reducing feedback.


Steps for Setting Up a Stage Sound System

Let’s say you’re setting up a sound system for a standard band, including vocalist, guitar, bass, keyboard, and drums. You’ll want to set up speakers, connect the mixer, and run microphones to start setting up the stage sound system. The following steps explain in detail how the set up is done. Let’s get started.

Positioning Main Speakers and Monitors

1. The first step before setting up a stage sound system is to decide the placement of the PA speakers. To achieve this, you must inspect the location. Check where the stage is located, survey the size, acoustics, and where the audience is going to be in the room. Check where the power outlets are located and verify that they are in good working order.

2. Once you have summed up the acoustics of the venue, and have an idea of where each performer is going to be on stage, set up the main speakers that are going to blast sound to the audience. We have dedicated a full article on speaker placement, click the link to learn more if you’d like.

If you plan on using subwoofers, place them at the front of the stage away from microphones to minimize feedback. Subwoofers have a spot in the top where mounting poles can be screwed into. Speakers will then be mounted on these poles.

If you are not going to use subwoofers, a pair of speaker stands with tops can be used instead. Make sure to tighten the set screw in the back that holds the speaker in place. Depending on the speakers’ weight and the height of the stands, you may want to have another person help mount the speakers.

Make sure to elevate speakers to the audience’s ears so they can hear better. Speaker sound travels farther when they are elevated.

Depending on the setup, there are many ways to raise speakers. The easiest to set up is by using a tripod speaker stands. Another way is by ground stacking, which is putting speakers atop each other in a tower. Scaffolding stands hold speakers at differing heights within a rack. Trussing is suspending speakers with cables. 

Speaker height is critical because higher stands will transmit sound farther. The one caveat to this is that if the speakers are too high, there will be a loss of impact in the front row of the audience (but if they are too low, the front row will be deafened by loud sound).

3. Next, you should position your monitors effectively when setting up a PA system for your band.  Usually, at least two are recommended, one on each side of the stage. If you have a third, you can set this up at the back of the stage. That way, it can cover the keyboard and drum players.

Running Power Drops on Stage

4. Once the main speakers and monitors are in position, run power drops (extension cords) to each side of the stage to run power cabling to the speakers and monitors. Power drops could also be used to power a guitar player’s foot pedals or any other equipment that needs to be connected to AC voltage.

When you are ready to run power to your sound system, connect your subwoofer(s), then run shorter power cables to the speakers. Make sure to have a roll of gaffer tape handy to secure any cables and prevent them from causing accidents.

One important tip when powering your stage sound system setup is to keep the power off until everything is connected to the mixer.

Setting Up the Mixing Console

5. At this point, find a convenient place to set up the mixing console. The mixer can go anywhere; it doesn’t need to be on the stage itself. Just keep in mind that if you set up the mixer far from the stage, you would need longer cable runs.

Nowadays, there are wireless digital mixers that are controllable using an iPad, such as the Behringer X AIR X18. If you get a digital mixer that is wireless capable, it can be placed on stage to connect all the vocals and instruments, then use the iPad/tablet from anywhere in the venue to control the audio.

6. Run all the cabling to connect all the audio sources such as microphones, guitars, and keyboards to the mixer. You can connect sources like a guitar or bass directly from the amp, using the line output provided in most guitar amps.

You could also use a microphone by placing it in front of the amplifier using a stand to send the signal to the mixer. To connect sources such as keyboards or electronic drums, use the line outputs straight to the mixer.

7. Make it a habit of keeping your setup organized because it will look professional. When setting up the stage for your band, try to keep cabling out of the band’s playing area as much as possible by keeping it to the sides and off stage, etc.

Take advantage of stands to wrap cables around to secure them and decrease the risk of tripping and tape if necessary. Triad orbit stands are great for this because they have a low profile, so they won’t be in the way.

8. One way to decrease clutter on stage is to get a stage box or multi-channel snake. With it, you can connect all of your microphones and audio sources with a shorter cable to decrease the number of wires everywhere.

Connecting the Mixer to the Speakers and Monitors

9. After all the mics and input sources are connected, it’s time to set up audio connections from the mixer to the main speakers and monitors. Run a line from the mixer’s left output to the left speaker. Do the same for the speaker on the right.

If you are setting up the sound system with subwoofers, they likely have an internal crossover or a “Pass Thru” connection. Use the pass-thru connection to connect the main speakers that go on top of the subwoofer.

After that, connect the monitors to mixers. We have dedicated a full article for explaining how to set up stage monitors, click on the link to read more.

Remember, it is vital to have all the performers pleased with the sound coming from the monitors because it is their reference during the performance. In some cases, you would have to relocate the monitor or adjust the volume until all the performers are happy with the sound.

Perform a Sound Test

10. After everything is connected, make sure the main volume on the mixer is all the way down. Start by turning on the audio mixer, then continue with the monitors and lastly, turn on the main speakers. Adjust the volume of the powered speakers to the middle, and do the same on the monitors. Later you can readjust the volumes as necessary.

If using power amplifiers and passive speakers, start by turning on the mixing console, then with the volume of the amplifiers all the way down, turn them on and slowly turn the volume up on the amps themselves. Set the volume level on the amplifiers to the middle and readjust as necessary during the sound check.

As pointed out by Ron, one of our readers, the reason you do it in this order is to “prevent any kind of popping or voltage spikes from equipment (such as the mixer) as it comes up from damaging the speakers.”

11. Play a track on one of the channels and start increasing the volume until you hear it on the speakers. Adjust the volume until you feel it is loud enough for the venue.

EQ Mics and Instruments, Check for Feedback

12. Perform a basic EQ on the mics, and lines. Ask the band to start playing and continue EQ each microphone and instrument connected to the mixer. Adjust the volume on the monitors until each performer can hear the mix.

13. If you start getting feedback, try to ring out the trouble frequencies, or reposition speakers and monitors to minimize feedback. An automatic feedback destroyer can be handy to help eliminate feedback. We have a full article on what can cause microphone feedback along with some tips on how to avoid it, click the link to read the post.

14. Allow enough time when setting up everything so that each mic is tested with the main speakers and monitors as well. Simulate a situation so that you know what is your volume headroom before feedback. In other words, slowly increase the volume of all microphones and generate a sound to see how the equipment behaves at higher volumes.

If you still see that you don’t have enough volume for your mix, you might need to reposition monitors and even the main speakers depending on how bad is the feedback.

Video Credits: Kettner Creative

Live Sound Setup Diagram

The images below are a couple of live sound setup diagrams. The first is using active speakers while the other is using passive speakers. In both set ups, I have included subwoofers for extending the low-frequency range.

If you are not going to use subwoofers, just omit that connection. Keep in mind that if you need a larger live sound system setup, you can easily daisy chain more speakers and subwoofers. This only applies if using powered speakers.

If instead you are using passive loudspeakers and you want to have a larger system, you would need to use a PA speaker management system that can accommodate your setup.

The following diagrams are simplified for understanding the signal flow.

Live Sound Setup Diagram Using Powered Speakers

Live Sound Setup (PA Setup) Diagram Using Powered or Active Speakers

Live Sound Setup Diagram Using Passive Speakers

Live Sound Setup (PA Setup) Diagram Using Passive Speakers

Other Considerations

When setting up the stage for a band (as opposed to a single performer or karaoke artist, or musician), it’s essential to focus on gain staging and feedback prevention. More microphones and speakers increase the probability of feedback, so it’s vital to limit the stage setup to the minimum number that will do the job well.


Final Thought   

Providing great musical entertainment for any venue starts with setting up the stage sound system for a band. Hopefully, reading this article has provided you with some tips and insights to make this process as seamless as possible.

Speaker Wattage Explained

It seems that there is a misunderstanding between the wattage of a speaker and the volume it outputs. Many people believe that if a loudspeaker can handle a higher number of watts, as a consequence, the sound level should be higher, but that is not entirely true.

In this post, I will explain speaker wattage, what it means, and some other essential concepts that will help you understand the specifications of a loudspeaker. Let’s get started.


Speaker Wattage Ratings Explained

Speaker wattage is the electrical power handling capabilities that a speaker can receive from an amplifier. When you look and the back of a speaker, you’ll see in the label the number of watts the speaker can handle. This measure only tells you the power requirements at which a speaker can operate, not the output volume.

There are two leading power figures used by manufacturers to describe a speaker’s capabilities, the nominal power, and peak power. Another rating used by some manufacturers is program power that one tends to be confusing. Let’s take a look at each one.

Nominal Power in Speakers

The nominal power rating in a speaker is the amount of power a speaker can handle from an amplifier continuously without being damaged. It is also known as the RMS power (root mean square). This is an essential rating you need to keep in mind when matching speakers to amplifiers.

Peak Power in Speakers

Speaker specifications also include the peak power rating of a loudspeaker. Peak power refers to the absolute maximum power a speaker can handle for a short time. In other words, it’s the maximum wattage a speaker can consume in short bursts without being damaged.

When it comes to speakers, the peak power is calculated by multiplying the nominal or RMS power by 4, RMS x 4.

Sometimes speaker manufacturers use peak power to advertise their products. That practice is misleading because customers would think that the speaker is more powerful than what it is in reality.

Program Power in Speakers

Program power and peak power are very similar in their definition because both refer to the maximum power a speaker handles in short bursts of sound. Examples of short bursts are if an open mic falls to the floor, swift feedback, or connecting a guitar cable with the channel being on.

Program power is twice the RMS or nominal power, RMS x 2. The program power rating is not as common as peak power but is still used by several speaker manufacturers.


What is AES in Speaker Specifications

AES stands for “Audio Engineering Society,” and it is an organization that sets standards for the audio community. One of the criteria that they have set is how to measure RMS power in loudspeaker components.

The AES RMS power is measured using pink noise at specific dynamics and frequency range that matches the component’s designed characteristics. The test is carried for 2 hours until the frequency content matches the component’s frequency range.

The nominal or RMS AES power specification that you find in a speakers’ datasheet corresponds to the measured average RMS power of the components frequency range.

Loudspeaker Specifications Example

What to Consider When Choosing a Speaker

Both ratings, nominal and peak power are essential for correctly matching speakers to amplifiers. Make sure always to check the specs to find the continuous or nominal power of the loudspeaker, because it is the base reference for correctly choosing an amp.

You would also need to know the sensitivity (sound pressure level SPL), measured in dB, and the coil’s impedance.


Don’t Confuse Wattage with Output Volume

It is often believed that the higher the wattage of a speaker, the louder it is, but this is not necessarily the case. As explained above, wattage only tells you the power a speaker can handle, and this measure doesn’t translate in output volume. When selecting a speaker, you need to look for how well it performs and not how much power it consumes. 

To know how well a speaker performs, you need to look for the sensitivity of the speaker. One of the specs on the datasheet is the speaker’s sensitivity, and it refers to the perceived loudness relative to distance. It is measured in dB (decibels).

Refer to the previous image, the one highlighted in red is the speaker’s sensitivity or SPL (Sound Pressure Level). We have a post dedicated to explaining in more detail the meaning of SPL and what it means in audio, click the link to read more about it.

By doubling the power of the amp and the speaker, loudness is increased by only 3dB. To double the loudness, you need 10 times the power. In other words, a 10dB increase in SPL translates to doubling the loudness of a system.

For example, to double the loudness of a 100W system, you would need 1000W, and this would only increase the SPL by 10dB. This is why it is vital to take into consideration all of these aspects when choosing speakers and amplifiers.


Final Thoughts

Speakers are not as efficient for transferring electrical power into acoustic power; a lot the energy is wasted as heat. This is why it is vital to not only care about how many watts it can handle but how efficient it is. I hope that this article helped you to get a better understanding of speaker wattage.

What is SPL in Audio

When shopping for speakers or microphones, you’ll see on the specifications sheet a spec called SPL measured in dB (Decibels); but what is the meaning of SPL in audio specs?

SPL stands for Sound Pressure Level, and it’s a measure used to define the efficiency of a loudspeaker or the sensibility of a microphone to sound.

In this article, I’ll explain what is SPL in audio and why it is so essential when choosing speakers or microphones.


Sound Pressure Level – SPL

In audio, SPL plays an essential role because it is the correct way of measuring the perception of loudness. In other words, SPL measures the strength of a sound wave when emitted from a speaker. It is also used to measure the sensitivity of a microphone to the sound waves’ strength.

SPL reacts differently at various frequencies. Speakers and mics operate between 20 Hz -20 kHz. At each frequency, the SPL response is different. A perfect speaker would react the same at all frequencies. Still, such a speaker doesn’t exist because it’s impossible to have the exact SPL at all frequencies due to physical restrictions.

A very common spec on the datasheet of a loudspeaker is the frequency response graph. In it, you will get the plot of different frequencies versus their respective SPL measurement. Frequency is plotted on the x-axis in Hz (Hertz) and SPL on the y-axis in dB (Decibels).

The image below is a typical frequency response chart for a loudspeaker.

Frequency Response Chart for a Loudspeaker

How is SPL Measured

To measure the SPL of a speaker, it is placed inside a sound chamber. A high definition microphone specially designed for precise measurements is placed 1 meter away from the speaker. Sounds are played at different frequencies at 1W of power. The results are then plotted, and you would get the frequency response graph.

When it comes to speakers, SPL is directly proportional to loudness, meaning that the higher the SPL, the louder the speaker is. With microphones, the higher the SPL, the louder the sound it can handle before distortion.


Sound Pressure Level Vs. Sound Power Level

Sound pressure level and sound power level are two completely different things. As explained previously, sound pressure level measures the perception of loudness created by a sound source; and it is dependant on the environment and relative distance from the sound source.

On the other hand, sound power level measures the acoustic energy created by an audio source. If you have a loudspeaker connected to a 100W amplifier that’s playing a 1kHz frequency, the sound power level will be the same whether you are standing close to it or 50 ft away. The reason is that the generated acoustic energy by the speaker is still the same. You might not perceive the same volume, but the generated energy is still the same.

This is why sound pressure level is the metric used when measuring loudness because you want to know what is the perceived volume, not the generated acoustic energy.


SPL Vs. Watts in Speakers

It is frequently believed that the higher the wattage of a speaker, the louder it is, but this is not necessarily the case. Wattage is a measurement of the power a speaker can handle, and this measure doesn’t translate in output volume. When selecting a speaker, you need to look for how well it performs and not how much power it consumes.  

For example, if a loudspeaker delivers an SPL of 120dB at 300 Watts and another provides an SPL of 105dB, also at 300 Watts, it means the first speaker is more efficient because it delivers more volume with the same wattage.

Don’t get confused by thinking that higher wattage translates in more volume, instead check the specs to find what is the continuous SPL the speaker can deliver.

Also, beware because some manufacturers use max SPL instead of continuous SPL. The spec you need to know is continuous SPL because that’s the continuous sound pressure level a speaker can deliver.  Max SPL is the maximum the speaker can handle for a short time.

Mixing Console Basics

A mixing console is the most critical equipment in live sound setups because it controls all the audio sources before they are sent to the loudspeakers. Knowing the ins and outs of a mixing board and how to use them will make the difference between a perfect mix and a mediocre one.

In this article, I present a short to the point explanation of the different sections of a mixing console so that after identifying the role of each knob, you can use it correctly. After learning the basics of the mixing console, you will be able to start practicing and getting your ear trained for doing excellent mixes.

What is a Mixer, and What does it Do?

An audio mixer is a device used to combine multiple sound sources by manipulating the volume, frequency, and dynamics of the audio source. Audio Mixers are also called mixing console, mixing board, mixing desk, or soundboard.

Parts of a Mixing Board

Depending on the size of the mixing console, it could have hundreds of knobs that are designed to do a specific task. All of the knobs on the surface of a mixing console make it look complicated, but the truth is that each channel strip has a few controls that repeat for the rest of the channels. If you understand one channel, you would know how a mixer works.

The diagram below shows the different parts of a mixing board so that you get familiarized with the different sections.

1. The Channel Strip

A single channel on a mixing board is also known as a channel strip, and it’s configured from top to bottom. All channels are arranged in columns that go across the board. Each channel strip has inputs, inserts, gain, equalization, auxiliary sends, and volume faders. I will explain each one in detail throughout the article.

The image below shows a channel strip, each channel strip is repeated according to the number of channels the audio mixer has.

2. Inputs

The Inputs on a soundboard are the connections that receive external signals to route them to the different sections of the mixer. There are different types of inputs connections, but the most commonly used are XLR and 1/4” Balanced or Unbalanced Line inputs.

  • XLR

An XLR is a style of audio connector that is used primarily for professional audio connections. It has three pins for carrying the signal, positive (red), negative (black), and Ground (cable shield).

XLRs are balanced connections meaning that they cancel out noise. The way they do it is by sending the same signal on two wires (red and black) but with their polarities reversed. As the signal reaches the other side, they are reversed again, canceling out any noise on the line.

  • 1/4” Jack

This style of connector is also known as a phone jack plug. It is was used initially for telephone switchboards and today is still widely used to carry analog audio signals. There are two versions of it, the balanced TRS connector (Tip, Ring, Sleeve), and the unbalanced connector TS (Tip Sleeve)

The image below shows the XLR connector, both male and female. It also shows both versions of a 1/4” jack plug for your reference.

this image shows the XLR balanced connector in male, female, and mixer side configuration. It also shows balanced TRS 1/4" and TS 1/4" connectors.

3. Inserts

On a mixing board, an “Insert” is a connection point where the signal is interrupted to be taken outside the mixer for processing it. Then the signal is sent back to the same point on the mixer to continue its path. Typical applications include applying compression, gating, or EQ to a particular channel without affecting any other channels.

An example could be if you have an electric guitar connected to a mixer that needs to go through an effect box. You could use the insert connection to send the signal from the mixer to the effect box and then back to the mixing board to continue the path.

If you would like to learn in more detail about how to use inserts on a mixer, click the link. I have a complete article that explains this feature in more detail.

4. Gain Knob

The gain knob on a mixer controls the signal level that is allowed to come into the audio mixer on that specific channel. In other words, it sets the amount by which the channel’s preamp will amplify the incoming analog signal.

In some models, it’s labeled as “Trim” or “Sensitivity.” If a signal is too weak, by increasing the gain, you would be amplifying the signal to line-level.

The gain is the single most important knob on the entire channel strip. If it’s set wrong, it will compromise the sound from the outset, and you will not be able to fix it later in the signal chain, so this knob must be set correctly from the get-go.

To learn how to set the gain on a mixing board correctly, click here to follow the step-by-step process. You’ll also learn more about this very important knob on your mixer.

This image shows the gain knob on different mixing console brands

5. Low-Cut Filter Switch

Most mixers have a small switch located either above or below the gain knob, and it is a low-cut filter, which is the same as a high pass filter. What it does is remove low frequencies from the audio signal. In some cases, this is a lifesaver because if the input signal is bass-heavy, it could saturate the channel no matter how you equalize it.

When the switch is pressed, the filter removes frequencies between 20 Hz and 150 Hz. The cutoff frequency could be different between brands of mixing consoles, but those numbers are typical. In case you didn’t know, the cutoff frequency is the starting point where the response is attenuated by 3dB.

this image shows the high pass or low cut filter switch on different mixing console brands.

6. Equalization

Soundboards have an EQ section to adjust the balance between the different frequency components that make up a sound signal. In other words, equalization is simple the process of changing the timbre of a sound signal.

Most mixers have three equalization bands, High, Mid, and Low, while smaller soundboards have only two bands. Professional-grade audio mixers, usually the ones found in recording studios, have four, even six-band EQ per channel.

  • High: Controls the high frequencies between 6000 Hz – 20000 Hz. These frequencies provide brightness and presence to a sound. High frequencies are characterized for adding an edge, punch, detail, closeness, and clarity to the music.
  • Mid: These are frequencies that range between 250 Hz – 6000 Hz. Balanced mid frequencies provide intelligibility to the sound, especially for speech. They are easy on the ears, not harsh, and deliver sound warmness.
  • Low: Also known as Bass, controls the lower frequency in the sound spectrum. These frequencies go between 60 Hz – 250 Hz.
the image shows a breakdown of a typical audio mixer EQ section.

Equalization is another key factor that’s very important when dealing with sound. The difficulty when equalizing different sound sources is that there is no such thing as one fits all EQ setting. To EQ, you need to develop your ear to recognize what “good sound” is.

Luckily, there are many resources on the web that can help you with this. One of the resources is the 4000+ word article I wrote showing the procedure you need to follow and providing specific tips on how to EQ sound sources such as vocals, acoustic guitars, electric guitars, bass guitars, piano and keyboards, drums, etc.

Plus, I explain in detail the EQ architecture of a mixing console so that you understand what each knob in the EQ section does and how to use it properly. Click Here to check it out.

7. Auxiliary Sends

Most modern mixing boards have outputs used to route the signal to external auxiliary devices such as monitors, or effects. The signal coming out of an auxiliary send (Aux Send) has the advantage of having level controls over each channel individually, which is entirely separate from the main mix.

The typical use for “Aux Send” is to connect monitors on stage and create a separate mix, called the monitor mix so that performers can hear themselves on stage.

Here is an article that goes into more detail explaining everything you need to know about using mixer Aux Sends, click the link to check it out.

the image shows the aux send section on a mixing console explaining what each knob is.

8. PAN Control

A pan control has three positions, left, center, and right. It is used to increase or decrease the level of the left and right audio signals. A pan control works by reducing the level of the audio signal in one channel, which makes it louder on the opposite channel.

By turning the PAN knob to the left, the audio signal comes out to the left speaker. Turn the knob to the center, and the audio is heard on both loudspeakers. Finally, by turning the knob to the right, the signal comes out of the right speaker.

9. Mute

Each channel has a Mute switch, by activating the switch all audio on that channel is disabled, including the signal going to the monitors. This feature is very helpful if, for example, you are done with soundcheck, and all the faders are at the ideal level. By activating the switch and disabling the channel, you ensure that no unwanted signal goes through to the speakers or monitors.

10. Over Load (OL) or Peak LED

The OL or Peak LED is available on all channels to visually indicate that the signal is turned up too high, which means that it is being clipped introducing distortion to that channel. All you have to do is turn the gain knob down until the LED stops flashing to avoid distortion. 

11. Subgroup / SUB Switch

Audio consoles have one or more subgroups. A subgroup is made up of several sources such as channels, tracks, lines, etc. that are combined into a separate bus on the mixer. Subgroups are ideal when mixing live because you can route channel outputs to a different device or assign them to the main mix.

For example, you can create a mix of common sources such as vocals, guitars, drums, keyboards, etc., and group them so that they can be controlled together by a single fader. When you have separate subgroups, you could route the output of that specific subgroup to record it separately from the other groups.

If you want to stream online the audio coming out of the mixer and want to have more control over which group of audio sources to stream, use subgroups to route that signal to the audio interface, then to the computer to stream it. There are many uses for subgroups; just know that it is a separate bus to route audio sources.

Here is a complete article that explains everything you need to know about subgroups in more detail, click the link to check it out.

12. Channel Faders

Channel faders are potentiometers in the form of sliders. They are used as the volume controller for each channel. They perform the same function as a rotating potentiometer to increase or decrease the volume, but because they have more travel length between minimum and maximum, the volume can be controlled very smoothly.

13. Master Faders

On mixing consoles, the master fader is what controls the overall volume level of all the audio sources connected to the mixer. Just as channel faders, they increase or decrease the intensity of the  audio output

14. Master Outputs

After all of the audio sources connected to the mixer are adjusted and equalized, this is where everything comes out to be amplified and then connected to the main loudspeakers that the audience is going to hear.

15. Auxiliary Outputs

Auxiliary outputs are used to take the routed signal “Aux Send” to connect it to either an effect processor or if used for stage monitors, this is where you would connect your monitors. Click on the following link If you would like to learn how to set up stage monitors.

Final Thoughts

This post covers the mixing console basics so that you can get familiarized with the different sections and knobs that make up a mixing board. Use the images included within the post to reference back as you need. As mentioned previously, by knowing the functions of a channel strip, you have the necessary knowledge required to start practicing on an audio mixer.

How to Position PA Speakers

When setting up a sound system for a party, wedding, or live performance, it is critical to choose the correct position for the PA speakers to deliver a pleasant experience to the audience.

Positioning the loudspeakers in the right way is not only going to make the setup easier, but it will also solve many acoustic related problems, including feedback.

In this post, I will present a few tips on how to position PA speakers in the right place so that you avoid the most common problems in live setups. Let’s get started with this speaker positioning guide.


Speaker Positioning Guide

Here are some practical tips that will help you get the best results when positioning PA speakers:

  • Place the speaker forward, away from the nearest microphone
  • Don’t place the speakers in corners or next to walls
  • For better sound dispersion position speakers high Up
  • In big spaces place speakers in a diagonal manner to cover more area
  • In echoey places, position loudspeakers high up angled down towards the audience.

For a detailed explanation of each one of these tips, continue reading.


How to Decide Where to Position PA Speakers

The first step in correctly deciding the placement of PA speakers is to inspect the location where you need to set up the sound system. Check where the stage is located, sum up the size, acoustics, and where the audience is going to be in the room.

One of the most typical problems in large rooms is that the stage ends up being too far from the people sitting in the back. This creates the problem of having to increase the volume making it too loud for the people closest to the stage.

Another problem you could face is the acoustics of the room. For example, the worst acoustics for setting up a sound system is a gymnasium. There you have high ceilings and no absorbing material such as carpet to prevent the sound from bouncing back and forth, creating a lot of echo.

Furthermore, a critical component for deciding where to position the speaker is where the microphones are going to be located. You don’t’s want to have to deal with feedback, and devising a plan ahead of time is going to save you a lot of trouble.


Tip # 1 – Place the Speaker Forward, Away From the Nearest Microphone to Avoid Feedback

The main reason for audio feedback in live setups is placing the speakers and microphones too close to each other, or at the wrong angles.

If loudspeakers are placed behind the microphones, feedback is almost guaranteed because whatever sound comes out of the speaker will be captured by the mic, and the loop will cause feedback.

Another bad idea is to place the speakers to the side of the microphones. The reason is that mics can pick up sound at about a 60-degree angle from the center, that’s why you want to make sure to direct microphones away from the main speakers to avoid feedback.

The Solution

To help reduce the occurrence of feedback, place all open microphones behind the loudspeakers, making sure that there is enough distance between the mic and the speakers.

A rule of thumb commonly used by sound engineers is to double the distance between a microphone and the speaker. That way, the volume of the mic can be increased by 6dB, providing you with more volume headroom before feedback.

When setting up your mics, make sure to allow enough time to try different positions until you get the best results. With time and practice, it will become easier because you will understand the behavior of your sound equipment. Click the link to learn more about what causes microphones to feedback and how to avoid it.

If you need to add stage monitors to your setup, placing them in the correct position is another critical issue you need to deal with. Read about setting up stage monitors by clicking on the link.

This diagram shows how to position PA speakers in a room to cover the whole area and avoid feedback. This setup uses 2 speakers.

READ: How to Set Up a Stage Sound System


Tip # 2 – Don’t Place the Speakers in Corners or Next to Walls

Another typical mistake when setting up PA systems is to place the speakers on a corner right where two walls meet. By doing so, the sound will be excessive around 125 Hz, resulting in annoying low-frequency resonances that will make it very hard to understand what is coming out of the speaker.

If instead the speakers are placed up against the wall, the sound will hit the wall and create an echo that’s not pleasant to hear. The acoustics created by the bouncing waves could also sound bloated depending on the room, which means that the sound will be excessive on frequencies around 250 Hz.

The Solution

When placing speakers in a room, make sure that they have enough space away from the walls and corners, no less than 2 feet. That way, the sound can be projected better, reducing the number of waves that bounce back immediately after leaving the speaker.

READ: Differences Between Active and Passive Speakers


Tip # 3 – To Get Better Sound Dispersion Position the Speakers High Up

Good sound dispersion throughout the venue is critical when positioning PA speakers. A usual mistake when setting up a sound system by amateurs is not to raise the speakers high enough to clear the heads of the audience.

Many times  PA speakers are placed at the same height as the audience members creating acoustic problems.

The problem of not having good sound dispersion is that the audience sitting closer to the speakers are going to absorb most of the sound waves, and the people sitting at the back will not hear as clear as those sitting on the front.

An amateur would think that to solve the problem, all that’s needed is to increase the volume. That’s a terrible solution because those sitting in the front will complain about the higher volume.

The Solution

To get good sound dispersion, all you have to do is raise the speakers high enough so that they carry the sound over the people’s heads. With this setup, sound waves will travel across the room without being absorbed by the audience sitting in the front, and everyone will hear a beautiful clear sound.

Mounting the speakers high up creates a risk for the stand to lose balance and trip over if it is not robust. Make sure you get high-quality speaker stands that are sturdy enough to carry the weight of the speaker without tripping over. Remember, you need to take into consideration the safety of the people walking around the venue.

READ: Tips to Stop Mic Feedback in a Small Room


Tip # 4 – For Big Spaces Place Speakers in a Diagonal Manner Facing Away from the Microphones

There are some situations where the setup is for big places like hotel ballroom. For these types of locations, the regular configuration where you position the PA speakers in the front is not going to work.

The reason is because the volumes would need to be increased to a point where feedback is going to be an uncontrollable problem.

Also, by increasing the volume, people sitting closer to the speakers will feel uncomfortable, and those seated at the back of the room will not appreciate the sound intelligibly.

The Solution

For this situation, you have two options. The first is to use at least four speakers spread across the ballroom, placed high up on the stand for better sound dispersion. As shown in the image below.

Diagram showing how to position PA speakers to cover a large area or ballroom. This setup uses 4 speakers.

The second option is to place one speaker in the front, and the other speaker on the opposite side, halfway down the room diagonal to the first speaker, and aimed into the middle of the room. As shown in the following image.

Diagram showing how to position PA speakers to cover a large area. This setup uses two speakers.

Any of the two options mentioned here are ideal for covering a large room without having to increase the volume to a point where feedback and other acoustic problems start to appear.

If you decide to go with the first option, you would have to connect four speakers to a mixer, and longer cable runs would be needed to send the signal across the room.

I recommend using powered speakers for better results. The good news is that there is an option to connect speakers wirelessly, click the link to read the article on how to do so.  

READ: How to Connect 4 Powered Speakers to a Mixer


Tip # 5 – In Echoey Places, Position Loudspeakers High Up, Angled Down Towards the Audience

As mentioned previously in the article, setting up a PA system in echoey places is tricky. Such is the case of a gymnasium or large auditorium without acoustic treatment.

Areas with high ceilings, flat walls, and hard surfaces create a lot of echo. The sound in such places is muddy, lacking clarity, producing weak harmonics, and smeared time response.

The Solution

There is not much to do when dealing with echoey places and positioning PA speakers. The best approach is to position the loudspeakers as high as possible, then angle them down, pointing towards the audience.

This approach directs the sound straight to the audience, using them to absorb the waves minimizing a bit the echo. It also provides you with the option of lowering the volume to reduce the waves from bouncing back and forth.

Allow enough time to experiment and get familiar with the acoustics of the venue, especially if you are dealing with a large echoey place. See how the system reacts to the space when using microphones and different sound sources.

READ: Best Live Condenser Vocal Mic

Converting Cassette Tapes to Digital

In today’s digital age, it is very easy to search for your favorite music on Spotify, iTunes, or any other streaming service. Although those services have huge music libraries, there is a chance that you won’t be able to find the song you are looking for, especially if it’s an old song.

If you grew up in the 80s and 90s, you might have lots of cassette tapes lying around with some of your favorite music and special memories recorded on them. As with most analog formats, as they get older, the sound quality diminishes, that’s why it is a good idea to digitize them.

I this post, I will present a couple of methods for converting cassette tapes to digital formats. That way, you can save your beloved cassette collection with your favorite songs and memories. Let’s get started.


What You Need for Digitizing Cassette Tapes

Before getting started, there are a few things that you need to have for converting your cassette tape library to MP3 or any other digital format. You will need:

  • Cassette tape deck with USB or Line Out; or a portable tape player such as Walkman or boombox.
  • Audio interface (Optional).
  • An Audio recording software. (Garage Band for Mac, or Audacity for Windows PCs).
  • A desktop computer or laptop.
  • The necessary cables for connecting the devices.

Steps for Converting Cassette Tapes to Digital

  1. Use a USB compatible cassette player or your existing one to connect it to the computer directly or through an audio interface to play each tape.
  2. Connect all devices.
  3. Record the incoming audio signal using Audacity.
  4. Split and edit the recorded tracks.
  5. Add metadata description to each track.
  6. Export digitized tracks to MP3 or any other digital format.

Methods for Converting Cassette Tapes to Digital

There are a couple of approaches you can take for transferring cassette tapes to digital. The first method is by using a USB-Capable cassette player, connect it to the computer, then digitize each tape using your favorite recording software.

The second method is by using your existing tape player connecting it to the computer via an audio interface. If you don’t want to spend any money buying an audio interface, connect your tape player directly to the input line of the sound card.

For both methods, you will need to have some type of audio recording software. If you have a Mac, it already comes with Garage Band, which can be used for recording audio sources. For Windows computers, you would need to install a recording software. I recommend using Audacity because it comes with all the features you need to get excellent results when digitizing cassette tapes.

In case you didn’t know, Audacity is a free, open-source program that can be used for recording, editing, and encoding any audio source. You can use it to record voice, instruments, for converting vinyl records to MP3, and of course, for converting audio cassettes to digital. Click the following link for a step-by-step guide on how to install Audacity on your Windows 10 computer.


Converting Cassette Tapes to Digital With a USB-Capable Cassette Player

If you don’t have a cassette player and need to get one for the sole purpose of digitizing your tapes, I recommend getting one that comes with a USB connection. This will make the process much easier because all you have to do is connect it to the computer, open the recording program, and start recording your tapes.

Here are a couple of examples of USB-capable cassette players, the Reshow USB Compatible Player, and the Teac W-1200 Dual Cassette Deck with USB (links to Amazon).

Follow these steps to convert cassette tapes to digital using a USB-Capable cassette player on a Windows PC with Audacity installed in it. The diagram below is for your reference.

1. Connect one side of the USB cable to the corresponding port on the cassette player and the other side to an available USB port on your computer.

2. Turn the device on and allow a few seconds for the computer to install the drivers. After the drivers install correctly, a confirmation will appear on a pop-up window on the lower right corner of your screen.

3. Open Audacity and select the cassette player’s interface as the input device from the drop-down menu. Check the image below for your reference.

4. Insert side “A” of the cassette tape, and make sure to rewind it to the beginning.

5. After you are ready, hit the record button on Audacity and press play on the tape player.

6. After side “A” is finished recording, press “Pause” on Audacity, and flip the tape to side “B.”

7. Press play on the tape player, then click on the “Pause” button again on Audacity to continue recording.

8. After you are done recording one tape, save the recorded audio as a project for editing it later. Click “File” >> “Save Project” >> “Save Project As…” then select the folder where you want to save the project you are working on.

9. The editing and exporting process is explained later in the article. I have dedicated a section only for explaining how to edit and export the recorded file.


Digitizing Cassette Tapes Using an Audio Interface

If you already own a cassette deck with RCA line out or a boombox with headphone out, you could use an audio interface to transfer your old tapes to digital. All you have to do is connect the tape player to the interface, then connect the interface to the computer to transfer the digital signal.

To connect your existing cassette deck to the audio interface, you would need a Dual 1/4” TS to Dual RCA Stereo Interconnect Cable (link to Amazon). If you have a boombox or Walkman, you could also use it, but in this case, you need to check that the boombox has a headphone out. If it does, you would need a 3.5mm stereo to Dual 1/4” TS interconnect cable to go from the boombox or Walkman to the audio interface.

To connect your existing cassette deck or boombox to an audio interface, follow these steps or the diagram below.

  1. Connect the RCA cable from the back of the cassette deck to the input of the interface. If instead, you decide to use a boombox, connect the 3.5mm stereo jack to the headphone out of the boombox, and one 1/4” TS to each input of the interface.
  2.  Take the USB cable and connect one side of it to the back of the audio interface and the other to an available USB port on your computer.
  3. After the interface’s driver is installed, open Audacity and select it as the input device from the drop-down menu, just as the shown image above.
  4. Insert the tape you want to digitize, press the record button on Audacity, then press “Play” on the tape player.
  5. After the tape has been recorded, save the project, and edit it. Read the next section about how to split, edit, and export digitized files.

Digitizing Cassette Tapes by Connecting Directly to the Computer with no Interface

Another way to transfer tapes to MP3 is by connecting the cassette deck or boombox straight to the computer’s sound card input line. Use this method if you don’t want to invest in a USB-capable player or audio interface.

If your cassette deck has RCA line output, use a 3.5mm stereo to Dual RCA interconnect cable to connect between the tape deck and the computer. If instead, you want to use a boombox or portable tape player like a walkman, you will need a 3.5mm stereo male to 3.5mm stereo male cable to run between the boombox and the computer.

This method uses the computer’s sound card to digitize the audio and record it to Audacity. To connect the cassette player to the computer for recording, follow the steps and the diagram below:

1. If using a cassette deck, connect the RCA cable in the back. If using the boombox, connect the 3.5mm stereo jack to the headphone out.

2. Connect the 3.5mm stereo jack to the input line of your computer. If you have a laptop, the Line input is the same one you use to connect your headphones. In newer computers, as soon as you connect the cable, a pop-up window asks you to select the type of connection you want. In this case, we have to choose “Line In.”

3. If, when you connect the 3.5mm cable, no pop-up window appears, go to “Control Panel” >> “Hardware and Sound” >> “Sound.” In the new window that opens, select the “Recording” tab. Click “Line In” then click on “Set Default.” This procedure enables the audio port to be used as a Line-In input.

4. The next thing to do is open Audacity, and don’t forget to select “Line In” it as the input device from the drop-down menu, just as shown in the previous section.

5. If you decide to use this method, make sure to monitor the audio level that is coming into the computer by looking at the VU meter on the “Recording” window or Audacity. Never allow the sound level to clip.

6. Next, insert the tape in the player, hit the record button, and wait for the whole tape to be recorded.

7. Save the file, then split, edit, and finally export it to MP3.


How to Convert Cassette Tapes to Digital With no Computer

Maybe you want a more straightforward method for converting tapes to MP3 without going through all this process. The good news is that there are portable tape players that come with the feature of saving the tapes to MP3 on a flash drive. The bad news is that they are low-quality products and it’s possible that you won’t like the result.

Internally they have circuits that take the analog signal from the tape to digitize it, and then it saves it to MP3 on a flash drive. Next, you can take the flash drive, insert it to a computer, or connect it to your phone to transfer the files.

I don’t recommend taking this approach to convert your cherished cassette tapes to digital. Still, if you want to check them out, here are some examples of portable tape players that can transfer cassette tapes to a USB flash drive. The DIGITNOW Cassette Tape to Mp3 Converter, and the Pyle Cassette to MP3 Converter – USB Flash Drive (links to Amazon).


Split and Edit Recorded Tracks

After recording one full cassette tape on Audacity, it is still one track. You would want to split each track to save it as one file. By going back to the beginning of the recording, you would see a silence between tracks. The silence helps you identify where a song ends, and when the next one begins.

If the type of album is a live recording or a mixed tape where tracks fade into each other, you would have to listen to the recorded file so that you know where one song begins and ends.

To split tracks on Audacity follow these steps:

1. Locate the first silence after the first song and click on it. Click on “Edit” >> “Clip Boundaries” >> “Split.” Doing this is going to separate that track from the rest of the recording. Repeat this process for all the tracks in the recording.

2. Double click on the first track you split and click on “Edit” >> “Copy.” Then click on “File” >> “New,” this is going open a new Audacity window. On the new window that opened, click on “Edit” >> “Paste.” Repeat the same process for all the tracks in the recording.

3. At this point, you have split the first track, and now you can edit it. For example, you could decrease the silence that appears at the beginning of the first track, or use tools such as “Noise Reduction” to reduce the hiss that is typical in cassette tapes.

4. To clean up the sound of the recorded track, double click the track to select it, then go to “Effects” >> “Noise Reduction…” Try different settings until you get one that you like the most and click “Ok.”

As explained in Audacity’s manual, “noise reduction is always a compromise because, on the one hand, you can have all the music and a lot of noise and, on the other hand, no noise and only some of the music. Try different settings on the “Noise Reduction (dB)” slider until you get the best compromise.”     


Add Metadata Description to Each Track in the Album

Now that you have separated all tracks and edited them the way you want, I recommend adding metadata to each track. That way, files are easily searchable, especially if you have a vast music library.

To enter the metadata description for each track on Audacity, follow these steps:

1. Go to “Edit” >> “Metadata.”

2. On the new window that opens, enter all the information about that specific track.

3. After entering the data for the first song, you can save it as a template so that you don’t have to reenter the same information for each track.

4. To save as a template, click on “Save” under “Template.” On the window that opens, choose a location where to save the template so that you can recall it later for each track of the recorded tape.


Export Digitized Tracks to MP3 or Any Other Digital Format

With Audacity, you can export a project to different digital formats, including WAV and MP3.

The following steps explain how to export the digitized tracks to digital formats.

1. When you are ready to export your recorded tracks, double click the track to select it, go to “File” >> “Export” >> “Export Selected Audio.”

2. On the new window that opens, name the file with the title of the song. Select the “Encoding” you want. The default is Signed 16-bit PCM. If you want a better sound resolution, select Signed 24-bit PCM, but remember that the encoded files will be bigger.

3. Next, select the audio format you want. The most popular is MP3. If you decide to go with this one, select the one option from the different format options available. Just know that if you choose the highest quality, each file is going to be large, and if you have an extensive music library, you might need a few terabytes to store them.

4. After selecting the format option you want, click on “Save,” and the metadata window opens, select the template you saved previously to load it, and edit the information as needed. Click “Ok,” and the file is going to be converted to whatever digital audio format you chose.


Final Thoughts

I hope that this post is helpful to you for converting cassette tapes to digital. By converting your tapes to MP3 you can save them on your computer, smartphone, or portable media player. That way, you can take them anywhere you go. You could even store them on the cloud for easy access.

If you have any questions about this article, please leave a comment, I will get back to you ASAP. Thank you for reading my blog.    

How to Convert Vinyl Records to MP3

Vinyl records have been around since 1940, and it can be argued that records can deliver superior sound quality than modern digital formats. The reason is because vinyl is recorded in an analog lossless format that provides a wider effective dynamic range. Also, there is no sampling taking place while recording, rendering a more realistic and warmer sound.

Although vinyl produces better-sounding records, as with most analog recording forms, there are some drawbacks. They degrade over time, introducing noise and scratches to the sound. They are not portable and cannot be transported easily anywhere.

In today’s article, I present different options for converting vinyl records to MP3. That way, you can digitize your priceless record collection so that it is not degraded as years pass by. Plus, you can take your music anywhere, either on your phone or a portable MP3 player.


What You Need to Convert Vinyl to Digital Format

Before getting started, there are a few things that you need to have for getting the best results while transferring your LPs to MP3. You will need:

  • Some vinyl record and Needle Cleaning Kit.
  • A USB-capable turntable or audio interface with an external preamp.
  • An Audio recording software.
  • A desktop computer or laptop.
  • All the necessary cables for connecting devices together.

Steps for Transfering Vinyl Records to MP3 or Any Other Digital Format.

  1. Clean and prepare each vinyl record to get the best possible audio for recording.
  2. Use a USB-capable turntable or audio interface with an external preamp to digitize the records.
  3. Connect all devices.
  4. Record the incoming audio signal using Audacity.
  5. Split and edit the tracks.
  6. Add metadata to each track.
  7. Export digitized tracks to MP3 or any other digital format.

Clean Vinyl Records to Get the Best Audio for Recording

If you have records that have been around for years, they likely have dust and fingerprints in the grooves. All the dirt accumulated over the years creates a static-like sound when it passes through the needle. You would want to minimize the static noise as much as possible before transferring the audio from the vinyl record to the computer, and to do that, you need to clean it.

There are different ways of cleaning a vinyl record. You could get a Vinyl Record Cleaner Kit that comes with all the necessary accessories, cleaning solutions, and instructions to get the best results possible.

Another way to remove dust and grime from the grooves is by using a Carbon Fiber Anti-Static Record Brush. Next, use a mixture of water and soft dishwashing soap to wash the record. Afterward, rinse thoroughly with water and, if possible, use filtered or reverse osmosis water instead of regular tap water. Ordinary tap water can have impurities; if you have hard water, it’s likely to be high in dissolved minerals such as calcium and magnesium. These minerals can find their way into the vinyl grooves, making it worse.   

To dry the vinyl record, use a clean Lint Free Anti-Static Microfiber Towel or cotton cloth by applying even pressure in circular movements.

Even after brushing and washing the vinyl, some dust can still be present in the deepest grooves. When playing on the turntable, the needle can pick them up, and it would become dirty with dust and lint.

After one side of the record has been converted to digital format, make sure to clean the needle with a Carbon Fiber Anti-Static Stylus Brush before playing the other side of the record. This procedure will ensure that no dust is attached to the needle so that you can continue recording and be able to get good results.

Video Credits: VHFSE Vintage HiFi and Stereo Equipment

Using a USB Capable Turntable or Audio interface With External Preamp to Convert Your Vinyl Records to Digital.

Some modern turntables are USB capable, meaning that internally they have an analog to digital converter, simplifying the process of converting vinyl records to MP3. These units also have a preamp that amplifies the signal to the ideal volume before digitizing it.

Some examples of USB-capable turntables are the Audio-Technica AT-LP60XUSB, Sony PS-LX310BT, House of Marley EM-JT000-SB, or the Audio-Technica AT-LP120XUSB (links to Amazon).

All of the USB-capable models mentioned in the previous paragraph are backward compatible with the Windows Operating system starting with Windows 7 all the way to Windows 11. So, if you decide to get any one of these, you should be ok when connecting it to your computer to convert your vinyl records to MP3.

Try to avoid cheaper models because, in most cases, it’s difficult to get replacement needles, and the overall build quality is not the best.

Another way to rip records to MP3 is by using an audio interface with an external phono preamp. Audio interfaces take any analog signal and convert it into a digital one.

If you have a classic turntable that uses a magnetic phono cartridge, connecting it directly to the audio interface will result in very low-volume recordings. This is why you need a preamp that could boost the signal enough for the audio interface to use it.

If you have a turntable and a preamp and don’t want to spend any money buying an audio interface, there is another option for you to transfer vinyl to MP3. All you need is a stereo RCA to 3.5mm male jack cable to send the signal from the preamp straight to the computer. Then use the Line-In input from the sound card to receive the analog signal and use your computer’s sound card to digitize the signal so that it can be recorded.


Connecting All the Devices to Convert Vinyl to MP3

This section will discuss the different ways you can connect a turntable to a computer to convert your vinyl collection to MP3. If you already own a turntable, start by checking the type of output connection it has.

Older turntables have an RCA output connection and a switch to select between Phono and Line. In case you don’t know, by choosing the Phono option, the turntable will output a very weak signal, and you would need a preamp. If instead, the turntable comes with a line-level output, the signal can be used by an audio interface for recording.

Using a USB Capable Turntable

This is the easiest option to transfer LPs to digital format because all you need to do is connect the turntable to the computer using a USB cable, open the recording software, and start recording.

As explained previously, inside of it, is an analog to digital converter that outputs a digital signal that the computer uses to record the audio. Audiophiles argue that this is not the best option because USB turntables don’t deliver the best audio results.

I think audiophiles are right because most USB turntables use Analog-to-Digital (A/D) and  Digital-to-Analog (D/A) converters that have a 16-bit/44.1 kHz or 48 kHz resolution. This audio resolution is low when compared to the ones an audio interface can deliver. The resolution of an audio interface is 24-bit/192 kHz providing a lossless audio resolution.

Although USB turntables don’t provide the highest audio resolution, they deliver good audio quality. Plus, they are very convenient, easy to use, and they get the job done. If you decide to go this route to transfer your LPs to MP3, make sure to choose a well-known brand, that way, the overall build quality will be better.

To connect a USB-capable turntable, follow these steps and use the diagram below for your reference:

  1. Connect the USB cable at the back of the turntable.
  2. The other side of the USB cable connects to the computer.
  3. Turn on the turntable and allow a few seconds for the computer to install the driver. After it installs, it will let you know with a pop-up message in the lower-right corner.
  4. Open your favorite recording software. In our case, we will use Audacity.
  5. Load the record you want to transfer to MP3, and hit the recording button on Audacity.

Connecting a Turntable to Audio Interface

Another way to convert vinyl records to mp3 is by connecting a turntable that offers a line-level output to an audio interface. If you have a turntable that comes with a switch to select between Phono or Line, make sure to switch it to Line. That way, the signal is set to line-level, and the audio interface can use it.

If your turntable only comes with Phono output, the signal will be too weak for an audio interface to use, and the recording will be useless. Use an existing preamp to connect between the turntable and the audio interface or if you don’t have one, get an external phono preamp (link to Amazon).

To connect a turntable with Line-Level Output, follow the steps and diagram below.

  1. Before connecting the equipment, make sure they are off.
  2. To connect the turntable to the audio interface, you need a Dual 1/4” TS to Dual RCA Stereo Interconnect Cable (link to Amazon).
  3. Connect the RCA side of the cable to the turntable and the 1/4” TS to the audio interface.
  4. Take the USB cable connected to the back of the audio interface and connect it to an available USB port on your computer.
  5. Turn all the equipment on, allow the computer to install the interface’s drivers, then open Audacity.
  6. Select your interface as the input device from the drop-down menu in Audacity.
  7. Perform a couple of short test recordings to see how the audio levels are. If the volume is too low on the test recording, try increasing it on the interface. Make sure not to allow the audio input levels to clip because it will sound distorted.
  8. After making the necessary adjustments to get the best volume, proceed to record the whole album to split the tracks later.

If you want to connect a turntable with Phono-Level Output, use an external preamp. The only difference, in this case, is that there will be a preamp connected between the turntable and the audio interface.

Follow the diagram below for your reference.


Connecting a Turntable to Computer Without an Audio Interface

If you want to know how to transfer vinyl records to MP3 without A USB Turntable or audio interface read on.

Let’s say you have a turntable that provides a Line-Level output, and you don’t want to spend any money getting an audio interface. You can still convert vinyl records to mp3 by connecting it straight to the Line-Input of your computer. All you need is An RCA to 3.5mm Stereo Jack cable like the one in the image below.

To connect the turntable to the computer, follow the steps and the diagram below:

1. Connect the RCA cable to the turntable, and make sure to select Line.

2. Connect the 3.5mm stereo jack to the input line of your computer. If you are using a laptop, the Line input is the same port where you connect the headphones. In newer model computers, a pop-up window asks you to select the type of connection you want as soon as you connect the cable. In this case, we have to choose “Line In”.

3. If, when you connect the 3.5mm cable, no pop-up window appears, go to “Control Panel” >> “Hardware and Sound” >> “Sound.” In the new window that opens, select the “Recording” tab. Click “Line In” then click on “Set Default.” This procedure will enable the audio port to be used as a Line-In input to connect the turntable.

4. The next thing to do is open your favorite audio recorder to start recording your vinyl records. I recommend using Audacity.

5. If you decide to use this method, monitor the audio level coming into the computer by looking at the VU meter on the “Recording” window. Never allow the audio level to clip.


Record the Incoming Audio Signal Using Audacity

After you have decided how you want to connect your turntable for recording, open Audacity to configure it. If you don’t have Audacity installed on your computer, read this article for a step-by-step tutorial on installing this excellent digital audio workstation.

After opening Audacity, click on the select recording device drop-down menu to select your device. If you are using a USB-capable turntable, select it here. If instead, you are using an audio interface, you can choose the device from this drop-down menu. Lastly, if you want to record using your computer’s sound card, select the line-in option from the drop-down menu.

Once the device is selected, load the vinyl record on the turntable, press the record button, and place the needle on the first song. Allow one side of the record to play entirely so that the audio is digitized.

If you want, you can stop the recording after one side of the LP has played, or keep recording while you load the other side of the vinyl. Afterward, you have to split the tracks anyways.

After the album has been recorded, don’t forget to save the file as a project so that it can be edited. On Audacity, click “File” >> “Save Project” >> “Save Project As…” then select the folder where you want to save the project you are working on.


Split and Edit Tracks

Up to this point, you have recorded one full album on Audacity, but it is still one track. You would want to split each track to save it as one file. This process should be relatively easy because you can go back to the beginning of the recording and see the silence between tracks. But if the type of album you recorded is live or tracks fade into each other, you would have to listen to the recording so that you know where one song begins and ends.

If the recorded album has silence between tracks, locate the first silence after the first song and click on it. Click on “Edit” >> “Clip Boundaries” >> “Split.” Doing this will separate that track from the rest of the recording. Repeat this process for all the tracks in the recording.

Now, double click on the first track you split and click on “Edit” >> “Copy.” Then click on “File” >> “New,” this is going open a new Audacity window. On the new window that opened, click on “Edit” >> “Paste.”

Now you can edit the track. For example, you could decrease the silence at the beginning of the first track or use some tools such as “Click Removal” to clean up the audio.

To clean up the sound of the recorded track, double-click the track to select it, then go to “Effects” >> “Click Removal.” Try different settings until you get one that you like the most, and click “Ok.”      


Add Metadata to Each Track in the Album

Now that you have separated all tracks and edited them the way you want, I recommend adding metadata to each track. Digital audio files use metadata descriptions to make each track easily searchable, especially if you have a vast music library. Computers and MP3 players use this file to locate the information on each track.

In case you didn’t know, metadata, as defined by the Landr website, is the information included in audio files used to identify, label, and present audio content. Metadata provides information like artist, genre, label, song titles, album names, and track numbers.

To enter the metadata description, go to “Edit” >> “Metadata.” A new window opens, and there you have to enter all the information about the track. After entering the data for the first song, you can save it as a template so that you don’t have to reenter the same information for each track. To save as a template, click on “Save” under “Template.” On the new window that opens, choose a location where to save the template so that it can be recalled for each track of the album.


Export Digitized Tracks to MP3 or Any Other Digital Format

With Audacity, you can export a project in different digital formats, including WAV, AIFF, FLAC, MP2, MP3, and Ogg Vorbis sound files. The most popular format is MP3.

When you are ready to export your recorded tracks, double click the track to select it, go to “File” >> “Export” >> “Export Selected Audio.” On the new window that opens, name the file with the title of the song. Select the “Encoding” you want. The default is Signed 16-bit PCM; I would select Signed 24-bit PCM for better sound resolution.

Next, under “Format Options” >> “Bit Rate Mode,” make sure “Preset” is selected.

Now you need to select the audio “Quality.” When choosing the bitrate, you can select between Medium 145-185kbps, Standard 170-210kbps, Extreme 220-260kbps, and Insane 320kbps.

Just know that if you decide to use 320kbps, each audio file will be bigger in megabyte size, and if you have an extensive music library, you might need a few terabytes to store them. You could compromise a little to avoid bigger individual audio files and use the Standard or Extreme option. But if data storage is no problem for you, use Extreme 320kbps, as this will give the best audio resolution.

If you want a lossless format, choose to export the file in WAV. The rendered file will be larger than the highest quality MP3 because it’s lossless but provides the best audio quality. If you decide to export the tracks in .wav format, you will need a lot of disk space to store your vinyl collection.

After selecting the format options you want, click on “Save,” and the metadata window opens, select the saved template to load it, and edit the information as needed. Click “Ok,” and the file will be converted to whatever digital audio format you choose.


Final Thoughts

I hope this tutorial article helps you if you want to know how to convert vinyl records to MP3. That way, you can convert all your priceless vinyl collections to a digital format and take them anywhere you go. You could even store them in the cloud for easy access.

If you have any questions about this article, please contact me via the Contact Us page, and I will get back to you ASAP. Thank you for reading my blog.    

How to Install Audacity on Windows 10

Audacity is an excellent free, open-source Digital Audio Workstation (DAW) that is perfect for anyone who wants to record any audio source to a computer. This software is not only used for recording, but it can also be used for editing and enhancing audio files because it comes with many effects.

In this post, I will explain step by step how to install Audacity on Windows 10, so that you can use this excellent DAW for your next recording project. Let’s Get Started.


What is Audacity

Audacity is an easy-to-use, multi-track audio editor and recorder for Windows, macOS, GNU/Linux, and other operating systems[1]. A group of volunteers developed it as open-source DAW, releasing the first version in the year 2000. Audacity is continually updated and expanded, thanks to coders from around the world who are part of this project.

In 2007 and 2009, Audacity won the SourceForge Community Choice Award for Best Project for Multimedia. [2]  

There are endless applications for which you can use Audacity. Here are a few examples of what you can use it for:

  • Record live audio using an audio interface or by using the computer’s sound card.
  • Record the computer playback sound on any Windows Vista or later machine.
  • Convert tapes and vinyl records into digital recordings or CDs.
  • Edit WAV, AIFF, FLAC, MP2, MP3, Ogg Vorbis sound files.
  • Cut, copy, splice or mix sounds together.
  • Use numerous effects, such as changing the speed or the pitch of a recording. Also, use it to remove the vocals from a song.

Downloading and Installing Audacity for Windows 10

For downloading and installing Audacity on a Windows 10 computer follow these steps:

1. The first thing you need to do is download Audacity (link to Audacity’s Official website). Select the download link for Windows 10 and Make sure to get the latest stable version.

2. After selecting the download link for Windows, it takes you to the Fosshub website for downloading the file. Click the Audacity Windows Installer to download the .exe file for installation. Just for clarification, Fosshob is the content delivery partner for Audacity.org. To read more about safety online when downloading online, read this article.

3. After downloading the installation file, double click it. Windows will prompt a warning to make sure that you want to install the program, click “Yes” to continue.

4. The next window is for you to “Select Setup Language” to use during installation. After selecting the language of your choice, click “Ok” to continue with the installation.

5. At this point, the Audacity setup wizard opens and asks if you want to continue with the installation, click “Next” to proceed.

6. The following window is the license agreement. If you would like, read the information and click “Next” to continue with the installation process.

7. This window allows you to select the destination folder where you want to install the program. I recommend leaving the default and click “Next.”

8. Select if you want a shortcut on your desktop, then click “Next” to continue installing.

9. Up to this point, you have selected the language, agreed to the license, and created a shortcut on the desktop; it’s time to click on “Install” so that the program installs on your hard drive.

10. When it’s finished installing, click on “Finish,” and the program is going to load.

11. If everything installed correctly, you should see the program interface like the image below.


What do Next

Now you can try recording your voice using the microphone that comes with your computer to test it. If you have an audio interface, connect it to a USB port and select it from the drop-down menu, just as shown in the image below, to start recording.

Another thing you can try is loading any MP3 song stored on your computer and start using the different effects to get used to them.

Here are a few tutorials that use Audacity that you can try:

  • How to Remove Vocals from a Song Using Audacity.
  • How to Connect a Microphone to a Laptop for Recording.

Final Thoughts

To start recording audio on your computer, you need a Digital Audio Workstation (DAW). There are different paid DAW software to choose from, but why not use a free DAW like Audacity to start learning? You can always select other DAW software later on if you feel like Audacity has limited functionality.

If you are starting a podcast or you’re a singer who wants to start recording songs, follow this tutorial to install Audacity and start recording. You can use a USB mic, audio interface, or audio mixer.

  • « Go to Previous Page
  • Page 1
  • Interim pages omitted …
  • Page 8
  • Page 9
  • Page 10
  • Page 11
  • Page 12
  • Go to Next Page »

Primary Sidebar

Search

Guides & Tutorials

  • Choosing a Portable PA System
  • How to Be a Better Singer
  • Build a Budget Live Streaming System Using PTZ Cameras
  • How to Get the Best Audio Quality on YouYube
  • Setting Up Stage Monitors
  • Mixing Console Basics
  • How to Position PA Speakers
  • Stage Sound System Set-Up
  • How to EQ Live Vocals
  • How to EQ Live Sound
  • Daisy Chain Active Speakers
  • Zoom Audio Settings for Music
  • How to Livestream a Wedding
  • Improve Your Livestream Audio Quality
  • Microphone Preamp Buying Guide

Featured Posts

Treblab X9 Pro: Tough Earbuds, Big Performance

Escape the Noise: Best Affordable Noise-Canceling Headphones

How to Combine Passive and Powered Mixers

What is a Ground Loop? – 5 Simple Ways to Fix the Buzz and Hum

Disclaimer

VirtuosoCentral.com is a participant in the Amazon Services LLC Associates Program, an affiliate advertising program designed to provide a means for sites to earn advertising fees by advertising and linking to Amazon.com.

Home  About  Contact  Disclaimer  Privacy

Copyright © 2019-2025 Virtuoso Central. All Rights Reserved.