There are two types of acoustic guitars, the ones that have an installed pickup system, also known as acoustic-electric guitars, and those that don’t. Depending on which one you got, the process of connecting it to an amplifier or PA system would be different.
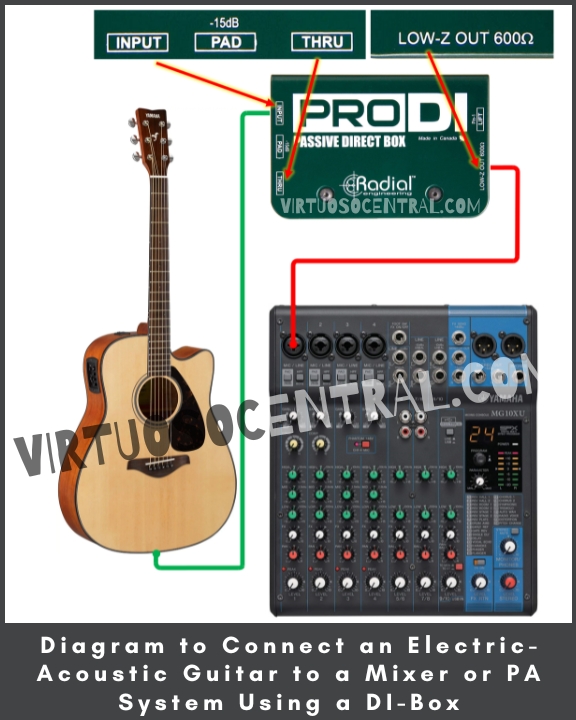
To connect an acoustic guitar to an amplifier or PA system that has a pickup system already installed, all you need to do is use a DI-Box to go from the output of the guitar to the input of a DI-Box, then go from the output of the DI-Box to an input of the mixer or PA system. If the acoustic guitar has no internal microphone, you need to use a vibration pickup mic system or a regular open-to-air microphone.
In this article, I will explain how to connect an acoustic guitar to an amplifier, mixer, or PA system using both methods. I will also provide connection diagrams for your reference. Let’s get started.
Connecting an Acoustic Guitar to an Amp. or PA System Using the DI-Box Method
To use this method, I am assuming that your acoustic guitar already has a microphone system installed.
If this is the case, using a Direct Insertion box (DI-Box) is the easiest way to connect the acoustic guitar to the PA system because you only need a couple of cables, and the procedure is simple.
The reason you want to use a DI-Box instead of going straight into the mixer or PA system is that, most likely, your cable run will be more than 6ft long, which means that your unbalanced guitar cable will act as an antenna degrading the sound quality and inserting unwanted noise in the signal.
Using the DI-Box will transform your guitar’s signal from high to low impedance without degrading the quality of the signal itself while gaining signal strength at the input of the mixing console.
It also converts the unbalanced line to a balanced one, meaning that it takes the two-conductor unbalanced guitar cable to convert it to a three-conductor balanced line like the XLR cable, so you don’t have to worry about external noise getting into the line. This is a must when you have long cable runs.
Here are a few examples of some of the best passive DI boxes available today (links to Amazon).
There is a lot more to learn about the DI-Box. If interested, click the link, as I have an entire article explaining everything you need to know about this fantastic piece of equipment.
Steps to Connect an Electric-Acoustic Guitar to a Mixer or PA System Using a DI-Box
Connecting an acoustic-electric guitar to a mixer using a DI-Box is simple. Here are the steps:
- Before we start, ensure the mixer’s main fader is down while connecting everything. That way, you avoid sudden pops or high volumes on your system in case the input level of the source signal is higher than expected.
- Use a 1/4″ TS to 1/4” TS cable (regular guitar cable) and connect one end to the output of the acoustic-electric guitar.
- Connect the other side to the high-impedance input of the DI-Box.
- Locate the Balanced output on the DI-Box, usually located on the opposite side of the input, and connect an XLR cable.
- Take the other side of the XLR cable and connect it to one of the inputs of the mixing console or PA system.
- It is essential to set the gain on the mixer correctly to avoid saturation in the signal later on. In the last section of this article, I explain step by step how to set the gain.
- Adjust the EQ until you get a balanced tone for the acoustic-electric guitar.
If you don’t know how to adjust the EQ for the acoustic-electric guitar, click the link as I provide some tips on how to do so.
If you are unfamiliar with how to equalize sound on an audio mixer, I recommend you read the whole article, as I explain some of the theory behind the equalization process for different sound sources.
Here is the diagram to connect an acoustic-electric guitar to a mixer or PA system using a DI-Box. Use it for your reference.
Connecting an Acoustic Guitar to an Amp. or PA System Using the Mic. Method
If you want to connect an acoustic guitar that doesn’t have an installed pickup system, then this is the method you need to use.
There are two options for this method. The first involves using a vibration pickup, and the second involves using open-to-air microphones.
Both options have pros and cons, but ultimately both methods can be used to mic and connect an acoustic guitar to an amplifier, mixer, or PA system, delivering excellent results.
Using a Condenser Vibration Pickup Microphone
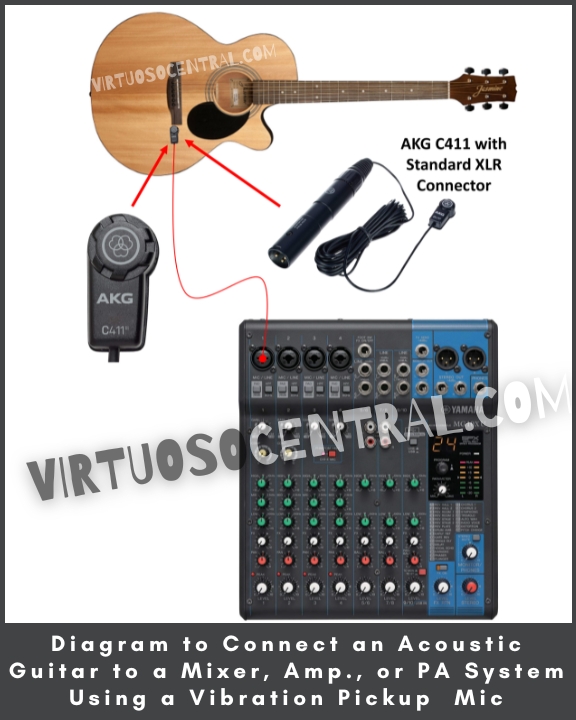
If you decide to go this route, I recommend using the AKG C411 condenser vibration pickup microphone. This mic works for guitars with steel strings as well as nylon strings.
This mic is designed especially for string instruments, and if you have an acoustic guitar that doesn’t have an internal mic system, this is the less intrusive way you can use to mic the instrument while delivering the best results.
When I say intrusive, what I mean is that, in some cases, to install a piezo mic system, you need to take the guitar to a luthier to perform the job because a piece of the guitar’s body needs to be cut out to insert the volume controller and drilled to install the cable connector.
To avoid all this, you can use a vibration mic like the AKG C411 and get a beautiful sound on the amplifier and PA system without drilling any holes in the guitar.
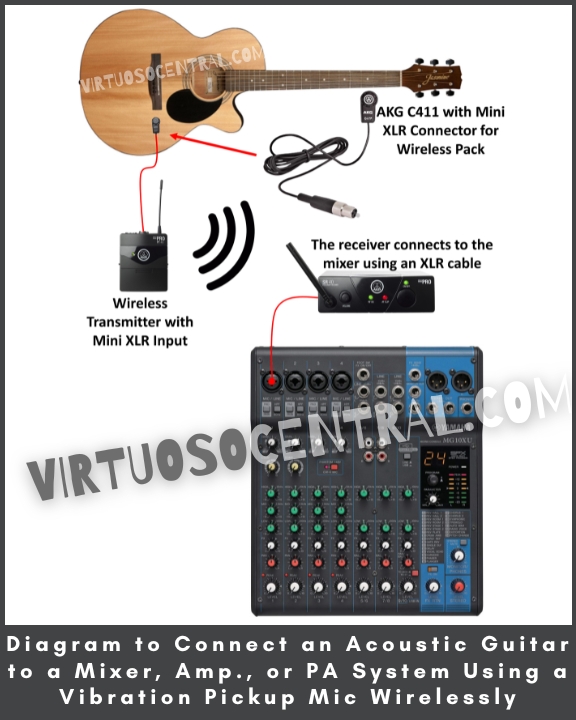
Another advantage of using the AKG C411/L is that you could pair it with an Instrument Wireless system that accepts the Mini XLR connector to go wireless, thus making your setup more organized and professional.
Be aware that this mic comes in two configurations that you can choose from. The C411PP comes with a standard XLR connector, meaning that you can use any microphone cable to connect it to the mixing board of the PA system, and the C411L, which comes with a miniature XLR connector designed to work with any wireless instrument bodypack that accepts mini XLR connector.
Here is the diagram for connecting the guitar to a PA system using the C411 wired and wireless versions.
Using a Contact Piezo Transducer Microphone
Another more affordable option is to use a piezo transducer contact microphone. This type of mic works for guitars with steel strings or nylon strings.
Contact mics are made using piezo transducer elements that pick up the string’s vibrations and convert them into electrical signals that can be amplified.
They are affordable, but their sound is natively heavy on the mid-frequencies, making the guitar sound boxy. To clean up the sound, you need to work on the EQ to make the guitar sound more natural.
The Korg CM200BK or the Luvay clip-on piezo contact mics are examples of what you can use if you decide to go this route (links to Amazon).
Although these mics are affordable, very easy to install, and can help connect an acoustic guitar to an amplifier or PA system, keep in mind that the sound quality is not as good as the AKG C411 or installing an under-the-bridge piezoelectric mic system.
Using a Soundhole Pickup for Steel String Acoustic Guitars
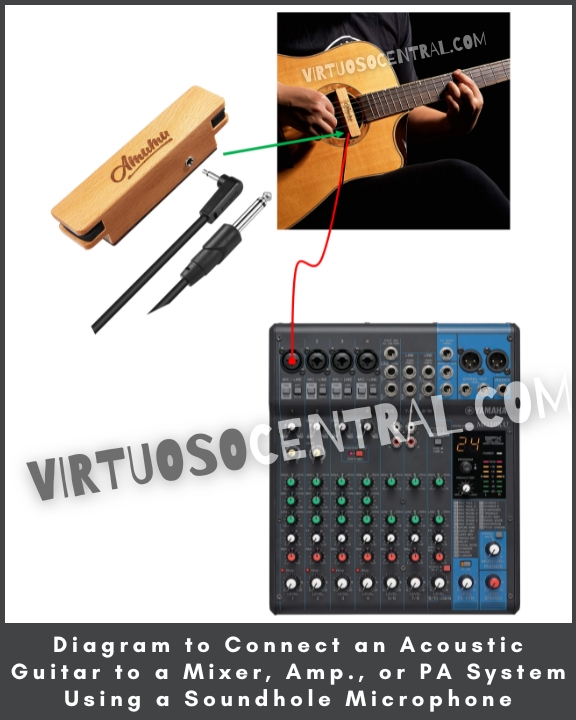
A soundhole pickup system delivers excellent results for guitars with steel strings. It uses a microphone with a magnet and a coil similar to the ones used in electric guitars. But be aware that this type of mic doesn’t work for classical guitars with nylon strings.
When the steel string vibrates, it induces an electric current in the magnetic pickup, which in turn, is amplified on the PA system. If the strings are nylon, no current will be induced because nylon is not a conductive material. This is why this type of mic wouldn’t work for classical guitars.
The installation is as simple as placing the pickup in the soundhole and connecting it to the amp. If the cable run is more than 10ft long, I recommend using a DI-Box, as mentioned earlier to avoid noise in the line.
Some of the best-sounding soundhole pickups are the AMUMU SP30, the Dean Markley Pro Mag Grand, the Fishman Neo-D, and the Seymour Duncan Woody (links to Amazon).
Using a Bridge Mic for a Nylon String Acoustic Guitars
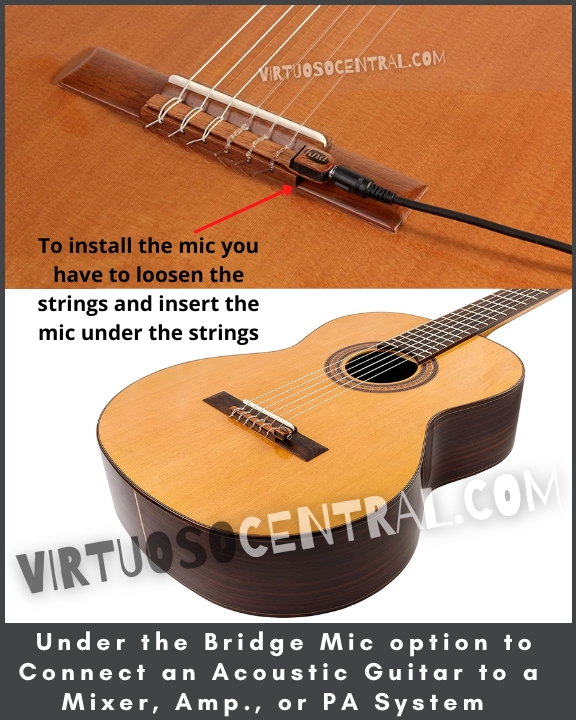
If you got a classical guitar with nylon strings and don’t like the sound of piezo contact mics but want the same sound quality as the soundhole pickup but for nylon strings, then I recommend the KNA NG-1 pickup for classical guitars.
This mic delivers the natural sound of your nylon-string guitar with no modifications to your guitar whatsoever. It’s built inside a wooden sensor casing, making it lightweight and unobtrusive. It is detachable and can remain installed when not in use.
To install it, all you have to do is loosen the strings and slide the mic under the string knots on the bridge. Then tighten the strings and connect the mic to the amp or PA system using the included cable.
Using Open-to-Air Microphones
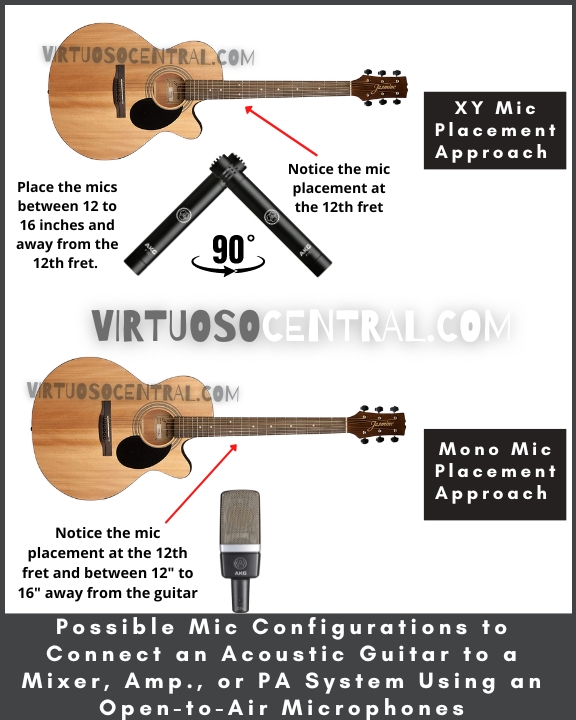
Miking the guitar using this technique would deliver the best results acoustically speaking. Because as the sound waves vibrate inside the guitar’s body and leave through the soundhole, the sound is amplified and developed as waves travel through the air, so you pick up the guitar’s sound in its natural form when using open-to-air mics.
This is why this method is preferred in recording studios when recording acoustic guitars and acoustic instruments in general.
If you need to mic a guitar on stage with more instruments around it, it could pick up a lot of noise and be prone to feedback. But, if you mic the guitar using the correct procedure and the right type of mic, it could deliver excellent results while reducing the chances of feedback.
I have a complete article explaining how to mic an acoustic guitar using open-to-air microphones. This theory applies to live sound as well as in the studio. If you are interested in going this route to mic your guitar, thus connecting it to an amp or PA system, I highly recommend you to read this article, as it will help you understand the process.
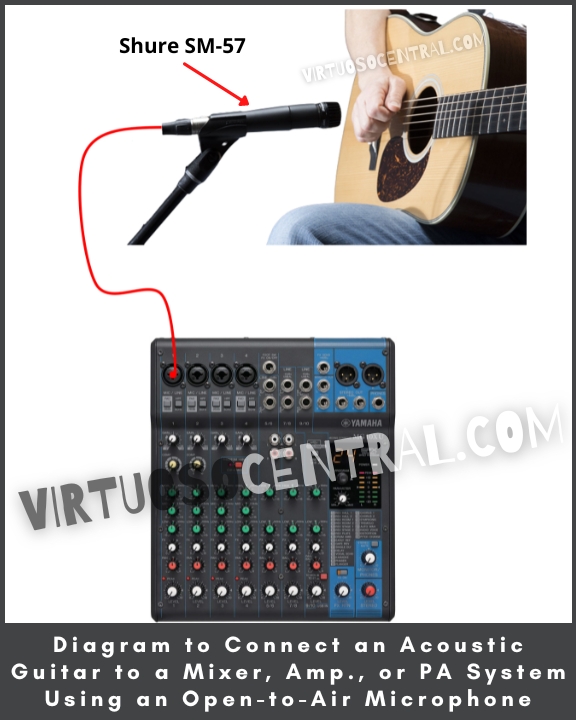
For live performances where there’s more external noise from the audience or other musicians on stage, consider using a dynamic mic like the Shure SM57 or a ribbon mic such as the Beyerdynamic M 160, which will deliver a warm, balanced classic sound.
Although the SM57 is considered a classic vocal mic, it shares many audio characteristics with some of the best dynamic guitar mics, and you’re likely to have one lying around.
Another option you can use is condenser microphones. While they are more sensitive and have more gain than their dynamic counterparts, they deliver a bright, full sound.
If you decide to use condenser mics for miking the guitar, remember that setting the correct gain and EQ levels is a must to avoid feedback.
Some of the most popular condenser mics for their quality, reliability, and crystal clear sound are the AKG Perception 170 and the Shure SM81-LC, among others.
Gain Setup on The Mixer or PA system for the Acoustic Guitar
To get a well-balanced mix, it all starts by setting the correct gain for each channel. Also, setting up the gain at this stage will leave enough headroom for all the other instruments in the mix so that you don’t end up with a saturated mix.
Now that you have connected the acoustic guitar to the mixer, I will show you the procedure you need to follow to set the correct gain and avoid distortion. Here are the steps to set the gain:
- Start by muting all other channels in the mixing console so that the readings on the VU meter are accurate. Also, to avoid sudden high volumes on your system in case the input level of the source signal is higher than expected.
- Set the Master Faders to 0dB / U / Unity, depending on what’s labeled on your mixer.
- Find and press the PFL button to activate it. The PFL button is usually located at the bottom of each channel strip next to the fader. In some mixers, a small LED lights up when pressed.
- Note: PFL stands for “Pre-Fader-Listen,” and it routes the audio signal from that channel to the VU Metter so that you can visually see and measure the strength of the audio signal on that specific channel.
- Next, have the guitar player start playing and watch what is happening at the VU Meter. If you don’t see any movement in the VU Meter, slowly increase the gain until the loudest sections of the audio source are shown in the green area of the meter. Ideally, you want to be as close as possible to 0dB or Unity (usually the last green LED).
- Never allow a signal to go beyond the yellow and into the red because it means that the signal is too loud and will distort. If the gain knob is all the way to the left (no gain) and your VU meter is in the yellow or red section, your source signal is too high, and you need to lower it at the source. This usually happens with acoustic-electric guitars or any other active instruments.
- Once you have set the gain correctly, your signal should always be in with the green LEDs on the VU meter.
Conclusion
If you were wondering how to connect an acoustic guitar to an amplifier, mixer, or PA system in this article, I have shown two methods to do so:
- You can use a DI Box to go straight from the acoustic guitar to the amp or mixer if the guitar has a microphone system already installed in it.
- If the guitar doesn’t have a mic system installed, you could use a vibration mic, a piezo contact microphone, a soundhole microphone system, or open-to-air microphones.
Any of these methods will also work in the studio for recording, delivering excellent results. But remember that using an open-to-air mic will provide you with the most natural sound that comes from the acoustic guitar.
One thing you need to remember is that setting the gain is a must to get a good sound.
I hope this article was helpful to you. Visit the site to explore more articles like this one by clicking here. Thank you for reading my blog.