Connecting powered speakers to a mixer is a straightforward process you can easily do. In this post, I will show you two easy ways you can use to achieve this.
The first method uses cables, and the second uses a wireless system to avoid having cables all over the place.
Before we get into the nitty-gritty details of how to connect powered speakers to a mixer, if you want the quick answer, here it is: All you need to do is run a couple of XLR or TRS balanced cables from the mixer’s main output to the inputs of each one of the speakers, one to the left and one to the right channels.
If you are not familiar with an audio mixer and audio equipment in general, the answer I just gave you could be hard to understand. That’s why I will go into more detail to show you the proper procedure to achieve this in no time. Plus, I will provide you with easy-to-follow connection diagrams to make it as easy as possible. Let’s get started.
Choosing The Correct Type of Connection
Before we go any further and start connecting things, we need to know what type of connection we want to use to get the correct cables.
There are different types of connectors used in audio equipment, but the most widely used are XLR and 1/4” Jack plugs for Balanced or Unbalanced connections.
If you already know the difference between balanced and unbalanced signals and the types of connectors used for each, you can skip to the next section. If not, read this section, as this is important to know when connecting a powered speaker to a mixer or any other audio equipment.
XLR Connector
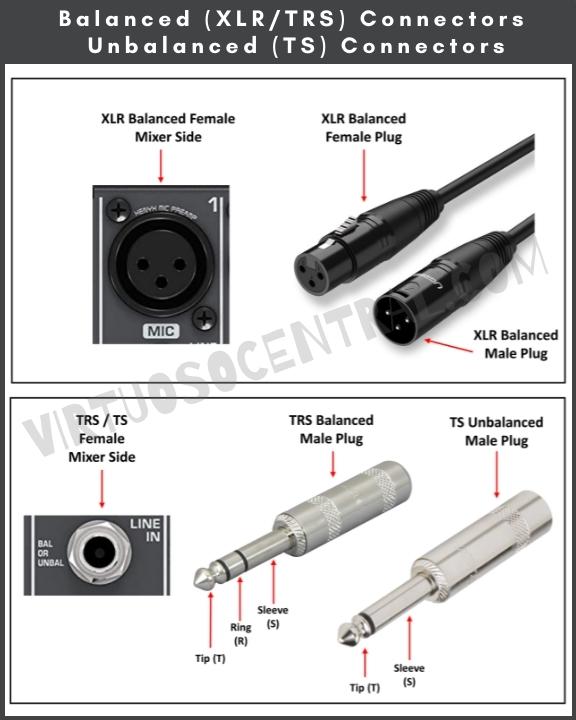
The XLR is a style of audio connector that is used primarily for professional audio connections. It has three pins for carrying the signal, positive (red), negative (black), and Ground (cable shield).
XLRs are balanced connections meaning that they cancel out noise. The advantage of balanced signals is that they reject noise from RF or ground loop interference.
This is a must if your cable runs going from the mixer to the speaker are more than 10ft long. The image below shows an XLR connector, both male and female.
1/4″ Jack Connector
This style of connector is also known as a phone jack plug. It was used initially for telephone switchboards and today is still widely used to carry analog audio signals. There are two versions of it, the 1/4″ balanced TRS connector (Tip, Ring, Sleeve), and the 1/4″ unbalanced TS connector (Tip, Sleeve)
The image below shows both versions of a 1/4” jack plug for your reference.
Now that you know the two types of connectors there are for connecting a mixer to powered speakers, you can choose the one that is more convenient for you.
I recommend you use balanced TRS or XLR as this will always be better to avoid noise in lines, thus delivering better audio quality.
If you don’t have these cables on hand and need to buy them, here are a couple of links to Amazon; you can choose the length according to your needs:
Getting To Know Your Mixer’s Output Channel Section
Mixing consoles have lots of knobs and several input and output connectors. If you don’t know the basics of a mixing board, looking at one can be pretty intimidating because each knob and connector has its function, and you wouldn’t know where to start.
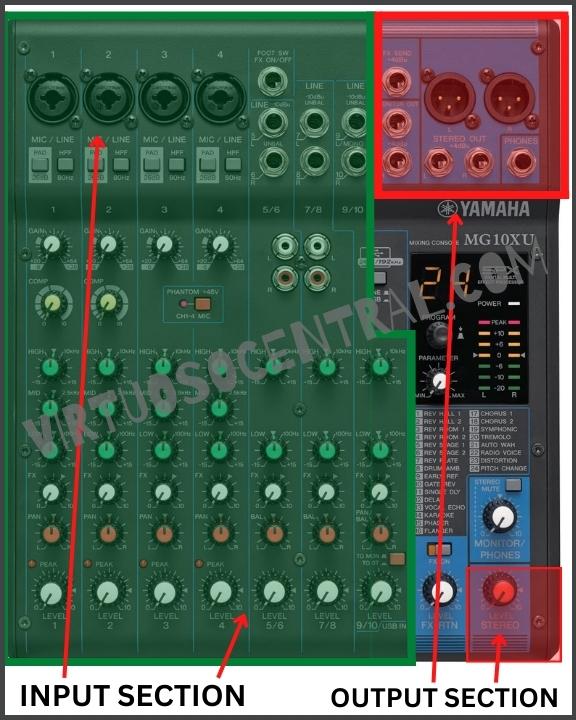
But don’t feel intimidated because audio mixers are actually straightforward to follow. A mixing console is divided into two main sections: the input and output sections.
The input section is composed of each channel strip, and the output section is composed of the “Main Outputs,” “Subgroup Outputs,” and “Auxiliary Outputs.” In the image below, I have divided the input and output sections of a mixer, the one in green is the input section, and the red is the output section.
Of course, there is more going on with each channel strip which is beyond the scope of this article, but if you are interested in learning more about the basics of mixing consoles, click the link as I have a dedicated, easy-to-follow article that explains this in more detail.
For the scope of this article and to correctly connect the mixer to powered speakers, we will concentrate on the mixer’s “Main Output.”
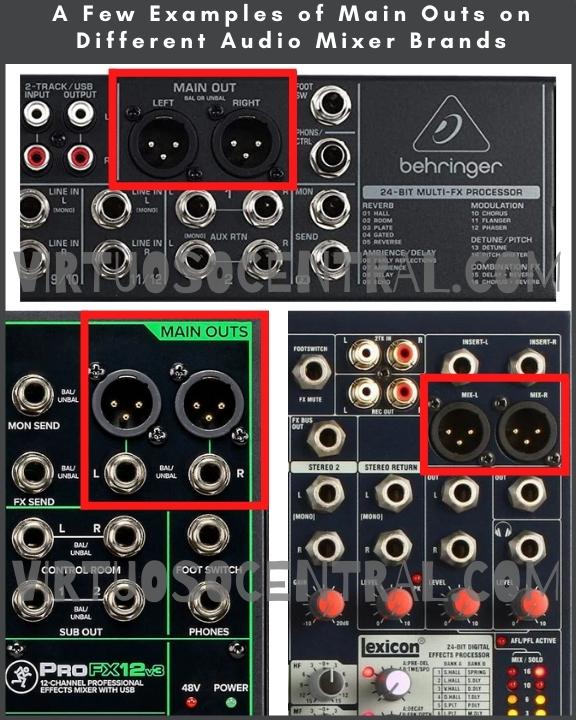
Before going any further, you need to locate the Main Output XLR or TRS connector on the mixer’s output section, which we will use to run the signal to the powered speaker.
The image below shows the Main Output connector you need to find on your mixer. This is where you will connect the two cables going to the speakers.
Getting To Know Your Powered Speaker’s Input Section
Now that you know where to get the output signal from the mixer, it is time to locate the input channel on your powered speaker to which you will connect the signal coming from the mixer.
Most powered speakers have two input channels and offer a wide range of input connectors you can choose from to connect your equipment.
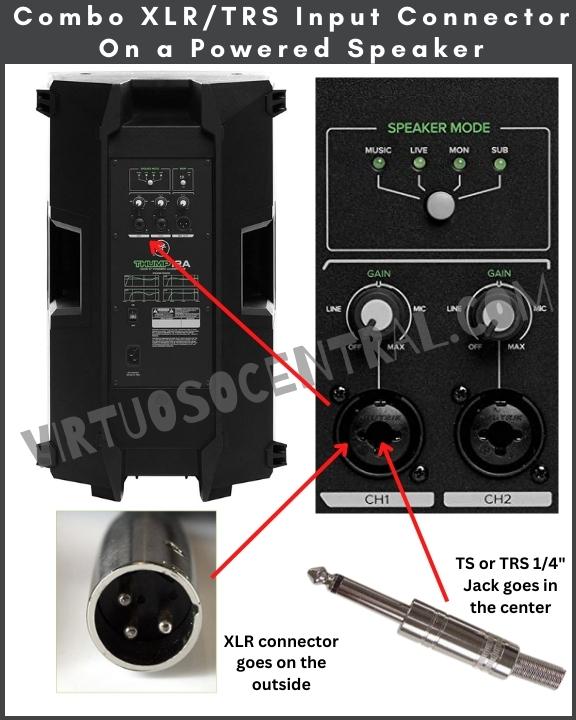
We will use either the XLR or TRS connector to make our connection. In most cases, powered speakers come with a Combo XLR/TRS input connector (See the image below for reference).
The combo XLR/TRS connector is the one we will use to connect the cable from the mixer to the speaker.
If you decide to use an unbalanced TS connector because that’s the cable you have and your run is short, connect it to the same plug where you connect the TRS, as shown in the image below.
Please Note: Your speaker may have a MIC/LINE switch on top or under the GAIN/VOLUME Knob. If it does, make sure to switch it to Line. This is because the speaker has a gain structure that makes it more sensitive for mics, as they need more gain to work correctly. But because we are connecting the speaker to a mixer with a line-level signal, it requires less boost.
Steps to Connect Powered Speakers to a Mixer – Using Cables
- Before we start connecting cables, I recommend turning off the mixer and the speakers. That way, you avoid sudden pops that could potentially damage your equipment.
- Bring the master volume faders in the mixer down. Turn the volume down on the speakers as well.
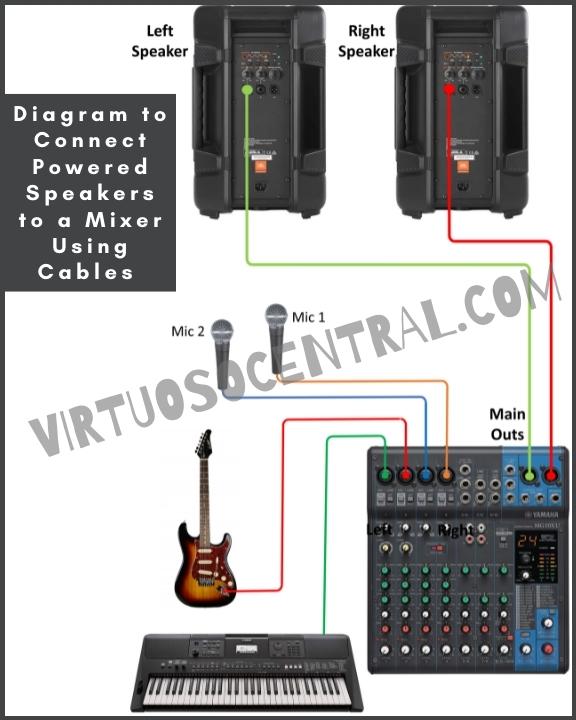
- Next, connect the cables to the Main Output of the mixing console—one to the left and one to the right channel.
- Take the other side of the left cable and connect it to the left speaker. Do the same for the right-side speaker.
- Now that everything is connected, turn on the speakers and the mixer.
- Set the volume on each speaker to the middle.
- If your mixer uses faders, bring the left and right channel faders to “0” (0 dB) or “U” (Unity Gain). If the mixer has a knob for the master volume, turn it halfway.
- Play some music or use a microphone connected to the mixer to check the volume structure of the setup by slowly increasing the volume slider until you hear sound coming from the speakers adjusting it to suit your needs.
- Use the EQ knobs to adjust the highs and lows until it sounds like you want.
The image below shows the connections you need to make to connect two powered speakers to a mixer. If you need to expand your setup to connect four powered speakers to a mixer, I have an article explaining the procedure in detail. Click the link to check it out.
Connect Powered Speakers to a Mixer Wirelessly
Up to this point, I have covered connecting the speakers using cables. But what if you want to have a setup with no cables to avoid tripping hazards or to have the freedom to place the speakers anywhere you desire in a venue? To do this, you need a wireless audio system for active speakers, such as the Alto Professional Stealth MKII-UHF system (link to Amazon).
The advantage of this system is that you can replace up to 200 feet of console-to-speaker cabling without compromising audio quality. Moreover, you can quickly and easily expand to more speakers by getting extra receivers.
This is a game changer when it comes to connecting a mixer to active speakers because it cleans up messy cables and makes your setup more professional.
This is especially true for people who DJ at parties bringing their own equipment, or for people who rent out audio systems for parties or events.
Steps to Connect Powered Speakers to a Mixer Wirelessly
- As mentioned previously, I recommend turning off the mixer and the speakers before starting to make any connections. That way, you avoid sudden pops that could potentially damage your equipment.
- Make sure that the master volume faders in the mixer and the speakers’ volume are all the way down.
- Locate the “Main Out” or “Stereo Out” connectors in the mixing console.
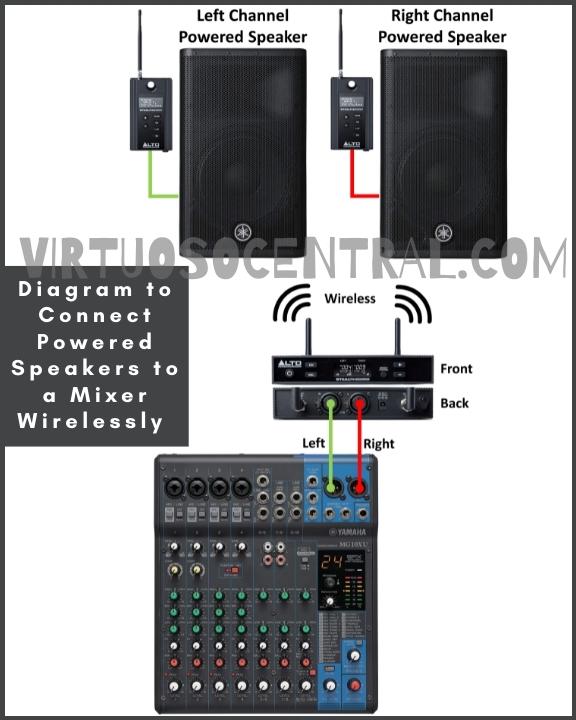
- Choose between XLR or 1/4” TRS jack plugs to connect the output of the mixer to the input of the transmitter of the Alto Stealth system.
- Use the included XLR to TRS cable to connect the output from the receiver unit to the input of each powered speaker.
- After connecting the XLR cable to the speaker, turn the volume on the speaker halfway and turn it on. Also, turn on each receiver unit.
- Now you can turn on the transmitter unit and the mixer.
- On the transmitter, set the mode to Mono or Stereo. If your mixer is stereo, choose the stereo mode.
- Press the “VOL” button on the transmitter unit to set the left and right channels’ volume at which it will broadcast.
- Press the “CH” button to select a broadcast channel on the transmitter for the left and right channels. Make sure to choose the same channel number on the receiver units.
- Play some music on the mixer and slowly increase the main volume until you hear sound from the speakers.
- Adjust the volume of the speakers or transmitter unit until you are satisfied with it and perform a sound check.
- Use the EQ knobs to adjust the highs and lows until it sounds like you want.
Here is a diagram for your reference on how to make the connection.
Final Thoughts
Now you know how to connect powered speakers to a mixer, and as you can see, it is a straightforward process as long as you know where to connect it to. I hope this post was helpful to you.
There’s so much to know when it comes to mastering audio! For more audio engineering tips and tricks, make sure to check out the rest of our informative blog articles here.