When you want to record yourself singing with background music, you are basically using a popular recording method called overdubbing.
Overdubbing, also known as layering, is a recording technique where you use a pre-recorded music track to record over it while it plays in the background.
This recording technique is very useful if you are a singer because you can create a track using a guitar or keyboard, then record your voice over it. Overdubbing also works well if you have a karaoke track and want to record your voice or instruments over it.
There are different methods you can use to record your vocals or instruments with background music simultaneously, but the easiest and best ways are:
- By using a DAW Software Such as Audacity or GarageBand
- Using Your SmartPhone and an App – [GarageBand for iOS and BandLab for Android]
- Leveraging the Overdubbing Capabilities of a Multitrack Recorder
- With a USB Capable Audio Mixer
- Using a Multichannel Audio Interface
In this post, I present the five best methods you can use to record your voice with music in the background. Keep reading as we go into more detail to explain each technique. Then you can choose the one that is more suitable for your overdubbing needs. Let’s get started.
1. Using a DAW Software Such as Audacity or Garage Band
One of the most straightforward ways of recording vocals over music is by using a DAW (Digital Audio Workstation) software. All you need is a computer with a DAW software installed on it and a USB microphone for recording your voice or an audio interface if you want to record your instruments.
Using the Audacity DAW
Most DAW software allows you to record yourself singing with background music, but using Audacity is definitively one of the best options. The reason is that it is a free, open-source recording software that works with Windows, Mac, or Linux. Plus, there are a lot of tutorials online for doing just about anything with it.
Of course, there are better and more professional programs out there for producing and recording music. Still, if your goal is to overdub, I recommend using Audacity, as it is simple to use and the results are excellent.
I have a complete, step-by-step tutorial on how to record in Audacity while a track is playing; click the link to check it out.
Using the GarageBand Digital Audio Workstation
If you are a Mac user, your computer comes with GarageBand already installed in it. So to record vocals or instruments over music, all you need is a USB-capable microphone or audio interface.
The process is also straightforward, and you can record your overdubs in no time. Here are the steps you need to follow if you want to use this method.
- Before we start, if you plan to use a USB microphone for recording the vocals or an audio interface for connecting mics or instruments, make sure they are connected and powered up before opening GarageBand.
- Open GarageBand, then go to File > New, then click on Empty Project > Save.
- In the new window that opens, select Software Instruments, then click Create.
- Locate the track file you want to use as the background music, then drag and drop it on the project you are working on.
- Double click the Software Instrument track and on the small window menu that appears, click on New Audio Track.
- Once the new audio track has been added, select the software instrument track again and press the delete button to get rid of it, as we will not be using it when overdubbing.
- On the upper left corner, click on GarageBand. Then, from the drop-down menu, click on Preferences. On the new window that opens, select the Audio/Midi tab (speaker icon).
- If using a USB mic, on the Input Device tab, select the mic as your input. Then, on the Output Device, select Built-in Output, that way, you can connect your headphone to the computer to monitor your recording and listen to the track.
- Tip: Ensure that the reference headphones you use to listen to the music track doesn’t bleed out, and the noise is picked up by the mic. For this purpose, using over-the-ear closed-back headphones is the best option. The Audio-Technica ATH-M20X is an excellent headphone for this purpose.
- Click on the new audio track added previously, and on the left side of the window, under Sounds, click on Classic Vocal. This will load EQ presets that will help you get a better sound from your microphone. You can also turn off the metronome in the upper center area of the window.
- At this point, make sure to select the new audio track added previously so that the vocal take is recorded in this track because if you don’t, then the mic take can be recorded over the background track.
- After the vocal track is recorded, you can add effects or change the volume level to create a balanced mix.
- To export your project to an MP3 file, go to Share > Export Song to Disk > Name your project > Select the folder where you want to save the File> Choose MP3 > Select the bit-rate quality > click on export.
Record Your Voice, Then Add The Background Music In Post Production
Another way you can overdub your voice over music is by recording a clean take of the vocals, then use a DAW software to add the background music in post-production.
In other words, you would record your vocals in one track and create a file of the original recording. Then when you are satisfied with the take, open your favorite DAW software, and add two tracks, one for the vocals and the other for the background music.
After editing, adding effects, and creating a balanced mix, you would export the project as an audio file.
As mentioned earlier, if you decide to go this route, make sure that the reference headphone you use to listen to the music track doesn’t bleed out and is picked up by the mic.
Most of the time, when recording vocals, a condenser mic is used. These types of microphones are very sensitive and can pick up the most subtle nuances. So make sure that the headphone you use doesn’t bleed out.
2. By Using Your SmartPhone and an App
Using GarageBand for iPhones
If you have an iPhone, you can use it to record yourself singing with background music by leveraging GarageBand on iOS devices. The best part is that you don’t even need to have an external microphone to start recording vocals over music.
The latest generation iPhones have good quality, sensitive microphones that work well and deliver good enough sound quality to record demo songs.
The process will be similar to the one explained in the previous section, but the app is a bit different because it is designed for mobile devices.
To record your vocals over background music using your iPhone, you’ll need a good pair of over-the-ear closed-back headphones (not earphones), an adapter to go from the lightning port to a 3.5 mm jack, and your iPhone with GarageBand installed on it.
These are the steps you need to follow if you want to use this method:
- Connect the headphones to the iPhone using the adapter, then open GarageBand
- Create a new session by pressing on the “+” sign
- Scroll until you find the Audio Recorder option and click on Voice
- On the main screen, look for “Monitor” and turn it on so that you can hear on the headphones the recording session
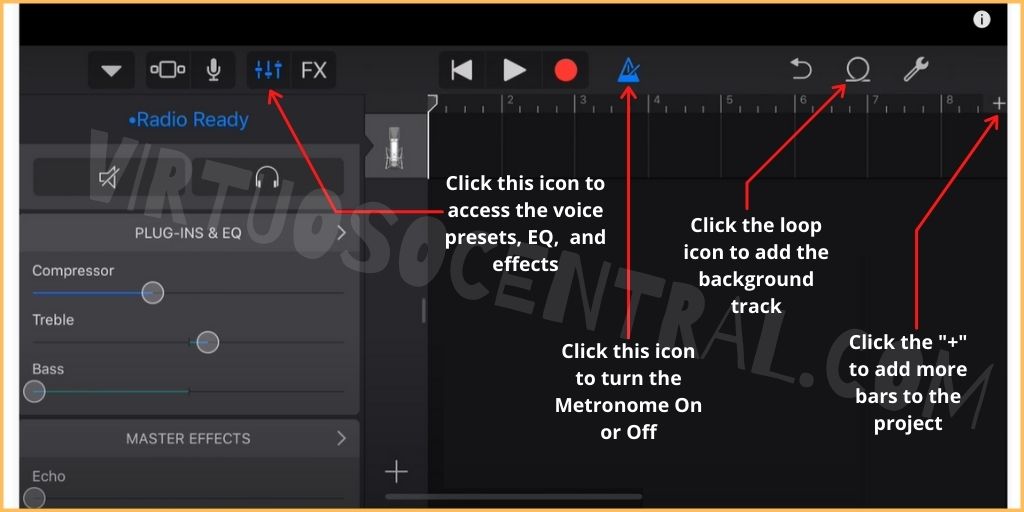
- GarageBand comes with voice presets that you can use to get the best results if you are not familiar with EQ and effects. To access these features, click on the mix board icon as shown in the image below
- In the window that opens, click on Lead Vocals. You’ll see different voice presets that can be used. Go over them to see which one you like the most. I recommend using the Radio Ready preset because it delivers a well-balanced tone for most vocal recordings. Play with the settings until you hear something you like.
- Next, if you need to change the EQ to give your voice more punch or clarity, click on the mix board icon again, scroll down until you find Plug-Ins & EQ, and turn on Visual EQ to change EQ settings on the voice. Play with it until you hear something that you like.
- Tips on equalizing vocals: You might want to boost or decrease specific frequencies depending on your vocal range. If you want a punchy, fuller voice, slightly increase frequencies between 60 Hz and 200 Hz. To add more presence to the vocals, increase the frequencies between 4kHz – 6 kHz, known as the “presence range of frequencies.” If you need to increase or decrease brightness, work with frequencies between 5 kHz to 10 kHz. For a more detailed article on how to EQ vocals, click the link. The principles explained in that article apply in this case as well.
- We need to add more bars to increase the time duration of the recording session. GarageBand uses bars to measure the number of beats in a project. Each bar is four beats, which is about 2 seconds. By default, it loads a project with 8 bars. To add more bars, go to the main working space, and next to the number 8 bar, there is a “+” sign. Click on it, and a new window will open. Click on Add and change the number of bars that you need. For example, a 3-minute song is between 80 to 90 bars.
- To add the background track for overdubbing, click on the loop icon. On the new window that opens, click on the Files or Music tab to load a track from the internal storage of your iPhone.
- At this point, lay your phone down on a flat surface, put the headphones on, and press the record button to start recording.
- Tip: When recording using your phone, try to find a quiet place. Avoid recording in areas with humming noises such as air conditioner, refrigerator, etc. One thing you can do is throw a thick blanket all over you. That way, it will help in reducing echo and picking up background noises.

Using BandLab for Android Devices
BandLab makes it easy to record your vocals on your Android device, which means that you can lay down a vocal track anytime, anywhere. The capabilities of BandLab are similar to GarageBand but geared towards Android users.
As with iPhones, the latest generation Android devices have decent microphones that can deliver a good quality vocal recording. But my recommendation is to use a dedicated USB condenser microphone with a pop filter or an audio interface to connect your mics and instruments and get the highest quality possible.
If you decide to go this route, check out our step-by-step tutorial explaining how to connect a USB condenser mic to a smartphone.
Here are the steps you need to follow to record yourself with background music using BandLab and your Android smartphone.
- Open BandLab and start a new project.
- Scroll until you find Import Track. The app will show you the audio files available on your phone. Find the track that you want to use as the background music and select it to load it in the project.
- Once the track has been added, look for the “+” and press it to add a voice track.
- On the new window that opens, select “Voice/Mic” to add a track for recording your voice.
- Next, put the headphones on and press the record button to test the setup. If you hear a delay between the time you sing and when you hear your voice on the headphones, turn off the monitoring option. That way, you will only hear the background track for your reference while recording.
- Tip: BandLab has a feature to fix the latency problem. To access it, click on the gear icon (settings), scroll until you find Latency Fix, run a test to see the latency on your system. If it is 50ms or less, you can use the monitoring option, but you will hear a delay difference if it is more than 80ms making it hard to record using the monitoring option.
- After laying down the vocal track, you can use the different EQ and effects available to edit the mix until everything sound the way you want. You can get creative on this part of the process by exploring the different options that BandLab offers.
- After editing and mixing your project, export your song as MP3.
3. Leveraging the Overdubbing Capabilities of a Multitrack Recorder
Multitrack recorders are very versatile when it comes to recording audio. The latest generation multitrack recorders offer overdubbing capabilities that can help you if you plan to record your voice-over background music.
Although this is a possible option, especially if you already have a multitrack recorder, in my opinion, the first two methods mentioned in this article are much better because you can leverage the editing capabilities of a digital audio workstation.
Besides, it is much easier to work on a computer or smartphone to edit and mix the recorded project than with a multitrack field recorder as they are limited on what they can do for editing recordings.
Still, this is a viable option you can explore. In addition, the multitrack recorder comes with condenser mics you can use to capture your vocals.
A cool feature of multitrack recorders is that if you prefer to use a studio condenser microphone instead of the ones that come with it, you can. All you have to do is connect it to the recorder on one of the available channels, turn on the phantom power and press the record button.
This method would be perfect for musicians who create their background track using an instrument. For example, you can record the track with a guitar, then use either the internal or an external microphone to record your voice over the track.
The following steps will focus on the Zoom H6, but the concept should also apply to other popular models such as the Tascam DR-40X. If you have a different brand or model number, check the manual to see if yours offers overdubbing capabilities.
Using the Zoom H6 for Overdubbing
To record your voice with music in the background using the Zoom H6, follow these steps. This tutorial assumes that you want to create a track with an instrument such as a guitar or keyboard.
- Power on the Zoom H6
- Plug your instrument in and create the file you wish to overdub with. Once finished, press stop.
- Go to the Menu and scroll down until you find Project Menu, then select it.
- Once inside the project menu, scroll down until you find Overdub, then select it.
- If you used channel 1 for recording the backing track, you would need to change inputs to record your next track.
- Please note that the Zoom H6 has a total of 6 channels you can use to layer tracks. Each track has an LED that can light green or red. Your recorded tracks will play back when their light is green. They will record when lit red.
- Once you have selected the channel where you want to record your voice, press the respective button until it turns red.
- Adjust the input level and make sure it doesn’t saturate. Then press record.
- Press stop when finished.
- Tip: If you would like to re-record your part, you can repeat the process, and a new file will be created on each new take. Press fast forward or rewind to scroll between different takes. Each take will retain its specific volume, pan, and stereo link settings.
- Once you have recorded your final tracks, you can set the balance of each channel. To do this, press Menu > select Project Menu > then select Project Mixer.
- Scroll to highlight and select different parameters, including volume, panning, and pitch. Then adjust each one to your preference.
- Tip: You can press the record button to reference the playback, bypassing the project mixer. When you are finished with the adjustments, mix down the project. Mixdown will create a stereo mix file containing audio from all of your individually recorded parts. Your level and panning adjustments will be added to this new file.
- To mix down the project, go to Menu > select Project Menu > select Mixdown > then select Execute.
- Tip: When finished, your final Mixdown can be imported to your computer for further editing or sharing. You can also export all the individual takes and edit them in a DAW software.
If you want to use an external studio condenser microphone, you need to activate the phantom power. Some users have reported having problems with the phantom power on the Zoom H6 when using the overdub mode because phantom power was unavailable on the XLR inputs, even though it was turned on the menu.
If you run into this problem, here is a very helpful video that shows you how to activate the phantom power when using the overdubbing mode. This should help you solve the problem.
4. Using a USB Capable Audio Mixer to Record Yourself Singing With Music
There are two ways to record yourself singing with background music using a USB-capable audio mixer. The first is by capturing the vocals and then use the bundled software to add the background music in post-production, and the second way is by recording the vocals and the background music simultaneously in one take. Let’s explore both options
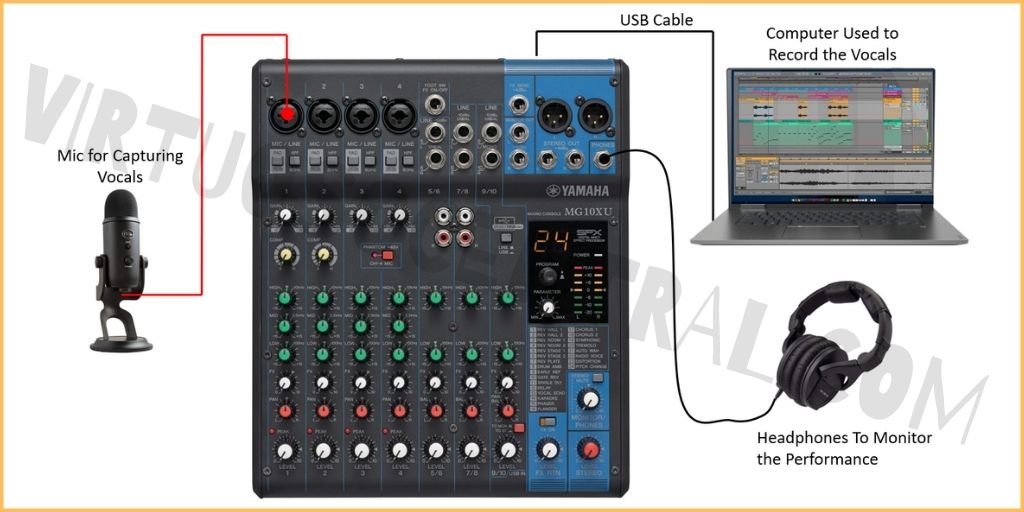
Record Your Voice Using the Mixer then Add Background Music in Post Production
If you decide to go with this option, all you have to do is connect the mixer to the computer and install the bundled software and drivers as necessary.
Then connect the mic you plan to use to the mixer and equalize it correctly. My recommendation is to use a neutral EQ to avoid exaggerated highs or lows.
It is better to record a raw take of the audio source without any EQ or added sound effects. That way, when it is time to finish the mix, you can add whatever you want to the sound. Just make sure that the recorded take is clean and unsaturated.
This is something you can’t do if your raw recorded audio it’s been equalized, and effects have been added to it before it was recorded.
After you lay down the vocal take, it will show on the DAW software. Then you can add another track for the background music. Make sure to sync the vocal recording with the background music. When the project has been edited, export it as a WAV or MP3 file.
The following image shows the connections you have to make on your mixer if you want to go with this method, use it for your reference.

Recording the Vocals and the Background Music Simultaneously.
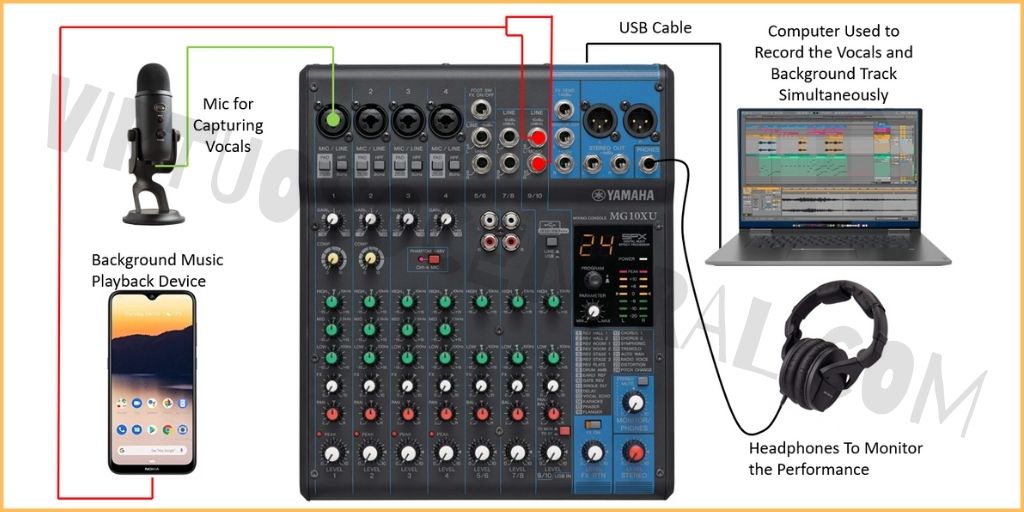
Another way to approach this is by recording the vocals and background music at the same time. All you have to do is connect the mic to one channel in the mixer while connecting the playout track to one of the stereo channels.
This approach aims to play the background music and sing simultaneously to record both sources while using the headphones to monitor yourself.
The drawback is that once recorded; you can’t do much editing. If the EQ or signal level isn’t good, or if the recording sounds unbalanced, you would have to re-record everything because it cannot be edited as everything is recorded and mixed simultaneously.
Using this method is similar to recording live, and is definitively not the best way, but it is an option, especially if you already have a mixer with a USB connection that you want to use.
The image below shows the connections you have to make on your mixer if you want to go with this method, use it for your reference.

5. Using a Multichannel Audio Interface
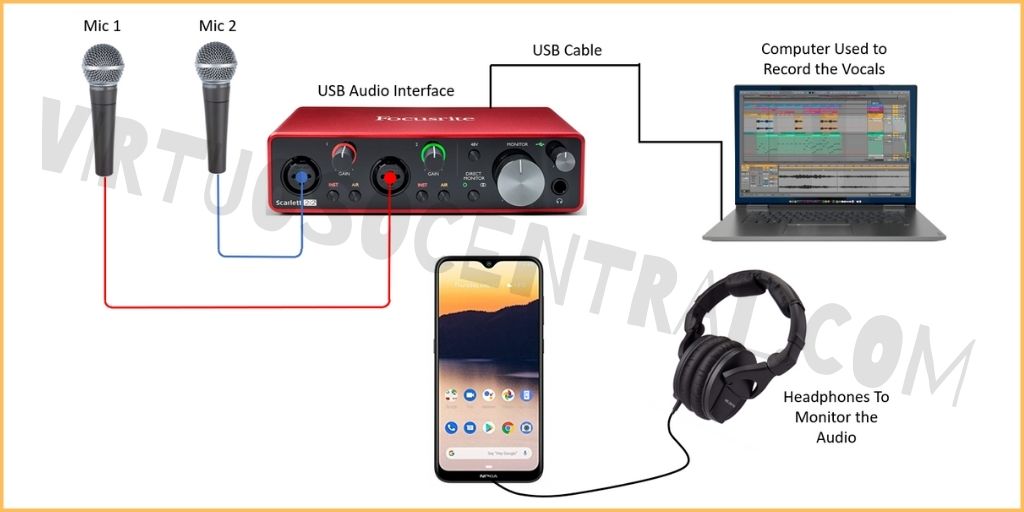
Using an audio interface is another way to record yourself singing with background music. The procedure is very similar to using a microphone and a mixer.
Basically, you record your voice first; then, you have to add the background track using a free DAW such as Audacity, GarageBand, or the bundled software included with the audio interface.
These are the steps you need to follow if you want to go this way:
- Start by installing the drivers of the interface. They can be downloaded from the manufacturer’s website.
- Next, install the DAW software you are planning to use. If you don’t have one, most audio interfaces come bundled with one which can download it from the manufacturer’s website.
- Connect the microphones to the interface using balanced XLR cables.
- Set the gain of each channel until you get a balanced tone.
- Make sure to check the audio level on the DAW side so that the signal sent to the computer is not saturated.
- Use a device such as a smartphone or mp3 player to play the background track through a pair of closed-back, over-the-ear headphones to use as a reference while recording.
- After the voice has been recorded, you can use the DAW software to edit the recorded sound.
- Next, add a stereo track and import the background music. Make sure to line up the vocal track and the background music, so they are synced.
- Once everything is ready, export the project to WAV or MP3.
If you need, use the diagram below as a reference for making your connections.

Conclusion
When it comes time to record yourself singing with music in the background, you can follow any of the methods shown in this post, and you will get excellent results. Just keep in mind that the most straightforward and effective way to achieve this is by using a DAW Software, whether on a computer or smartphone.
Make sure to use a good quality microphone to achieve the best results, and watch your volume levels so that the vocal take sounds good.
I hope this post is helpful to you. If you’d like, drop a comment below. Thank you for reading my blog.